rdsaplala Posted September 29, 2013 Share #61 Posted September 29, 2013 Very nice planking work Vitus, I like the wood contrast in the planks Quote Best regards,AldoCurrently Building: HMS Pegasus (Victory Models)-Mothballed to give priority to Triton HMS Triton (first attempt at scratchbuilding) Past build:HM Brig Badger (Caldercraft), HM Brig Cruizer, HM Schooner Ballahoo Link to comment Share on other sites More sharing options...
vths Posted September 29, 2013 Author Share #62 Posted September 29, 2013 Cheers guys, much appreciated. Now I'm taking a little-big detour, because I decided to scratch-build a small pinnace, about 110 mm long. I'm using bulkheads on a keel. They will provide a foundation for planks and then they will be removed and substituted with "real" frames, or at least I hope that this will work. Quote 1st build - HMS Race Horse (Sergal) Current build - HMS Fly (Victory/Amati) Link to comment Share on other sites More sharing options...
vths Posted September 29, 2013 Author Share #63 Posted September 29, 2013 A few more photos... Quote 1st build - HMS Race Horse (Sergal) Current build - HMS Fly (Victory/Amati) Link to comment Share on other sites More sharing options...
vths Posted September 30, 2013 Author Share #64 Posted September 30, 2013 (edited) Started planking using 0,5 x 3 mm strips. Quite a delicate work, but the details are yet to come. Bulkheads are loose, so there should be no problem removing them and replacing them with frames. Edited September 30, 2013 by vths Quote 1st build - HMS Race Horse (Sergal) Current build - HMS Fly (Victory/Amati) Link to comment Share on other sites More sharing options...
aliluke Posted October 1, 2013 Share #65 Posted October 1, 2013 Hi Vitus Nice work on the pinnace. I really look forward to it's progress. I did something like this years ago for some whaling boats and ended up triple planking the things. Two layers on the outside before removing the bulkheads and then a third internal layer - all with the same sized planks as you are using. It is fiddly but the results can be really good. I'll send you a picture of the outcome by PM rather than place it here and confuse your posts. The third internal layer really helps and you can gently sand it and the outer layers to create a very exact boat. Cheers Alistair Quote Cheers Alistair Current Build - HMS Fly by aliluke - Victory Models - 1/64 https://modelshipworld.com/topic/34180-hms-fly-by-aliluke-victory-models-164/ Previous Build - Armed Virginia Sloop by Model Shipways Previous Build - Dutch Whaler by Sergal (hull only, no log) Link to comment Share on other sites More sharing options...
rdsaplala Posted October 1, 2013 Share #66 Posted October 1, 2013 Very nice bit of scratchbuilding there, Vitus, your clinker planking looks great. Quote Best regards,AldoCurrently Building: HMS Pegasus (Victory Models)-Mothballed to give priority to Triton HMS Triton (first attempt at scratchbuilding) Past build:HM Brig Badger (Caldercraft), HM Brig Cruizer, HM Schooner Ballahoo Link to comment Share on other sites More sharing options...
vths Posted October 4, 2013 Author Share #67 Posted October 4, 2013 (edited) Cheers guys, I'll do just one layer, that should be just enough. I don't see how I would be able to make a layer on the inside. I think that the crude hull turned out quite good for my first attempt. Now it is time to sand it, cover the pin holes and finish the fittings Edited October 4, 2013 by vths freewheelinguy, Padeen and Blue Ensign 3 Quote 1st build - HMS Race Horse (Sergal) Current build - HMS Fly (Victory/Amati) Link to comment Share on other sites More sharing options...
Blue Ensign Posted October 4, 2013 Share #68 Posted October 4, 2013 Well done Vitus, she should look very nice atop the gallows on the spare topmasts. B.E. Quote Current Build: HMS Indefatigable-1794-by-blue-ensign-vanguard-models-164-scale Medway-longboat-1742-by-blue-ensign-½”-scale Completed builds: HMS Sphinx 1775 by Blue Ensign. 1:64 scale - Vanguard Models Queen-Anne-Royal-Barge-circa-1700-by-Blue-Ensign Fifie fishing boat Lady Eleanor Muirneag-1903-–-a-scottish-zulu-fishing-boat-164-scale-based-on-the-vanguard-models-zulu-kit/ HM Cutter Alert 1777 HM Cutter Cheerful 1806 18th-century-English-longboat-by-Blue-Ensign-ms-148-scale/ finished 18thc English Pinnace by Blue Ensign-Model-Shipways-1:24 scale/ finished HMS-Pegasus-by-Blue-Ensign-finished-Victory-Models-1:64-scale/ Heller Seventy-four 1:150 scale - modified Le Superbe/Le Glorieux kit after Boudriot, waterline setting with sails. The schooner Pickle, Jotika pob kit 1:64 scale, my interpretation. Link to comment Share on other sites More sharing options...
rdsaplala Posted October 5, 2013 Share #69 Posted October 5, 2013 Very nice and clean work on the pinnace, Vitus Quote Best regards,AldoCurrently Building: HMS Pegasus (Victory Models)-Mothballed to give priority to Triton HMS Triton (first attempt at scratchbuilding) Past build:HM Brig Badger (Caldercraft), HM Brig Cruizer, HM Schooner Ballahoo Link to comment Share on other sites More sharing options...
Padeen Posted October 5, 2013 Share #70 Posted October 5, 2013 Beautiful job on the pinnace, Vitus, well done indeed! Quote Padeen (Adeline) "When there is a will, there is a way" Completed build: Le Camaret - Constructo - static wood 1:35 (build log, gallery) Current build (very limited modelling time at the moment...): HMS Fly - Amati/Victory Models - static wood 1:64 (build log) Projected build: HMS Victory - Chris Watton's design - static wood 1:64 (when available..., no rush!) Link to comment Share on other sites More sharing options...
miketherock Posted October 5, 2013 Share #71 Posted October 5, 2013 Looking good! Quote Built: Bounty, Lady Nelson, Endeavour, Granardo. Finishing, HMS Fly, Victory, another Bounty Want to build, Snake, Vanguard, Aggamemnon, Link to comment Share on other sites More sharing options...
aliluke Posted October 5, 2013 Share #72 Posted October 5, 2013 A superb boat Vitus - I won't bother to show you my efforts! I really like the clinker planking. Well done I look forward to seeing it finished. Cheers Alistair Quote Cheers Alistair Current Build - HMS Fly by aliluke - Victory Models - 1/64 https://modelshipworld.com/topic/34180-hms-fly-by-aliluke-victory-models-164/ Previous Build - Armed Virginia Sloop by Model Shipways Previous Build - Dutch Whaler by Sergal (hull only, no log) Link to comment Share on other sites More sharing options...
vths Posted October 5, 2013 Author Share #73 Posted October 5, 2013 Thanks guys, you make me go further, so here's the almost finished boat. The bow is yet to be finished, as well as the oars, rudder, hook, etc. But these tiny thingies can wait, so now I can get back to the build. ZyXuz, Padeen, Mirabell61 and 2 others 5 Quote 1st build - HMS Race Horse (Sergal) Current build - HMS Fly (Victory/Amati) Link to comment Share on other sites More sharing options...
ZyXuz Posted October 7, 2013 Share #74 Posted October 7, 2013 wow... well done on the pinnace! like what Alistair said.. nice job on the clinker effect Quote Visit My Blog! http://malaysiamodelship.blogspot.com/ Previous Build: HMS Race Horse (Sergal) Current Build: HMS Unicorn (Corel) Link to comment Share on other sites More sharing options...
vths Posted October 15, 2013 Author Share #75 Posted October 15, 2013 Cheers, ZyXuz. Now I'm creating the main wales using simple anchor stock planking. Planks are 110 mm long with full width in the middle and half at both ends and they are shifted like the rest of the hull planks. The wales will be painted black, but their pattern should show anyway. realworkingsailor, Blue Ensign, Barbossa and 1 other 4 Quote 1st build - HMS Race Horse (Sergal) Current build - HMS Fly (Victory/Amati) Link to comment Share on other sites More sharing options...
vths Posted October 24, 2013 Author Share #76 Posted October 24, 2013 (edited) Hello everyone, I've got a small update. Just finished the main wales and painted them black, now it is time for the little ones above. Doing this I realized my previous mistake. The main wales are just thick planks, not another layer, which means that I could not follow the plan precisely, because then they would be overlapping the planks below. So, note to self, next time begin the second planking layer with main wales and follow their lines correctly. Now I had to choose the lesser evil - slightly wrong shape, but no overlapping, which would look just terrible in my opinion. It is also almost time to chose the colour for decorations' background. Ochre would create poor contrast, red is used in the interior, green is just ugly and blue is used too often. I'm thinking about plain white, is that possible (i.e. historically plausible)? Edited October 24, 2013 by vths Mirabell61, dafi, Landlubber Mike and 1 other 4 Quote 1st build - HMS Race Horse (Sergal) Current build - HMS Fly (Victory/Amati) Link to comment Share on other sites More sharing options...
Blue Ensign Posted October 25, 2013 Share #77 Posted October 25, 2013 The hull looks very nice Vitus How you colour the topsides is down to personal choice, but the official colour in the British Navy was Black, although in practice there were variations, predominently shades of blue and red, particularly on contemporary models. It really comes down to aesthetics and what looks best to your eye; personally I would stay away from white, perhaps a little too stark against the dark wood, and probably the least authentic of colour choices. You also need to consider how the brass etch decoration will look and how you intend to colour that. Against the hull colour you have I would go for either Dark Blue or Black, but that's just my thought. Cheers, B.E. Quote Current Build: HMS Indefatigable-1794-by-blue-ensign-vanguard-models-164-scale Medway-longboat-1742-by-blue-ensign-½”-scale Completed builds: HMS Sphinx 1775 by Blue Ensign. 1:64 scale - Vanguard Models Queen-Anne-Royal-Barge-circa-1700-by-Blue-Ensign Fifie fishing boat Lady Eleanor Muirneag-1903-–-a-scottish-zulu-fishing-boat-164-scale-based-on-the-vanguard-models-zulu-kit/ HM Cutter Alert 1777 HM Cutter Cheerful 1806 18th-century-English-longboat-by-Blue-Ensign-ms-148-scale/ finished 18thc English Pinnace by Blue Ensign-Model-Shipways-1:24 scale/ finished HMS-Pegasus-by-Blue-Ensign-finished-Victory-Models-1:64-scale/ Heller Seventy-four 1:150 scale - modified Le Superbe/Le Glorieux kit after Boudriot, waterline setting with sails. The schooner Pickle, Jotika pob kit 1:64 scale, my interpretation. Link to comment Share on other sites More sharing options...
vths Posted October 25, 2013 Author Share #78 Posted October 25, 2013 Thanks B.E., black topsides seem reasonable, at least the hull won't look like a Christmas tree (or some medieval ships . Then I will probably go for ochre decorations, but are the brass pieces possible to paint well with water-based Jotika Admiralty Paints? I don't want to see the paint peeling off. Quote 1st build - HMS Race Horse (Sergal) Current build - HMS Fly (Victory/Amati) Link to comment Share on other sites More sharing options...
miketherock Posted October 25, 2013 Share #79 Posted October 25, 2013 (edited) To paint the decorations and brass fittings it is best to key the parts with acid etch (primer). It will give you a good surface to paint and unless you are heavy handling the painted parts, you should not get any chips. Edited October 25, 2013 by miketherock Quote Built: Bounty, Lady Nelson, Endeavour, Granardo. Finishing, HMS Fly, Victory, another Bounty Want to build, Snake, Vanguard, Aggamemnon, Link to comment Share on other sites More sharing options...
Blue Ensign Posted October 25, 2013 Share #80 Posted October 25, 2013 I used enamels and artists oils to colour the etch after applying an etch primer. Humbrol 81 (pale yellow) was used as a base colour, this along with the primer was applied before I removed the decoration from the fret. Once in place on the model I applied the Artists oils using a fine pointed brush For the highlights I used soft mixing white with a touch of Yellow ochre, and for the shading Raw Umber mixed with Indian Red and toned down with white. Both mixes thinned with distilled turpentine to quite a thin consistency. B.E. WackoWolf 1 Quote Current Build: HMS Indefatigable-1794-by-blue-ensign-vanguard-models-164-scale Medway-longboat-1742-by-blue-ensign-½”-scale Completed builds: HMS Sphinx 1775 by Blue Ensign. 1:64 scale - Vanguard Models Queen-Anne-Royal-Barge-circa-1700-by-Blue-Ensign Fifie fishing boat Lady Eleanor Muirneag-1903-–-a-scottish-zulu-fishing-boat-164-scale-based-on-the-vanguard-models-zulu-kit/ HM Cutter Alert 1777 HM Cutter Cheerful 1806 18th-century-English-longboat-by-Blue-Ensign-ms-148-scale/ finished 18thc English Pinnace by Blue Ensign-Model-Shipways-1:24 scale/ finished HMS-Pegasus-by-Blue-Ensign-finished-Victory-Models-1:64-scale/ Heller Seventy-four 1:150 scale - modified Le Superbe/Le Glorieux kit after Boudriot, waterline setting with sails. The schooner Pickle, Jotika pob kit 1:64 scale, my interpretation. Link to comment Share on other sites More sharing options...
vths Posted October 27, 2013 Author Share #81 Posted October 27, 2013 (edited) miketherock, BE: Looks like a lot of painting and an opportunity to experiment. Thanks. Anyway, almost finished the topsides, so now it's time to treenail the hull. A gentle press of a sharpened needle and a coat of clear varnish seems to do the job just fine, but I will have to create a template to place those nails evenly. Edited October 31, 2013 by vths Landlubber Mike, Barbossa and Blue Ensign 3 Quote 1st build - HMS Race Horse (Sergal) Current build - HMS Fly (Victory/Amati) Link to comment Share on other sites More sharing options...
vths Posted October 30, 2013 Author Share #82 Posted October 30, 2013 A small update that I'm putting here with sore index finger, too many treenails and just one side of the hull is done. ZyXuz, Landlubber Mike and Padeen 3 Quote 1st build - HMS Race Horse (Sergal) Current build - HMS Fly (Victory/Amati) Link to comment Share on other sites More sharing options...
aliluke Posted October 31, 2013 Share #83 Posted October 31, 2013 Very crisp work Vitus - great. The alignment of your nails looks spot on. The black is an interesting choice but looks really sharp. Look forward to more. Cheers Alistair Quote Cheers Alistair Current Build - HMS Fly by aliluke - Victory Models - 1/64 https://modelshipworld.com/topic/34180-hms-fly-by-aliluke-victory-models-164/ Previous Build - Armed Virginia Sloop by Model Shipways Previous Build - Dutch Whaler by Sergal (hull only, no log) Link to comment Share on other sites More sharing options...
Padeen Posted November 1, 2013 Share #84 Posted November 1, 2013 Wonderful job Vitus! The hull is magnificent! Quote Padeen (Adeline) "When there is a will, there is a way" Completed build: Le Camaret - Constructo - static wood 1:35 (build log, gallery) Current build (very limited modelling time at the moment...): HMS Fly - Amati/Victory Models - static wood 1:64 (build log) Projected build: HMS Victory - Chris Watton's design - static wood 1:64 (when available..., no rush!) Link to comment Share on other sites More sharing options...
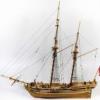
vths Posted November 2, 2013 Author Share #85 Posted November 2, 2013 Thanks guys. Now I have a real challenge in front of me - creating the quarter badges (Alistair, thanks again for the plans). The supplied cast metal pieces are not great, so I decided to make my own. The first attempt includes modurit, which is a kind of clay that is hardened in an oven or boiling water. Now I have to decide whether it is good enough and then it will be necessary to create windows. Those will be simply made of thin wooden strips. Kurt Johnson 1 Quote 1st build - HMS Race Horse (Sergal) Current build - HMS Fly (Victory/Amati) Link to comment Share on other sites More sharing options...
aliluke Posted November 2, 2013 Share #86 Posted November 2, 2013 That looks pretty good to me Vitus. Perhaps protrudes a little far from the hull though? You can get the PE brass window frames from Pegasus - I ordered mine through Chris Watton. They would be very fiddly to make in wood strip but it looks like you have the skills required. Cheers Alistair Quote Cheers Alistair Current Build - HMS Fly by aliluke - Victory Models - 1/64 https://modelshipworld.com/topic/34180-hms-fly-by-aliluke-victory-models-164/ Previous Build - Armed Virginia Sloop by Model Shipways Previous Build - Dutch Whaler by Sergal (hull only, no log) Link to comment Share on other sites More sharing options...
Blue Ensign Posted November 3, 2013 Share #87 Posted November 3, 2013 (edited) Nicely formed Vitus, the pattern looks good but I would agree with Alistair the canted quarter badges only protruded a little way out from the hull. David Antscherl makes the point in Vol 11 of tffm that the lower stool is shaped that it protrudes no further from the ships side than the Quarter pieces, (ie the stern piece on the model) and comments that many modern models show badges that project to far. A heavy sea could carry such a badge away. B.E. Edited November 3, 2013 by Blue Ensign Quote Current Build: HMS Indefatigable-1794-by-blue-ensign-vanguard-models-164-scale Medway-longboat-1742-by-blue-ensign-½”-scale Completed builds: HMS Sphinx 1775 by Blue Ensign. 1:64 scale - Vanguard Models Queen-Anne-Royal-Barge-circa-1700-by-Blue-Ensign Fifie fishing boat Lady Eleanor Muirneag-1903-–-a-scottish-zulu-fishing-boat-164-scale-based-on-the-vanguard-models-zulu-kit/ HM Cutter Alert 1777 HM Cutter Cheerful 1806 18th-century-English-longboat-by-Blue-Ensign-ms-148-scale/ finished 18thc English Pinnace by Blue Ensign-Model-Shipways-1:24 scale/ finished HMS-Pegasus-by-Blue-Ensign-finished-Victory-Models-1:64-scale/ Heller Seventy-four 1:150 scale - modified Le Superbe/Le Glorieux kit after Boudriot, waterline setting with sails. The schooner Pickle, Jotika pob kit 1:64 scale, my interpretation. Link to comment Share on other sites More sharing options...
aliluke Posted November 3, 2013 Share #88 Posted November 3, 2013 Hi Vitus Have measured my badge and reckon the maximum projection from the hull will be about 5mm at the centre, perhaps less when I shape the junction between the two. That feels about right to me but this is just guessing... Cheers Alistair Quote Cheers Alistair Current Build - HMS Fly by aliluke - Victory Models - 1/64 https://modelshipworld.com/topic/34180-hms-fly-by-aliluke-victory-models-164/ Previous Build - Armed Virginia Sloop by Model Shipways Previous Build - Dutch Whaler by Sergal (hull only, no log) Link to comment Share on other sites More sharing options...
vths Posted November 3, 2013 Author Share #89 Posted November 3, 2013 Thanks alot guys for the info. The pieces are about 8 mm at their thickest point and I was wondering, whether that is not too much, but I found nothing on this topic. Then perhaps instead of clay I will simply use a piece of wood, with a maximum of 5 mm you say? B.E.> Antscherl speaks about the lower piece of the badge, but what about the top part? Should that be a bit more "massive" or the same? By the "stern piece" you mean the stern fascia plywood part with five windows? This one protrudes about 8 mm from the ship side, but in the narrowest point of the ship, so if I'm getting this right, it should be like this. In such case the badge should be no more than 3 mm thick. And my last question, what about the window itself? The badge has one big window and two narrow at its sides. Should there be appropriate openings in the main hull for all of these (as you can see, now I have just the one big) or not? Quote 1st build - HMS Race Horse (Sergal) Current build - HMS Fly (Victory/Amati) Link to comment Share on other sites More sharing options...
realworkingsailor Posted November 3, 2013 Share #90 Posted November 3, 2013 If I recall correctly, I made mine to stick out about 5-6mm, just a little bit inside the edge of the stern fascia. As for the hull opening, it should be just for the main central window. Andy Quote Quando Omni Flunkus, Moritati Current Build: USF Confederacy Link to comment Share on other sites More sharing options...

Recommended Posts
Join the conversation
You can post now and register later. If you have an account, sign in now to post with your account.