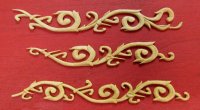
EricWilliamMarshall Posted December 14, 2019 Share #1 Posted December 14, 2019 (edited) Since Chuck kindly posted the scale pdf of the decorations, I felt laziness and a bit of fear were the only bars to an attempt. After printing, I glued the paper to my sacrificial bits of wood. I aligned the longest direction of the pattern with the direction of the grain in a hope to reduce the wood splitting apart. Edited December 16, 2019 by EricWilliamMarshall Changed title GrandpaPhil, MEDDO, Ryland Craze and 2 others 5 Current adventures: USS Perry of 1843, model kit by Bluejacket - Scale 1:96 Lost at Sea: Dapper Tom - model kit by Model Shipways Previous adventures: an English Pinnace, model kit by Model Shipways, Opium Smuggler Schooner Yacht 1805, model kit by Authentic Holland Models Chesapeake Bay Flattie, model kit by Midwest, USS Constitution, model kit by Revell Albatros 1912, card model kit by HMV Link to comment Share on other sites More sharing options...
EricWilliamMarshall Posted December 14, 2019 Author Share #2 Posted December 14, 2019 I first started to saw the wood without support and that made me nervous. I found piece of pine scrap with a pre-existing hole a cut a v-shape and then clamped the pine to my work area. That worked better but sometimes I found myself sawing into the pine as well as my target. A few pencil marks helped that issue. For the sawing, staying vertical can be a challenge and tight turns require cutting a extra bit out with the saw so the back of the saw blade doesn’t bind when turning. The whole cutout took 15 minutes; which was quicker than I expected. That’s nice because anything printed and glued can be cut! I used a jeweer’s saw since I don’t have ‘proper’ cooping saw and the smallest blade I could find - again for jewelry making. GrandpaPhil, Ryland Craze, Ras Ambrioso and 5 others 8 Current adventures: USS Perry of 1843, model kit by Bluejacket - Scale 1:96 Lost at Sea: Dapper Tom - model kit by Model Shipways Previous adventures: an English Pinnace, model kit by Model Shipways, Opium Smuggler Schooner Yacht 1805, model kit by Authentic Holland Models Chesapeake Bay Flattie, model kit by Midwest, USS Constitution, model kit by Revell Albatros 1912, card model kit by HMV Link to comment Share on other sites More sharing options...
EricWilliamMarshall Posted December 14, 2019 Author Share #3 Posted December 14, 2019 Flipped over the piece and glued it to a chunk of 2x4 for support and ease of handling. The paper in between will later when remove the carved piece from the support. After it dried, I drew the image in the piece to be craved. ccoyle, druxey, mtaylor and 6 others 9 Current adventures: USS Perry of 1843, model kit by Bluejacket - Scale 1:96 Lost at Sea: Dapper Tom - model kit by Model Shipways Previous adventures: an English Pinnace, model kit by Model Shipways, Opium Smuggler Schooner Yacht 1805, model kit by Authentic Holland Models Chesapeake Bay Flattie, model kit by Midwest, USS Constitution, model kit by Revell Albatros 1912, card model kit by HMV Link to comment Share on other sites More sharing options...
GrandpaPhil Posted December 15, 2019 Share #4 Posted December 15, 2019 (edited) Well done! Good start! Edited December 15, 2019 by GrandpaPhil EricWilliamMarshall and mtaylor 2 Building: 1:64 HMS Revenge (Victory Models plans) 1:64 Cat Esther (17th Century Dutch Merchant Ships) On the building slip: 1:72 French Ironclad Magenta (original shipyard plans) On hold: 1:98 Mantua HMS Victory (kit bash), 1:96 Shipyard HMS Mercury Favorite finished builds: 1:60 Sampang Good Fortune (Amati plans), 1:200 Orel Ironclad Solferino, 1:72 Schooner Hannah (Hahn plans), 1:72 Privateer Prince de Neufchatel (Chapelle plans), Model Shipways Sultana, Heller La Reale, Encore USS Olympia Goal: Become better than I was yesterday "The hardest part is deciding to try." - me Link to comment Share on other sites More sharing options...
reklein Posted December 15, 2019 Share #5 Posted December 15, 2019 (edited) Nice, but, I think I would have left it partially attached the main piece of wood so as to have a handle while carving the piece. Then cut it from the stock and finish it. Edited December 15, 2019 by reklein Ian B, EricWilliamMarshall and mtaylor 3 Bill, in Idaho Completed Mamoli Halifax and Billings Viking ship in 2015 Next Model Shipways Syren Link to comment Share on other sites More sharing options...
EricWilliamMarshall Posted December 15, 2019 Author Share #6 Posted December 15, 2019 Using a ‘regular’ flat wood chisel and a x-acto blade, I cut in “low” areas. The contrast between high and low helps define the definition of the different areas. I’ve used a combination of vertical and then horizontal cuts to knock chunks of wood, with slicing cuts for vertical cuts for the curves. Duanelaker, mtaylor, Ryland Craze and 2 others 5 Current adventures: USS Perry of 1843, model kit by Bluejacket - Scale 1:96 Lost at Sea: Dapper Tom - model kit by Model Shipways Previous adventures: an English Pinnace, model kit by Model Shipways, Opium Smuggler Schooner Yacht 1805, model kit by Authentic Holland Models Chesapeake Bay Flattie, model kit by Midwest, USS Constitution, model kit by Revell Albatros 1912, card model kit by HMV Link to comment Share on other sites More sharing options...
EricWilliamMarshall Posted December 15, 2019 Author Share #7 Posted December 15, 2019 Thanks for the suggestion, reklein. I thought gluing it to the block of wood would work in a similar fashion. I’ll keep you posted. Thanks to everyone for the likes! mtaylor 1 Current adventures: USS Perry of 1843, model kit by Bluejacket - Scale 1:96 Lost at Sea: Dapper Tom - model kit by Model Shipways Previous adventures: an English Pinnace, model kit by Model Shipways, Opium Smuggler Schooner Yacht 1805, model kit by Authentic Holland Models Chesapeake Bay Flattie, model kit by Midwest, USS Constitution, model kit by Revell Albatros 1912, card model kit by HMV Link to comment Share on other sites More sharing options...
EricWilliamMarshall Posted December 15, 2019 Author Share #8 Posted December 15, 2019 I’ll have think about cutting inside curves. If you will pardon the pun, the x-acto doesn’t cut it. Duanelaker, Chuck, bruce d and 4 others 7 Current adventures: USS Perry of 1843, model kit by Bluejacket - Scale 1:96 Lost at Sea: Dapper Tom - model kit by Model Shipways Previous adventures: an English Pinnace, model kit by Model Shipways, Opium Smuggler Schooner Yacht 1805, model kit by Authentic Holland Models Chesapeake Bay Flattie, model kit by Midwest, USS Constitution, model kit by Revell Albatros 1912, card model kit by HMV Link to comment Share on other sites More sharing options...
EricWilliamMarshall Posted December 16, 2019 Author Share #9 Posted December 16, 2019 I ground down a bit of brass tube to make a circle-shaped ‘punch’ for the center of the flower and I ground down a X-acto blade for scraping the previously described inside curves. It was quick to do and they worked ok. Ryland Craze, KARAVOKIRIS, Edwardkenway and 2 others 5 Current adventures: USS Perry of 1843, model kit by Bluejacket - Scale 1:96 Lost at Sea: Dapper Tom - model kit by Model Shipways Previous adventures: an English Pinnace, model kit by Model Shipways, Opium Smuggler Schooner Yacht 1805, model kit by Authentic Holland Models Chesapeake Bay Flattie, model kit by Midwest, USS Constitution, model kit by Revell Albatros 1912, card model kit by HMV Link to comment Share on other sites More sharing options...
EricWilliamMarshall Posted December 16, 2019 Author Share #10 Posted December 16, 2019 (edited) I undercut the flowers slightly and the carving looked ok enough for the time spent so far. I popped the carving off and wet the paper and rubbed most of it off quickly. The rest yielded to the X-acto blade with a couple quick scapes. I noticed a couple of my cuts didn’t cut all to the base so I scraped that as well. I thought I would need to scrape or sand at this point, but I’m happy enough with the exercise as is. Beyond the the sawing, the cutting (and grinding) took two 15 minutes sessions (plus a bit more for photos). I assume this would quicker with practice. I think I would invest in buying or making a small gouge to supplant my ‘scraper’. Edited December 16, 2019 by EricWilliamMarshall Edwardkenway, JeffT, Duanelaker and 5 others 8 Current adventures: USS Perry of 1843, model kit by Bluejacket - Scale 1:96 Lost at Sea: Dapper Tom - model kit by Model Shipways Previous adventures: an English Pinnace, model kit by Model Shipways, Opium Smuggler Schooner Yacht 1805, model kit by Authentic Holland Models Chesapeake Bay Flattie, model kit by Midwest, USS Constitution, model kit by Revell Albatros 1912, card model kit by HMV Link to comment Share on other sites More sharing options...
reklein Posted December 16, 2019 Share #11 Posted December 16, 2019 Turned out pretty good, Ya got a fine touch. Like Snoopy catching bubbles. EricWilliamMarshall and mtaylor 2 Bill, in Idaho Completed Mamoli Halifax and Billings Viking ship in 2015 Next Model Shipways Syren Link to comment Share on other sites More sharing options...
EricWilliamMarshall Posted December 16, 2019 Author Share #12 Posted December 16, 2019 (edited) On 12/15/2019 at 8:40 PM, reklein said: Turned out pretty good, Ya got a fine touch. Like Snoopy catching bubbles. You are too kind! Thanks! Edited December 26, 2019 by EricWilliamMarshall mtaylor 1 Current adventures: USS Perry of 1843, model kit by Bluejacket - Scale 1:96 Lost at Sea: Dapper Tom - model kit by Model Shipways Previous adventures: an English Pinnace, model kit by Model Shipways, Opium Smuggler Schooner Yacht 1805, model kit by Authentic Holland Models Chesapeake Bay Flattie, model kit by Midwest, USS Constitution, model kit by Revell Albatros 1912, card model kit by HMV Link to comment Share on other sites More sharing options...
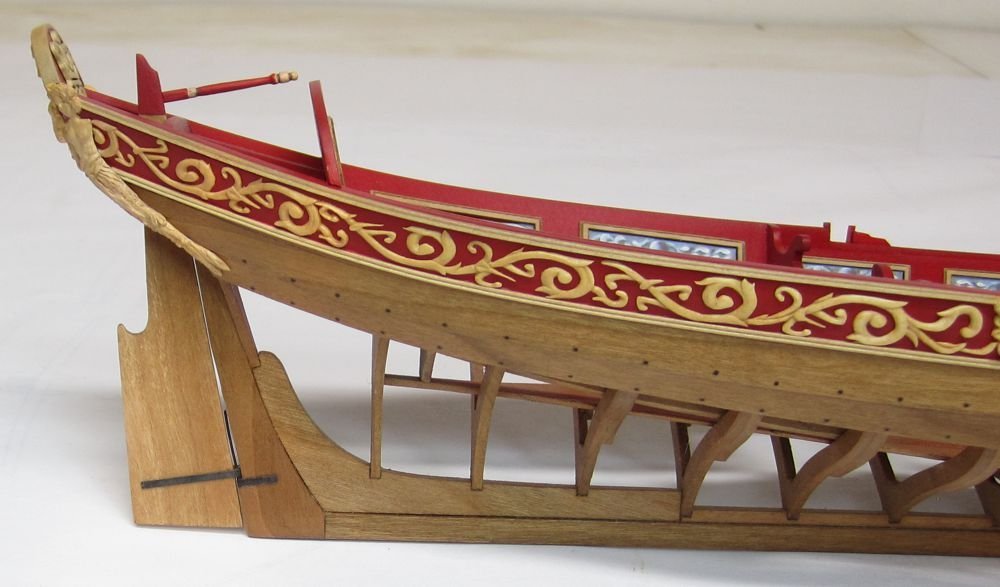
EricWilliamMarshall Posted December 26, 2019 Author Share #13 Posted December 26, 2019 I covered the carving with several coats of water based polyurethane, which ‘smoothed out” the texture of the cut wood, making it look much better, than it actually is! VTHokiEE, KARAVOKIRIS, Ryland Craze and 7 others 10 Current adventures: USS Perry of 1843, model kit by Bluejacket - Scale 1:96 Lost at Sea: Dapper Tom - model kit by Model Shipways Previous adventures: an English Pinnace, model kit by Model Shipways, Opium Smuggler Schooner Yacht 1805, model kit by Authentic Holland Models Chesapeake Bay Flattie, model kit by Midwest, USS Constitution, model kit by Revell Albatros 1912, card model kit by HMV Link to comment Share on other sites More sharing options...
Chuck Posted December 26, 2019 Share #14 Posted December 26, 2019 That really looks nice. I dont think the others know just how small that carving really is. A fine job indeed. VTHokiEE, mtaylor and EricWilliamMarshall 3 Chuck Passaro - MSW Admin Sloop Speedwell - POF scratch Block Island Boat - POF scratch HMS Winchelsea - POB scratch build HM Cutter Cheerful - POB scratch build Royal Barge - POF scratch Medway Longboat- POF Scratch SYREN SHIP MODEL COMPANY Link to comment Share on other sites More sharing options...
druxey Posted December 26, 2019 Share #15 Posted December 26, 2019 Nicely done, Eric; particularly with the comparatively large tools you are using. If you are serious about miniature carving, you might consider acquiring some miniature carving tools. It will make a difficult job much easier. mtaylor and EricWilliamMarshall 2 Be sure to sign up for an epic Nelson/Trafalgar project if you would like to see it made into a TV series http://trafalgar.tv Link to comment Share on other sites More sharing options...
EricWilliamMarshall Posted December 30, 2019 Author Share #16 Posted December 30, 2019 Druxey, I have ordered a handful of Dockyard mini chisels to play with (or more accurately, to see if I can sharpen and then play with them!) Thanks Chuck, druxey, reklein, and everyone else again for taking the time to take a peek and comments! Duanelaker and mtaylor 2 Current adventures: USS Perry of 1843, model kit by Bluejacket - Scale 1:96 Lost at Sea: Dapper Tom - model kit by Model Shipways Previous adventures: an English Pinnace, model kit by Model Shipways, Opium Smuggler Schooner Yacht 1805, model kit by Authentic Holland Models Chesapeake Bay Flattie, model kit by Midwest, USS Constitution, model kit by Revell Albatros 1912, card model kit by HMV Link to comment Share on other sites More sharing options...
GrandpaPhil Posted January 2, 2020 Share #17 Posted January 2, 2020 Well done! EricWilliamMarshall 1 Building: 1:64 HMS Revenge (Victory Models plans) 1:64 Cat Esther (17th Century Dutch Merchant Ships) On the building slip: 1:72 French Ironclad Magenta (original shipyard plans) On hold: 1:98 Mantua HMS Victory (kit bash), 1:96 Shipyard HMS Mercury Favorite finished builds: 1:60 Sampang Good Fortune (Amati plans), 1:200 Orel Ironclad Solferino, 1:72 Schooner Hannah (Hahn plans), 1:72 Privateer Prince de Neufchatel (Chapelle plans), Model Shipways Sultana, Heller La Reale, Encore USS Olympia Goal: Become better than I was yesterday "The hardest part is deciding to try." - me Link to comment Share on other sites More sharing options...
.thumb.jpeg.fc5d633a7b34428fcf19419a73d56d55.jpeg)

Recommended Posts