Sharpie Posted August 27, 2014 Share #1 Posted August 27, 2014 Hi everyone! I've just started my third model ship, a scratch-built Roman quadrireme, as the title says. The model is in 1/48 scale, and will have a total length of 40 inches. It will be constructed mostly of basswood, but it will be stained and sealed to eliminate any unsightly fuzziness. Additionally, a sizable portion of the hull on the starboard side will be left un-planked, in order to show the inside of the ship. I'm basing my model primarily on drawings by John F. Coats, the naval architect who designed the reconstruction of the trireme Olympias. However, he apparently never drew a reconstruction of this particular type of ship. Anyways, I'm hoping to end up with something that looks sort of like this: But, unfortunately, this isn't actually a J.F. Coats drawing; it's based on several of his drawings, but it was created by someone on another forum. Even more problematically, it gives only one cross-section, and no top view. So, for the hull, I am using this drawing of a Roman quinquereme: I also prefer this hull form, which lacks the odd projection at the front, where the ram is mounted. Due to the lack of concrete historical evidence about these ships, I have a considerable amount of leeway with this sort of thing. And, since I don't have a real set of plans, a lot of this build is going to be based on other models, illustrations, and books. So far, I haven't done much besides the keel, which, as you can see, is much simpler in its construction than that of a later sailing ship. To give a sense of scale, the keel stock is 1/8x3/16". (Don't worry, my sloppy pencil marking next to the cut will be sanded off. ) It isn't perfectly aligned with the plans in these photos, but the curves do match up. I've also completed most of the curved stern section of the keel, but I haven't got a photo handy right now. I'll try an update this log with some degree of regularity, but it all depends on my progress, of course! In the mean time, comments, questions, and especially suggestions are welcome! By the way, for those who may be interested, photos of my previous model ship can be found in the MWS gallery here. Thanks for looking! Sharpie Omega1234, WackoWolf, Erebus and Terror and 4 others 7 Quote Current build: Roman Quadrireme Past builds: Mediterranean Merchant Galley, Roman Trireme (First Build) Link to comment Share on other sites More sharing options...
woodrat Posted August 28, 2014 Share #2 Posted August 28, 2014 Good luck with this, Sharpie. I will be keeping a Sharp eye on your progress. But a warning, the more you delve into the literature and the archaeology, the more you get dissatisfied with your build. I did a half hull model on my carrack before launching on to the full hull and thereby was able to sort out a lot of mistakes. You have done an excellent job on the trireme so I am probably teaching you how to suck eggs. Cheers. Woodrat Quote Current build: Le Gros Ventre 1:48 POF http://modelshipworld.com/index.php?/topic/564-le-gros-ventre-by-woodrat-scale-1-48-pof-1767-french-exploration-vessel/ Past builds: Mycenaean War Galley by Woodrat - 1:48 - Shell first Plank on Frame:https://modelshipworld.com/topic/33384-mycenaean-war-galley-by-woodrat-148-shell-first-plank-on-frame Venetian round ship 14th century by Woodrat fully framed - 1:40 scale Completed https://modelshipworld.com/index.php?/topic/17991-venetian-round-ship-14th-century-by-woodrat-fully-framed-140-scale Venetian Carrack or Cocha 1/64 by woodrat https://modelshipworld.com/index.php?/topic/4915-venetian-carrack-or-cocha-164-by-woodrat completed United States Frigate Essex 1:64 POF http://modelshipworld.com/index.php?/topic/4496-usf-essex-by-woodrat-scale-1-64-fully-framed-from-takakjian-plans/ - completed Yenikapi12 by Woodrat - 1/16 scale - a small Byzantine merchant vessel of the 9th century https://modelshipworld.com/topic/23815-yenikapi12-by-woodrat-116-scale-a-small-byzantine-merchant-vessel-of-the-9th-century-finished/ The Incredible Hulc by Woodrat - an experimental reconstruction of a mediaeval transport https://modelshipworld.com/topic/25641-the-elusive-hulc-by-woodrat-finished-a-speculative-reconstruction-of-a-mediaeval-merchantman-132-plank-on-frame/ Location: Perth, Western Australia Link to comment Share on other sites More sharing options...
dgbot Posted August 28, 2014 Share #3 Posted August 28, 2014 I also agree with the above comment. However be careful. One my fellow club members spent 20 years on a model. The more he researched the more errors he would find in his build and he would redo it. We finally said no more research. Build with what you have and if anything new comes up forget about it. David B WackoWolf 1 Quote Work in progress USS Maine in cardstock.http://modelshipworld.com/index.php/topic/7446-uss-maine-by-dgbot-hmv-card/#entry220003 Completed Blockade runner Teazer http://modelshipworld.com/index.php/topic/6063-blockade-runner-teazer-by-dgbot-card-stock/#entry175967 Completed The Monitor Lehigh http://modelshipworld.com/index.php/topic/6920-the-monitor-lehigh-by-dgbot-card-model/#entry203680 Completed Kingston Class MCVD http://modelshipworld.com/index.php/forum/10-kit-build-logs-in-progress/ Link to comment Share on other sites More sharing options...
Louie da fly Posted August 28, 2014 Share #4 Posted August 28, 2014 (edited) I'll be watching this with interest. Building the Olympias and rowing her revealed some faults in the concept - for example, oars from different banks interfering with each other to the degree that there were quite a few broken oars in the first trials. But that's why people do reconstructions - to find out what works and what doesn't, in hopes of getting a more accurate idea of what was used. They couldn't get her to go as fast as the original triremes were reported as going, either. If I remember rightly, it was to do with the oarsmen not having room to fully stretch out and get a full oar stroke. I take it you've read "Age of the Galley"? As far as I'm aware, this is still pretty much the definitive work on the subject, though a lot of it has necessarily to be educated guesswork, and as it was published in 1994, the world has moved on as more discoveries have been made. I look forward to seeing your progress. They are such graceful vessels, aren't they? Edited August 28, 2014 by Louie da fly Quote It's not really a ship model unless you've bled on it. CURRENT BUILDS Venetian merchant Ship from Basilica of San Marco Golden City - Ballarat paddlewheeler FINISHED Australian couta boat RMS Titanic HMVS Cerberus 11th century Byzantine dromon Winchelsea Nef - Late 13th century Mediaeval ship Henry Grace a Dieu - Rebuild of 1:200 model I started in 1967 https://modelshipworld.com/topic/36379-mistydeefer-by-louie-da-fly-finished-restoration-decor-yacht/#comment-1040663 Mistydeefer - restoration of decor model yacht Link to comment Share on other sites More sharing options...
Sharpie Posted August 28, 2014 Author Share #5 Posted August 28, 2014 (edited) Good luck with this, Sharpie. I will be keeping a Sharp eye on your progress. But a warning, the more you delve into the literature and the archaeology, the more you get dissatisfied with your build. I did a half hull model on my carrack before launching on to the full hull and thereby was able to sort out a lot of mistakes. You have done an excellent job on the trireme so I am probably teaching you how to suck eggs. Cheers. Woodrat I also agree with the above comment. However be careful. One my fellow club members spent 20 years on a model. The more he researched the more errors he would find in his build and he would redo it. We finally said no more research. Build with what you have and if anything new comes up forget about it. David B Woodrat, this danger did occur to me, and I will certainly follow David's advice. But don't worry about this being a 20-year build; I have to have it done by next February for a contest. (One of the rules is that the model must have been begun since the previous year's competition.) It's definitely a tight schedule, but I think I'll make it. Of course, this is a much larger build than my previous ships, but I've also improved a lot since then. I'll be watching this with interest. Building the Olympias and rowing her revealed some faults in the concept - for example, oars from different banks interfering with each other to the degree that there were quite a few broken oars in the first trials. But that's why people do reconstructions - to find out what works and what doesn't, in hopes of getting a more accurate idea of what was used. They couldn't get her to go as fast as the original triremes were reported as going, either. If I remember rightly, it was to do with the oarsmen not having room to fully stretch out and get a full oar stroke. I take it you've read "Age of the Galley"? As far as I'm aware, this is still pretty much the definitive work on the subject, though a lot of it has necessarily to be educated guesswork, and as it was published in 1994, the world has moved on as more discoveries have been made. I look forward to seeing your progress. They are such graceful vessels, aren't they? I do remember reading that the space inside the Olympias was too cramped, since apparently the modern roars were an average of 2" taller than the ancient Greeks. Of course, the volunteer crew was also not nearly as skilled as professional oarsmen would have been, so it's not surprising that the Olympias' speed wasn't as great as an ancient trireme's. I actually haven't read Age of the Galley, though I'll be getting a copy for this build, along with Roman Warships by Michael Pitassi. Now for some progress. This build sure has been a learning experience. So far, I've learned that making things with a scroll saw is really, really hard. Here are all the pieces I've made that didn't quite turn out. I'm referring to these pieces as floors, even though they're really more like the floors and the first futtocks combined into one piece. Because of the differences in construction, I've often found that it's difficult to apply standard nautical terms to ancient ships with my limited knowledge of the subject. Anyways, I eventually figured it out, though some of the edges are a little rough thanks to my cheap blades. After cutting the ends to length and sanding the edges to even them out, they should look alright. The first thing you'll notice is that they are asymmetrical. I gather that this isn't typical of ship ribs, and to be honest I can't say why it would have any particular benefit, but everyone seems to agree that this is how it was done. I have a number of references images showing the internal structure, but this is probably the best one, showing the ribs, keel, and hull stringers. I'll try to cut at least a couple dozen more of the floors by the weekend, so hopefully I can get to attaching them to the keel sometime next week. In the mean time, here's a rather alarming picture of my bucket of waste. Edited August 28, 2014 by Sharpie harvey1847, mtaylor, dgbot and 8 others 11 Quote Current build: Roman Quadrireme Past builds: Mediterranean Merchant Galley, Roman Trireme (First Build) Link to comment Share on other sites More sharing options...
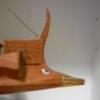
Sharpie Posted September 1, 2014 Author Share #6 Posted September 1, 2014 Well, I didn't get as much done today as I'd hoped, but here it is: The 16 floors that have been made so far were sanded to the proper width, and the ends cut to length. I may decide to cut the ends at an angle, though, rather than a 90˚ cut. I then drilled the bottoms of the floors and inserted 0.035" dowels, to strengthen their attachment to the keel. I also added another piece to the keel at the stern. The next piece after this will complete the curve of the "tail." Tomorrow, I plan to start drilling the mounting holes in the keel, finish the stern of the keel, and maybe also get some more of the floors cut out. At this point, I can't move forward without the use of my scroll saw. Since I live in a neighborhood where the houses are very close together, I can't use power tools late at night. So, I decided to embark on a little side project, which may or may not ever be finished. tarbrush, Omega1234, druxey and 4 others 7 Quote Current build: Roman Quadrireme Past builds: Mediterranean Merchant Galley, Roman Trireme (First Build) Link to comment Share on other sites More sharing options...
Omega1234 Posted September 1, 2014 Share #7 Posted September 1, 2014 Hi Sharpie. This looks like it's going to be a lot of fun building your ship and challenging, too, without a doubt. I especially like your 'side project'. Can you give some more info on it, too? Cheers and all the best! Quote MY SCRATCH BUILT MODELS ARE: Splendid Mega Yacht https://modelshipworld.com/topic/28576-splendid-by-omega1234-scale-1500-mega-yacht/ Majestic Mega Yacht https://modelshipworld.com/topic/28483-mega-yacht-majestic-by-omega1234-miniature/ Sapphire Mega yacht https://modelshipworld.com/topic/21088-sapphire-by-omega1234-1388-scale-mega-yacht-66m-8-inch-hull-length/?tab=comments#comment-639898 Genesis - Supersports Mega Yacht https://modelshipworld.com/topic/18168-genesis-by-omega1234-1300-49m-mega-yacht-8-inches-long-finished/?tab=comments#comment-559026http://modelshipworld.com/index.php/topic/14141-shadow-by-omega1234-scale-1300-luxury-60m-mega-yacht-8-inches-long/ SHADOW Luxury Motor Yacht http://modelshipworld.com/index.php/topic/11384-majellan-by-omega1234-luxury-37-metre-motor-yacht-miniature-7-inches-approx/ Majellan Luxury Motor Yacht http://modelshipworld.com/index.php/topic/9261Rainbow-j-class-racing-yacht/?p=273543 Rainbow J Class Racing Yacht Mystic Classic Motor Cruiser Symphony Ingomar Schooner: Scratch build Dorade Schooner: <p> Lennox Restoration Warship http://modelshipworld.com/index.php/topic/9577-pandora-cutaway-dockyard-style-miniature/?hl=pandora Link to comment Share on other sites More sharing options...
testazyk Posted September 1, 2014 Share #8 Posted September 1, 2014 You call that a side project?? Beautiful work on the trireme and I look forward to following your progress on this new challenge! Good luck. Quote Tom Current: Sergal Sovereign of the Seas Previous builds: AL Swift, AL King of the Mississippi, Mamoli Roter Lowe, Amati Chinese Junk, Caesar, Mamoli USS Constitution, Mantua HMS Victory, Panart San Felipe, Mantua Sergal Soleil Royal Link to comment Share on other sites More sharing options...
Sharpie Posted September 1, 2014 Author Share #9 Posted September 1, 2014 Thanks guys! I often find that when I'm working on a repetitive and relatively boring part of a build, I get sort of demotivated, and I tend to wander off and start doing other things. I figure my "side project" will help with this, since it will allow to switch gears for a few minutes without leaving my workbench. The mini ship is a Fair American, built from a scaled down version of some POB plan I had laying around. I doubt I'll ever get to rigging it, since I'll probably set it aside when I get past the tedious stage of the quadrireme. I'll probably post another progress update later today, depending on how long it takes me to get my schoolwork done. Omega1234 1 Quote Current build: Roman Quadrireme Past builds: Mediterranean Merchant Galley, Roman Trireme (First Build) Link to comment Share on other sites More sharing options...
Vivian Galad Posted September 1, 2014 Share #10 Posted September 1, 2014 Great project, Sharpie. As for the historical accuracy we can always build a new one with what we learn from the previous build. I´ll be following, for sure! Quote Current: Red Dragon (modified) by Vivian Galad - Artesania Latina - 1:60 Oseberg (modified) by Vivian Galad - Amati (1:50)Cocca Veneta by Vivian Galad - Corel - 1:70 Finished 15th Century Latin Caravel kit model from Artimanha models Link to comment Share on other sites More sharing options...
Sharpie Posted September 2, 2014 Author Share #11 Posted September 2, 2014 Great project, Sharpie. As for the historical accuracy we can always build a new one with what we learn from the previous build. I´ll be following, for sure! Thanks Vivian. I'll definitely need some kind of excuse for building another one-- historical accuracy will do just fine! For once I actually got as much done as I planned: mounting holes drilled in the keel, final stern section of the keel added, and eight more floors cut out. They still need to be sanded and pinned though. For the last piece on the keel, I tried a slightly different method of attachment. Instead of trying to cut another hook scarf joint, I drilled the two pieces and fitted them with 0.037" dowels, and a bit of wood glue. After drilling the mounting holes in the keel, I did a dry fit of the 16 floors that I've made so far. If you squint really hard and use your imagination, it kinda sorta looks a little like a ship! It helps that the photo's a little fuzzy. A better view of how much remains to be done: qwerty2008, Omega1234, mtaylor and 6 others 9 Quote Current build: Roman Quadrireme Past builds: Mediterranean Merchant Galley, Roman Trireme (First Build) Link to comment Share on other sites More sharing options...
usedtosail Posted September 3, 2014 Share #12 Posted September 3, 2014 Oh my, that looks very delicate at this stage. Quote - Tom - Current Build: Vanguard Speedy Completed: Vanguard Duchess of Kingston, Stove Project, Ships Wheel Project, NRG Capstan Project, Billings Half Moon, Dumas Chris Craft 1938 27' Triple Cockpit Barrel Back, Panart Santa Lucia , Model Shipways Constitution , MS Bounty Launch , HMS Beagle Member: Nautical Research Guild Link to comment Share on other sites More sharing options...
druxey Posted September 4, 2014 Share #13 Posted September 4, 2014 It's always nice to see a model of a subject that's more unusual. Scroll saw skills improve with a bit of practice. I find a fine blade, tensioned properly, and a good light improved my success rate considerably. Quote Be sure to sign up for an epic Nelson/Trafalgar project if you would like to see it made into a TV series http://trafalgar.tv Link to comment Share on other sites More sharing options...
Sharpie Posted September 4, 2014 Author Share #14 Posted September 4, 2014 (edited) Oh my, that looks very delicate at this stage. It's not quite as fragile as it looks-- the biggest danger is snapping the treenails that are holding the floors onto the keel, since they're not glued yet. It's always nice to see a model of a subject that's more unusual. Scroll saw skills improve with a bit of practice. I find a fine blade, tensioned properly, and a good light improved my success rate considerably. Thanks. My scroll saw skills are already a little better than when I started, but I think by the time I get good at it, I'll be done cutting the ribs... I'll have to experiment more with the blade tensioning as well. For a light, I've occasionally used the lamp on my bench grinder, but it's a very noisy way to produce 60 watts of light. Edited September 4, 2014 by Sharpie Quote Current build: Roman Quadrireme Past builds: Mediterranean Merchant Galley, Roman Trireme (First Build) Link to comment Share on other sites More sharing options...
Sharpie Posted September 5, 2014 Author Share #15 Posted September 5, 2014 A little bit of progress today. I got another 6 floors made and dry-fitted to the keel. I'll probably take them off this weekend to stain them, since I need to be able to lay the keel flat to add the fore assembly. I'm planning to approximately follow the Olympias plan for this part. Next I'll be cutting the rest of the floors, which I have to draw myself from measurements of the plans, since I only have a mid-hull cross section. In the mean time, I did a little work on the ship's armament. I'm still debating whether to try to make it functional. fnkershner, tarbrush, Waitoa and 6 others 9 Quote Current build: Roman Quadrireme Past builds: Mediterranean Merchant Galley, Roman Trireme (First Build) Link to comment Share on other sites More sharing options...
Omega1234 Posted September 6, 2014 Share #16 Posted September 6, 2014 Geat work Sharpie. You've certainly set a very high bar! Functional armament would raise it even higher. Quote MY SCRATCH BUILT MODELS ARE: Splendid Mega Yacht https://modelshipworld.com/topic/28576-splendid-by-omega1234-scale-1500-mega-yacht/ Majestic Mega Yacht https://modelshipworld.com/topic/28483-mega-yacht-majestic-by-omega1234-miniature/ Sapphire Mega yacht https://modelshipworld.com/topic/21088-sapphire-by-omega1234-1388-scale-mega-yacht-66m-8-inch-hull-length/?tab=comments#comment-639898 Genesis - Supersports Mega Yacht https://modelshipworld.com/topic/18168-genesis-by-omega1234-1300-49m-mega-yacht-8-inches-long-finished/?tab=comments#comment-559026http://modelshipworld.com/index.php/topic/14141-shadow-by-omega1234-scale-1300-luxury-60m-mega-yacht-8-inches-long/ SHADOW Luxury Motor Yacht http://modelshipworld.com/index.php/topic/11384-majellan-by-omega1234-luxury-37-metre-motor-yacht-miniature-7-inches-approx/ Majellan Luxury Motor Yacht http://modelshipworld.com/index.php/topic/9261Rainbow-j-class-racing-yacht/?p=273543 Rainbow J Class Racing Yacht Mystic Classic Motor Cruiser Symphony Ingomar Schooner: Scratch build Dorade Schooner: <p> Lennox Restoration Warship http://modelshipworld.com/index.php/topic/9577-pandora-cutaway-dockyard-style-miniature/?hl=pandora Link to comment Share on other sites More sharing options...
Vivian Galad Posted September 6, 2014 Share #17 Posted September 6, 2014 We always love guns that work. But it´s a project in itself and many times will change nothing. Quote Current: Red Dragon (modified) by Vivian Galad - Artesania Latina - 1:60 Oseberg (modified) by Vivian Galad - Amati (1:50)Cocca Veneta by Vivian Galad - Corel - 1:70 Finished 15th Century Latin Caravel kit model from Artimanha models Link to comment Share on other sites More sharing options...
Sharpie Posted September 7, 2014 Author Share #18 Posted September 7, 2014 (edited) Thanks Omega! Vivan, I see your point about the ballista becoming its own project, and whether it functions or not certainly won't change the appearance of the model. But, in order to look right, it has to be built pretty much the same way as a real one, so the only thing needed to make it functional is some tension on the skeins and a lack of glue in a few spots. Anyways, we'll se how it goes. I didn't get any more of the floors cut today, but I did measure the plans for the first seven stern frames. Later, I removed the floors from the keel and stained it with Minwax Golden Oak. It still needs to be sanded to take off the fuzz, and recoated after that. In the interest of honesty, I confess that the scarf joint in the photo is fake. My real scarf joints don't look nearly that good. But the part of the keel that's inside the hull be barely visible (if at all) in the completed model, so it may not make any difference. Much of the ship would have been made from cedar because of its light weight and rot resistance, but the main structural members would probably have been oak. Though the type of wood used would have been largely determined by where the ship was built, both oak and cedar are common in what was the Eastern half of the Roman Empire. I also got some new research material. This book was kindly recommended to me by Chris Watton, as one of the most helpful resources in his development of the Amati quinquereme kit. (Edit: Not sure why it keeps rotating the photo; I thought I fixed it.) I've only flipped through it so far, but it looks like a wealth of valuable information. Tomorrow I'll stain the floors I've already made, and either cut out the ones I've taken measurement for or take measurements for the rest of them. Edited September 7, 2014 by Sharpie WackoWolf, Vivian Galad, Omega1234 and 1 other 4 Quote Current build: Roman Quadrireme Past builds: Mediterranean Merchant Galley, Roman Trireme (First Build) Link to comment Share on other sites More sharing options...
Sharpie Posted September 8, 2014 Author Share #19 Posted September 8, 2014 (edited) I continued to put off cutting floors today, since I came down with a cold, but later in the evening I managed a little work of the fore assembly. The curve will be filled out later in the build. I also did a little experimentation with fake treenailing detail. The rings are 0.7mm across, which translates to about 1.3" (33,6mm) at full size. Since this was just a test piece, I wasn't too careful with the spacing. I'm unsure as to whether or not I want to show the mortise and tenon joint dowels on the hull. There somewhat visible in this photo of the Olympias (inside the red box), but I don't know if it would make the model look too "messy." If I do add this detail, it will be done with a pounce wheel, so it will be much more regular than on the test piece. Also note that the larger treenails holding the ribs to the inside of the hull are much darker than the surrounding wood. I'm not sure if I'm going to try to duplicate this, or just use the method shown on the test piece above on the hull as well as the deck. Even using colored putty to fill holes is much more time consuming than simply making an impression in the wood. As you can see, there's a lot of uncertainty at this point in the build. Hopefully I can determine what to do with the detailing through some more tests, but in the meantime, suggestions/opinions are welcome. Edited September 8, 2014 by Sharpie WackoWolf, tarbrush, mtaylor and 3 others 6 Quote Current build: Roman Quadrireme Past builds: Mediterranean Merchant Galley, Roman Trireme (First Build) Link to comment Share on other sites More sharing options...
druxey Posted September 8, 2014 Share #20 Posted September 8, 2014 Whether to impress, drill and fill with coloured wax, or actually treenail is very much a personal preference. If you do some other test pieces using the different techniques you can see which appeals to you best. Vivian Galad 1 Quote Be sure to sign up for an epic Nelson/Trafalgar project if you would like to see it made into a TV series http://trafalgar.tv Link to comment Share on other sites More sharing options...
Sharpie Posted September 13, 2014 Author Share #21 Posted September 13, 2014 Sorry for the lapse over the past week-- life had the temerity to get in the way of my model ship building. For the tree nailing detail, I've decided that I really like the looks of the ring impressed in the wood, despite the potential inaccuracy of the treenails not being darker. The larger treenails, which would hold the ribs to the inside of the hull, will be represented as shown on my test piece, with the 0.7mm ring on the planking and on the insides of the ribs. The smaller treenails, which would hold the mortise and tenon joints together, will be represented by either 0.3mm or 0.4mm rings, depending on what size mechanical pencils I can get my hands on. These will be set 1/4" apart (1ft/30cm at full size). This is much farther than is shown on the Olympias, but it doesn't seem too unreasonable given the size of the ship and the dimensions of the planks. I would like to show these on both the outsides and the insides of the planks, as if they really went all the way through, but I may change my mind depending on how long it takes to do them on just the outsides. Given that both the inside and outside won't be visible at the same time, alignment shouldn't be too much of a concern. As far as actual progress, I've cut and mounted another four floors. I'll definitely get a picture up this weekend, and I should have a few more floors done by then. Omega1234 and tarbrush 2 Quote Current build: Roman Quadrireme Past builds: Mediterranean Merchant Galley, Roman Trireme (First Build) Link to comment Share on other sites More sharing options...
Sharpie Posted September 13, 2014 Author Share #22 Posted September 13, 2014 OK, here's where I'm at as of this afternoon: A total of 31 floors made and dry-fitted onto the keel, with about 15 more to go. The last five or so on the stern will be single-piece frames, since the cross-sections of the tail are so small. Once I stain all the floors, I might have to find a photo backdrop that's not brown… dgbot, ianmajor, tarbrush and 5 others 8 Quote Current build: Roman Quadrireme Past builds: Mediterranean Merchant Galley, Roman Trireme (First Build) Link to comment Share on other sites More sharing options...
Vivian Galad Posted September 14, 2014 Share #23 Posted September 14, 2014 She seems so fragile at this stage!!! mtaylor and WackoWolf 2 Quote Current: Red Dragon (modified) by Vivian Galad - Artesania Latina - 1:60 Oseberg (modified) by Vivian Galad - Amati (1:50)Cocca Veneta by Vivian Galad - Corel - 1:70 Finished 15th Century Latin Caravel kit model from Artimanha models Link to comment Share on other sites More sharing options...
Sharpie Posted September 15, 2014 Author Share #24 Posted September 15, 2014 I seem to have run into a minor obstacle. I need to take measurements of the prow to make the forward frame templates, but the prow section on the plan is a little confusing. Here's how it appears in the original drawing: Having very limited knowledge of how to properly interpret this drawing, I would assume that the two sides simply show the profile of the prow at different heights. Is the top half at the waterline, and the bottom half at the deck level, or somewhere else? When I mirror the top half, this is what I end up with: This looks far to pointy to me, especially when compared to drawings such as this one: But mirroring the bottom half of the prow on the drawing still doesn't quite look right: How is this drawing supposed to be interpreted? Thanks in advance! Quote Current build: Roman Quadrireme Past builds: Mediterranean Merchant Galley, Roman Trireme (First Build) Link to comment Share on other sites More sharing options...
Sharpie Posted September 15, 2014 Author Share #25 Posted September 15, 2014 OK, so I made a crude mock-up of the prow using the mirrored profiles in my previous post, set at the proper height as determined by measuring the plans... …and I think my initial assumption was correct. With the profiles in place relative to each other, the proportions look much better. Note that the deck height shown here is the deck height on the plan, which is actually for a quinquereme. The deck height of the model will be considerably lower. I think I failed to mention earlier that I'm actually not strictly following the plan-- the model's hull is slightly narrower than the drawing's, since it would only have to accommodate four rowers in two banks, rather than five rowers in three banks. mtaylor, Omega1234, hexnut and 3 others 6 Quote Current build: Roman Quadrireme Past builds: Mediterranean Merchant Galley, Roman Trireme (First Build) Link to comment Share on other sites More sharing options...
Sharpie Posted September 15, 2014 Author Share #26 Posted September 15, 2014 I seem to have a motivational problem when it comes to measuring/cutting frames. So, I spent some time today working on making rope. I did some experimentation with this a while ago, but this is the first usable piece of rope I've turned out. I used quilting thread, which is quite a bit thicker than regular sewing thread, so my three-strand rope has a diameter of about 0.8mm. It's not completely perfect, but then again my ropewalk is made of scrap wood and paper clips. I plan on using three ropes like this one to make the hypozomata, the highly tensioned cable that runs through the ship near the keel. The hypozomata prevented the ship from flexing during rough seas or ramming, and was essential in maintaining the structural integrity of Greek and Roman warships. In a trireme, the hypozomata is written to have been about 47mm in diameter, and tensioned to 13.5 tones of force. Presumably the hypozomata in a quadrireme would have to have been slightly larger, so it looks like my rope diameter is ideal for this. Unfortunately, there is no recording of how the hypozomata was tensioned, so when I come to that point in the construction, I shall merely attempt to contrive some sort of windlass-ish thing that looks likely. druxey, tarbrush, Vivian Galad and 2 others 5 Quote Current build: Roman Quadrireme Past builds: Mediterranean Merchant Galley, Roman Trireme (First Build) Link to comment Share on other sites More sharing options...
druxey Posted September 16, 2014 Share #27 Posted September 16, 2014 A Spanish windlass arrangement, perhaps? It would have been the simplest method for applying torque to the hypozomata. Quote Be sure to sign up for an epic Nelson/Trafalgar project if you would like to see it made into a TV series http://trafalgar.tv Link to comment Share on other sites More sharing options...
Sharpie Posted September 16, 2014 Author Share #28 Posted September 16, 2014 A Spanish windlass arrangement, perhaps? It would have been the simplest method for applying torque to the hypozomata. That does seem likely, especially given its similarity to the torsion skeins on Roman artillery. I've only skimmed it so far, but this lecture by John Coates mentions that Egyptian ships used a Spanish windlass to tighten their hogging trusses. Although they were looped around the prow and stern of the ship, instead of being a single straight tendon running parallel to the keel, it seems very probable that the Romans would have used a similar method of tensioning the ropes. However, it seems to me that this could impart a considerably amount of torsion to the ship. I guess that minimal leverage resulting from the small size of the hypozomata's attachment point would prevent that? Quote Current build: Roman Quadrireme Past builds: Mediterranean Merchant Galley, Roman Trireme (First Build) Link to comment Share on other sites More sharing options...
Sharpie Posted September 29, 2014 Author Share #29 Posted September 29, 2014 Well it looks like this build log is going to be a little more intermittent than I had originally planned. Anyway, I finally got some time to get back to work on this today. I intended to cut seven of the front floors, but my scroll saw skills have declined considerably, so I only ended up with three usable pieces, until I retrace the templates and try again. But at least the three floors that I ended up with are spread out, so they give a good indication of the shape of the prow. I also prepared one plank with the mortise and tenon joint dowel detailing. Since the lower planks will be covered with lead on the outside, the detailing only needs to be applied to the insides. Based on the amount of time it took to prepare a single plank, I don't think it will take an unreasonable amount of time to apply this detail to the entire model. The modified hypodermic needle used (22 Ga.): The photo makes the detail look a little more distinct than it really is; I don't think it will make my ship look like it has measles. And, finally, I've started attaching the floors to the keel. I put together a simple jig to ensure that the floors are properly aligned, but unfortunately I have to let the glue fully set before I can remove the jig and move on to the next floor. This is going to be a long process. Omega1234, Jaekon Lee, tarbrush and 3 others 6 Quote Current build: Roman Quadrireme Past builds: Mediterranean Merchant Galley, Roman Trireme (First Build) Link to comment Share on other sites More sharing options...
Sharpie Posted November 26, 2014 Author Share #30 Posted November 26, 2014 Despite all appearances, I have not abandoned this build! I've only been able to work on it on and off, a few minutes at a time, so I haven't made a whole lot of progress. (This is largely due to having started construction on a recreational hovercraft, which gets priority because of its much larger budget.) In the 58 days since my last post, I've cut 4 more floors and treenailed them to the keel, sanded, stained and sealed all of the floors cut so far, and cut, detailed, beveled, and attached a grand total of 2 1/2 planks. Given how much time it takes to press the treenailing details into the planks, I'm very glad that this will not be a fully-planked model. Here's what it looks like now: (Sorry about the picture quality. I'm using an ancient 5MP Nikon, but I'll be getting a better camera soon.) A few of the floors aren't quite straight, but most of them still haven't been glued in place. The planks are glued at the edge and to the few floors that are permanently affixed; the rest of the floors will be glued in place using the first couple of planks on each side as a guide to ensure that they all line up properly. Hopefully the next update will follow a little sooner than this one did. Thanks for looking! tarbrush, BANYAN and mtaylor 3 Quote Current build: Roman Quadrireme Past builds: Mediterranean Merchant Galley, Roman Trireme (First Build) Link to comment Share on other sites More sharing options...

Recommended Posts
Join the conversation
You can post now and register later. If you have an account, sign in now to post with your account.