


thibaultron
-
Posts
2,952 -
Joined
-
Last visited
Content Type
Profiles
Forums
Gallery
Events
Everything posted by thibaultron
-
 X,Y,Z in 3D, so your data will transfer.
 -
Yes. There is no usable software to automatically "trace" the graphic to a CAD format. There are lots of programs that say they will, but none that do even an adequate job of it.
-
I've never used TinkerCAD, perhaps it can import a JPEG, or other graphic file? You could then trace it, in the CAD, and go from there.
-
Air Brush Paints
thibaultron replied to Worldway's topic in Painting, finishing and weathering products and techniques
For mixing/stirring the Vallejo paints before use, I use these mixing balls: https://www.ebay.com/itm/Mixing-Stainless-Balls-6-35mm-Paint-pots-Vallejo-Model-Color-Citadel-/281190910666?hash=item417848caca Open the top and drop one in. Shake the bottle before each use. I use the 6mm balls for the regular bottles, and 8mm for the larger primer bottles. Some of the thicker brush colors, get a 8mm. To tell which bottles have them (I don't open a new bottle, until I need it), I put a dot with a permanent marker on the bottle when I add the ball. These balls are specially coated, so as NOT to rust, very important! A regular BB or steel ball will rust. -
It looks like the cleats are painted/not painted, so as to contrast with the surrounding area. Ie. natural dark cleat in a white painted area, white painted cleat in a natural dark colored area.
-
Jaager, could you be a bit more specific about the drill? they seem to have everything from tools to clothes, and many in the tool catagory?
-
Love the idea for the display feet!! I'll remeber this for future projects.
- 82 replies
-
- 1
-

-
- naval smoothbore
- model shipways
- (and 1 more)
-
Many historic buildings in the US are required to be painted with "historic" paint mixtures. These are expensive, and have a much shorter life than modern paints. Several years ago I worked with an Engineer who owned a farm with Historically Registered buildings. When it came time to repaint, he found it cheaper to sell the farm, and buy another, that had more modern structures!
-
For the paint bleed problem, next time put a light coat of the color you are trying to protect with the tape, on first. Any wicking will then be the existing color, which will then seal the tape protected color joint. Ie. a light coat of the poly first, then the color coat.
- 30 replies
-
- 2
-
-
- model shipways
- finished
- (and 1 more)
-
You might want to consider getting Phospur-bronze wire, from a model RR supplier. Stiff, and doesn't corrode, solders easily. While at you freainda age, the corrosion is not a big deal, his family may want to keep the models after he passes.
-
Pull some of the wire out, cut lengths generously longer than needed. Attach one end to a shelf, or other high surface. Tie a heavy weight to the other end, and let it hang for a few days. That should give you lengths of straight wire.
-
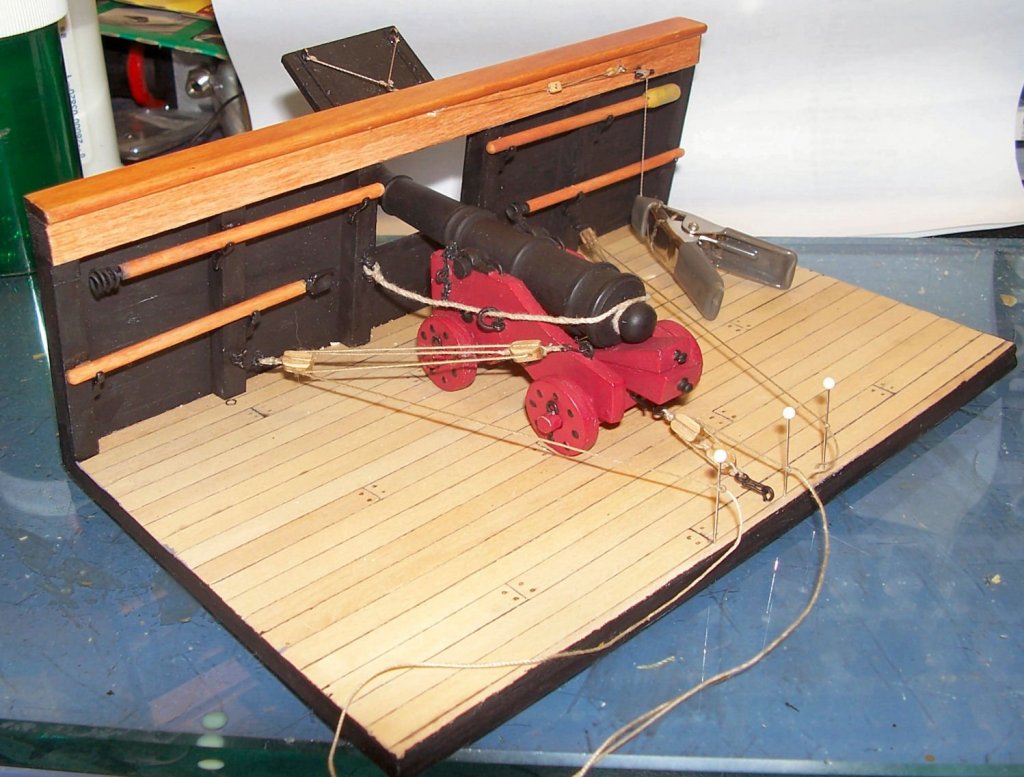
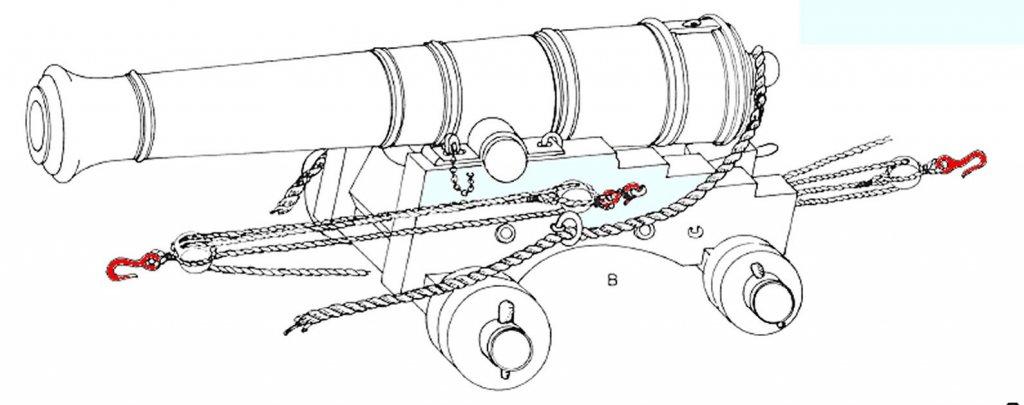
Glad to see you went with treenails, not the brass brads they include. I use the seizing thread for the port lid lift, rather than the chain. I could not find any pictures or drawings that showed chain used on ships for this. I also think chain would have abraded the lid surface, in real life. While almost no ships used a lid like this on the weather deck, I did find one drawing of a ship, that did. I think it was one of the Anatomy Of The Ship series books. I also fabricated hooks for the running tackle blocks, as shown in several drawings. Mine came out a little large, but improved the looks.
- 82 replies
-
- 7
-
-
- naval smoothbore
- model shipways
- (and 1 more)
-
Perhaps an electric toothbrush, lightly applied?
-
What version of the Cricut software did you use? All the DXF files I tried to import came out with strange shapes.
-
Have have some of the old woven fishing line, from a fishing reel I used as a kid, its not brown, but it might take stain.
-
I think it is accurate enough, the problem lies in inputting the existing pages. With the Cricut you have to scan in the pages, reprint them with alignment marks added by the Cricut software, then cut the prints, not the original pages. In addition their software uses the web browser as the drawing pallet, limiting the size of the print, to smaller than a sheet of standard paper. If I remember correctly about 8 1/2 by 6! They have released a new version of "Design Space", their software, but I have not had a chance to see if they have corrected this. So far with not being able to go from CAD to the machines format, and the limited Scan to Print function, I've been disapointed. I have about 100 HO scale high photo quality detailing building kit files, that I was planning to use this machine to cut out the parts for, but they are 8 1/2 by 11 sheets and printing them, scanning, then reprinting with the alignment marks will seriously degraded the details.
-
Before you remove the sails, see if you can find a local shop that does the "Detailing" for the used car dealers. They may be able to point you towards the stuff they use to remove mold from fabric seat upholstery. It may work on the sails, in place. I don't know what that stuff may be, but I do know that my car needed this done to it, as the previous owner left a window down for a year, before I bought it. My Brother-In-Law had the mold removed before I bought it. He was selling it for one of his friends. (Yes, I knew about the mold before I bought it, it is a good car, for a good price.)
-
I have a Cricut machine. The problem they both have, is that they are setup to cut image files, not CAD drawings. I have yet to be able to go from my CADs to a format that I can cut. Something simple like a building (all straight lines), can be drawn with several graphics programs, frames, decks and bulkheads, not so much so. The machine has been sitting for several months, as I've been to busy to get back to it. This fall/winter, I will try again.
-
They look good! "An artist must suffer for his art." At least you seem to have done that for your model!:-)
- 449 replies
-
- 3
-
-
- sultana
- model shipways
- (and 2 more)
-
Great looking model!
-
Condolences to you!
-
question for sketchup users
thibaultron replied to hamilton's topic in CAD and 3D Modelling/Drafting Plans with Software
Hope it works for you! I've been happy with the various versions for a couple decades. -
The owner of a leading airbrush company recommends NOT using alcohol!! It is what they use in there airbrush cleaners to disolve the water based paints.


