
HOLIDAY DONATION DRIVE - SUPPORT MSW - DO YOUR PART TO KEEP THIS GREAT FORUM GOING! (Only 68 donations so far out of 49,000 members - Can we at least get 100? C'mon guys!)
×


TBlack
-
Posts
1,308 -
Joined
-
Last visited
Content Type
Profiles
Forums
Gallery
Events
Everything posted by TBlack
-
 Gregory, I’m just. Guessing, but maybe the steering cables went straight down from the drum, through the captain’s cabin, into the space below, and thence to the rudder post? Tom
- 341 replies
-
- 2
-

-
- Sophie
- Vanguard Models
- (and 1 more)
-
Steve, Your quoted passages are on pages 79-80 in my edition. While Mr. Brown thought the yard should be shortened, Jack thought otherwise, and instructed the carpenter, Mr. Lamb, just to touch up the stop-cleats. The spar was never shortened and remained at 43 feet. Tom
- 341 replies
-
- 2
-
-
- Sophie
- Vanguard Models
- (and 1 more)
-
Steve, You're never too granular for this hobby. Keep it up! Sophie was always going to have a wheel. Page 69 of my paperback edition of the book says that Jack took the wheel, and that the wind blew his hat off, getting caught in the hammock netting. So, the wheel is on the quarterdeck. Tom
- 341 replies
-
- 2
-
-
- Sophie
- Vanguard Models
- (and 1 more)
-
Walter, Check out Tom Szabo's Leopard (TomS10). Last page of his log shows the result, and back a couple of pages shows how he did it. Tom
-
Jon, A nice explanation and I'm sure a big help to other first timers. Looks good so far. Tom
-
My mistake. Must be the late night that fogs my brain. I was thinking 1:64=3/8" to the foot and it's actually 3/16" to the foot. We're all in agreement this morning. Tom
- 341 replies
-
- 2
-
-
- Sophie
- Vanguard Models
- (and 1 more)
-
This is becoming an interesting discussion, because the kit calls for a main yard 202mm long (7.953") and suggests that Cochrane extended it to 220mm (8.66"). In this scale, 1:64, that translates to, in the first instance, 21' and in the second 23'. Now I don't know how I'm going to resolve this issue, but I know that I'm a looong way from having to deal with it. And Steve, please don't recede into the background! Tom
- 341 replies
-
- 2
-
-
- Sophie
- Vanguard Models
- (and 1 more)
-
OK, Steve, you're a lot further on in the book than I am. Let me catch up. Tom
- 341 replies
-
- 2
-
-
- Sophie
- Vanguard Models
- (and 1 more)
-
First, I am delighted that I've got an audience that is appreciative of my modest efforts. Thank you all for being here. Secondly, I hope Chris Watton doesn't stumble of this log and see how I'm ruining his perfect kit! He'll never sell me another thing! Steve: once I figure out the shape and dimensions of the stern area, I need to go back and reread Master and Commander to see if Aubrey provides any more detail on the rest of Sophie. We know that the "forecastle" is not a raised deck but just an area of the main deck, and that there is an elm tree pump up there as well. Big assumption, but perhaps the main yard is as supplied in the kit? Tom
- 341 replies
-
- 4
-
-
- Sophie
- Vanguard Models
- (and 1 more)
-
Holidays over, back to the shop. Making some progress, albeit slowly. I'm trying to get the stern section together and flowing smoothly. I've added the gun port patterns and one hull plank: Now I'm working on fabricating two of these: Happy new year to all! Tom


- 341 replies
-
- 10
-
-
- Sophie
- Vanguard Models
- (and 1 more)
-
Untangling and rerigging or start from scratch?
TBlack replied to Rgpracer's topic in Masting, rigging and sails
Msgt. Ray, Mark makes a good point. How far down the rabbit hole do you want to go? Yes, the forestay and preventer stay is rigged incorrectly, but will your audience know the difference? I stand by my previous recommendation. Do a little trimming and tightening; fix the masts. It will pass muster. Don't make perfection the enemy of the good. As an aside: I'm thinking, Master Sergeant, fighter aircraft. Does that mean Marines? Tom -
Untangling and rerigging or start from scratch?
TBlack replied to Rgpracer's topic in Masting, rigging and sails
Ray, I’m going to depart from the considerable wisdom and advice given by Roger and Druxey. I had a similar problem a few years ago (see log Researching St. George) where the bowsprit and attendant rigging was a tangled mess. That area I cut away and redid from scratch. The rest of the rigging I left in place and tightened it up. My reasoning was that I didn’t want to add work if I didn’t have to. Your situation looks like the main mast and rigging needs a redo. However, it looks like you can save the lower shrouds. Hard to tell from the photo what the main top shrouds look like. BTW, when you go to buy the Q tips be careful; they sell 2 kinds. The one to avoid is the one where the stem has break away joints. The least little pressure and they break in your hand. Most frustrating! Also, Mark’s suggestion is spot on. Longridge’s book would be helpful, and there are many build logs on this site that may supply help. In the search box (upper right) type in Victory. Tom -
Mark, If it's any consolation, I would have done that job in the same order. Tom
- 505 replies
-
- 3
-
-
- vanguard models
- Sphinx
- (and 1 more)
-
Andy, Do you suppose the pictures are too large for the program? Tom
-
Mark, That was a fast turnaround. Impressive recovery; you must be one solid fella! Tom
- 505 replies
-
- 2
-
-
- vanguard models
- Sphinx
- (and 1 more)
-
I think it looks terrific! Nicely painted, crisp, good contrast. Bravo Zulu! As I recall, your surgery was scheduled for the 16th, All done? And already back in the shop! Tom
- 505 replies
-
- 5
-
-
- vanguard models
- Sphinx
- (and 1 more)
-
To all who have posted "likes" and especially you 9 who are following my modest attempts I wish you a joyous Christmas day and a productive modelling new year! Bless you all. Tom
- 341 replies
-
- 3
-

-
-
- Sophie
- Vanguard Models
- (and 1 more)
-
Mic, Delighted to have you aboard! A French influence is always welcome. Are you modelling anything? Tom
-
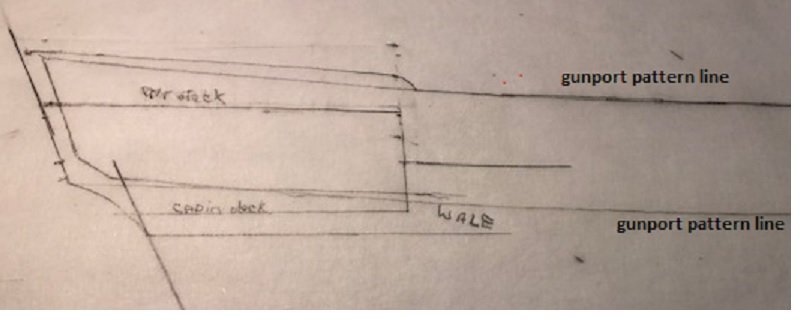
With reference to my post #37, dealing with the gun port pattern, I decided to do a little drafting to see the magnitude of the issue: Fortunately, I don't have to do any cutting; it's more a question of adding a little bit at the top, and more at the bottom.
- 341 replies
-
- 5
-
-
- Sophie
- Vanguard Models
- (and 1 more)
-
Keith, Your fingerprints are all OVER this website, which suggests to me that you got all the social gracious genes in the family. But it doesn't stop there. This piece of art is at a scale of 0.1": 1' if I remember correctly. I don't know how you do it. To Iraymo: Keith and I were long tucked in for the night when that happened. I can tell you that, fortunately, the double door to the hall was 2" too narrow to allow the escapade's conclusion. But we woke up the next morning to find the Jeep on the porch. Now, Keith was quite young at the time, so he may not remember this.
-
Hi Keith, The windows I've drawn, above, include the sash. Yes, I could make the space between the windows smaller, but then the whole transom would not be as wide. That would fix my issue of not too much transom sticking out from the hull (think Fair American). But then it would really depart from the picture in post 33. Either way I go, I'm wrong! I think I'll just let it be as you see it and plunge onward. Tom
- 341 replies
-
- 3
-
-
- Sophie
- Vanguard Models
- (and 1 more)
-
Keith, Or are you suggesting I should make the whole thing smaller? Need to think about it overnight. Tom
- 341 replies
-
- 2
-
-
- Sophie
- Vanguard Models
- (and 1 more)
-
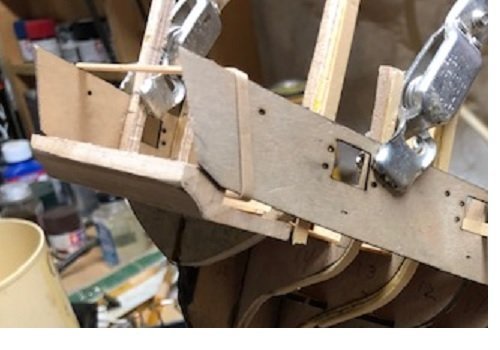
Keith, I think the piece is wider than in the picture, but I didn't want too much of the transom ends sticking out from the hull: With reference to the picture (post 33) where the quarterdeck bulwark meets the transom, from that point on the transom, drawing a line straight down, that line crosses the window (#2 in from the outboard side) about 1/4 to 1/2 of the width of that window. As you can see from the photo above I've got the bulwarks hitting the corner of the outboard window. So, I'm making the transom wider than in the picture, but, as I mentioned, I don't want too much transom ends out there flapping in the breeze. It looks unsightly.
- 341 replies
-
- 3
-
-
- Sophie
- Vanguard Models
- (and 1 more)
-
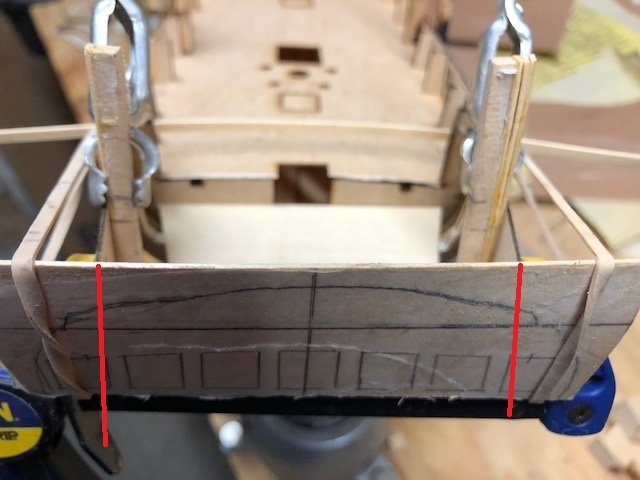
Keith, Here's how that piece fits: Ideally, the bottom of the pattern should be along the bottom of the counter piece. Moving the pattern down, lowers the gun port, #6, at the far right too close to the main deck. So I can't move anything forward of gun 6. I don't care about gun port #7; it gets covered up (gun 7 is on the quarterdeck). Cutting the pattern aft of gun 6 is ok; it just means I have to cut planking stock the same thickness as the pattern, no problem. The tricky part is getting the new sheer line smoothly executed.
- 341 replies
-
- 4
-
-
-
- Sophie
- Vanguard Models
- (and 1 more)
-
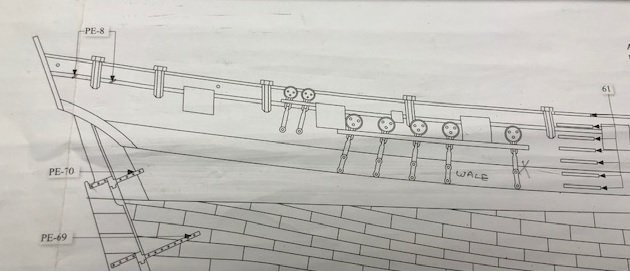
I'm just thinking out loud here, but it helps to clear my head. The gun port pattern, provided in the kit, sweeps upward toward the rear: On the Sophie there is less sheer at the aft end (see photo in post #33), so I think I need to cut the pattern just aft of gun port 6 which is also where the quarterdeck starts. I hate making these irreversible decisions; maybe I'll sleep on it.
- 341 replies
-
- 4
-
-
- Sophie
- Vanguard Models
- (and 1 more)
