
HOLIDAY DONATION DRIVE - SUPPORT MSW - DO YOUR PART TO KEEP THIS GREAT FORUM GOING! (Only 13 donations so far - C'mon guys!)
×


TBlack
-
Posts
1,308 -
Joined
-
Last visited
Content Type
Profiles
Forums
Gallery
Events
Everything posted by TBlack
-
 well that all fits! Lookin' good! Tom
 -
Nipper! Thanks so much for your kind words. I guess I've shown that one doesn't need fancy CAD programs to get a smooth result. Also, my last project (Scud) was greeted with some derision (why bother? Waste of time and talent) until the end (see log). Moral of the story? Don't rush to judgment. Anyway, you and the other 18 people who are following this keep me going and trying my best. Thanks for that. Gregory, I intend to do just what you suggest: 5 real windows and 2 fake. That arrangement will agree with the picture of the stern of the cover of the book. We had some discussion here on the impossibility of having 7 windows in the cabin given what the picture shows of the hull shape (please see post #84), and certainly there are no quarter galleries. Thanks, also, to the others for the "likes", especially my brother, Keith, whose talents and encouragement keep me going! Tom
- 341 replies
-
- 4
-

-
- Sophie
- Vanguard Models
- (and 1 more)
-
Small up-date, but life sometimes interferes with ship building: Having built the hull to its new configuration, I'm now trying to follow Chris Watton's excellent instructions on building out the model. One deviation is the placement of the wale, which I think I've figured out to my satisfaction: I only, belatetdly, realized that I don't need to make the wale out of the very nice pear wood supplied, inasmuch as it gets painted black in the end. Next layer will be something less grand. Next step is the garboard and then figure out the plank spacing in between. Tom
- 341 replies
-
- 8
-
-
- Sophie
- Vanguard Models
- (and 1 more)
-
Peter, Thanks for your interest and suggestion. I'm kinda constrained by the parameters of the kit and any descriptions that I glean from the book. I figure nobody can tell me I'm wrong. Tom
- 341 replies
-
- 3
-
-
- Sophie
- Vanguard Models
- (and 1 more)
-
Bulkheads from solid wood
TBlack replied to Burroak's topic in Building, Framing, Planking and plating a ships hull and deck
Greg, I've used both without ant adverse effects. If the bulkheads are of solid wood, and you put supporting blocks between the bulkheads and then plank the hull, there would be little room for the bulkheads to get out of alignment. Plywood would be more stable, but may not be necessary. Tom -
Dear Mark, Perseverance will save your day. You've got it! Keep going! Tom
- 505 replies
-
- 6
-
-
- vanguard models
- Sphinx
- (and 1 more)
-
Eric is also on youtube. TB
-
Alan's quote: I learnt the term "preacher " versus "farmer" pencil yesterday morning on television watching the master woodworker from Eureka California. OK, Alan, and if he cracks you up, perhaps you'd share with us his entertaining link. Tom
-
Nice, tight fit. Lookin' good!
-
Keith, You zipped passed the manufacture of the prop pretty quickly. I would imagine the machining of the basic shape is a little tricky. Wefalk, wouldn't the keels provide some protection for the shaft/prop assembly? Tom
-
Michael, Windows in the new workshop! Most impressive. I'm jealous. Tom
-
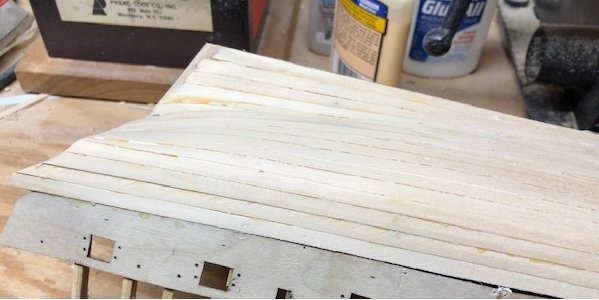
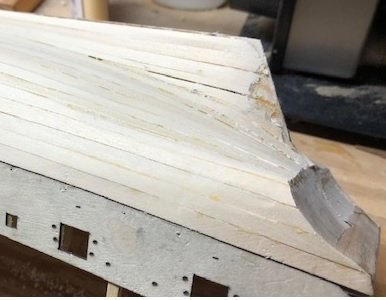
Hi Keith, Yes, getting the hull shape was the biggest hurdle. Adding the captain's cabin, and the quarterdeck should be straightforward. Otherwise, it's just build out the kit (maybe I'll see some places where I can augment or improve). For now it's a question of sanding down those first planks. Unaltered, the first planks and the finish planks together are 1/8" thick; too much for my eye, so lots of sanding. Thanks to all of you who are following along and adding "likes". Most humbling! Tom
- 341 replies
-
- 4
-
-
- Sophie
- Vanguard Models
- (and 1 more)
-
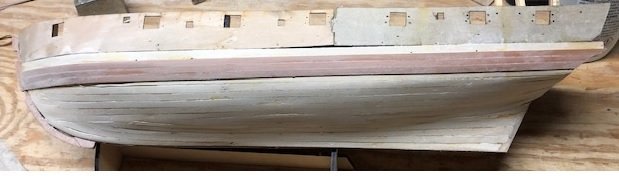
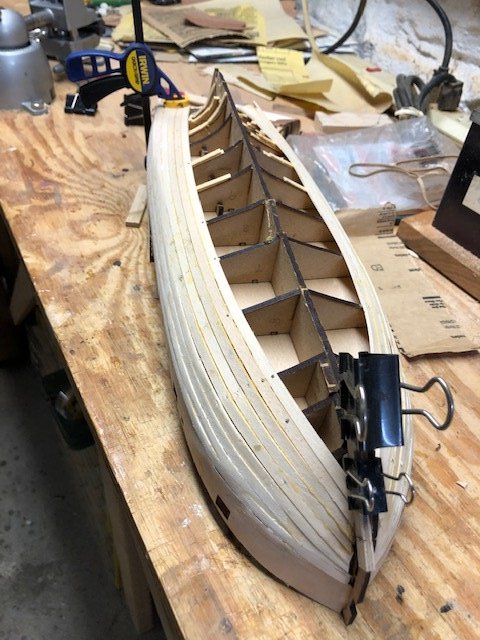
First planking done. Sanding, sanding, sanding. But, If you will recall, my biggest question was how to achieve a smooth hull shape aft with no plan to guide me. I'm happy with how it turned out:
- 341 replies
-
- 11
-
-
- Sophie
- Vanguard Models
- (and 1 more)
-
Nice looking flags. And I'm jealous of the fact that you have windows in your workshop! Tom
-
AON, Well, she sounds English, so she must know more than I do. Anyway, a neat little site. Tom
-
Given the weight of the schooner, and the weight of the launch, I doubt that the C of G or Metacentric height is altered significantly. I think deck access is more important. Tom
-
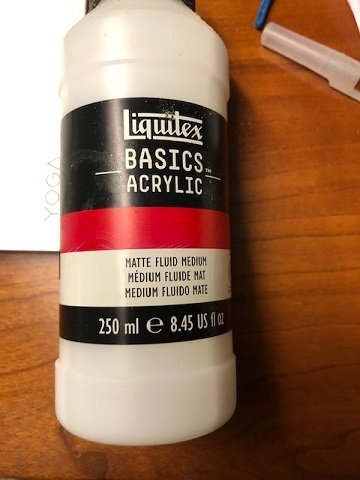
Keith, If you go to Amazon, and in the search box type: Liquitex matte fluid medium, you'll see the bottle. I think it qualifies as a paint. It dries clear, and acts like a glue. Tom
-
Keith, Polyester line; try this as glue on that line. It dries clear, and is thin viscosity.
-
Keith, I've done the weaving of the ratline, using a sewing needle, with some success. Not sure I understand the gluing issue, but with a bit of diluted PVA on the end of a straight pin at the right spot, then align the ratline; on to the next one. TB
-
Keith, I salute your caution and applaud your plan. I think you are going to find out that you can do it. Tom
-
I haven't put anything on this log for the longest time. Didn't want you to think I'd quit. I'm doing the preliminary planking which, for me, is slow going. I cut the angle at the bow; I cut the length; then the plank gets soaked in water until saturated. The plank is then placed on the hull and clamped down to dry. Once dry it can be glued in place. All this means that I can do about one plank per day....I told you it is slow going, but it works for me. In the meantime, I can put together gun carriages and other deck accoutrements.
- 341 replies
-
- 9
-
-
- Sophie
- Vanguard Models
- (and 1 more)
-
I thought about just doing a "like", but thought you'd miss my point. This is a great idea. Thanks, Mark! Tom
- 505 replies
-
- 5
-
-
- vanguard models
- Sphinx
- (and 1 more)
-
That's what I was hoping Keith was going to do. I've done it several times on small scale. BTW, I'm delighted that Rob, who is much more accomplished than I, agree on this small aspect. Tom
-
And I hate to mention it, Keith, but knots at this scale are going to be an issue - size wise. Tom
