TBlack
-
Posts
1,311 -
Joined
-
Last visited
Content Type
Profiles
Forums
Gallery
Events
Everything posted by TBlack
-

SS Vinal Haven by TBlack - FINISHED
TBlack replied to TBlack's topic in - Build logs for subjects built 1851 - 1900
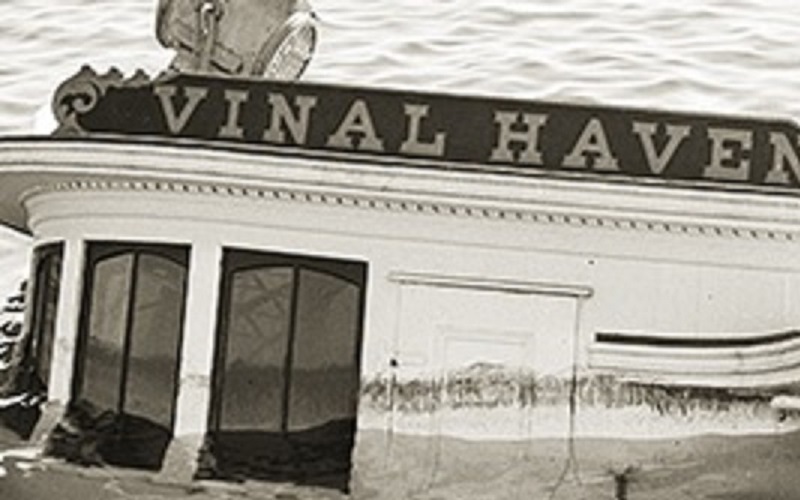
Bob & Michael. I'll grant you that the middle window of the first picture looks like it might be in 2 planes, but look at the window next to the door above; it's flat. And, I'd argue, so is the middle window above or else the reflection wouldn't be consistent on both sides of the mullion. So how about we compromise and make the 4 windows on either side of the center window in 2 planes and the remaining 3 windows flat? Tom -
SS Vinal Haven by TBlack - FINISHED
TBlack replied to TBlack's topic in - Build logs for subjects built 1851 - 1900
Michael, Now I know you want that beer! But doesn't your approach end up with a window with an angle in it? Look at this picture; the windows look flat to me.
-
SS Vinal Haven by TBlack - FINISHED
TBlack replied to TBlack's topic in - Build logs for subjects built 1851 - 1900
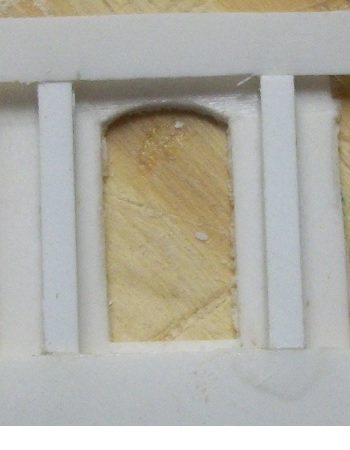
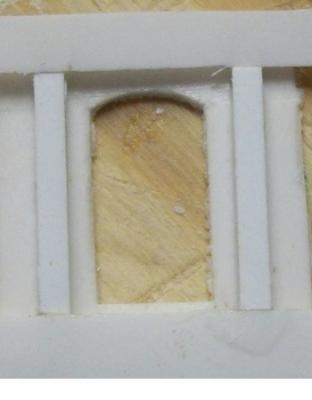
Michael, Art Downes, Paddlewheels on the Frontier check on Amazon; readily available for little money. I'm new to this styrene stuff and am just learning how to handle it. I haven't tried the scraping yet, but it's in my future. Here's the close-up of that moulding around the roof. Also, notice the window insert; on the sides, it's maybe an inch wide? My first shot at casting those had them showing too much around the edges (see photo back a couple of entries). So, I've got to re-do those as well. But I think this is going to be doable. The end result, I hope, will be a lighter, thinner structure than building up in pieces. Tom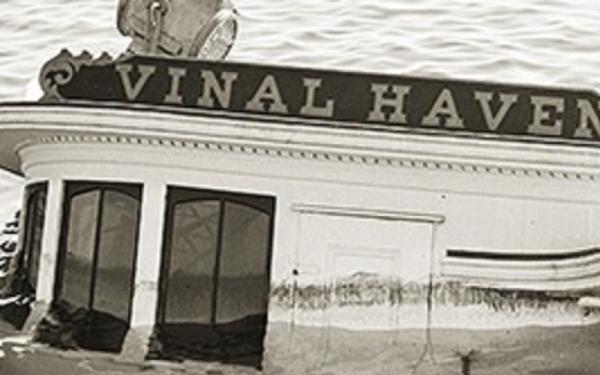
-
Meredith, welcome back to good health! I know nothing about stains/paints, so I can't be much help there, but your joinery work looks first rate! Good luck with this; it seems to turn into a proud little ship. Tom
-
SS Vinal Haven by TBlack - FINISHED
TBlack replied to TBlack's topic in - Build logs for subjects built 1851 - 1900
Popeye, I don't know what kind of an idea it is, but it's different! Love your yacht America! Meredith, Thanks for looking in. Somewhere on this site is a thread about why we build the ships we build. I can tell you that I'm doing this as a break from tying ratlines, and I wanted to do something with a state of Maine background. And I can draw up the plans either, so I just throw myself at the mercy of my community (please see M. Mott's entry above). This is a great place. Interesting place you come from...can you give me a phonetic spelling? Tom -
SS Vinal Haven by TBlack - FINISHED
TBlack replied to TBlack's topic in - Build logs for subjects built 1851 - 1900
Thanks guys, I did actually manage to break the rib...glad I've got spares! Anybody know how long it takes to fix these things? Michael, I woke up this morning at 2:00 AM with the realization that you've put quite a lot of thought and work into my project. I'm not sure I thanked you adequately in my last message. I think the uprights are narrow enough that they won't need "rounding". But the rabbet concept is brilliant!(If Andy's reading this, it's a wabbit!). When I'm next up in the Edmonton area, I'll buy you a beer! Tom -
SS Vinal Haven by TBlack - FINISHED
TBlack replied to TBlack's topic in - Build logs for subjects built 1851 - 1900
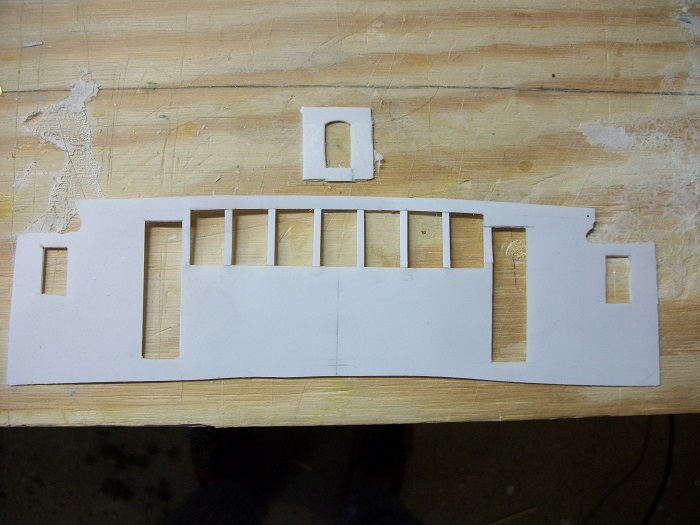
I've had slow going on the pilot house. In part, because I was trying to make it out of one piece, and in part because I fell off the back porch and busted a rib and bashed my face up really good. Any way, after several failed attempts I realized the pilot house skin had to be in several pieces. The really tricky part is the dividers between the windows. They are thin and close together and so ANY deviation from parallel or thickness stands out. Easier to do them separately. So that's what I did. What I didn't do, and should have, was, as Michael has just suggested, to allow for a rabbet on the inside of the window partition for the inner liner. that can be fixed. On the subject of maintaining the curve, I think I can take the wooden plug and cut off the bottom up to flush with the bottom of the 2 doors (about 3/8") and use that to maintain the proper shape along the bottom. A thinner one around the roof ought to take care of the top. Once I put the interior paneling in place the walls ought to be stiff enough to carry the roof without bowing? The styrene is .030" thick. And Michael, I'm all over that 1/2 round under the windows. It's the moulding at the roof that is more interesting. David Antscherl gave me a tip on how to approach it; let's see if I can carry it off!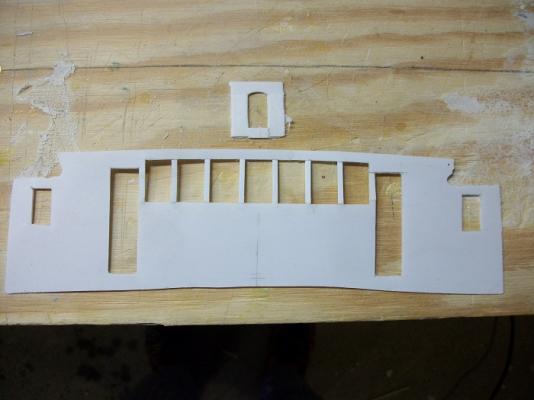
-
Len, Thanks for putting this back. As I recall, you provide a lot of very useful information and experience. One thing, back in your first post you mentioned that you bought sheet stock from Cornwall. I'm assuming that you did that to get lumber dimensioned in mm rather than in.? Sorry to miss you at RI, but I know it's a long haul for you. During the event the various ship model clubs were called away for a group photo. At the next event we could do a MSW group photo as well! Tom
-
Volume 4? Does that mean that you have the previous 3 volumes? David is around here somewhere; bet you could get him to sign it! Also, this book is focusing on what you call "the dark side" (I'd call it freedom!); does that mean that you're getting closer to the edge? Tom
-
SS Vinal Haven by TBlack - FINISHED
TBlack replied to TBlack's topic in - Build logs for subjects built 1851 - 1900
Thanks, Andy, I'll give it a try right after I fix the garage door opener. And I read your entry about how the Engineers saved the day! Tom -
SS Vinal Haven by TBlack - FINISHED
TBlack replied to TBlack's topic in - Build logs for subjects built 1851 - 1900
Thanks, Andy, but what about the uprights between the windows? Are they going to be misshapen in the process? BTW, when I mentioned your 2 options, my wife immediately thought the hot water technique was preferable (she has no idea), but she wasn't going to give up her hair dryer! Does this reply mean you're back home? Tom -
SS Vinal Haven by TBlack - FINISHED
TBlack replied to TBlack's topic in - Build logs for subjects built 1851 - 1900
OK, sounds intriguing. And the styrene will hold its shape when dry, right? Also will the uprights between windows wrinkle in the heating process? Notice how thin they are in the photo. Tom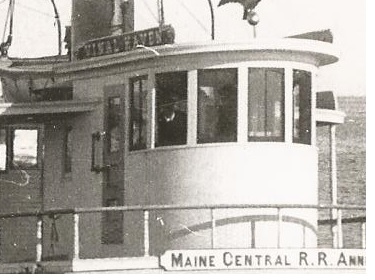
-
SS Vinal Haven by TBlack - FINISHED
TBlack replied to TBlack's topic in - Build logs for subjects built 1851 - 1900
OK John, I get it, but my mandrel is wooden does wood ignite before styrene melts? Do we have any chemists on this board. Oh, wait, yes, we have Themadchemist! I definitely need professional help! -
SS Vinal Haven by TBlack - FINISHED
TBlack replied to TBlack's topic in - Build logs for subjects built 1851 - 1900
I'm not sure I understand about the heating thing. How do you apply that and how hot does it need to be? Tom -
SS Vinal Haven by TBlack - FINISHED
TBlack replied to TBlack's topic in - Build logs for subjects built 1851 - 1900
OK you guys, but if it doesn't work it's your fault and if it does work I get the credit! Anyway, can't do anything about it until Sunday. Tom -
SS Vinal Haven by TBlack - FINISHED
TBlack replied to TBlack's topic in - Build logs for subjects built 1851 - 1900
Thanks, guys, but I'm still a little hesitant. I want to build the exterior of this pilot house out of one piece of styrene. I'm told, however, by experts who have gone before me that I should build it up piecemeal. I'm either a fool or a genius! -
Dan, Whoa! huge improvement! lookin' good! Yes, they probably are line brakes; I'm a dinosaur and used to cleats. See you Sat. Tom
-
Dan, I'd echo Druxey's comment. Also, when I look at the photo of the actual boat it looks like the forward part of the handhold is even with the forward edge of the short skid pad. So maybe your holds need to be longer? Or it may just be the perspective that is throwing me off. Also, and this is not about the model, but on the boat, the lines coming through those jam cleats look awfully small for that size rig, and would be hard to haul on? Tom
-
SS Vinal Haven by TBlack - FINISHED
TBlack replied to TBlack's topic in - Build logs for subjects built 1851 - 1900
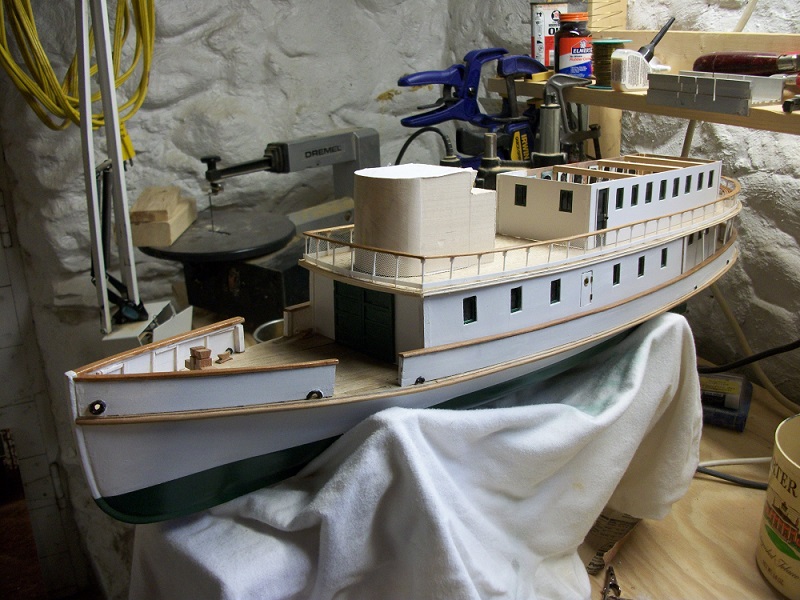
I decided to build a "plug" (think ship's boat construction) around which to build the pilot house. It also serves to show the massing of the houses to make sure it all will look like the photos.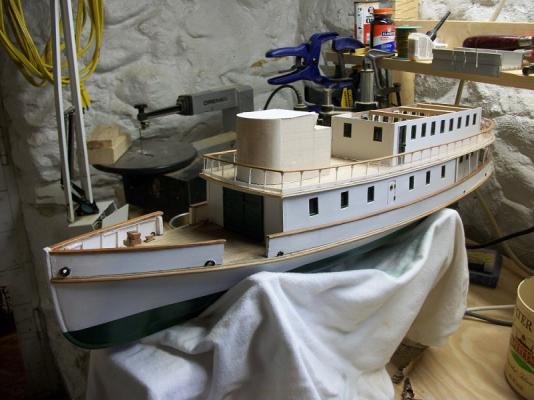
- 326 replies
-
- 3
-

-
- vinal haven
- steam ship
- (and 1 more)
-
Steve, I did an Aeropiccola version of the frigate Essex back in the late 80's. It was very similar to what Pierre has mentioned: hard to determine scale; and, as you've pointed out, the head rails and stern detail were all pressed wood. I would encourage you to throw those parts away and build those areas up on your own. It's not that difficult, and there's a lot of help here. You will be happier with the result. Anyway, go to it! we're all cheering you on! Also, you've got a good start with a smooth looking hull! Tom
-
Popeye, I'm just catching up with your wonderful accomplishments with this build. She looks very yar! I'm not sure I understand your unhappiness with the anchor arrangement. I don't believe a boat that size would have had hawse holes in the hull, and the arrangement that you've shown is the way I've seen it in my experience. The only thing lacking is a couple of fairleads (chocks) mounted on the cap rail near the stem (they keep the anchor chain from chewing up the rail and they also keep the anchor road coming off the bow as the ship swings to wind/tide.) Tom

-
Sarah, Nice work, especially at that scale. I particularly liked the furling job...very neat! Your logs are fun to follow not only to see your work, but the repartee is especially entertaining. Don't focus so much on the moderator work that you neglect to post entries! I hope you're not moving far...not out of the Seattle area? And a TINY Missouri? How tiny is tiny? Tom
- 160 replies
-
- 1
-
-
- harriet lane
- model shipways
- (and 1 more)
-
Homemade Rudder Hinges
TBlack replied to lamarvalley's topic in Metal Work, Soldering and Metal Fittings
Well Randy, whatever, you're a champ! -
Enemeink, Glad to have you back for very selfish reasons. My first scratch build attempt was this craft, so, sentimentally, it's close to me. It looks like you've been able to overcome some terrible manufacturing problems, and your results look very smooth. One of the things I discovered in my research is that there are two long guns also included in the armament. I could never figure out where they would go that would allow for their recoil. There is a model of the Prince in the Smithsonian done by Merritt Edson; he couldn't figure it out either and also left them off his model. I think I showed you the bow escutcheon back in version 1.0; I'll do it again when you get to that point if you'll remind me. Tom
-
SS Vinal Haven by TBlack - FINISHED
TBlack replied to TBlack's topic in - Build logs for subjects built 1851 - 1900
Thanks, John, Adrieke, and Michael. Michael, my brass work is merely paint; yours is art. As I recall, you live just west of Toronto on a lake where your craft will get its trial run? Do your neighbors know of the talent in their midst? Thanks for keeping us all in awe. Tom