usedtosail
-
Posts
2,421 -
Joined
-
Last visited
Content Type
Profiles
Forums
Gallery
Events
Everything posted by usedtosail
-
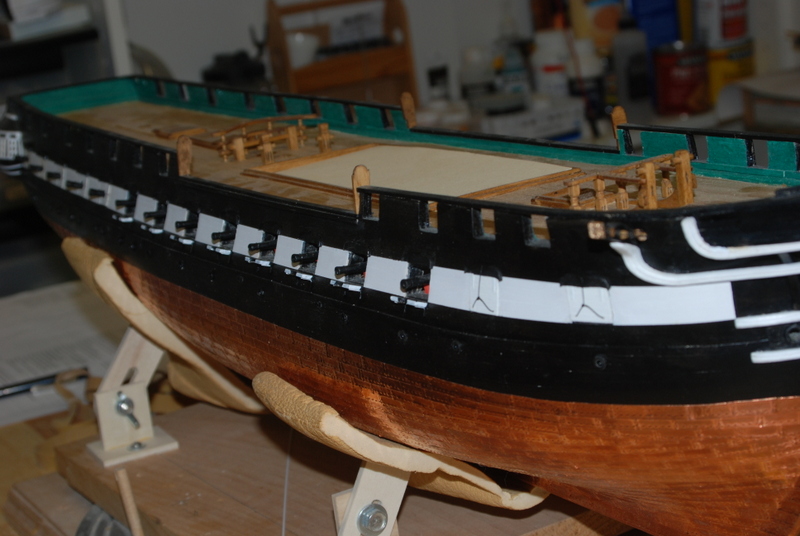
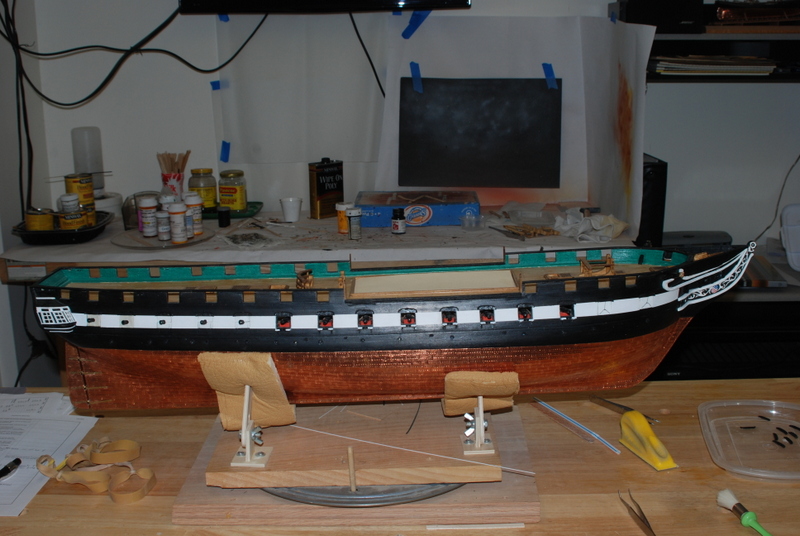
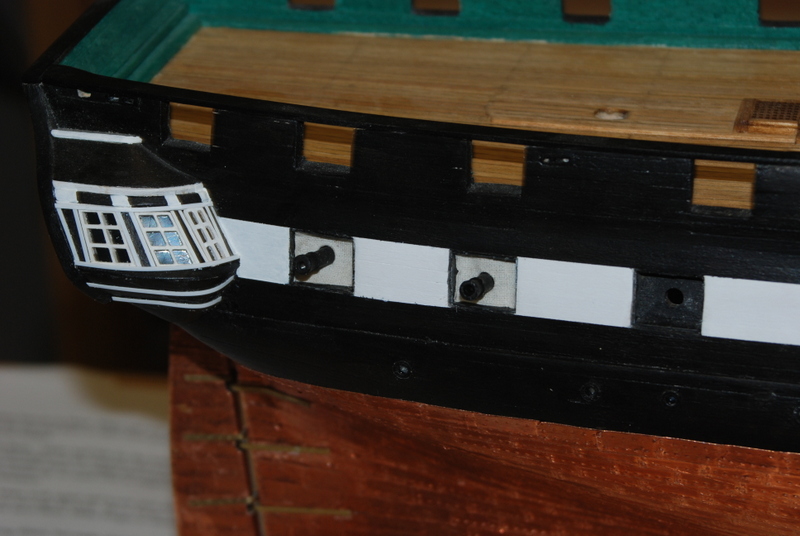
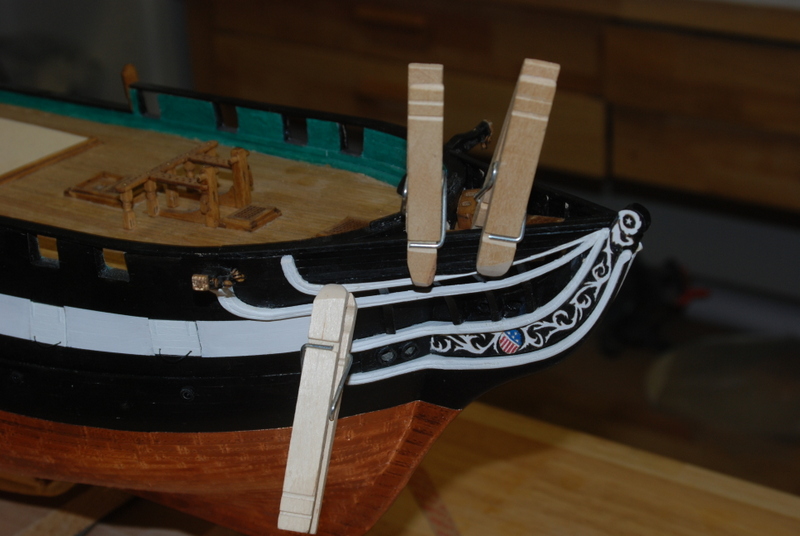
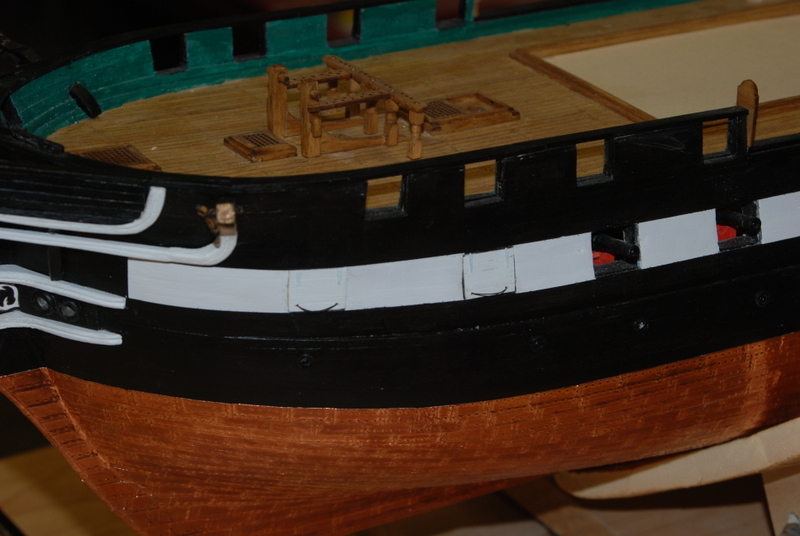
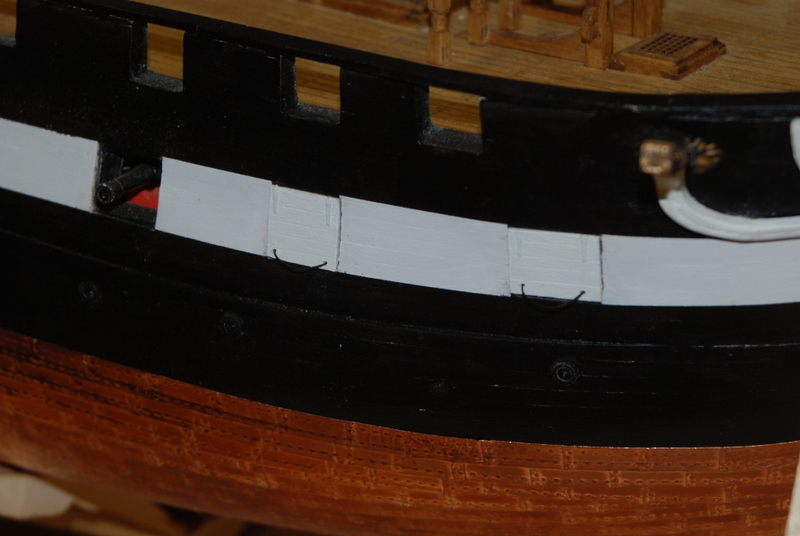
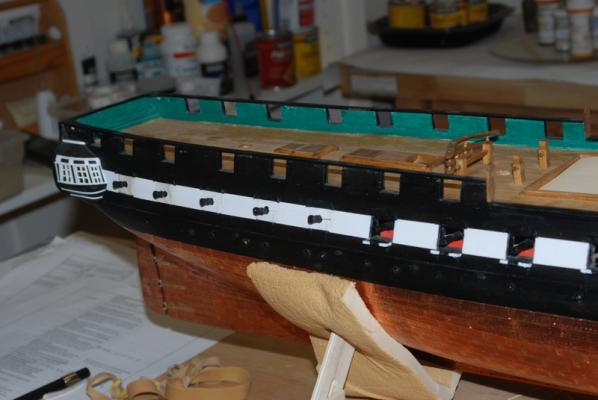
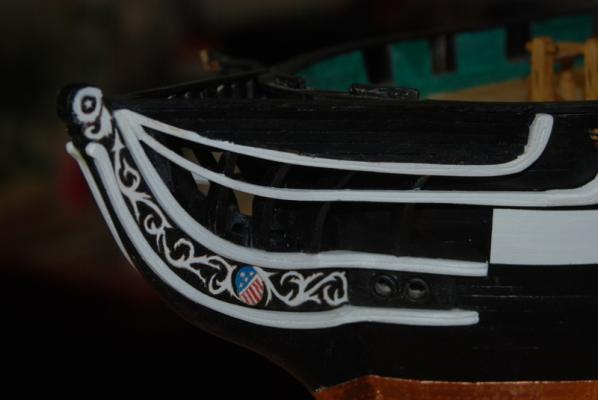
 The gun port lids are just about finished. I have all the lids glued in place and the starboard side rigols are all installed too. I have some touch up to do on the port side and some rigols to still install. Here is how the starboard side came out, with the different lid types. I went with white edges on the open port lids, so they are more pronounced.
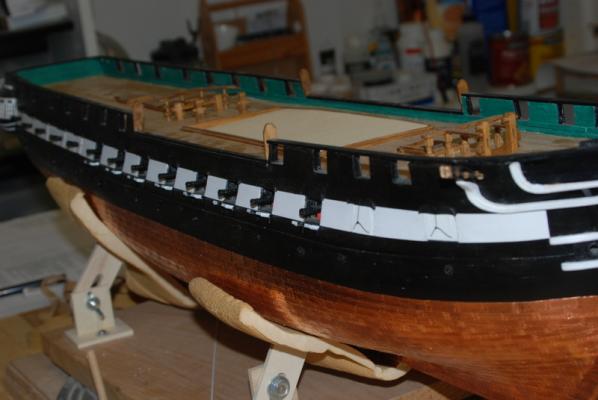

- 1,354 replies
-
- 13
-

-
- constitution
- model shipways
- (and 1 more)
-
I'd be happy to help, Greg. Do you have a build log going yet?
- 1,354 replies
-
- 1
-
-
- constitution
- model shipways
- (and 1 more)
-
Greg - ask away. I will always answer if I can. I made the sides of the gun ports parallel to the bulkheads, so they were always straight up and down. The tops and bottoms tilt according to the curve of the deck, but it was never by very much if I remember.
- 1,354 replies
-
- 2
-
-
- constitution
- model shipways
- (and 1 more)
-
You want those back pieces to be vertical, or else your barrels will be pointed to the sky. Use a thicker piece for the bottom then the top like it shows in the picture from the instructions that you posted. And I did have to shave those pieces down for the first ports in the bow.
-
That's what it looks like it does, so that makes sense.
- 1,354 replies
-
- 2
-
-
- constitution
- model shipways
- (and 1 more)
-
Cutty Sark by NenadM
usedtosail replied to NenadM's topic in - Build logs for subjects built 1851 - 1900
That is a funny story Nenad. Your stand looks beautiful, too.- 4,152 replies
-
- 6
-
-
- cutty sark
- tehnodidakta
- (and 1 more)
-
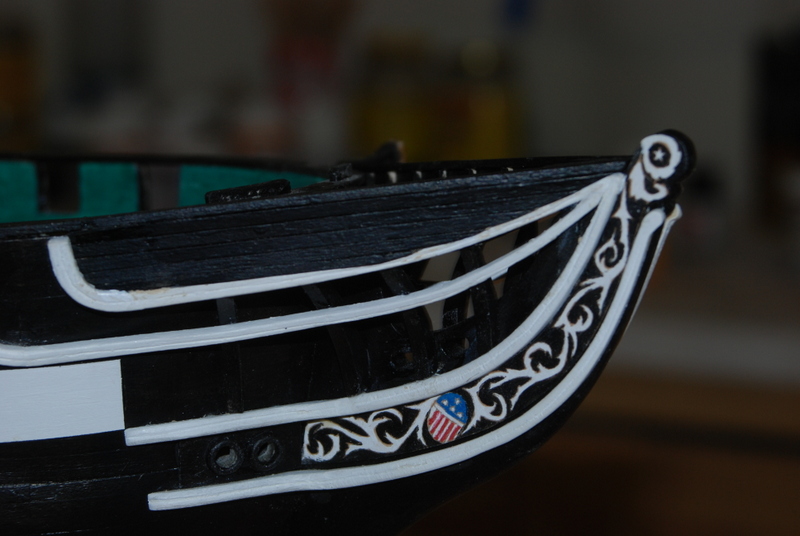
Thank you George, the Popeyes, and Greg, and the likes. Thanks Henry for the name of those things. Rigol sounds so much better. Do you know if these pieces were purely decorative or did they have some other purpose?
- 1,354 replies
-
- 3
-
-
- constitution
- model shipways
- (and 1 more)
-
Yep, that's what I saw too Ken, there is a good side and a bad side to those grates. I just didn't realize the bad side was supposed to be the good side. I did use the better looking side for all mine.
-
Thanks Boyd. I am certainly in no hurry with this build and I enjoy looking ahead, but I can't look too far ahead or I get depressed. Work on the gun port lids continues. First, here are the two full port lids on each side with their draw lines installed to open them. I went with a modified version of the lines on the current Conny. I glued the top lines onto the back of the eye brows after threading them through the holes. I then glued the eye brows in place, and tied the other end of those lines to the lines running into the bottom corners of the lids. The remaining eye brows (there has to be a better term for these, no?) are all going over half ports or canvas covered ports which do not have draw lines. So I first primed them, which involves a pickling step in white vinegar before painting with primer. I then filled the holes with wood filler and smoothed the filler out after it set for a few minutes. When the filler was fully dry, I gave the parts two coats of black paint. Here they are with some of the half port lids currently being painted. These are the remaining port lids for the starboard side and are ready to install. I already installed four of these on the starboard side. These use the L shaped hinge brackets I made which worked really well to support these half lids. They provide supports like shelf brackets while I was still able to glue the back edges of the ports to the hull. Between both attachments, these seem very sturdy. I will have pictures of these installed in a future post. I went ahead and made all of the hinge brackets for the port side and blackened them. I also cut all of the wood pieces for the port gun lids and have started adding the hinges to them and will start painting them soon. I have been going back and forth on the canvas coverings for those gun ports near the galleries, as you can see by the previous posts. I tried making the frames last night from manila folder material, but could not get them to look good, especially the circular sections. I then tried some thin styrene strip, thinking I could use that for the straight sections of the frames and come up with something for the circle later. I removed one of the canvas covers from the model and glued styrene strips to the four edges to see how this might look as a frame before adding the diagonal pieces. I placed it into the gun port opening and was not happy with the look at the joints of the frame pieces. I then thought to try turning the piece around with the frame on the inside of the port hidden by the canvas, fit into the rabbet around the port. I was really happy with this look, and removed all of the canvas covers and framed them this way. Here is how they came out and here is how they are going to stay. I think this is a nice compromise between what may have been and what I can make look have way decent. The edges look much better than the raw fabric edges that I first had. I do really appreciate the suggestions so please keep them coming, even if I don't always follow them. They do push me to do better.


- 1,354 replies
-
- 10
-
-
- constitution
- model shipways
- (and 1 more)
-
Ah, I see you did get some work in yesterday. I feel better now. I am confident you will come up with a very convincing solution for those windows.
-
Thank Nenad. I have taken great inspiration from your Cutty build. Dan, I am going to try to replicate that framing but it may be beyond my abilities, especially that circle in the middle. I am going to reproduce it on the computer then print it out on some manila, and hopefully be able to cut out the middle sections. Then I can glue it to the stiffened sail cloth. We will see... Popeye - I saw all your likes yesterday and could not believe you where going through it all at once. You should have been using your valuable time on all the models you have going at once . Thank you though and I am glad to have you on board. My daughter is working at Dartmouth Hicthcock Hospital so she moved to Lebanon, NH. It is a good distance I think - not too far but not too close either. We are going up Saturday to help her buy her first car that will be in her name. She is very excited.
- 1,354 replies
-
- 3
-
-
- constitution
- model shipways
- (and 1 more)
-
Oh, that picture is worth a lot. I totally misinterpreted the original. That said, here are the other two pictures referenced. The first one here looks just like the picture you sent with no gun. The bottom one looks like it has a gun in it. So I guess that hole would allow a gun to poke through. I like the frame though and will attempt to recreate that look. Thank you very much.
- 1,354 replies
-
- 5
-
-
- constitution
- model shipways
- (and 1 more)
-
I got mine from MicroMark: http://www.micromark.com/magnetic-gluing-jig-10-1and4-inch-square,7038.html
-
Thank you Dan for the details on the flag. I like that method a lot and will be trying it in the future.
- 108 replies
-
- 5
-
-
- andrea doria
- ocean liner
- (and 1 more)
-
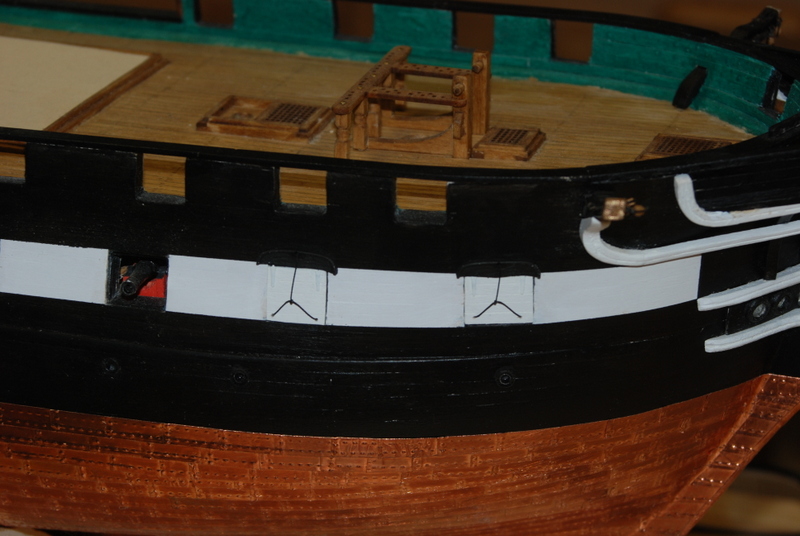
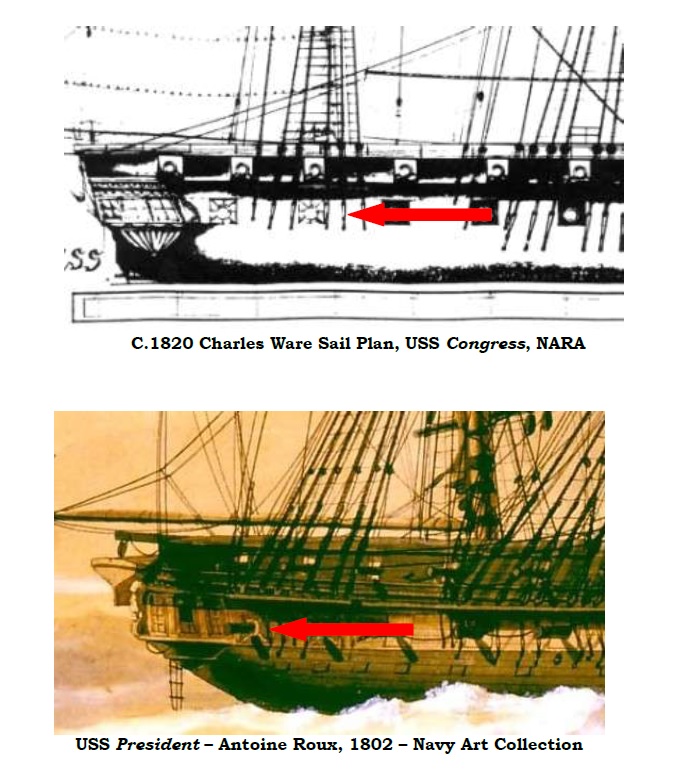
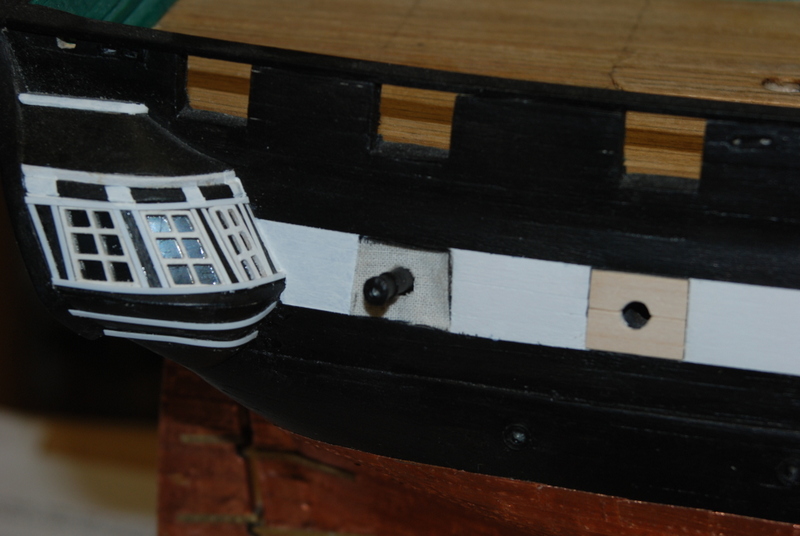
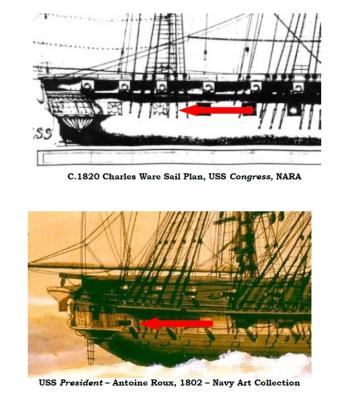
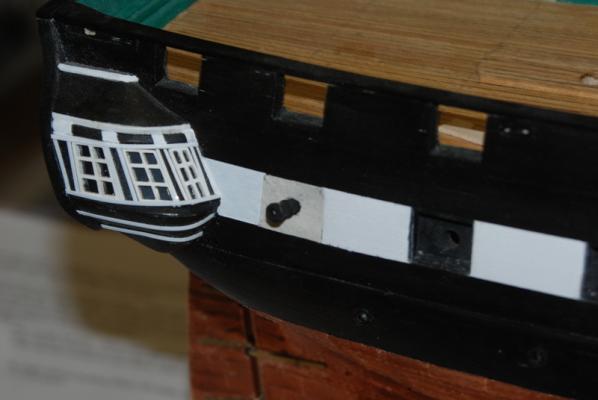
Ken and Dan , thank you for the encouragement. It means a lot to me. Ken, I'll have to look for the Admiral's iron to try that. It doesn't get used much these days. Dan, here is one of the pictures I have been working off for the canvas covers. You can see a hole in the center with the gun sticking out. The others show the same thing. In the text it says this: The canvas covers in the captain’s great/forward cabin gun ports would have kept out some water when sailing in general or light weather, but more important, would have allowed diffused light to enter the cabin during all daylight hours, no matter the weather. If the weather was really inclement, likely half ports could have been fitted into the ports to secure them from heavy seas. No mention if they could be rolled down, but with the gun there it might have been difficult. These guns may have been stowed inside, but I am depicting this just before battle with some of the guns run out so I am thinking they would maybe in this position.

- 1,354 replies
-
- 4
-
-
- constitution
- model shipways
- (and 1 more)
-
Congratulations Dan. This was a great build to follow along. You should be very proud and your client should be very happy. I am a bit curious about how you made the flags. Could you elaborate on how you skewed the flag image, please. Also, it sounds like you printed directly to the silkspan. Did you use an ink jet printer for that? Thanks.
- 108 replies
-
- 3
-
-
- andrea doria
- ocean liner
- (and 1 more)
-
Yes, those column really make a nice addition. Great job.
-
Ken, nice job with those deck beams. It makes all the difference having them match the grates.
-
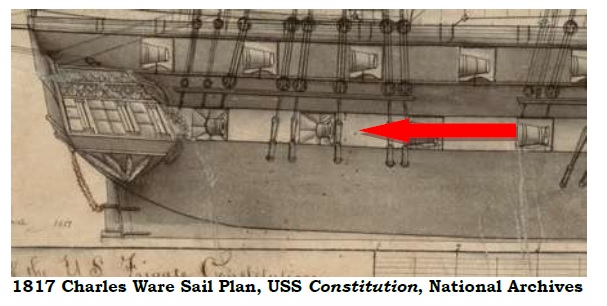
Yes Tom, there is a curve to the deck. It is higher in the stern and bow than in the waist. You can see this on Plan Sheet 4. The top diagram is a side view of the deck and it shows the curve of the deck.
-
Greg, my first thought was to make a frame inside the rabbet, but the frame stuck out too much from the side with the cloth behind them. I would need a deeper rabbet around the gun ports. I didn't think about a frame inside the gun port, though. I may try that. Thanks.
- 1,354 replies
-
- 1
-
-
- constitution
- model shipways
- (and 1 more)
-
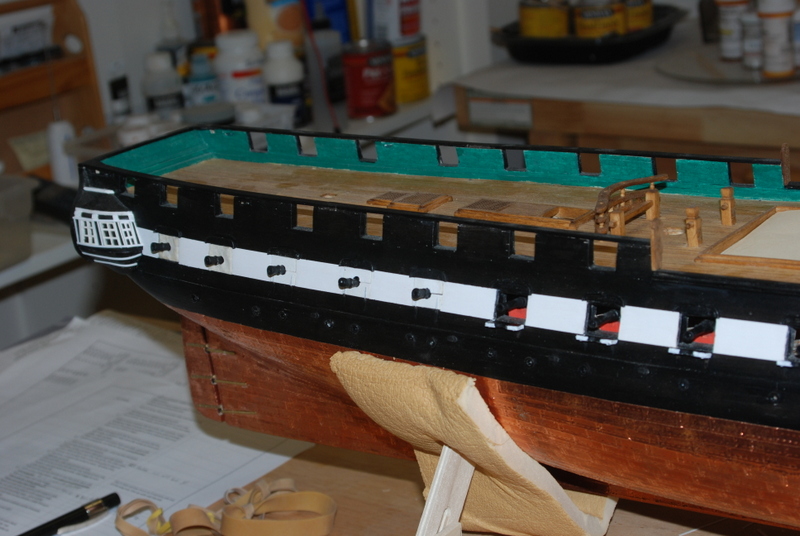
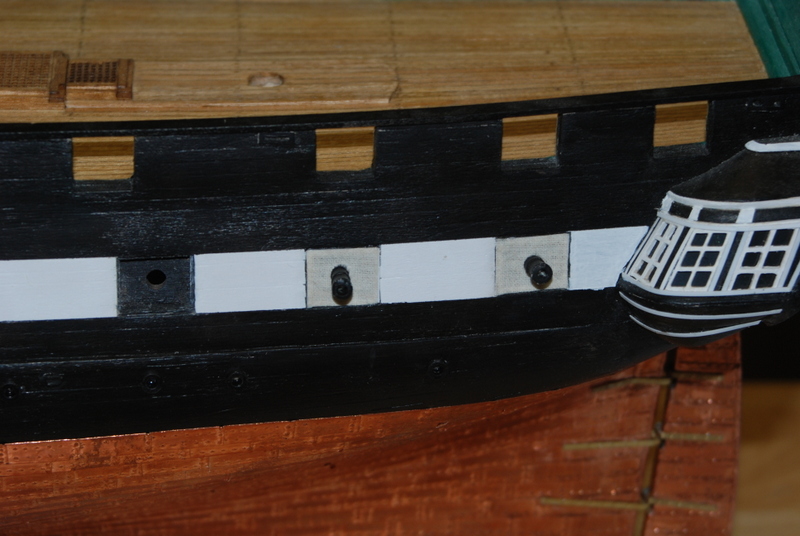
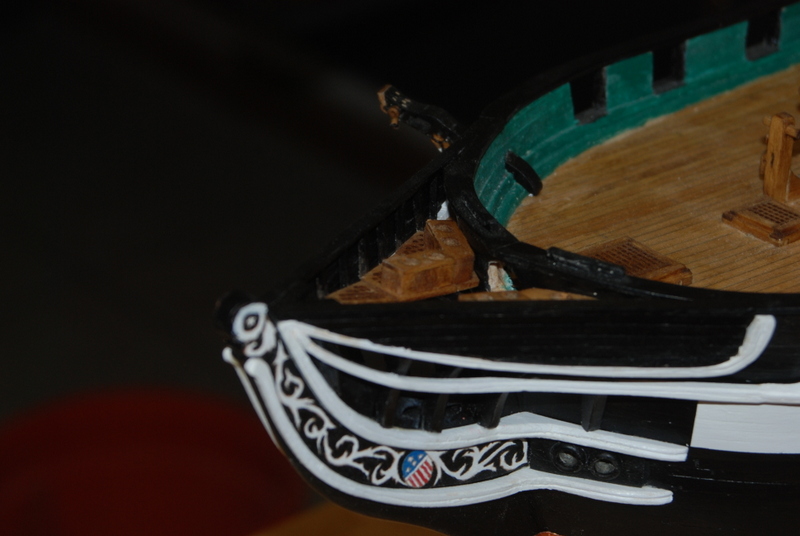
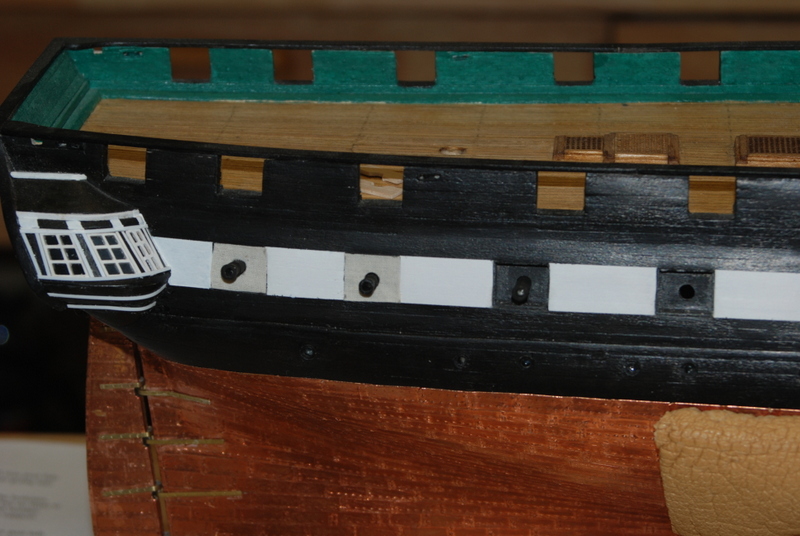
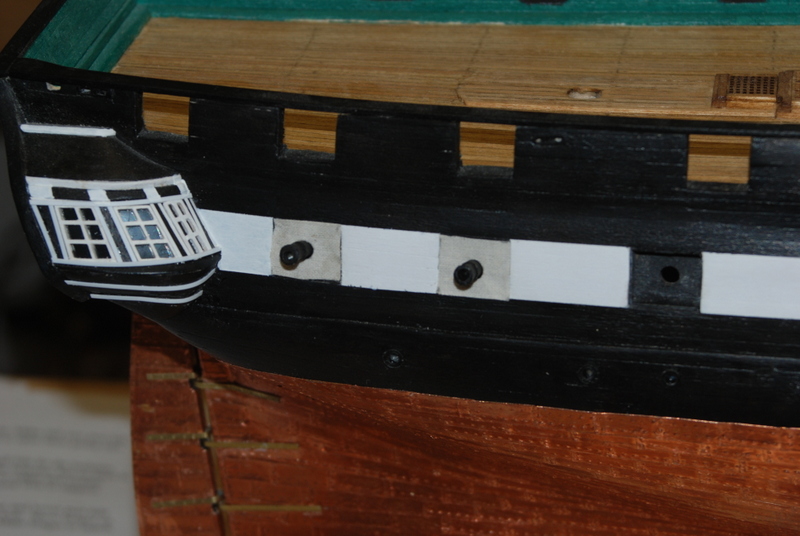
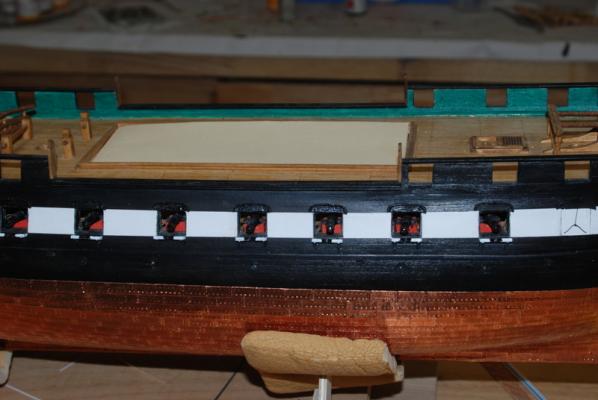
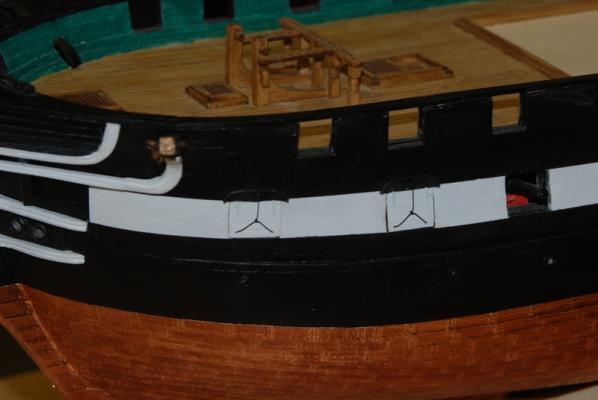
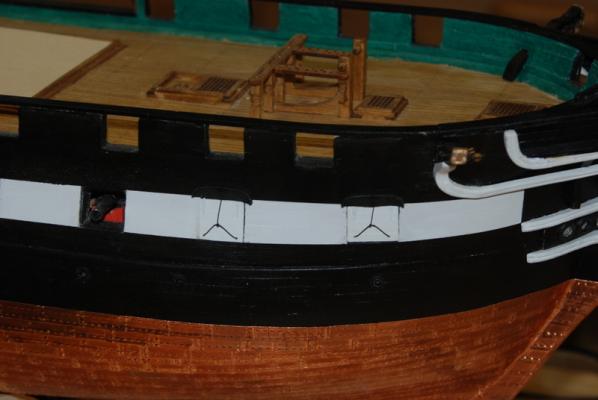
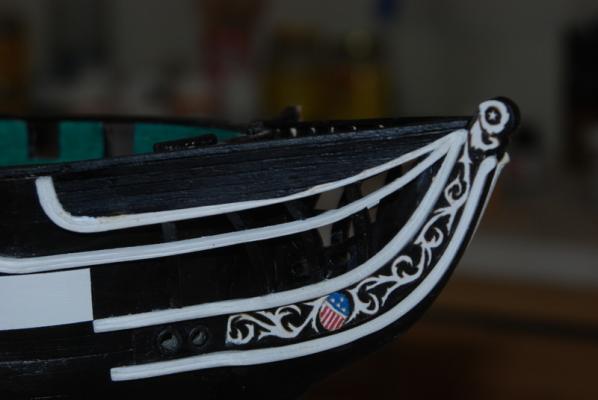
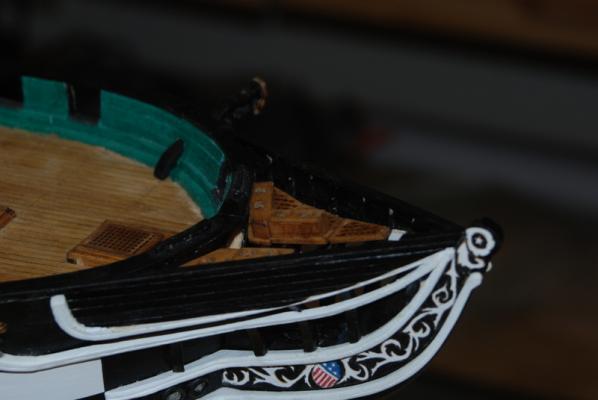
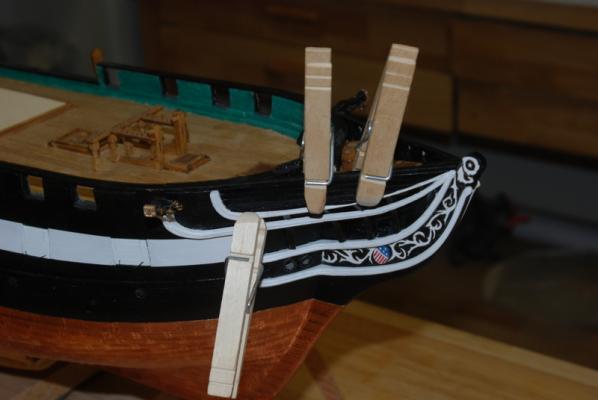
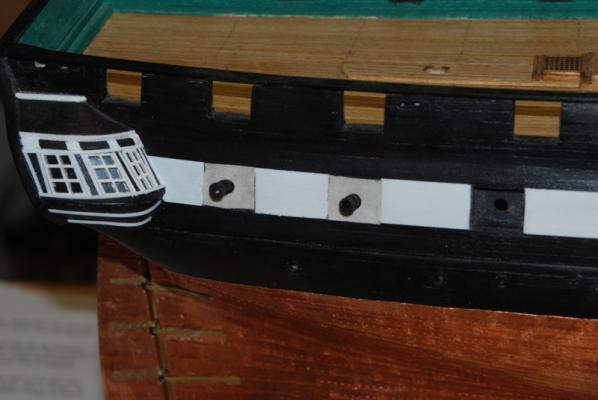
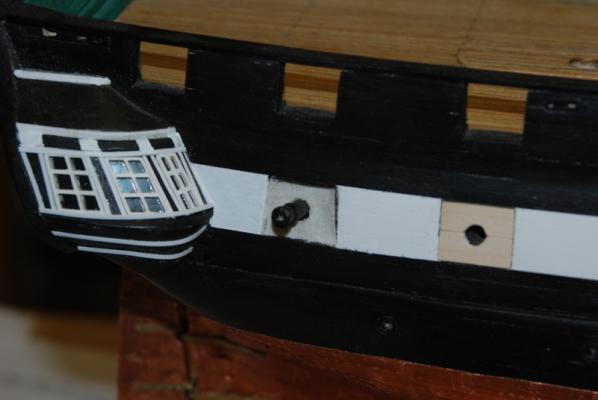
I touched up the paint around the head rails and planks and here is how it came out. I am pretty happy with the look. What I was not happy about was the look of those canvas gun port covers, especially the way the edges showed. I tried a few things and came up with a solution that I like a lot. I pushed them into the gun ports, and they look as if they were fastened on the inside of the ports, which they may have been. Here is how they came out: One small issue is that they are not glued in, only pressed in. The sail cloth with glue is pretty stiff so they have a spring to them that is holding them in place. I would hate to pull them out and try to get them back in place with some glue on the edges, but I may do that in the future. For now I am going to leave them as is. As always, any suggestions are most welcome.


- 1,354 replies
-
- 7
-
-
- constitution
- model shipways
- (and 1 more)
-
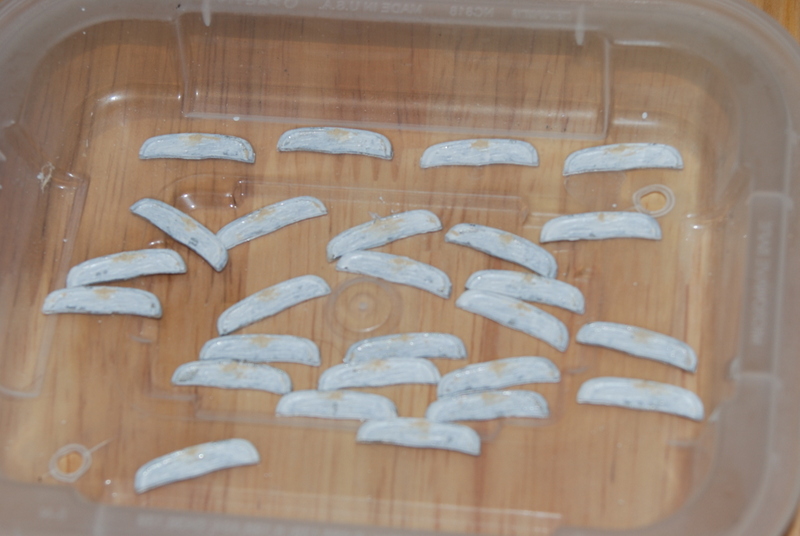
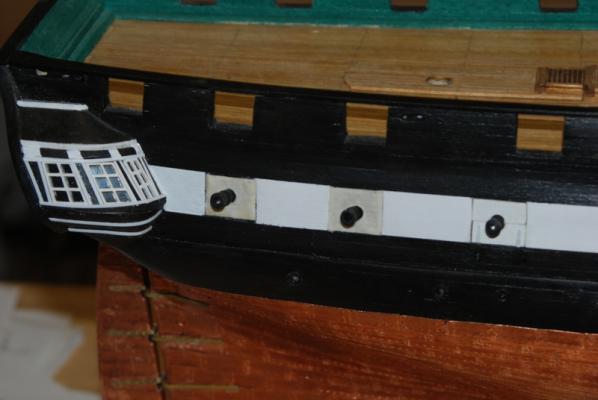
I am almost done with the head area. I glued the last plank in place just above the middle rail. I have a little clean up to do around the middle rails on both sides, then this area is done. Work on all the various gun port lid configurations continues. I glued in the full port lids on the first two gun ports on each side. I added half the line to open them by threading the line into two holes at the bottom of the lids and tying knots behind the holes. I will add the second line when I add the eye brows over these gun ports. The supplied eye brows have holes in them for the line into the hull, so I am going to thread the line through the hole, glue it to the back of the eye brow, glue the eye brow on, then tie the line to the line on the lids. Speaking of eye brows, I cleaned up four of them to go over these port, primed them and am painting them black. I am also painting the three starboard lids that will be closed around the dummy barrels white, after adding the hinges to the bottoms. I blackened the hinge/brackets I made for the open half lids and glued them on, then painted the lids white. I want to try these out on the hull before I make all of them. I have to really thank Ken for the suggestion to use 50/50 white glue on the sail cloth. I painted a swatch and let it dry overnight on some wax paper, then cut out the covers for the two starboard ports. I used a hole punch to cut the center hole, just applying pressure and rotating it by hand. It cut a nice clean hole. I then applied medium CA glue to the dummy cannon barrels where they fit into the holes in the back of the gun ports, and white glue around the lip of the gun ports, and glued the barrels and cloth in at the same time. I am enjoying making all these different port lids, especially doing a them in stages like this.


- 1,354 replies
-
- 7
-
-
- constitution
- model shipways
- (and 1 more)
-
Ken, that is all looking great. At the rate you are going you will be passing me in no time. I can't take credit for that link. It came from another modeler on this site (Modeler12 (Jay) I think). I just passed it on.
-
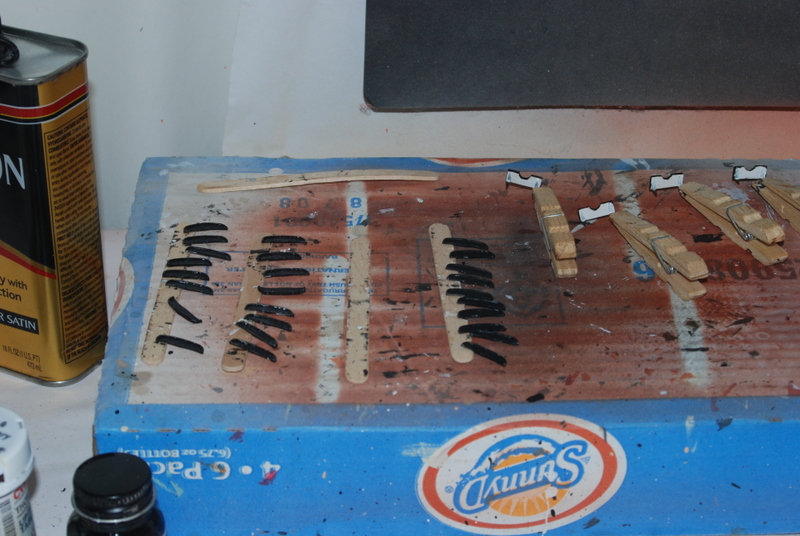
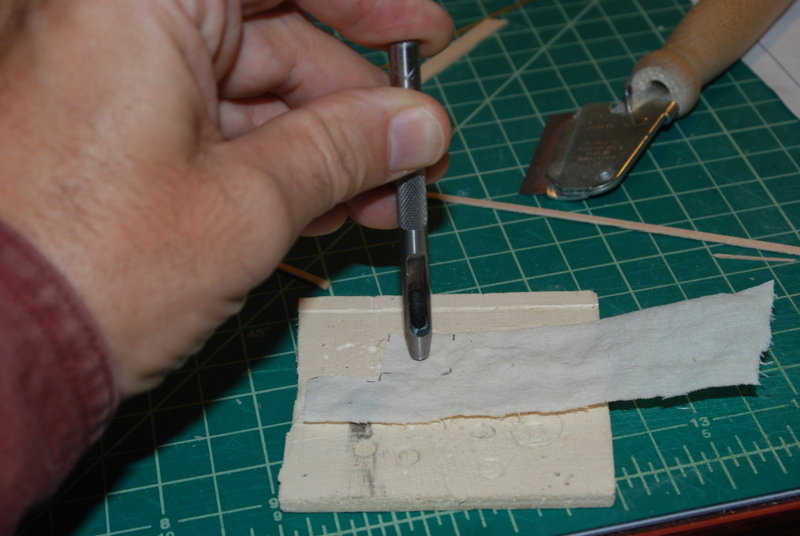
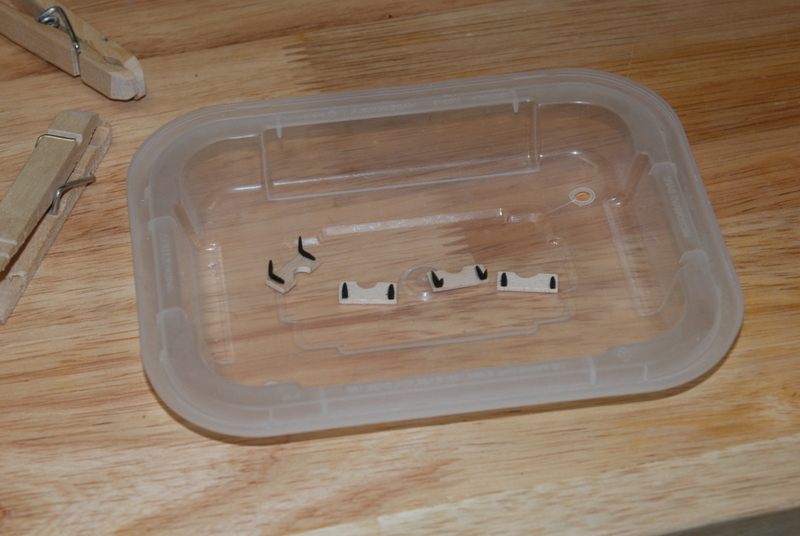
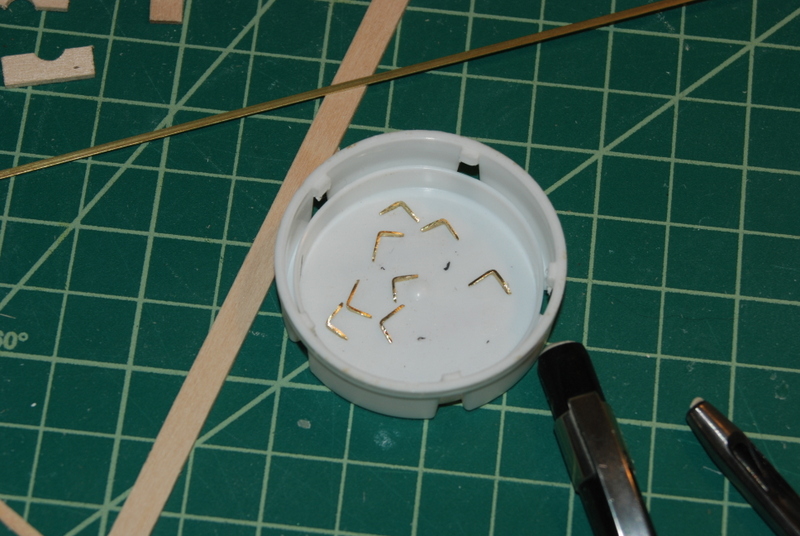
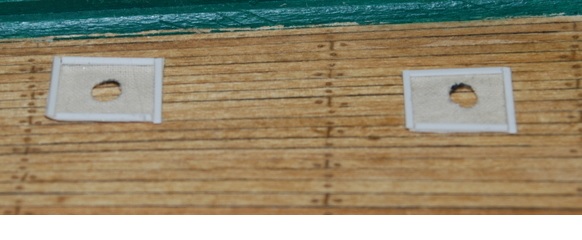
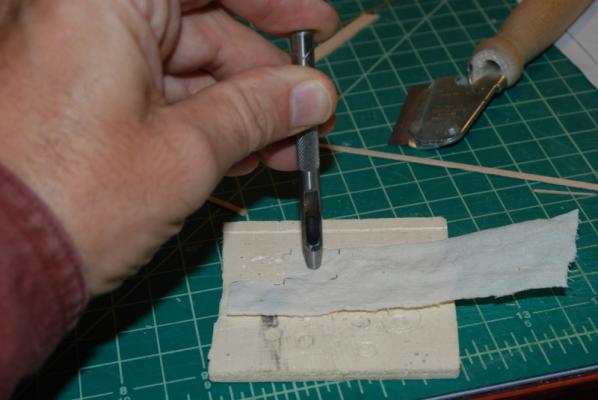
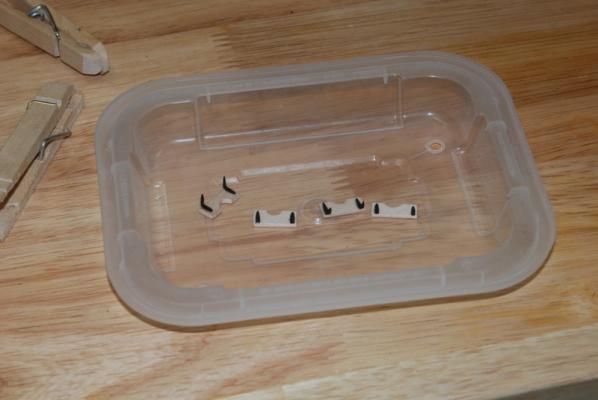
For the open lower gun port lids, I decided to make some 90 degree brackets that look like the photoetched hinges. I used some 1/64" by 1/16" brass strip and filed the hinge shape in by hand, then thinned the width down to about 3/64" I have only made 8 of the 32 I will need, but it was a good start. I also experimented with some sail cloth I had left over from another build to try to simulate the canvas gun port covers at the stern ports. I used a hole punch to make the hole for the cannon barrel. I think with some fray check on the edges and maybe some paint they will do. What do you think?

- 1,354 replies
-
- 4
-
-
- constitution
- model shipways
- (and 1 more)