usedtosail
-
Posts
2,420 -
Joined
-
Last visited
Content Type
Profiles
Forums
Gallery
Events
Everything posted by usedtosail
-
 That is some fine work you are doing Sal. She looks great.
- 659 replies
-
- 5
-

-
- syren
- model shipways
- (and 1 more)
-
Hi Greg. Thanks for all the likes. For the decking planks, I gave the planks an initial sanding before installing them. I actually sanded the full length supplied wood strips before cutting off the lengths I needed. I made sure the sides were sanded smooth and straight, and gave the tops and bottoms just a rough sanding. Then I sanded the tops flat after they were all installed.
- 1,354 replies
-
- 2
-
-
- constitution
- model shipways
- (and 1 more)
-
Thank you Nenad. I love what you are doing on your Cutty Sark, especially at that small scale.
- 1,354 replies
-
- 1
-
-
- constitution
- model shipways
- (and 1 more)
-
Greg, I was worried about that too, but I have received some really good advise by doing it. And it is a great feeling knowing that folks like yourself find it useful. I am sure you are doing a great job.
- 1,354 replies
-
- 4
-
-
- constitution
- model shipways
- (and 1 more)
-
Thanks Greg. Do you have a build log? I'd like to follow along.
- 1,354 replies
-
- 3
-
-
- constitution
- model shipways
- (and 1 more)
-
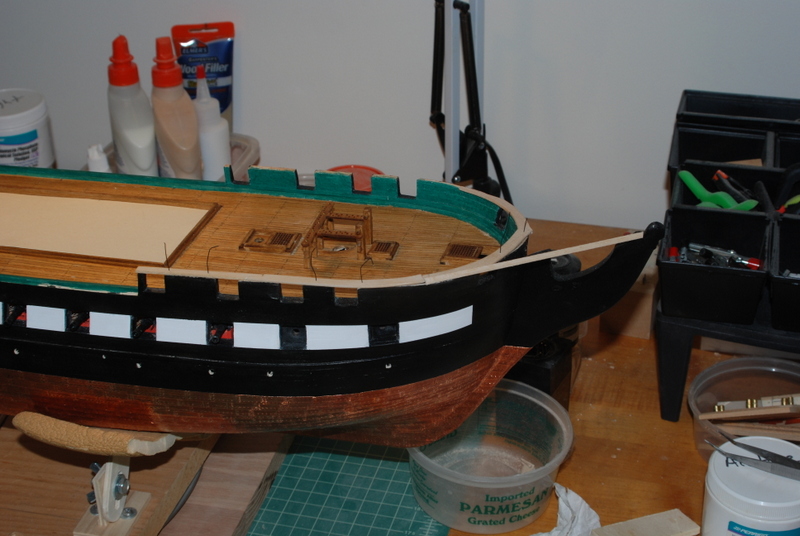
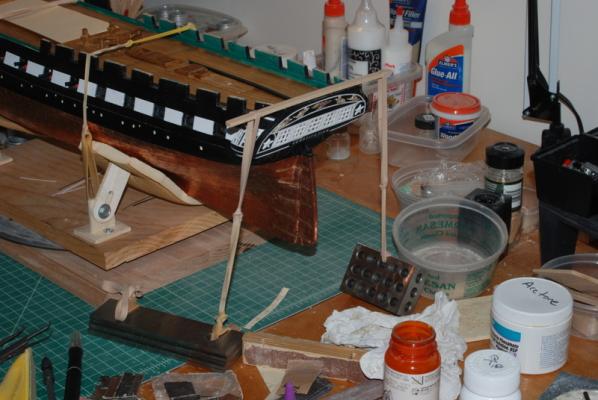
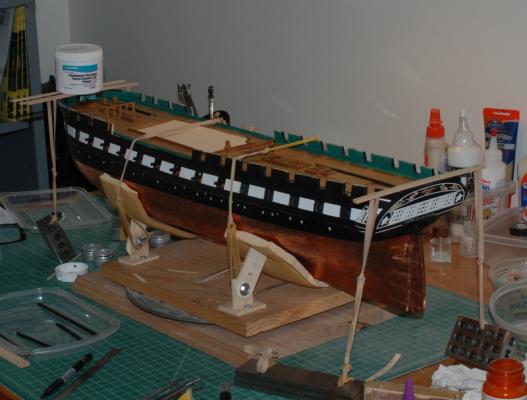
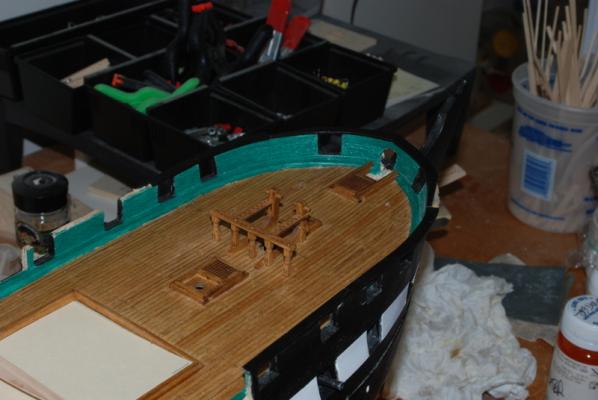
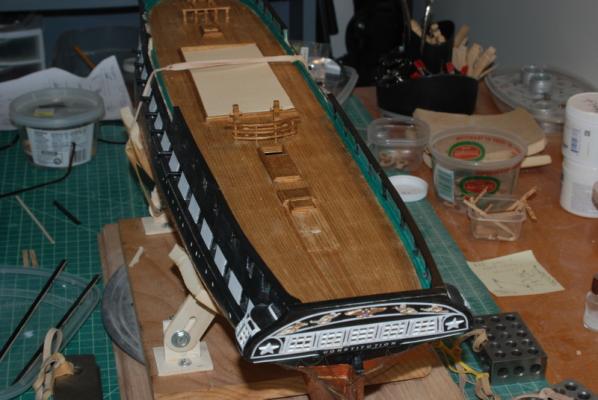
Thanks J and for the likes. We are not quite done with the move in - more to do this weekend, but I did manage to get some time in the shop this week. I ended up re-stropping the blocks for the cat heads, with slightly better results. I then glued the various eye bolts with either blocks, bulls eyes or plain into the cat heads. I then glued the cat heads in place and touched up the areas around the holes with some wood filler and black or green paint. Here are the results: I have also been working on the hammock boards that will go on the ends of the open waists to close off the bulwarks. I cleaned up the kit supplied boards and gave them a coat of oak stain and a coat of wipe on poly. I will glue these on a take some pictures after they are dry. I rearranged the shop so now I have a bench in the middle of the room to hold the model, which I can walk around. I had it on a smaller table on a lazy susan, so I could rotate it, but once I install the bow sprit that would be asking for trouble, since if I rotated it the wrong way the bow sprit would hit the wall. I also put in some nicer shelves for storage, since we found some nice wire shelve that were reasonably priced while looking for shelves for my daughter. It is now time to stop stalling and tackle the head rails. I stared at the plans last night for a while and I think I know how to start, so hopefully I will have some time on Sunday for that.

- 1,354 replies
-
- 7
-
-
- constitution
- model shipways
- (and 1 more)
-
drilling without drill press
usedtosail replied to lionfish's topic in Modeling tools and Workshop Equipment
Lionfish, I had these descriptions in my notes. I am pretty sure they came from posts in MSW 1.0, so if the authors recognize their writing, please acknowledge. Good luck Drilling Mast Holes Cut a block of wood for each mast, and hold them up to the plans aligned with the deck at the mast hole. Mark the locations of the sides of the mast on the top and bottom of the block, then connect these marks to show the mast angle on the sides of the block. Mark the center holes of the masts from the deck plans, then place each block on the deck next to these marks. Use the hand drill to drill small holes for each mast, using the lines on the blocks to hold the drill at the correct angle. Also make sure the drill is aligned port and starboard. Use bigger bits up to 3/16” for each hole. Don’t drill hole same diameter as mast. Drill smaller hole and add tenet to bottom of mast, so mast will hide holes edges. Drilling Mast Holes 2 Actually, you'll find that accuracy of only a couple of degrees is nowhere near enough. Any inacuracy will be greatly magnified by the length of the mast and you'll realise that 1 degree at the deck will mean a deviation of several cm at the tip. Start by making a little jig out of a scrap of timber about half to 3/4 inches wide by an inch high and and half an inch thick. Shape it by hand so it sits on the deck at the mast hole squarely, and cut then file an angle on it, that matches the rake. You need to end up with a block you can sit before or aft of the hole with a face layed back at the correct angle, so that a line drawn down the centre of this face would actually be the imaginary line in the centre of the mast. You can fix the jig to the deck with double sided tape, as it will guide your drill, not support it. Then, line the block with it's marked line up appropriately and using a scribe or pin awl, run it down the line in your jig and push it into the deck, making a good deep hole. This will give you a start for your drill in the correct place at the correct angle. You might not think the angle of an awl hole could make any difference, but believe me it does, since if the angle isn't correct a drill presented into the start you've made will move out of location as it turns. Now using a drill bit somewhere between small and tinsy winsy, in a pin vice or other hand tool that can grip your bit, run it down the line on your jig and hand drill the first very very small hole. Just watch the drill tip as it starts, to make sure it follows the awl hole, then concentrate on the line on your jig, keeping the bit perfectly in line and touching the jig all the time. This will give you a perfect guide hole, which is invaluable. Now step up in drill size. I can't tell you what sizes to use, but if you need say, a 6mm hole, you want to do it in no less than 4 steps. The second step should be no more than a 1mm drill. You'll have to move your jig back now, or it'll push the drill off line, but you don't need to lean on it, just use it as an eye guide. Follow this for all the steps you need until you get to the final hole size and your hole should be perfectly angled. It is important to note, that twist drills (the ones that everybody thinks of when you say drill, that have a screw all the way along the shank), are designed and angle sharpened for metal, not wood. These DO NOT drill an accurate sized hole in timber, since the timber is constantly cut by the side flutes while the drill is cutting its way through the wood. Spade bits are accurate for timber, but far too dangerous to your model, since one slip up and they can rip it to pieces. The solution is to use a normal twist drill bit, that is smaller by about 0.2 to 0.4 than the finished hole you need. If you need say, a 6mm hole, you will finish with a 5.8mm fractional drill, otherwise your hole will be too big. You will need to run the larger drills in a power tool, unless you have enough hands to use a good hand drill. You must make sure that you DO NOT let the weight of the drill rest against the low side of the angled hole as you're drilling, though this is the natural thing to do. If you do, you will get an oval hole and there's nothing you can do to fix it, so make sure you are fully supporting the drill with your own muscle. Multiple sized drills is how I do it too with my last largest drill bit running in reverse that way it never shews up any planking, old woodworking trick. This may seem a little tedious, but accurately drilling small holes in soft wood is suprisingly tricky and this method is sure fire. When you think about it, most times you drill wood, near enough will do, but not on a scale model. There is a high tech and fairly cheap way to know at what angle your hand drill is at, and more importantly what angle the masts will be at. Drilling a perfect hole is not the end all, there will almost always be some play even in a perfect drill. If you drill a slightly larger hole you can buy a set of mast coats which should actually be part of the kit anyway. The high tech tool is a laser. One like the Craftsmen version that shoots a long line. Model Expo also sells a protractor that will make things a bit easier. It has an armature you can set exact to the plans. Make certain the model is level, the laser is level. Set the protractor where the ship will be and the laser to the angle of the setting on the protractor, then slide the ship in place where the protractor was and you've a line to keep the drill in or set the mast to later. The laser has more applications with these models. Yards, center lines down the decks, even a waterline. I got mine as a Father's day gift last year, I've used it on model ships and not a thing else. Today there are a number of cheaper versions of the Craftsmen laser line but be sure you can manipulate the line between vertical and horizontal and you've got what you need. -
I also am interested in following along. I like the way you made your boats and will be using some of your hints when I get to mine.
-
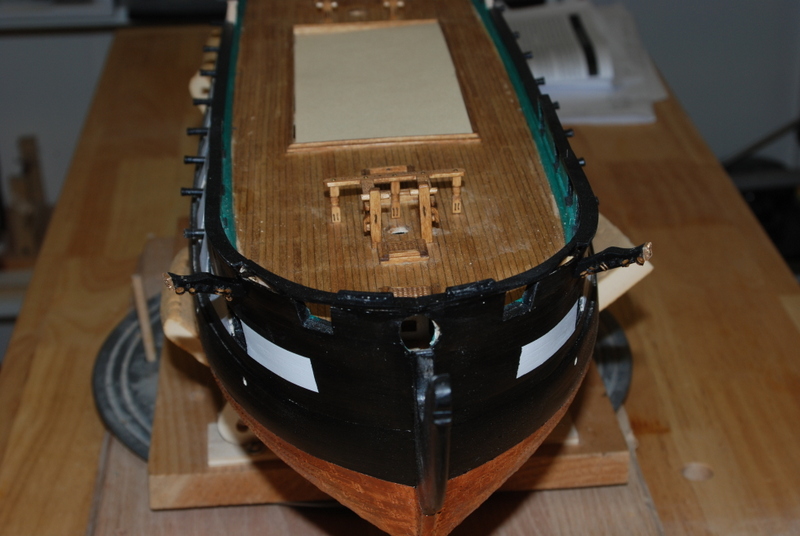
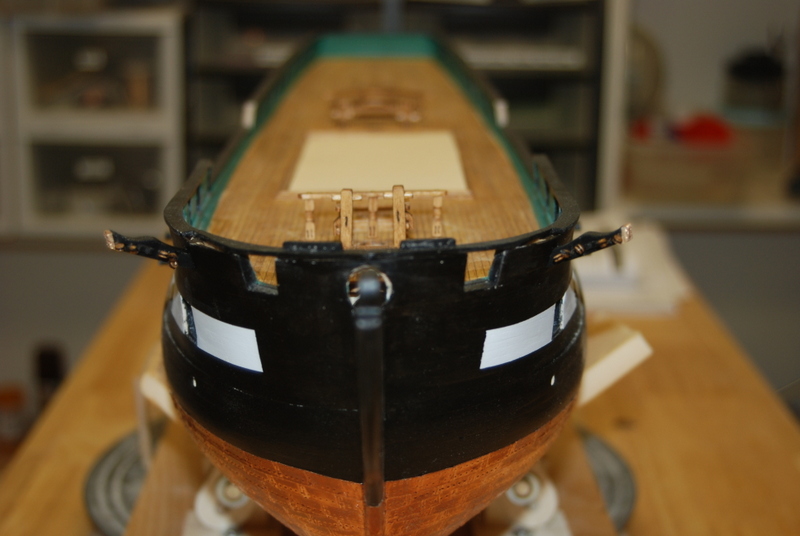
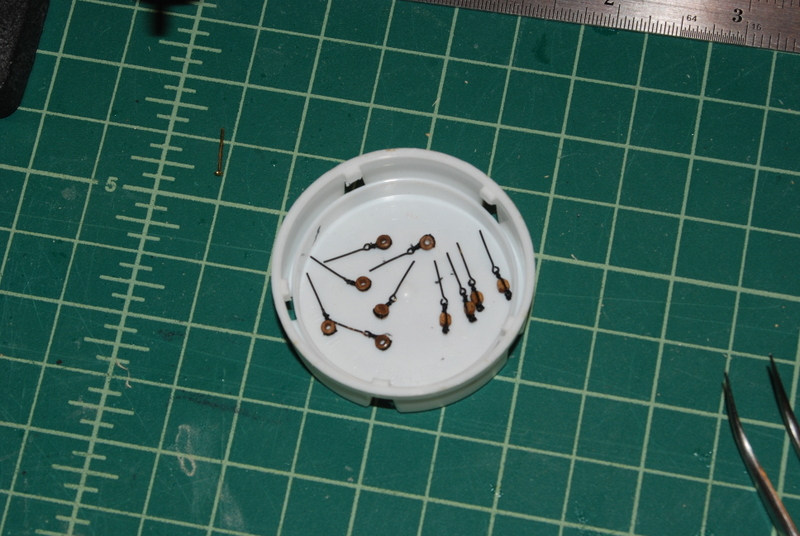
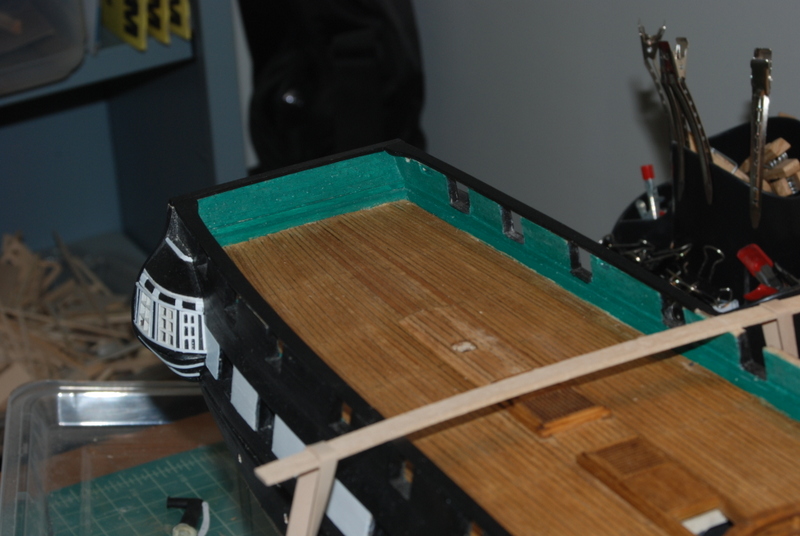
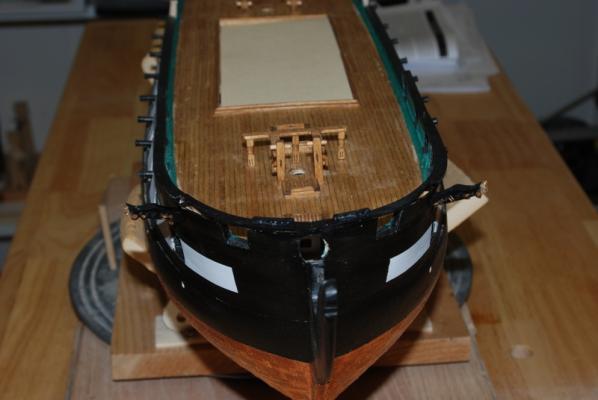
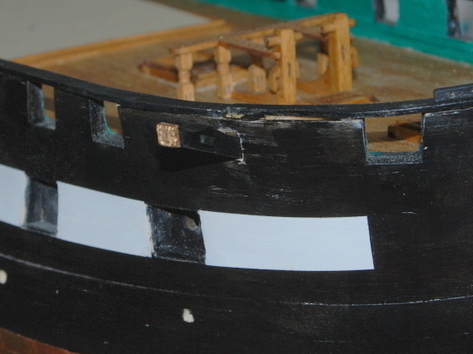
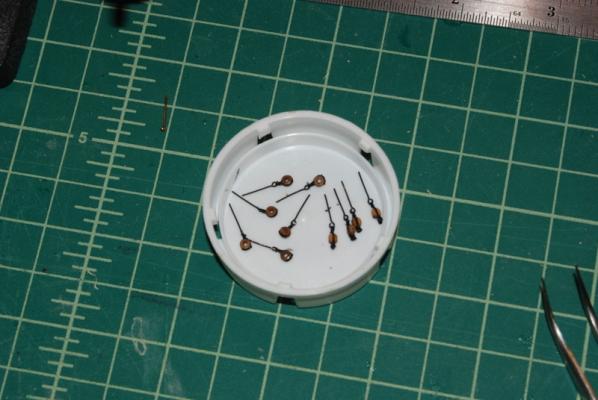
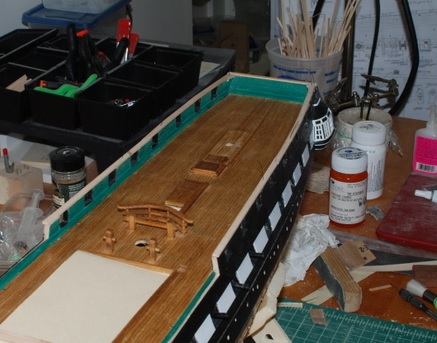
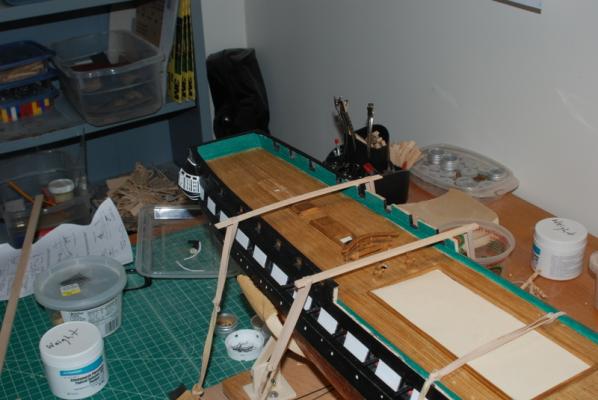
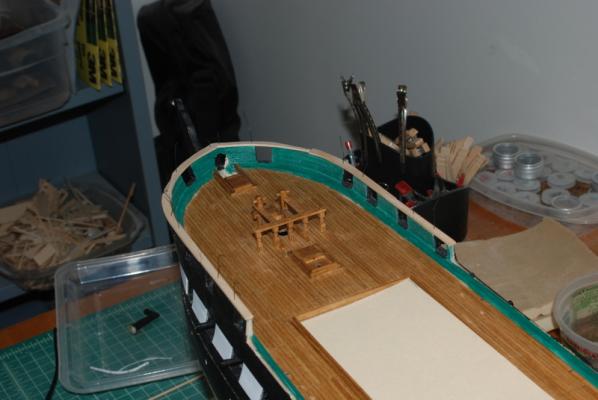
Thanks for the likes. I added some trim pieces over the open waist just to cover the long joint at the plank sheer. I made these from the same material as the rails and also painted them black like the rails. Continuing with the cat heads, I did manage to get something that looked like a cat face for the ends (if you squint hard enough). I painted these gold and glued them to the ends, then sanded the edges flush and touched up the gold and black paint. I also added the small cleat on the sides, using a piece of wood that I sanded to the rough shape, then filed into the final shape after it was glued on. This cat head is just set in place and not glued in yet, because I still have to add the eye bolts. I will also have to touch up the joints and black paint around these after they are glued in, although one of the head rails will hide the underneath joint. The plans show five eye bolts on the forward side of the cat heads and two on the aft side. The aft two are for the anchor tackle, so i can just add them empty for now. I checked the rigging plan for what is attached to the five on the forward side, and three of them have bulls eyes and two of them have blocks, all for lines that go to the bowsprit. Instead of trying to strop these to the eye bolts later, I added them now, after cleaning up the blocks so they looked better. I am not happy with the size of the beckets on the blocks, so I will probably redo them to make smaller beckets. I also decided that now was a good time to add the hammock boards to the ends of the open waist, although I have not decided whether to use the laser etched version or carve my own. In any case they will be shorter than the tallest supplied laser cut pieces. I will play around with them next week. I think I am stalling on starting the head rails but I do need to tackle them soon. No work in the shipyard this weekend - we are moving my daughter into her own apartment in NH, since she just got a really good job at a big hospital there. She is getting very close to being off the books.

- 1,354 replies
-
- 8
-
-
- constitution
- model shipways
- (and 1 more)
-
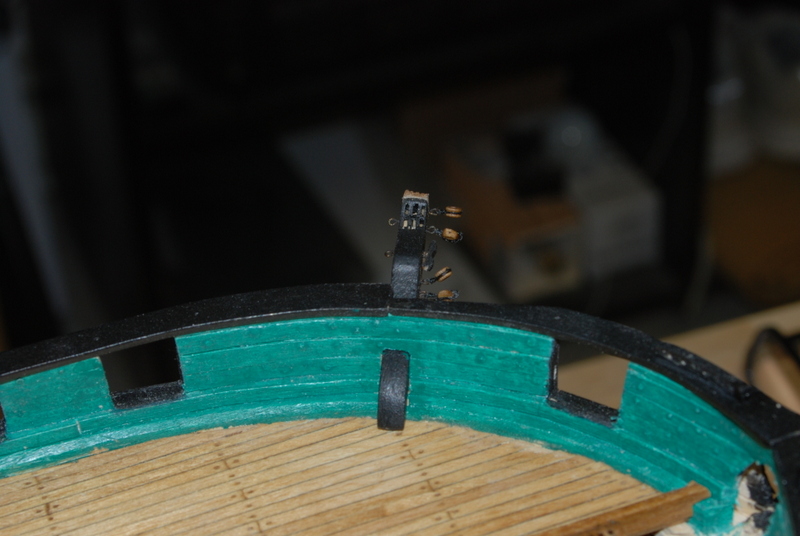
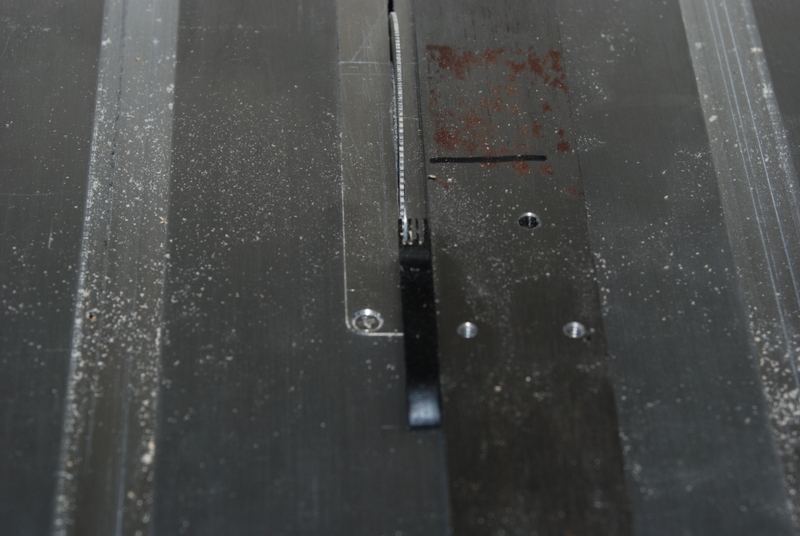
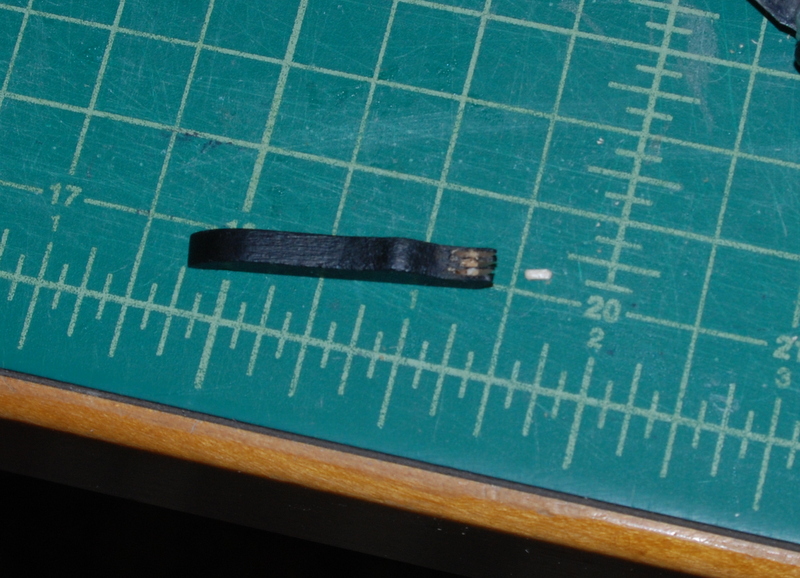
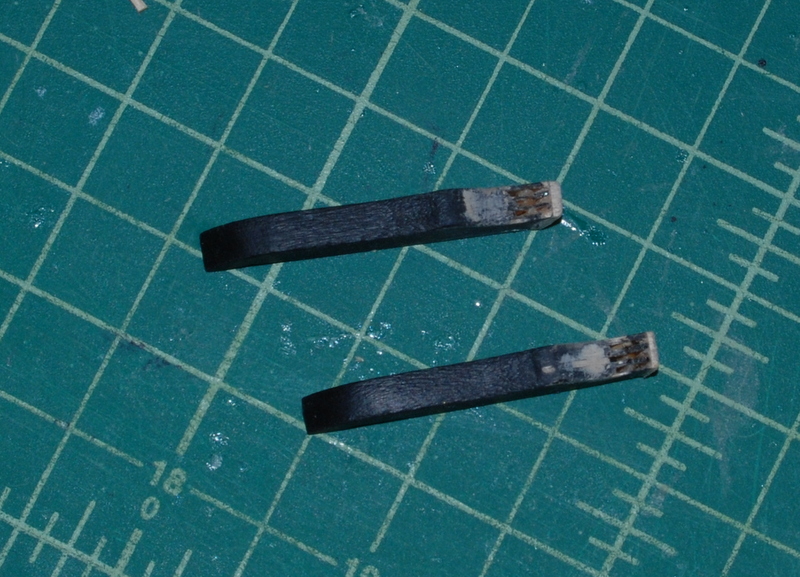
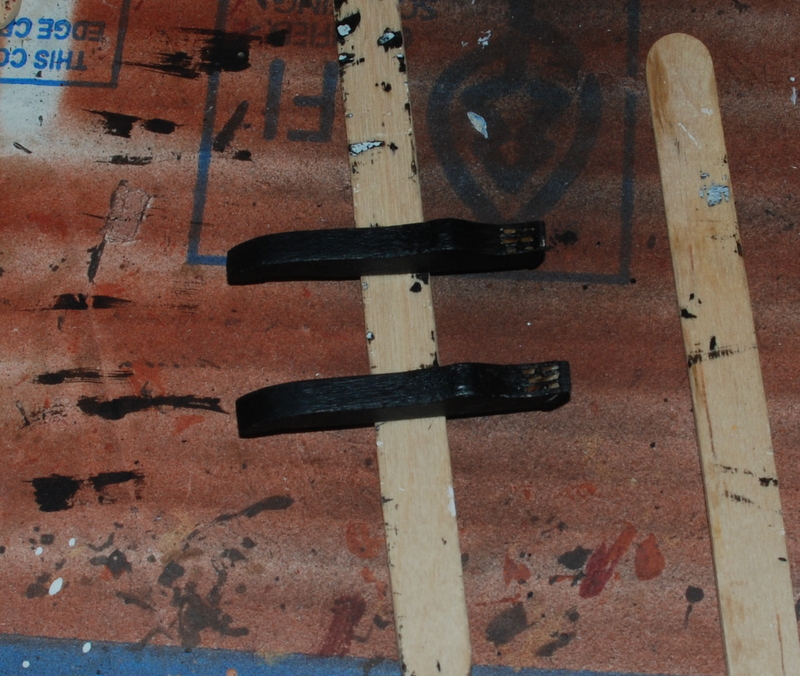
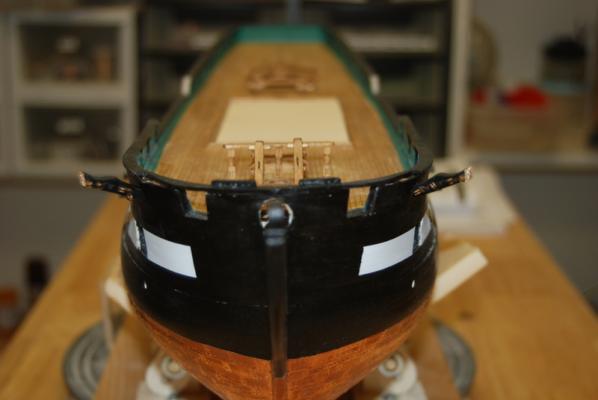
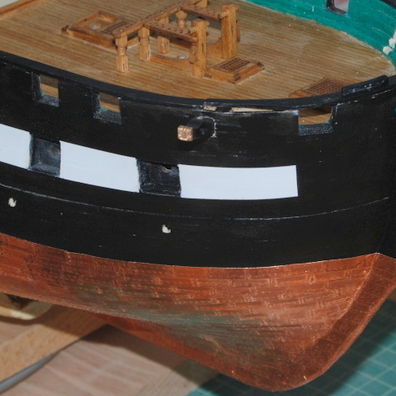
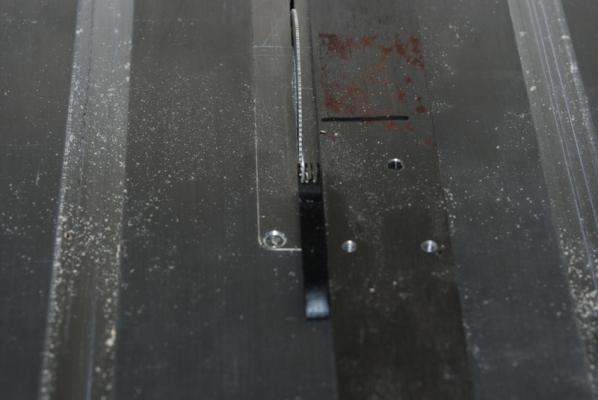
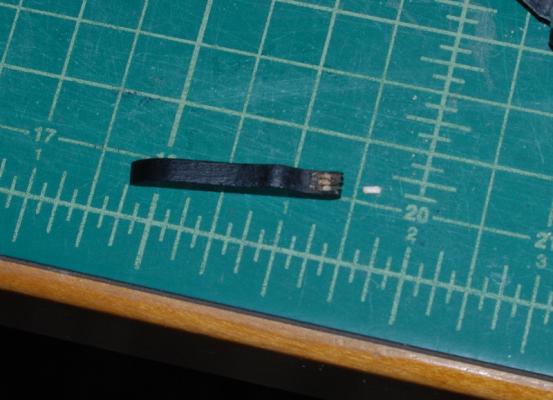
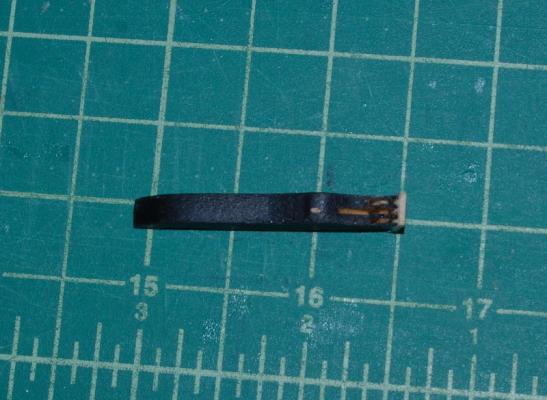
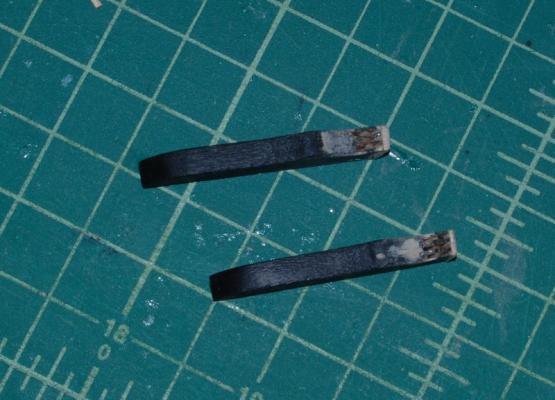
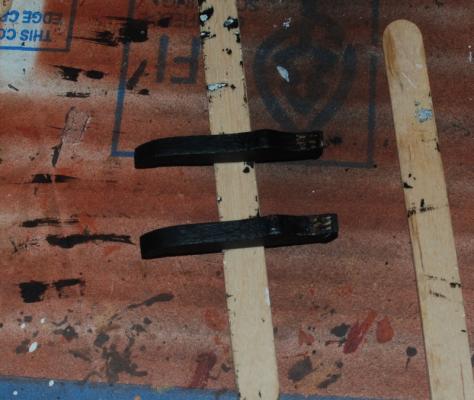
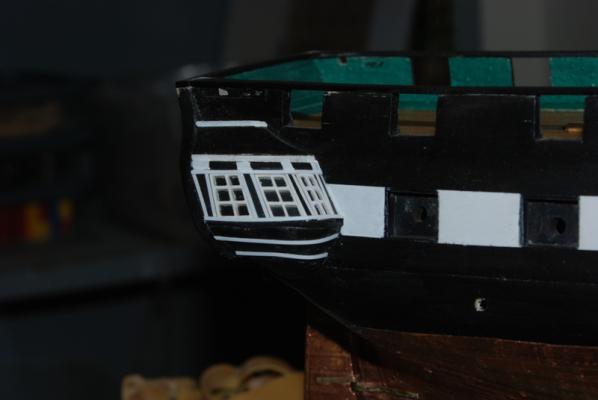
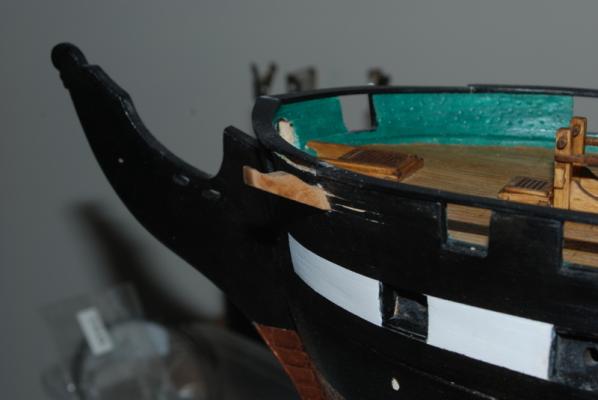
Now that I have the two holes through the bulwarks for the cat heads, I needed to add the details to them. I started with the sieves in the ends. My first attempt was to use the same method I used for the bitts - drill two holes for each sieve and connect them with an awl. Once these were painted black, they really didn't look good, so I went in another direction. I used a slitting disk in the Byrnes saw to cut three slots in the end of each cat head. I then cut small pieces of thin wood and glued them into each slot after rounding the ends. You can see one of these pieces next to the cat head in this picture, but this cat head has all three pieces already in place. I then put some thin CA on the slots to strengthen them, and used the True Sander to sand the ends down so the slots were the correct length. Some of the slots were long in the other direction, so I filled the extra length with wood filler. I then capped the end of the cat heads with a small piece of wood. When it was dry, I sanded the wood piece to sit flush with the sides of the cat head and thinned it a little bit, and also sanded the wood filler. I then repainted them black, and here is how they came out. I should have taken a picture of the first ones to show the difference, but the sieves in these new ones look much better to me. I tried last night to carve two cat head figures onto some strip wood to add to the ends of the cat heads, but the results were laughable. I will give it another go tonight with some different tools and maybe some different wood. I have also finished installing the rail pieces and touched up all the black and green paint around them, and I am in the process of adding trim strips over the plank sheer at the open waist. I was going to leave these natural but after making them I think they will look better black, like the rest of the rails. I'll have a picture of these after I finish painting them and installing them. Next up, after adding the rest of the details to the cat heads and installing them, is the head rails and trim boards.
- 1,354 replies
-
- 12
-
-
- constitution
- model shipways
- (and 1 more)
-
I am looking forward to this build, Bob. I love the small boats you have built in the past and this one looks like a really interesting subject.
- 348 replies
-
- 2
-
-
- pequot
- cable ship
- (and 1 more)
-
Don't worry, Jay. more pictures are coming. I just haven't had time to get them off the camera yet.
- 1,354 replies
-
- 3
-
-
- constitution
- model shipways
- (and 1 more)
-
Nice Dirk. I am always amazed what you can get out of those phone cameras.
-
Thanks Jay. Well, I did drill the hole on the other side for the starboard cathead, and let's just say it is a good thing this hull is painted. The catheads look symmetrical but there was a little hull patching to take care of, but once painted over it is all good. Again, I really admire you guys and gals that can work in unpainted wood with such good results. I drilled holes to simulate the sieves in the ends of the catheads and will be painting them black before installing. I also touched up the black paint on the rails, but no pictures today.
- 1,354 replies
-
- 3
-
-
- constitution
- model shipways
- (and 1 more)
-
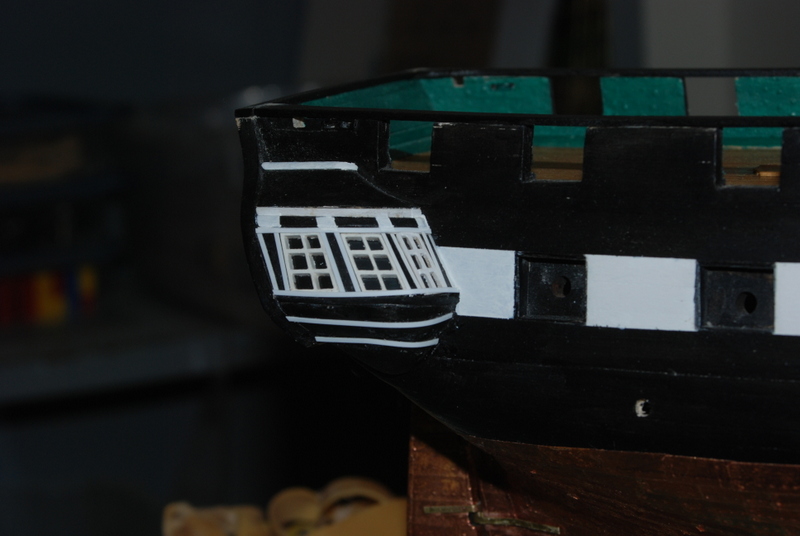
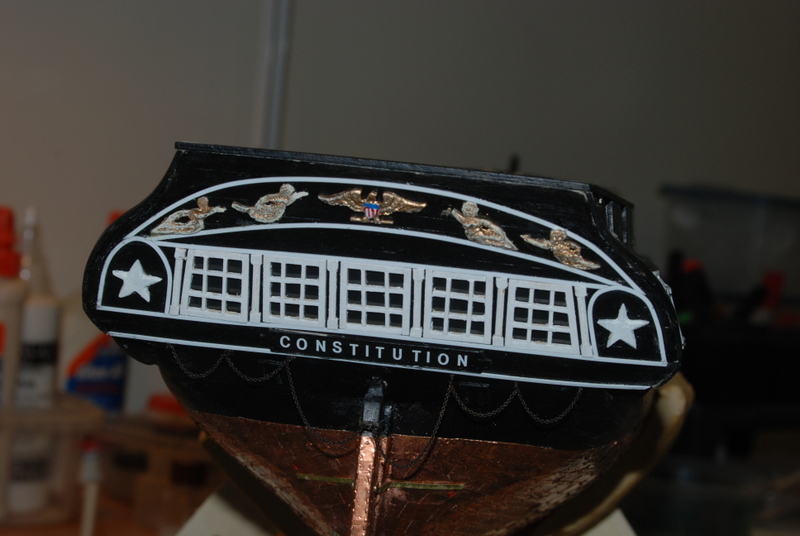
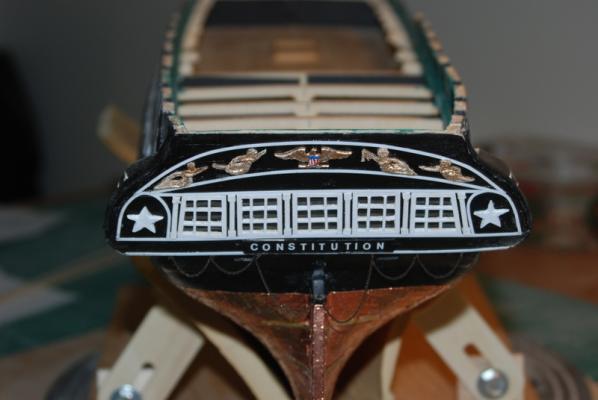
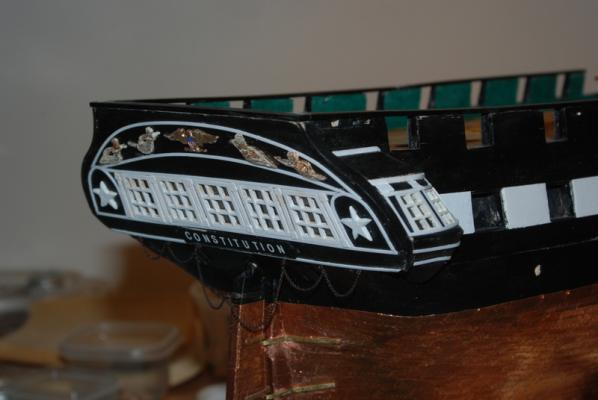
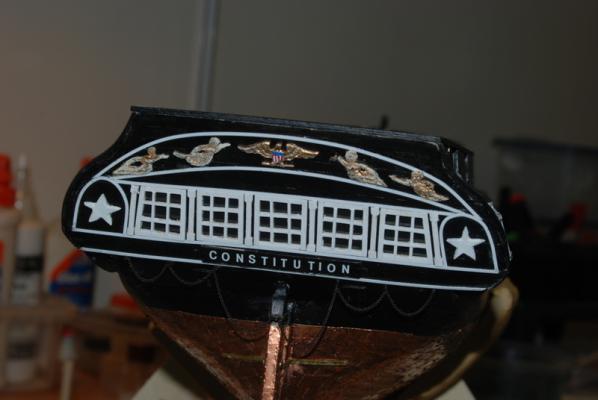
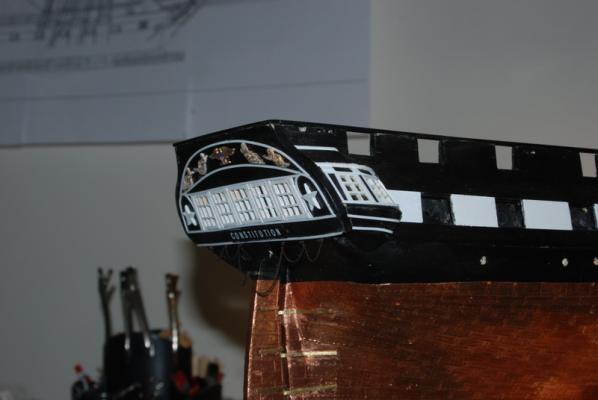
"Can I see a close up of your transom and aft cabins" - Here you are Jay. This is how the transom looked when I finished adding the decorations months ago: And sadly here is how it looks today. I was really pleased with those details at the ends of the arms and now they are gone due to handling of the hull. I am going to try to recreate some of those details and reattach them, but I will be waiting until much closer to the end of this build so I don't mess them up again. I have not touched up the black paint under the rails yet, either, but will do that after the last rail piece is in place. I (somewhat) bravely drilled a series of holes through the port side bulwark for the cathead. This took a lot of syching myself up to do it and it was not easy due to the angle of the bulwarks and the angle of the hole needed. I started using a small drill that I drilled from the outside almost straight into the bulwark, then used larger drills at more and more of an angle. I finished the hole with square files to square it up until the cathead fit, and notched the bottom of the cathead to fit over the waterway and plank sheer. Now all I have to do is replicate this on the starboard side - same position, same angle, same depth. How hard can that be? I am not too optimistic that I can pull it off, but I will give it a go tonight. Wish me luck. Oh and I have to fix some planks around the port cathead hole that started to come up during the drilling process. I need to add some support behind them, which may be wood filler as the hole is too small to try to get a piece of wood in there. Oh and I also took a closer look at the scarf joints on the rails, and they could benefit from some wood filler, so I added that last night. And I have to clean up some scratches in the deck planks from the filing process. I should have put some masking tape down before I started drilling and filing, which I will do on the starboard side.

- 1,354 replies
-
- 14
-
-
- constitution
- model shipways
- (and 1 more)
-
I made up the stern rails this weekend, then gave them all a few coats of black paint. While they were drying, I thought about how to hold these down while I glued them. After some experimentation I came up with this approach, which is just rubber bands threaded through some metal blocks, that I can hook over the ends of some planks to hold the rail on down. These worked pretty well, but there were a few rails that I held with my fingers for a while until the glue set, to make sure they stayed in the right place. I started with the bow rails and the traffrail, then worked my way to the waist. One of the rails was a bit too short, so I ended up having to remake it, so it is being repainted now. Here is how the rest of the rails came out. I need to do some touch up of the paint around the rails, but the joints came out better than I expected, so no filler is needed yet. I know I will need to use some when I add the rails to the stem, which go in those areas that are still left rough near the bow. I bent a piece of wood for the fairleads at the bow and drilled a series of holes by hand with a pin vise. This piece is also getting a few coats of black paint so no pictures yet. Next up are the catheads.


- 1,354 replies
-
- 7
-
-
- constitution
- model shipways
- (and 1 more)
-
Yep, exactly. Nice retouch job. Can I hire you for all my pictures? Oh and can you tie ratlines too?
-
Yes, you are so right. That would have made a much better shot. Backgrounds have always been one of those things I just don't see until after I see the picture. Thanks.
-
Thanks Slog. I could have put the model on a table on the other side of the room, but I was trying to use the foliage as the background in the picture.
-
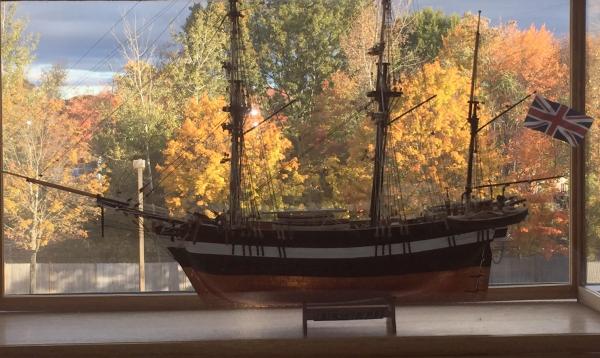
Good question Dave. I hope not. I have a feeling though that those folks interested in adding build logs are also interested in getting better at taking pictures of their hard work. I know I am. Were build logs really practical before digital photography? Like you said, the turn around times make for long gaps between building. Not to mention having to scan the paper pictures into the computer to post them, which takes a while. I walked into my office this morning to this scene: I keep my model of the Beagle on my window sill at work and the Fall foliage on the other side of the parking lot was lit by low sunlight. Of course, I only have my phone to take the picture, which did not help. There are a couple of problems with this picture. One was to get enough depth of field to have the model in focus and the trees in the background. The other was the dark office versus the bright outside. I did use a bit of fill light on the final image to bring out the model a little.
-
Thanks George and for those likes too. They are much appreciated. I traced the rail templates onto some 1/16" basswood sheet and strip wood and cut the pieces out oversize on the scroll saw. I sanded the edges down until they fit correctly with a slight overlap on each side of the bulwark. I didn't put a design into the edges but did round them slightly. The widths of the middle pieces were adjusted to be the same as the width of the bow piece plus the piece that goes to the stem on the front, and the back of that second piece was adjusted to the width of the straight strip wood used for the third piece, which will also be used for the rails behind the open waist. The scarf joints were cut in using an X-Acto knife and cleaned up with a small diamond file. I drilled small holes through the rail pieces into wood supports in the bulwarks, and put in some 28 gauge wire pieces, just to hold them in place while I fit them and their neighbors. I don't know if I will use the wire when I glue these in place after priming and painting them black. I may use the wire to position them then take it out if they look like they are attached well enough, which I suspect they will be. The joints are OK between pieces, but I know I will be adding a little wood filler and repainting the tops of the rails after they are installed, since these rails are painted. They are good practice for when I build something that I won't have paint to fall back on.

- 1,354 replies
-
- 7
-
-
- constitution
- model shipways
- (and 1 more)
-
Adam, your Mayflower is looking great.
-
Thanks Brian for that great post on cropping. Makes it all clear to me. Slog - for the stacking software, for focus stacking how close does the alignment need to be between images? If you tried do use it with hand held images, would it still work?