HOLIDAY DONATION DRIVE - SUPPORT MSW - DO YOUR PART TO KEEP THIS GREAT FORUM GOING! (Only 13 donations so far - C'mon guys!)
×

FrankWouts
-
Posts
535 -
Joined
-
Last visited
Content Type
Profiles
Forums
Gallery
Events
Everything posted by FrankWouts
-
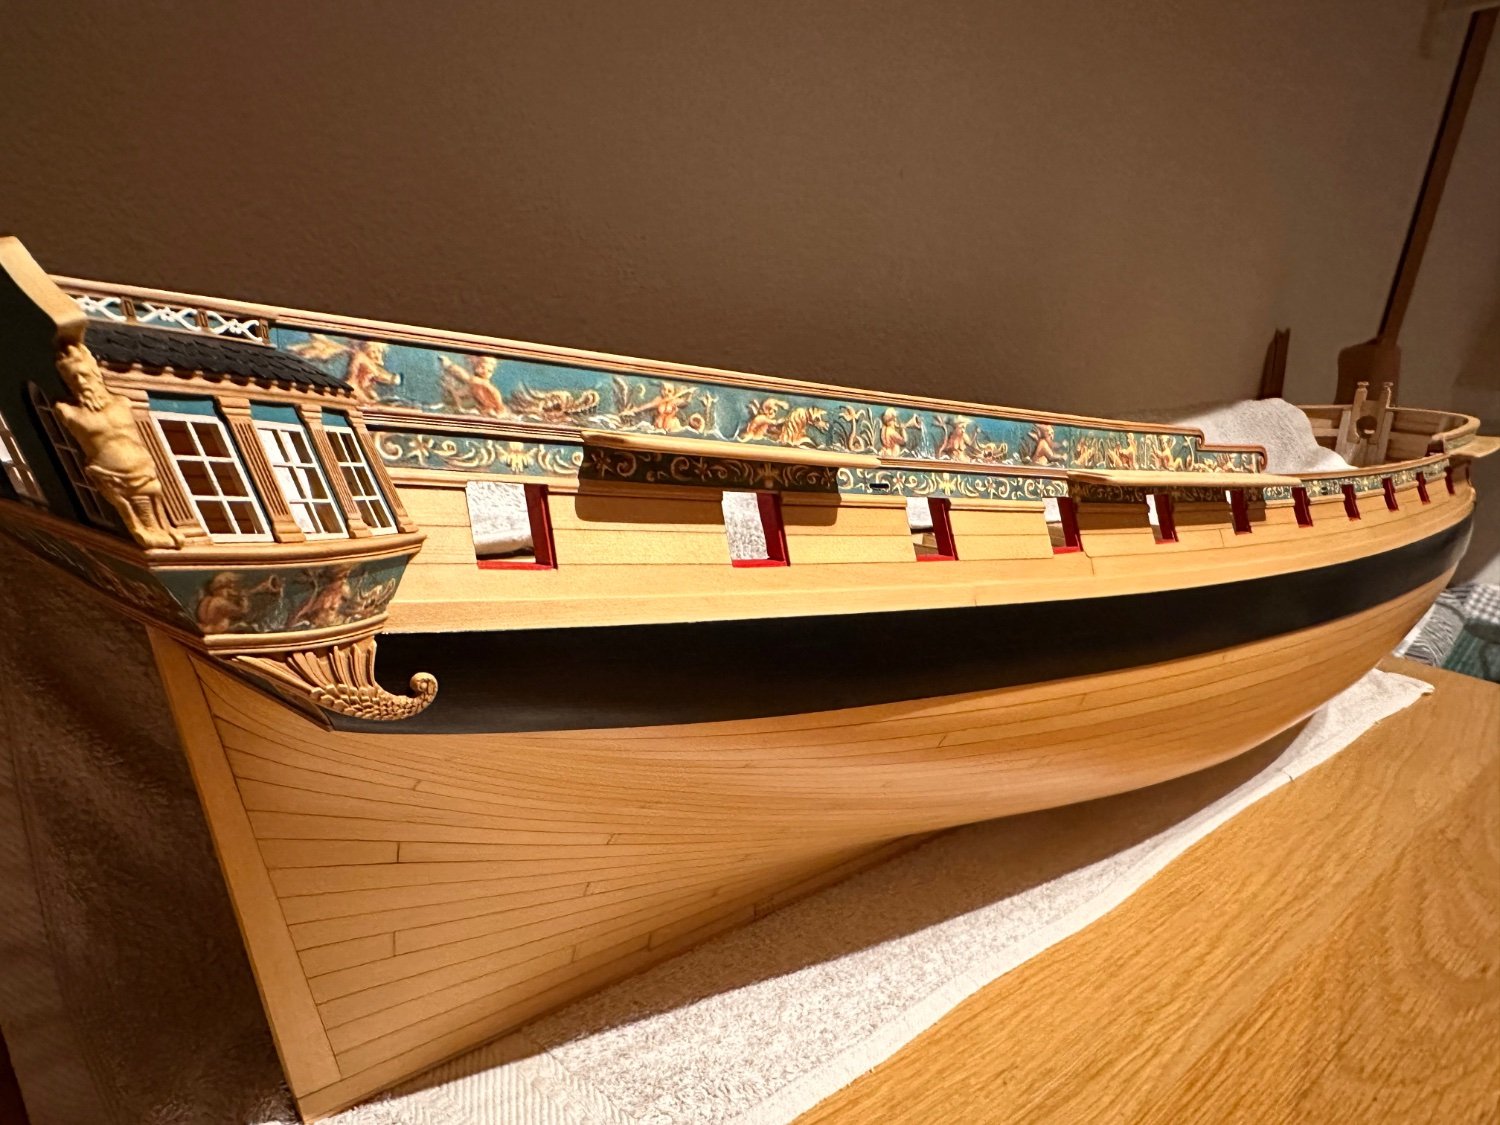
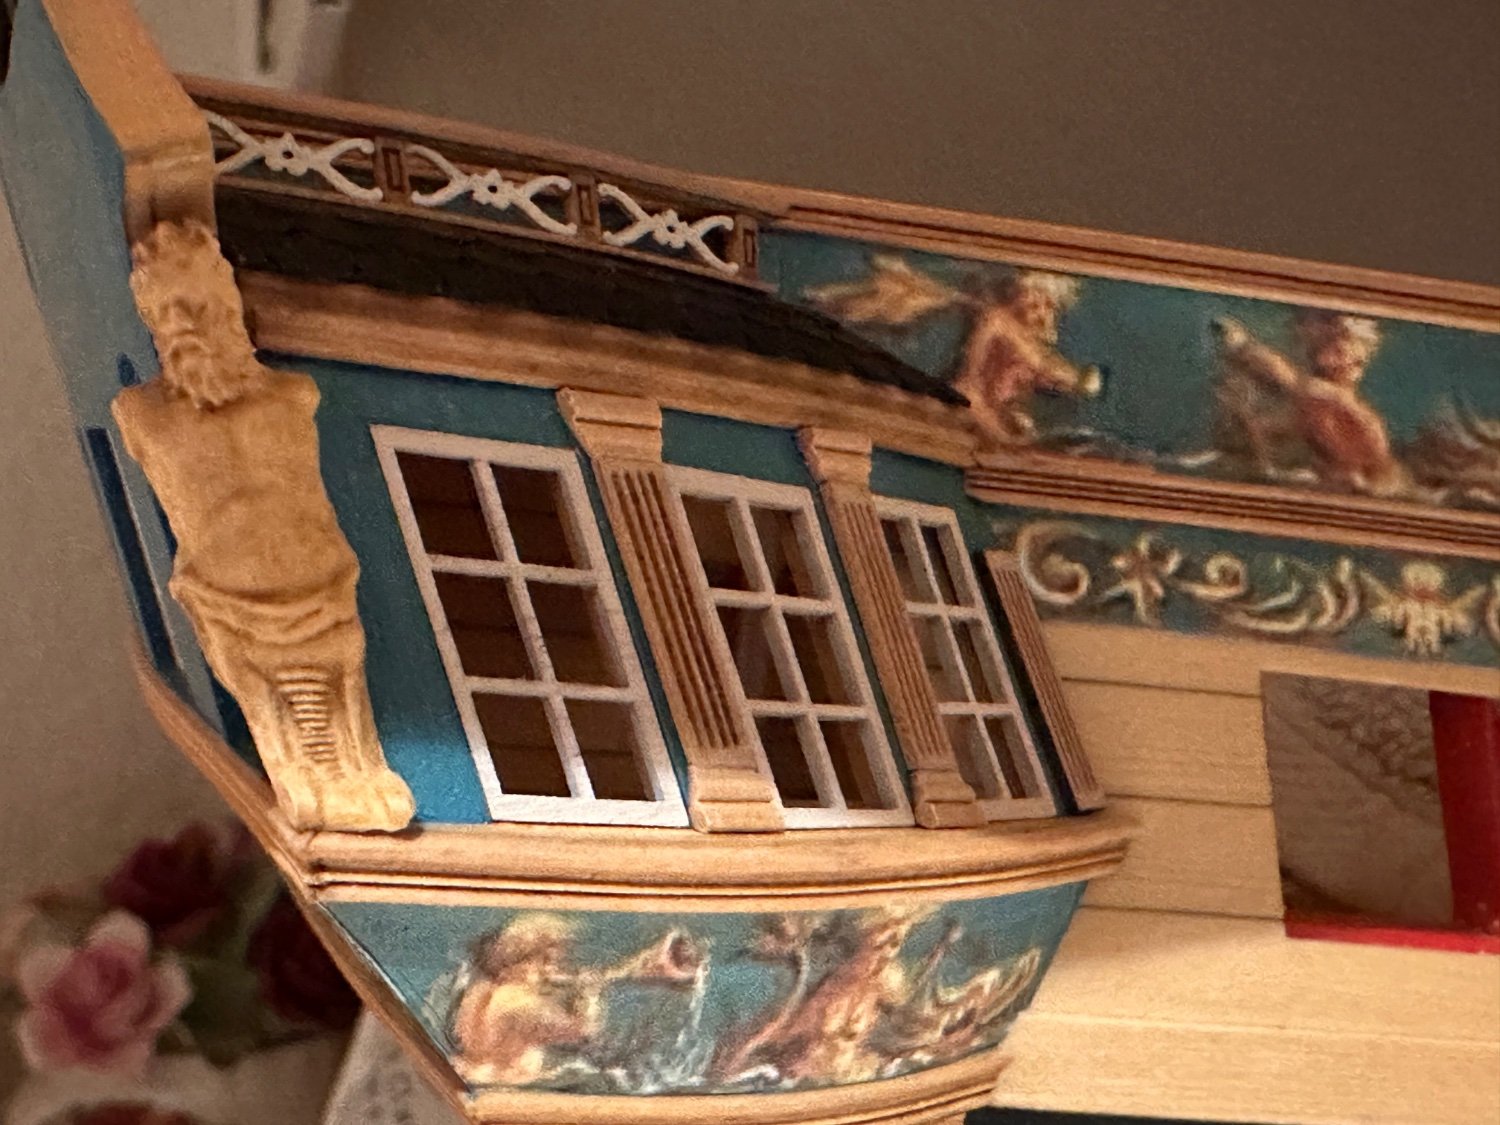
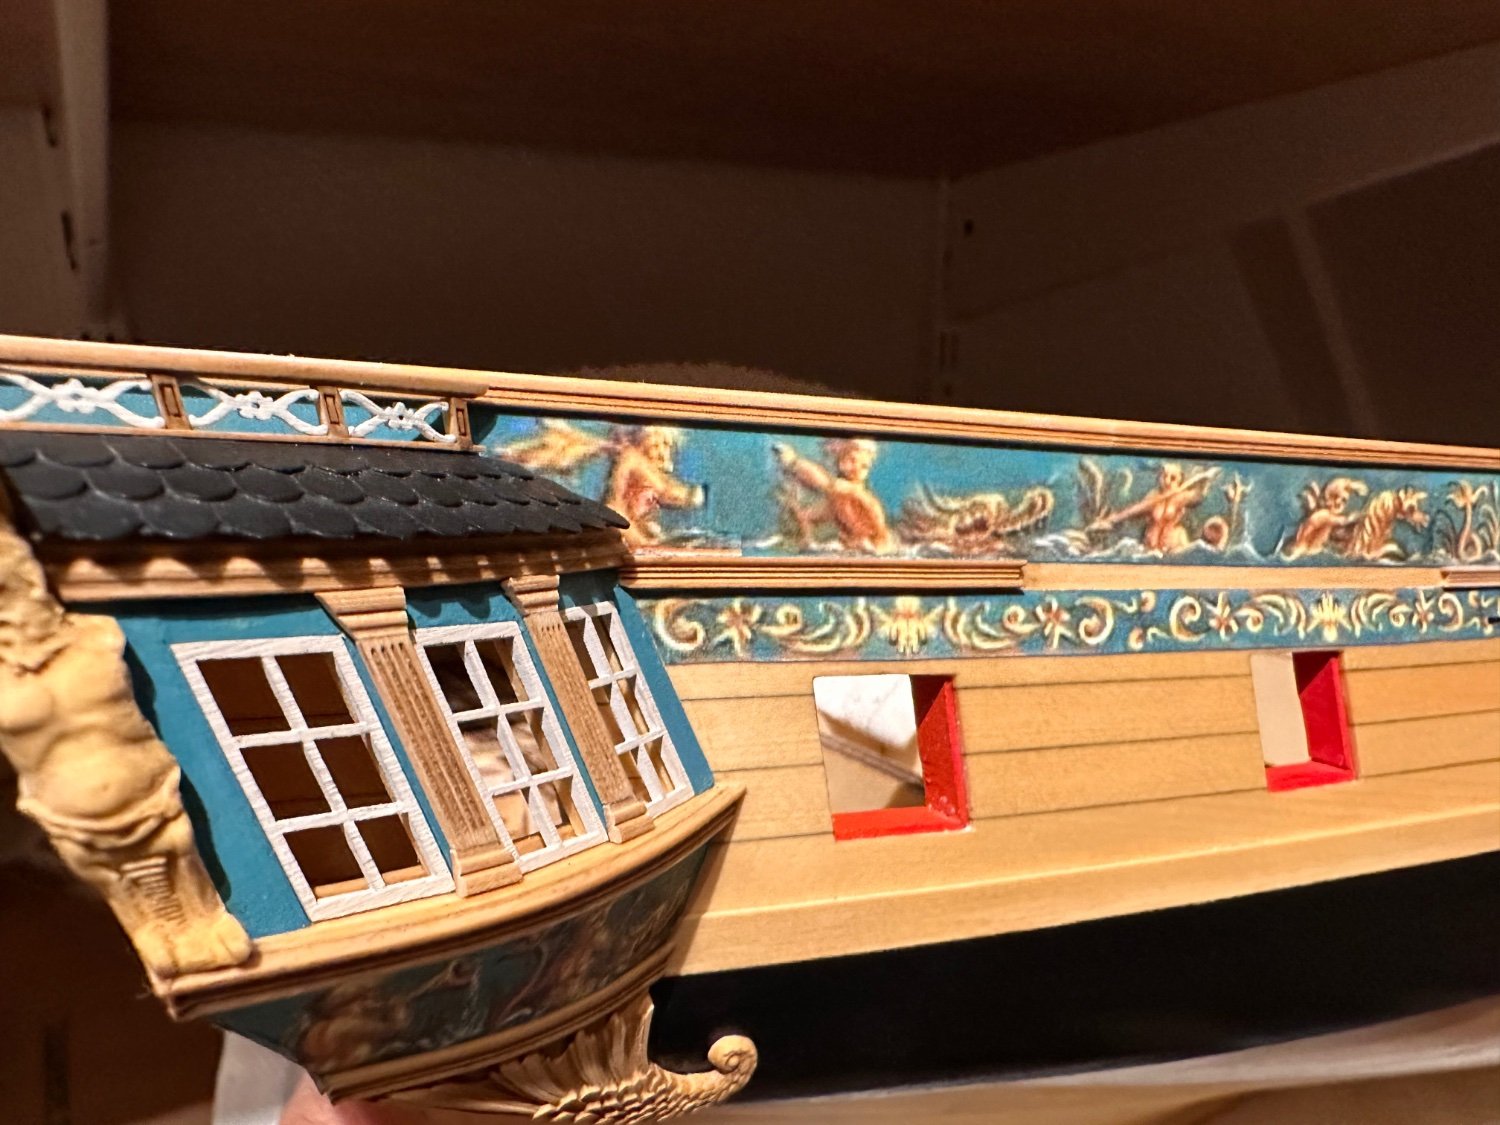
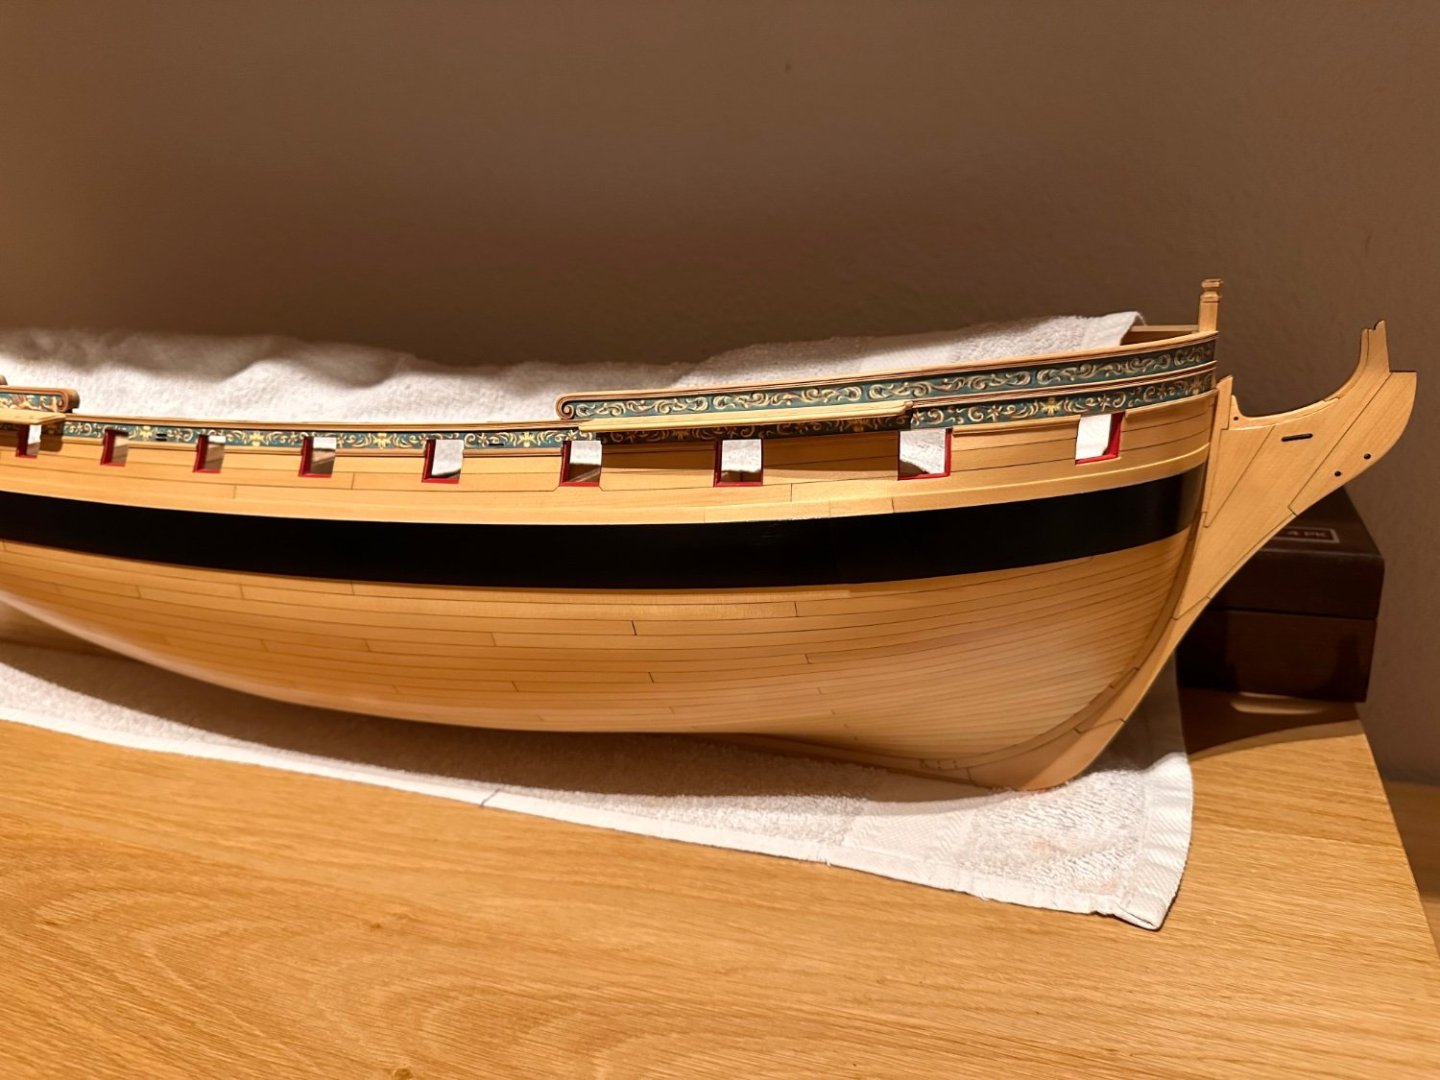
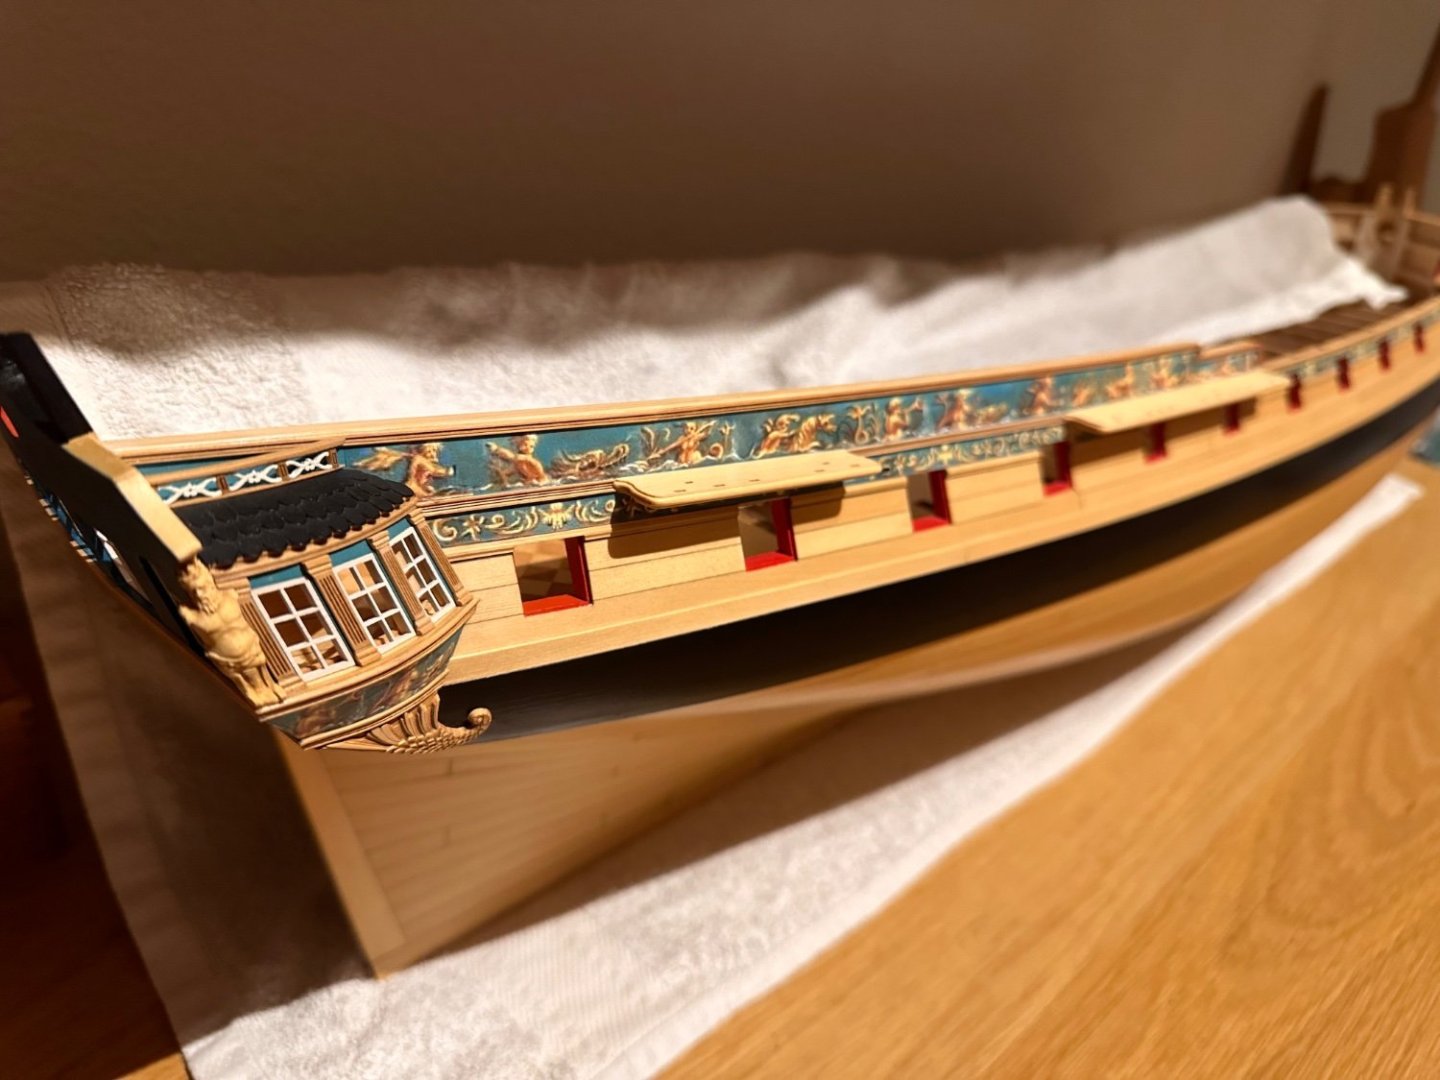
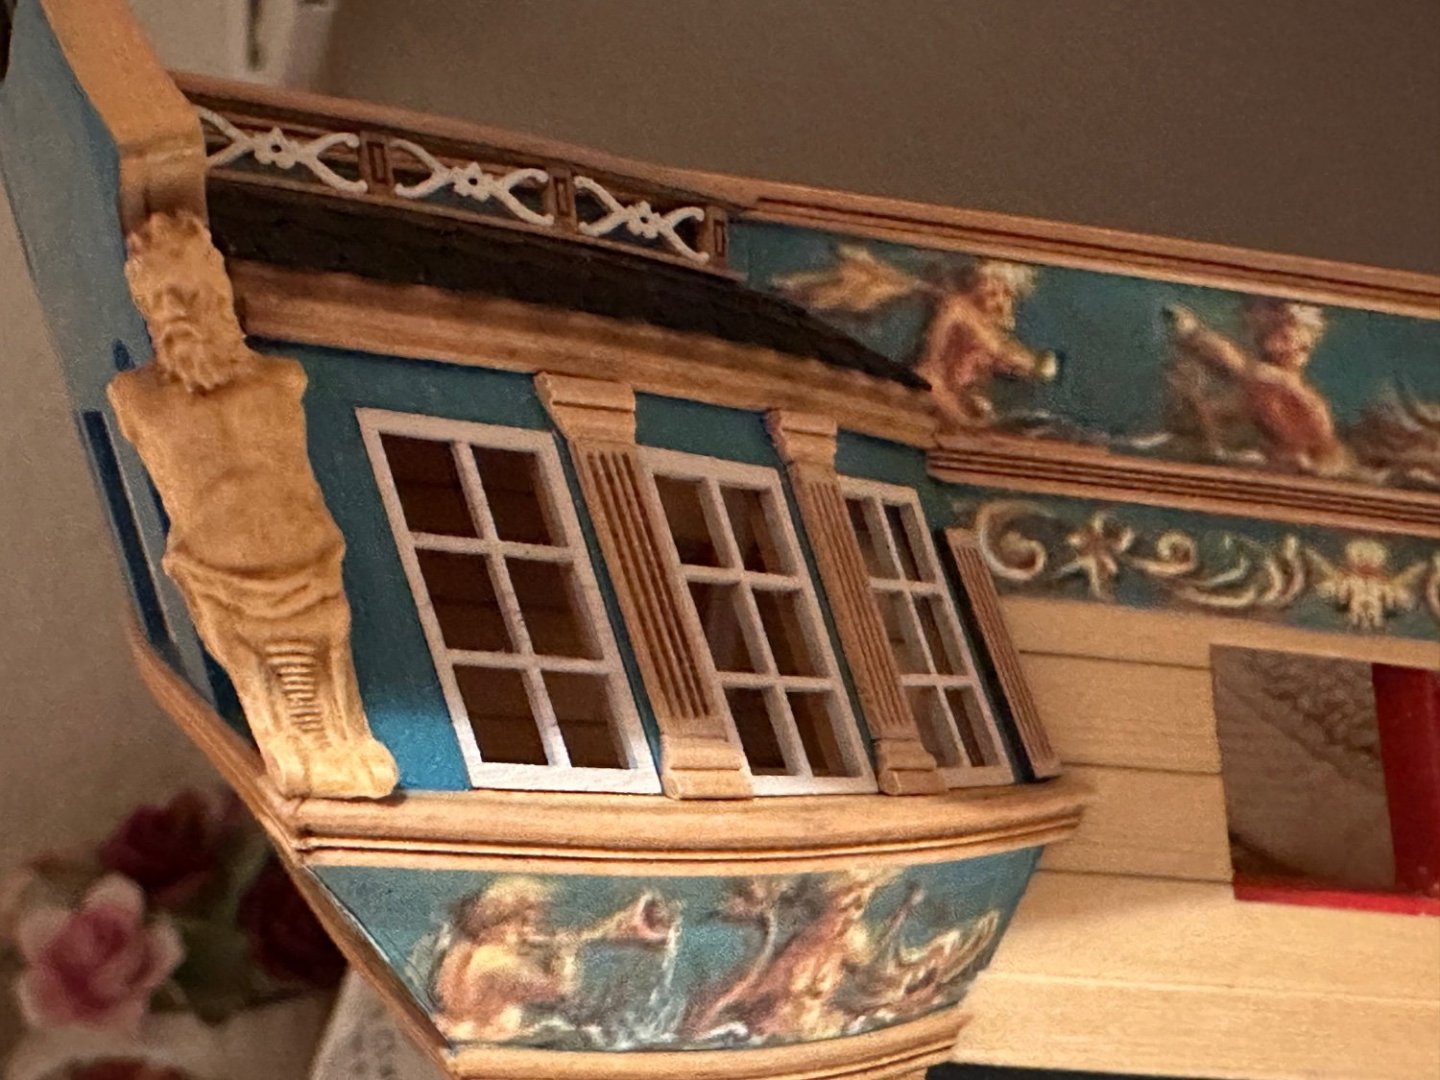
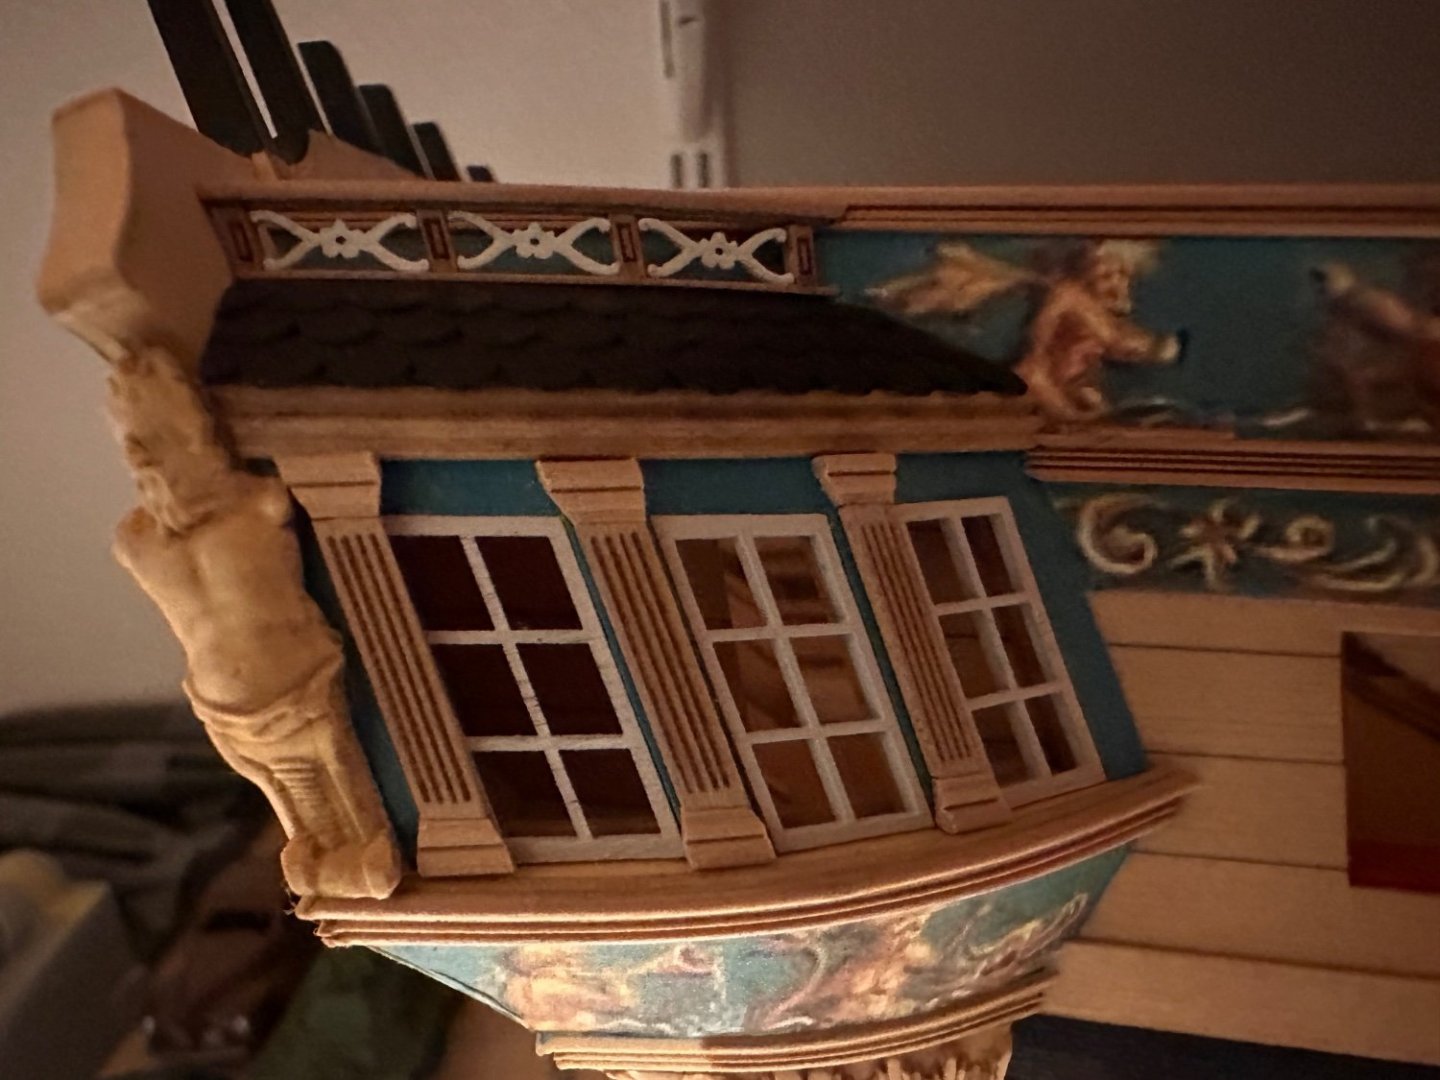
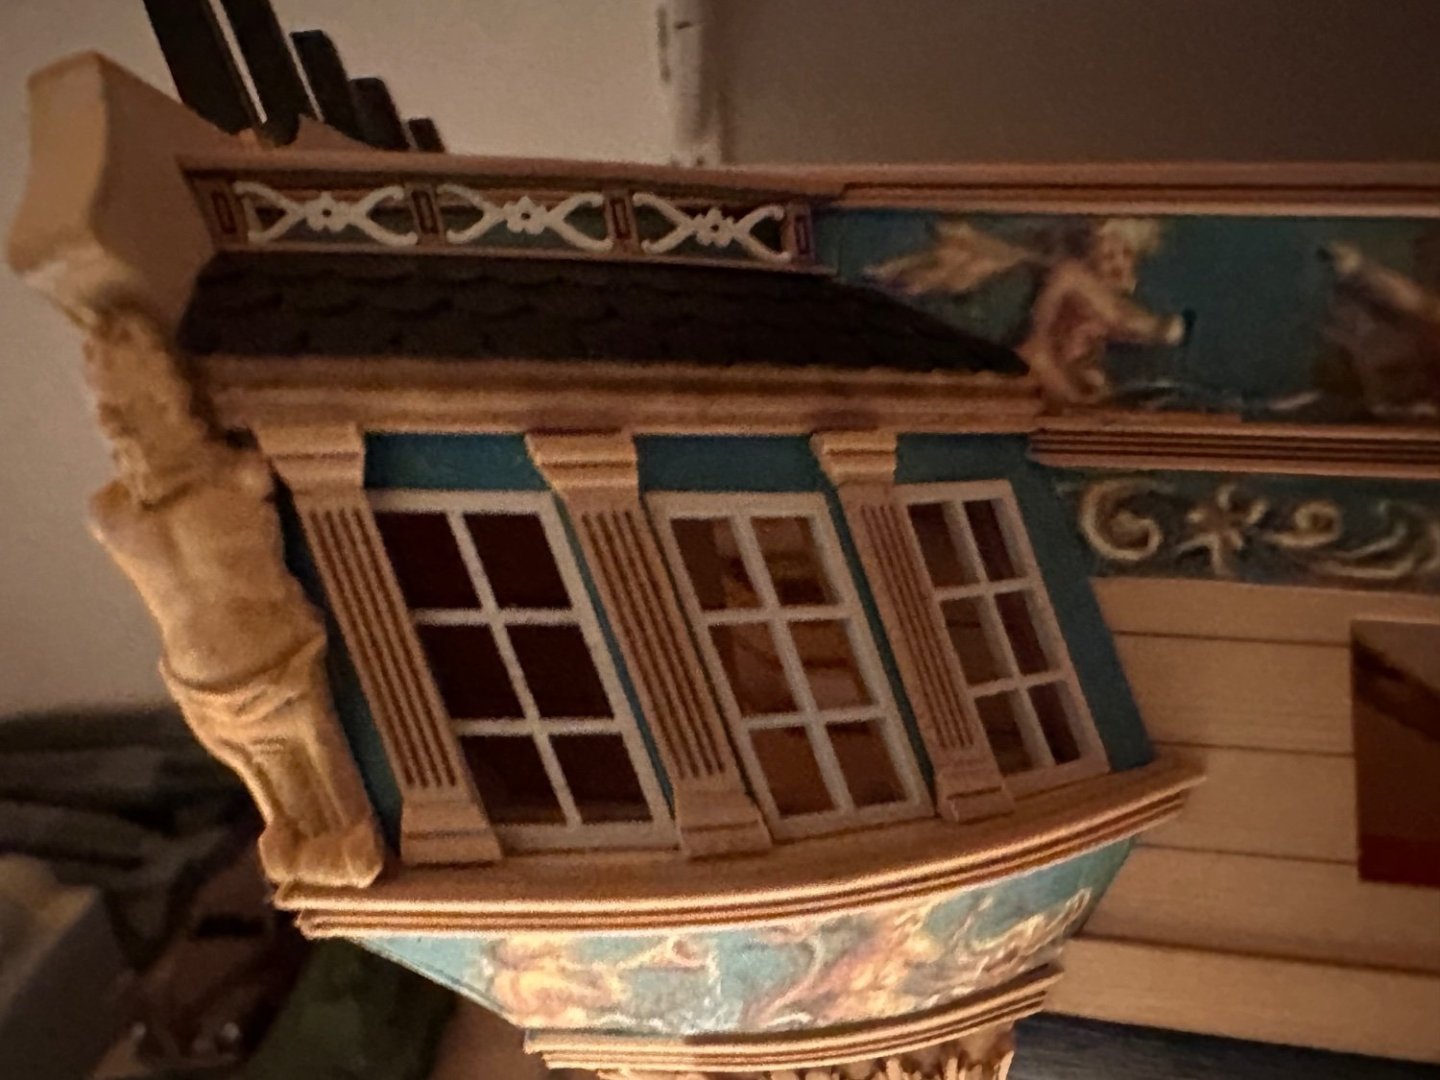
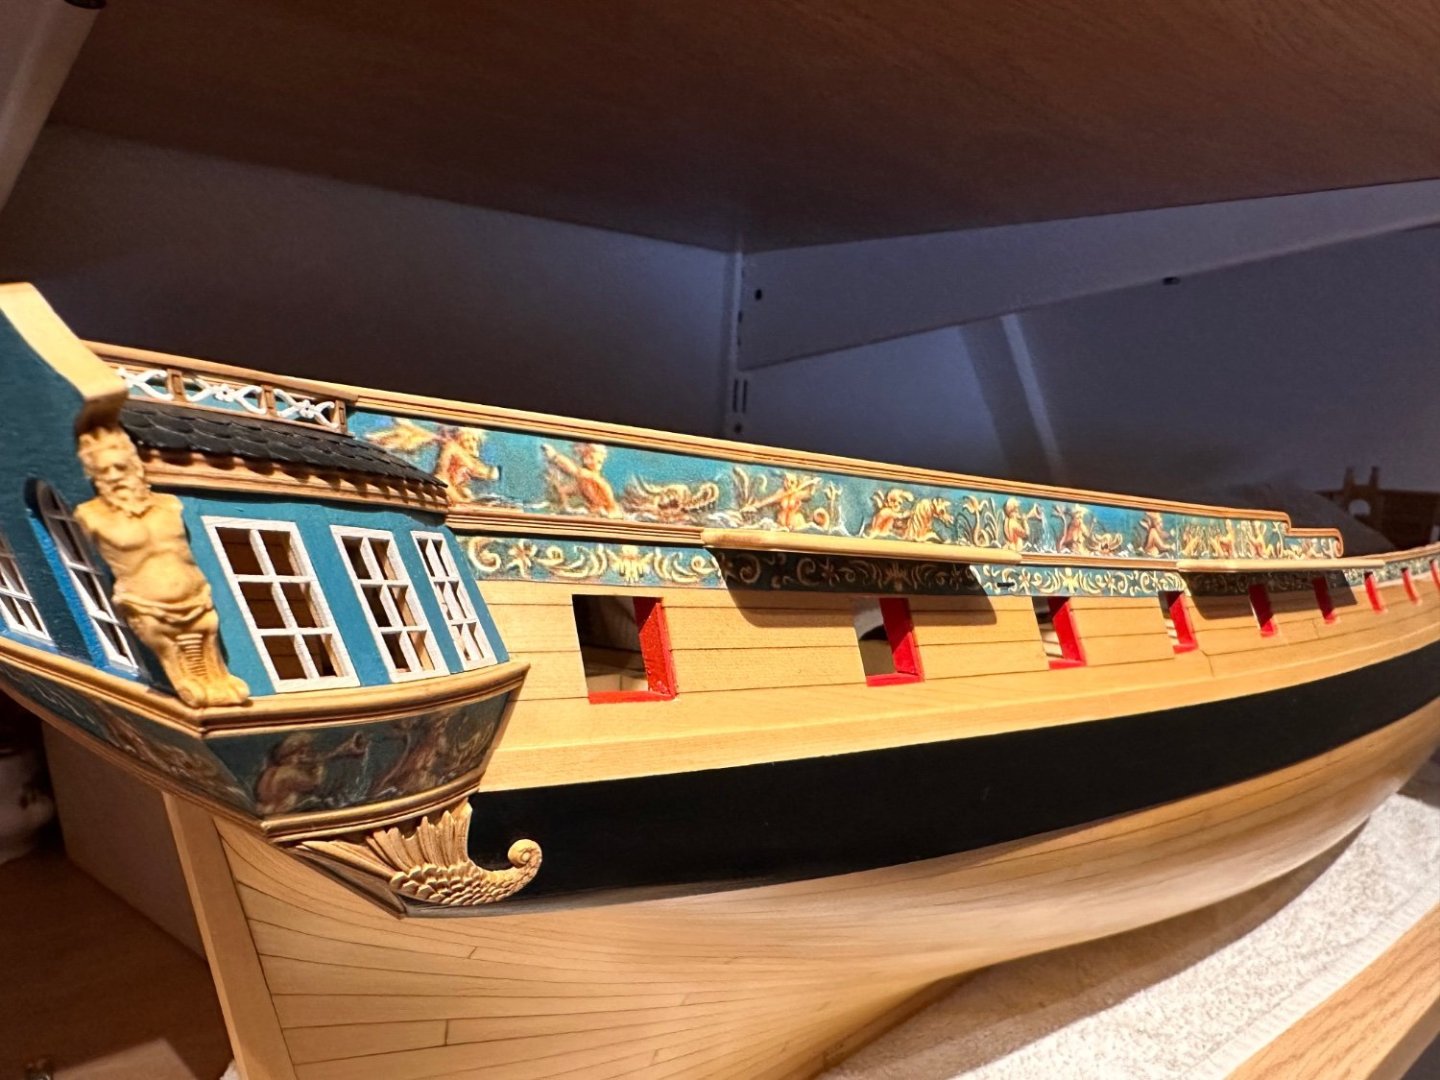
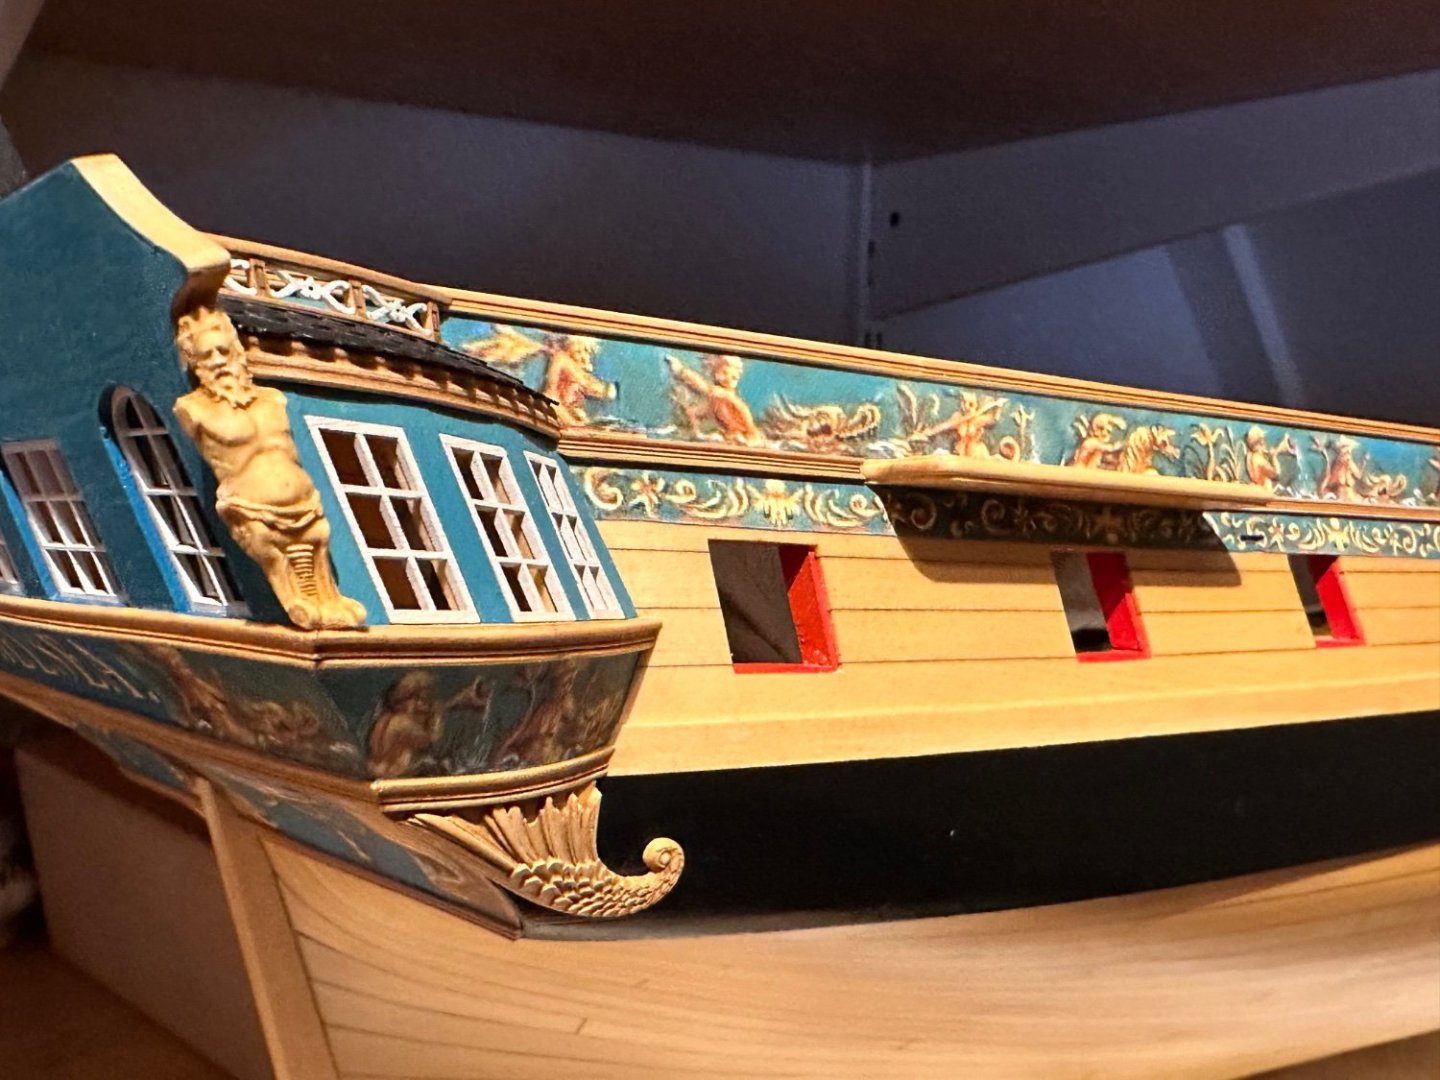
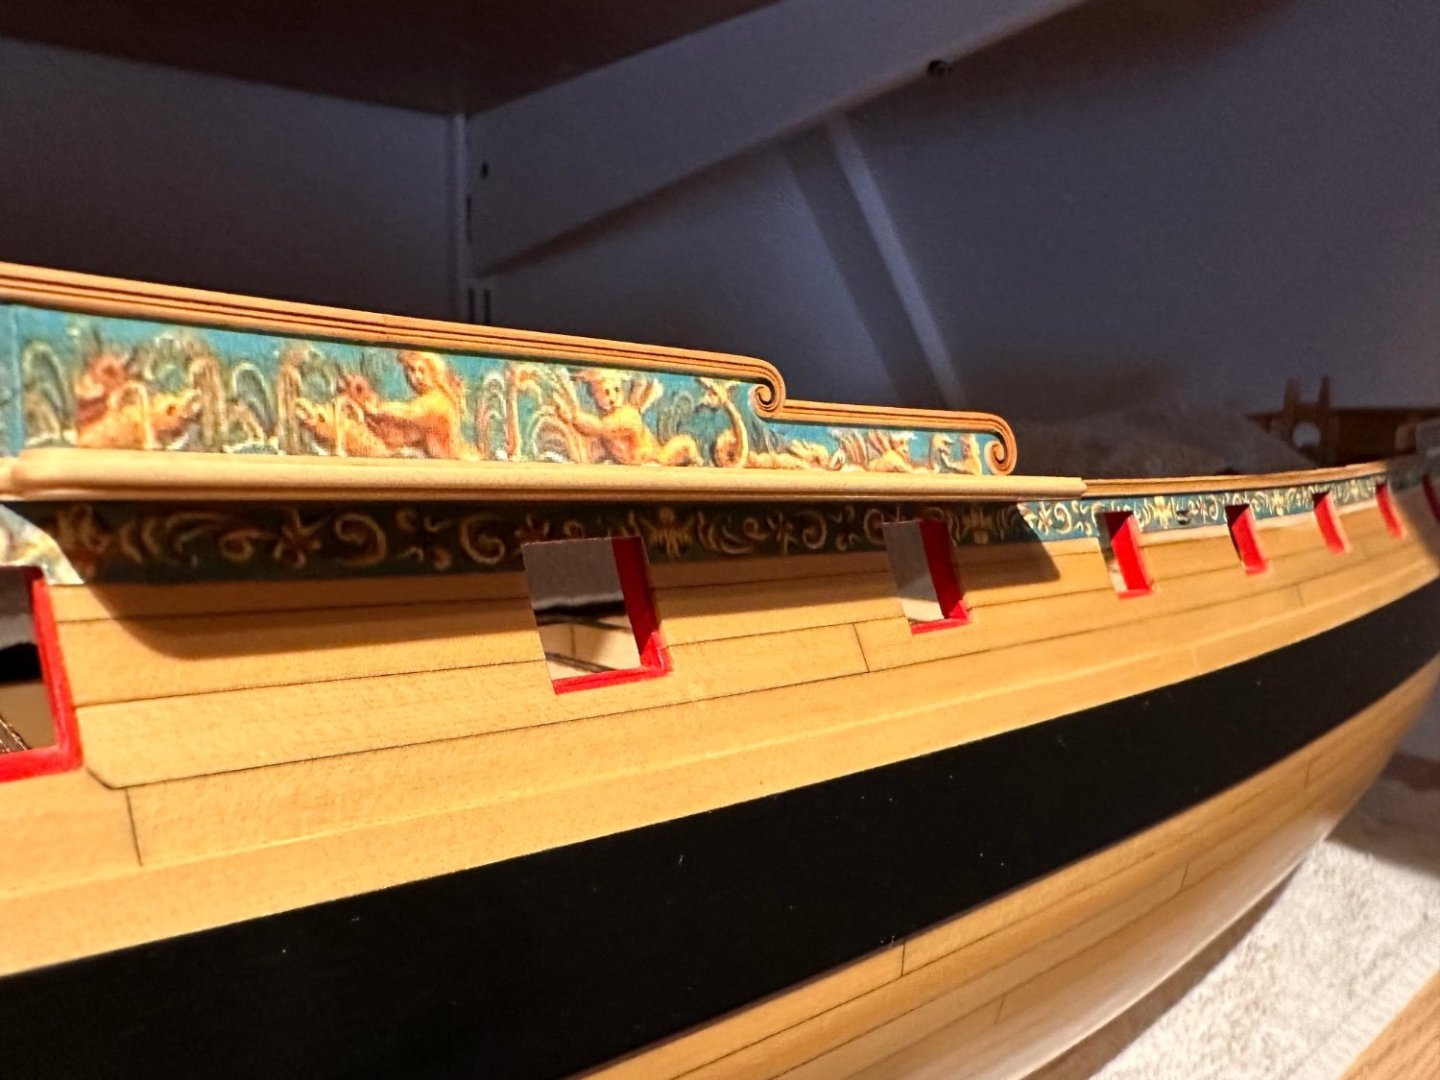
 Good day all, Starboardside chapter 3 finished. Hopefully chapter 3 finished these Christmas Holidays… I added some extra fancy molding above the QG windows as my roof and fancy molding was a little high and I didn’t like the large blue space above these windows. Also on the contemporary model I spotted something that looks more or less the same… The roof and channels are not glued on permanently yet ofcourse! Frank.
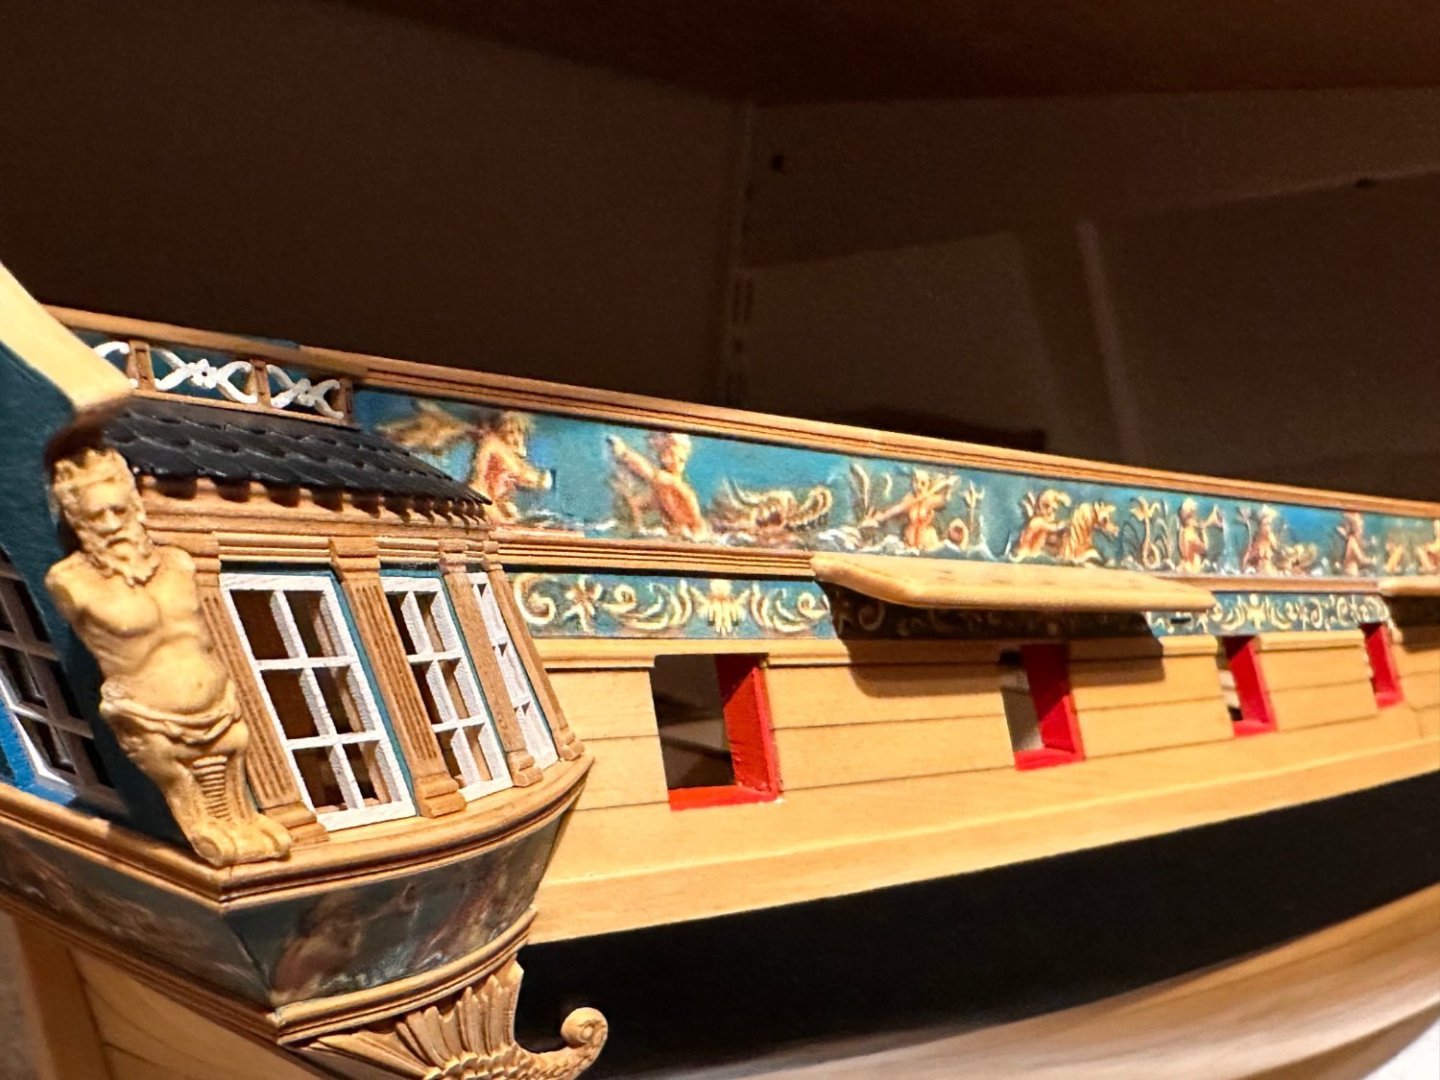

-
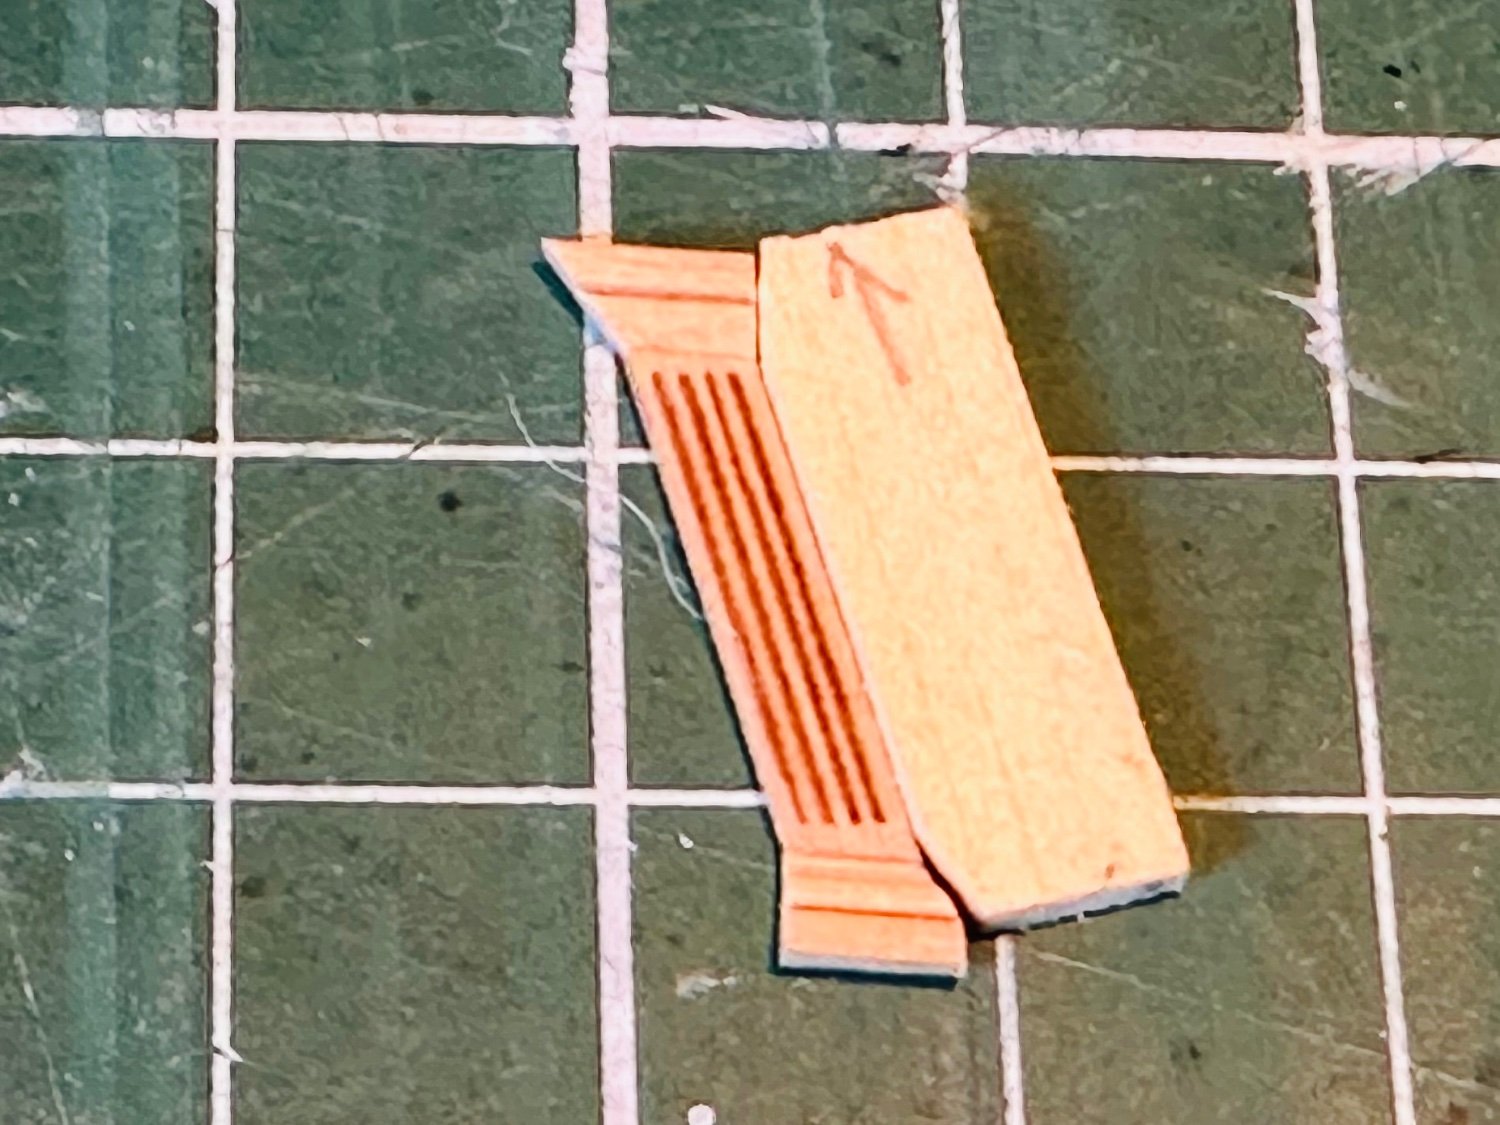
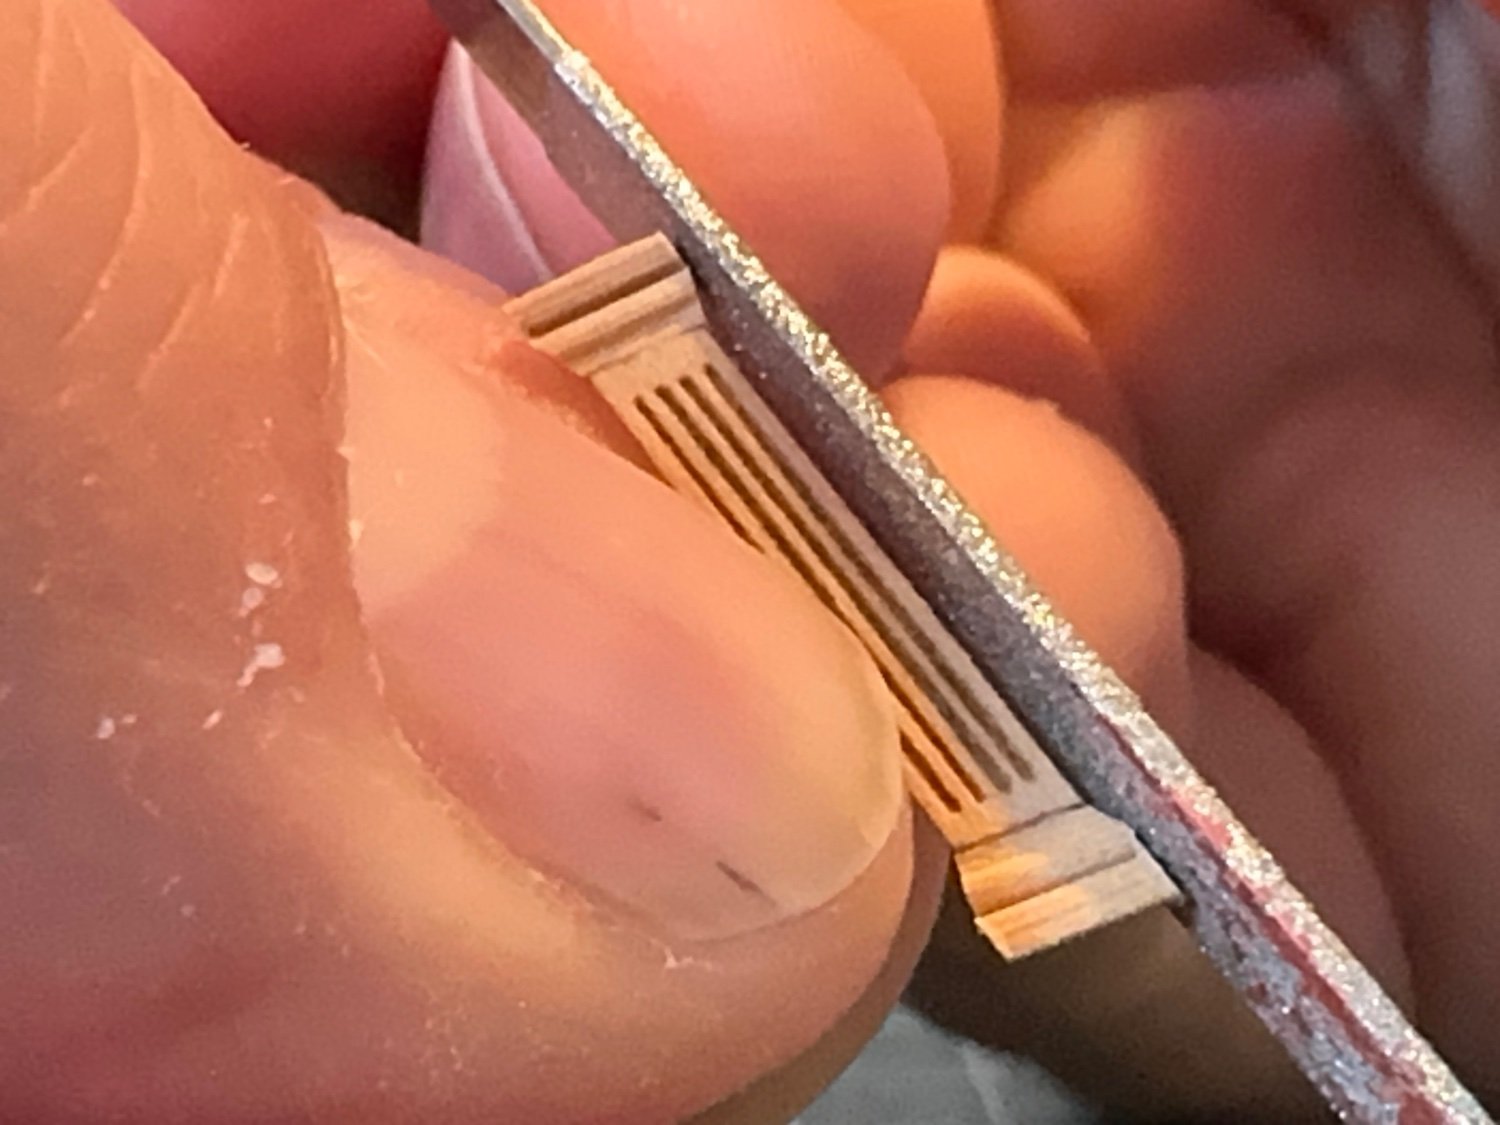
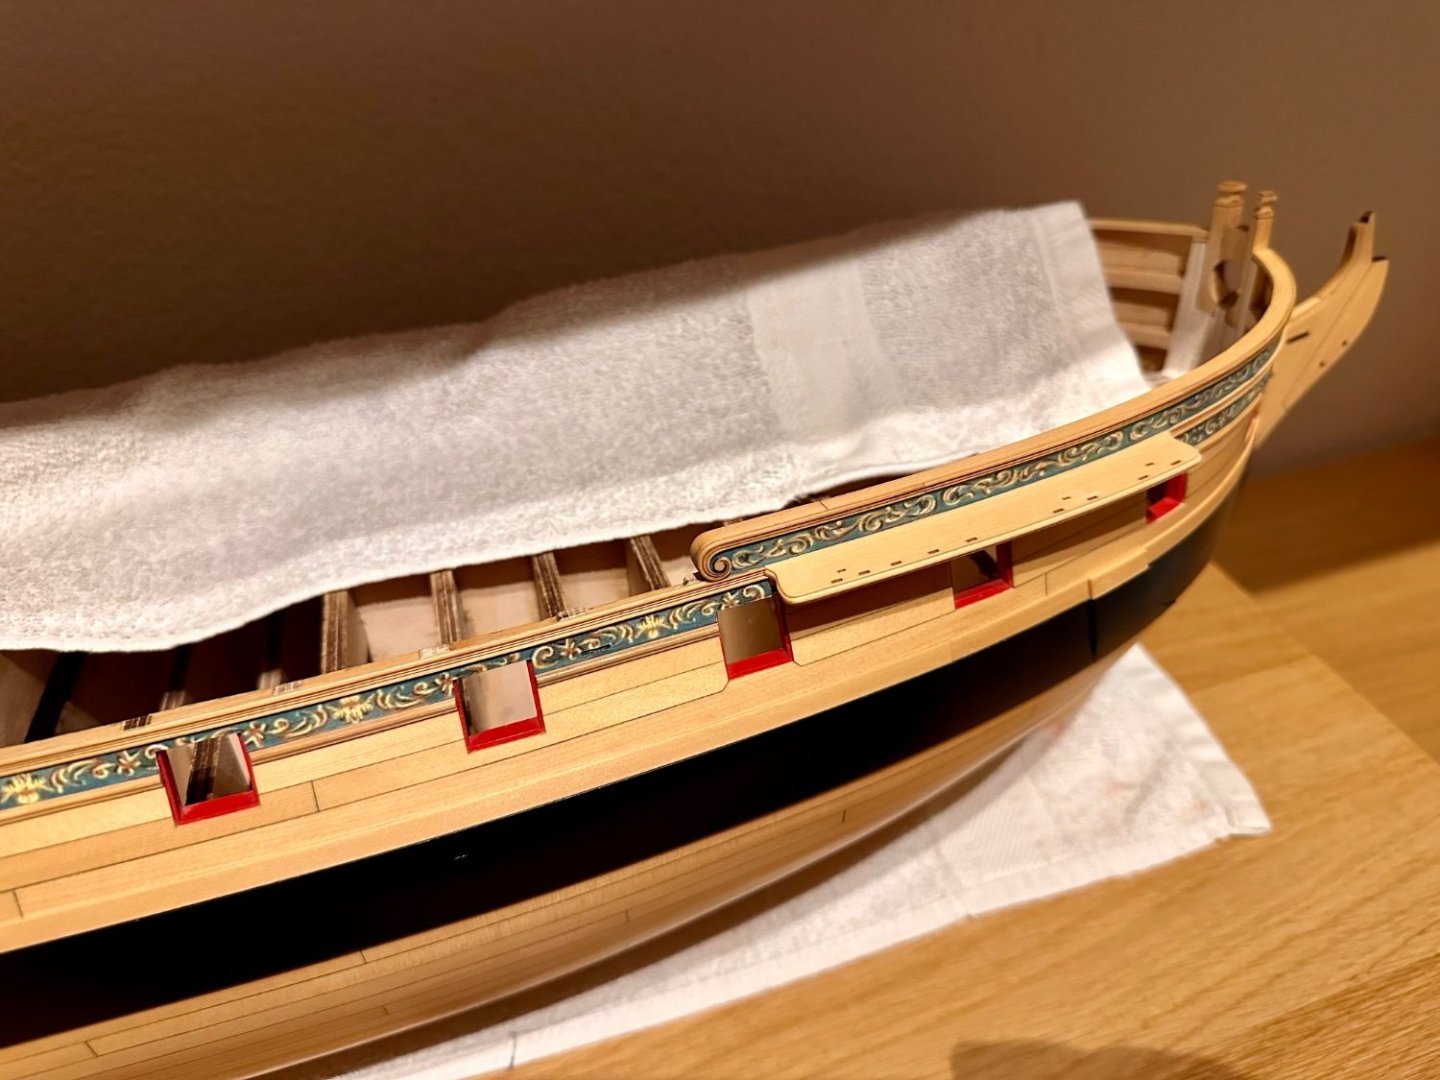
Found my way making the columns…nothing permantly glued on yet… Above the windows still a lot of blue plane empty area…on the contemporary model there is some kind of fancy molded edge there as well. I think I’ll be making that too! Frank.


-
Congratulations Reg! You did it! With such a wonderful and beautiful result to be really proud of! Frank.
-
I had and still have the same feeling Greg! That’s so marvelous about this whole project. Unbelievable that a year ago I would not have dreamed I would be able to build chapter 3 up this point! But as our self confidance grows, we should beware not to overestimate ourselves and keep going slow and steady and work according to the plans Chuck provided. Frank.
-
Thanks JJ, Jim, Greg, Glenn & the likes! It was actually Dusan’s (westwood) idea to leave space for the channels and more…thank you Dusan! I anticipated only on the channels by building them now and placing them between the fancy moldings. The other items are much smaller and for them the fancy molding can hopefully also be chiseled away easily but precisely.. Frank.
-
Small Sunday update. Almost done starboardside. Struggling to get the angles right on the pilar pedestals between the windows. Not satisfied yet, they will still change and transform…nothing is glued yet, the roof, channels (actually chapter 11) and the pilars are still loose. Frank.


-
Just checked Jennifer Coolidge. https://en.wikipedia.org/wiki/Jennifer_Coolidge She will make a great ADMIRAL for sure...at least I would clean all my sawdust for her immediately... LOL.... Frank.
-
Wow! Tha's indeed very, very cool! I hope we can watch the movie here in Europe too later on! So the lead character is in fact trying to be you in his workshop.... But aren't we all trying to be some kind of version of Chuck here!?? LOL... Frank.
-
Hello Andrey, It's bin too long. Any updates? Frank.
-
I'm very glad to see you back at her after such a long time Greg! That stern piece and the blinded window edges look very good! Excellent job! Frank.
-
Beautiful work, design and true to the contemporary model Chuck! I'm hooked... I do hope the POB version will be realized, POF may will be a bit too expensive for me in total, but we'll see. Otherwise it will be my first full scratch build, as I already bought the Speedwell books from Seawatch on your advice... Frank.
-
No Mike, I tried to ask how to make sure the deck supporting beams / logs are perpendicular to the deck planking / axle / keel of the ship. Those beams go into 'slots' or inlets and those have to be exactly opposite to each other to achieve beams / logs perpendicular to the axle / deck planking / keel of the ship... Glenn answered my question perfectly without understanding it, LOL.... Frank.
- 840 replies
-
- 2
-

-

-
- winchelsea
- Syren Ship Model Company
- (and 1 more)
-
Your answer answers my unclear question perfectly Glenn…thanks. It’s my high school level English that made my question unclear I guess… No Greg, I meant it exactly the way Glenn describes it perfectly, but thanks…but indeed the scuppers seem a challenge to get right as well I think… Frank.
- 840 replies
-
- 2
-
-
- winchelsea
- Syren Ship Model Company
- (and 1 more)
-
Looking very neat, clean and beautiful again Glenn! I have a question. How did you anticipate with the cams or inlets at the sides that the deckbeams are perpendicular to the deck planking, i.e. the long axle of the ship? Thanks, Frank.
- 840 replies
-
- 1
-
-
- winchelsea
- Syren Ship Model Company
- (and 1 more)
-
Those are two wonderful and beautiful models in amazing and beautiful cabinets Matthias! Beautiful craftmanship Matthis! Respect! Frank.
-
Understandable Chuck, things must not grow over your head and sell in big enough numbers. But I don't know your opinion on outsourcing the lasercutting work / kit production of your superb designs? I mean, why do everything yourself? You could spend more time and focus on designing and prototyping. When I count the number of build logs, you're becoming very succesful now, or is it not enough quantity to start thinking on outsourcing? Or do you prefer to keep it 'small' and in your own hands? Thanks, Frank.
-
That is looking extremely well and spot on to my eye! Glad to be able to help Jim. Frank.
-
Hahaha, those are Dinky Toys Glenn, and in the back you see Bone China ‘Royal Albert, series ‘Old English Country Roses’, part of a complete English thea set. All English stuff near Winchelsea thus… Frank.
-
All is looking very good thusfar Jim. Once you’ve glued on those lower counter planks positioned with that template you’re using, you’ll see where planks have to start and end. Let the planking journey and fun begin! Frank.
-
Thanks, James, Dusan and ofcourse the likes! Frank.
-
Beautiful, inspirational and simply amazing work Dusan! Frank.
-
What will roughly be the total price of the POB version Chuck? Thanks, Frank.
-
Following with great interest JJ! Have you got any time release schedule yet for a first chapter? Frank