Chuck Seiler
-
Posts
1,878 -
Joined
-
Last visited
Content Type
Profiles
Forums
Gallery
Events
Everything posted by Chuck Seiler
-
 Outstanding! You can never have too many clamps. I recommend you post this as a stand-alone in the "Modeling tools and Workshop Equipment" topic.
 -
It looks great. I almost have my rocket up and running. I have several colors and sizes of GM from Wawak so I will see how it goes.
- 950 replies
-
- 1
-

-
- syren
- model shipways
- (and 1 more)
-
What thread are you using? Gutermann Mara?
-
New Modeler, eager for advice!
Chuck Seiler replied to Joseph F.'s topic in New member Introductions
I thought that was just plain old Virginia. I knew there was a WEST Virginia, but... 😁 -
From my understanding of ships of the day, between the tar, wood, sails and cordage, they were ALL potential fireships...whether you wanted them to be so or not.
-
New Modeler, eager for advice!
Chuck Seiler replied to Joseph F.'s topic in New member Introductions
EAST Virginia? Did we get a new state when I wasn't looking? -Does "Hobby knives" include an Exacto? My #1 tool. (I have graduated to scalpel, but you get the point). -Dremel, my #2 tool -Clamps...you can never have too many. Check out the various build logs and buy the clamps as you need them. -Patience. -Alcohol-Isopropyl. As Azzoun said, all models get screwed up. Using alcohol to unglue the defective parts is invaluable. ...and DO unglue the defective parts. Trying to compensate for errors only make the errors worse. Don't ask me how I know this. -Dictionary of nautical swear words...for when you just spend 4 hours on a part only to drop it and not be able to find it. -Have fun. Ask question and don't be afraid to share your work. -
Congratulations on your 1 year anniversary. A good build log is great. It can provide a wealth of information. Very often it tells us the result but not the process. Your videos are fantastic because they show us not only what you did but how you did it. I encourage everybody to check out your various videos. Even if they are not making the ship you are working on, the processes are the same.
-
Quite true. Reading about the conditions while building my PHILADELPHIA was quite interesting. WASHINGTON would have been the same. At the time, the location was pretty much in the middle of nowhere. They builders had the benefit of a working (captured) lumber mill, and alot of wood but the other necessities such as cordage and ironwork...not so much. Those had to be purchased from and carted in from shipbuilding locations that were already short of supplies because of their own needs. I also recall them having problems finding craftsmen. They sometimes had to pay very handsomely...noting at one time the craftsmen were making more than the admiral of the American navy. Half inch hinges are fine.
- 504 replies
-
- 2
-
-
- washington
- galley
- (and 1 more)
-
Ah, ship-in-a-bottle tool. I see. In that case you also need a professional bottle emptier. I volunteer.
-
As I strive for smaller tools, I wonder why you would need forceps that long?
-
I disagree a little with Allan. There are many replicas out there that would replicate the sound quite well (assuming the engine is turned off). You didn't specify what kind of sailing vessel. There are quite a few brigs, schooners and small vessel...larger, not so much...although there are a couple frigates that get out and about once in awhile. Also, an 19th century schooner will give a similar result as an 18th century one. Also, although sound attenuation will be a little different between wood and metal, I can provide some input based on years on a naval destroyer. You do not specify size of vessel or sea state. A wooden ship at sea is an orchestration of wood working against wood. Alot of groaning and creaking and this is increased with the increase in sea state (along with the sound of people barfing over the side). The larger ships would have a deeper sound. Yes, you can hear the water below deck, thru the hull. Below the waterline you can hear sounds as well. 18th century ships did not have sonar...on modern day destroyers you can hear somebody else's sonar from a distance. I heard whales once. The sound aboard a ship inport is universal...sailors complaining about not being able to go ashore fast enough.
-
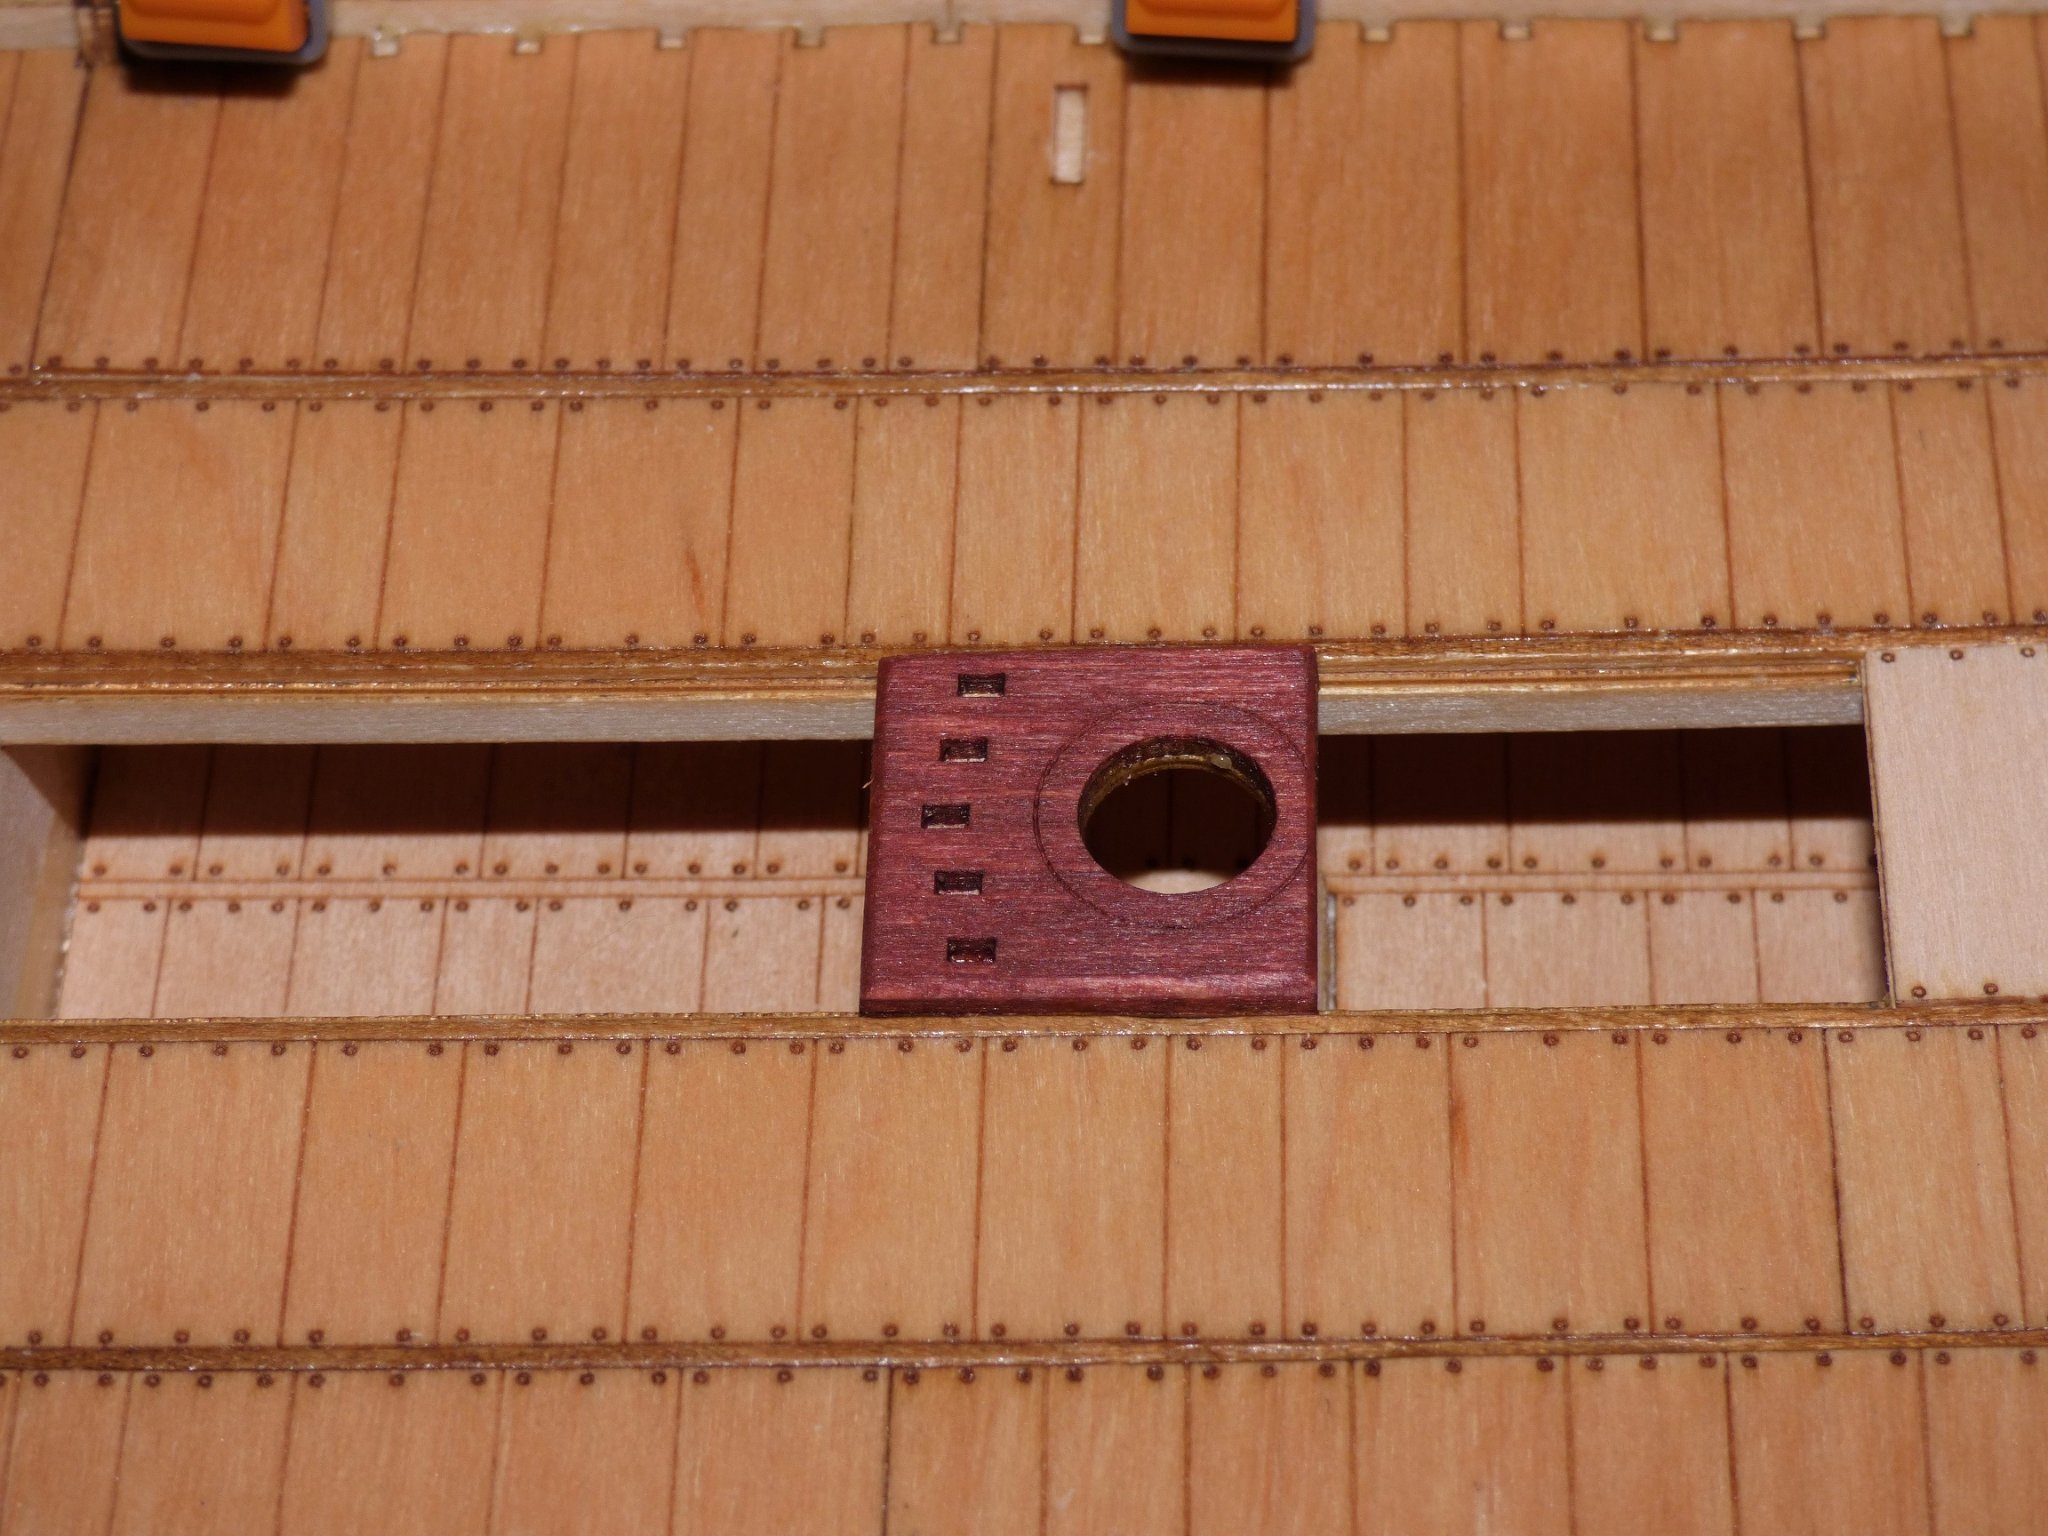
Progress Continues... Stern hull supports and false frames for aft strakes are in place. Aft strakes in place. Vertical knee and support added to port side above-deck deck beam. Blackened bamboo peg/trunnel is test fitted into knee. This will serve to strengthen the knee and act as 'bolt'. Mast support in place. I decided to add a little color by staining it "Sedona Red" Whadya think?

- 130 replies
-
- 6
-
-
- wütender hund
- hanseatic
- (and 2 more)
-
Eric, Great presentation. Many thanks.
-
I'm late to the party. Louie da Fly ate all the popcorn. Very nice build! What is next? I know of a good cog kit.
- 48 replies
-
- 2
-

-
-
- dusek
- viking knarr
- (and 1 more)
-
Oh! That's right. Still, I should strive to be more careful.
- 130 replies
-
- 1
-
-
- wütender hund
- hanseatic
- (and 2 more)
-
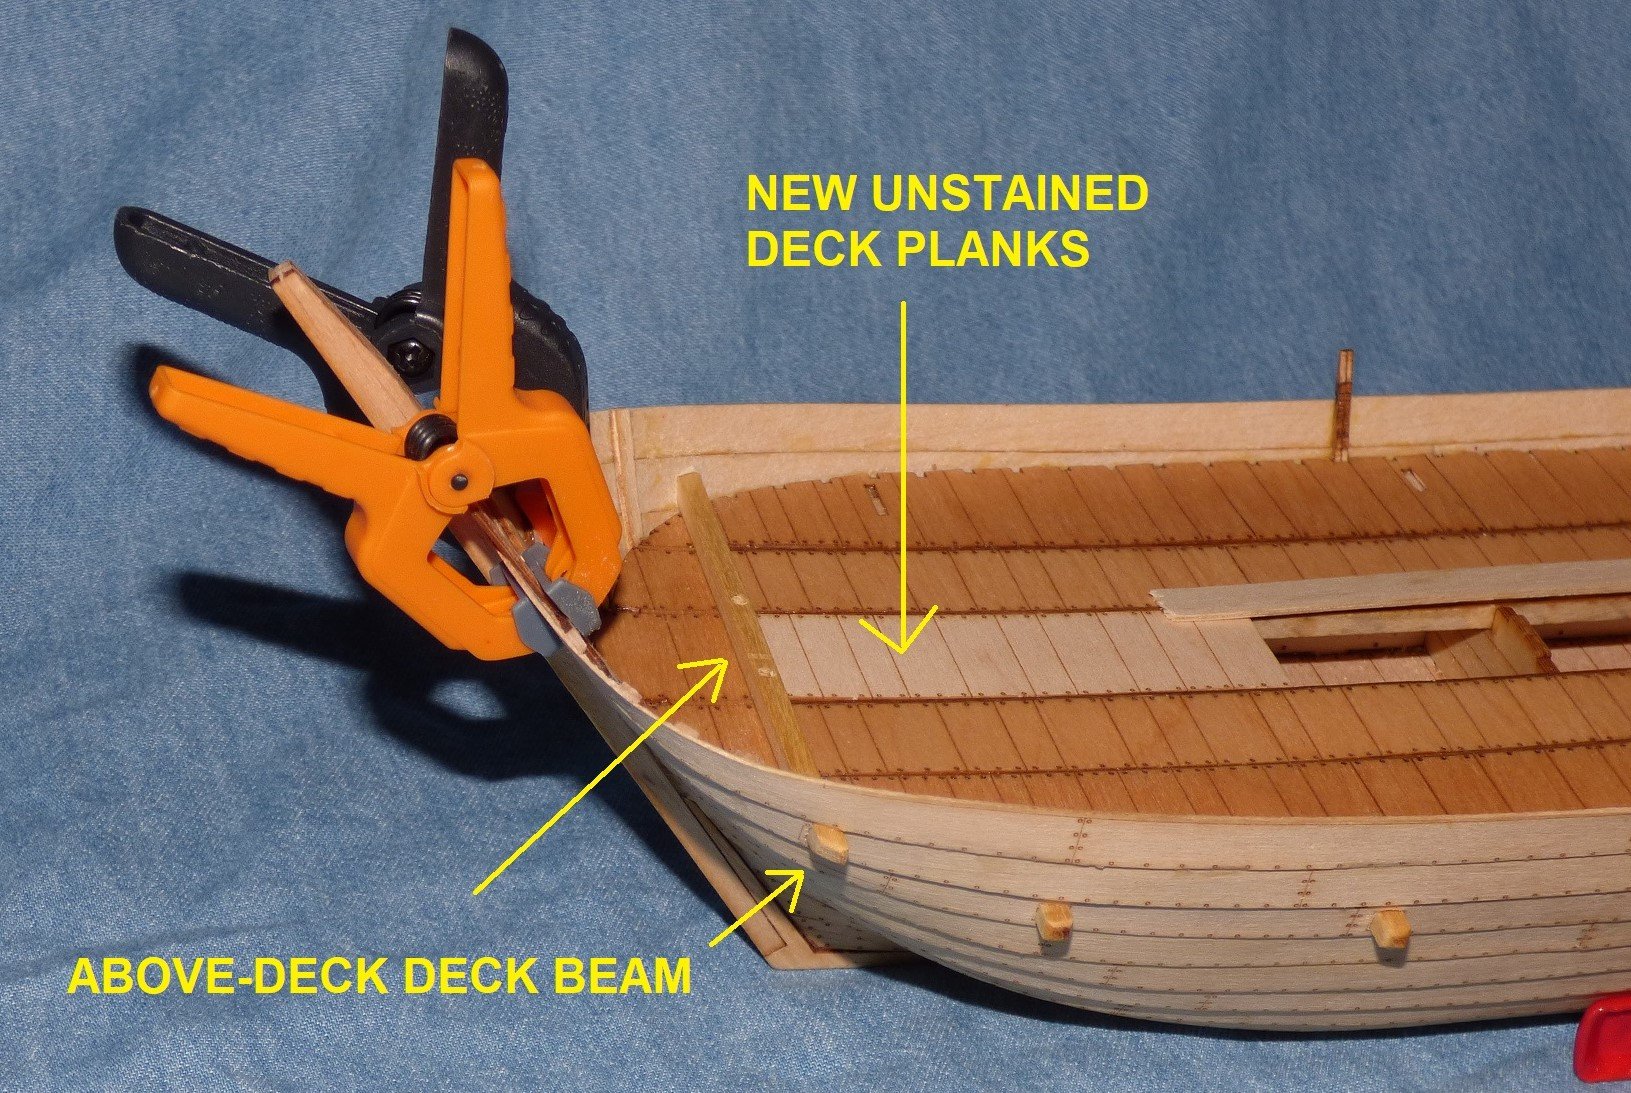
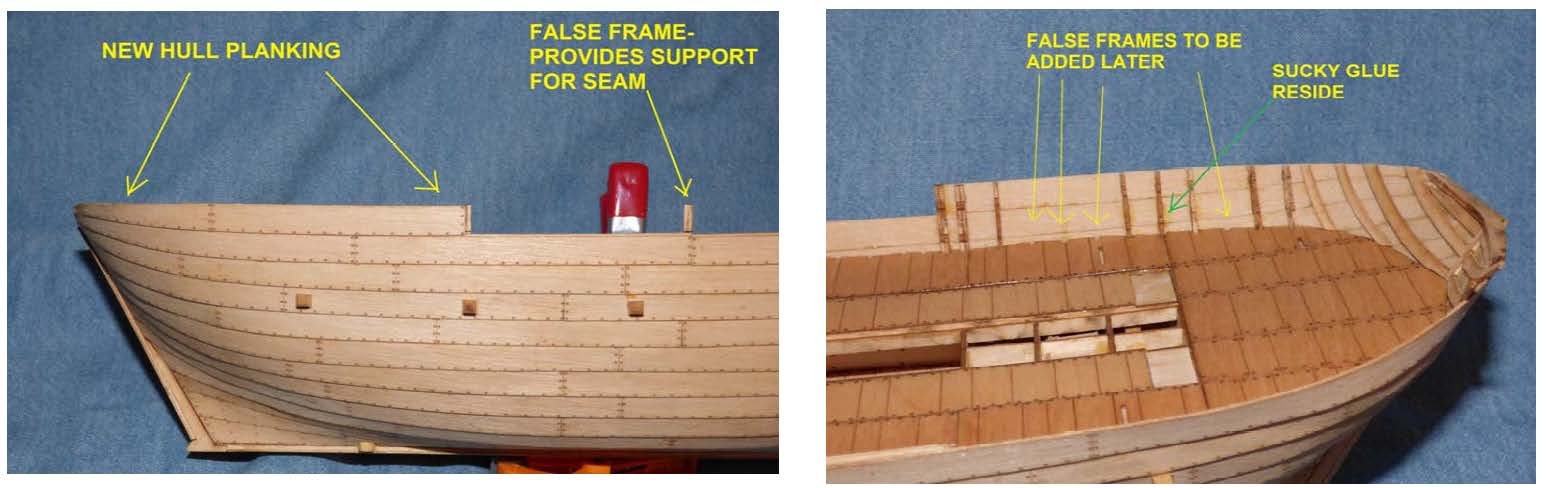
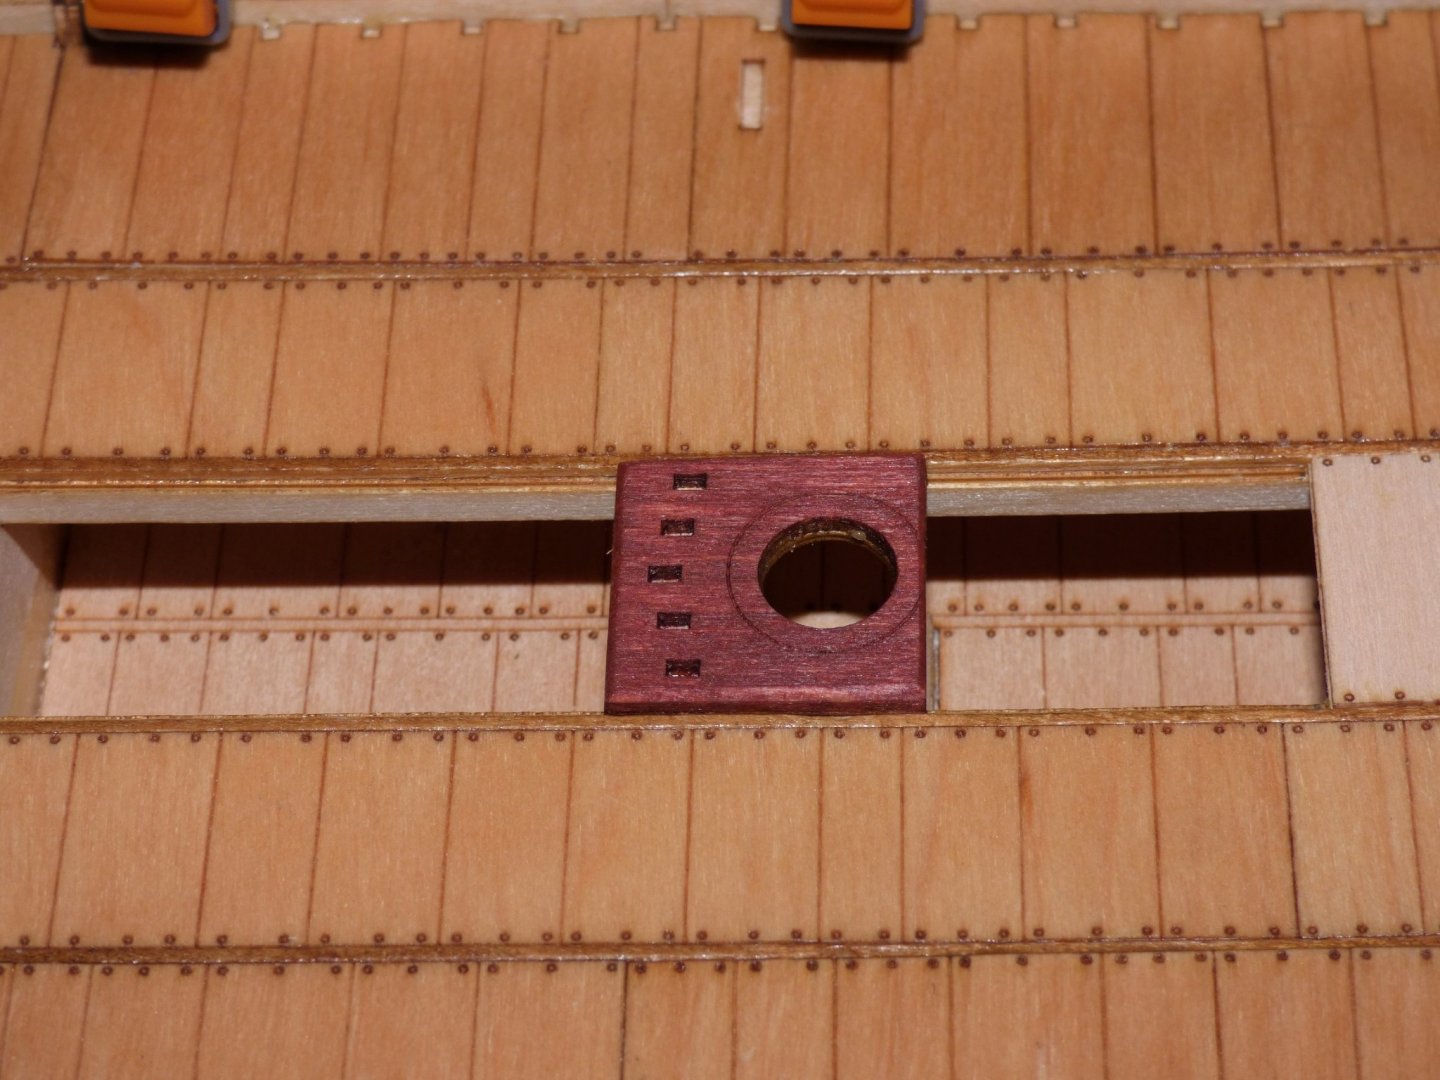
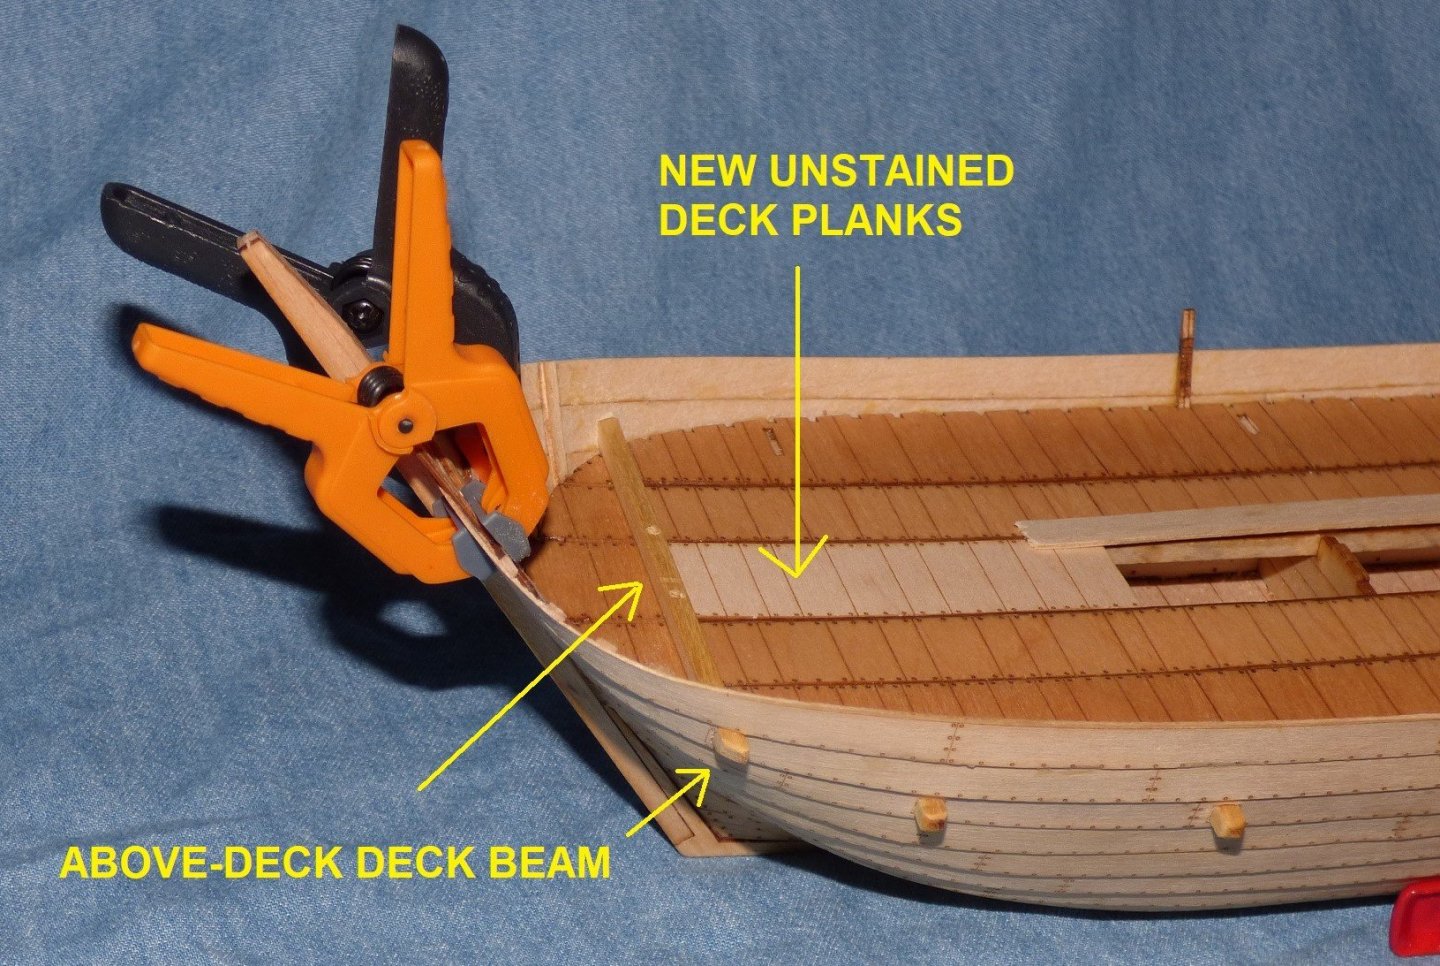
Progress continues. A number of false frames are installed in the stern area starboard side. Once dried, the aft-most plank section of the upper strake is installed. With all other strakes I started at the bow and worked back because it was critical that the plank placement on the stem be exact while the stern could be fudged. With the finals strake I started at the stern because it will eventually end with a 'flying end'. I chose not to install all the false frames before installing the plank. I found it works better for me. I will add the remainder later...probably right after I post this. My glue job is less than great. This will be under the stern structure so will not be too visible. I need to work on my technique. I added one false frame right at a location where there is a seem in the strake below. This adds strength to that strake and also provides support so I can dry-fit the forward plank group. I need to do this to be sure where the strake actually ends because that is where the above-deck deck beam will need to be located. As currently cut, the hole can be expanded 1/16" fore or aft as needed. Hole cut and beam installed. I had to install the forward section of the center row of deck planks because it tucks under the beam. You can tell the diff between the stained and unstained planks. I left the remainder unplanked. This allows me to pick up the model without having to touch the delicate edges.

- 130 replies
-
- 4
-
-
- wütender hund
- hanseatic
- (and 2 more)
-
Eric, Please let us know when this can be viewed online.
-
BEFORE installing the top strake? I agree anything glued in place is strong...where it is glued. It is my experience is that I install all the frames and don't immediately 'cover' them with a plank, I will eventually snap one or more off. As I said, I am quite sausage fingered.
- 130 replies
-
- 3
-
-
- wütender hund
- hanseatic
- (and 2 more)
-
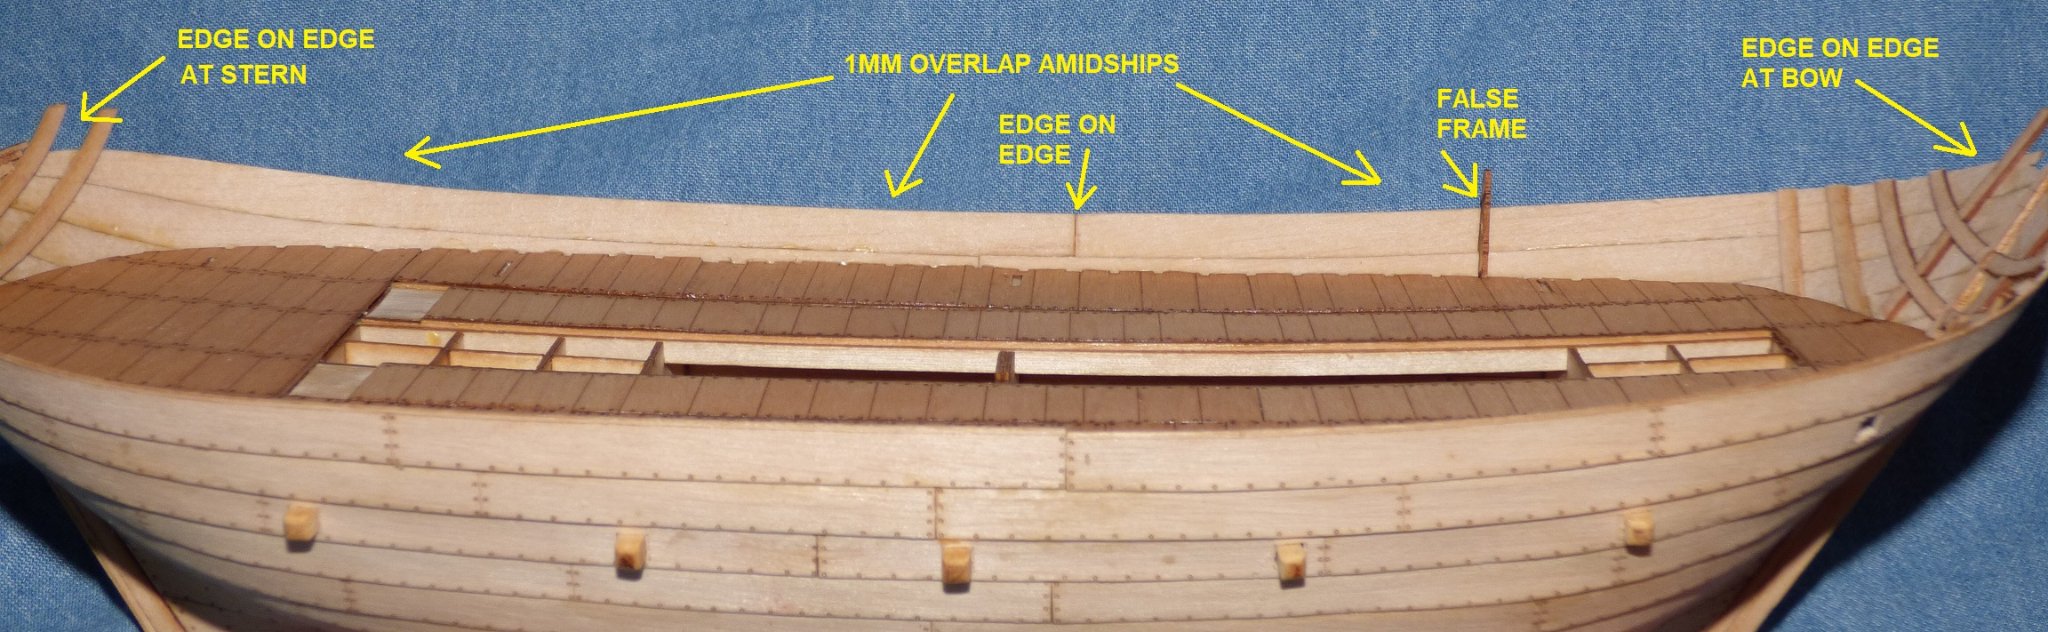
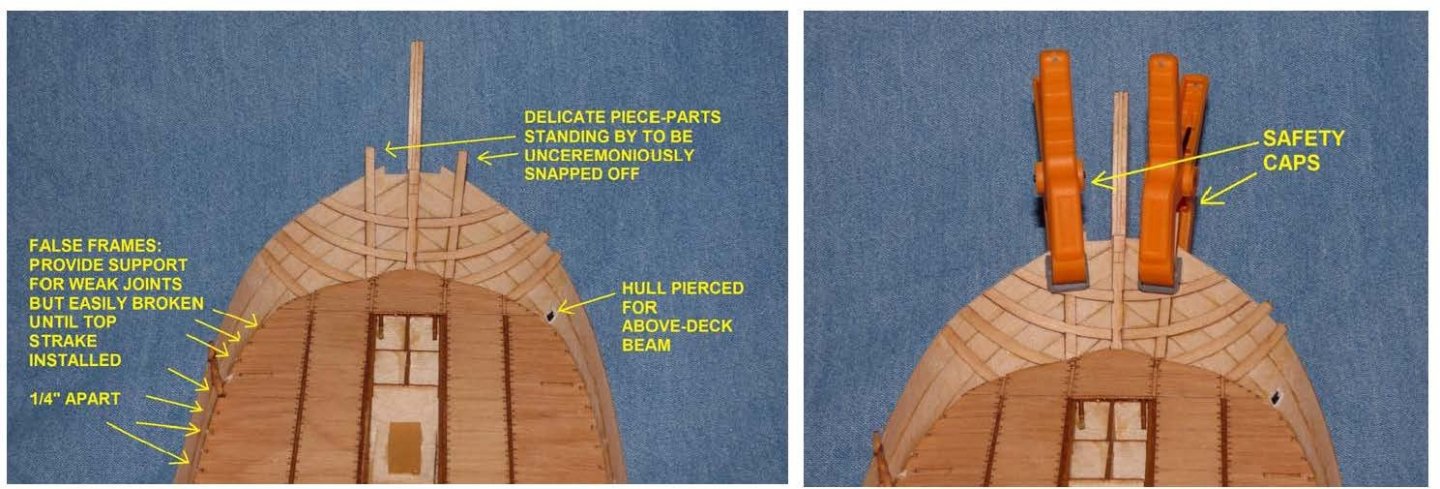
Progress continues, but it is slow. I keep popping the glue joints. I am at a very delicate phase of the model. The first strake above the main deck overlaps the one below by only 1MM along most of the hull and edge glued at bow and stern. Supporting false frames and uprights are not added until later. My sausage-fingered handling of the model often cause a seam to pop. Huzzah!!!! Equilibrium! The plan says to install the false bulkheads first, then the support structure fore and aft. The false frames are spaced a quarter inch apart along the length of the hull and stick up until the top strake is added. Sixty six vulnerable pieces waiting to be snapped off. I decided to do the fore and aft support structures first. Added strength with only 2 breakables. "Safety caps" added.

- 130 replies
-
- 6
-
-
- wütender hund
- hanseatic
- (and 2 more)
-
Rodolfo, I thought about that but once dry the difference is alot less. Pressing on.
- 130 replies
-
- 1
-
-
- wütender hund
- hanseatic
- (and 2 more)
-
'The Terror' - BBC series Mar 2021
Chuck Seiler replied to Rik Thistle's topic in Nautical/Naval History
Cold as well.🥶- 8 replies
-
- 3
-

-
- John franklin
- 1845
- (and 2 more)
-
I have purchased cherry and maple from Ocooch. Good quality. Great service. Custom thickness as well.
-
I have used Higgins Sepia calligraphy ink, treated with Renaissance archival wax for standing rigging. I needed to use several coats of ink to get it dark enough, but still probably should have been darker. (Note 1. Most kit standing rigging is black but if you look at some of Chuck's past post on rigging, the consensus is that true pine tar rigging was a very dark brown. Note 2, Higgins ink is not water resistent. The archival wax kind of waterproofs it and is non-acid, unlike beeswax. I am hoping to get a Syren ropewalk soon (if Chuck doesn't sell out the next batch before I can jump in) but am unsure if I will be up, running and fully functional (i.e. making good rope) before I am ready to rig my current project. I am experimenting with a mixture black and sepia Dr. Ph. Martin's Bombay India Ink. They both are supposed to be waterproof.