Landlubber Mike
-
Posts
4,551 -
Joined
-
Last visited
Content Type
Profiles
Forums
Gallery
Events
Everything posted by Landlubber Mike
-
 Really nice work Mark. The personal touches really make for a nice build.
- 652 replies
-
- 1
-

-
- royal william
- euromodel
- (and 1 more)
-
Beautiful work Doug. Agree with BE, the colors you are using are working very nicely together.
-
Beautiful work J.P. Lot of character and artistry in your model. You're setting the bar very high for us other LAR builders
-
His books are excellent. I would highly recommend his more recent book, where he displays some more refined techniques, and where the pictures are in very high quality color: https://www.amazon.com/Building-Miniature-Navy-Board-Model/dp/1848321864/ref=la_B001JP2ALM_1_3?s=books&ie=UTF8&qid=1479145996&sr=1-3 I have to say, I always thought that I would jump to 1:48 scale or bigger on my future scratch builds. After reading his books and seeing his work, I'm rethinking that. It's astounding the level of detail that he is able to create at the 1:200 scale or thereabouts, at less cost for materials, and less space in the workshop and home.
-
Ebony is very flexible at 0.5-0.7mm thickness.
-
Hey guys, sorry, been busy and haven't been on MSW much recently. Sorry to have missed your posts. USS Frolick, thanks for the warning. I started using ebony on my Charles Morgan, and have been very careful to the point of using dust masks, vacuuming constantly, dust collector running, etc. Frankly, I should be as careful milling any kind of wood, but you certainly should be careful working with exotics. Getting ebony milled to exact specifications is really going to help minimize the sawdust too as I won't have to use my thickness sander much. It's a really beautiful wood though, and just having the stem done in ebony so far encourages me that using it will make for a very unique build. http://modelshipworld.com/index.php/topic/12593-charles-w-morgan-by-landlubber-mike-model-shipways-new-bedford-whaling-bark-scale-164/?p=444511 SpyGlass, I'm using General Finishes products on my Pegasus. Here you can see the tests I ran using GF black stain and GF ebony dye stain: http://modelshipworld.com/index.php/topic/7267-hms-pegasus-by-landlubber-mike-amativictory-models-scale-164/?p=227035 For my Pegasus, I went with GF black stain on the wales. It went on very smooth and evenly, and although it's a bit tough to tell from the pictures, unlike using paints, it went on thin and kept the definition between the planks. The GF ebony dye stain is a bit different in that it seems to go on thinner. I was worried about using different woods and having different "blacks" on the model, so went with the GF black stain which seemed to produce a more uniform color. http://modelshipworld.com/index.php/topic/7267-hms-pegasus-by-landlubber-mike-amativictory-models-scale-164/?p=378715 As a word of caution, you hear that people have used Fieblings shoe leather dye on pear. The effects look great initially, but I've heard from multiple sources that it starts wearing off over time. I've had no such issues with the GF stains.
-
Another masterpiece. Well done Igor! Thanks for sharing!
- 22 replies
-
- 3
-
-
- jolie brise
- diorama
- (and 2 more)
-
I think the Byrnes saw fence has a clearance gap of approximately just under 0.7mm. It was a pain to cut 0.5mm planks for my Pegasus because the wood would slide right under the fence. Using the Grr-Ripper helped, but I think Don's approach, or alternatively, gluing a strip along the bottom of the fence like Dan Vadas did would be better approaches.
-
Wow, amazing work Igor! You certainly are a master and an inspiration to other ship-in-bottle builders. Thank you for sharing your techniques! Can I ask about the wave caps? When you first put the acrylic gel on the sea, it looked very white but in the final image, it looks like the wave cap color mellowed very nicely. Did you have to do anything to achieve that? Or did the acrylic gel become clear on its own?
-
Looking beautiful EJ. I'd be so nervous having that spiritsail topmast up - I can't tell you how many times my elbows, etc. knocked the bowsprit of my Badger and messed up all the bow rigging.
- 608 replies
-
- 3
-
-
- la couronne
- corel
- (and 1 more)
-
Hey Bill, I've been using redheart on my Pegasus build, and really have enjoyed working with it. It can be a bit crumbly at times, but unless you're doing detailed carving, it hasn't been an issue for me at least when it comes to using it for planking or creating deck structures like the bitts: http://modelshipworld.com/index.php/topic/7267-hms-pegasus-by-landlubber-mike-amativictory-models-scale-164/?p=441236 I haven't worked with bloodwood, but I heard that it can be splintery, and the UV aging effects are much more dramatic. Redheart will age to an orangy-brown color, while bloodwood will turn a very dark brown almost bordering on black.
-
Nice Bill. Dave (Doc Blake) has been using yellowheart on some of this builds to real nice effect. I'm considering using it on my Charles Morgan build to represent the ochre areas.
-
There were filler blocks in my MS Charles Morgan and I believe in my Euromodel kits. My Caldercraft Badger and Amati Pegasus kits didn't include blocks (I don't think the Corel Unicorn has any either). I think it certainly depends on the manufacturer. It also depends on how far apart the bulkheads are spaced at the bow and stem. On my Pegasus kit, for exactly, the bulkhead spacing at the bow and stem was quite small, leading to less need for filler blocks. Either way, it's pretty easy and cheap to source filler block material if you need it.
-
Really beautiful work Dave. Your approach of painting with wood is very inspiring. I love the approach of using holly below the wales - I'm thinking of a similar approach on my La Renommee. How did you like working with yellowheart? Is it at all splintery or can it be used for small detail parts? I have some that I'm considering using for the ochre areas on my Morgan per your suggestion
-
Really beautiful work Frank. Nice job!
-
Power Tools for a Fully Framed Build
Landlubber Mike replied to ChrisLBren's topic in Modeling tools and Workshop Equipment
Chris, I have the Sherline lathe and mill. They get pricey, especially with all the add-ons. I went ahead and bought them used on eBay, so I was able to spend just a fraction of the price for something new. They are build like tanks, kinda like the Byrnes tools. Not sure if you need a scroll saw, but you can get those fairly cheaply on Craigslist. Lots of one-shot use items where the saw was used for a kid's science project and then never used again. I got my Dewalt 588 that way and saved quite a bit of money. -
Many woods change when exposed to UV. Some get bleached, others darken. For some woods, the color change can be very dramatic. Take a look at this article: http://www.wood-database.com/wood-articles/preventing-color-changes-in-exotic-woods/
-
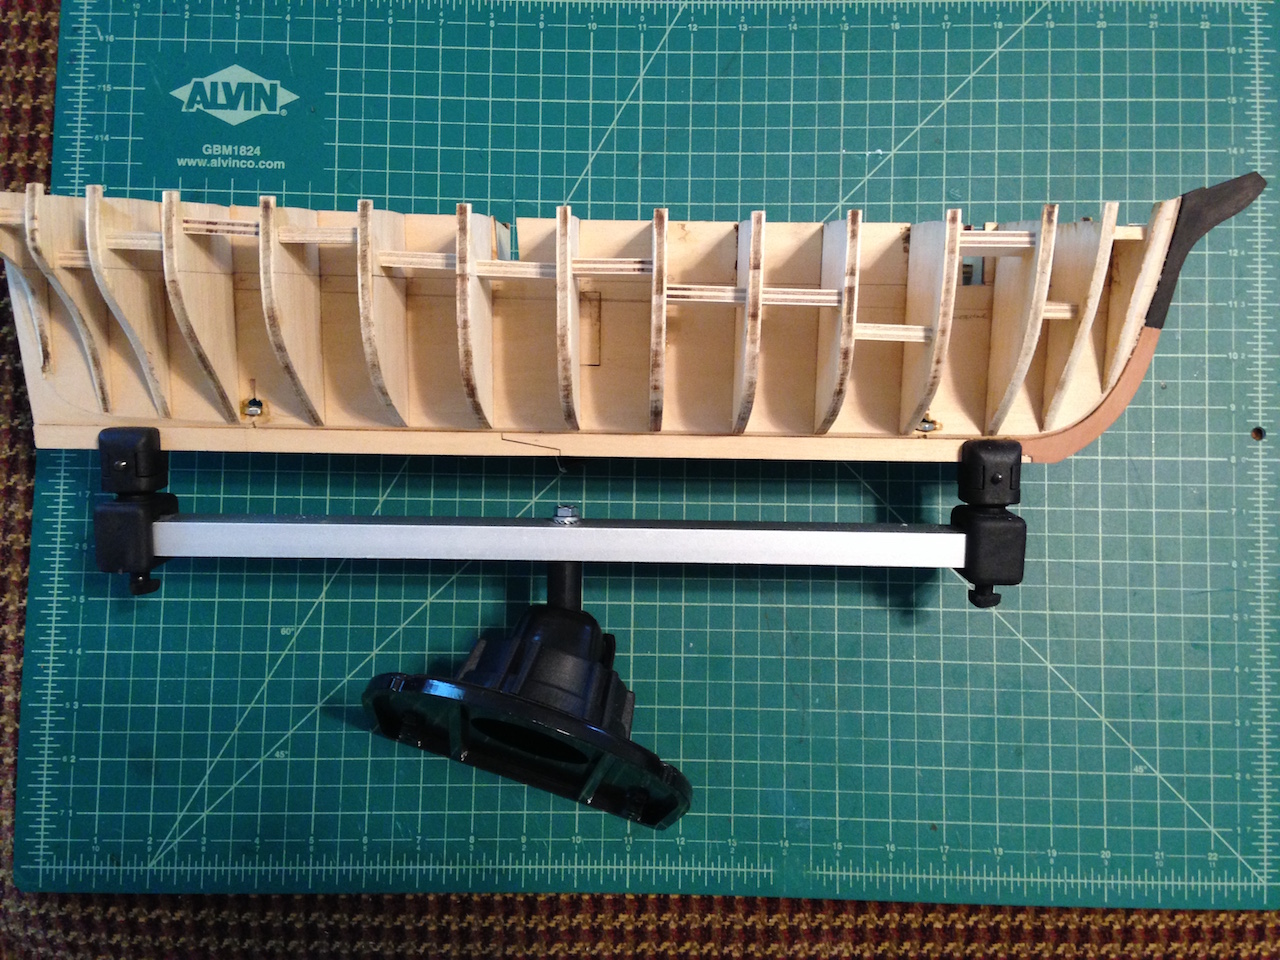
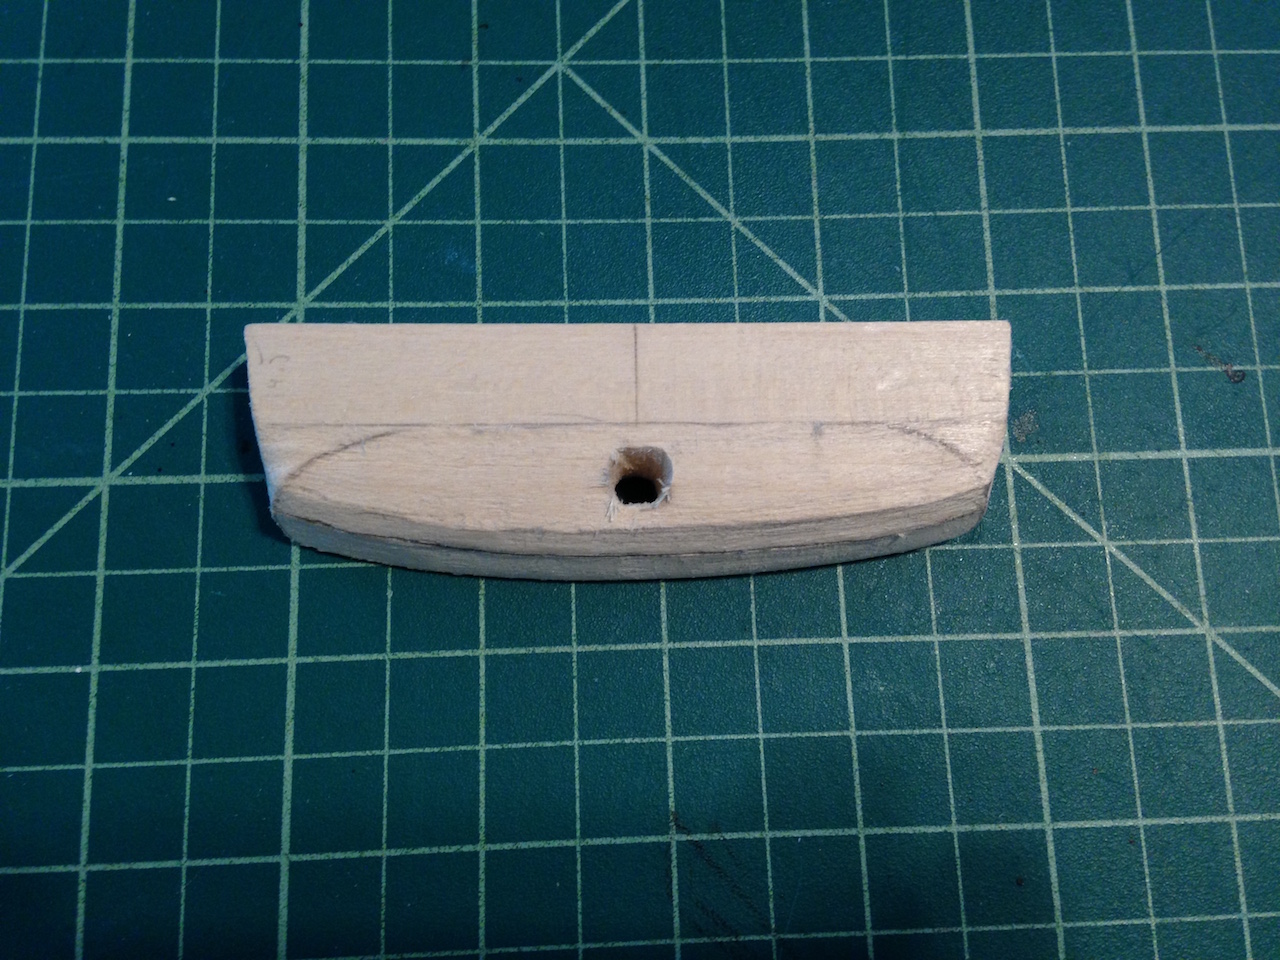
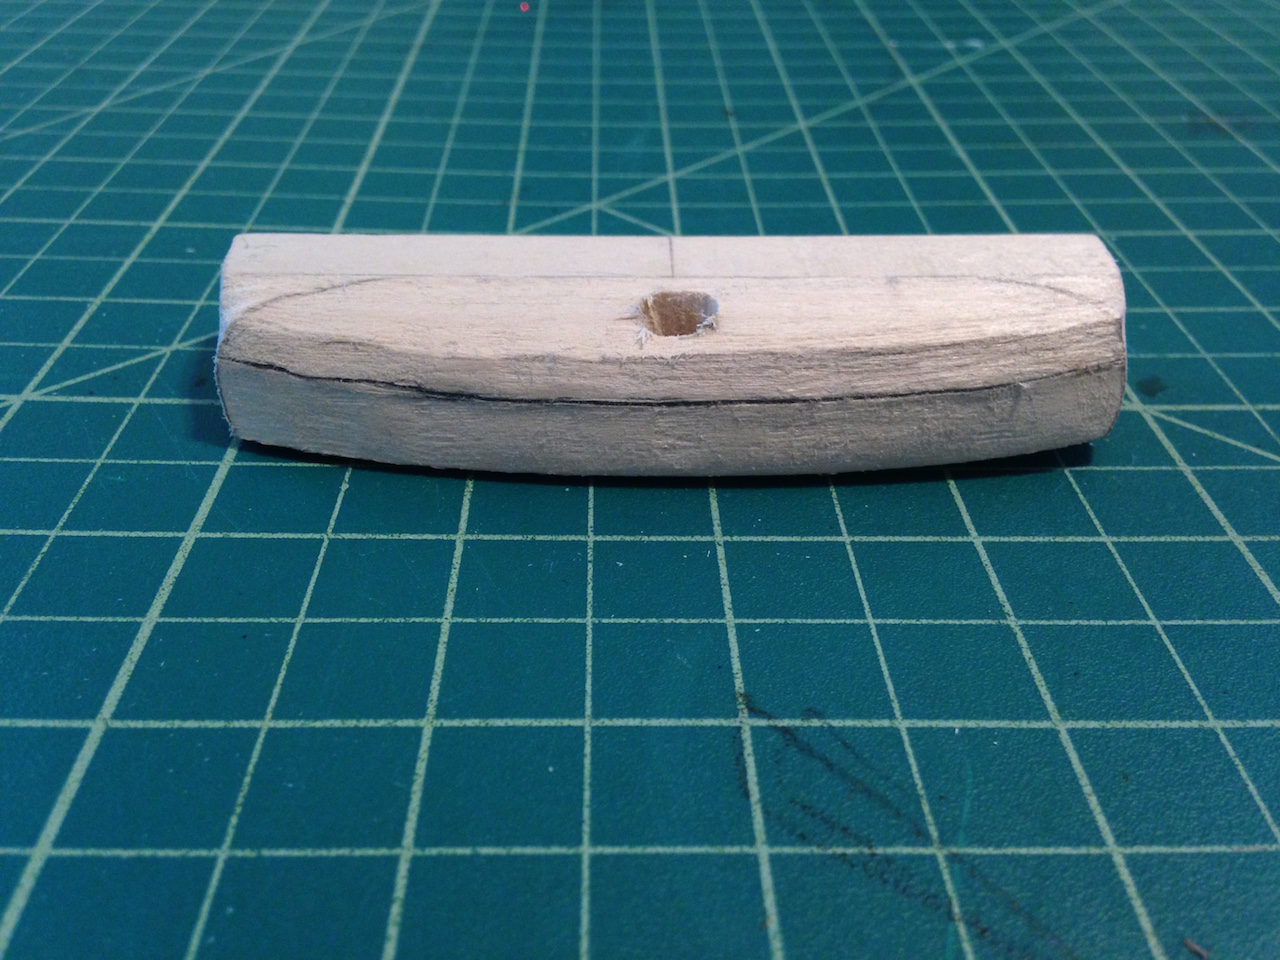
I'm not a big fan of the use of basswood for the keel and bulkheads. There is too much flex to the skeletal structure of the hull, and plywood, or better yet, MDF would be preferable. To ensure that the keel and bulkheads stayed square, I inserted scrap pieces of plywood in between the bulkheads which not only keeps everything square, but also makes the skeleton very rigid. I highly recommend taking this extra step. It's too bad more kits didn't use the dowel approach used by MarisStella's kits - the dowels seems to be a very precise and easy method to ensure everything stays in alignment. As I mentioned earlier, I decided to take a completely "paint with wood" approach, and will be using ebony for the black areas, holly for the white, and yellowheart for the ochre (I might have to use paint on the tryworks, but I'm exploring alternatives there). I was originally going to go with African Blackwood for the black areas, but I couldn't find a supplier for thin milled wood stock and didn't want to buy a bandsaw. On recommendation of MWB, I was able to source ebony from www.inlaybanding.com in the sizes I needed. I replaced the portion of the stem above the waterline with an ebony piece. It was a shame to remove half of the stem that I cut out in pear, but I want the "black" color to be consistent throughout the build. This was my first time working with ebony, and it really wasn't that bad. I used my scroll saw to cut the stem piece, and touched it up using my Byrnes disc sander for the outside curves and my Dremel in the workstation as a poor man's spindle sander for the inside curves. The stem tapers, so I used a sanding block to accomplish that. I was very careful and used a dust mask and constantly vacuumed up any dust (which I should probably do with all woods). All in all, I didn't find it all that hard to work with. Bending it might be a different story, but aside from being careful with the dust and the fact that it is a very dense wood so sanding by hand was a little more of a workout, I had fun working with it. When sanded with fine grade sandpaper, it takes on a beautiful, almost glass like finish. The stem came out pretty nicely - I think using ebony for the full build will make for a very unique model: Ebony against the white holly I received from Jeff is very striking. I was thinking about using yellowheart for the ochre areas, and possibly maple (stained a light grey to match the actual ship) for the deck. I knew holly had very little grain, but ebony almost looks painted. So, I'm wondering how using yellowheart, which has a lot of grain and some figure, will look against the ebony and holly. I might switch it to boxwood, but am curious if anyone has any thoughts on the look of grainy versus non-grainy woods together. Thanks for looking in!

-
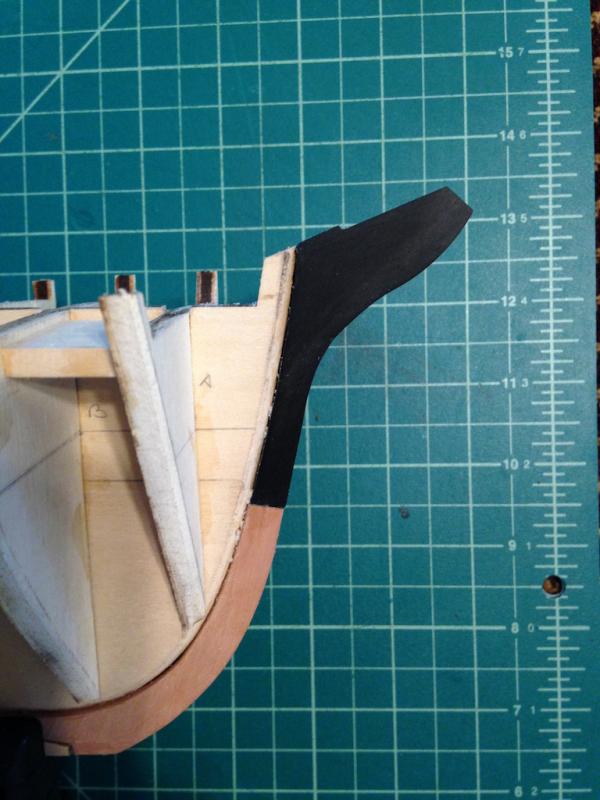
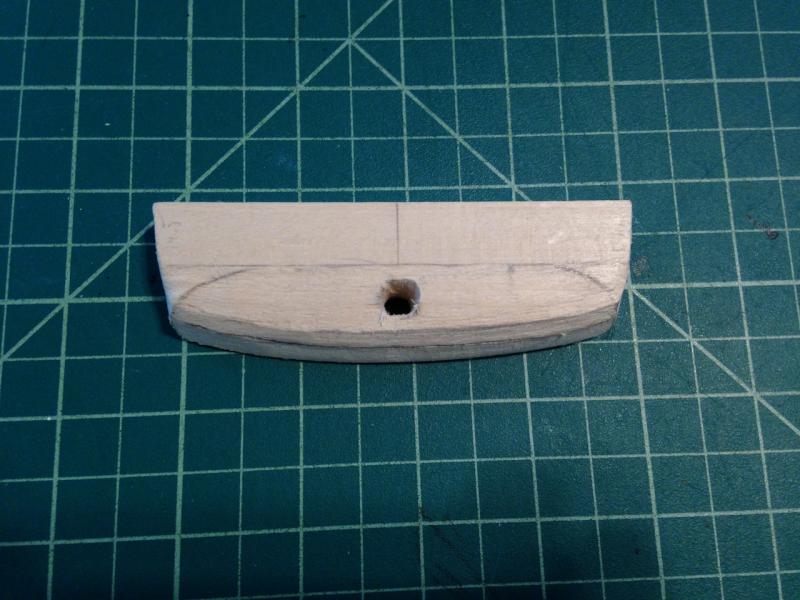
While taking a break from my Pegasus (burnout from planking) and the La Renommee (thinking about color scheme), I turned back to the Morgan and made a little progress. First up was creating the counter block, which took quite a long time. It's a complicated piece that is not rectangular in the sense of having 90 degree corners. Instead, the top of the block needs to account for the deck camber, the sides need to taper inward on a slight angle, and the aft side is rounded with an offset section for the name board. I know folks (including me) complain about kits using gunport strips, but the benefit of the gunport strips is incredibly helpful in pre-determining the counter and tuck of the planks into it. The stern/counter area can ruin an otherwise nice model if not done correctly, so I always have a bit of angst when working on this section of the model. After a few hours or work though, I'm pretty happy with the final product. I'll need to do a little touch up when it's attached to the hull, and I can work out any other issues with filler and the first planking. The one area in particular that I need to figure out is the bottom corners on the aft side. The plans show a rounding, but I think I'll understand better after running some test planks to that section along with the fashion pieces. Anywhere, here are the pictures of where I ended up in case other builders have questions on how the counter block should be constructed :


-
Joe, really great coppering! Very nice job! Just out of curiosity, what did you think of the tape? It has a different look than the copper plates in my Pegasus kit, which I think are individual plates that are pre-marked with rivets. The two also differ in terms of the copper hue - the ME tape looks more like the copper you see in copper wires, while the Amati plates are more maybe pinkish in color. I've been thinking about upgrading the copper in my Morgan kit, but your work makes me think the tape works very nicely.
- 136 replies
-
- 2
-
-
- caldercraft
- Cruiser
- (and 2 more)
-
Holy cow, that looks amazing Jason. It almost looks like it was drawn on the computer or something the lines look so perfect. I'll send you my Pegasus to copper if you don't mind...
-
Really nice work Don. The wood in the MarisStella kits is really beautiful with a natural finish. By the way, I blame you for me now working on three builds at the same time
- 653 replies
-
- 8
-
-
- trabakul
- marisstella
- (and 1 more)
-
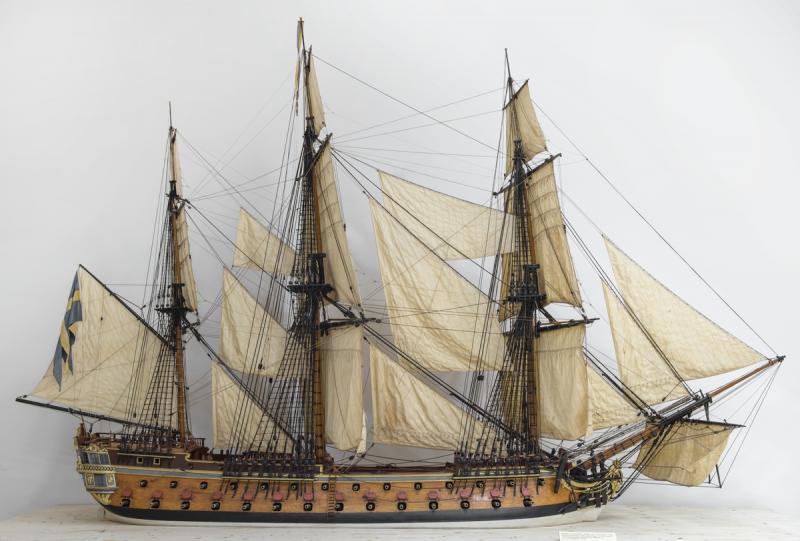
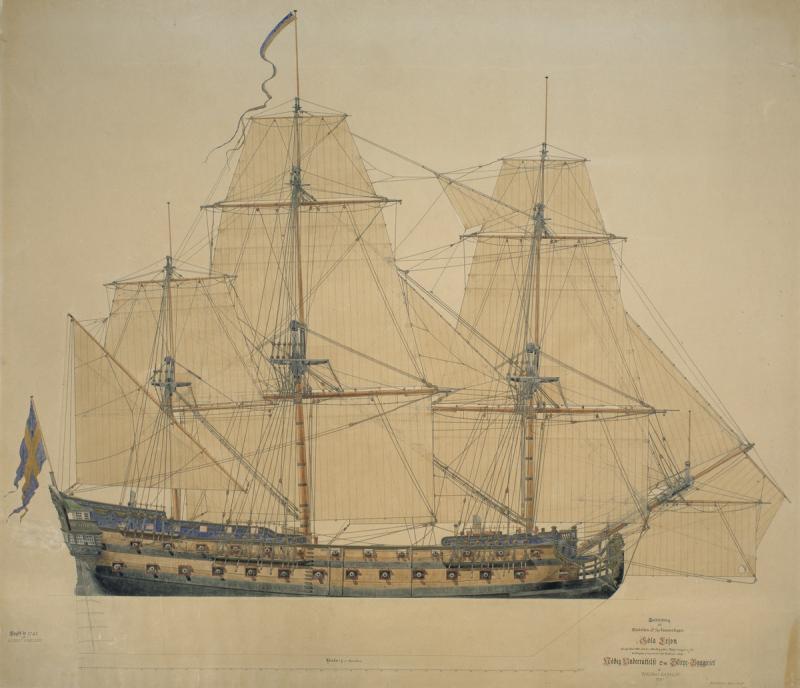
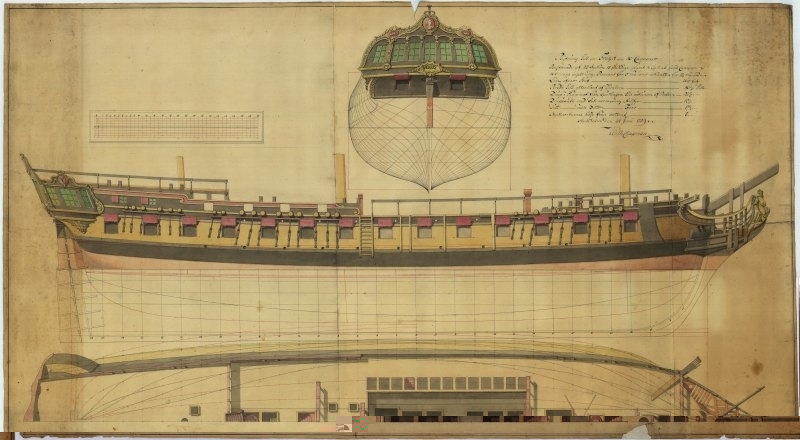
Friends, I'm a bit stuck in terms of a color scheme for the hull. I was originally going to go with a similar approach that Kenji Nakajima's build took (first picture at the top of my log) and go with mostly black and either walnut or pear for the brown areas, with boxwood accents. But, after seeing Chapman's plans for the Venus and the two builds for the Göta Lejon, I'm thinking of trying something different. In particular, I'm really taken by the color scheme on this model: If I went that route, does the blue strip running across the full hull look odd? Does it look odd to have the dark brown areas just above that blue stripe? I haven't seen too many ships with this color scheme, but it seems like these Swedish ships might have had a slightly different color scheme from other European ships. An alternative is Chapman's color plan of the Venus, which is similar, except it looks like a black stripe runs across the top of the hull, but there is a red stripe at the top near the quarterdeck: Alternatively, I could go with something like this color plan, where it's mostly black and pear around the gunports, with blue at the top of the hull at the quarterdeck and forecastle: Any suggestions or preferences would be greatly appreciated as I try to figure things out. To avoid the use of paint, I'd do the hull below the waterline in holly, wales in black, and that middle band around the gunport likely in pear (I think box might be a little light for my tastes). It's just what to do with the other areas of the upper hull that I can't decide on Thanks!