


Landlubber Mike
-
Posts
4,543 -
Joined
-
Last visited
Content Type
Profiles
Forums
Gallery
Events
Everything posted by Landlubber Mike
-
 Jagger, thanks very much for these suggestions. Sorry, I responded very quickly last night when I saw your post without fully reading it (had to put the kids to bed). I've tried using black dyes and stains. They certainly look quite nice on pear. The issue with black though is that at least with the ones I've tried, they tend to almost have a paint like effect whereby although the grain may be highlighted, the figure is not (I'm probably getting my terminology mixed up here). So, you sorta get a uniform color across the piece, unlike other colors which highlight the grain and figure. It's hard to get the highlight/lowlight effect on black though - folks that paint miniature figurines seem to face the same issue when using black. Generally though, using stains and/or oils on natural woods gives a really nice effect, as you sorta get more of an aged look with highlights and lowlights without really having to do much. Some of the Eastern European masters use a bitumen type of finish (still not exactly sure that that is) which gives that effect in a really beautiful way. It's that look that I'm trying to emulate. I have to admit that I'm feeling my way through the wood/color issue, as I only have one model under my belt and have otherwise done no woodworking except to put up a decorative chair rail in my daughter's bedroom (plus, I'm not sure that I have a single artistic bone in my body). What I'm coming to realize, at least for my own sense of aesthetics (or lack thereof), is that not only do I want to try to use complimentary colors on my models, but also, to the point possible, use similar "textures" for lack of a better word. For example, on my Badger, I used a tung oil finish on the walnut upper hull, stern counter and tanganyika deck. Elsewhere I used white, red ochre, and black paint. When I look back at it, what I really like about it is the natural wood sections. In contrast, I think the painted areas look plastic. It certainly is the case that my painting skills aren't the best, but paint definitely covers up the character in woods. So, it seems like the better course would be to try to go all natural woods (maybe with some non-black stains) to keep the wood character, or use woods with very tight grains like pear and boxwood to go along with painted areas so that the "texture" is the same across all areas of the model. I'm trying to do the former with my Pegasus (with stains thrown in) and the Charles Morgan. I do think that when I eventually get to scratch building the HMS Lyme, that I'll stick with natural pear and boxwood with a tung oil finish, maybe with either ebonized pear for the black areas or ebony/blackwood. Anyway, it's been fun experimenting and learning about this kind of stuff and sharing it with everyone. This is probably more than you were expecting - sorry, just some rambling thoughts on my end.
 -
Yes, just sent him an email to see if he could cut custom sheets. Looks like he has really nice stuff. I'll let you and everyone know if this works out.
-
MWB, thanks so much! If I could kiss you right now, I'd give you a big one! I've been trying to find a source of thin cut African Blackwood for literally months now, and to no luck (I've tried the Lumberyard, but it seems like they are having difficulty sourcing the stock). I might just try ebony - I heard blackwood was easier to work with, but it seems very hard to find in thin sizes.
-
General Finishes makes a whitewash stain - it's coverage seems close to paint like though.
-
Thanks guys! After bringing out the model into more natural light (my workshop is mostly fluorescents), the natural maple actually looks quite nice. I'm pretty far from finishing the deck, with still needing to treenail and all, so I have a little time. I think i was worried that the deck was very light against the black, dark brown, blue and redheart areas that it might not fit in. I think after some tung oil it will darken a tad. Plus, it looks like the deck has already darkened a bit over time. Martin, I'm going to match the coamings to the dark brown stained upper hull. I had also stained the gratings, and I think the combo looks pretty good. Otherwise, the bitts and gun carriages will be redheart. Speaking of redheart, the upper bulkhead extensions that I made in redheart have lightened to almost a brownish-orange color. I'm in the process of doing the bulwark planking, and there was definitely a mismatch. I went ahead and sanded the visible extensions around the waist so that the color more closely matches the fresh planks that I'm using, and so that everything ages relatively together. I knew about the redheart color change going in, and actually, I think it should mellow into a nice look with the rest of the model.
-
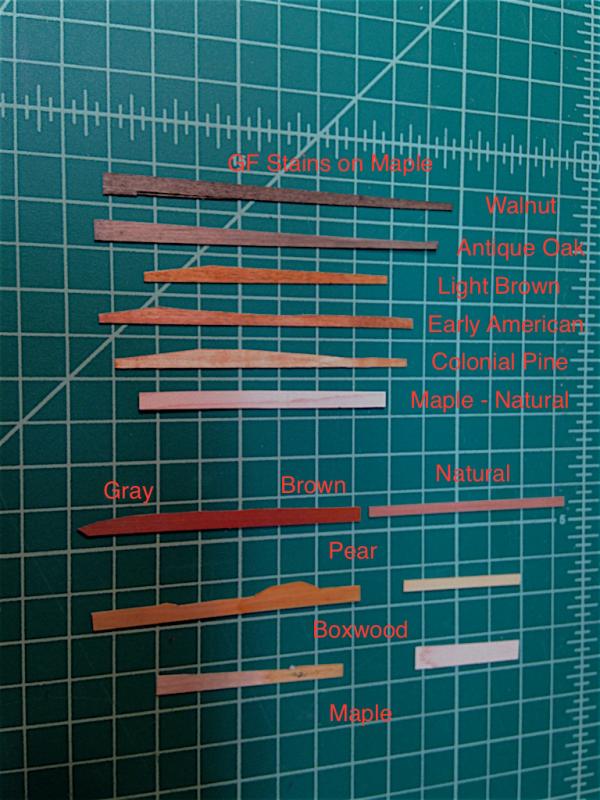
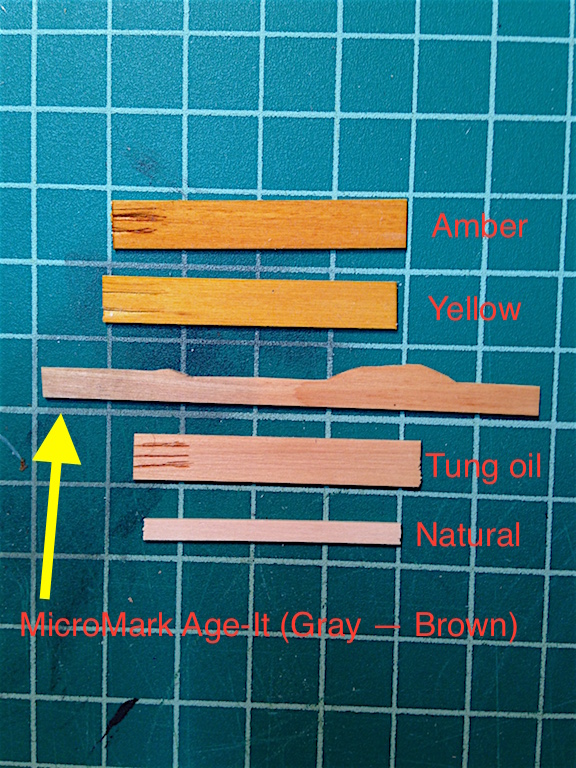
Have been a bit busy with work and with family in town, and frankly, aside from time, I haven't had much energy or inclination to work on my Pegasus for whatever reason. But, I have started building the individual components for the quarter galleries and started work on the bulwark planking. So, I guess there's some progress. I'm considering whether to stain my deck, which is a little on the lighter side. So, I tested the various stains I had on some scrap pieces of maple. I also tried out the two "Age-It" products from Micromark (Gray and Brown) on pear, boxwood and maple. The first set of tests are in the top half of the picture below, and the Age-it tests are on the bottom half. The GF stains on maple were quite interesting. I used Antique Oak on the upper hull planking, which turned the pear almost walnut in color. Yet, on maple, the wood turned a grayish color which I really like for my Charles Morgan deck, as the color seems pretty spot on from when I visited the ship a couple of years ago. The Age-It stains were very interesting too. Both really brought the pear to life. The brown on the boxwood looked pretty good too. I also tried various stains and finishes on boxwood. I'm considering carving the stern and quarterbadge figures in boxwood, as well as scraping the various rails to be more decorative. So, I wanted to see how stains and other finishes would look on boxwood, and in particular, in the recesses of the carvings which is why I knicked the one edge of the test pieces. The General Finishes Amber and Yellow really changed the color of the boxwood. Yellow was a bit too yellow, but Amber looked pretty good. The Micromark Age-It Brown had a nice effect. I'd probably lean towards the amber or the Age-It brown, but i still have some time to make a decision.
-
No worries. There is such a thing called a "plank nipper" or the like that makes narrow cut into the underside of the plank to help with bends. Similar principle to what you are doing, but no chunks are taken out. Don is right on the use of tapering and stealers to plank. Use the first planking as a practice run for the second planking. In some respects, the second planking is easier in that you have a solid foundation to plank on - for example, you don't need to pin the planks to the bulkheads, but use pins, etc. anywhere along the planking line (just don't put the pins in the plank itself!).
-
Really nice work - coming along great! The french ships were really works of art, weren't they? Not sure how practical they were, but they sure were beautiful.
- 608 replies
-
- 5
-

-
- la couronne
- corel
- (and 1 more)
-
Yeah, no reason to do that (not sure I've seen that method either!). The first planking material is thick enough to sand the heck out of, and you can use filler for gaps.
-
Looks like a really cool project - nice start! I like how the bow and stern are reinforced with fore/aft supports. Seems like a good thing wood kits should think about so that builders didn't have to add filler blocks.
-
Hey Don, feel free at any time to ping me with any questions. I'll definitely see your PMs if you want to do it through there (probably the easiest way to make sure that you get me quickly), otherwise I'll try to keep track of your log
-
Nice Don - that's a nice wood for the lower decks. Is that maple or something similar? I also blackened the bulkheads and other interior items. Now that my hull is planked and the deck laid, I'd say it was probably overkill, but made me feel better. I think it's probably most important for the stern and quarterbadges though, depending on how you do the windows if you want "depth." I also hear you on stalling before the "hard" parts, though after I end up completing them, I always think to myself, "that wasn't too bad!" Are you going to do the deck next? If you do, a couple of things to note. First, it's well worth considering adding midline supports for the plywood deck template. It's a little tricky because of the various holes for the hatches, masts, etc., but you can see here how I added a few small supports which adds a great measure of support at the midline: http://modelshipworld.com/index.php/topic/7267-hms-pegasus-by-landlubber-mike-amativictory-models-scale-164/?p=243029 Second, while the kit is very close to the NMM plans, there is a slight difference in the kit's deck items to simplify construction. I moved some of the hatches and deck items forward to better comport with the plans: http://modelshipworld.com/index.php/topic/7267-hms-pegasus-by-landlubber-mike-amativictory-models-scale-164/?p=248877 The one tricky thing if you decide to do that is that the aft hatch is too far back, and if you look at the NMM plans, the hatch should be more forward to where the bitts go through the hatch. Also, if you are going for "accuracy," some of the bitts are the wrong size (the main topsail sheet bitts and jeer bitts) and the cross piece on the jeer bitts should face aft. Take a look at my log here on how I approached that if you're considering going that route: http://modelshipworld.com/index.php/topic/7267-hms-pegasus-by-landlubber-mike-amativictory-models-scale-164/?p=258189 The only other thing I would suggest is that if you are cutting your own deck planking, you get a nice clean look if you butt the planks up against the hatches, rather than sit the hatches on the deck planking. It's not really a huge deal in the grand scheme of things once the deck is finished with all the cannons and rigging, etc., but it is a cleaner look and technically more accurate if you are into such things.
-
Wow Don, that came out beautifully. Very nice job! Just out of curiosity, is that walnut or oak? I'm assuming walnut but just curious.
- 653 replies
-
- 6
-
-
- trabakul
- marisstella
- (and 1 more)
-
EJ, this is a fantastic build, wow! I love your work on it. I wondered about the wood in Corel kits (I have the Unicorn), but it looks really nice when on the model and finished. Seeing your work actually makes me seriously consider building the Unicorn again (screw accuracy)... Great job, you have a new follower!
- 608 replies
-
- 5
-
-
- la couronne
- corel
- (and 1 more)
-
Really beautiful work Dan, amazing. Congratulations on a wonderful model! Glad to see you added furled sails to the build. Looking forward to your next projects. Just to follow up on Charlie's question, what finish did you use on the boxwood? It really looks nice.
-
Same happened with me on my files. They took a beating on the Caldercraft plywood. The carbide set works much better. The Pegasus is a really nice kit. I give it an A+ all around in terms of quality of parts, fit, and plans. If I had to quibble about anything, it's that the walnut used is all over the place in terms of color, from a very dark brown to almost a blonde color. I will ultimately replace or stain the walnut which is fine, but I really wish kit manufacturers thought more about stocking kits with wood of a more consistent color.
- 28 replies
-
- 2
-
-
- ballahoo
- caldercraft
- (and 1 more)
-
For a first model, that's really nice work! Very well done! For files, I had the same problem when doing my Badger. I ended up buying larger carbide files which make bigger jobs like fairing bulkheads a lot easier: http://www.micromark.com/5-piece-carbide-needle-file-set-coarse-80-grit,7526.html I have an older variable speed Dremel. I rarely use it, as it takes material off very quickly. I tried it on my Pegasus bulkheads which were MDF, and I found you have to be very careful. I also used it to drill holes in my Badger for pedestal supports, but that's been about it. I do plan to try it out for carving more decorative items on my build.
- 28 replies
-
- 2
-
-
- ballahoo
- caldercraft
- (and 1 more)
-
Tom, no offense taken! I've learned so much from the folks on here that it's an honor to give back at least in a little way. So, no worries at all. Hope it helps lots of people, as I spent an inordinate amount of time researching and testing various methods.
-
Ron, I'm wondering if stains would be a better solution. Take a look at General Finishes Black Stain - it goes on very evenly to the point of looking identical across different types of woods. I would say that it is almost a hybrid between paint and stain marrying the best qualities of both. GF also does an Ebony Dye Stain, but it is more stain-like in effect. I tried Varathane black or ebony stain, and it was too thin to use across different types of woods. So far the GF stain is holding up very well. And thanks for the kind words, means a lot coming from someone of your skill level.
-
Great work Bruce, your Morgan is a real inspiration! Once I source some wood, I should be able to get back to mine. Love the furled sails, very nice touch!
-
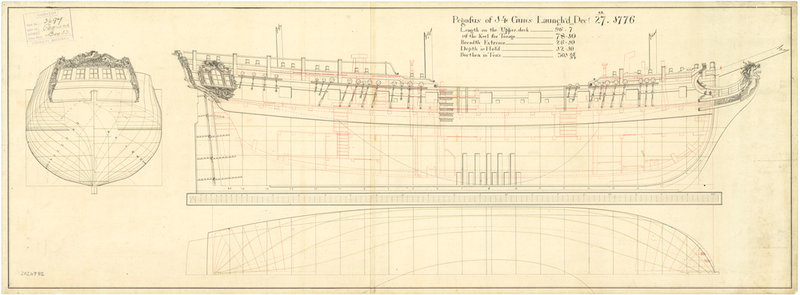
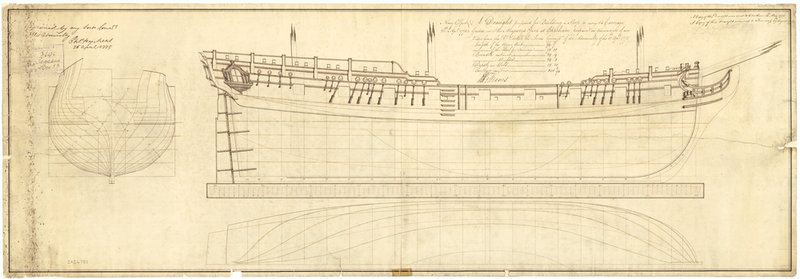
Thanks Mark. I went through the various Swan class plans on the NMM site, and none really seem to show the projections for the quarterbadges. Interestingly, TFFM says that the Vulture's plans show a flat quarterbadge, but I'm not sure how they came to that conclusion. It's probably very well the case that I just don't know how to read the plans though. Scaling the TFFM plans down to 1:64, the quarterbadges are only going to extend 4.5-5mm from the hull at the stool (the widest point). So we're not talking about a very pronounced quarterbadge. If anything, TFFM cautions that many make the mistake of extending the quarterbadge too far from the hull. Below are the two sets of line plans for the Pegasus available at the NMM. The first, J5006, is what I'm basing my build on and the plans that Amati seems has based the kit on. The second, J5009, is a bit more bare of the various decorative elements on J5006, but has what I'd say is more of a traditional looking quarterbadge.
-
Hey, that's from my Badger log! Looks like I made it to the big time as someone cut my posts into a PDF!
-
Hey Martin, no worries my friend. I've been swamped with work as well and haven't had much time to visit on here, let alone work on my Pegasus. On the badges, that's interesting about the dolphin/dogfish motif. It almost looks asian inspired in some ways. I think I'm going to try to do the badges in more of a three dimensional way. I started cutting out some of the pieces using the TFFM approach, so we'll see how that goes. This is going to be a good test for how the painting with wood approach and my entry into carving goes. I'm planning on boxwood for the rails and the figures in the upper and lower finishing, blue for the background on the upper and lower finishing (GF blue on boxwood to match the blue frieze area), holly for the window frames, redheart for the upper segment of the lower finishing with boxwood accents, and other boxwood accents. We'll see if I can pull that off - if I can, then I can think about tackling the stern area. For the three rails on the hull, I'm going to use boxwood. Part of the reason I didn't use boxwood for the upper hull planking is that I like the contrast of boxwood rails against other colors. I think boxwood will set off nicely against the redheart, the blue frieze areas, the dark brown stained pear, and the black in the stern counter. Since most of my model is showcasing wood grain (either naturally or through stains), I'm going to test adding stains or washes to help bring out of the grain and deep areas (like in the ridges of the rails or low areas of carvings). Tough call on what to do with your Fly. If you're planning to carve the rails like in TFFM, then you might want to consider a tighter grained wood than walnut. Pear could work - would you be open to staining it? It takes stain very nicely (the brown on my upper hull is pear stained with GF Antique Oak). BE seems to have used boxwood for the upper hull planking and rails - but then again, he painted the frieze area blue and the upper part red (not sure if you're planning to go that route). I've seen others use black for the railings, so GF Black is a nice option too. I know Ron and others have used Fieblings dye, but Chris had mentioned that on his Confederacy, it was starting to fade or rub off (I forget which). One other thing to consider if you want to use black is to take a look at African Blackwood. It's a super nice wood and didn't seem all that bad to work with (though, i just cut a single test plank). I'm 99% sure that I'm going to use it for the black areas on my Charles Morgan once I can find a good source.
-
Hey Ron, thanks for looking in! Not sure if you remember, but I bought this kit from you a few years ago. Glad I did - it was a good step up in difficulty that has really pushed me to get better. Plus, with the TFFM books, NMM plans and all my fellow Swan class builders here, it's been a really fun project. One of these days I'll hopefully be half as good as you Hope all is well with you.
-
My approach on my last two builds is to start downward from the gunport patterns, and at least get a few rows in from the keel/garboard up, and then meet in the middle. I always wanted a clean line at the keel, so running a full garboard strake was preferable to me. In the end, it really doesn't matter as you're going to sand, fill and cover the first planking anyway. What's probably more critical is thinking now about how you want to do your second planking. You can use the first planking as a test run to figure out how your planks will lay on the hull, and where doing the garboard separately makes sense. Just make sure that you lay your planks naturally against the hull, and don't try to bend them laterally against their width. That's when you start getting gaps, clinking effects, etc. You can always use filler and stealers on the first planking, and can plan for how you want to approach the more difficult areas on the second planking.
