


Landlubber Mike
-
Posts
4,543 -
Joined
-
Last visited
Content Type
Profiles
Forums
Gallery
Events
Everything posted by Landlubber Mike
-
 Looks good. Just sand down the high spots, and layer on the filler in the low spots, and you'll have a solid foundation for the second planking.
 -
Take a look at my Pegasus if you'd like to see what a maple deck looks like. I like maple a lot - it's a very hard wood, works and finishes very nicely. Some people prefer holly for decks because it is whiter and without grain, while maple (at least the maple I have - which I think is hard maple) has amber waves through it.
-
Really nice work Dave. Your work with the different woods is brilliant. Not too shabby on the metal working too - very nice job!
- 306 replies
-
- 4
-

-
- armed virginia sloop
- Patrick Henry
- (and 2 more)
-
Very nice Igor! Are those blocks wood? Just our of curiosity, how will you step the masts into the hull? It doesn't look like you are using a hinge - are you using a string from the bottom of the mast through the bottom of the hull? I'm wondering because I'm doing a similar ship in an upright bottle, but still trying to figure out how to step the masts as I would prefer to avoid using a hinge.
-
proxxon ks 230
Landlubber Mike replied to rdestefano01's topic in Modeling tools and Workshop Equipment
Sorry, I should have said that if you see yourself doing multiple models in your lifetime, then the Byrnes saw is a good option. Most of the planking I've worked with is 1mm in thickness, so I can't see spending $130 for a machine that can't rip planks of that thickness. That being said, if you're going to be one model and done with the hobby, then that's a lot to pay for cutting some planking. I don't think you need to only use if for scratch building either. I've used mine extensively, and I'm bashing kits at the moment. -
All great suggestions here. If you are looking for one book to buy to get you started, I would second Frank Mastini's book. It's very basic but gives a really good overview of model ship building. From there, zu Mondfeld and the Lennarth Petersson book (for rigging) can take you through your first build. If you have the money (and the time to read them), buy the other books that were mentioned. Each has good nuggets of info. I would highly recommend looking on Amazon for used books, as well as Abebooks.com and eBay. A lot of these books can be bought for very little money. Some of the more rare and highly sought after books can go in the hundreds, but the vast majority of the books mentioned here are not in that category (the Frolich book is one that is pretty pricey).
-
proxxon ks 230
Landlubber Mike replied to rdestefano01's topic in Modeling tools and Workshop Equipment
Buy the Byrnes table saw. I mill stock as thin as 1.0mm without any issues all the time. Anything thinner than 0.7mm will go under the fence, so for sheets that thin, you can simply add a piece of wood to the fence to make it zero clearance. -
Micro Jig Gripper
Landlubber Mike replied to Landlubber Mike's topic in Modeling tools and Workshop Equipment
Sorry for never updating this thread. After two years, I still love it! I use it all the time except when cutting very thin strips less than 1/8" when I use push sticks. I'm a lot more comfortable using my Byrnes saw, but my fingers are well worth the cost of the Grr Ripper. I never got around to building a sled, but haven't felt the need for one with the Grr Ripper. -
Beautiful work Eamonn, and glad to see you're back
- 1,039 replies
-
- 1
-
-
- ballahoo
- caldercraft
- (and 2 more)
-
This kit is definitely supposed to be the 1748 version - look at the Chapman plans and the NMM plans of the Lyme. The problem is the narrow waist is not consistent with frigates from that period, but frigates from later in the century. That's probably why people say they are not sure what ship the kit is supposed to represent. https://en.wikipedia.org/wiki/HMS_Unicorn_(1748) Make sure you start a build log here. We'd love to follow your progress. I ended up stopping my Unicorn build, as I liked its sister ship, the Lyme, a little better and will scratch build it in the future since the Corel keel is incorrect when it comes to the stern and quarter galleries.
-
Thanks Don. I've had a similar experience when people outside the hobby look at my work. I almost want to tell them about all the extra details that are added, but I don't think they would fully get it. I'm sure the response would be, "you agonized over that tiny detail??" It's that darn Blue Ensign guy and his Swan crew and their exquisite builds that push me to put in all these extra details
-
I bought the Dutch ships book along with some other books from Seawatch that were on sale, and I have to say that it's a fantastic book. Lots of pictures of models and artists rendering, and the plans (for which there are a number of them!) are really great. These Dutch ships have a lot of character, and are a nice change from the typical warship you see built over and over. The ships are also smaller, so using a similar scale, you can scratch build the ships in the plans and have models that are about 2' or less in length. Anyway, just thought i'd say that I'm really happy with the purchase and would recommend the book/plans if you like Dutch ships
-
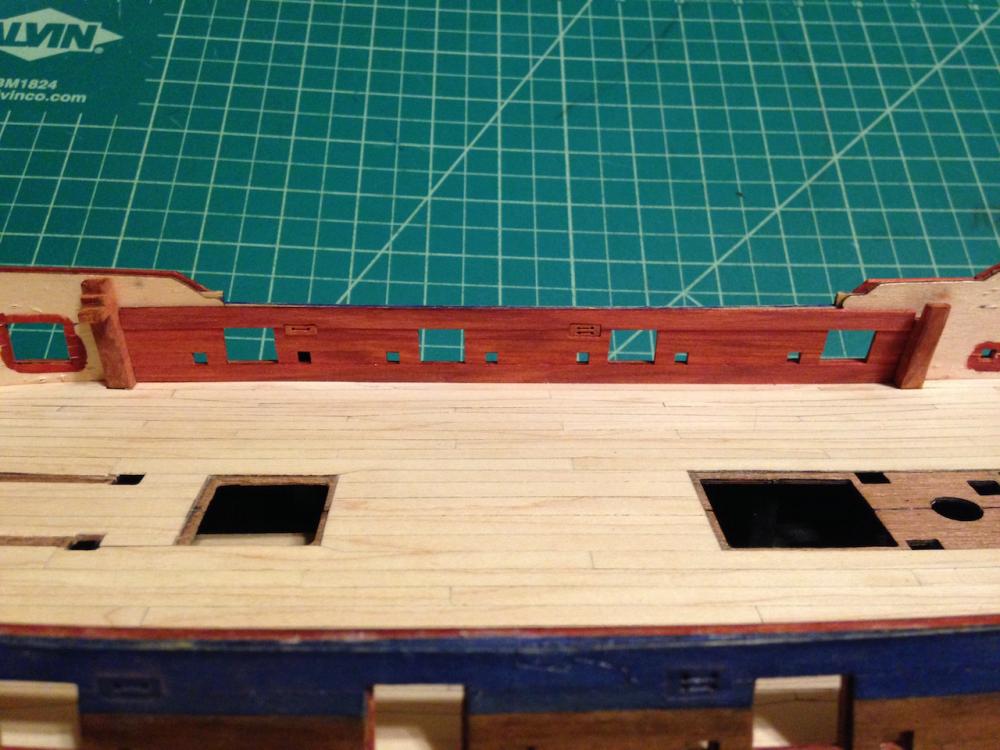
Work and family has been limiting my time in the shipyard, but I made some progress over the last few weeks. I started the bulwark planking, and managed to get the waist area completed. Need a little sanding here and there particularly to help define spirketting from the quickstuff, and to touch up the gun ports and sweep ports. I did the spirketting as a single piece at about 1.25mm thickness, and the quickwork as three rows of planks at about 0.8mm in thickness. It's a little simplified from the bulwark planking in TFFM, which includes a scarpf joint somewhere in there, along with top and butt planks I believe. Given how much of this area is going to be covered up with the cannons, etc., it didn't seem all that worth it to torture myself - I feel like I went though enough on the outer hull planking The wood I'm using is redheart. It can be crumbly at times, but for planking, it works really nicely. Over time it will mellow a bit to a more orange-brown, which I think will be a nice effect along with the other colors in the build. You can see a bit of this color change in the bulkhead uprights which I replaced a year or two with redheart. The only thing to watch out for is that the end grain turns almost black if you use an oil finish - i found that using varnish preserves the color much better. I'll also be using redheart for the gun carriages, bitts, and likely the capstan, as well as a part of the stern decorative area. I already used it for the upper stripe on the outer upper hull. In some ways this "painting with wood" idea has been a pain, but I'm really happy with how things are coming together. Thanks for looking in!
-
There actually was a Unicorn - it and its sister ship the Lyme were members of the Lyme class, and are considered to be the first true frigates. The ship's plans were in Chapman's "Architectura" book, which you can see here (scroll down to plate LV), or you can go to the National Maritime Museum's website and see the plans for the Lyme, which are also on my log. http://www.finemodelships.com/ship-plans/Chapman_Architectura_eng.htm http://www.sjohistoriska.se/ImageVaultFiles/id_2241/cf_1115/55.JPG (direct link to plans) Take a look at Ian's log and my log of the Lyme (based on the Corel Unicorn). Lots of inaccuracies in the kit which can generally be overcome though with a little forethought and preparation. Probably the biggest I would say is the closed waist and wrong slope to the deck levels, particularly at the stern. Those can be fixed early in the build. Other issues which are trickier to deal with are the inaccurate placement of the figurehead and how the stern comes together. Essentially, the stern galleries are incorrectly placed, there should be a stern post, and the angle of where the stern post should be is wrong. There are some other slight inaccuracies from the actual ship in terms of the deck items, location of the masts, location of the first bulkhead, and the gammoning. All that being said, the ship does make for a very nice model, regardless of whether you tackle these inaccuracies.
-
Hmm, not sure if I would say it's heresy or not, but no names will be mentioned I'm not sure how old the kit is. The Keith Julier handbook where he builds the model is dated 1995, so it's been around since then. I don't blame Euromodel though - it seems like the kit is spot on as to very detailed and accurate plans. It's just that the name and origin of the ship has been passed down through history due to what might have been a mistake of Admiral Paris in transferring the name of the incorrect ship to the plans 150 years ago. Given the extensive plans (there are 18 sheets for the Le Renommee!) and Euromodel's reputation, I don't think that they took any short cuts with this kit. It's been interesting using Google translate to translate some of the Russian forums where this ship is discussed. They correctly noted that the stern of the ship is represented in zu Mondfeld's "Historic Ship Models" on page 108, where it is labeled as the stern of the Swedish privateer frigate from 1760 named the Jupiter. I can't find any info on a Swedish ship of that name though, I'll have to reach out to perhaps European sources. Sorry for the diversion. Now back to your Unicorn
-
Really amazing work Patrick. The fact that you are doing it at such a small scale is incredibly impressive.
-
Chuck, is it possible to keep this log up? I might resurrect the build in the future, or at least, want to borrow/cut and paste items from it into a different log. Hope that's ok, I know you're trying to clean things up.
-
Tools and Supplies for My "Shipyard"
Landlubber Mike replied to daveward's topic in Modeling tools and Workshop Equipment
I started using Swann Morton blades this summer - I like them a lot better than X-acto blades. They seem much stronger structurally (blade doesn't flex) and seem to hold an edge better. -
Hello Ian, hope all is well. I was doing some poking around on my Le Renommee kit from Euromodel, and came across a deck plan for the Swedish frigate Venus from 1783. The ship was designed by Chapman, as you can see in the link below. Check it out - looks like this might have been the deck plan used by Corel for the Unicorn kit, at least when it comes to the narrow waist. It's a beautiful ship by the way, one that I will put on my list for possible ships to scratch build in the very distant future http://www.wikiwand.com/en/Swedish_frigate_Venus_(1783) Based on the Gardiner book on frigates, we always knew that the waists closed up on ships as the 19th century approached. Looking at the Venus plans, however, it looks like Corel might have created a hybrid model using not only Chapman's Unicorn plans, but possibly deck plans from a Swedish ship like the Venus (the two ships were of very similar size). As a big aside, it turns out the Unicorn is not the only kit I bought that might be somewhat inaccurate. The Euromodel Le Renommee is another. There were two Renommees in the 18th century, and one in the early 19th: 1. 1744, which was captured in 1747 for the HMS Dover, renamed as the HMS Renown, and broken up in 1771; 2. 1793, a Galathee-class frigate which was captured in 1796 by the HMS Alfred and broken up in 1810; and 3. 1808, a 40-gun Pallas-class frigate captured in 1811, renamed the HMS Java, which was captured by the USS Constitution and burned in 1813. Euromodel says it is the 1744 version, but I think the Boudriot version in the Ancre monograph series is more accurate. Keith Julier in "Period Ship Handbook 2" says he thinks the kit is based on the 1793 ship. But, the Euromodel kit looks identical to plate XXXI in the Chapman "Architectura" book: http://www.sjohistoriska.se/ImageVaultFiles/id_2212/cf_1054/31.JPG There's some discussion on Russian forums which suggest that plate XXXI is based on the Swedish frigate Jupiter, but it's a bit hard to follow the translation of the conversation which essentially seems to involve a frenchman named Admiral Paris making a mistake in Souvenir de Marine Conservs. Apparently he read an earlier work that contained plate XXXI and that noted that the anchor was similar to Le Renomee, but when Paris copied over the plans from plate XXXI, he mistakenly labeled it as Le Renommee. I can't find anything out there on a Swedish frigate name Jupiter (my search is what led me to the Venus), so I don't know if I have a French ship or a Swedish ship I might have to flip a coin after building it to figure out what nation's flag to add

-
Looks great JP - can I ask what woods and finishes you are using on the build? Whatever you are doing is giving a lot of character to the model, and is a look i'm trying to emulate on my builds.
-
Really nice work Frank. Looks fantastic! Great planking and love the weathering! I was going to ask the same question that Don did but saw he beat me to it. You're right about the Age-It products being good on some woods but not others. Looks great on the lime deck (assuming that was what was in the kit).
-
whats an easier build for a first kit
Landlubber Mike replied to rdestefano01's topic in Wood ship model kits
I should have added that you should try to find a kit with good, extensive instructions. The Caldercraft Badger had a 60-page instruction manual. Take a look at how detailed and extensive it is: http://www.jotika-ltd.com/Pages/1024768/Nelson_15.htm There are other models out there with lengthy instruction manuals as well. Even if you don't have the particular ship they can be useful - i borrowed lots of tips, for example, from Chuck's Syren instruction manual. This book by Mastini was a good resource too in being very new to the hobby: https://www.amazon.com/Ship-Modeling-Simplified-Techniques-Construction-ebook/dp/B00ARHCE5U/ref=sr_1_1?ie=UTF8&qid=1471545268&sr=8-1&keywords=mastini Also, you might want to pick a model for which there are a few build logs on here. Pre-crash, there were a bunch of us "Badger Brothers" that worked on the kit - not only did we share info and tips, but it was fun building alongside others. Unfortunately, a bunch of those logs were lost in the crash, but a few of us are still around. -
whats an easier build for a first kit
Landlubber Mike replied to rdestefano01's topic in Wood ship model kits
Welcome Rob! I would echo a lot of the folks here that suggest you start with something smaller. You didn't say whether you have any other modeling experience. If you did, then you might be able to pull it off if you take your time. Some people can do that, but I think it's very rare. I totally get wanting a kit to keep your attention. When I was looking, I didn't want to get the very beginner level kits. I thought the Badger hit the sweet spot in terms of having enough complexity to keep me interested, but not too much to be overwhelming. If you were dead set on one of the two though, I would go with the Constitution as there are a lot more build logs and material out there that can help with the build. Good luck, and let us know what you pick!
