Landlubber Mike
-
Posts
4,509 -
Joined
-
Last visited
Content Type
Profiles
Forums
Gallery
Events
Everything posted by Landlubber Mike
-
 Am very excited to see a build log for this ship here - a bit jealous too! Gorgeous ship, and the Euromodel kits are really amazing in terms of the quality of plans and components, and the added instructions. I recently picked up the Friedrich Wilhelm zu Pferde, which really has spoiled me when it comes to all other kit manufacturers. Good luck and take lots of pictures!
- 593 replies
-
- 1
-

-
- royal william
- euromodels
- (and 1 more)
-
Landlubber Mike's technique for furled sails
Landlubber Mike replied to Landlubber Mike's topic in Masting, rigging and sails
Jay, thanks very much for sharing - they came out great, and look better than mine Certainly not imposing at all. I like the color of your sails, and the seams in them. Very nice! Happy that you were able to borrow a little from my post to do your fine work. -
Good question Robert. Probably thinner than what I used I imagine. I think his Victory was at 1:96 scale, so his cloth is probably a lot thinner. I'm going to have to look into that material for my next builds.
-
Thought I'd pass along this link of a spectacular model of the Victory that I came across today. Take a look at the furled sails - they are furled very tightly against the yard for a rather thin profile. Amazing work! http://www.dailymail.co.uk/news/article-2219810/Magnificent-model-HMS-Victory-complete-Lord-Nelson-Captain-Hardy-deck-took-pensioner-10-years-complete.html
- 153 replies
-
- 2
-
-
- badger
- caldercraft
- (and 1 more)
-
Hi John, I agree with Augie - you can't really paint in place. What I've done though is use a cotton swab to keep constant contact on brass that was already fitted to the model. I've had mixed results with that, so right now, for minor touch-ups, I just add a little black paint. Good luck!
- 2,250 replies
-
- 2
-
-
- model shipways
- Charles W Morgan
- (and 1 more)
-
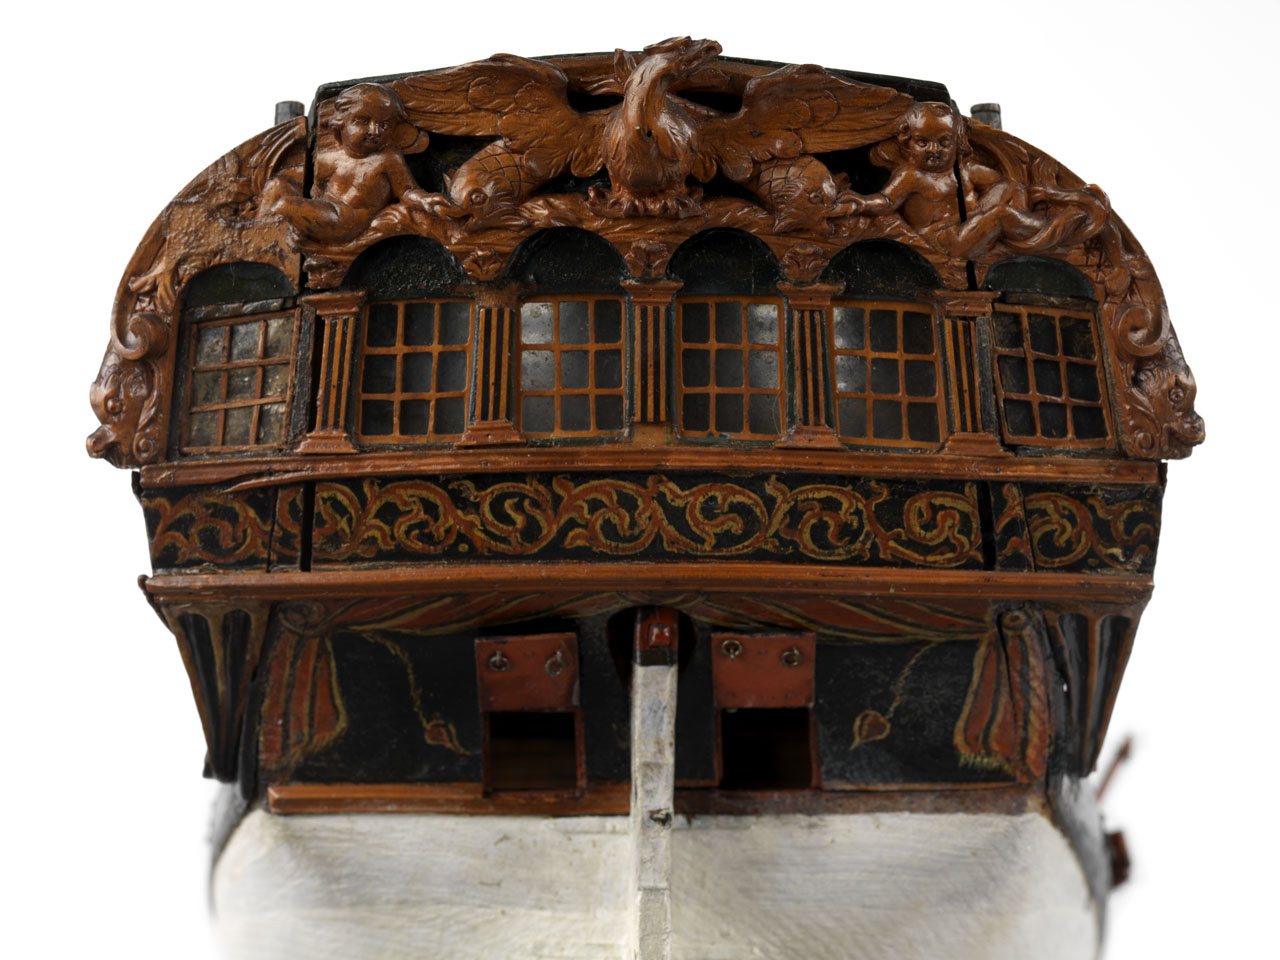
Hi Ian, Good to know about the windows. I'll have to take that into consideration when scratching the stern and stern galleries. If you look at the Chapman plans, they do indeed show windows with arches at the top. I'm wondering if these arches were decorative, rather than part of the actual windows? It's a bit hard to tell from the Chapman plans whether the arch served as part of the window panes, but take a look at this stern from model SLR0461 of the RMG. The windows here are rectangular, with decorative arches at the top. The ship is from 1741, so fairly close in time to the time of the Unicorn. Here is the link to the RMG site. It's a bit hard to tell whether the stern gallery windows are constructed this way as well, but it looks like it could be the approach taken. It might be a bit odd to have rectangular windows at the stern and arched windows at the gallery. http://collections.rmg.co.uk/collections/objects/66422.html After seeing this model in the Gardiner book, I was thinking that this would be a nice approach when scratching the stern - particularly since it would be much easier to create rectangular windows without arches Given your research and calculations on the window size, then maybe this approach would not only make more sense, but also be true to the Chapman plans. So, should we contact Corel and tell them to fix their kit? Think we can charge a consulting fee for all our research?
-
Hi ZyXuz, sorry to hear about the issue with your order. Sounds like you can use the stuff they sent by mistake, so I guess all is not lost. When my package arrives, I'll let you know how the coat of arms works (I'll post a picture so you can see if you need to go with the bigger or the smaller one). My hope is that I can use either of the Amati coats of arms, and reconfigure the stern to look like the Chapman plan. That would take making a curvier design to the top of the stern, and I'll probably sculpt or carve figures on the side of the coat of arms. At least that's the plan For the thread, I just ordered the Caldercraft thread. I didn't want to mix and match threads at this point on my Badger. I'm not super impressed with their thread - it's ok, but can be a bit fuzzy, especially some batches. I might go with Chuck's thread for future builds, but looking at the other kits on my shelf, the Amati thread looks pretty good. For the Unicorn deck, the height is probably correct but the slope is probably off given that the Chapman plans show the portholes opening up as you go forward. I think you're right that all that is needed is to build up the frames of the fore end of the quarterdeck a bit before the planking is added. I am going to try and modify it to match the Chapman plans, but not sure how easy it will be to open them up. CMB sells the Corel portholes in packets of 10, so I placed an order for them (they were sold out the first time I ordered). I had to guess on the size, as CMB sells them in 9mm and 12mm (diameters I assume), and of course when I measured them, they seemed to be 10mm in diameter I had some time this week to do some thinking about the color scheme as well. I think I'm going to go with a thick black wale, and black for the background of the stern and possibly the stern galleries. I have a feeling that I'm going to want to scratch the stern galleries as well, as I'm not all that impressed with the cast parts. I plan to open the waist as well, and I'll probably also add ships boats to that area. Interestingly, the Pandora had four boats of various sizes - three across, and the smallest nested inside one of the other three. If I don't talk to you before then, hope you have a good new year and good luck with your future career plan
-
Very nice work Pierre, coming along beautifully.
-
Wow, this is incredible work. I love the sails - very nice touch. Thanks very much for sharing.
- 555 replies
-
- 1
-
-
- sovereign of the seas
- mantua
- (and 1 more)
-
HI again ZyXuz, Just out of curiosity, did you get the CMB order in yet? I was wondering how the coat of arms replacement part that you got worked out. I had to place an order for more rigging thread on my Badger because I needed a bit more 0.50mm thread to do a tie on the main topgallant yard (the last bit of rigging requiring that size thread, very frustrating!), but that gave me an excuse to order other goodies for my Unicorn. I ended up ordering the smaller coat of arms as I forgot that you had placed an order for the larger one. Just wondering how it worked out. Thanks! Hope all is well my friend.
-
Hi ZyXuz and Ian, I was reading the Gardiner book "The Sailing Frigate" last night (an excellent book on the development of frigates using ship models from the NMM), and came upon a passage on the headroom between the decks that reminded me of Ian's post above. Here is an excerpt from page 49: "The Unicorn and Lyme were a great success, and eventually twenty ships were built to this design during the next war, including five experimentally built of softwood . . . . The prototype pair followed their French model [the Tygre] quite closely, but proved too cramped internally for RN purposes, so the second pair were modified to add about a foot of headroom between decks - ironically, as this was one of the features that had made the French formula so attractive in the first place - but it meant better conditions for the men berthed on the lower deck, and increased the main battery freeboard from its barely adequate 5ft." So maybe Corel actually got this right?
-
Hi John, hope you and your family are having a great 2014. Really nice work on your Morgan - it's coming along great. I remember getting to this point on my Badger and getting excited that the build was finally looking like a ship I don't mean to hijack your build log, but can I ask you a question? I am going to start the Morgan after my Badger is completed, and I'm considering avoiding the use of paint as much as possible. So, I've been thinking about what type of wood to use for various parts of the ship. In looking at your pictures of the real Morgan and other pictures, it looks like the deck, bulwarks and deck furniture and other items seem to all be the same color. Was that your recollection? If so, I was thinking that maybe using boxwood for those areas would work. Thanks very much!
- 2,250 replies
-
- 1
-
-
- model shipways
- Charles W Morgan
- (and 1 more)
-
Royal William by derebek - 1/72
Landlubber Mike replied to derebek's topic in - Build logs for subjects built 1501 - 1750
Absolutely beautiful model of a beautiful ship. Thanks so much for sharing. -
Daniel thanks for that great explanation. Makes a lot of sense, thank you!
-
Landlubber Mike's technique for furled sails
Landlubber Mike replied to Landlubber Mike's topic in Masting, rigging and sails
Thanks, I'll have to try that out. -
Landlubber Mike's technique for furled sails
Landlubber Mike replied to Landlubber Mike's topic in Masting, rigging and sails
Oh, he made it collapsible? I was worried that his model was damaged, whew! Did you manage to get Google translator to work? Or do you speak Italian? I would love to find a translated version for reference on my next build - which, at the rate that I proceed at, will likely be in 5-10 years -
This is a good point Eamonn - I've been thinking about your comment most of the day today which made me go back to some of the resources I consulted when trying to figure out how to approach the furled sails. The diagrams in Harland show very tightly furled sails, relatively close to the scale of mine. Zu Mondfeld also cautions that the furled sails should be neither too thick nor too thin - he includes a picture on page 331 of an 1867 French corvette whose furled sails he praises. It's a bit hard to tell from the black and white photo, but it looks like the ends of the square sails are at the same scale as mine if not smaller, but the bulk in the middle is significantly larger. Maybe this is a factor of the sails being furled on top of the yard, rather than down and in front? The general bulk of the driver/spanker seems to be a little larger than mine as well. So, definitely a point of consideration. Now I'm hoping that mine aren't too thin
- 153 replies
-
- 2
-
-
- badger
- caldercraft
- (and 1 more)
-
Landlubber Mike's technique for furled sails
Landlubber Mike replied to Landlubber Mike's topic in Masting, rigging and sails
Wow, I just came across this webpage where the builder's sails are absolutely amazing and put mine to shame. The website is in italian, and I can't seem to get Google translate to work on it, but the pictures tell the story. For the squeamish, don't scroll down on page 2 http://www.deagostinipassion.com/forum/posts/list/50/23263.page -
Landlubber Mike's technique for furled sails
Landlubber Mike replied to Landlubber Mike's topic in Masting, rigging and sails
I added buntlines to the topsails and the fore course. Rather than knotting the end of the line and running it through the buntline blocks at the top of the mast like you would do per the kit instructions, I glued a portion of the line onto the sail and ran it through the buntline blocks before furling the sails. Unfortunately the example I showed in the beginning of the thread was for the topgallant sails, which didn't have buntlines. I skipped the bowlines and reef tackles. You're a brave man if you are going to add them I will likely add a combination of furled, partially furled and full sails to my next build, so I'll be following your techniques closely. -
Looking really great Augie. Wales and the treenails came out very nice indeed
- 2,191 replies
-
- 1
-
-
- confederacy
- Model Shipways
- (and 1 more)
-
Landlubber Mike's technique for furled sails
Landlubber Mike replied to Landlubber Mike's topic in Masting, rigging and sails
Hi again Jay, sorry I missed this response earlier. What confused me earlier was the configuration in the kit plans for how the clew lines and sheets and their related blocks were run - essentially, the clue line is fixed to the spar towards the end, travels downward to the clew block (from which the sheet is run), then back upward to the clue block on the spar near the middle of the spar, forming a triangle. The triangle is fictitious really, and is there only because the kit's plans show a typical model without sails. Actual sails had the clew block attached to the cringle of the clew of the sail, and the sheet or tack (depending on the sail) was run through the cringle. The diagrams from pages 82-82 of the Lennarth Petersson book are very helpful, but unfortunately I can't find the online version to post pictures. So, what I ended up doing with my sails is that I added the cringles to the clews of the sails, attached a clew block at the sail clew (and for the fore course a sheet block as well), then ran the sheets through the cringles, knotting them at one end so that they stayed locked at the cringle (for the fore course, I ran the tack). It took me a long while to wrap my head around all this, but I think this is how it all works. You're right that it does make for a busy section at the furled sail clew. I've seen a few models with furled sails where the sail clew was omitted, perhaps because of the "busy-ness" at that point, or perhaps because it makes things a bit more complicated. -
Thanks very much Eamonn, really appreciate the kind words. Give them a try!
- 153 replies
-
- 1
-
-
- badger
- caldercraft
- (and 1 more)
-
Landlubber Mike's technique for furled sails
Landlubber Mike replied to Landlubber Mike's topic in Masting, rigging and sails
Jay, the location of the furled sail as to the spar (below and in front vs. on top) depends on the period. I think when jackstays were introduced (I think that's they were called, but I could very well be wrong), the furled sails sat on top of the spar. The Badger dated from about 1778, which preceded the jackstay (or whatever it was called), so I put my furled sails below and in front. Mike -
Very cool, thanks very much for sharing your technique! Looks fantastic, particularly against the red painted areas.
-
Landlubber Mike's technique for furled sails
Landlubber Mike replied to Landlubber Mike's topic in Masting, rigging and sails
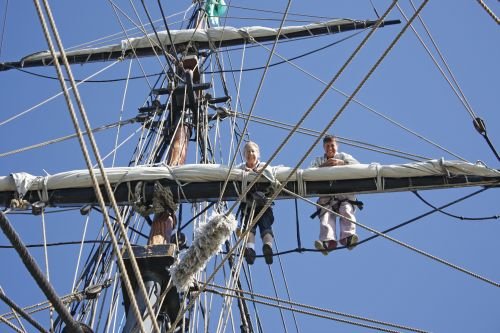
Looks great Jay! How did you do the seams? They look very good. The crew were very brave indeed to stand on the yard horses and furl the sails. Here is one picture that I found online of some folks doing that - not my cup of tea, and I don't think that I'd be all smiles like these gentlemen!