HOLIDAY DONATION DRIVE - SUPPORT MSW - DO YOUR PART TO KEEP THIS GREAT FORUM GOING! (Only 13 donations so far - C'mon guys!)
×


Piet
-
Posts
3,568 -
Joined
-
Last visited
Content Type
Profiles
Forums
Gallery
Events
Everything posted by Piet
-
 Thank you all for dropping in and clicking the like button, it's really appreciated. A special thanks to MarkT, Patrick, Nils, Pete, JesseLee, Sjors, Remco, Ian, Mobbsie and Anthony for your very kind words. Sjors and Remco, send me the specs, drawings and material but I don't think you can afford my price What's the fun in farming out these pleasurable little Jobs, you'll miss all the fun that way. Hey Ian, after the anchors were blackened (painted flat black over metal primer) none of the brass is visible. However, they still needed to be semi nice looking because all blemishes will show through the paint. Cheers,
 -
I don't need Google Translate but I don't have a clue what they are talking about, never heard of that expression. Hmmmm, too many years away from that language I guess Shrouds look very good Sjors and it looks like you haven't lost your touch with the ratlines. Cheers,
- 1,616 replies
-
- 5
-

-
- caldercraft
- agamemnon
- (and 1 more)
-
Ah, I just caught up on your America in a bottle build Igor. Marvelous detail at that scale, just lovely. This makes my fingers itch to start my Dutch fishing boat in a lamp or bottle. I'm taking notes my friend, your pictures are a good teacher. Cheers,
-
Very nice progress Popeye Denis, drip edges on the roof, no gutters though . Then the door handles and knockers, wowsie babe, they do look like antique bronze, very classy. Paint job on the hull came out really nice too. Cheers,
-
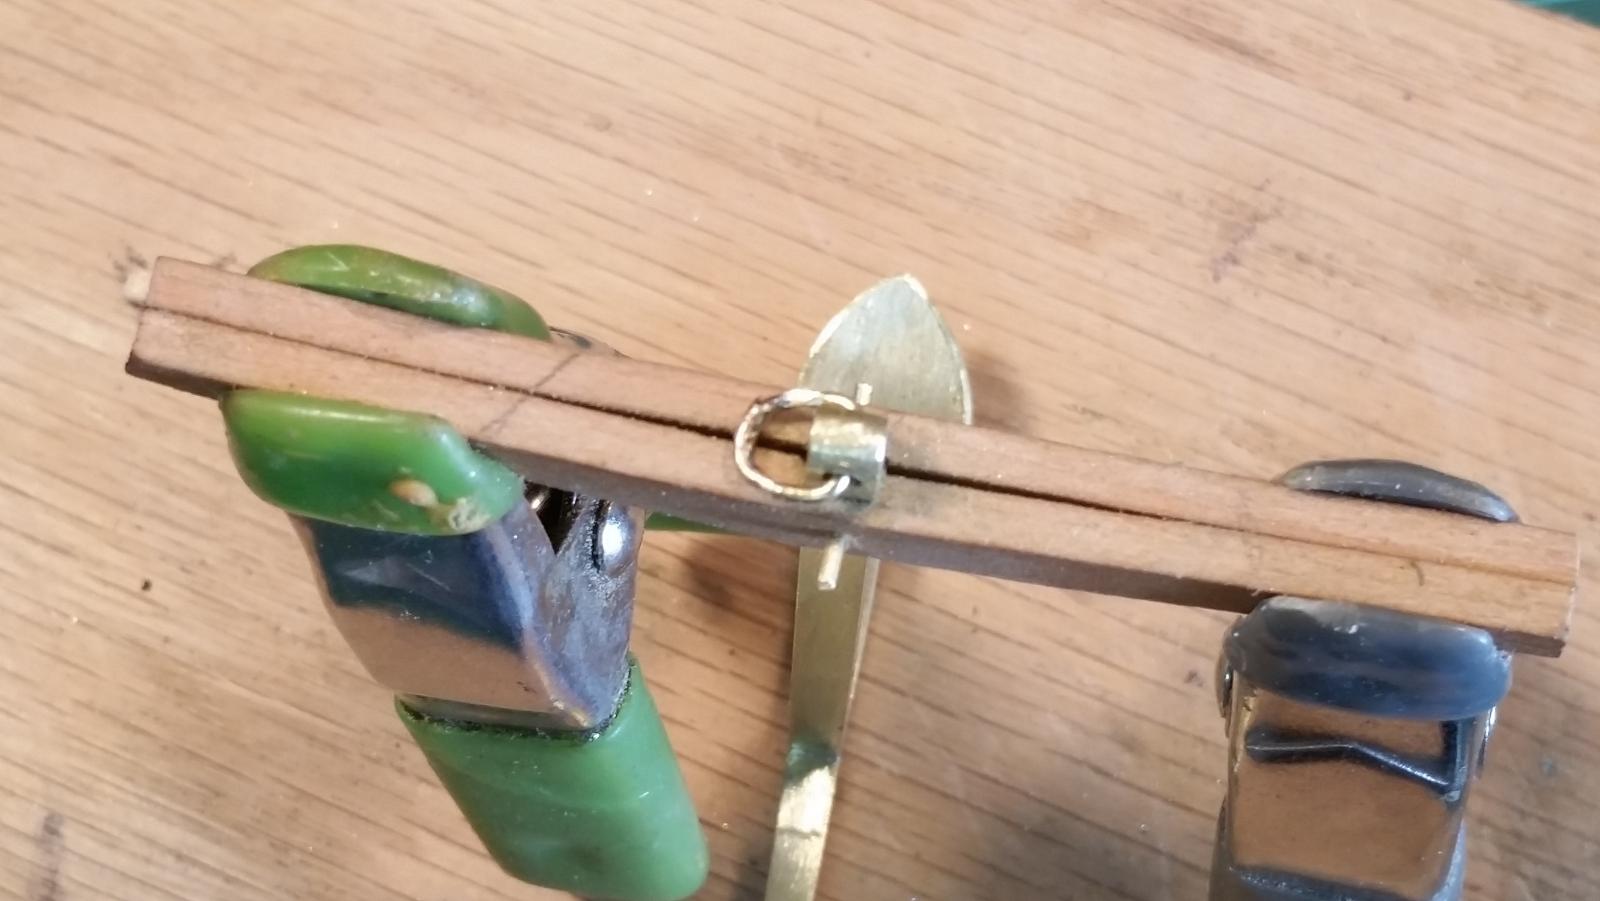
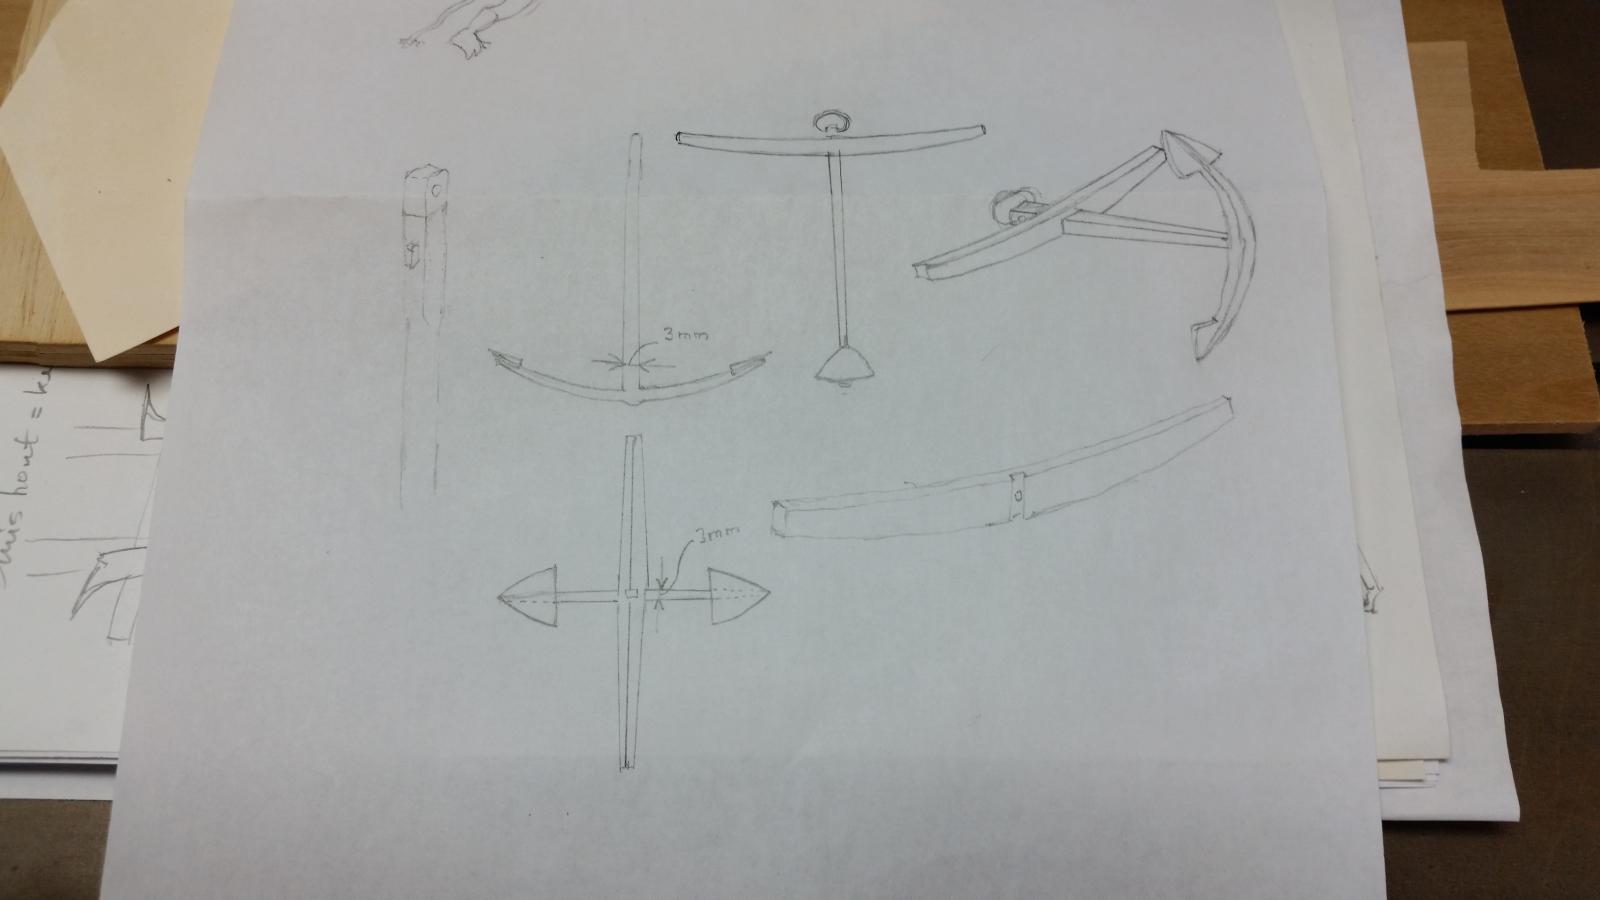
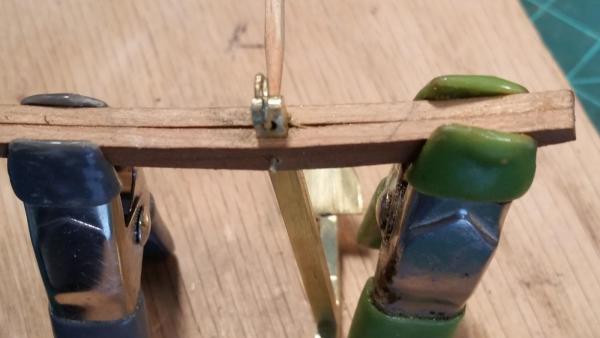
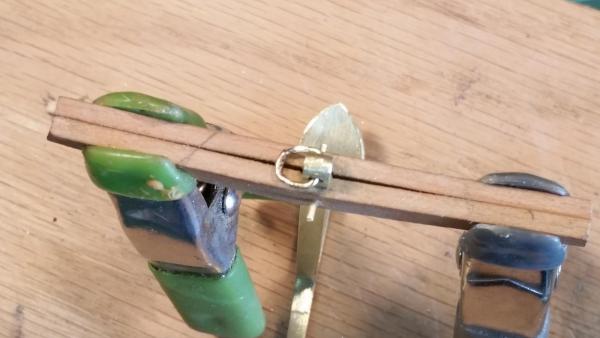
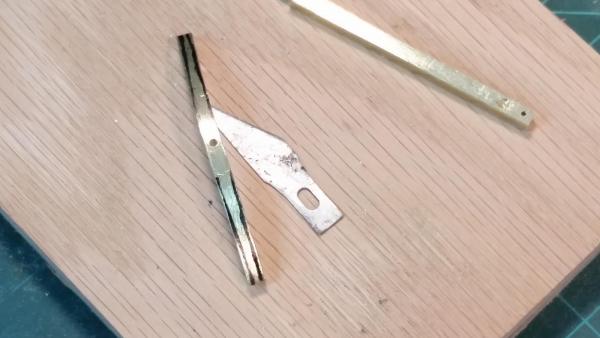
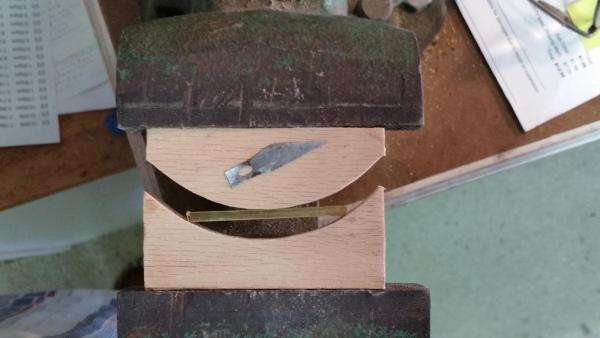
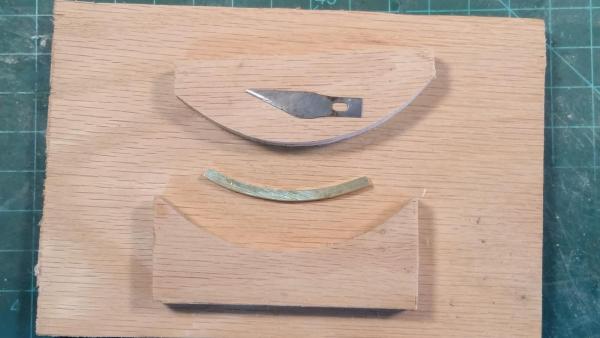
Today was rather productive, albeit short. I didn't get to the shipyard till around ten a m but soldered the second anchor together. Then it was cleaning them and roughly polishing them. I don't want them to appear as jewelry, leaving them a little rustic like the ship is, a good match. Next step was installing the stock. I put a small dab of CA at the center anchoring bolt and then some PVA at the ends of the stock. Next I made the rings for the anchor cable. This posed a slight problem because the shank in square and I had to make the ring with a flat part that goes through the shank. It was a little tricky getting the ring to look like a ring yet also let it rotate in the shank. Next problem was soldering the ends together in such a way to make it look like a forged ring. I don't know if anyone on the forum ever have welded iron rings like chain links, in a black smithy or forge fire. Very tricky - yes I have. In any case this reminded me of that process. I filed both ends to a taper so that when thy are soldered together they should look like one piece. Perhaps I'm making it a lot more difficult then need be, again not really knowing how they did it in 1665. It turned out acceptable to me and if it's not the way it should be Jan will most certainly let me know. One more thing I need to look at using the URL Jan gave me. \I normally don't start with MSW till late in the evening, sorry Jan for not yet getting to look at the model in the Rijksmuseum. Tomorrow for sure, before I do anything else. After lunch I cleaned up and started making the bands for around the stock. I made three that are actually ready to be put on and the ends soldered. Then it was time to close shop. I cancelled the order for the iron bands Tomorrow we'll make the bolts for the stock and finish the anchors. There is still a smaller anchor I want to make. We'll see - the 3.2 mm brass bar is a little to hefty for the smaller anchor and ordering a smaller bar at the total cost of $12.00 is a little much at tgis stage - - unless I hand machine these down. Here I am in the process of filing the ring ends to a taper. If you squint real good you may be able to see the spit and start of the taper. I had to put a toothpick in it to hold the ring up for the picture. Here we see the finished ring. Here are both main anchors posing for the picture. Now the only thing left are the bolts that hold the stock pieces together. I hope all yuns approve. Cheers,
-
Thank you all for visiting my humble shipyard, your welcome comments and also those who clicked on the like button. @ David B: To tell you the truth, no. Actually I like to do things the hard way, use real metal and wood Glutt'n for punishment, I know but it's all a challenge to me. Can it be done and can I do it. Now that you mentioned it, I have read or heard about black electrician's tape before. Besides, Jan just informed us that the anchors on ships in my era, mid 17th century, did not yet have iron bands, so I'm saved by the bell @ Jan: Thanks for the head's up and the link. Here i was ready to add some more detail to the anchors and save some time. I actually made three bands already but didn't put them on the stocks. I never looked to see of iron bands were appropriate for that era, they just look nice. Okay, I'll put bolts in, that'll look nice too, although I like the looks with the bands. Now to make the bolts. They were most likely square headed and forged. Hmmmm, that'll be a challenge making them and the nuts - or were they just clinched at the other end Kidding of course, 1 mm brass rod will do. @ Ian: Yup, that's why they make alligator clips for and clothe pins. Thanks for kudos too - appreciate it. @ EJ: Thank you for your complements, not deserved but appreciated never the less. Having worked with my hands most of my adult life fabricating parts for aircraft and engines and assembling aircraft from parts and pieces lying around helps (grossly simplified). It all starts with an idea, finding the right info, which I lacked at the time I started, is the first step. That's where this forum is such a treasure of information freely given to those who need it. And boy, do most of us need it. For me Amateur Jan, Dirk and Hans have been invaluable. Someday you'll get there. @ Anthony: Don't make me blush but thanks for the added confidence, we all need it. @ Pete: Thanks my friend. @ Michael: A note of clarification on that Chinese drill bit. What I meant was that the drill didn't show two curls coming out of the hole, just chips and the flute was rather elongated, didn't look like the 1/16 inch I finally bought. Yes, I like to use mostly hand tools, mainly to keep my hands and fingers nimble (arthur needs to be exercised) and I don't have many pieces of machinery. @ Sjors: What can say, not many people lived after calling me jochie For the non Dutch speakers that translates to little boy. We could say lad but that's a high class word. Okay, here's what my response is - jochie, you are calling me a jochie? I have enough hair on my chest to weave an indian blanket - and you call me jochie? Hey Sjors, all in jest mind you and I'm grinning from ear to ear BTW, thanks for the kudos - bedankt voor de complimenten. The drill bits I bought are Irwin. Cheers,
-
Well, it does resemble a VOC ship and it being a fantasy ship, looks quite nice. I like the lion and the stern part with the galleries. Even with lights! Good luck with the model s.v. and Cheers,
-
That came out very nice Dave. Cheers,
- 962 replies
-
- 6
-
-
- sovereign of the seas
- ship of the line
- (and 1 more)
-
When you Google "sitka spruce" you'll get many hits where to buy it. When I was in the aircraft repairing business i bought aircraft grade sitka spruce from an aircraft parts supplier in the Midwest. The name escapes me right now. Cheers,
- 258 replies
-
- 4
-
-
- buzzards bay
- herreshoff
- (and 1 more)
-
Isn't it a real satisfying feeling when things fall in place so perfectly - ref the deck coming stringer. And now your carving prowess, nicely done Michael. Cheers,
-
ancre La Salamandre by tadheus - 1:24
Piet replied to tadheus's topic in - Build logs for subjects built 1751 - 1800
Some very nice chisel work Paul! Cheers, -
Nice work Dave! Will there be a crown in the center? Cheers,
- 962 replies
-
- 5
-
-
- sovereign of the seas
- ship of the line
- (and 1 more)
-
Wow baby, wait a cotton pick'n minute here. Thou sayest thou hast no metal working skills??? Those metal parts are outstanding! I'm sure you'll be making all the fittings from brass, yes? Coming together really nice Pete. Question, what kind of wood are using for the mast and booms? Will they be from a one piece dowel? If so, not afraid of warping later on? Cheers,
- 258 replies
-
- 6
-
-
- buzzards bay
- herreshoff
- (and 1 more)
-
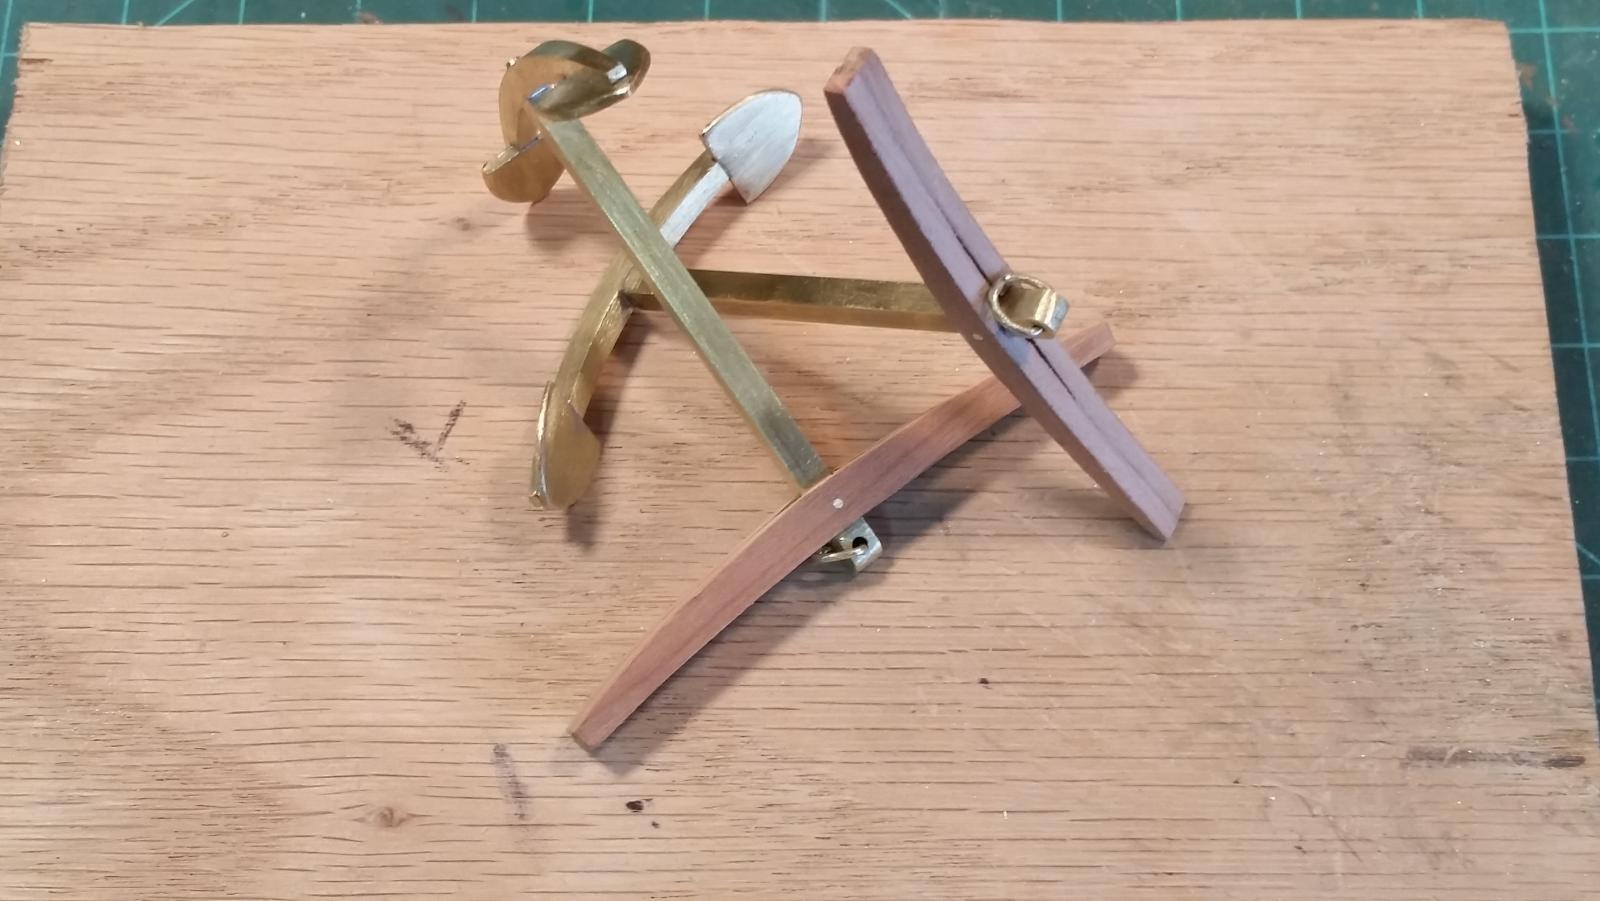
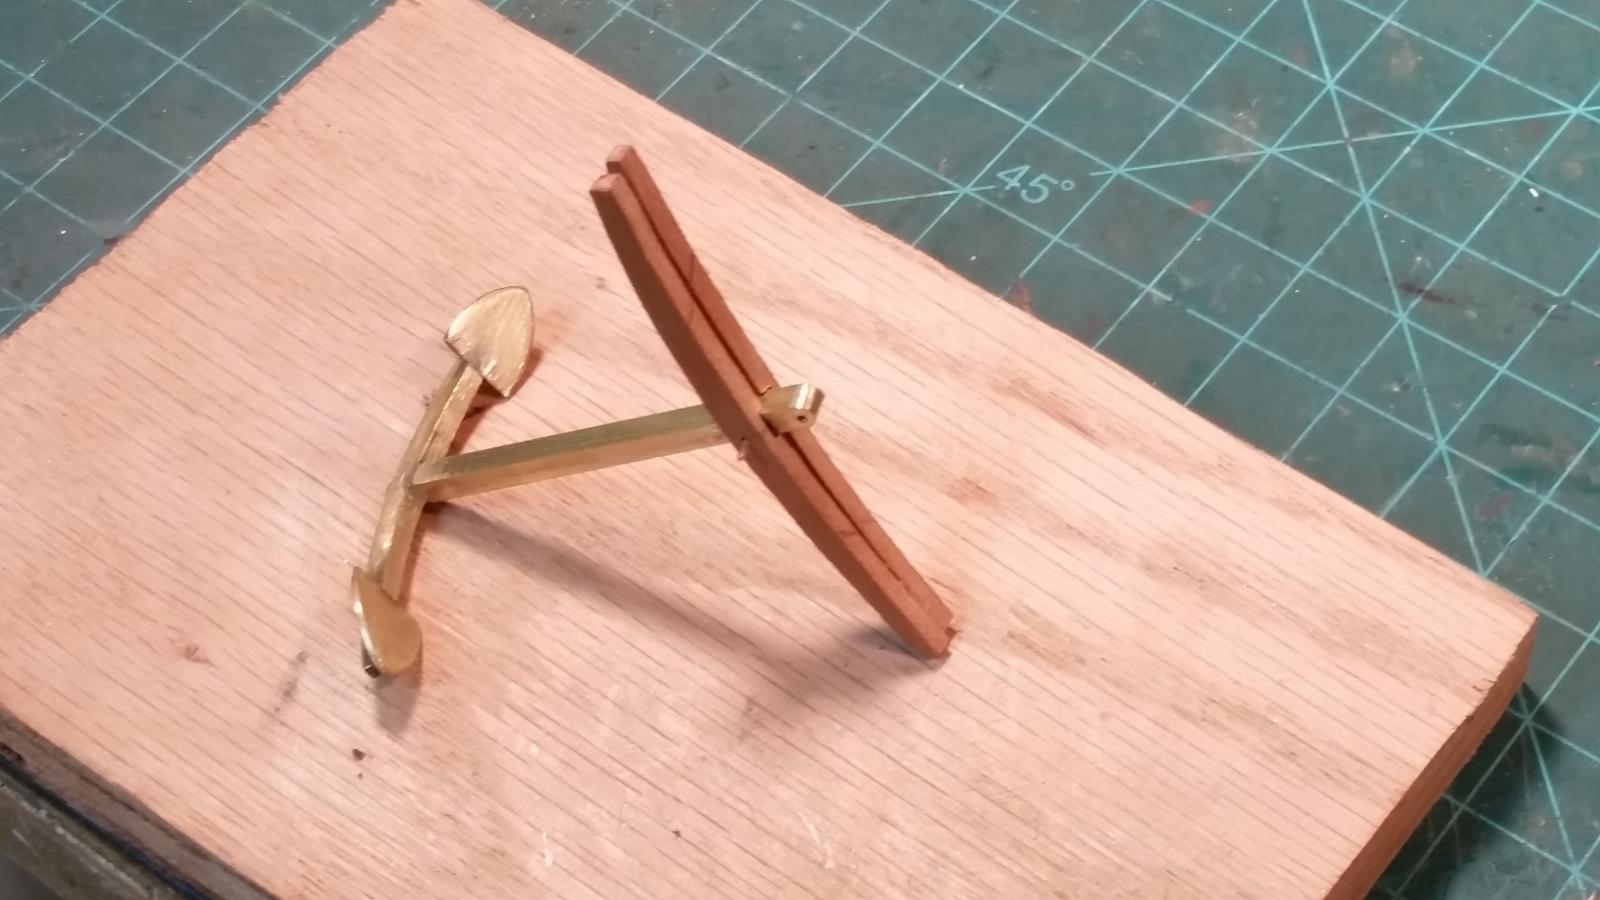
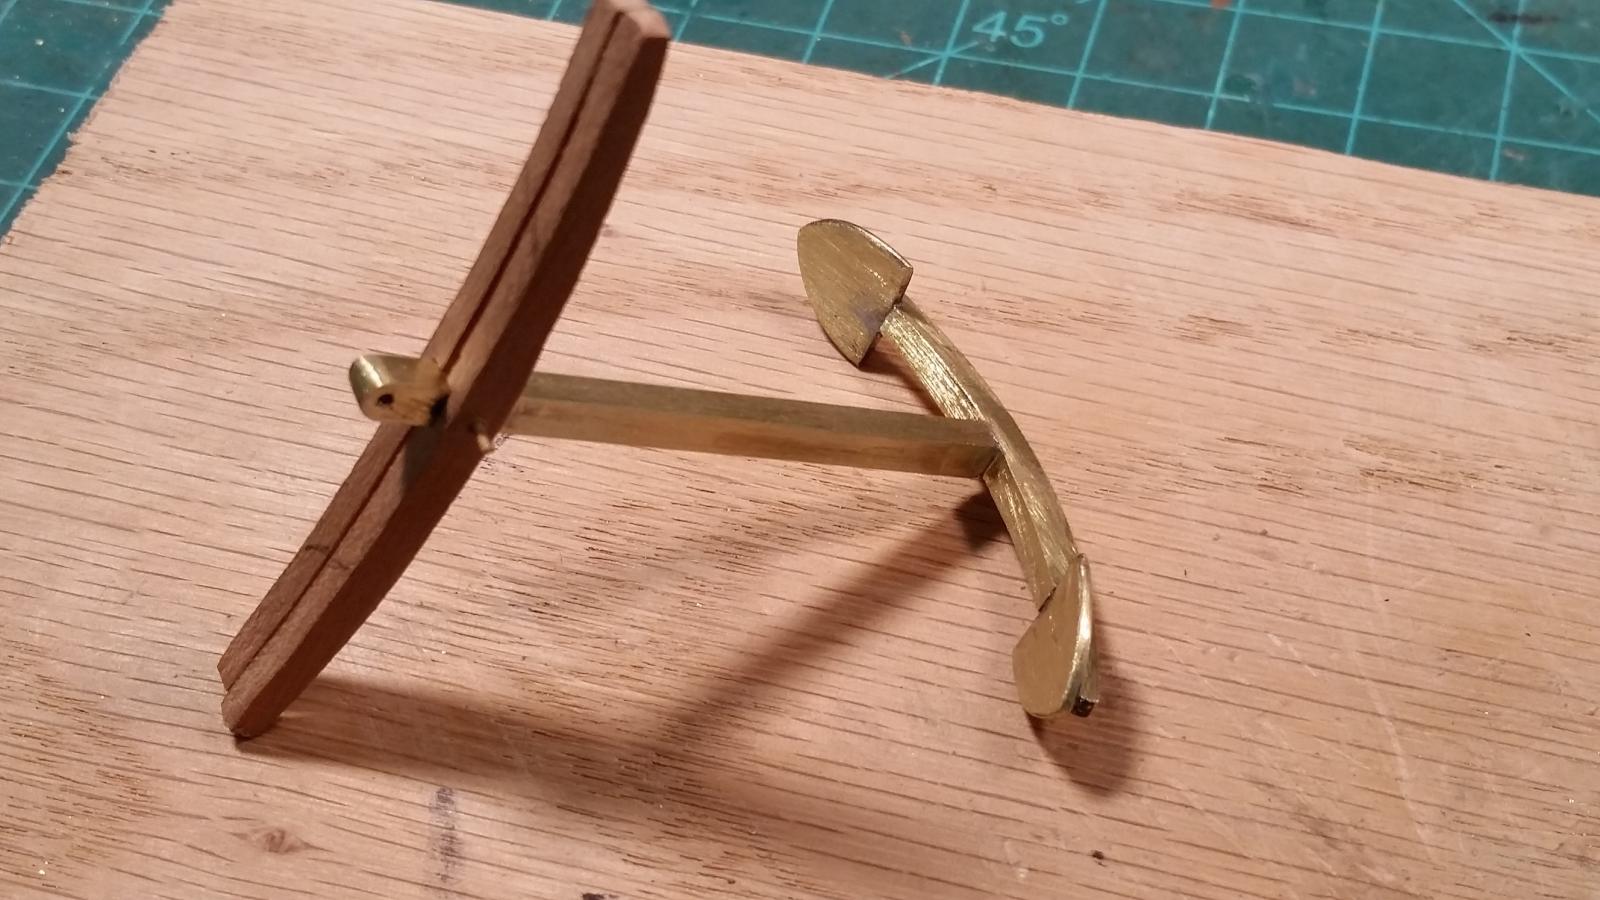
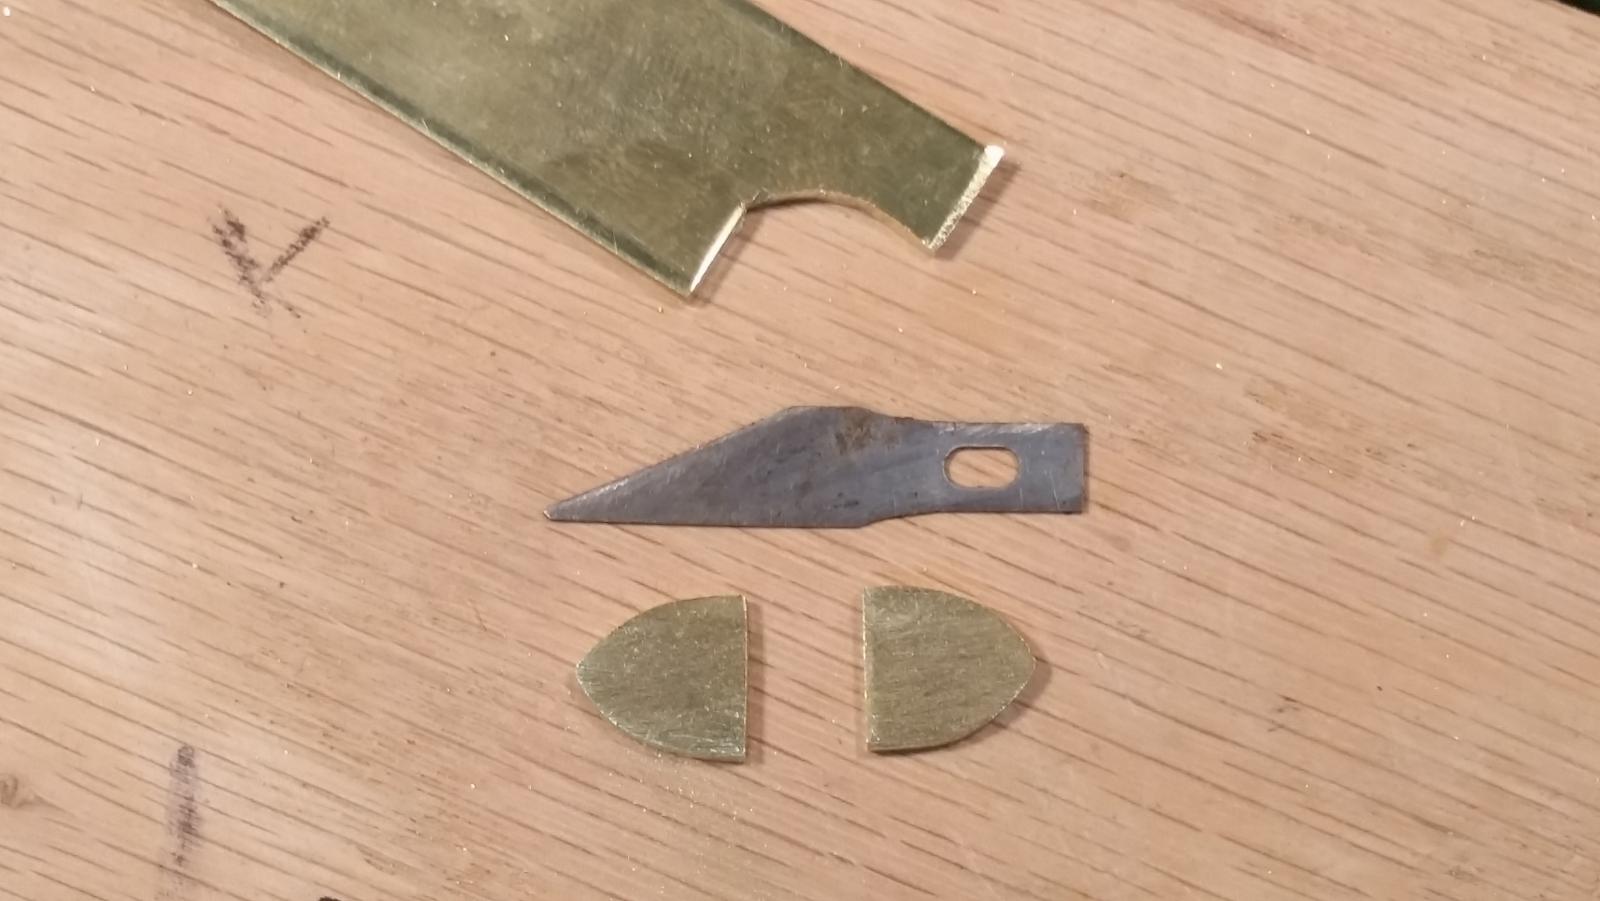
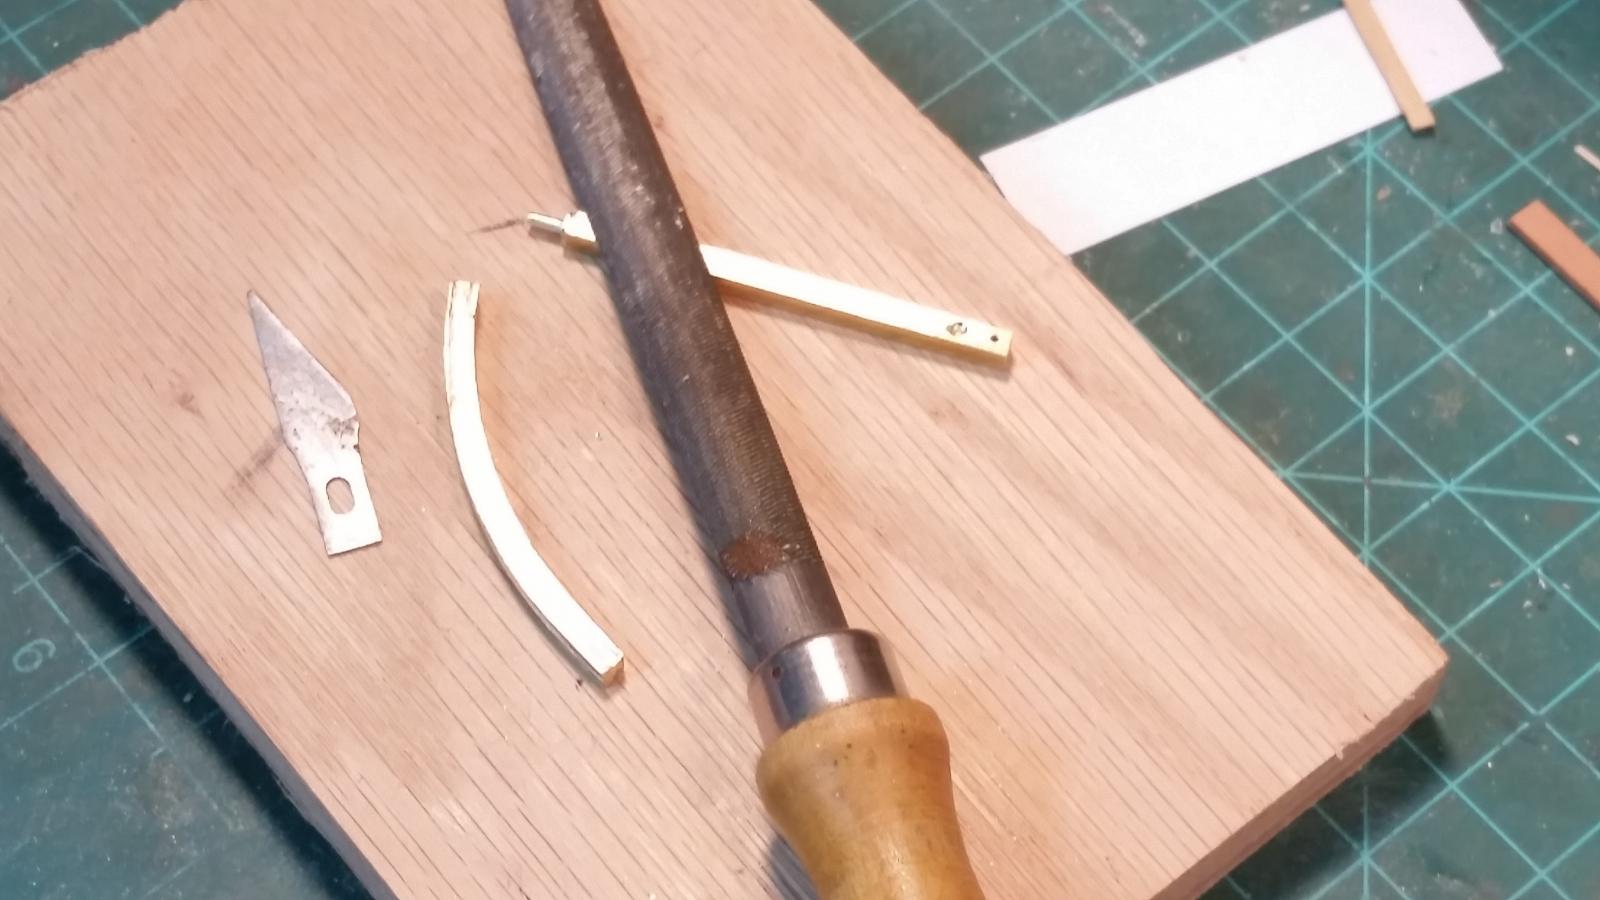
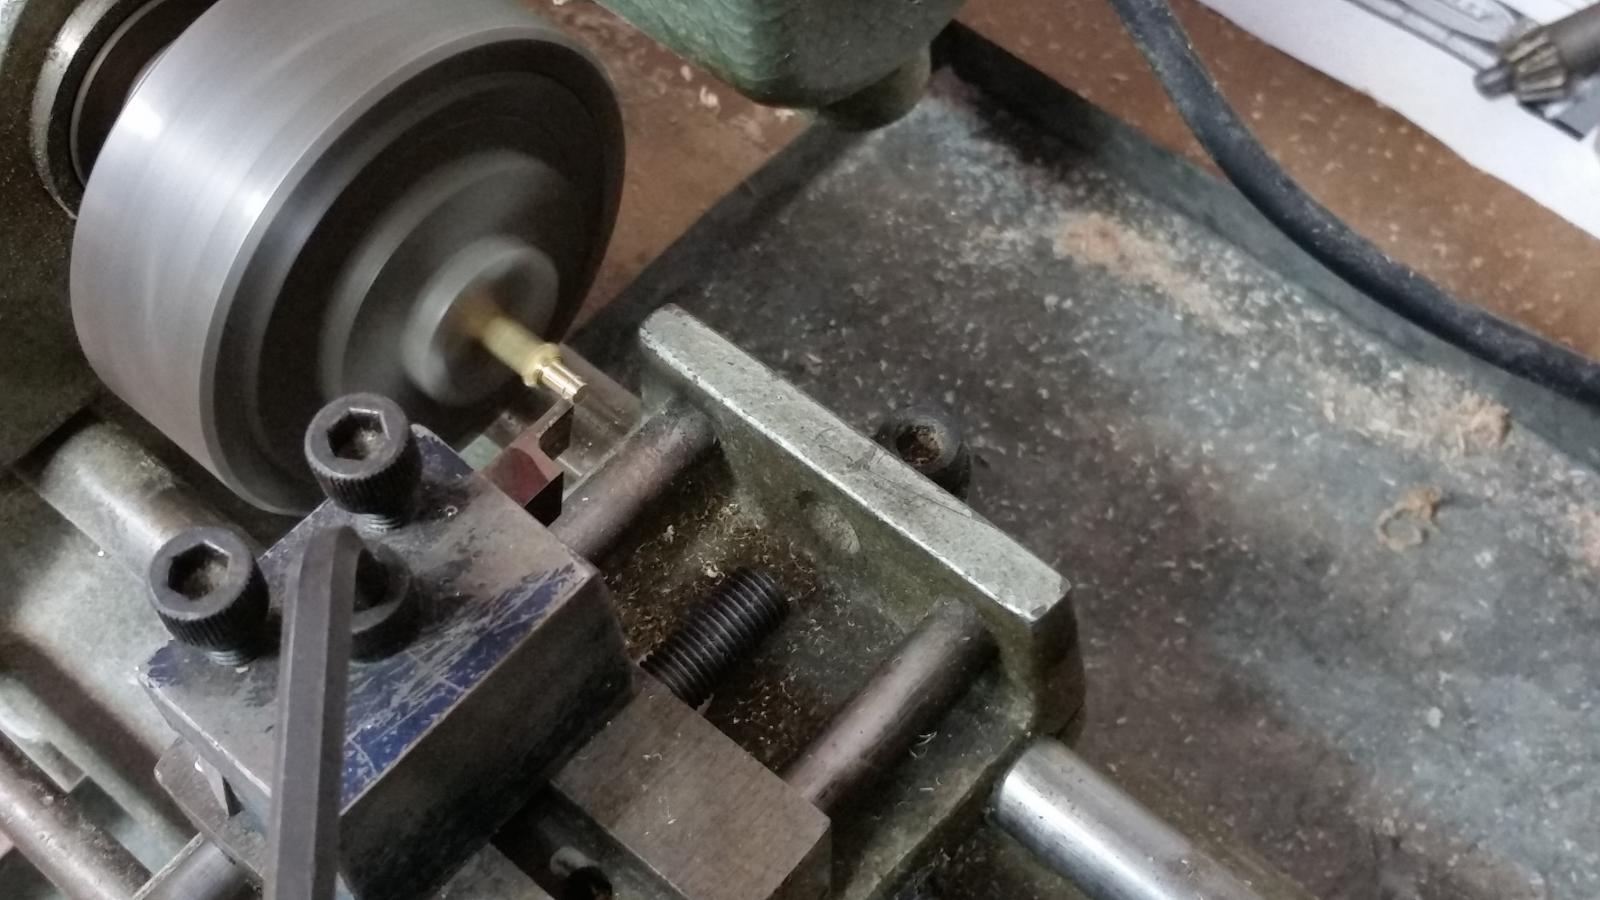
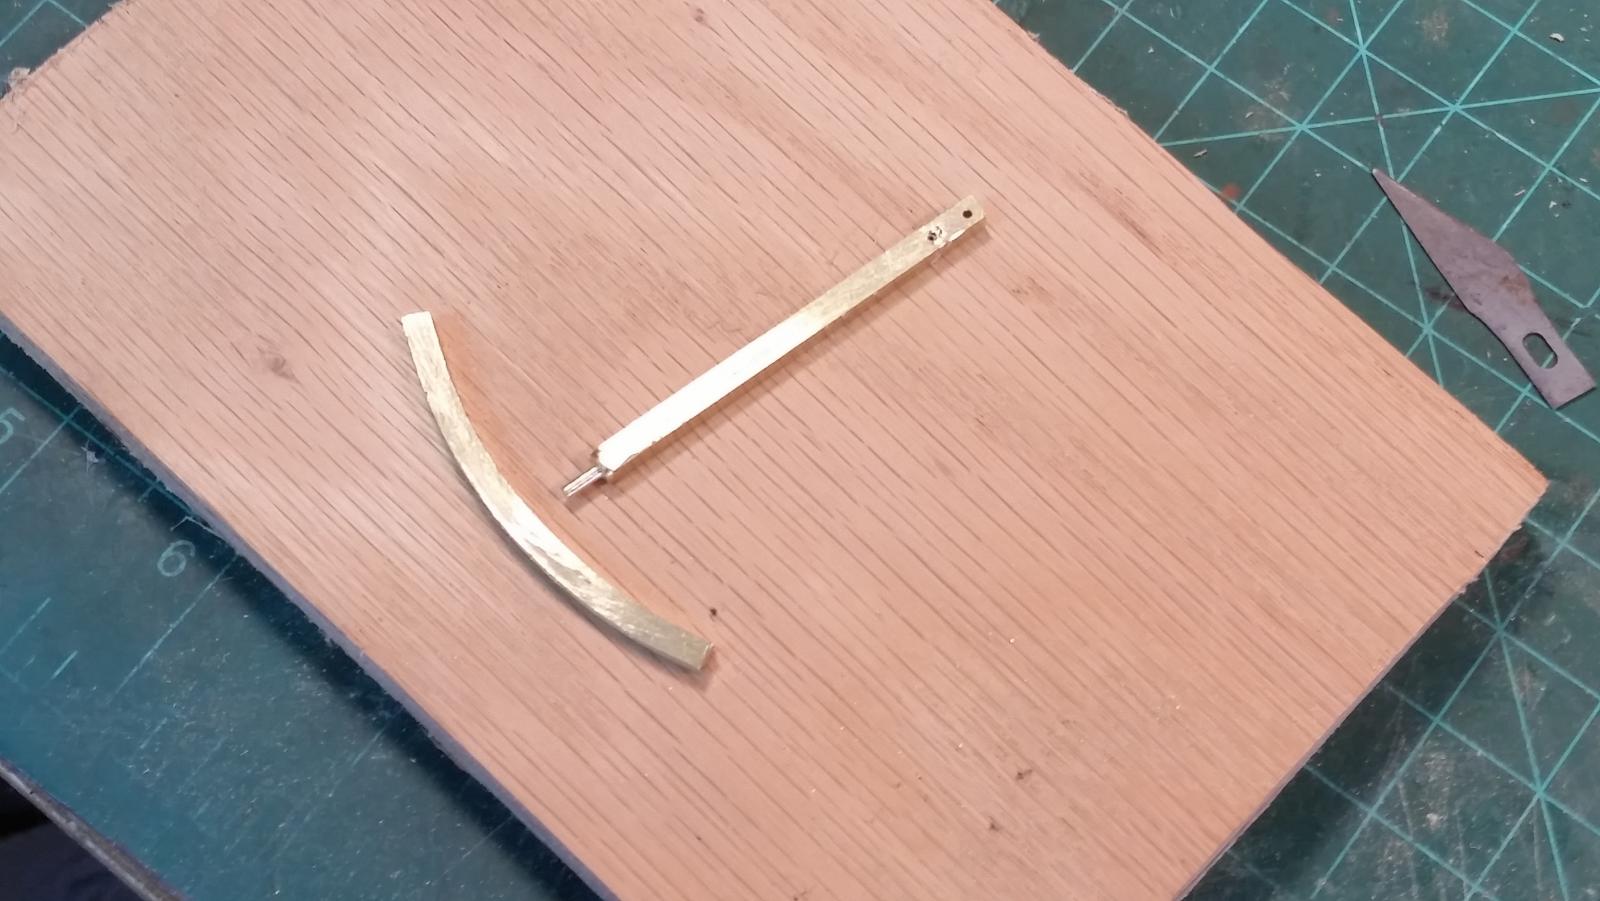
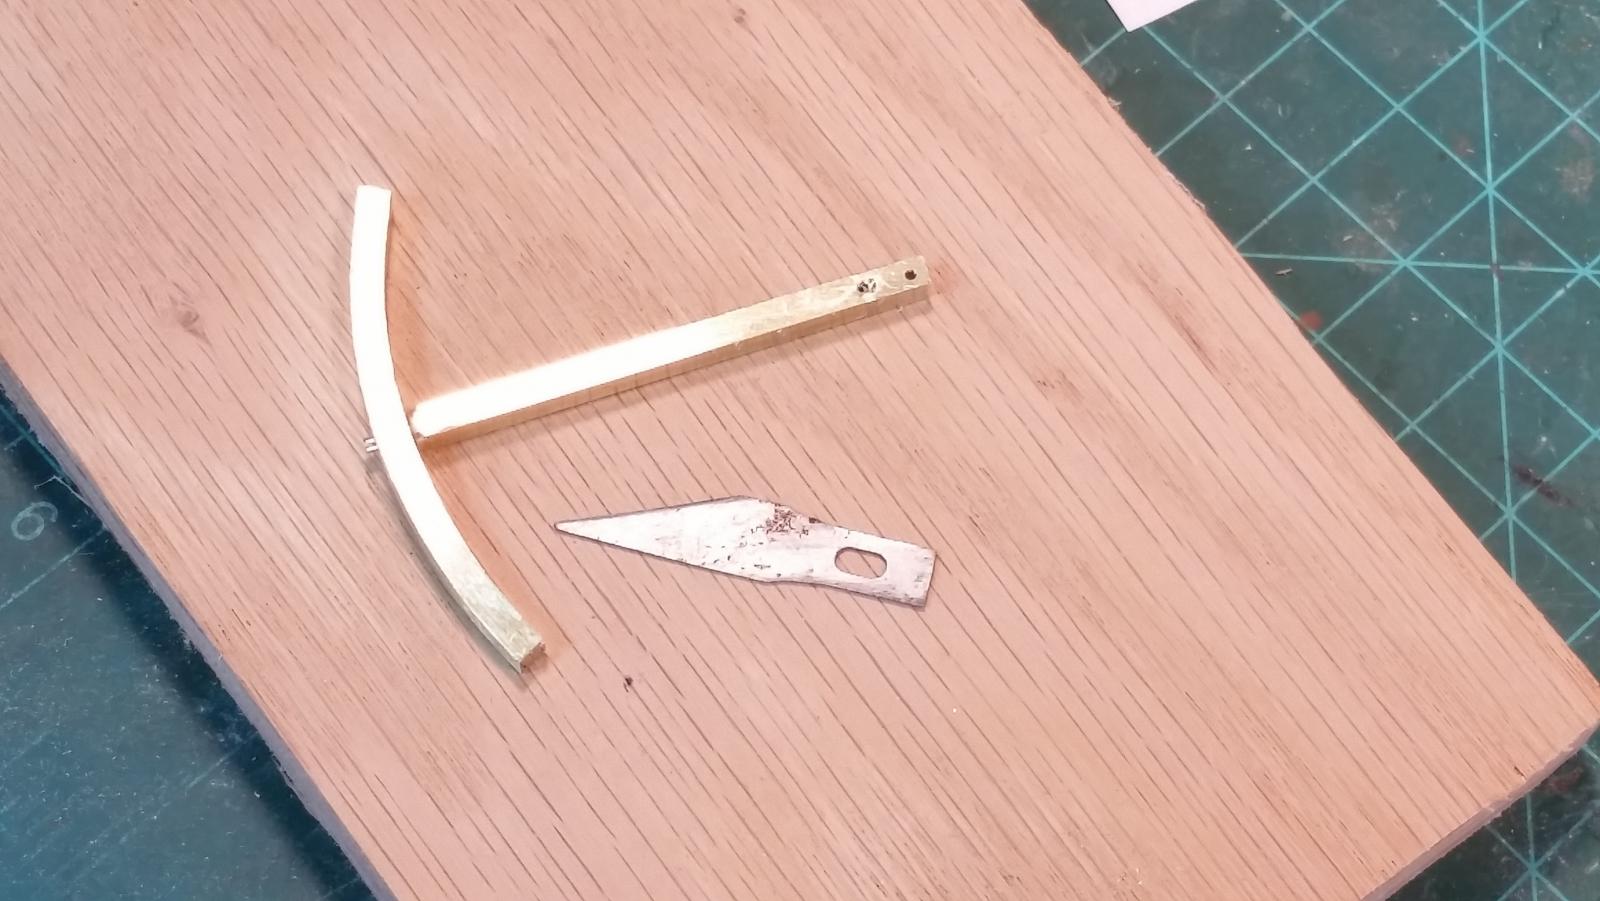
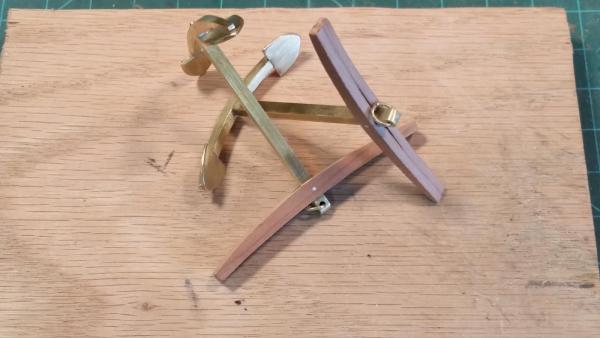
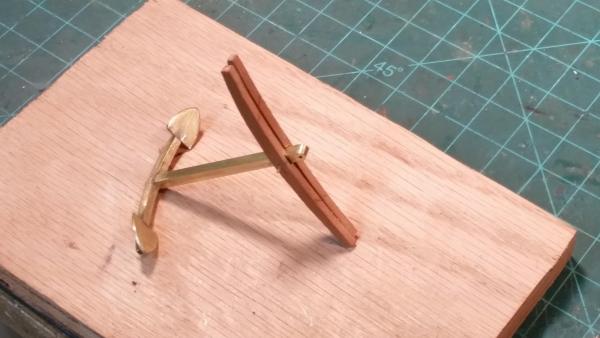
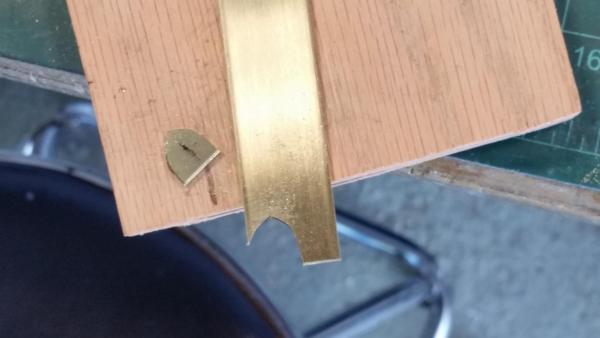
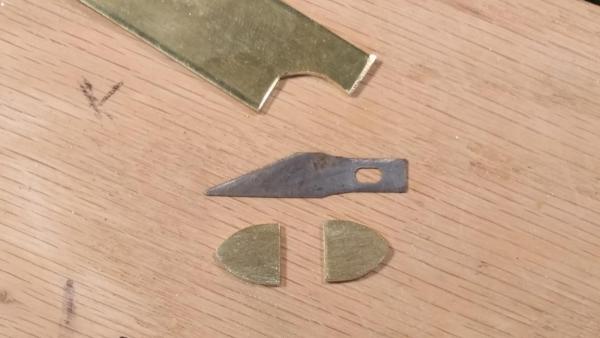
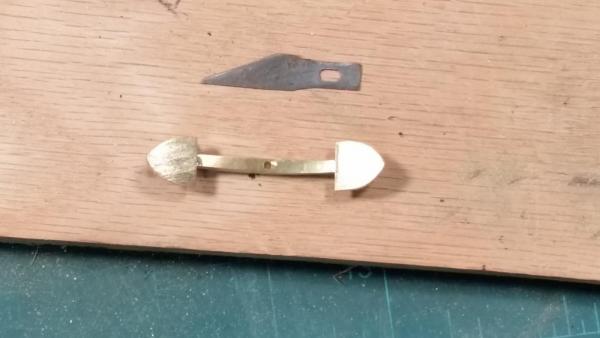
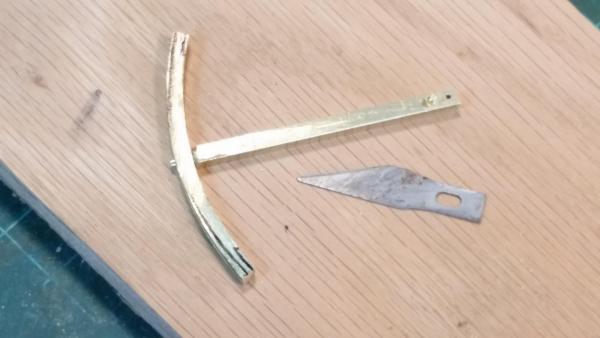
Well, it looks like I lucked out this time and everything in my previous post showed up as advertise. Today I continued with cutting the last fluke out of that brass sheet stock and filed the last two to size. Looking at them on the anchor arm they looked just too heavy for scale and flat. So, I decided to hand machine them down somewhat and at the same time machine a curve into them. Yes, it's a lot of work but so what, it's only a few more hours of my time. I did use diamond impregnated mini grinding wheels though to speed-up the work. I brought the thickness down to 1.2 mm, not bad at all. The final shaping was done with a series of files. I'll wait with the final dressing till after all the parts are soldered on and the anchor is completed. I did not make any pictures of the grinding and filing, all yuns know how to do that - - right? I also didn't make any pics of the soldering for the same reason and besides I don't have an extra set of arms So then, tomorrow I'll assemble anchor numero duo and put the stock on. I plan to wrap three straps around each side to secure the two halves together. That'll be fun, soft soldering the brass straps on the cherry stock without burning them That'll complete both main anchors and I think I need to make a smaller one to display somewhere on the ship. Here are two pics, hope you approve. Cheers,

-
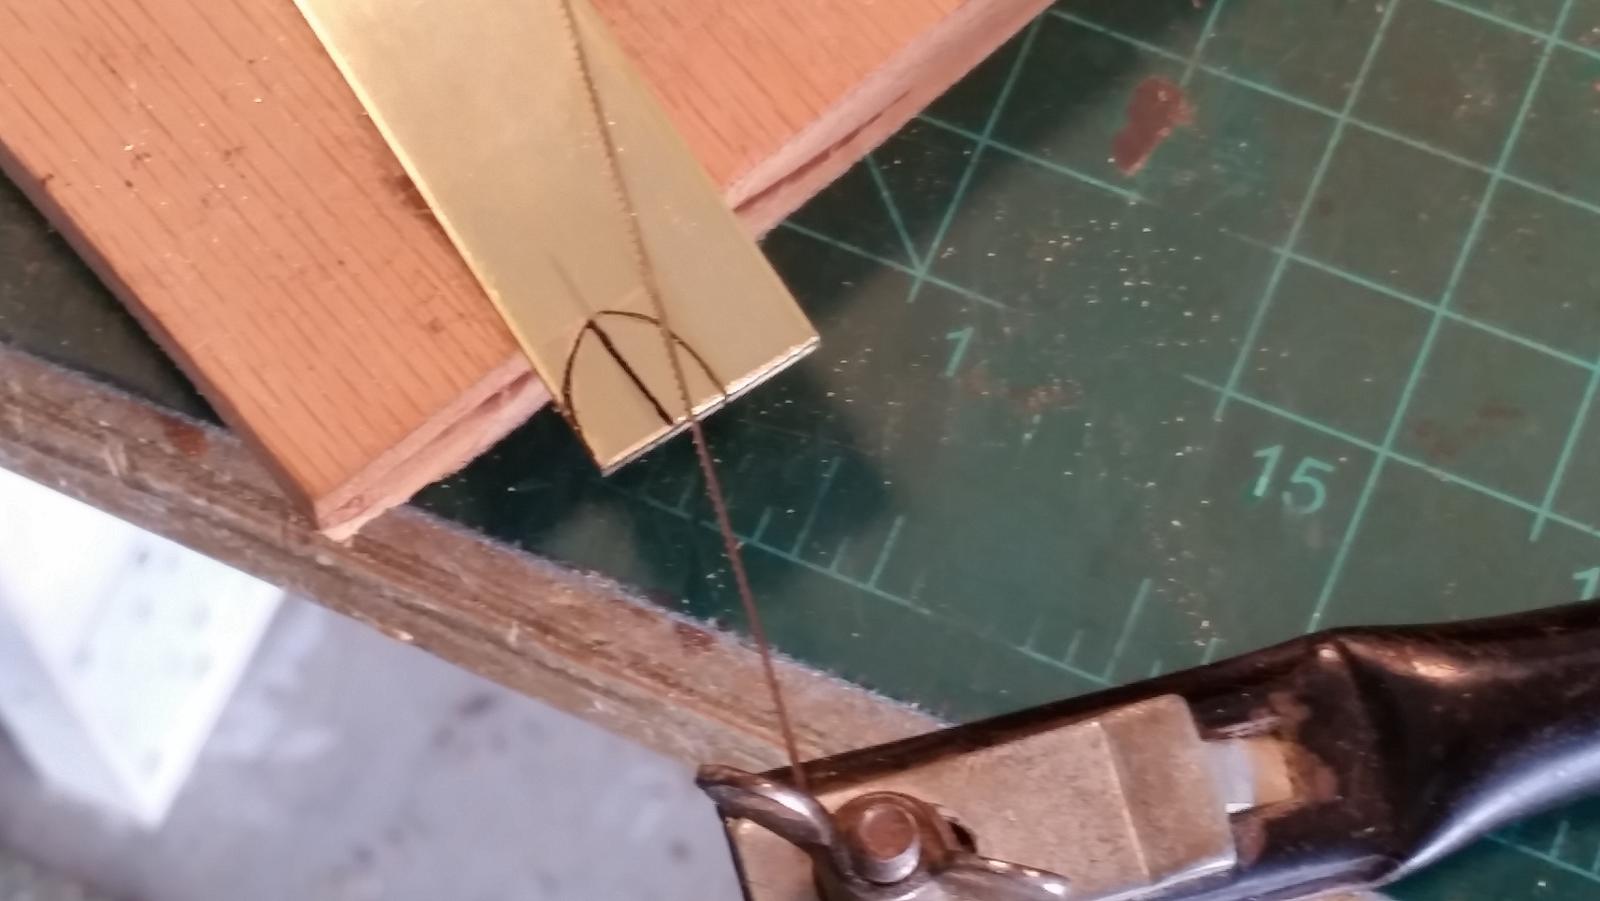
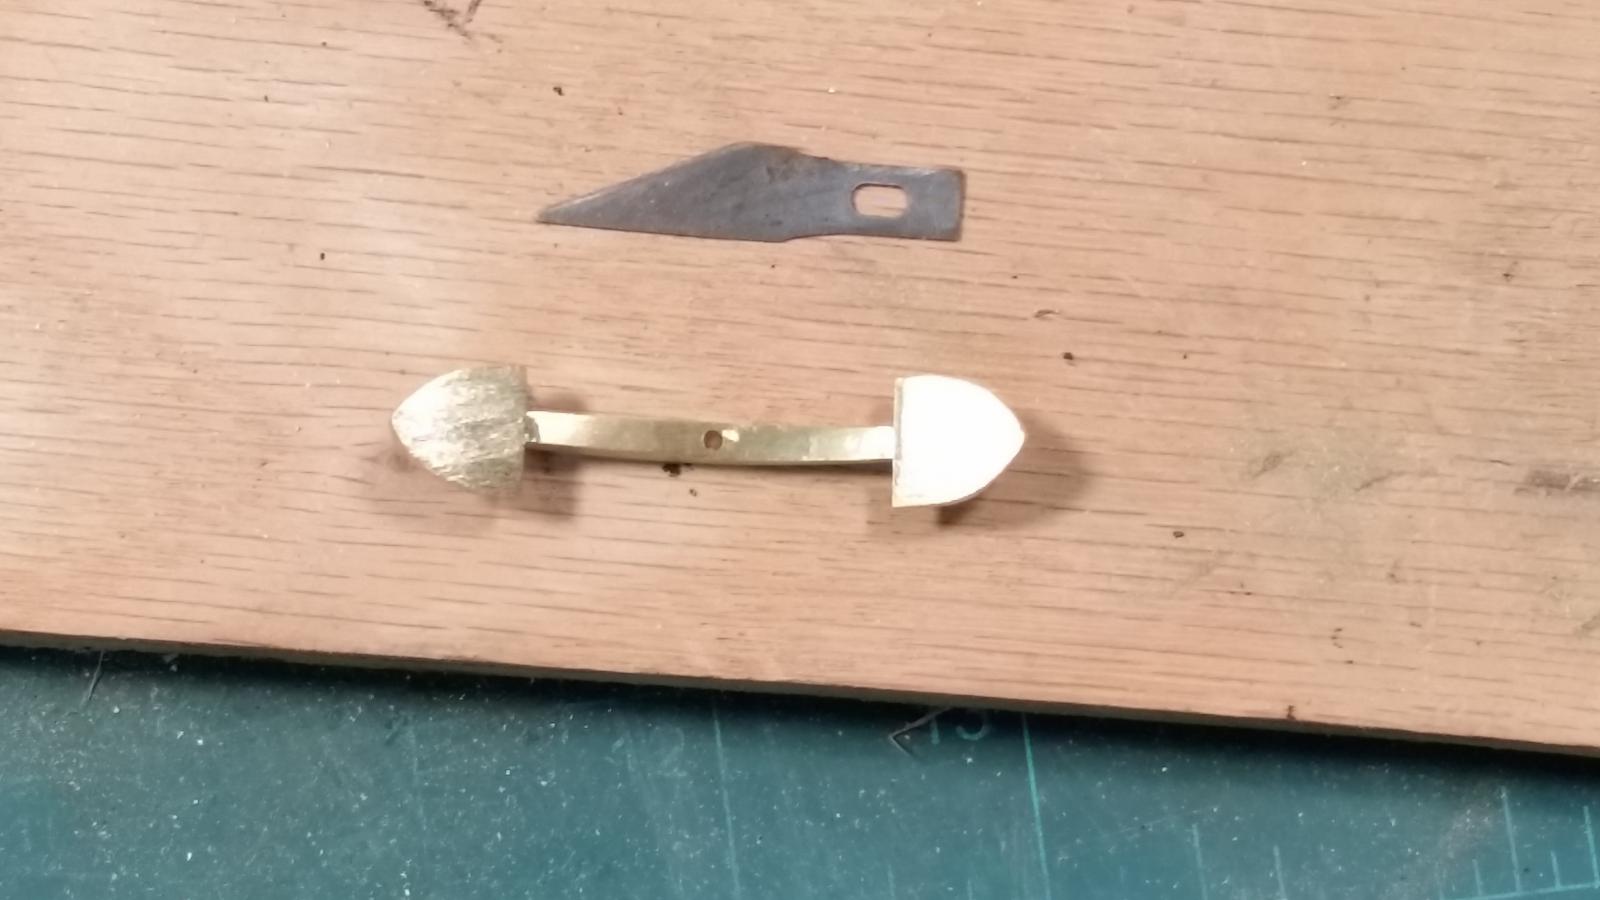
Okay, I pasted yesterday's post here and see if I can add the pics in the right sequence. The first thing I did this morning, after my morning cup of coffee, was drive up to Bunnel to the hardware store to buy some brass flat stock for the anchor flukes. It so happened that when I asked the store attendant if they have numbered drill bits he showed me where. Oh my, I was in heaven, and bought a bunch of the smallest they have, from # 60 to #56. Next trip I'll get some more of the other sizes to replenish my drill index box. I was now able to drill the holes for stock locking bolts in the shafts, which was the first thing I did when I got home. . Worked just beautiful with brand new USA made #60 drill bit, which is about 1.1 mm and will work just fine with the 1 mm rod I'm using. I also managed to drill a new hole right next to the one with the broken bit in it. The stock will hide it. After that was done I transferred the shape of the fluke to the brass sheet stock, which is 1/16 inch or 1.7 mm. It's a little on the thick side but all the brass sheet stock I have in house is too thin and the store didn't have the size I really wsanted, soooooh - beggars can't be choosers. I can always machine them thinner if need be. Well, I was only able to cut out three, using my jeweler's jigsaw and finishing two of them. I tried cutting them out on the Proxxon jigsaw but that was waiting for breaking a bunch of saw blades. So back to my old trusted hand held jigsaw that I still have from when I was a kid in Holland. It only took me 1/2 hour to cut one out, which is not too bad considering - - - I wanted to finish at least one pair before closing shop for today. I also completed the stocks for both anchors, including the securing bolt holes. Now let's see if the transfer of the pics work out better. This shows my old trusty jigsaw with a fine tooth metal saw blade. One fluke cut out, ready for dressing it down. Two completed anchor flukes. Here I have placed the two completed flukes on the arm cut-outs. Cheers,

-
Thanks everyone for your like votes and Greg, Patrick and Lawrence thanks for dropping in and your kind words. @ Greg: I think I would not want to try it but I guess it will. These sanders are really not made for metal, regardless of hardness. I have used it against my regular disc sander, holding it with vice grip pliers though. It wears the sanding disk real fast. Even using a bench grander is frowned upon by machinists, it tends to clog up the wheel. @ Patrick: Yup, progress is being made and I'm doing more then expected. Will explain in an upcoming post. @ Lawrence: Thanks for your kind words my friend and yes, having been around metal, specially sheet metal, my whole life I'm quite well aware of the drill bit breakage when coming through the metal. My problem was not that, the bit broke half way through. Like Michael mentioned, brass tends to be "grabby" like aluminum. Let me blame it on the cheap Chinese drills, I had no problem with good old Yankee drill bits. I could not use a back-up block of wood that I use otherwise because I had to put the parts in my drill vice for accurate 90 degree drilling. You can actually feel when the drill is about to come through and then you ease off and go slowly. I'll try to post yesterday's work next and hope it will work this time, other wise I'll have to post each picture on a separate post. Wish me luck, Cheers,
-
Thanks Pete, yeah, it's working out okay, so far. Better then with posting pictures in my log. Some show two or more and others don't show at all. I'm calling it a night and will try again tomorrow whit today's work. Cheers,
-
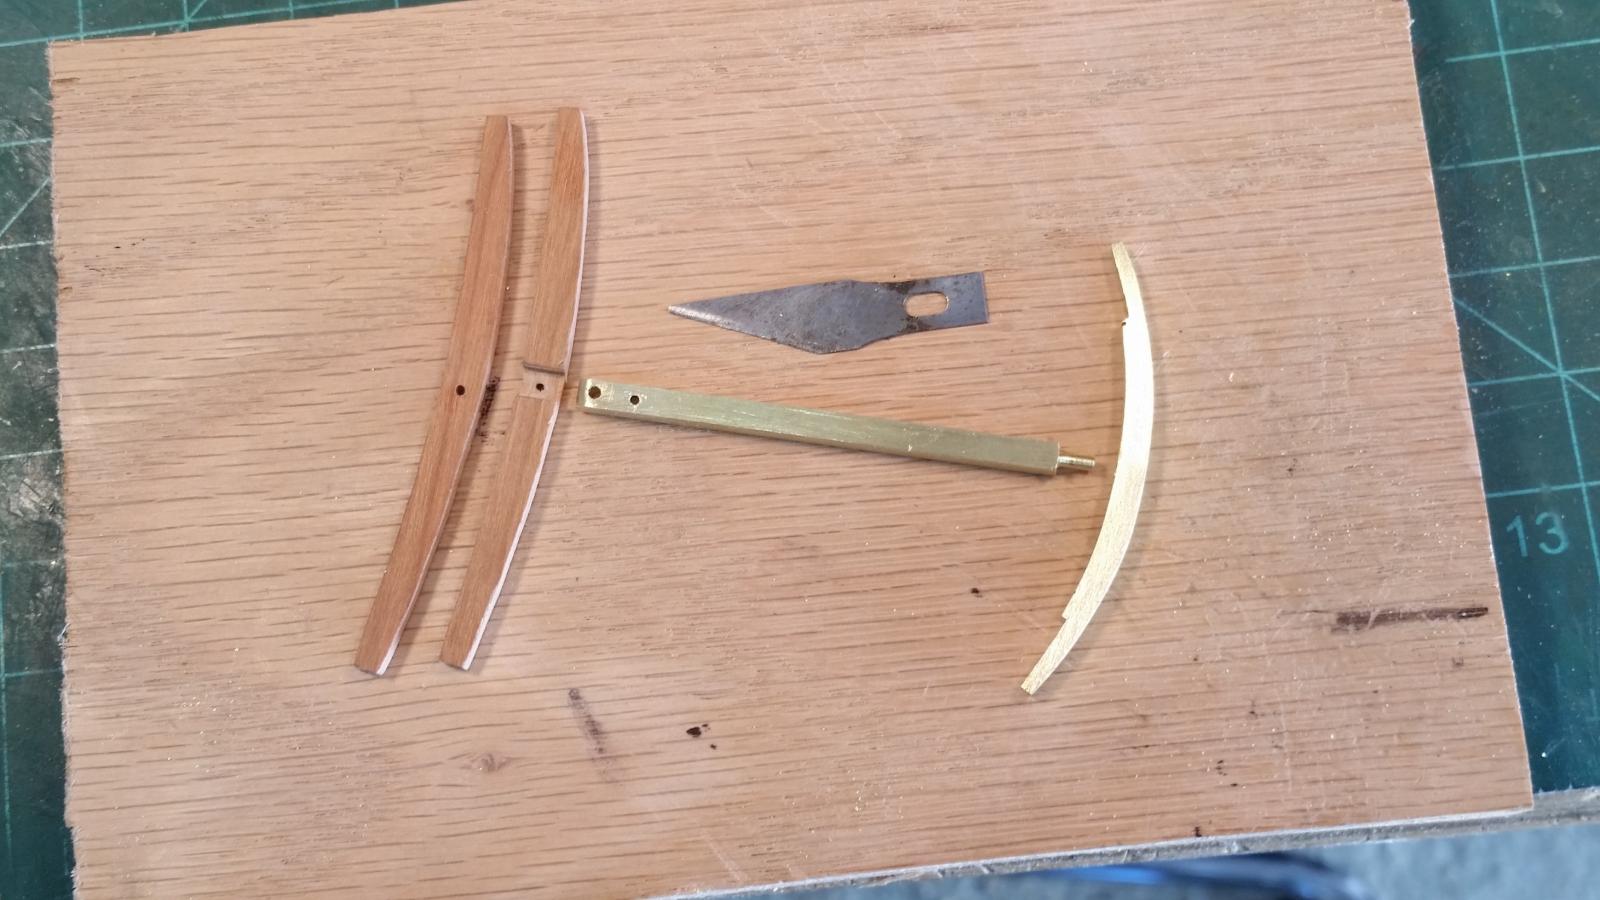
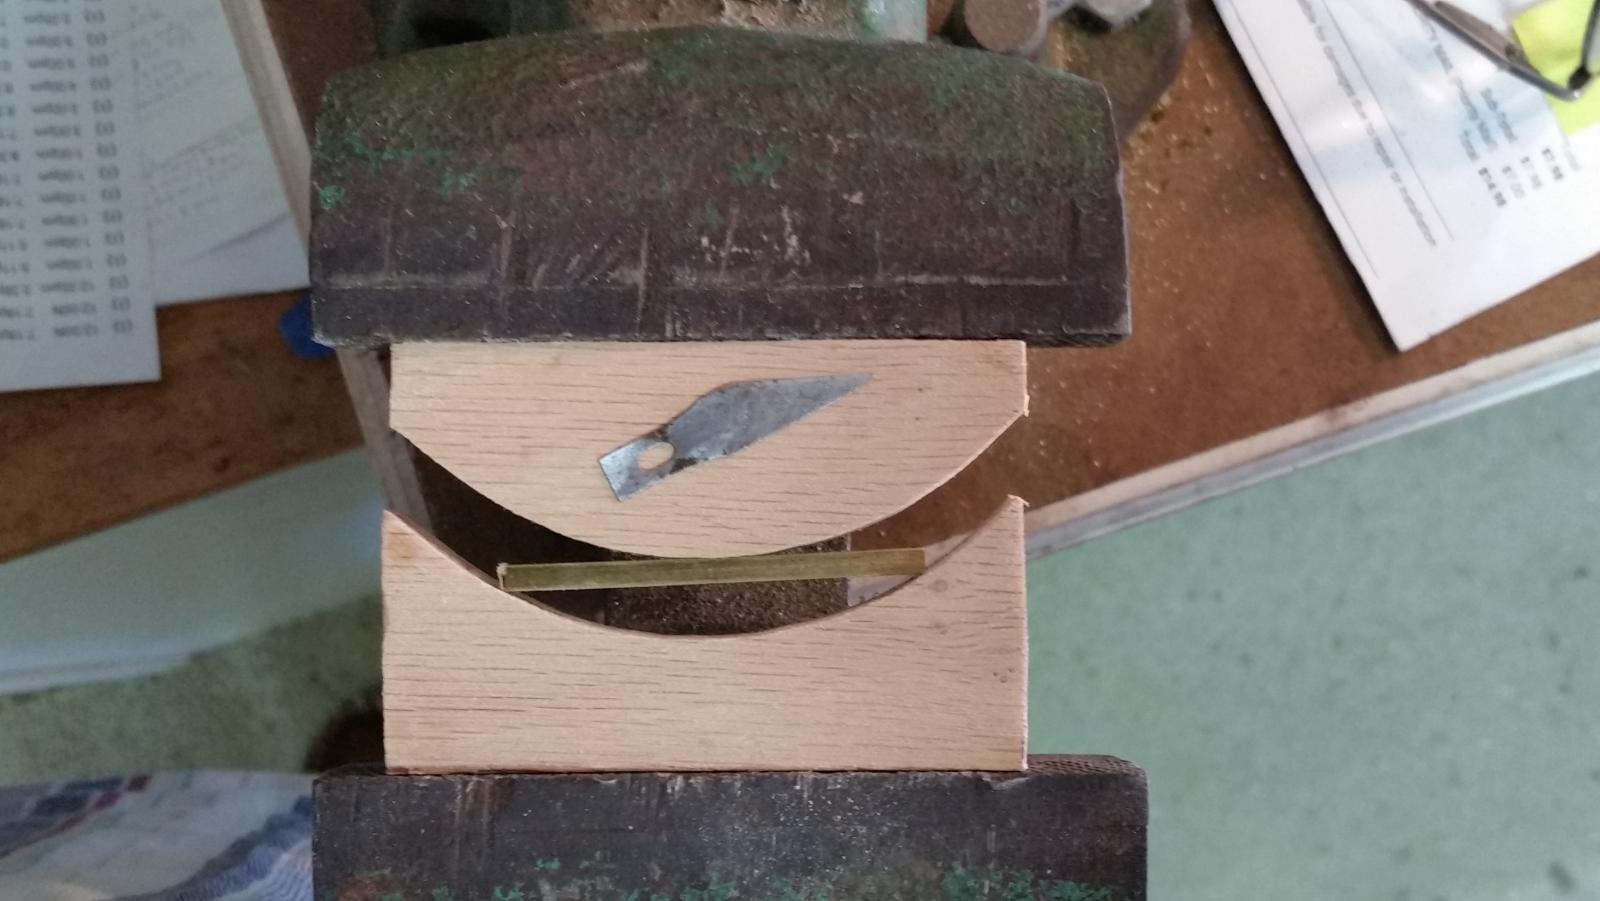
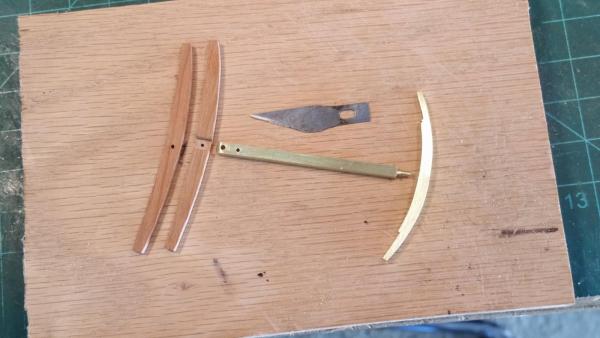
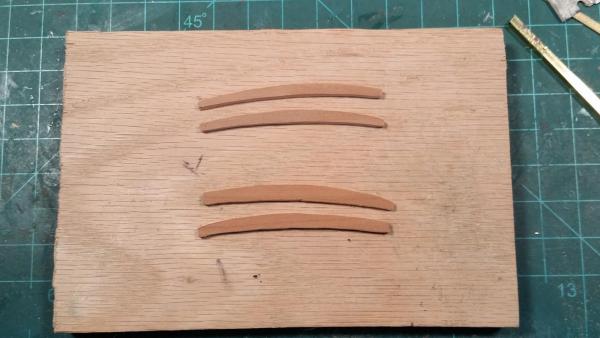
I'm trying to catch up with what I've done in the last few days. This post is from work done yesterday. I marked the anchor arms for machining. They deed to be thinned out towards the outside and steps machined in the ends for the flukes to be silver soldered to. Unfortunately I do not have a milling machine so I had to resort to the "armstrong" method - the file. Oh, I guess i could use a rotary file but that's kinda messy with all the filings flying every which way. Besides, I like to use a hand file, better control. Yes, it's slow work but hey, I'm retired and not going anywhere so what's the hurry I also started making the anchor stock and used cherry for that. Fortunately I had some stock left that was thick enough. I completed the arms for both anchors but expect having to do some more "machining" after the flukes are made. This shows where to "machine" away metal on the sides of the arms. This shows where to "machine" away metal from the top of the arm for the flukes and the lower part of the arm. This shows my "armstrong"milling device. Here are the rough parts for the stock. Sorry for the messed up post. I don't know what happened or why. i tried three times to re post this but every time it comes out the same. Well, all yuns are smart enough to understand what dialog goes with what picture. Cheers,

-
Thanks to all for visiting, the comments and likes. Yes, Michael, actually the drill bit angles should also be a different for brass and aluminum. The bit was only half through the bar but I already had a bad feeling about the possibility of it happening. I saw the bit making waving motions thus my very slow feed. I like to blame it on the bit having only one flute, thus also one cutting edge, which takes it out of balance. It's good enough for wood but not metal. One learns the hard way. True though with what you said about flattening the "sole" of the bit. My actual machining days are so long ago and memory failed me again. I used to be able to sharpen drill bits on a bench grinder, no more today However, I lucked out today and found an American made 1 mm drill bit at our local hardware store. I proceeded to drill a few more holes in the brass bars in the anchor shafts for the stock without any problems. It seems that the brass alloy I am using here is rather hard and not too" greasy." I was able to drill next to the broken bit where the stock can still hide the bad part. Cheers,
-
Yup, that's looking rather splendid Dave. 'm sure you'll come up with something extraordinary for that blank space. Cheers,
- 962 replies
-
- 4
-
-
- sovereign of the seas
- ship of the line
- (and 1 more)
-
Great work and safe on the bulwarks Ian and not to worry about the cap, it isn't noticeable from Palm Coast, Florida Fantastic work and research on the cannons. Tip to the heat my friend, very impressive work. Cheers,
-
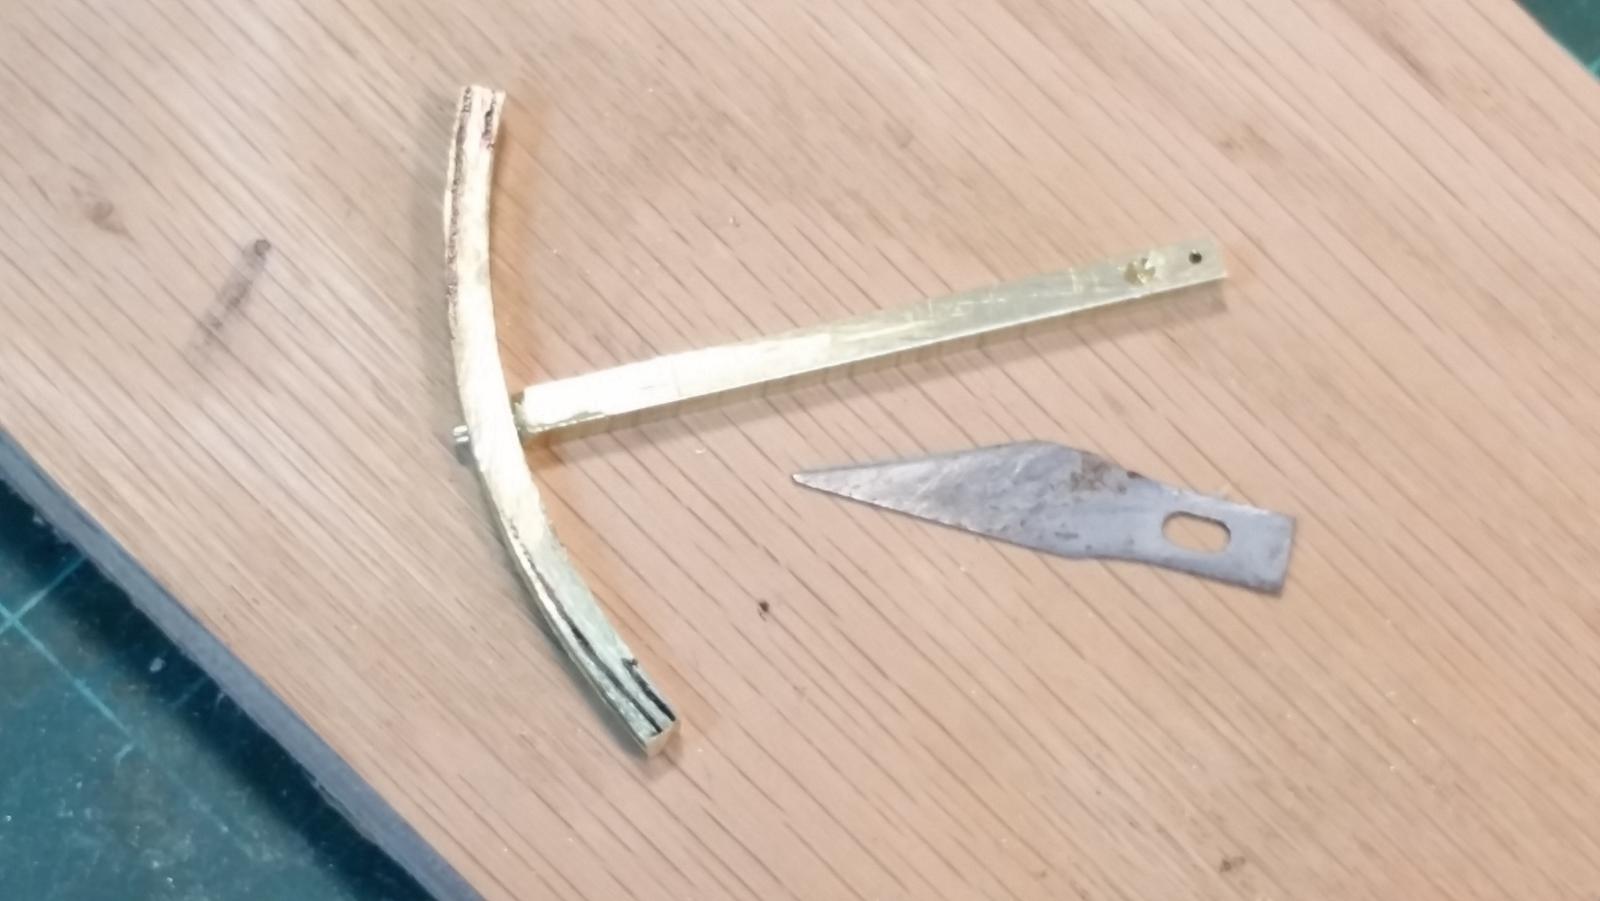
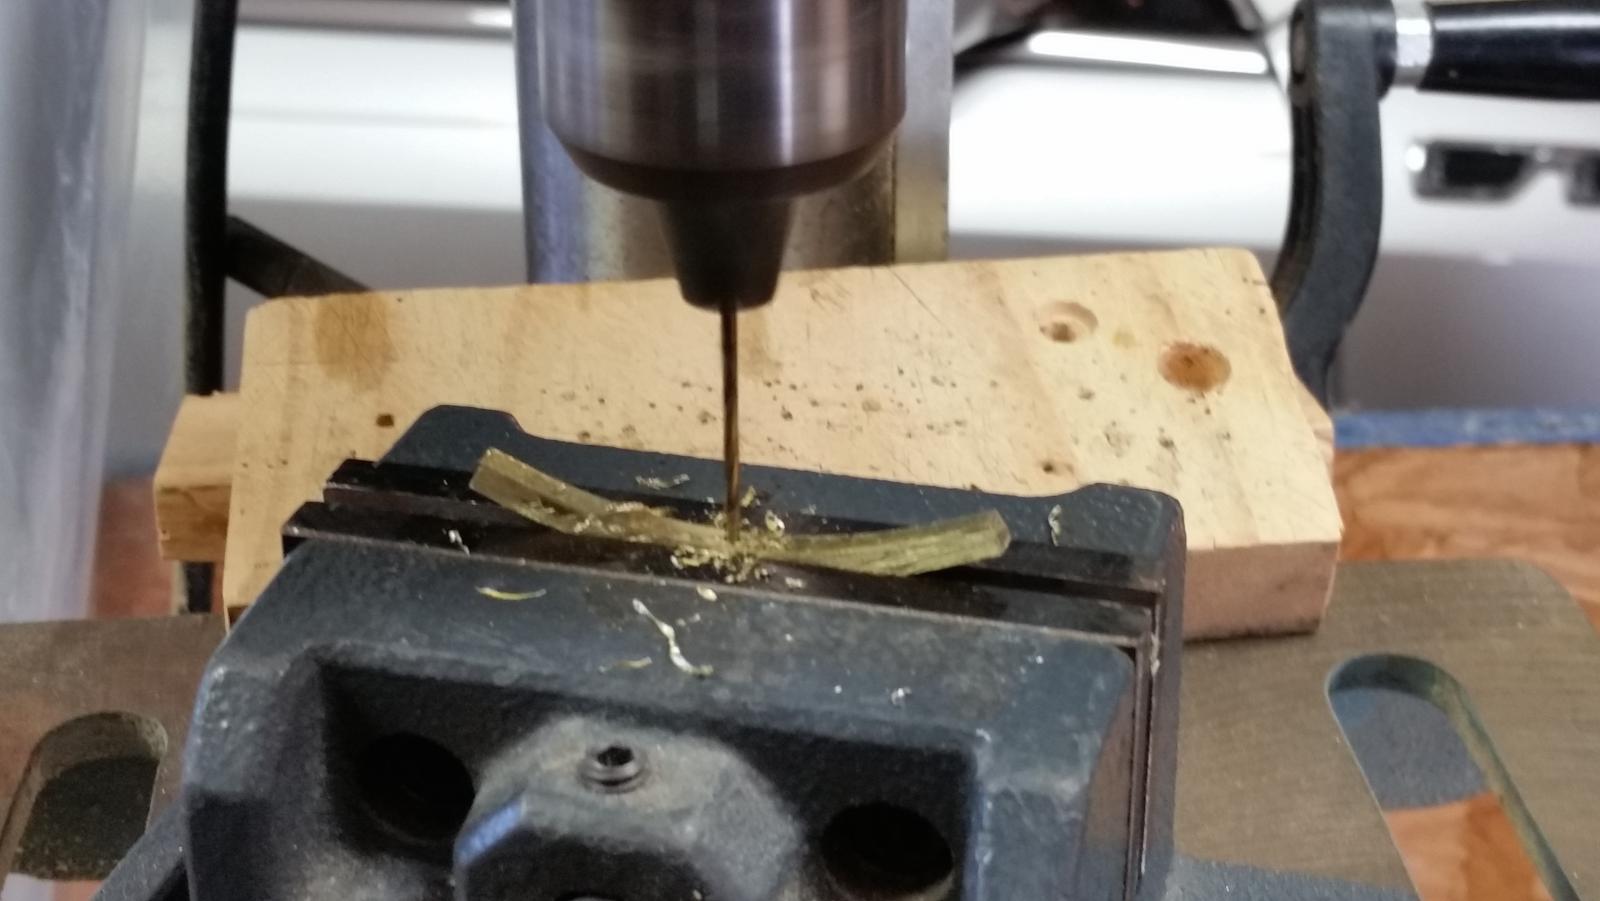
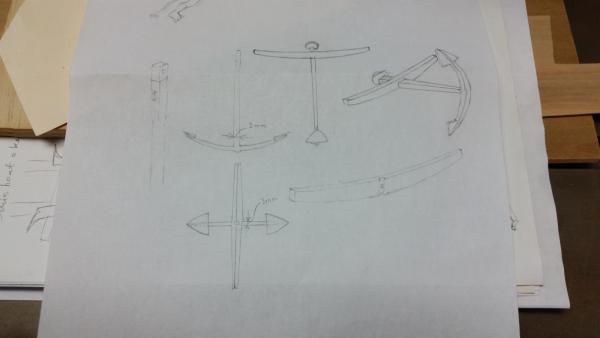
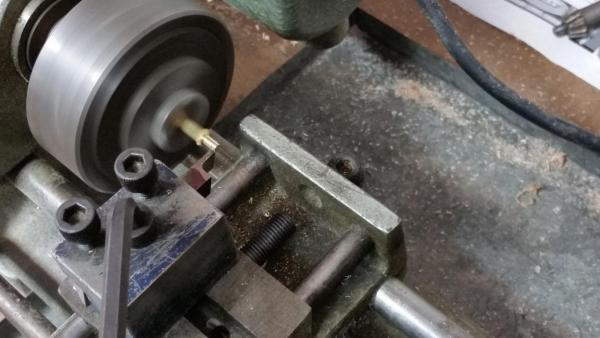
Thanks everybody for visiting my humble shipyard and all your very kind comments and all the likes. It's really encouraging. Well, I finally started making the two large anchors. I ordered and received a 3.2 mm square brass bar from a supplier in Canada at www.qualityhobbyshop.com I first made a few sketches to my scale to get a feel of how they would look. I then just started cutting the shank and arms, marked them for the holes. The hole for the ring that holds the anchor cable/rope measured 1 mm. The first hole went kinda okay but I had to go very slow with the feed in fear of breaking the drill. The only small drills I have are made in China and have only a single flute, not very strong. Good enough for wood end even there when using boxwood you have to be careful. So, when drilling the second hole, sure enough the drill bit broke off and there was no way getting it out of the hole. Fortunately, the hole was meant for a pin to hold the stock and I'll replace that with a small strip of brass soldered to the shank. That way I'll cut a groove in both parts of the stock to keep it from sliding up or down. That strip and the stock will cover this hole and no one will ever see it. Next I made a bending jig from wood to bend the curve in the arms. Nice thought but it only partially worked. The brass is too hard for a wooden jig and I could only get a partial bend. So I used the Rube Goldberg method by putting the brass bar half way in the vice and with my gebanger (hammer) I gave it a nice tap. I proceeded to do this at small increments, moving the bar out of the vice little by little until I had the correct radius I drew out on paper. Turned the bar around and did the same thing to the other half. I followed this procedure for #2 anchor and had very good results, at least it looks pretty darn good to me. Just a little filing and polishing to dress out the few mars. Next was drilling the hole for the pin at the end of the shank that'll function as the main soldering attaching pin. I drilled a 1/16 inch hole in the center of the arm, which went off without a hitch, a new cobalt drill bit helps. Okay, next I chucked the shank into my non-centering four-jaw lathe chuck and cut a 1/16 inch diameter pin at 3.5 mm long to fit into the hole in the arm. That too worked great. Yeah, my old DB200 Unimat doesn't have a self centering four jaw chuck What I am describing here transpired over two days. Messed around trying to extract the broken drill bit and had to give up. Had to do some stuff around the house and try to resolve a computer problem, I'm getting phishing pop-ups that I can't get rid of. So, let me cut this off here, add a few pics and proceed with the next few days work in another post. I didn't show how I made the curve using the vice and hammer method. I think my description above should suffice. This is not the recommended way to do things but beggars can't be choosers. The end result is what counts. This sure brought back memories from my machinist training and subsequent machine shop work. The shank and arm are now ready to be assembled. Here I have put the assembly together. You can now also see the hole with the broken drill bit. Why can't we get some decent machine tools here for a decent price. Cheers,


-
Great idea Nils with the vents. Sorry to say - hmm not - - my VOC ship doesn't use them so I don't have make them You'll be busy manufacturing that many different vents my friend. Cheers,
- 2,625 replies
-
- 3
-
-
- kaiser wilhelm der grosse
- passenger steamer
- (and 1 more)
-
Statenjacht Utrecht by Angarfather - 1:36
Piet replied to Angarfather's topic in - Build logs for subjects built 1501 - 1750
Wonderful planking job Hartmut and I'm glad you leave the deck partly open so your beautiful interior can be admired. Cheers, -
Very nice progress Patrick, she's looking great. A one cm cat engine, with all the "stuff" hanging on it, now that's a challenge and a half. But - - - you're up to it! Cheers,