HOLIDAY DONATION DRIVE - SUPPORT MSW - DO YOUR PART TO KEEP THIS GREAT FORUM GOING! (Only 13 donations so far - C'mon guys!)
×


Piet
-
Posts
3,568 -
Joined
-
Last visited
Content Type
Profiles
Forums
Gallery
Events
Everything posted by Piet
-
 Good to see you back at the VOLVO yacht Pete, very nice progress. I still marvel at the design of these boats and you capture the essence of it beautifully. Cheers,
 -
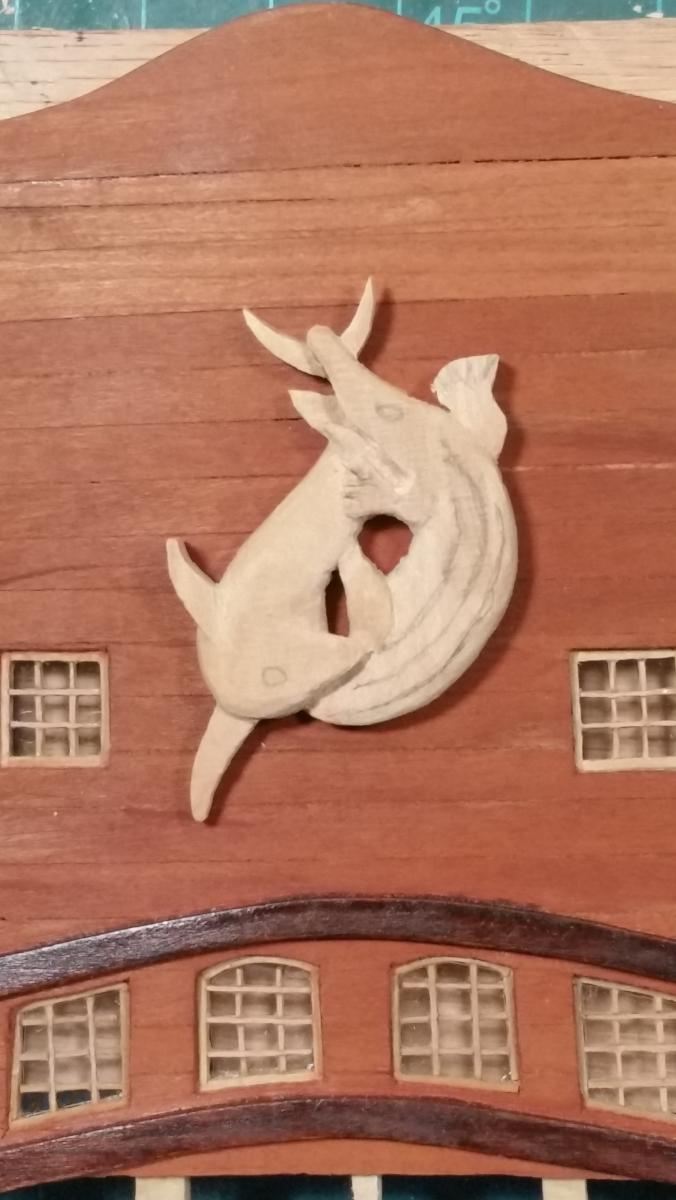
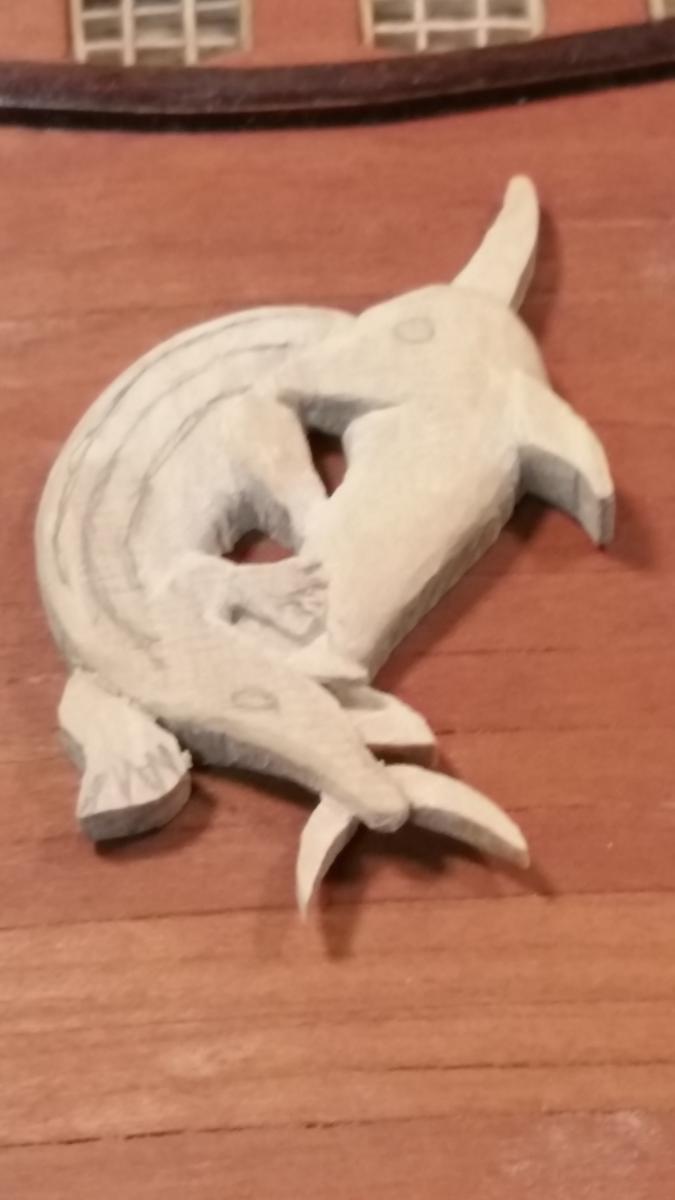
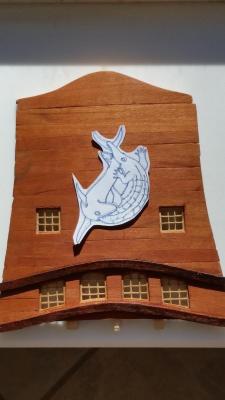
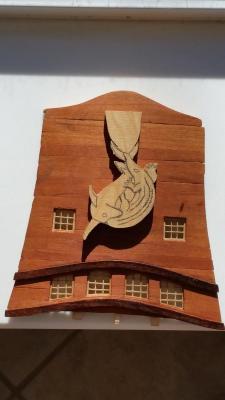
Hello everyone and I thank all of you who visited and clicked the Like button. @ Patrick: Thanks for the encouragement and I need all the good luck I can get. This is my very first attempt with carving. @ Pete: Thank you too. This carving business is not easy but we'll give it a bloody go. @ JesseLee: Yes, I like to see how it goes as well, you are not the only one You'll like these small dental burs, they work really nice, slow on boxwood, which is actually a good thing. @ George: Thanks my friend, all you guys have more confidence in my carving ability then I do, but like said, I'll give it a real good try. @ Ian: Thanks for kudos, I try. As far as tales from far flung places - - well, I think that livens it up a little and all yuns get to know me a little better that way. Today I made an attempt with carving the Sura and Buaya for the counter decoration. Most of the carving I did was with a #11 blade. Two of the holes I had to make in the center of the model I did with a #60 drill bit and followed with one of the dental burs. This being a relief carving or actually it'll be a combo of bass relief and semi pierced relief, the visual aspect can only be realized when viewed one way, or so it seems. I undercut parts of the figures to show some dept and form, just hope it'll work as I envision it. Perhaps more work then necessary but it's worth a try. Like the tail of the shark - I wanted to show it with an upward twist. I also removed a lot of wood under the crock's upper jaw that's clamped down onto the shark's tail. So far I have used primarily the #11 blade, dental bur, a #60 and #50 drill bit, a broken piece of an 80 tooth jeweler's saw blade, a rotary sanding drum and a few small files. I need to hunt for a stiff bristle brush for the Proxxon hand tool I have and of course sandpaper. After about an hour into it I removed that little handle at the top end of the model. I really didn't need it, it was in the way. As yuns can see from the below pics there's still a lot of work to do before it's completed. Then we have to decide whether to keep it or make a new one. I'll let Gwen cast her critical eye on it , she's not bashful in telling me the truth. Any of you master carvers also don't be shy and let me know where to improve, what to change. What you see here is a total of 5 hours worth of work. No, I'm not as fast as Sawdust Dave, but don't forget that this is my fist carving attempt. This shows the model straight on as one would see it when on the ship. This shows the model looking from the top of the counter down towards the water. I just wanted to show the undercuts at the shark's tail and the crock's head. Cheers,


-
That's looking rather nice Hennie. Love the transom decorations and your coppering. Cheer,
- 214 replies
-
- 5
-

-
- agamemnon
- caldercraft
- (and 1 more)
-
Nice job - nice fix on the muizen Everything is looking fantastic. Cheers,
- 1,616 replies
-
- 5
-
-
- caldercraft
- agamemnon
- (and 1 more)
-
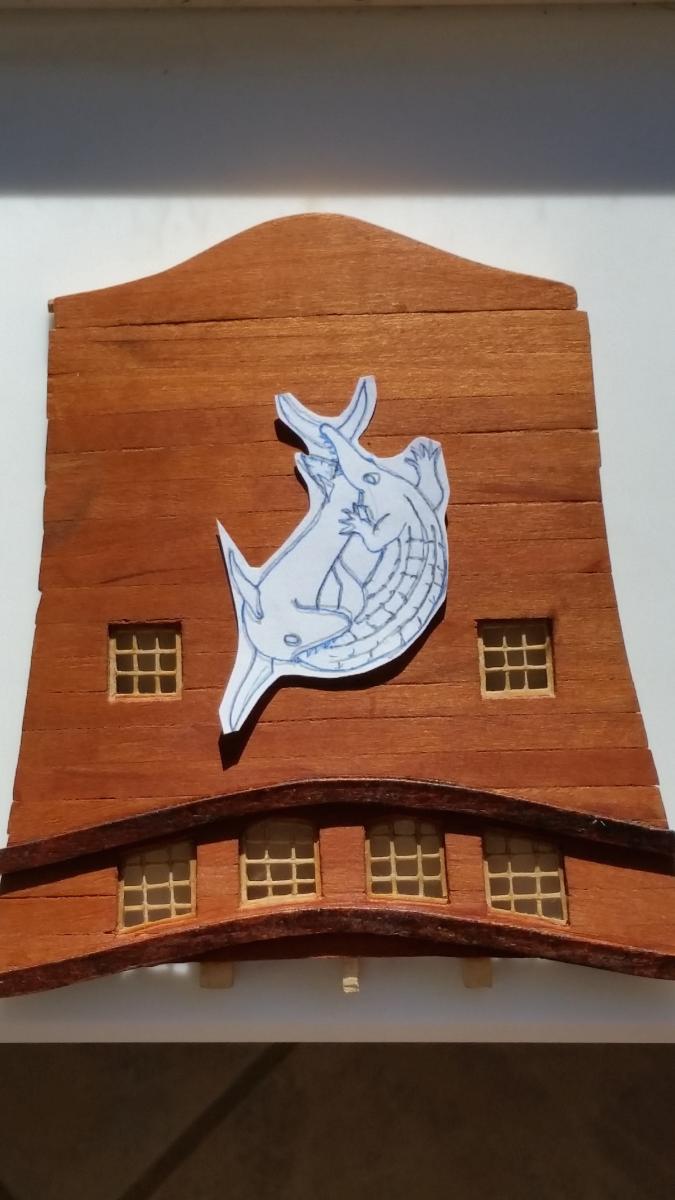
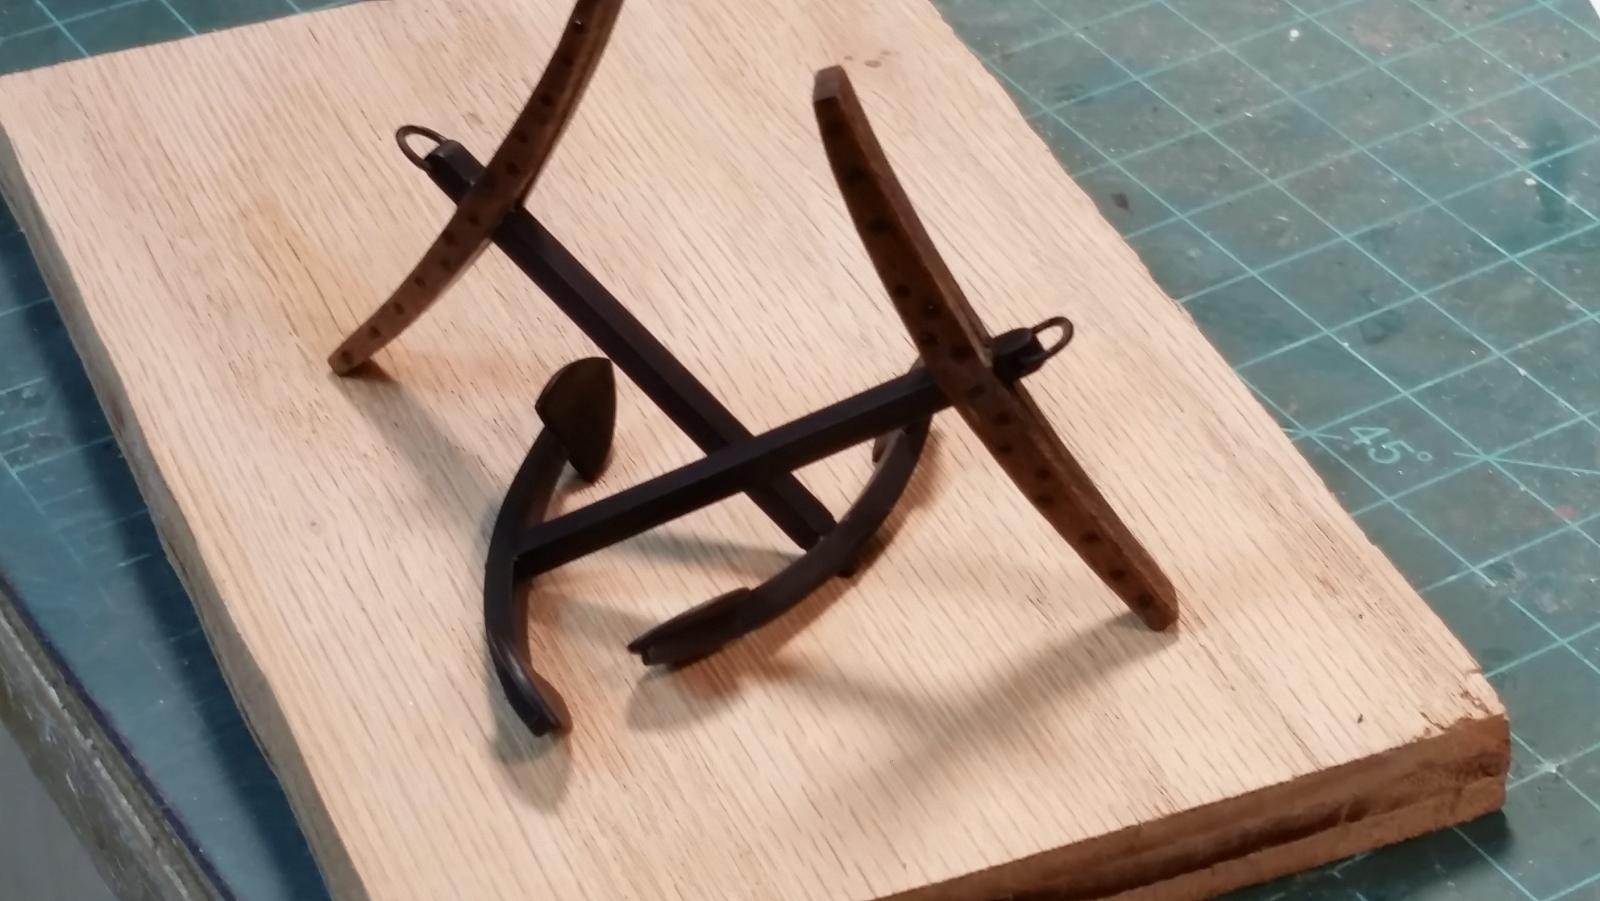
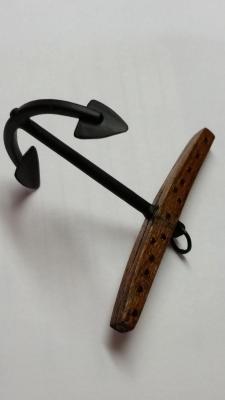
Thank you all for visiting my humble shipyard and clicking on the like button. Thank you Amazon Dirk, Lawrence, Patrick and Popeye Denis for your encouraging comments. Orders for anchors? Yuns think you can afford my prices? Good to see you Dirk, hope all's well with you and your project. I didn't have much time yesterday to post anything, besides there was really nothing worthwhile to post. The weather has been just too chilly and windy here in Palm Coast, Florida so my stay in the garage - aka shipyard - was brief. The same for today, still too cold for me and I didn't feel like punishing my delicate old bod if I don't have to. Did I ever tel all f you that I HATE cold weather? Well, I HATE cold weather. The only thing I did yesterday was put some primer on the anchor and made the stock. After the primer was dry I installed the stock, cut the bolts from 1 mm brass rod, drilled the bolt holes, mixed some slow cure epoxy cement and installed the bolts. I also cut a small piece of boxwood out of some stock I have for the counter decoration. That piece is 40 X 65 X 5 mm - I wanted to keep the carving reasonably small so as not to be overpowering. This will also give me the space to add some more decorative things on the sides, bottom and top. The stern area will require quite a few carvings to hide the intentionally kept bare areas for that purpose. On my dentist visit yesterday he have me about 6 small burs. One is a tungsten carbide bit and the rest are diamond studded. They are tiny, thus very good for carving the mane on the bow lion. Today I moved some of my things inside and finished the small "stern anchor" in the breakfast nook where it was nice and warm. I could look outside at my koy pond and do some work in the warmth. So I filed all the bolts down to just above the wood to give it the feel and appearance of hammered heads. I already put the little jar of flat black paint inside to let it come to room temperature. The first thing was using the toothpick trick to put some flat black on the bolts. Let it dry and then brushed the flat black on the anchor and put it aside to let the paint dry. That gave me the chance to have some lunch and let the paint dry. After lunch I put the oak stain on the stock and put it aside to dry. Gwen, who doesn't want to be called the Admiral, said that she really liked the anchor, it's better then the first two, she said. So, okay, I'm a happy camper Looks like that I'll be making a few more, ummm, for myself though Next thing was that I transferred the drawing of the Sura and Buaya battle to that little piece of wood and proceeded to cut it out with the Proxxon jigsaw. I left a handle like piece at the top end to have something to hold on to. I like to hold the parts I work on between my fingers, that way I have a better feel of what I'm doing. Well, that's it or now and below are a few pics of my accomplishments for two days work. Hope you like it. The completed "stern" anchor for the Surabaya. This is the sketch for the counter carving. It's the visual depiction of a legend about a shark, called the Sura who fought with a salt water crocodile, the Buaya, for supremacy of the Kali Mas and the river delta. The word kali means river in the Indonesian language and that's the place where the city called Surabaya was established. It's the city where I was born and raised, a really nice place - at that time - ergo, the name of this model. This shows the rough cut-out for the carving. This will be a real challenge for me, it'll be my fist attempt at carving. Wish me luck. Cheers,
-
Thanks Igor, yes, I like these Dutch working boats, especially the Botter as shown or Kotter. They are not too complex for a bottle or lamp when compared with a Staen Jacht or VOC Jacht. Also thanks for your very generous offer to send some fabric to me. I'll PM you. Cheers,
-
Beautiful progress Boris, she's looking fantastic. Thanks for sharing it via personal mailing a few days ago, sorry for not responding in a timely fashion. For all members on MSW I like to mention that my father went down with this ship after she was hit with a long run Japanese torpedo. That was during the battle on the Java Sea, February 27, 1942.
-
Very nice looking doors Dave and to forget the hinges. But - but - no door knocker or a little bell with a pull cord?? Glad you could save the door molding pieces, plenty of bling there Cheers,
- 962 replies
-
- 7
-
-
- sovereign of the seas
- ship of the line
- (and 1 more)
-
Ah yeas Nenad, you are not disappointing us, I figured you'd come up with a solution with materials you have on hand. It's a handicap you'll have to work around and so far you have come up with some brilliant ideas. My hat off to you and your perseverance. Your solution will work just fine, have patience and go slow - you don't have to rush on our account. Cheers,
- 4,152 replies
-
- 8
-
-
- cutty sark
- tehnodidakta
- (and 1 more)
-
Very nice looking head rails JesseLee, will done. Glad you found some of that mystery wood, it's really looking very nice. Cheers,
- 1,306 replies
-
- 5
-
-
- syren
- model shipways
- (and 1 more)
-
Nice planking job Mobbsie. I little sanding and you're there. Love the ebony staining trick you showed. Cheers,
- 129 replies
-
- 5
-
-
- armed launch
- panart
- (and 1 more)
-
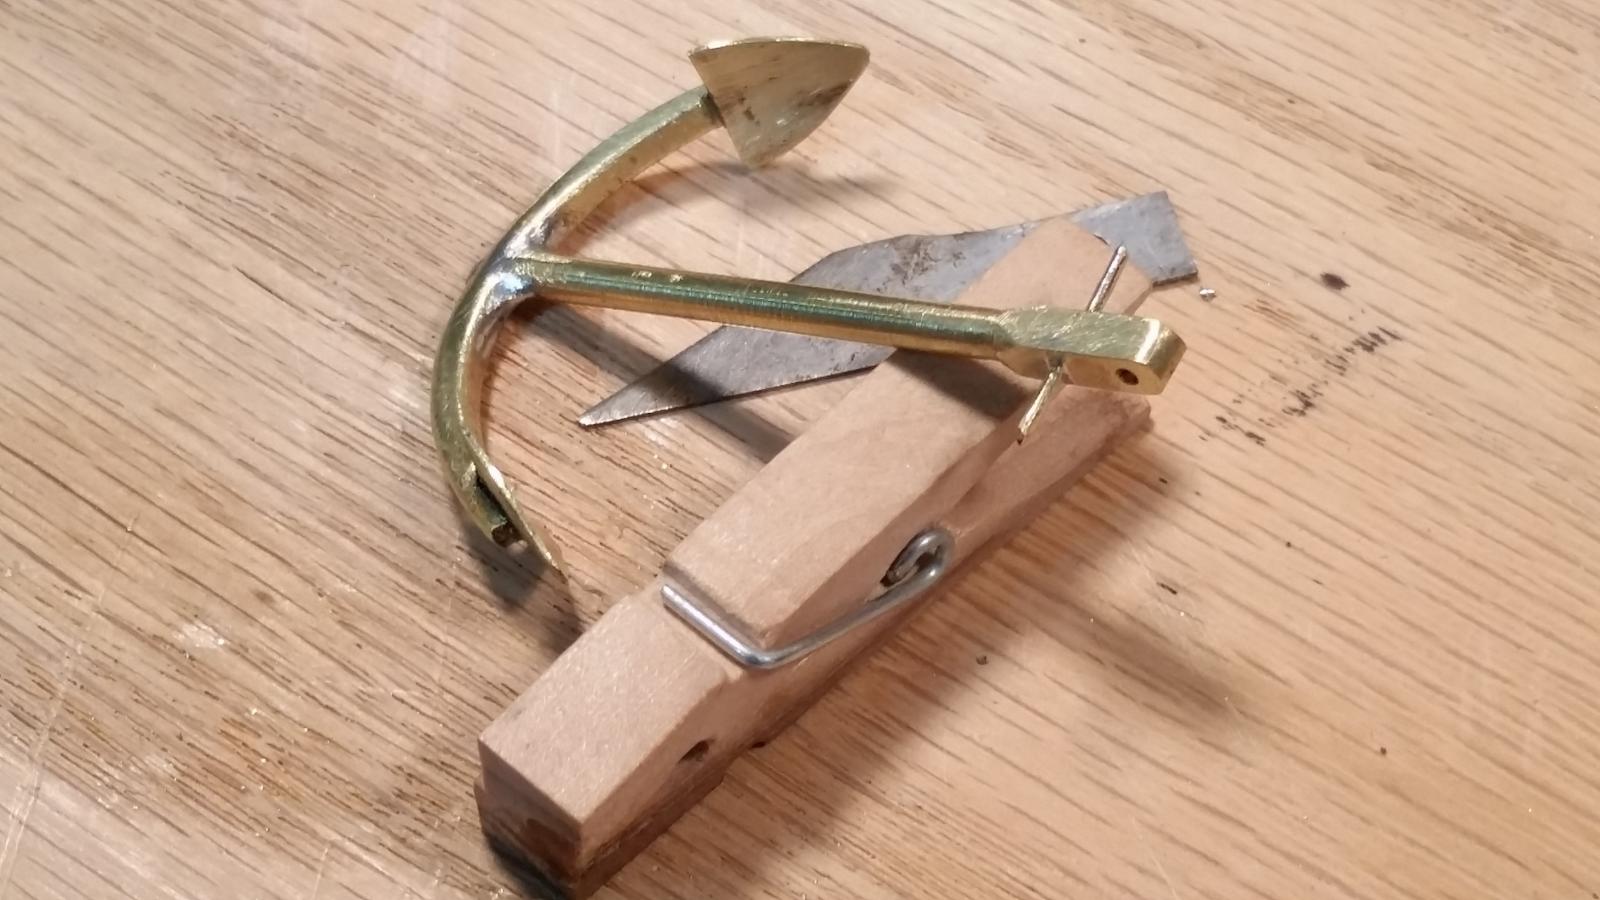
Thanks everyone for dropping by in my humble shipyard and all the likes, I'm overwhelmed. Thank you Michael, yes, I'm pleased with how they came out. Hello Mark, thanks for dropping in and for your very kind word. That's one of the reasons why we should look at others work - it pushes us to emulate the inspiring work of others. We also learn new things, how other people have solved problems or are using materials we are not familiar with. I am inspired by what I see being done on this forum. Hoi Carl, yes, working with hot metal does make it easier but by the time I get the hot bar to the anvil and then on it it cools off very quickly, thus a waste of time. The bend is really not that much and cold working the bar at this size works quite well. If I'm going to make three more anchors as Hans is teasing me with, I may just give it a try. I can set the torch nearby and heat it up between the hammer whacking. Or let Gwen hold the torch to keep the bar hot Well okay, so after I came back from the dentist and had some lunch I decided to drill the three 1 mm holes in the parts, make the two flukes and solder all the metal parts together. Tomorrow I'll finish dressing it down some more, make the rope ring and stock. Here is the evidence of this afternoon's 2 hour work session. Hope yuns like it. Cheers,

-
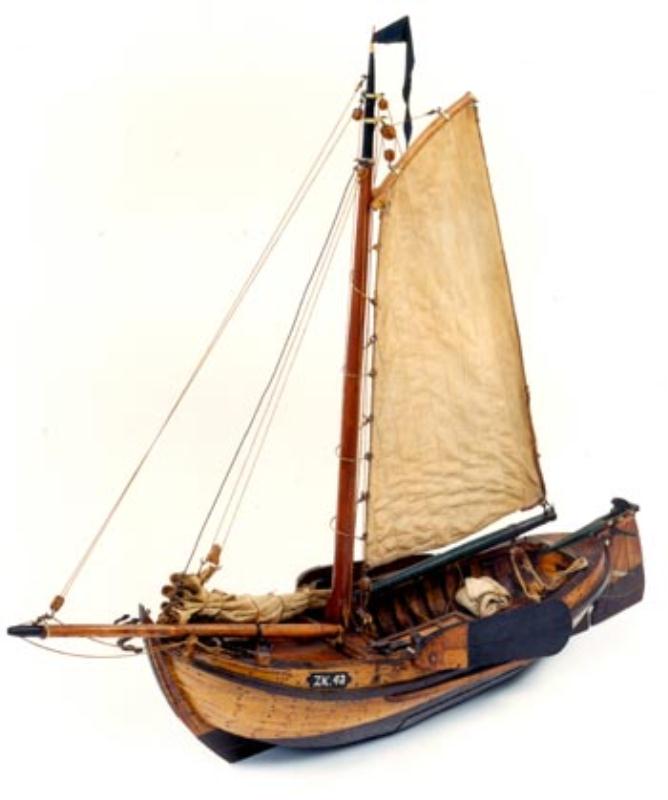
Hello Igor, The photos of the cloth make it appear to be rather heavy. How thin is it? When I am going to make a Dutch fishing boat in a lamp then I will need very fine cloth. To answer your question about what boat I plan to put inside a lamp, that'll be a Botter. I plan to put it inside a 6 inch or 152.4 mm with a 18 mm opening. I like the old working boats that were used on the former Zuider Zee. It could also be an other type out of a choice of 6. I have the drawings of only a few though. The model will have to be done in pieces because of the small opening. These boats are rather wide on the beam. This model is from about 1920 at a scale of 1:20 Cheers,

-
Nicely done on the capstan Nils and sorry for the railing problem. Cheers,
- 2,625 replies
-
- 3
-
-
- kaiser wilhelm der grosse
- passenger steamer
- (and 1 more)
-
Nice going Pete. Hope the round works wont warp on you later. To answer your question about me being a commercial pilot - negative to that. I didn't want to be a bus driver, - oh sorry Sjors, no offense intended. It was just too boring and I like working with my hands. I have flown planes from a single seat home build to the Boeing 757. The last 20 plus years in my aviation career was being an airworthiness safety inspector for the FAA and in that capacity learned to fly the "heavy iron" to check pilot proficiency and aircraft performance after major repairs and mods. Now I enjoy working with wood and build ships. Cheers,
- 258 replies
-
- 5
-
-
- buzzards bay
- herreshoff
- (and 1 more)
-
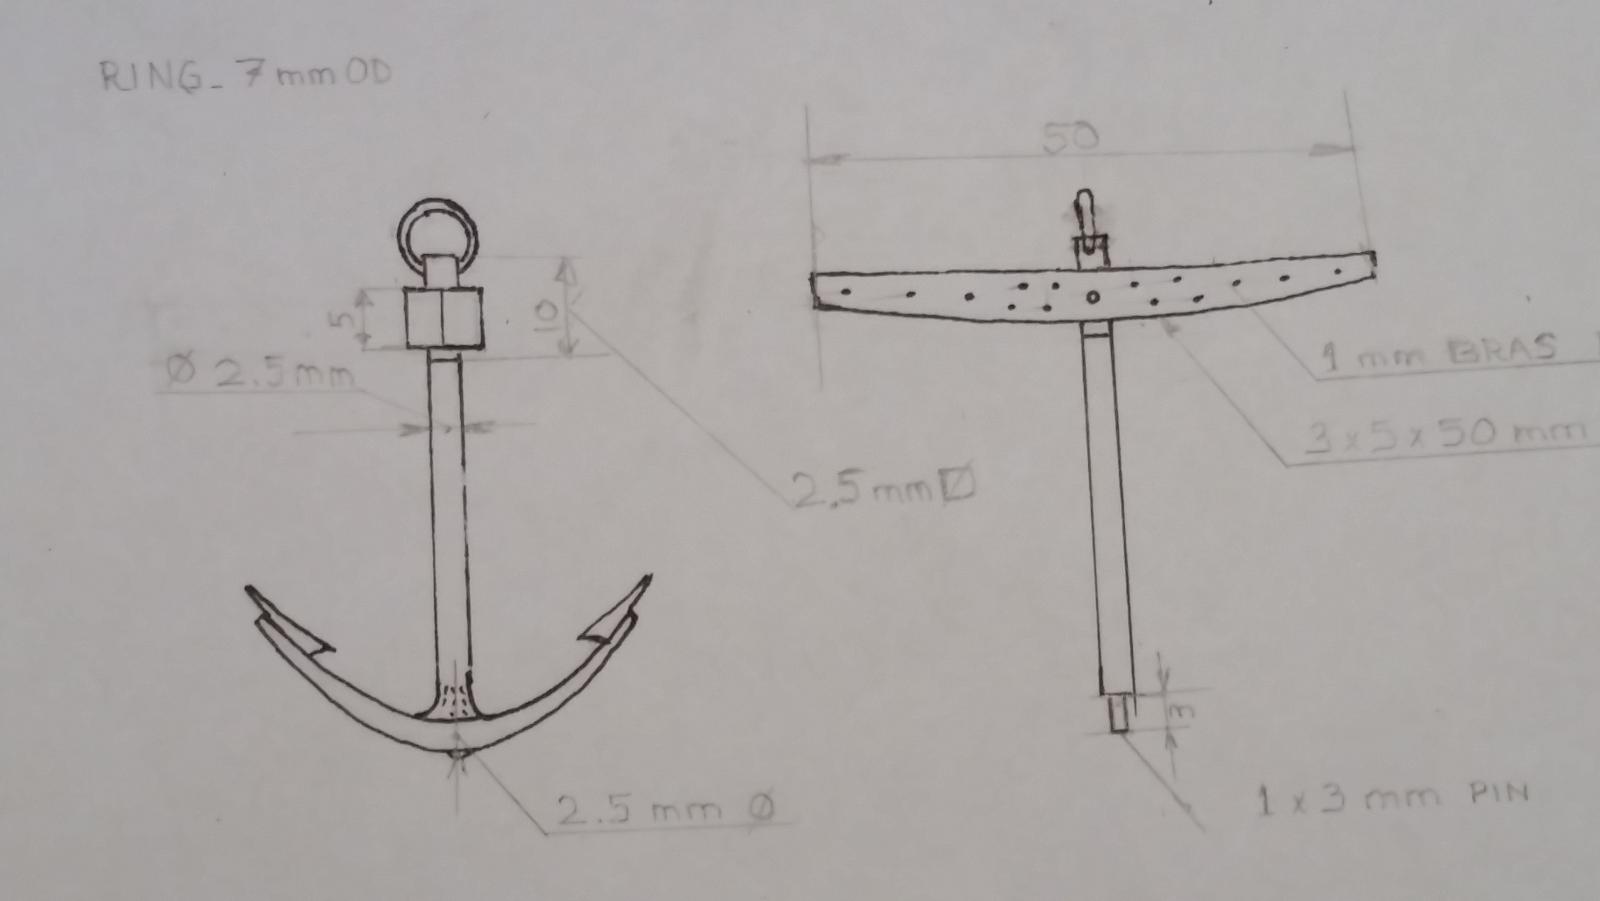
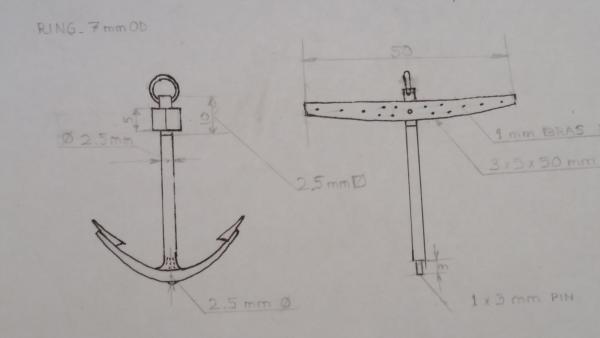
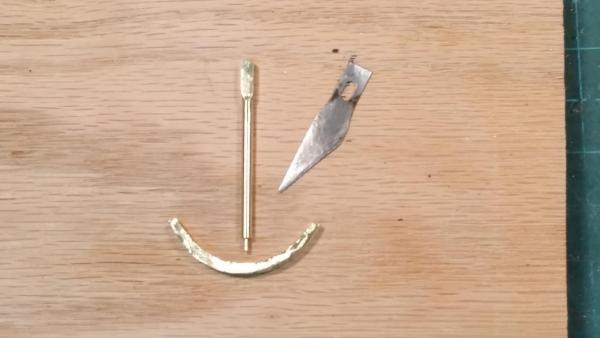
First of all to all who visited and clicked the like button my sincerest thaks and secondly - Thanks to George for your very kind words, I think these anchors will do. And Hans, thank you too for your kudos, much appreciated. Hmmm, 6 anchors total on board? Well now, I think I'll leave it at three though. I'm in the process on number three - this one'll be smaller and I'll call it "stern anchor." Well, one never knows what this crazy Dutchman may do in the future. I thought there were three brass bars in the package I ordered but there was only one. The price is okay but the shipping brings it to about $12 for a package. I can get only three anchors out of one bar. It's still rather chilly here in Florida, 55F in the morning. So after breakfast I spend some time reading my new book on the "Valkenisse." Very interesting book where Ron Napier describes his work on the restoration of that model. After an hour reading I made a working sketch for the third anchor. I had a short piece of the 3.2 mm brass bar left over that worked out exactly right. Without further ado I ventured out into the garage, aka shipyard, to start work on the third anchor. I chucked the bar into the four jaw lathe chuck, centered it and proceeded to make the square bar round to 2.5 mm. I had to really work very slowly because the bar was sticking out to about 55 mm and not supported. It worked okay but finalized the diameter with a file. The 1 mm pin on the end was equally testy but that too worked okay. I don't advice anyone doing this, the bar or rod is just too springy and the chance for the cutting tool running underneath the bar is just too risky. That 1 mm pin will go into a 1 mm hole in the center of the arm to fasten the two parts together. In any case, I lucked out again After lunch I started on making the arm. I decided against making it from round stock - didn't have aby anyway - and used the left over part of the 3.2 mm bar. My thinking was to make it look like a forged oval piece of iron. So first I had to reduce the 3.2 mm bar to about 2.5 mm or a smidgen larger and pre-shape it to a slight bend. This required a lot of filing but it made the actual bending easier when I had to do it by using the persuader tool (hammer) with the piece in the bench vice. The final shaping with the hammer was done on the vice anvil. Then came the dressing of the piece to shape it the way I wanted with files. It's not done yet but I think it's beginning to look satisfactory. The ends of the arm still needs to be have the cut-outs filed in for the flukes, then all the 1 mm holes drilled in the pertinent locations. Hopefully tomorrow I can solder the metal parts together after my dentist visit. I'll keep all yuns posted for sure. I'm really enjoying this little project! :) Working sketch for the "stern anchor." This shows the rough formed arm and started with the shaping using various sizes of files. Here we see a little more progress in the shaping where I also started with the oval shape. Cheers,

-
Great idea Michael and should work like charm at your scale. Actually - why wouldn't work at a smaller scale. Hey, paper is made out of wood and it sure looks like a wooden ring! Chalk that one up for future reference. Cheers,
-
Statenjacht Utrecht by Angarfather - 1:36
Piet replied to Angarfather's topic in - Build logs for subjects built 1501 - 1750
Nice work Hartmut and a real pulley sheave too, wow! Cheers, -
ancre La Salamandre by tadheus - 1:24
Piet replied to tadheus's topic in - Build logs for subjects built 1751 - 1800
Fantastic looking capstans Paul. Cheers, -
Hey Denis, glad you thought of me drilling your great looking antique door handles, at least you didn't break a drill bit like i did Here iI learned something new, using floor finishing stuff to make glass. Who would have ever thunk that, amazing. Shingles look fantastic too, where will your imagination go next? And now you are thinking again. Whenever you start thinking we get hit with another surprise. Different roof maybe? Cheers,
-
Nice glazing job Mark. Yeah, acetate works but does not reflect the primitive glazing they used in those days, especially a few hundred years ago, like my VOC ship. Hmmm, would it be too late for me to change???? Cheers,
-
Oooooh, I can already hear them diesels purring! Looking very realistic from here Patrick with or without the Caterpillar logos. What a challenge, what a great job. Cheers,
-
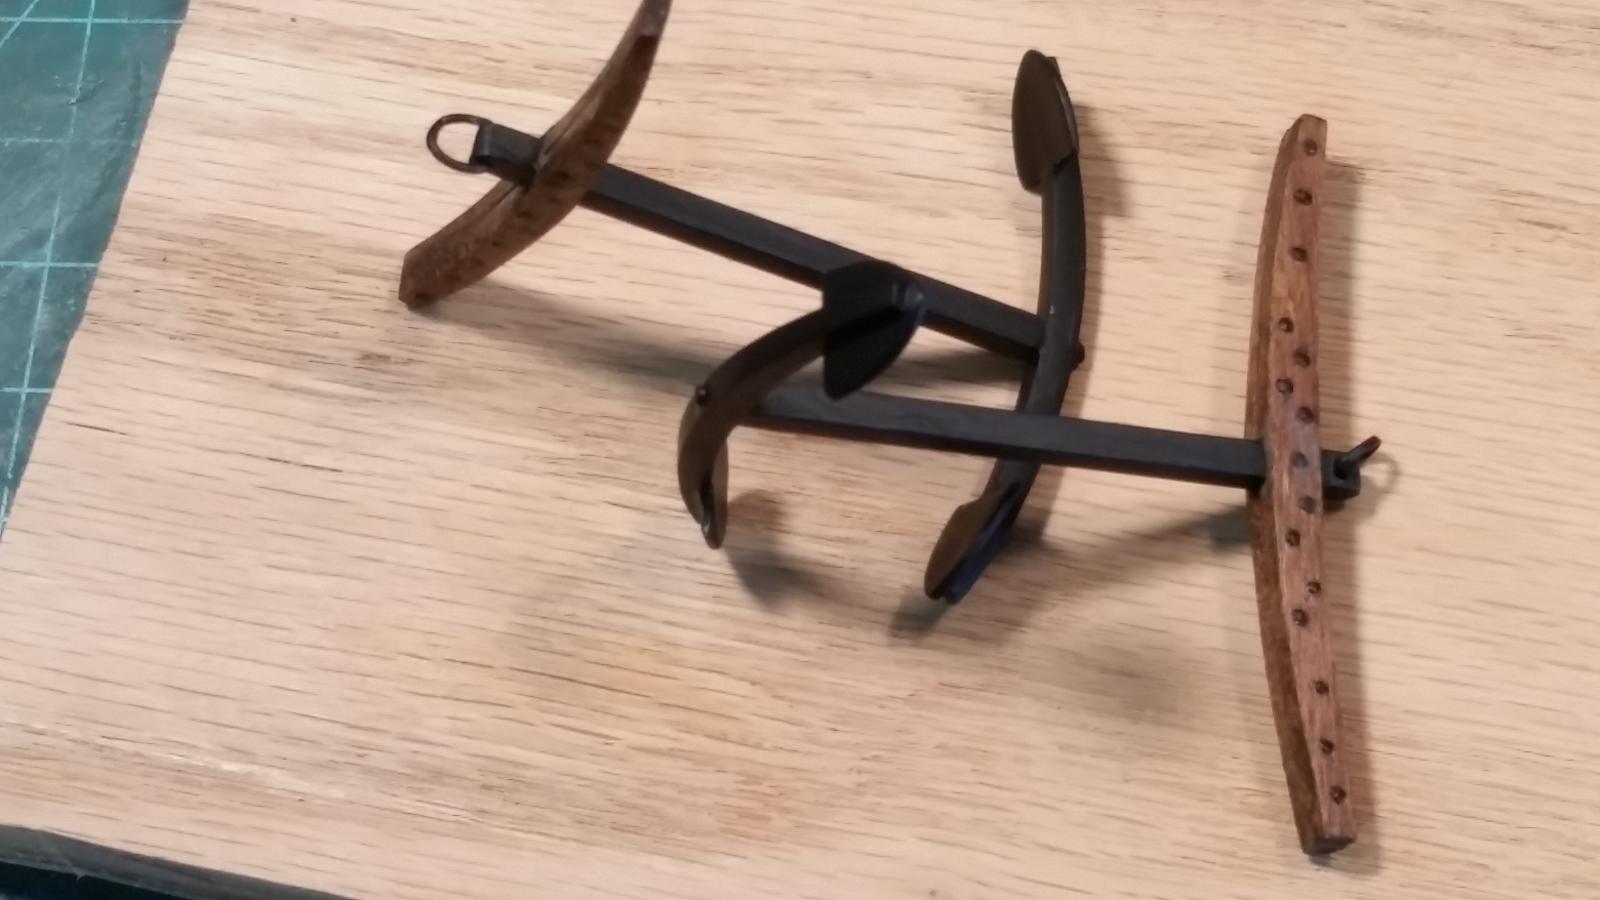
Well, let's see, what is it today - - oh yeah, Saturday evening. I managed to complete both main anchors yesterday afternoon. Put the bolts in the stock, left all pf them with just a skootch sticking above the wood to simulate the upset and painted them flat black. After the paint had dried I stained the wood in oak because I think that's what they used in those days. Now the stocks look like those on the photos of the various Dutch ships. thanks Jan for pointing it out to me. For the smaller anchor I plan to chuck the square brass bar in the lathe and turn the shank round but leaving the top end square. I still have some round brass rod for the arm so that one will be close to scale as well. Need to hunt for an example first, make a drawing and start work. Here are two pics of the completed main anchors. Hope yuns approve. Cheers,