


Bob Blarney
-
Posts
467 -
Joined
-
Last visited
Content Type
Profiles
Forums
Gallery
Events
Posts posted by Bob Blarney
-
-
-
-
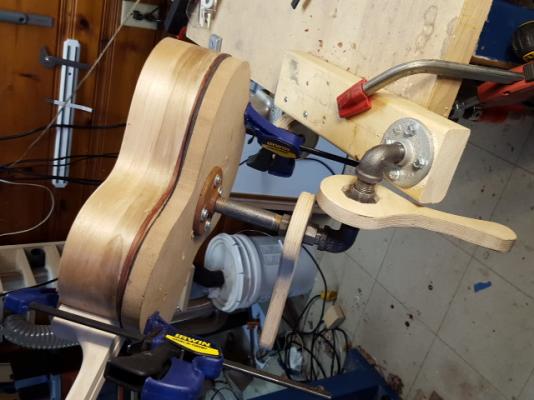
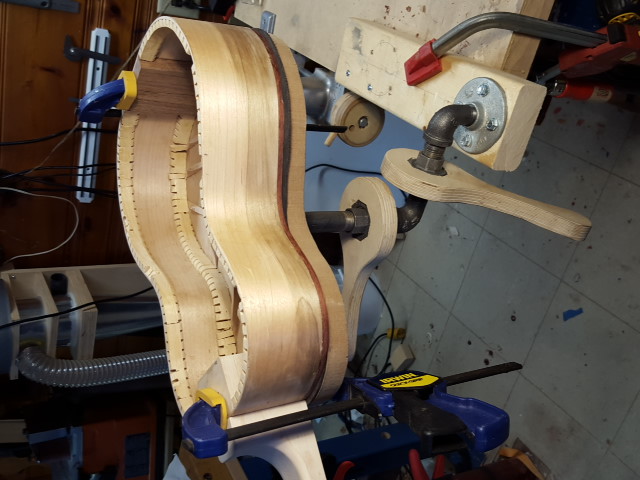
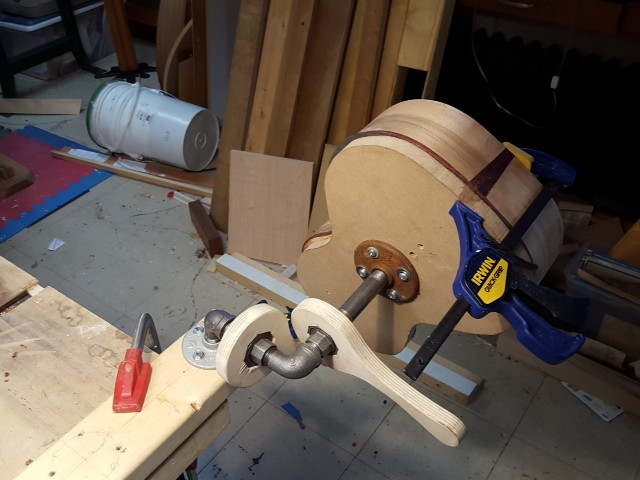
Hello, I wandered in through a space/time portalrfrom from another artisans' universe, but here's something that might be useful to shipbuilders(I'm sorry, you'll need to tilt your head to the left; I can't get the pics to cooperate clockwise.)I'm getting to an age where I like to position a workpiece so that is comfortable to work, for my eyes, hands, neck, and spine (It's Hell getting older!) So I made this Plumbers' Special positioning fixture from ~$25 of 1/2" pipe fittings and some scraps. It allows me to position a workpiece at a comfortable height and attitude. There are two floor flanges, two unions, and a few nipples. The captured service wrenches are made of baltic birch. I haven't decided how and where I will permanently mount this fixture, and so for now it's just screwed and clamped to the corner of my bench. Also, I suppose 3/4" or 1" pipe & fittings might be heftier, but I'm not chopping wood here. -- I'm doing fine work. >>>For model building, 3/8" pipe & fittings might be more suitable.<<<Obviously, your hull should be fixed to a mounting plate to prevent a shipwreck tragedy. I hope this is useful to you.


-
I realize that most people don't have the money and/or space for a larger and well-constructed bandsaw (14"-18"). That said, before cutting valuable wood on any bandsaw, it might be a good idea to run the saw for a few minutes and cut some scrap wood, and then re-adjust the blade tension (and the saw if necessary). As the saw runs for a bit, it will warm up and the blade tension may slacken and the blade will become more 'noodle-ly'. Also, for thin wood as is often used in modeling, then maybe a blade for sawing metal might give better results than a wood blade. Just don't over/under-feed it.
-
A company that was known as Small Parts Inc is now owned by Amazon, and is called
For belts for almost any machine, try www.beltsforanything.com
-
It certainly looks compact, but it doesn't say what the minimum thickness it can go down to. Generally, about 1/8" is the minimum for a planer, but I've seen wood blow apart at that thinness. To go to 1/8" or thinner, I would stick the stock onto a 3/4" MDF backerboard with double-stick woodturners' tape.
-
How much time would you be willing to invest in making your smaller hand tools, as opposed to spending your time to search out good tools and then spending your money to buy them? If you think about it, any tool that you might buy or make, will need to be sharpened from time to time. I've found that making and sharpening tools works for me.
There's good steel available. I buy old 1/4" shanked HSS spade bits at yardsales, and then grind them down to what suits my need. I use a 6" bench grinder with an aluminum oxide (white) wheel to shape them, and dunk the bit in water from time to time to cool it. (Another method is to stick the spade bit through a piece of a potato -- when the potato cooks, then the bit is getting hot.). You can do the same with hacksaw blades, but they're a bit more delicate. After grinding, then honing the tool with stones or wed/dry silicon carbide paper on glass can finish the sharpening of the tool. Once you get the hand of it, it goes pretty fast, and faster than hunting around.
For a handle, I buy a 6" extension for the spade bits (~$3) and drill a broomstick to hold it. I glue the extension into the broomstick with epoxy. This makes a handle this is interchangeable with many bits, and you can shape the broomstick to fit your hand. The same can be done with hacksaw blades.
- JPett, Cap'n Rat Fink and hornet
-
 3
3
-
-
Here's a place to find drill, router, and milling bits for your dremel or handpiece:
-
Hello,
While attending the monthly meeting of the Detroit Woodturners Club and listening to the presentation, I remembered a website that is very useful for hobbyists and pros. There are many useful scalable scales & rulers that you can print, and other information and calculators too.
Enjoy:
-
I dont know about how anybody else would do it, but at $10 per 100 for blades that have a machine-made edge, then I'd use new blades as needed.
I might (but more likely might not) save the used blades for a slow winter afternoon, to whet them into sharpness. It's more likely that I'd go outside and knock the icicles off the eaves, and then make a hot cup of coffee and read a good book.
-
I vote for a genuine surgical No. 4 handle. It will also hold Nos. 10, 15, and 12 blade styles. And as mentioned above, always use a tool to grasp the blade while changing.
Incidentally, I find that a new No. 11 blade is very useful for removing splinters. Wipe the blade with rubbing alcohol. If the end of the splinter is above the skin, then usually a scalpel blade can catch it and pull it out. If not, don't squeeze the skin; just gently cut straight down with the scalpel to expose the splinter, and use the point of the blade to extract it. Another useful implement is the tweezer from a Victorinox Swiss Army knife (really!)
If a splinter is buried underneath the skin, or is 'through-and-through' a finger, then do not wait --- seek help immediately at the Emergency Department of your local hospital. Inflammation from the foreign body will make it much more painful to extract the splinter, and inflammation will greatly prolong the healing process. (if you don't believe me, then ask me how I know this).
- mtaylor, druxey and michael mott
-
3
-
Have a look at Herman Miller laboratory chairs. They have fully adjustable seats, backs, and individual armrest adjusments.
-
"If I could just find something to stop my hand shaking my batting average back to 100 !!!!! "
There are a couple of ways to steady hands. One way is to touch your pinky fingers together or rest one hand on the other lightly. Another way is to build an articulated arm/wrist rest that can swing in/out, and with some height adjustment capability. Also, fine work is usually easiest to do at elbow height with the shoulders relaxed.
-
First improve the lighting where you work.
Then go to the dollar-store, and buy a baseball cap to shade out glaring light. Then go over to the 'reader/cheater' glasses display, and try out the different diopter strengths. I bought diopter strengths from 1.5 to 2.5 for about $10 max.
I've got and used the other things -- Optivisor etc, and also have used $1500 surgeon's loupes. My opinion is better lighting, and some cheap readers work just about as well for far less money.
-
I hope it works out, but I'd be concerned about the expansion & contraction with seasonal changes in humidity. This will work against and eventually loosen the screws of the crossgrain battens.
-
-
The play in a mechanism is known as 'backlash'. You can read more about this at the Sherline website.
All parts of a movable mechanism need some clearance between other parts, so that the mechanism can be operated. And the price of a moveable mechanism is commensurate with the fineness of the clearances, i.e. a machine with little or no noticeable backlash will cost a lot more money than a crudely constructed copy. But there are methods to compensate for a less than perfect mechanism. -
Hi,
The Dremel speed is far too high to sand for long because it wears the abrasive far too quickly.
By popular acclaim, the Rigid Belt and Spindle sander Model # EB4424 is the best. I've used all of the types above, but this one takes away the prize as the most useful. The changeover from belt to spindle is very easy, the table is good with tilt and a miter gage slot, and it has a good dust collection design.
http://www.homedepot.com/p/RIDGID-120-Volt-Oscillating-Edge-Belt-Spindle-Sander-EB4424/100061671
Also a gum rubber cleaner stick is a useful accessory to clean the belt. And the Shopsmith ceramic belts are the best in my opinion, but there are many options.
-
After thinking about it a bit longer, I suggest that you do not screw the plywood strips on crosswise. Instead, while the bench is equilibrating with the environment, apply two wedge-clamps at either end, one on top and one underneath. You could place the 'underneath' one on the steel leg support, Then cinch the wedges up over the weeks until you're ready to glue.
In fact, you might end up just leaving it this way. You could probably take the top-side clamp off, and just use the clamp underneath to adjust for seasonal change across the width of the bench.
Cut your wedges about to 1:6 or 1:8 (rise to run, about 7 degrees). To do this, take a board about 2 inches wide and 8 inches long, and cut diagonally from end to end about 1 inch from the edge, so that the wedges are exactly the same size
-
-
I apologize if I made anybody feel stupid. For many years I was a research professor in a medical school, and occasionally I was recruited to teach either in a lecture hall and/or in the laboratory. Those are two very different places and different crowds.
Well, I'll tell you, that when I was faced with 50--150 bright faces, then I learned that 'There are no stupid questions, but there are many stupid answers.'
It's a matter of understanding what a student is asking, what the student knows, and then explaining how a problem can be solved. But it's more than that -- it's about teaching a student how to learn about how to solve a problem on their own, when nobody else is around to ask for help.
- Stuntflyer, Jay 1 and trippwj
-
3
-
-
After years of owning Canon film cameras, I've found that my Samsumg cellphone camera can do about 85% of all photos that I might take. It's always in my pocket if not in my hand, and since I use it all of the time, I don't forget how to use all of its features. That works for me.

How Do I Lube/Protect a Metal Lathe Without Oil?
in Modeling tools and Workshop Equipment
Posted · Edited by Bob Blarney
There are 'dry' teflon lubricants that are applied in liquid form, e.g. Tri-Flow. I use it on my woodworking tools, as well as paste wax for planar surfaces. These reduce dust accumuations.. There are other vegetable rust-protective oils that are used by woodworkers - camelia oil from tool suppliers (highland woodworking), and canola (rapeseed) oil from the grocery store (e.g. PAM). However, they should be removed from time to time so that a gooey hard buildup doesn't accumulate.
I would avoid silicone spray -- it's got a very bad reputation among musical instrument builders because it often spoils finishes and is nearly impossible to remove.