


Canute
-
Posts
5,833 -
Joined
-
Last visited
Content Type
Profiles
Forums
Gallery
Events
Posts posted by Canute
-
-
John, I'd only prime if I was painting a yellow or red color. These are more translucent than the other shades we use. White or light gray primers under the yellow.
You may also want to get some sanding papers with adhesive backing. And get some wood popsicle sticks or coffee stirrers. Make yourself some small, narrow sanding sticks. Cut the stick ends to shapes you need.
- Jack12477 and thibaultron
-
 2
2
-
OC, was the hull surface clean? If casting oils, release agents or dust are on the plastic, the paint won't stick. Get some dishwashing liquid and warm water and wash your hull. Let it dry and then paint.
A good brand I like here in the US is "Dawn". No scents, cuts grease.
-
John,
I'd definitely seal the wood first. I've used Scalecoat(a model RR paint brand), that stuff model airplane builders use (clear dope and talc) and stuff from local craft stores (Michael's, etc.). Lately, I've used the craft store stuff; more sealer for less bucks! Apply and then steel wool it smooth. Should knock down your "furrys".
Airbrush the Floquil: thin it to the consistency of skim milk. I think a 60% paint/40% thinner will do. Mix up a small batch and use the little cup to hold some of your mix.Test shoot it on some cardboard to see how it sprays. Do not pour the mix back into the original bottle!
I haven't used retarder with solvent paints before so I've no clue.
I use rattle cans for my primer so I can't tell you the correct mix. I have cans of white, light gray and red oxide (excellent hull bottom and brick color for structures)
-
-
Looking good, Jerry. I can see Ragnar raiding in this boat.
-
-
-
Love that little carronade, Matt. Well done on that elevating screw.
-
-
Neat looking brass mortars, Matt.
- GLakie and mattsayers148
-
2
-
thanks for the comments and likes, fellows. Squirrel Whisperer, your wish is my command...


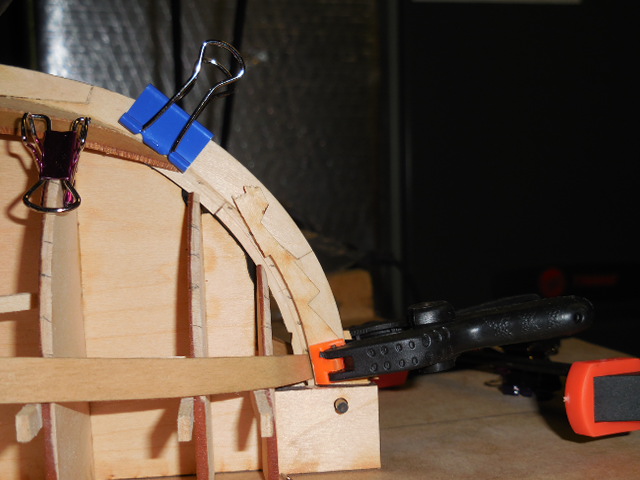
This is my take on Cathead's stem blocking. I cut the part outlines from the parts sheet, marked them to show where the planks should fall and clamped them onto the stem. These are for the sheer strake and next few planks. I have a second set for the lower planks.

Sitting with the Admiral eating breakfast this morning, she asked how the Launch was going.
 I said I had to bend the ends in boiling water and affix them. She asked why I wasn't using the blow-dryer to bend the ends. Hmm, the Darlin' is on to something here.
  So port side plank #2 is hot air bent.
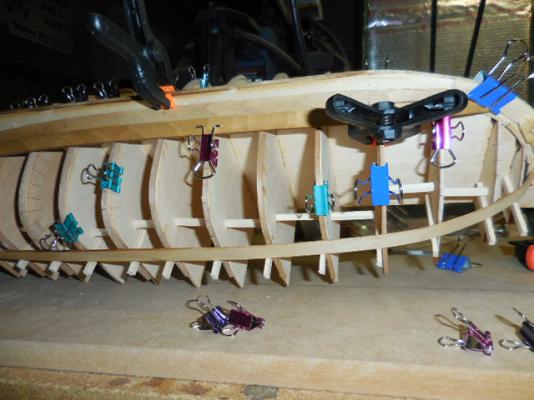
One kind of overall shot. I'm tapering the edges by sanding the inside edges to tighten up the outside edges of the planks. Another Maestro Chuck technique.

Matt, I've been thinking about that spread issue. Methinks the cherry frames don't sit as tight to the forms as they should, hence the spread. I may tack glue the center seat or affix a light weight spreader clamp across the thwarts. Think light but strong.

-
-
-
Finally have both garboards and strakes glued up. Now fitting the #2 strakes by boiling the hood ends. I beefed up the stem form with the kit scraps for the stem bracing. Per Cathead in #65 and 67 above, it helps to hold the hood ends in place. I penciled in the lines for strake alignment on the inside of the curves; it matches up with the pencil lines I already had in place in the stem's rabbet.
-
What Jack, George and Cap'n Steve said, Mark! Tres bien in Licorne lingo.

- GLakie, Piet, Salty Sea Dog and 4 others
-
7
-
Ron, you don't need a shop for this model, just a cutting mat, knife with blades, a little glue, good desk lamp and 5 bottles of Visine.
An Optivisor or similar magnification device would be nice, too. Unless you're 20 years old with 20/05 vision. Those of us with a case of Too Many Birthdays (TMB) will require such a device.

-
-
-
Guess I hit a funny bone there.
Thanks, ya'll. Well, the train scratch builders are fading, so tools like scale rules are in short supply.
 Too many model railroaders prefer "ready to run" stuff. Open box, put on tracks. Yawn, no pride in actually building something. Instant gratification only. I think they'd have a coronary if they perused the beautiful stuff over here. Their loss. I love working in wood, though I wish I was a little neater applying glue. Guess I just need to keep on building.
- mattsayers148, GLakie and CaptainSteve
-
3
-
Wasn't the Goons some UK TV show back in the. 60s?
- CaptainSteve and GLakie
-
2
-
Matt, mine is a 12" stainless steel ruler by General. And it has a chart with number drills from 1 to 80 and their decimal inch sizes.
- mattsayers148 and GLakie
-
2
-
The recent TV series has me thinking "longboat". I'd like to follow along, also.
-
Lads, 1:64 scale is called S Scale by model railroaders. See if you can find a model railroad ruler. It has 1:48 (O - think Lionel),1:64(S - think American Flyer trains), 1:87(HO) and 1:160(N). Also has inches and mm scales and a drilling and tapping guide(lists drills for several screw sizes). Handy measuring tool. Make sure you read it the correct way.
-
Cat, check out the recent modeler's meet here: http://modelshipworld.com/index.php/topic/9510-2015-33rd-annual-northeast-joint-clubs-model-show-and-conference/page-2 Look at post #26. It shows an exploded view with some decks and roofs raised to enhance viewing all the detailing.


Licorne 1755 by mtaylor - 3/16" scale - French Frigate - from Hahn plans - Version 2.0 - TERMINATED
in - Build logs for subjects built 1751 - 1800
Posted
Yowie-zowie, very nice work.