


toms10
-
Posts
928 -
Joined
-
Last visited
Content Type
Profiles
Forums
Gallery
Events
Posts posted by toms10
-
-
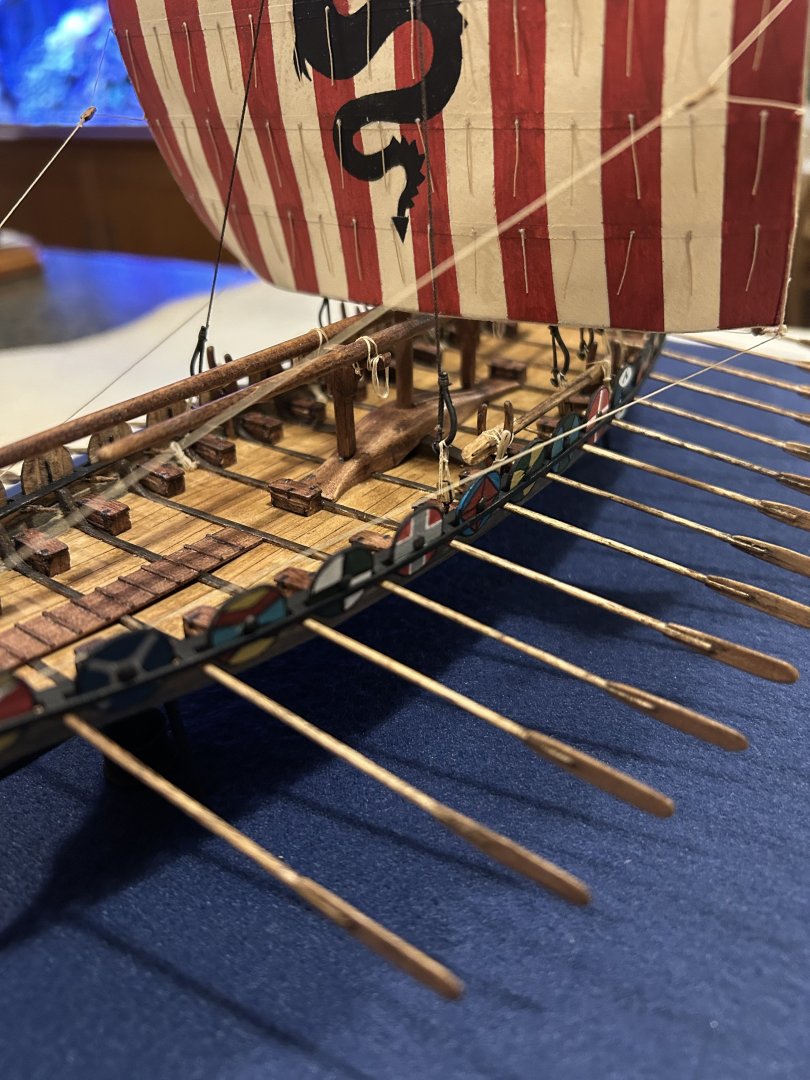
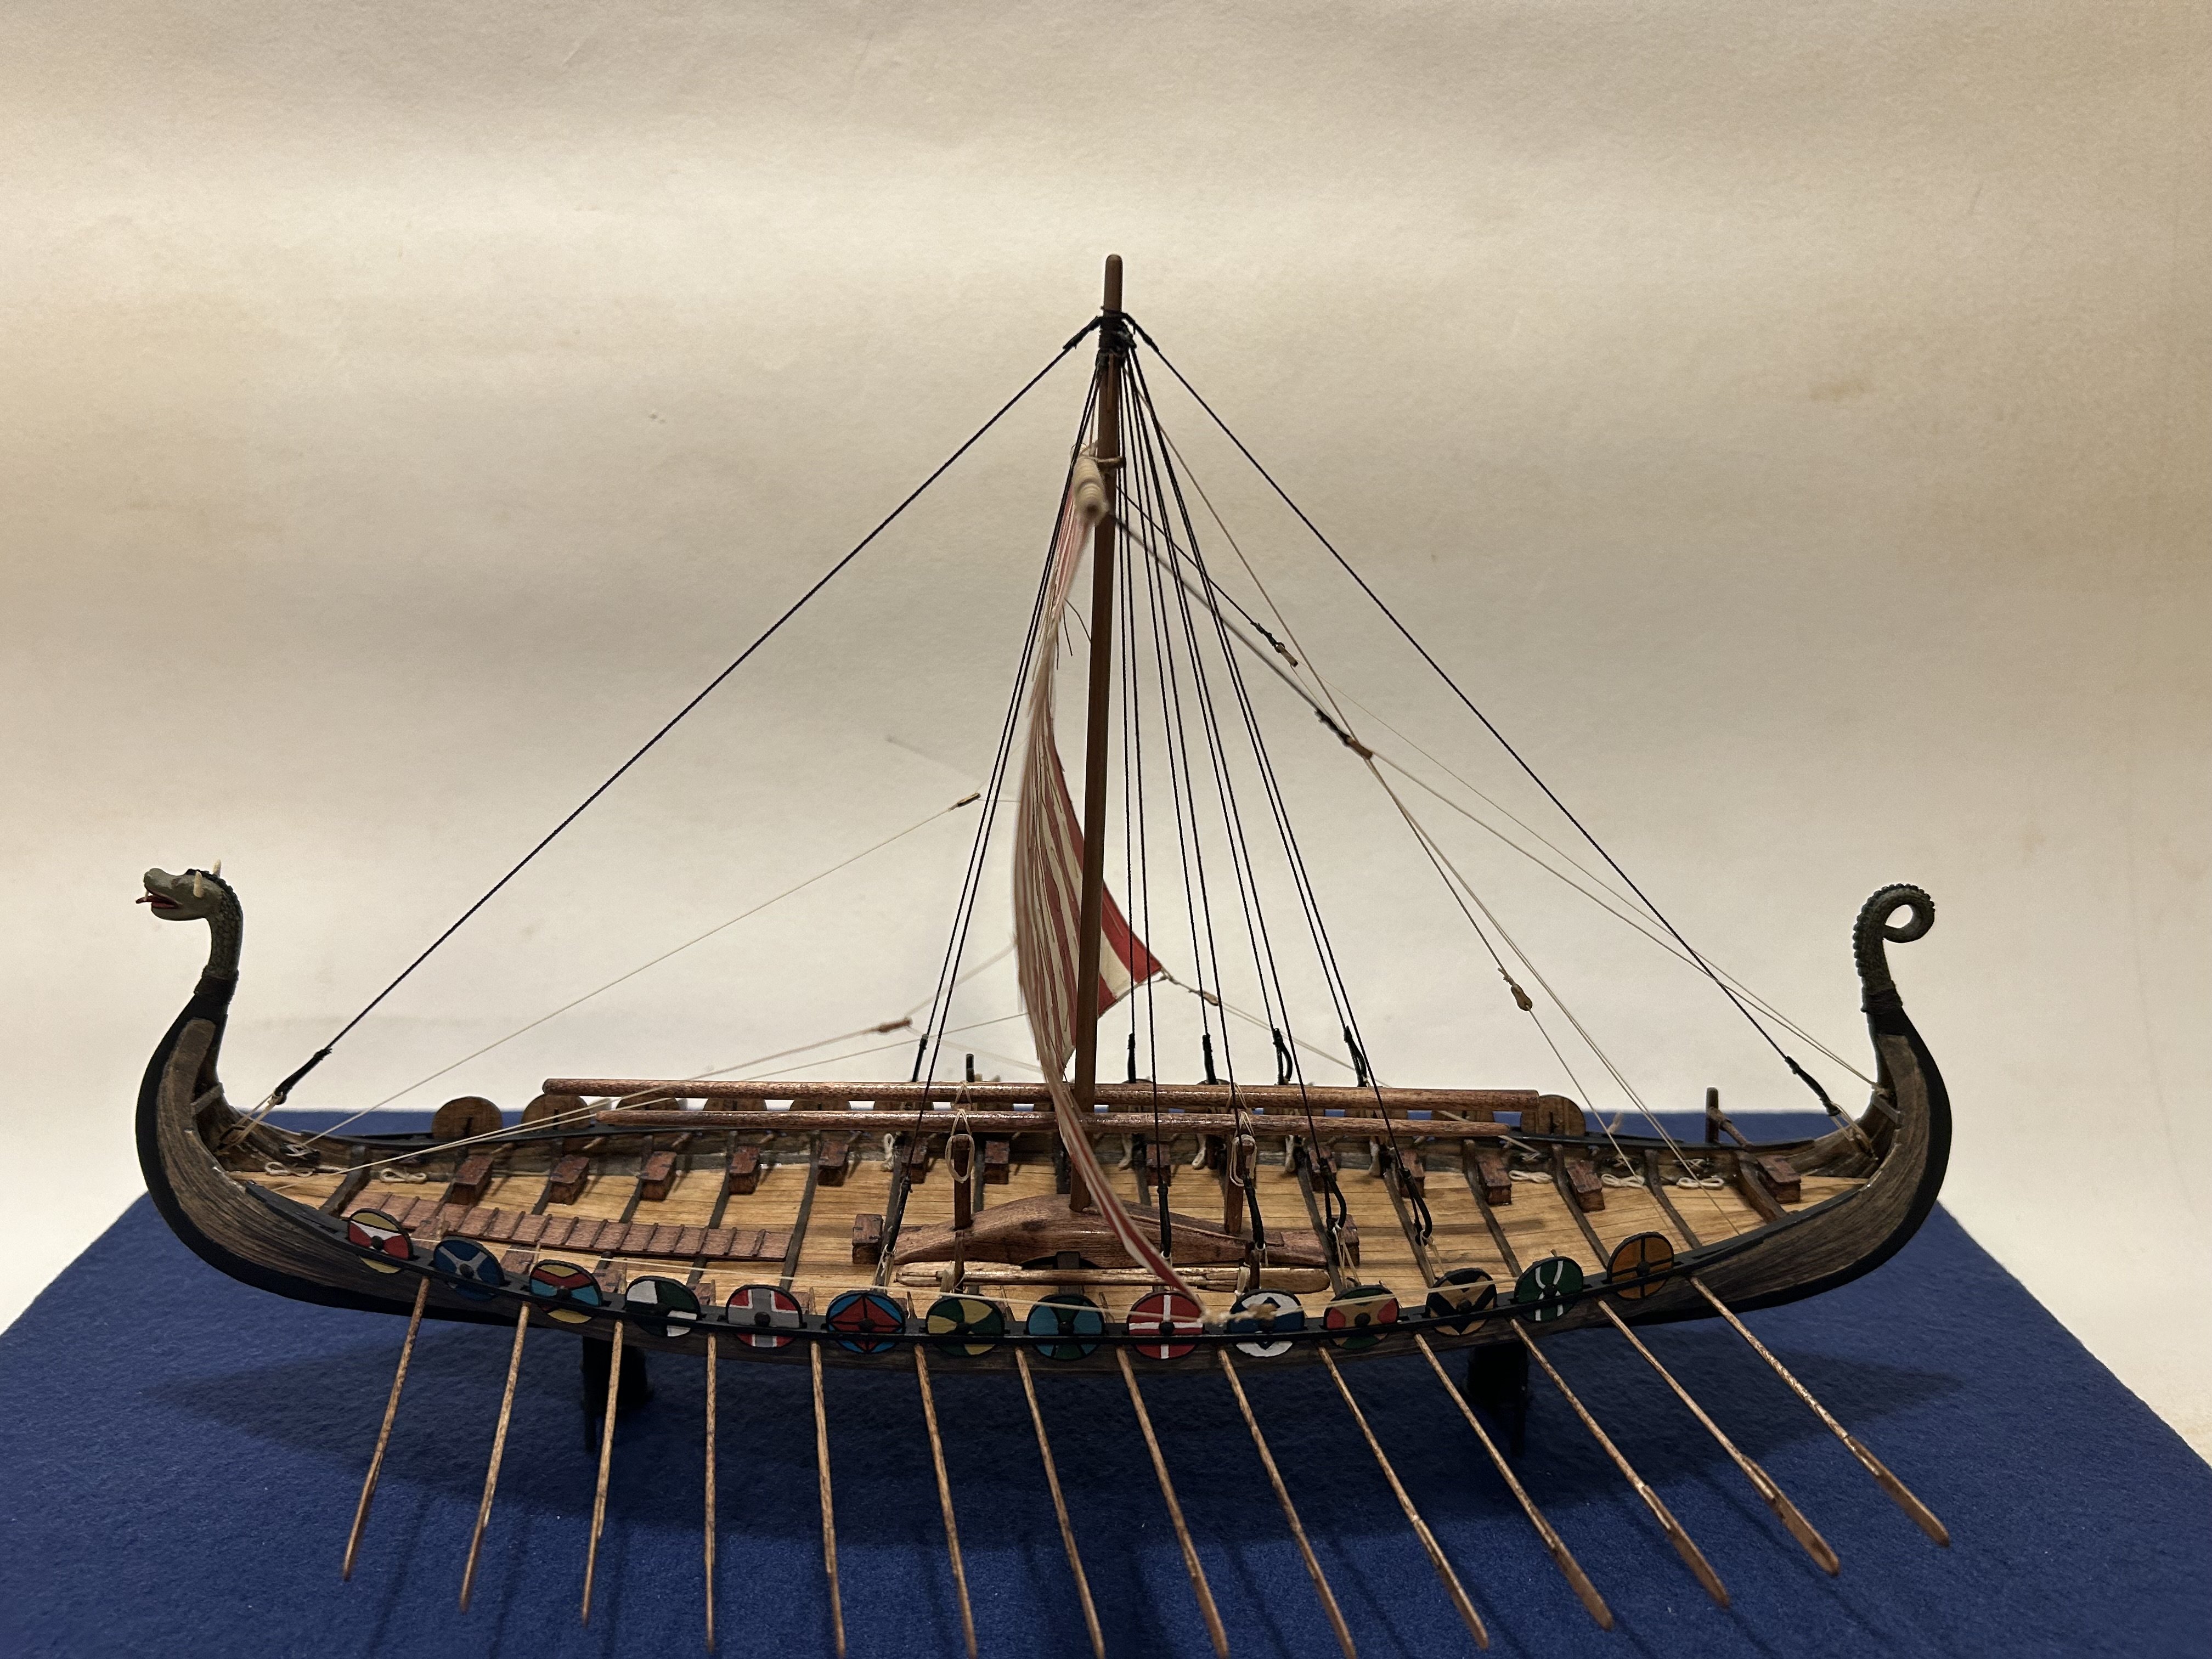
The drakkar is complete and ready to set sail. I will probably add a few barrels (after I make them) to store food and water.


Going to take s bit of a break and work on my 9000+ piece puzzle of the Battle of Algiers. That should be a few months. Then I am planning on starting a scratch build of the French ship La Courrone from 1635.
Tom
- Waitoa, Ryland Craze, Seventynet and 10 others
-
 6
6
-
 1
1
-
 6
6
-
-
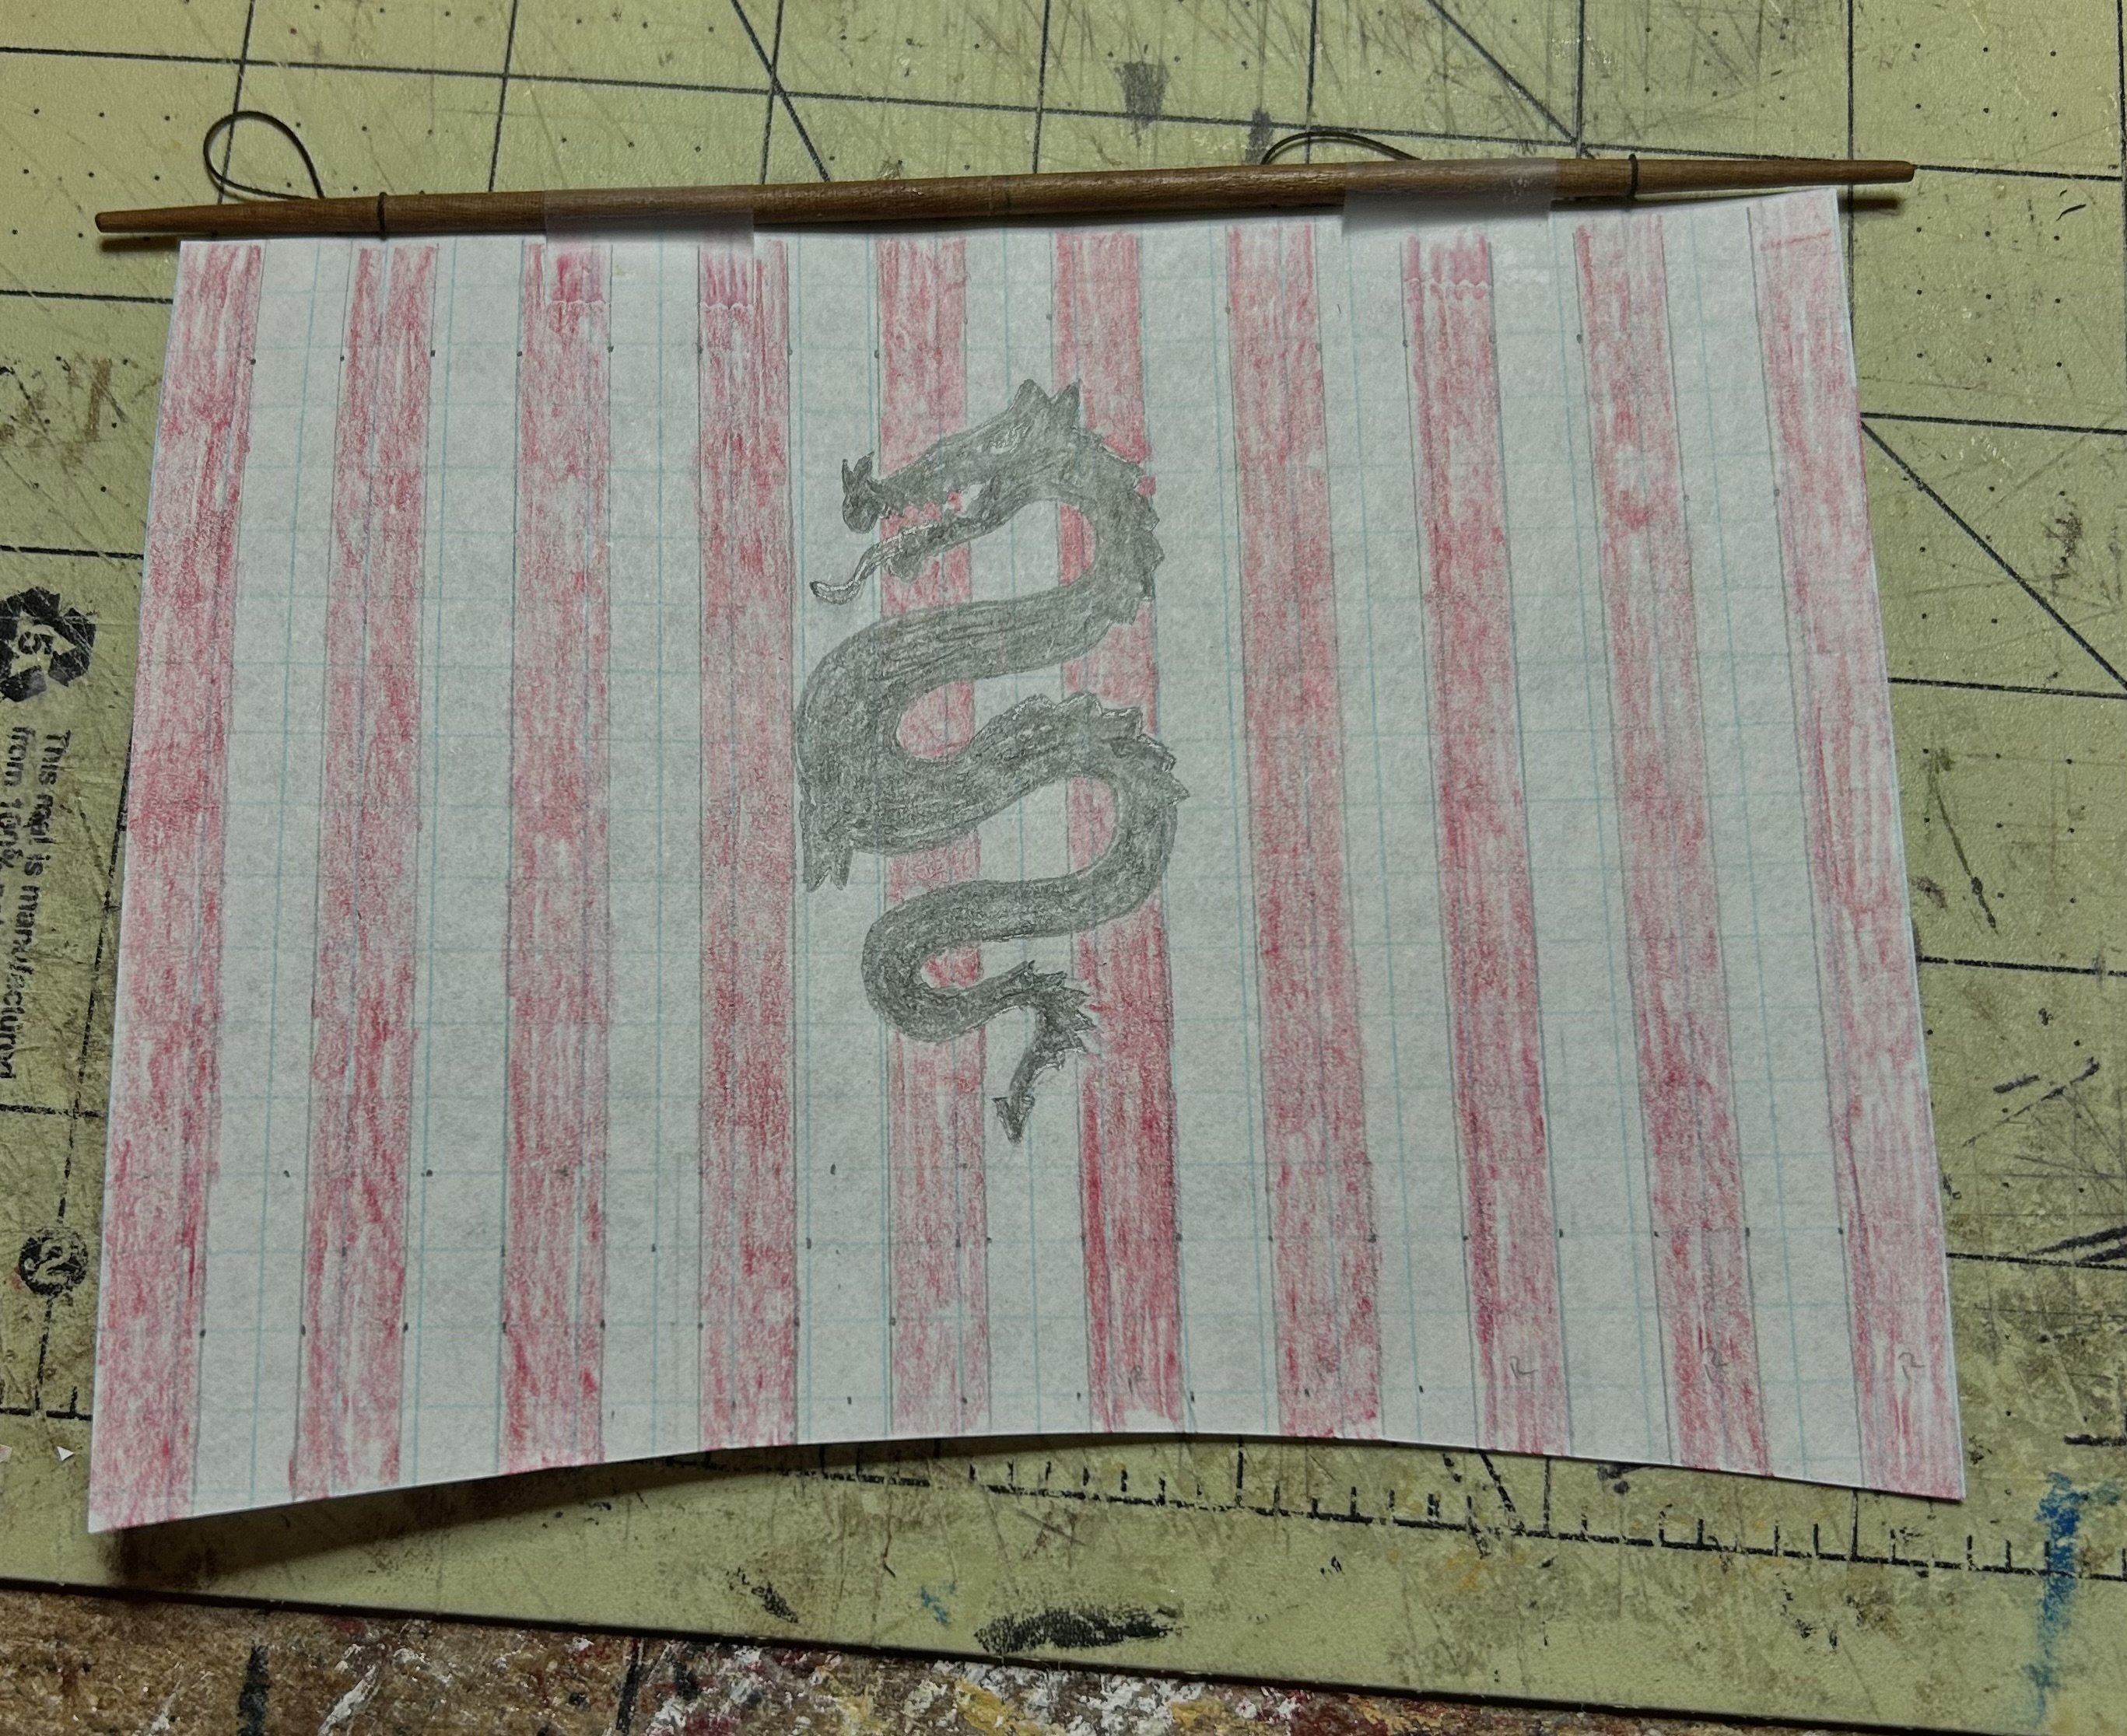
I now have a sail with all the rigging and spare mast and yard in case of some nasty weather in the North Sea. 😂
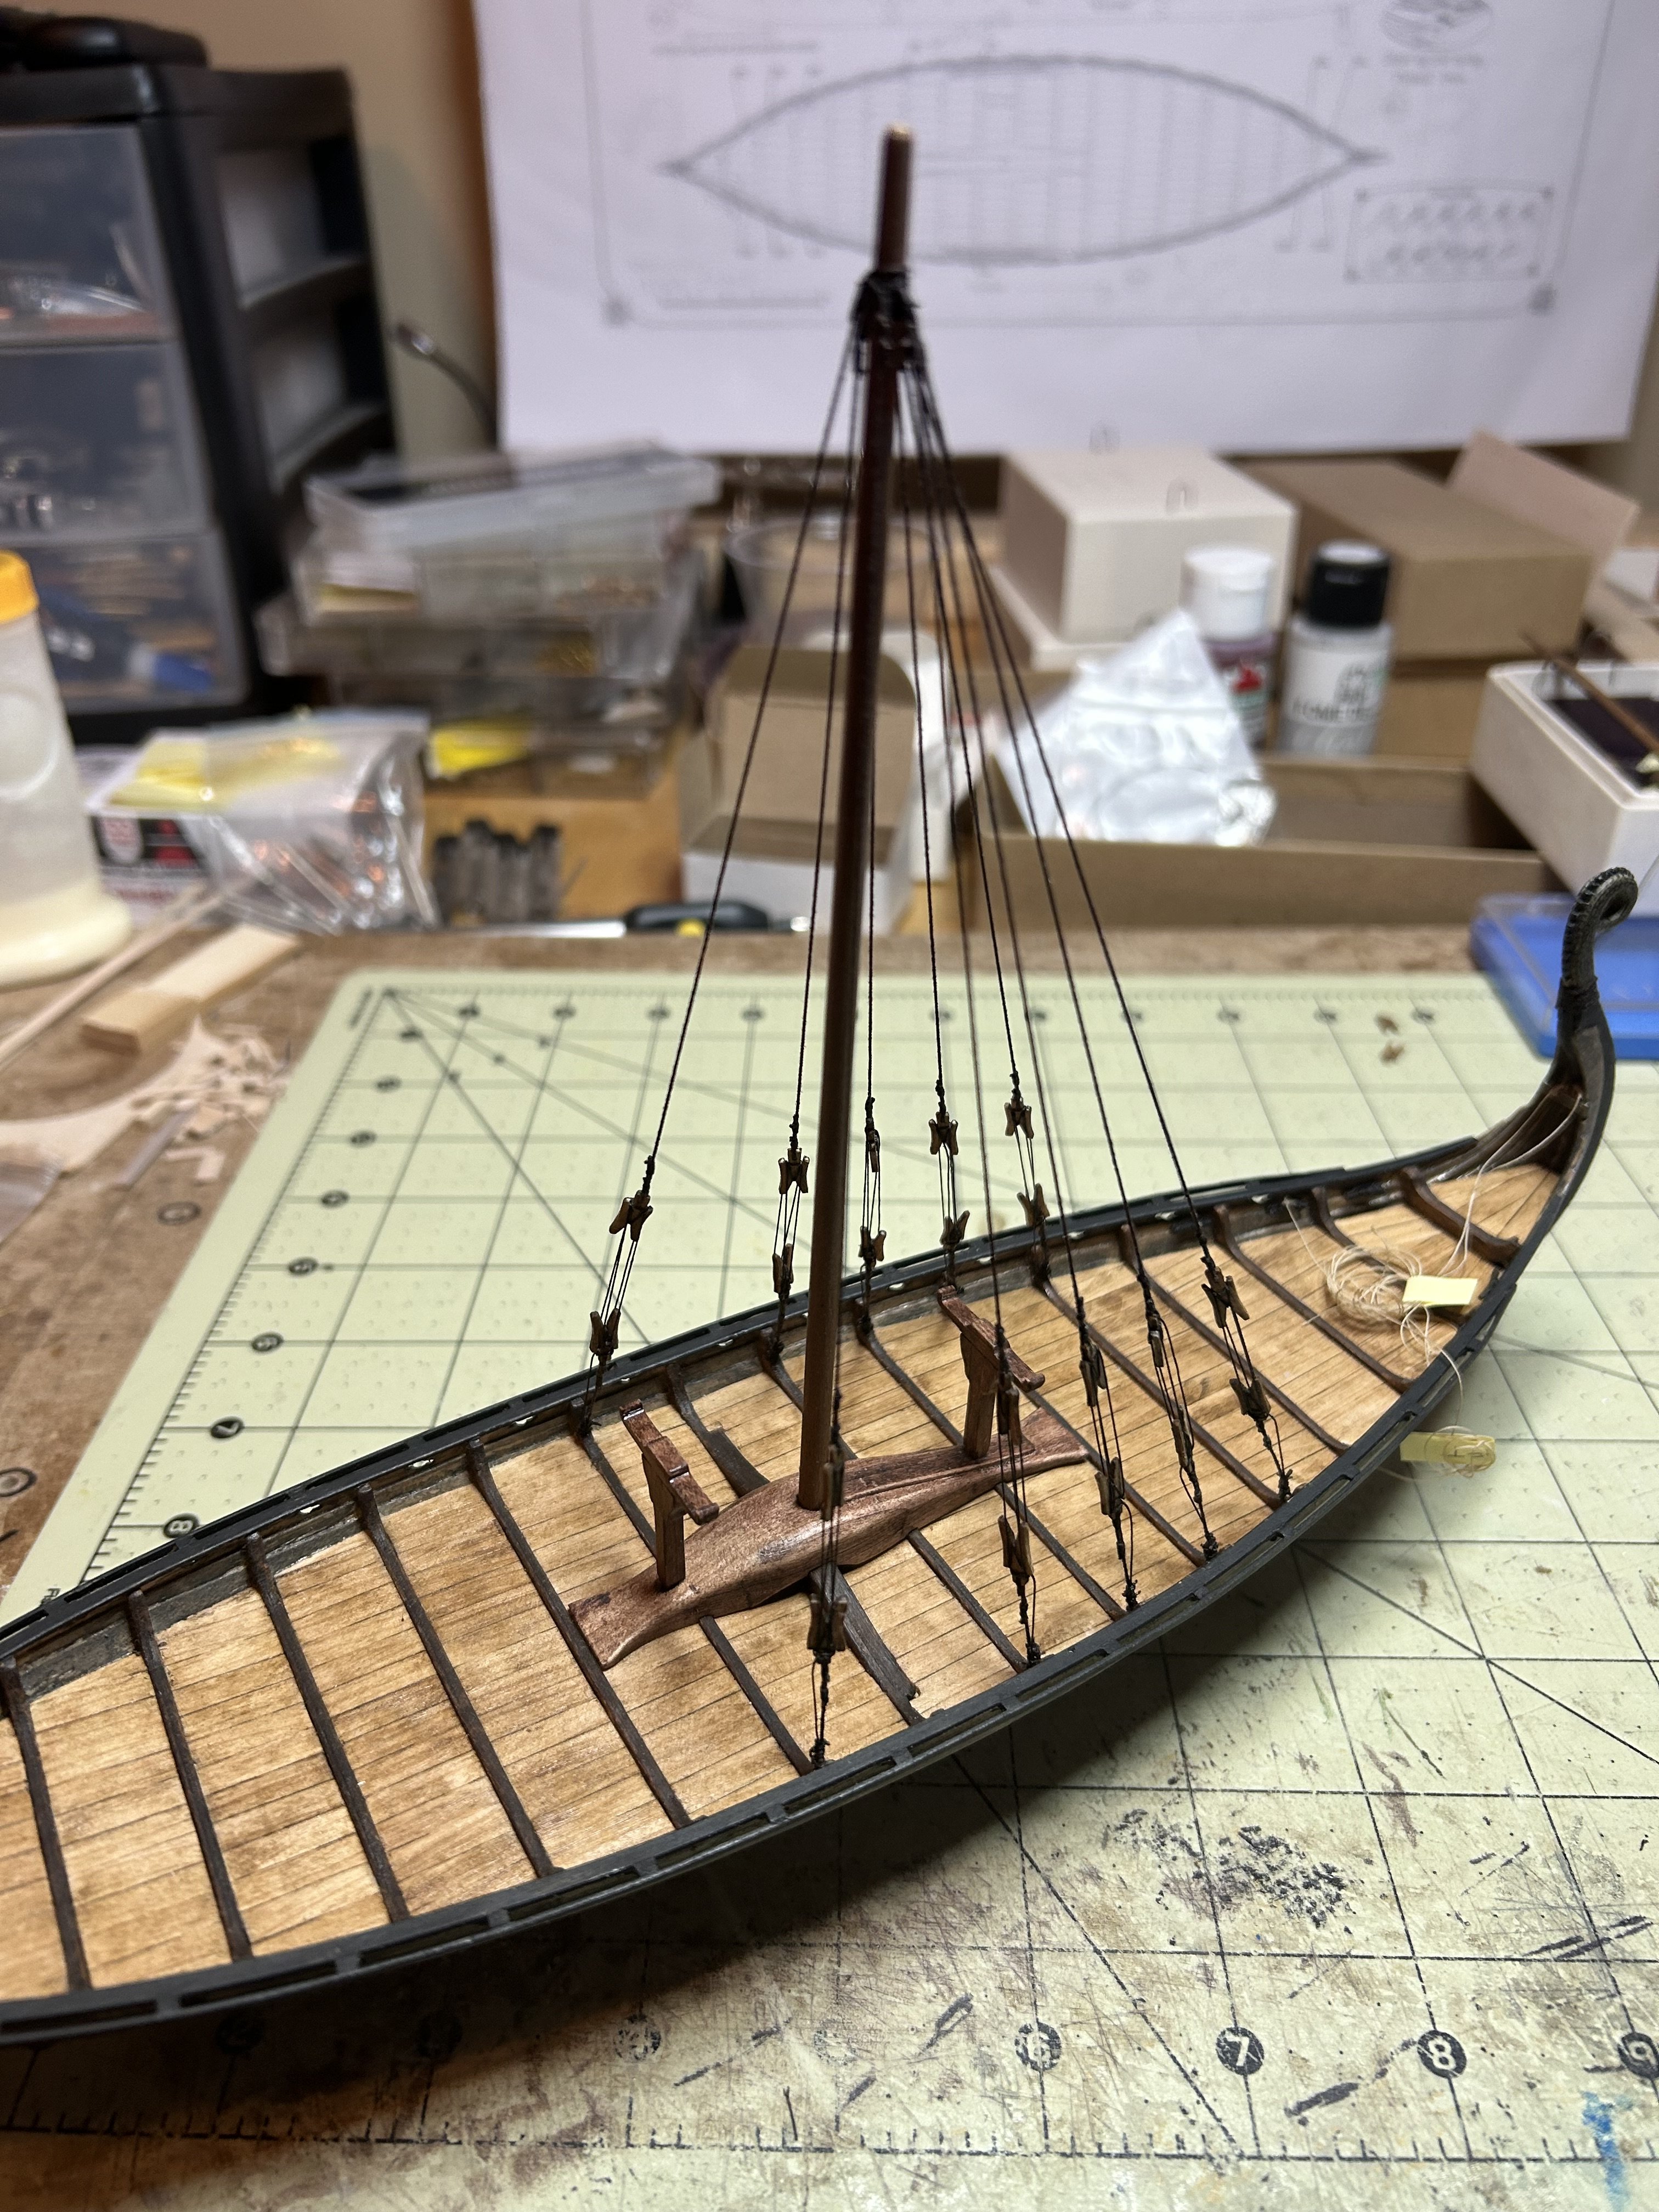
Getting down to the final details, sea chests, oars, rudder assembly, rope loops at all the tie offs and the delicate details on the dragon head/tail (horns, tongue, saber teeth and tail spikes). Everything is already made so it is just assembly work.
And lastly, the base and acrylic case. The end is within sight. 😜


Tom.
-
On 12/21/2024 at 8:07 AM, Wind Jammer said:
How about just looping the end of the line with a loose knot then using tweezers to loop the bottom of the belaying pin then the top pulling the knot tight with the loose end securing the line to the pin. No special tool required.
This is the technique I use although sometimes the loop doesn’t lay exactly right and I need to fiddle around with a pair of tweezers.
Tom -
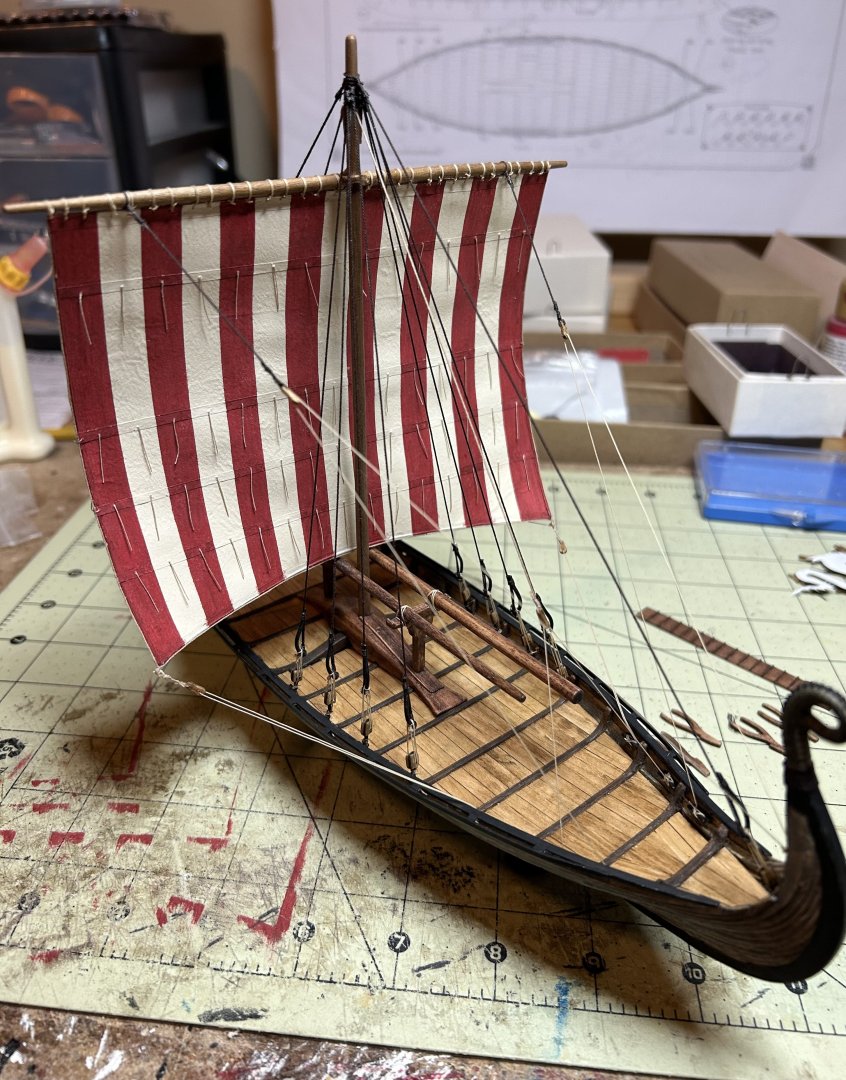
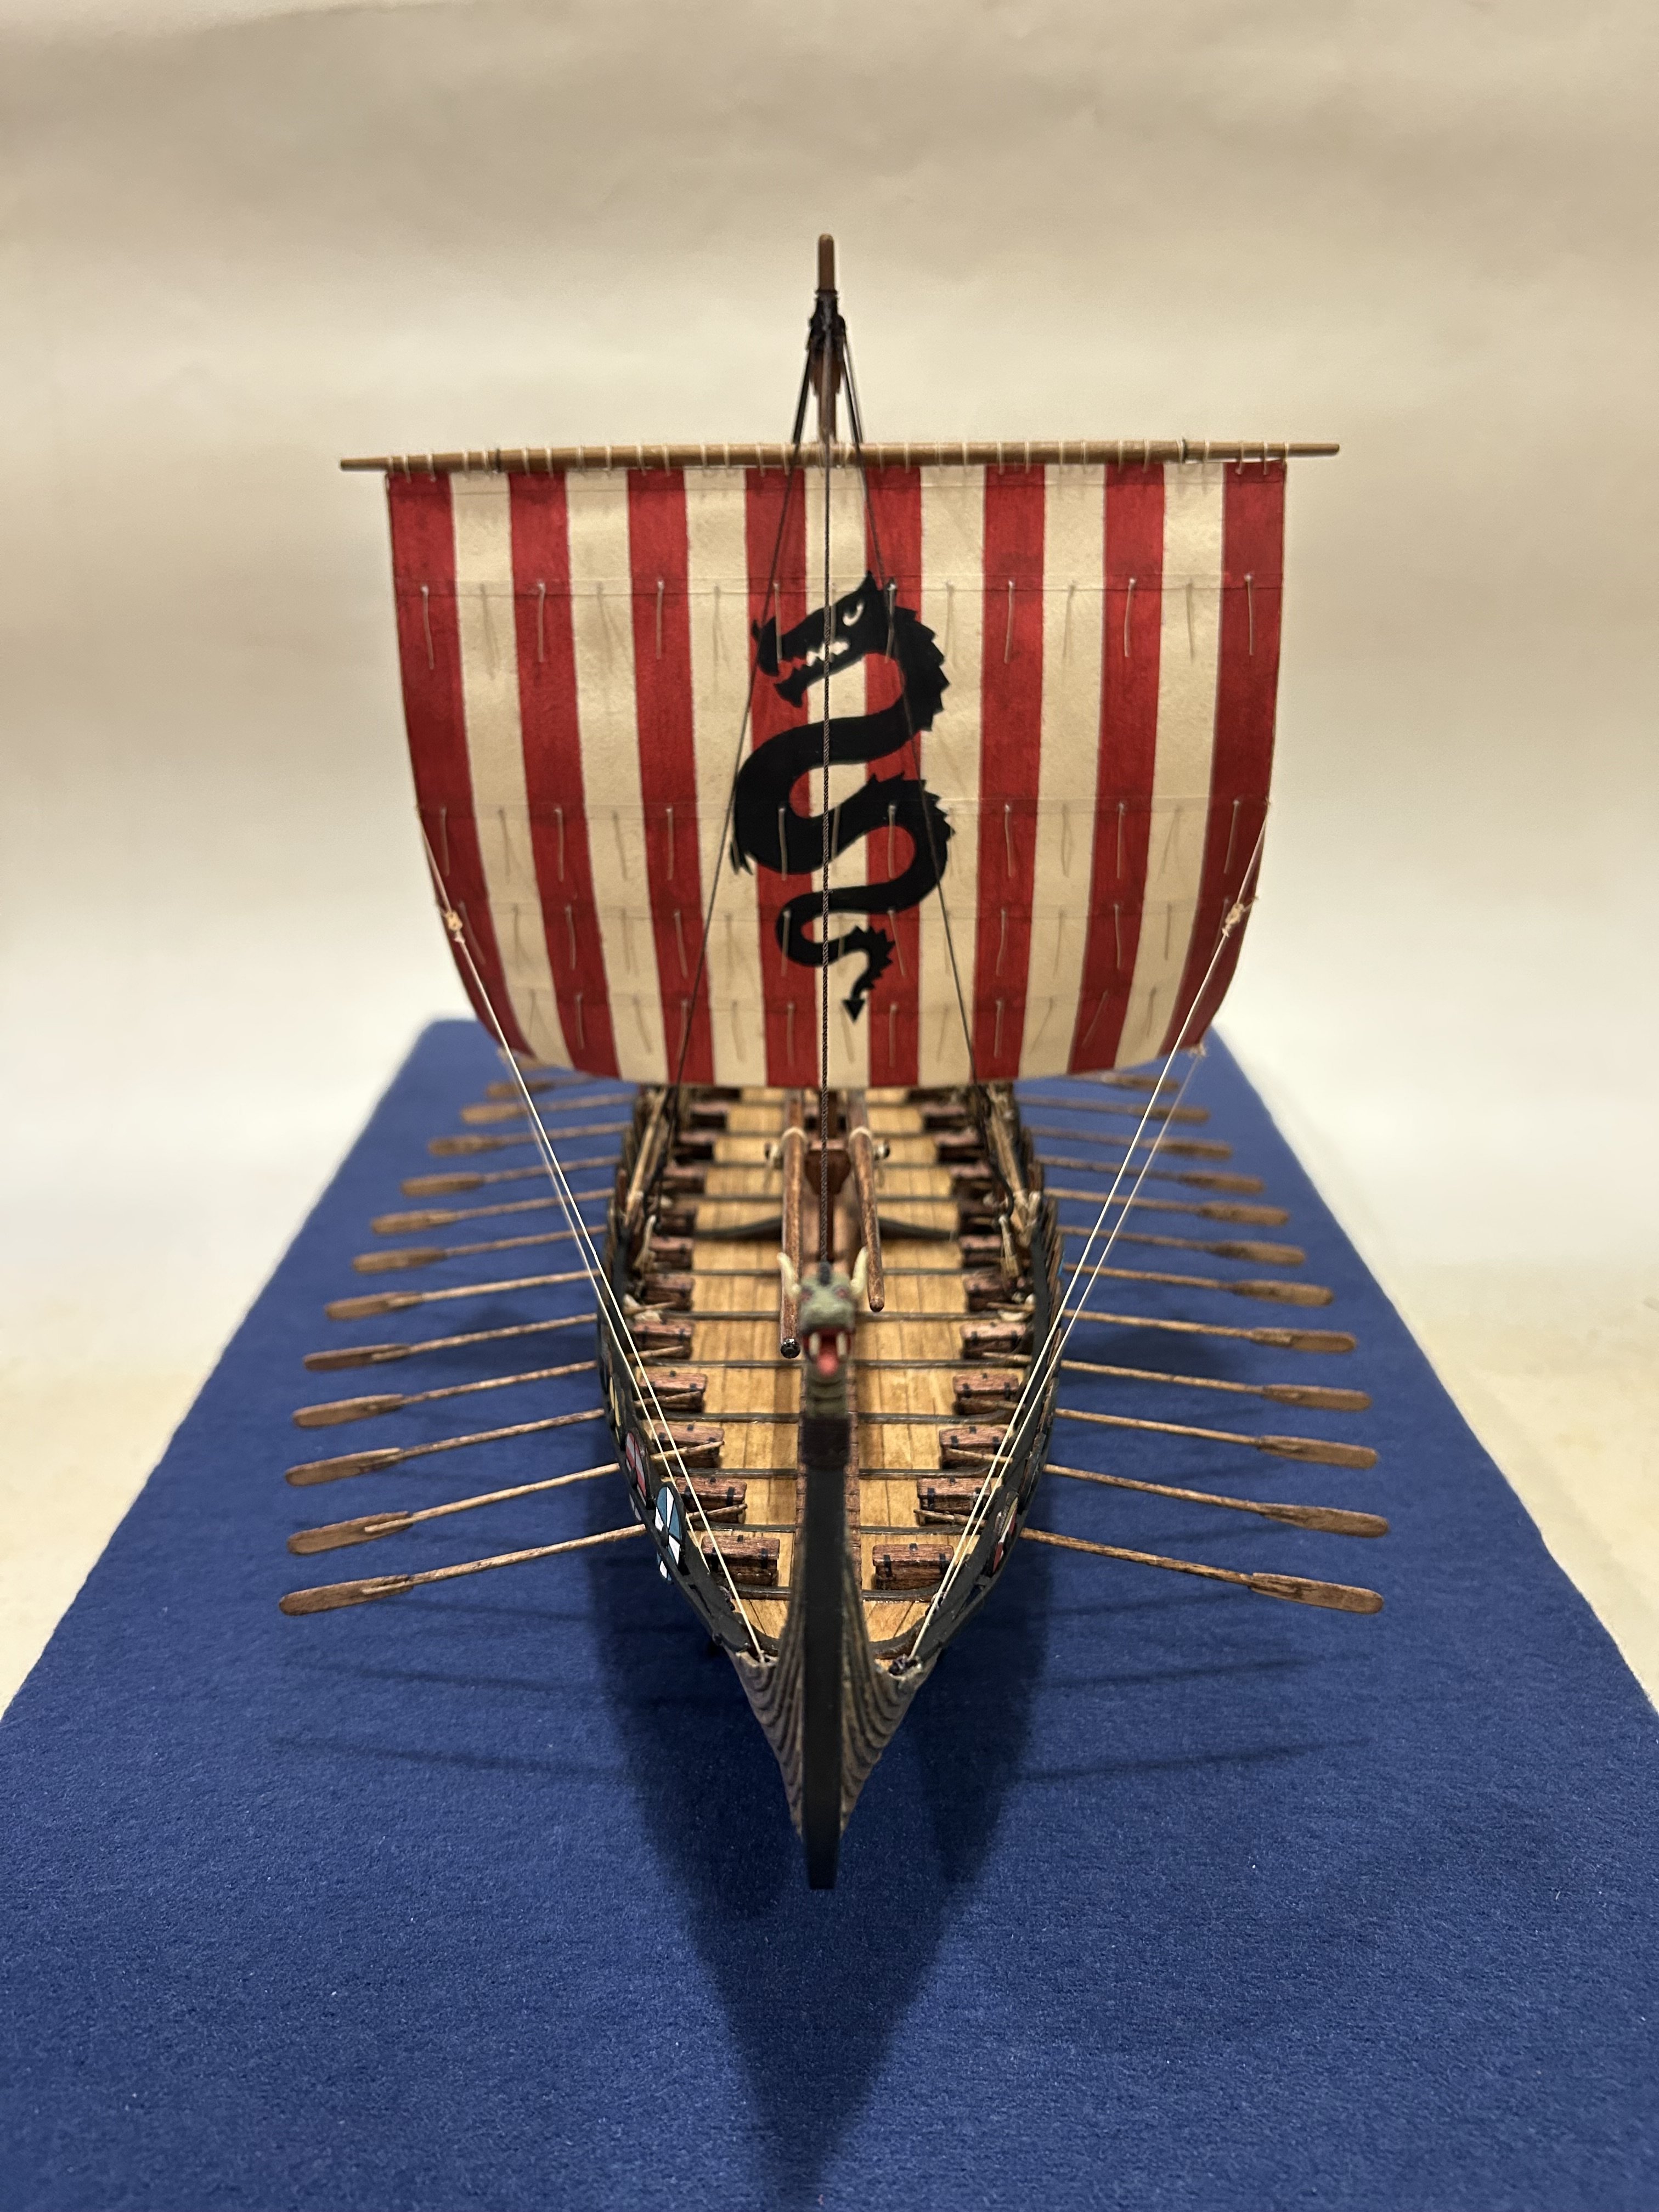
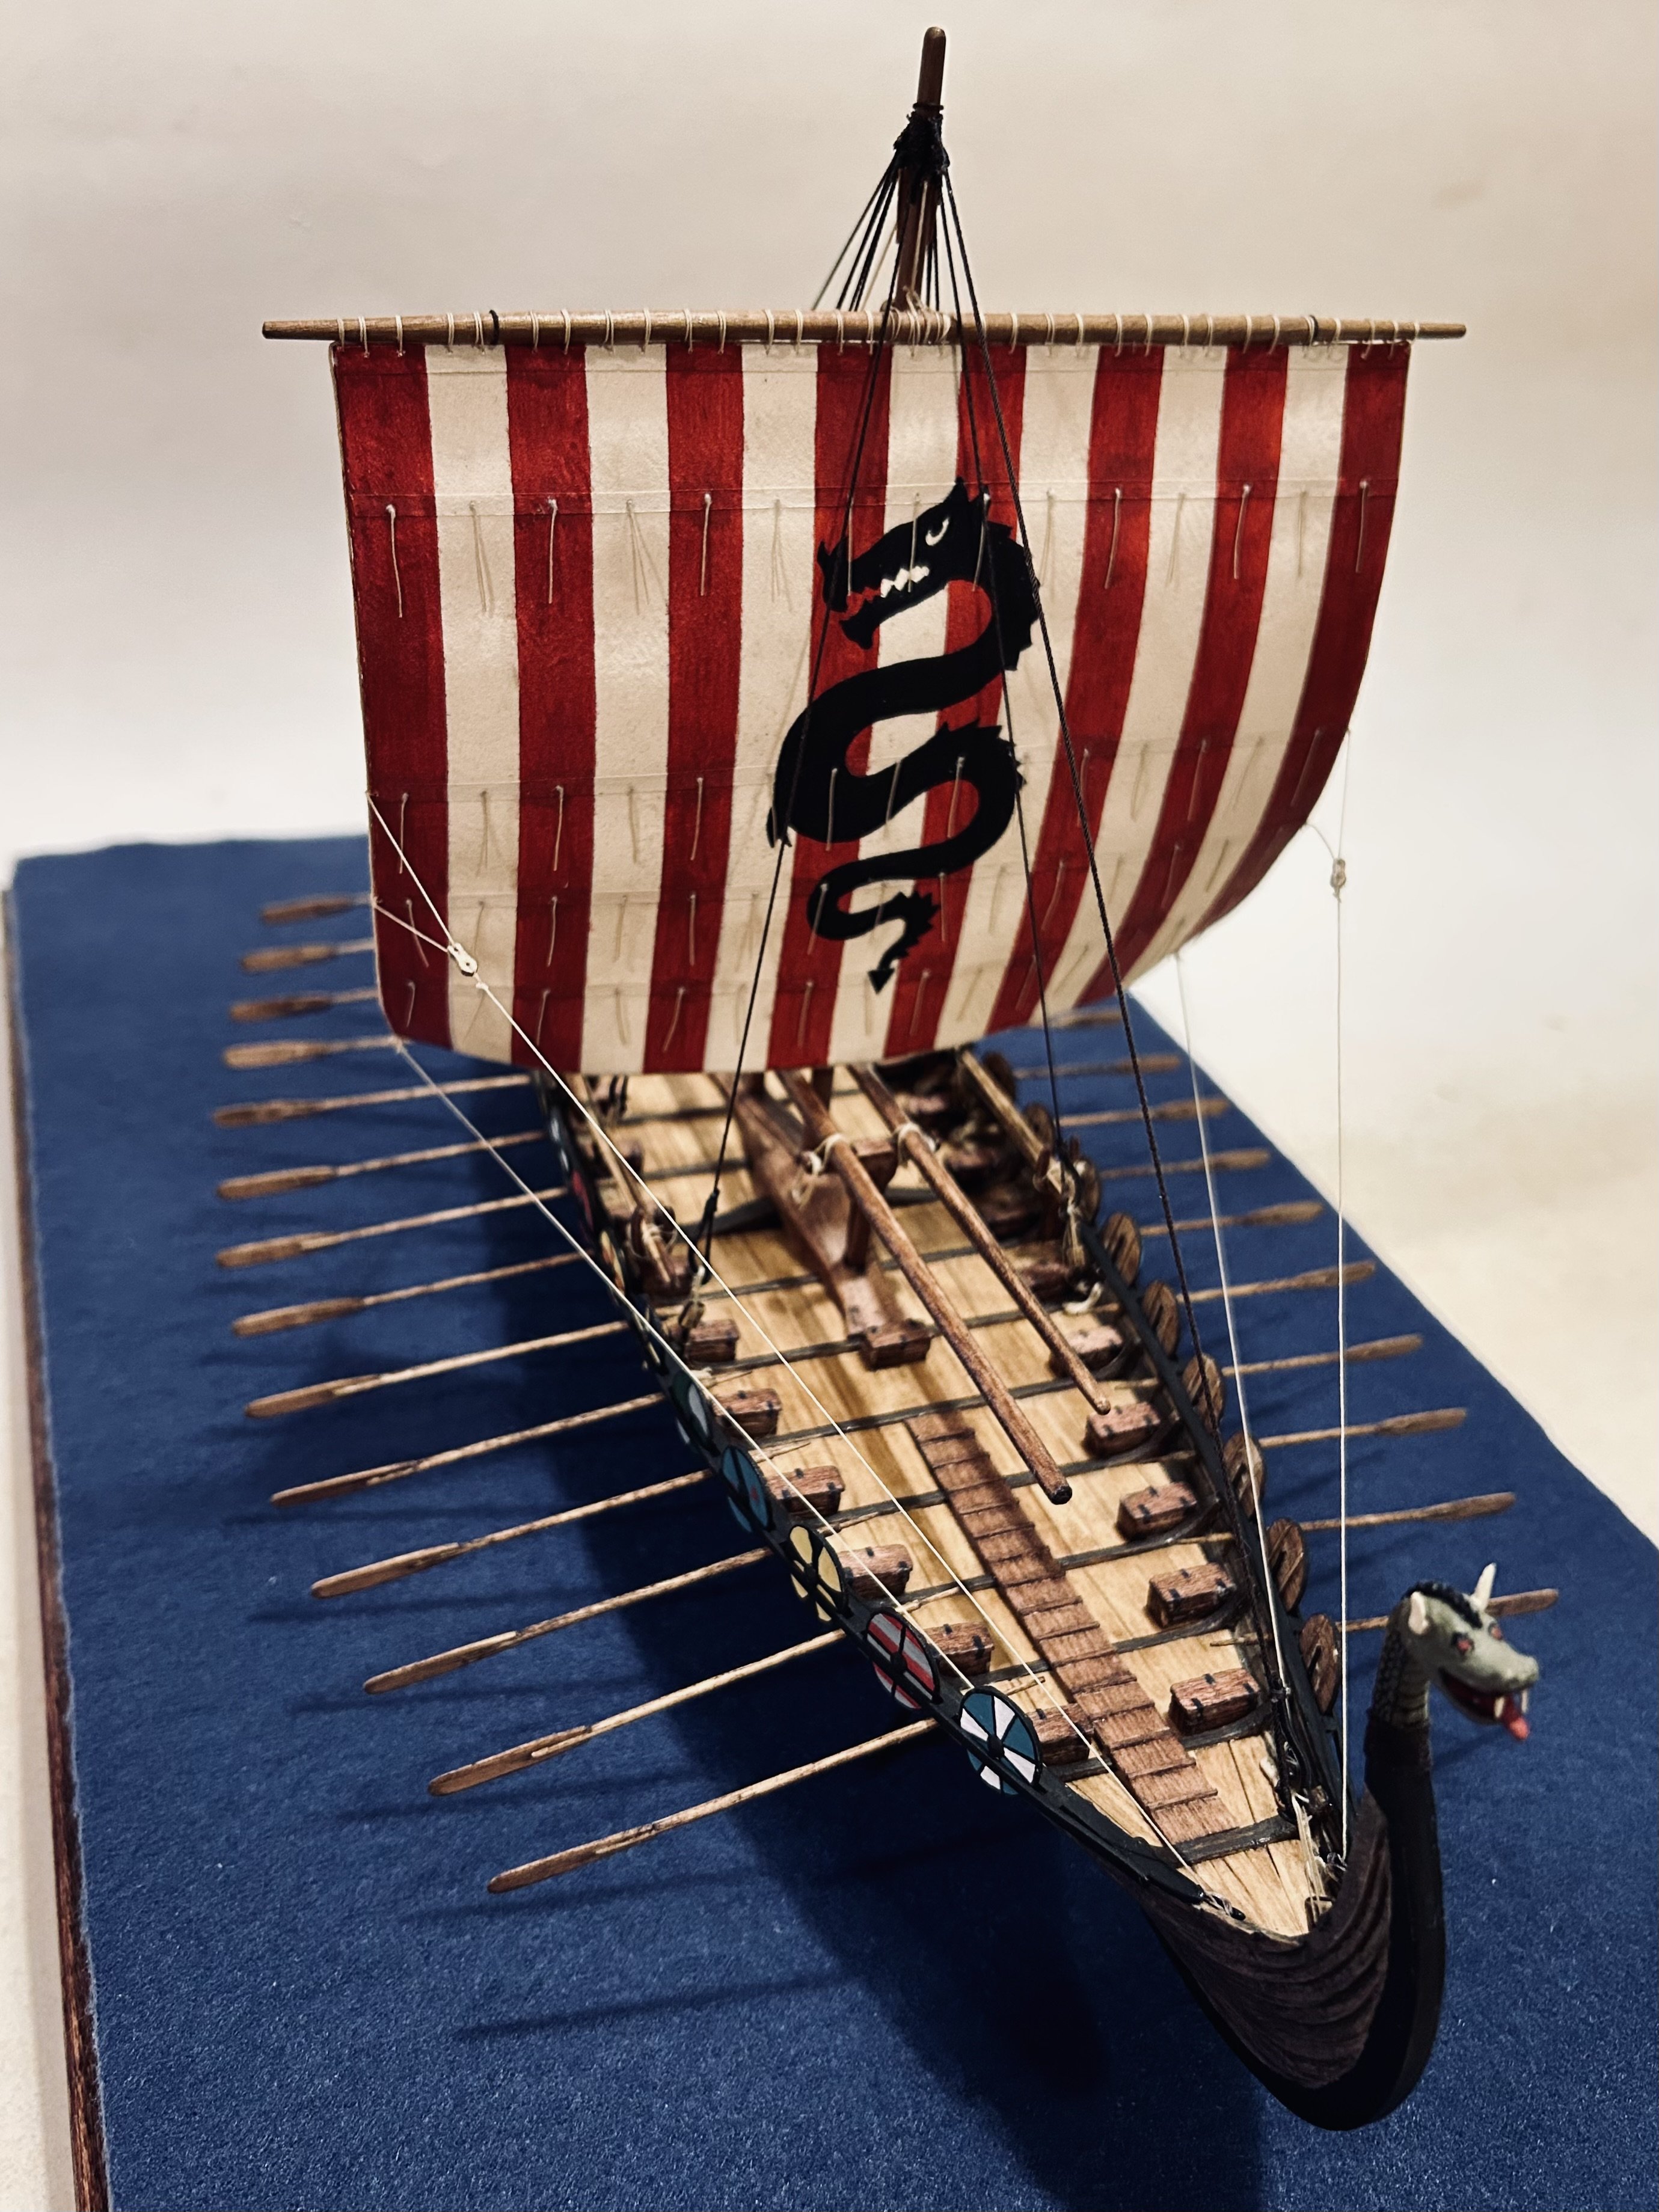
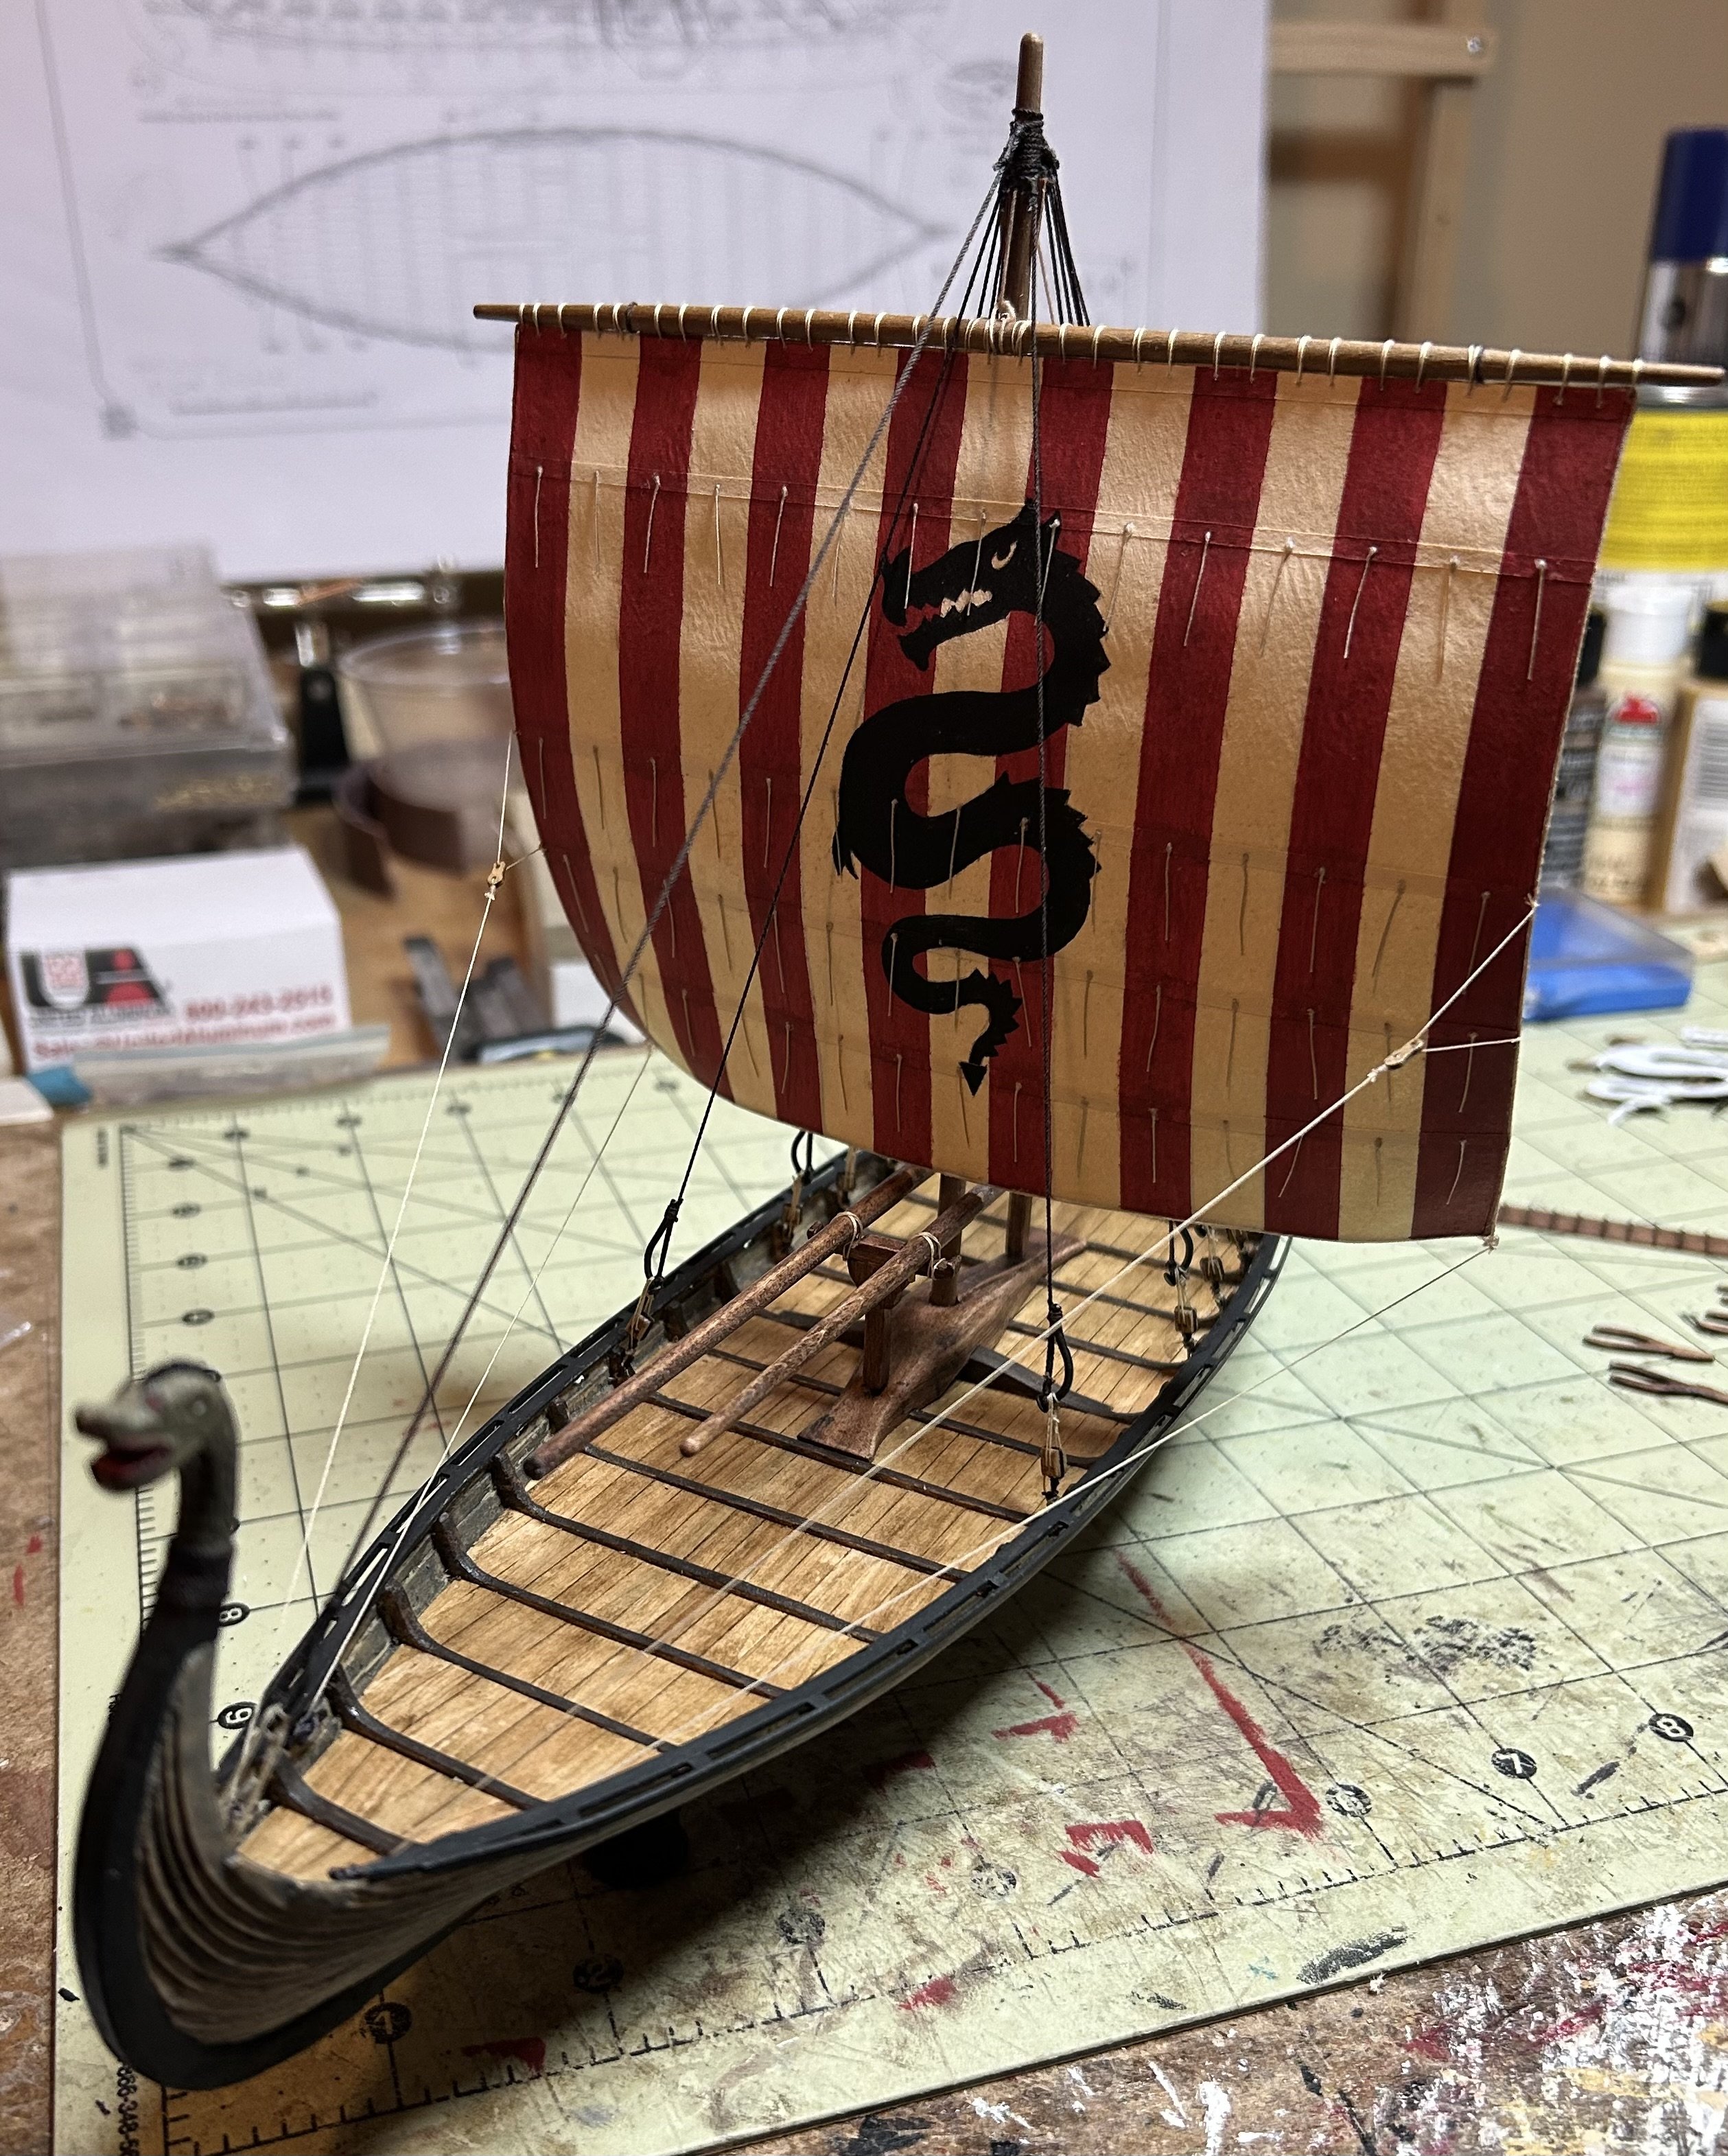
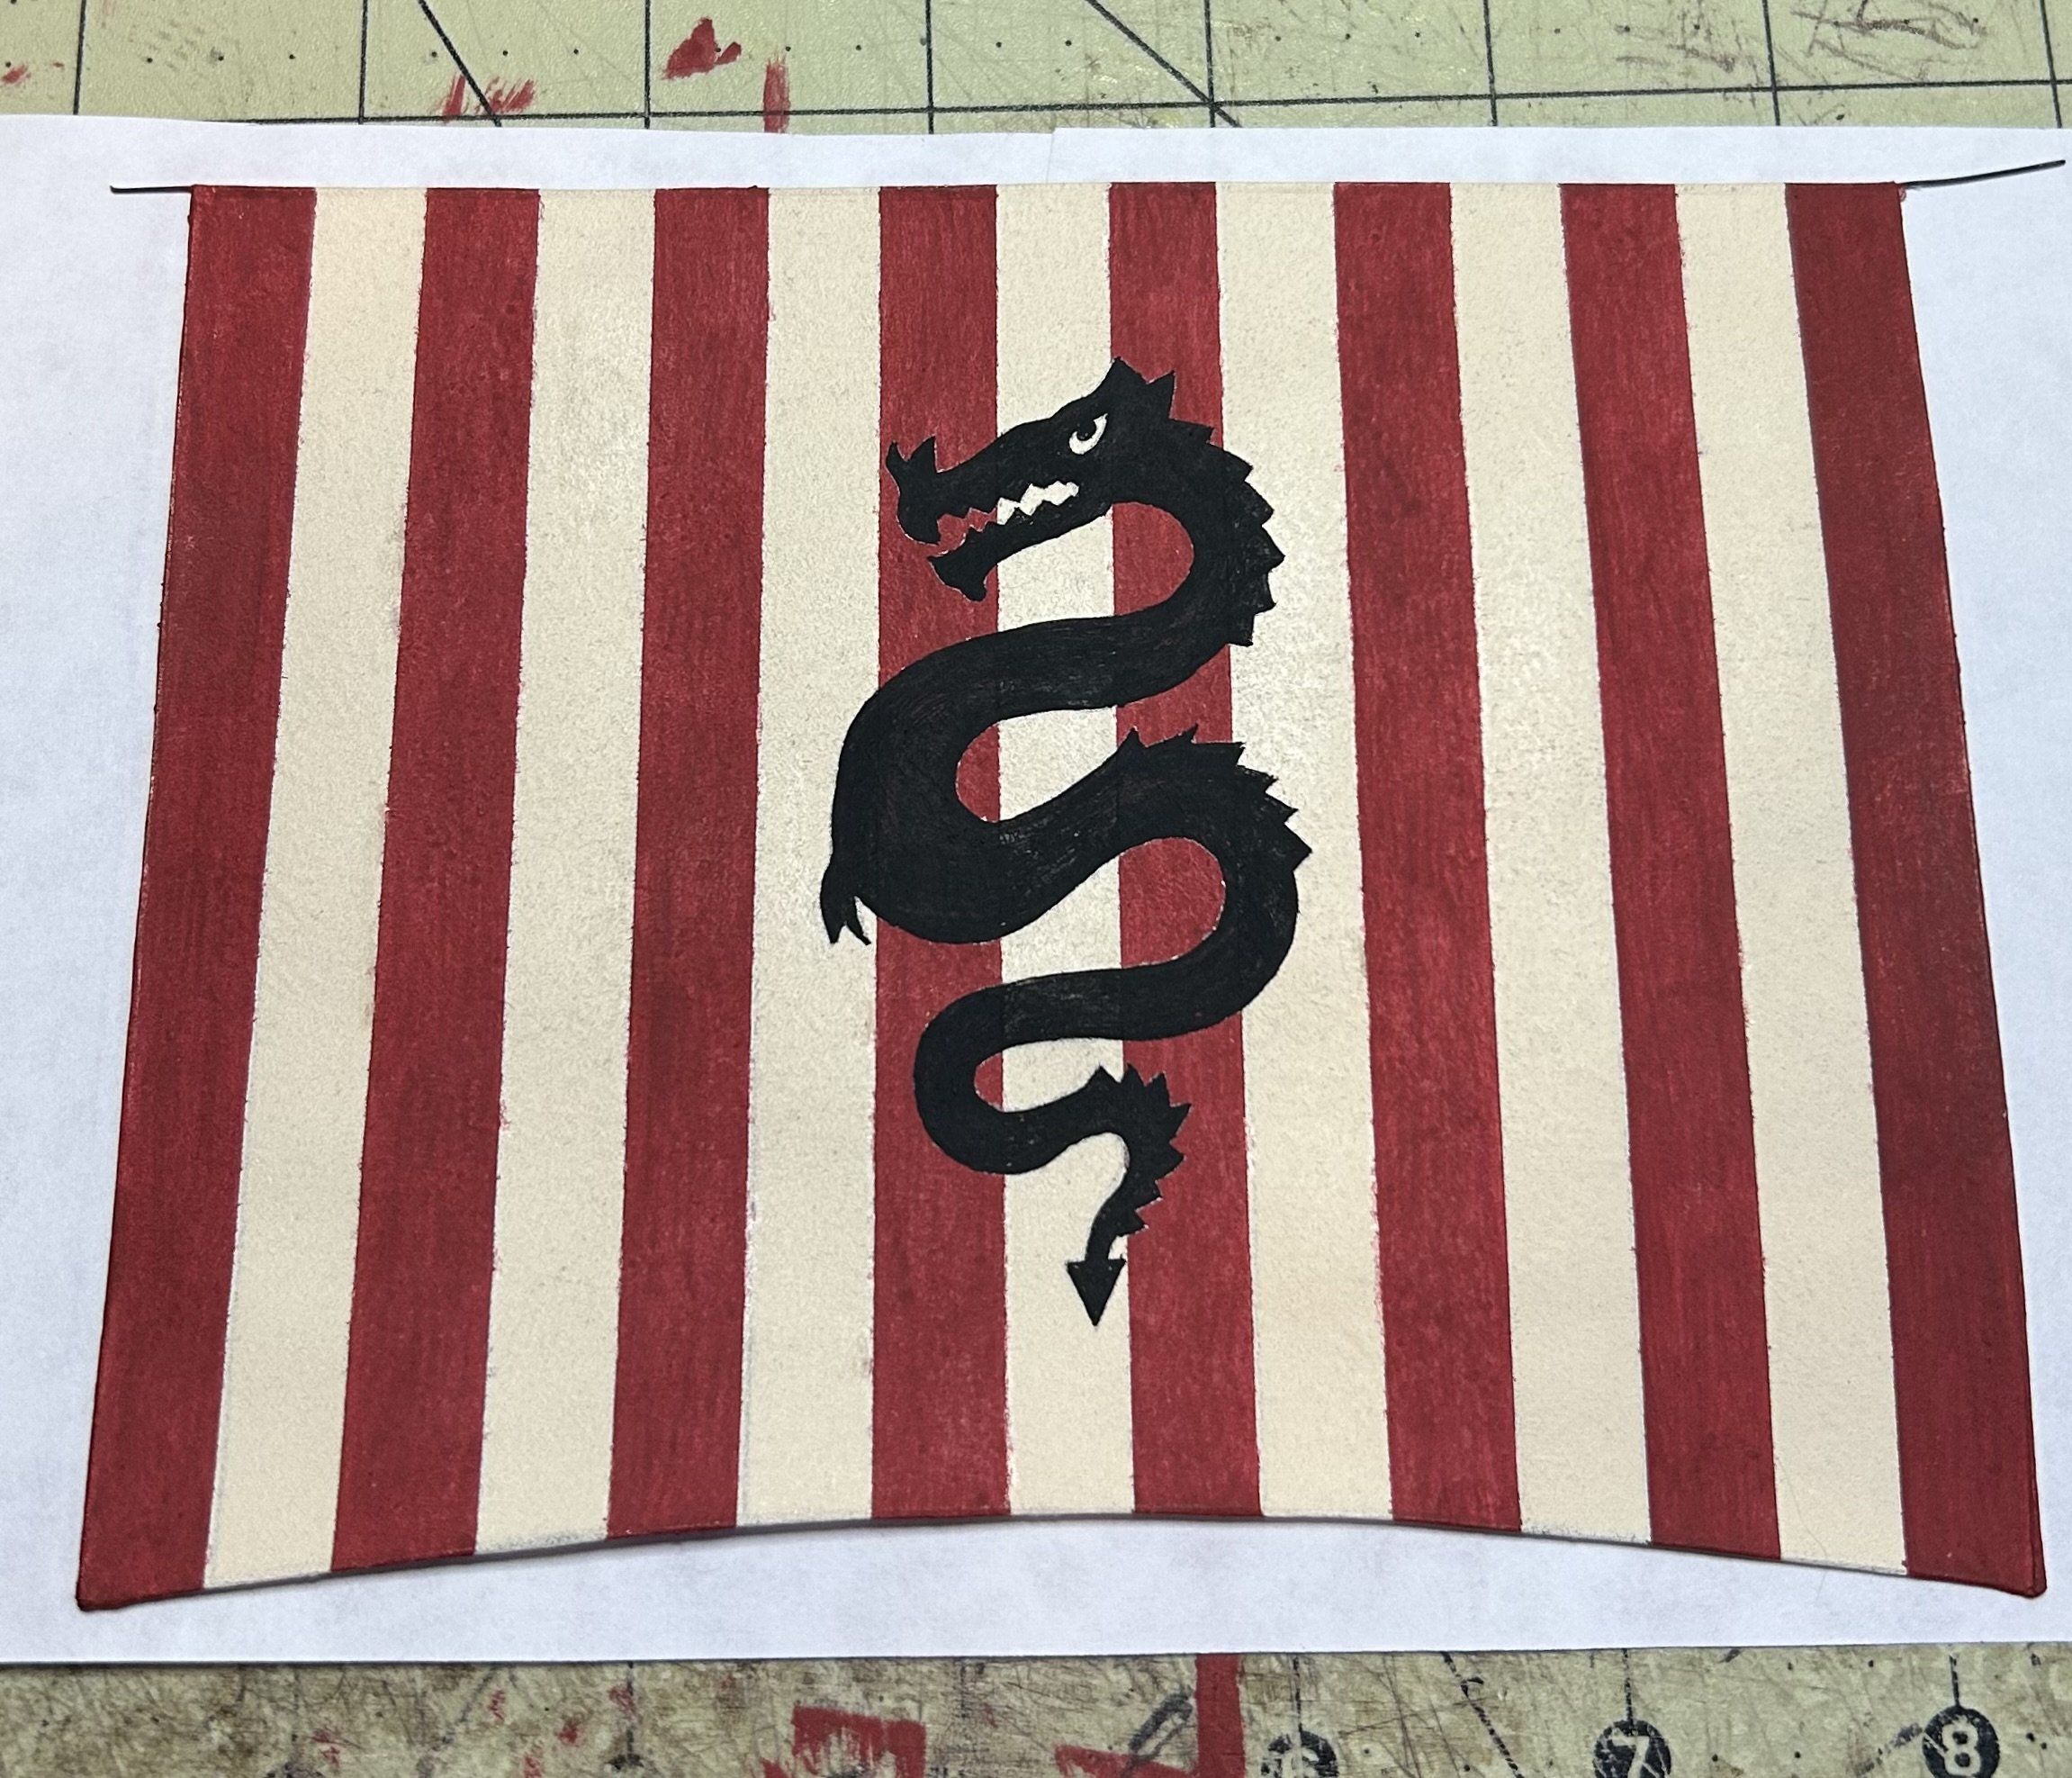
Painted up my sail with a threatening looking dragon.😂 Now I need to bend it to the spar and add some sheet and leech lines. I’m hoping to set sail for foreign lands soon. 😁
Tom
- Seventynet, Thukydides, Ian_Grant and 6 others
-
7
-
2
-
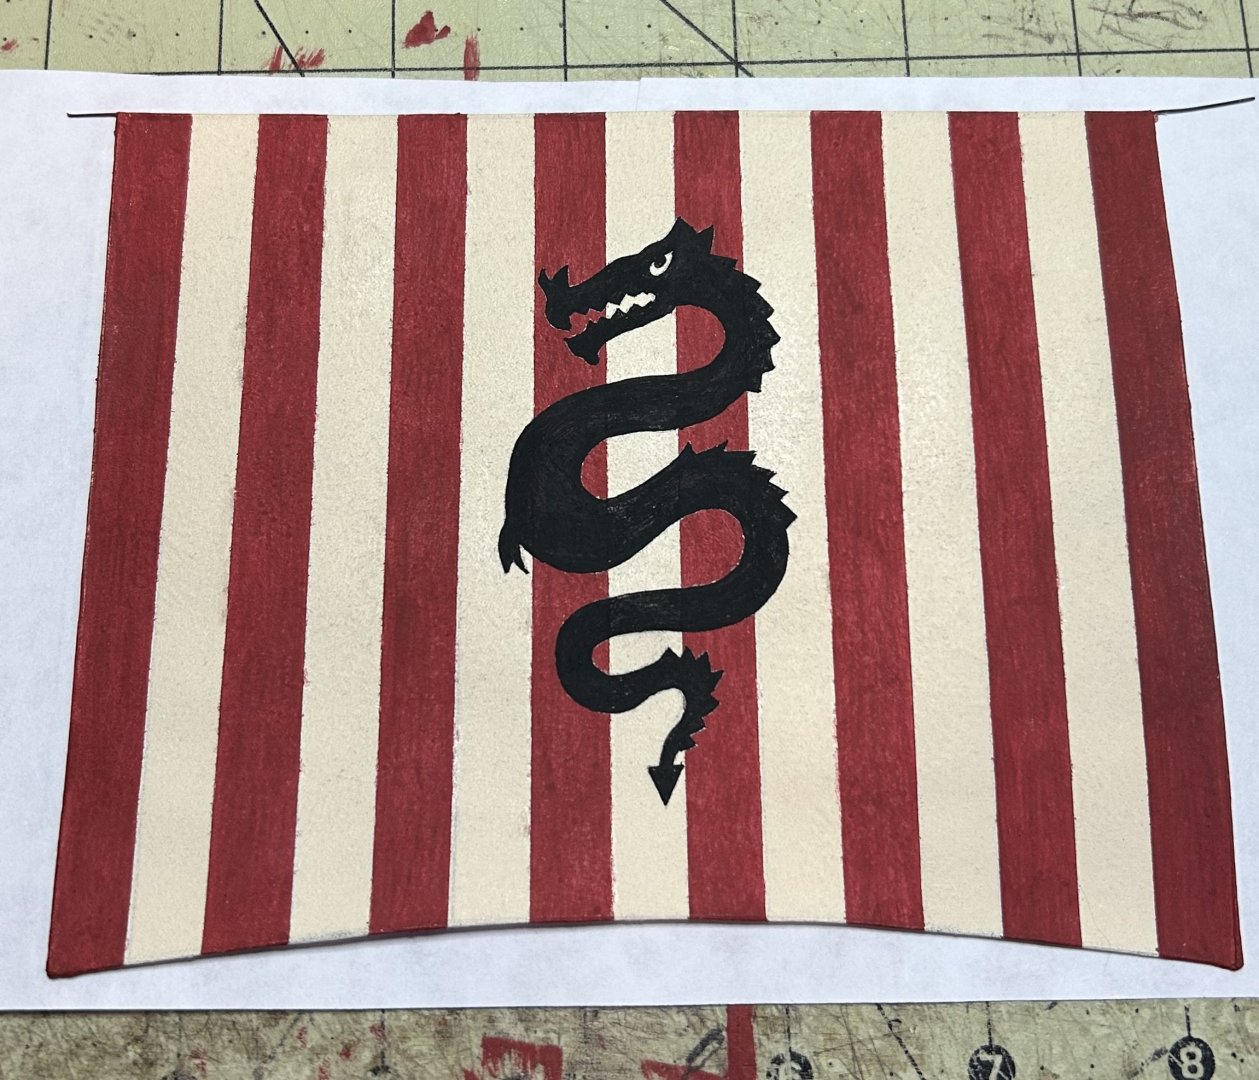
Here is question #2 about viking sails or any other sail with an insignia on it. Does the insignia get put on both sides of the sail or just the front side facing the bow? I believe it is only on the front side similar to what I have seen on 18th century Spanish warships.
Below is a color pencil rendition of what I would like to put on my current drakkar build. Again, I believe it is only on the front side but I just wanted to see if the expert talent pool out in MSW land agreed.

Thanks for any input,
Tom
-
Managed to get the shrouds installed today. Not too much rigging to do on this model. Time to start working on the sail.

Tom -
Hi MSW,
I am starting to research and think about the sail on my scratch built Drakkar. I noticed that many of the various drawings and pictures show the sail with reef points. I was under the impression the idea of reefing a sail did not come about until hundreds of years later.
i don’t believe there is any evidence or actual sails from the viking era to verify. The only thing that might show something is a piece of viking art depicting a sail.
i like the look of the reef points on the sail but don’t want to put them on if they are unrealistic. Does anyone out there have any information one way or the other?
Thanks
Tom
-
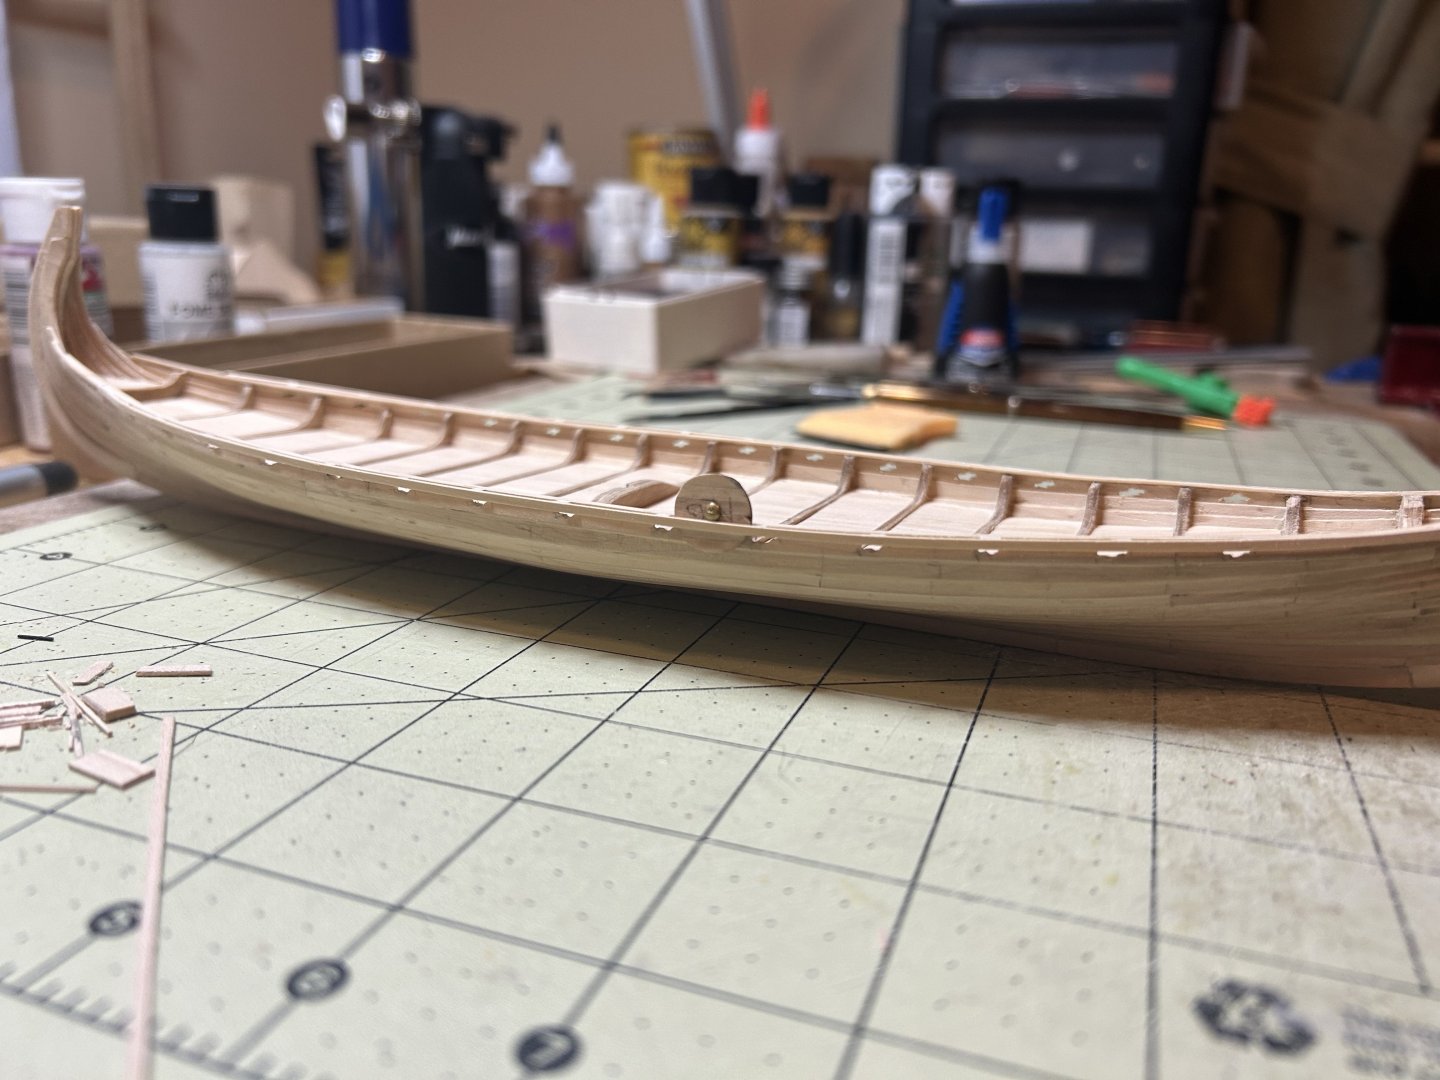
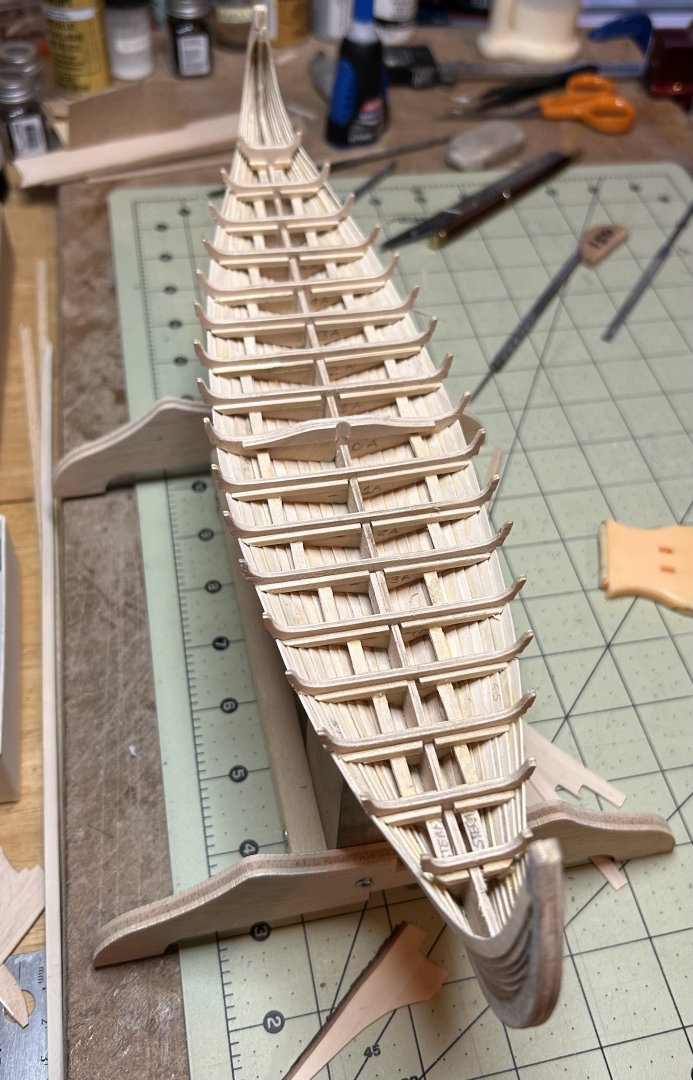
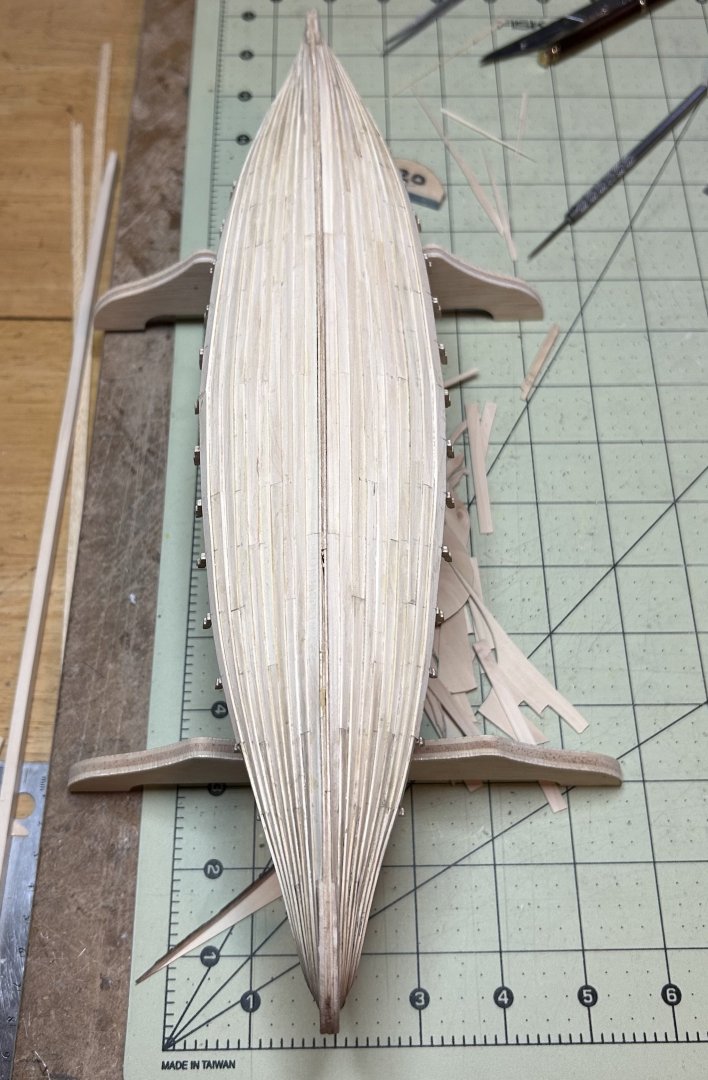
This is how the hull looks after the keel was painted and the hull put on two pedestals. The deck sections are now in place also.
Coming up with the color schemes is harder than the actual build!😁
Tom
- Jack12477, Knocklouder, GrandpaPhil and 4 others
-
7
-
On 11/6/2024 at 10:36 AM, tartane said:
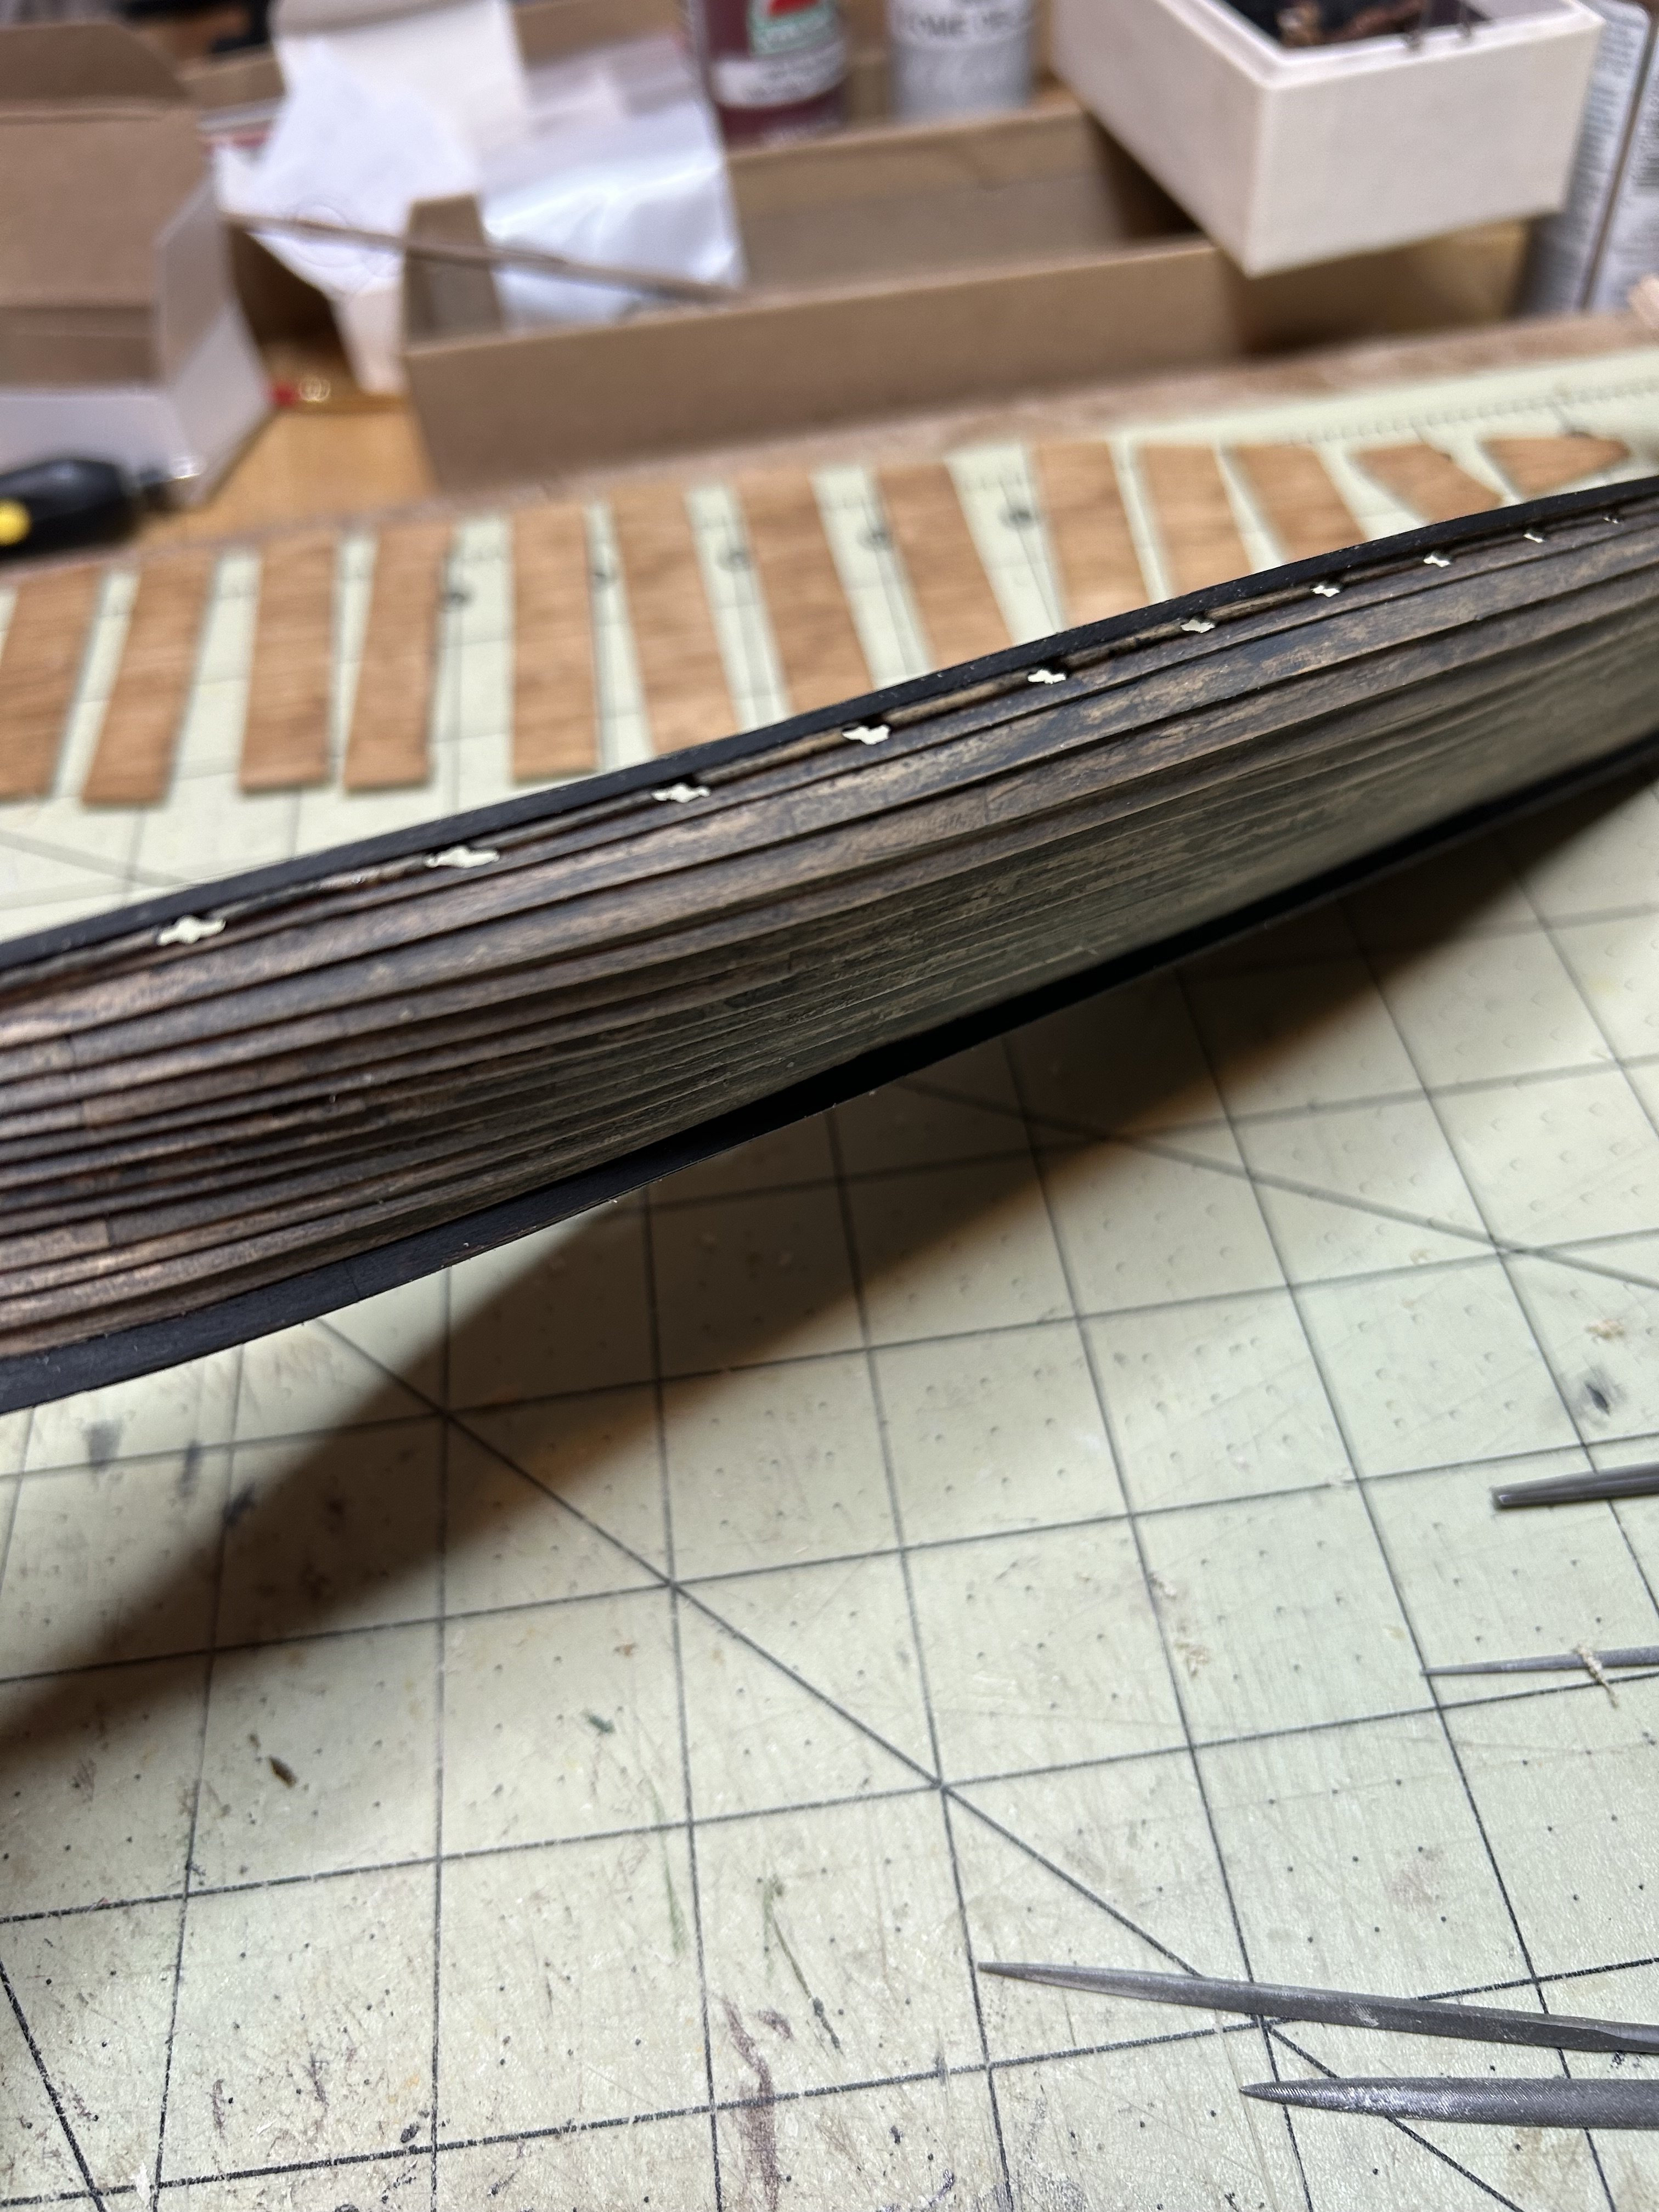
I think you are building a beautiful boat. But may I perhaps make a small point of criticism? You use plywood for the rafters. That comes into view and then I find it disturbing that you can see the three layers of wood so clearly, especially when they are varnished.
This is easy to avoid. Simply make your own plywood by gluing together a number of layers of veneer of the type of wood you find suitable. If you cut the trusses from it, the ends are completely even.
Hi Tartane,
I was reviewing my log and noticed I missed your post about the plywood beams. Thank you for the input. Actually I did make my own plywood using pretty much the procedure you described. It seems (hard to tell in pics) that you made your “plywood” with the grain all going in the same direction. That kind of defeats the purpose of using plywood to gain strength or in this case because the pieces were so small, stopping them from splitting along the grain in the very thin/small areas. This happened several times when making the frames.
I agree the plywood look is not the greatest. I may paint the top edges later. It depends on how much it really bothers me. 😁
Thanks again for the input. That is why I like this site and how I learn.
Tom
-
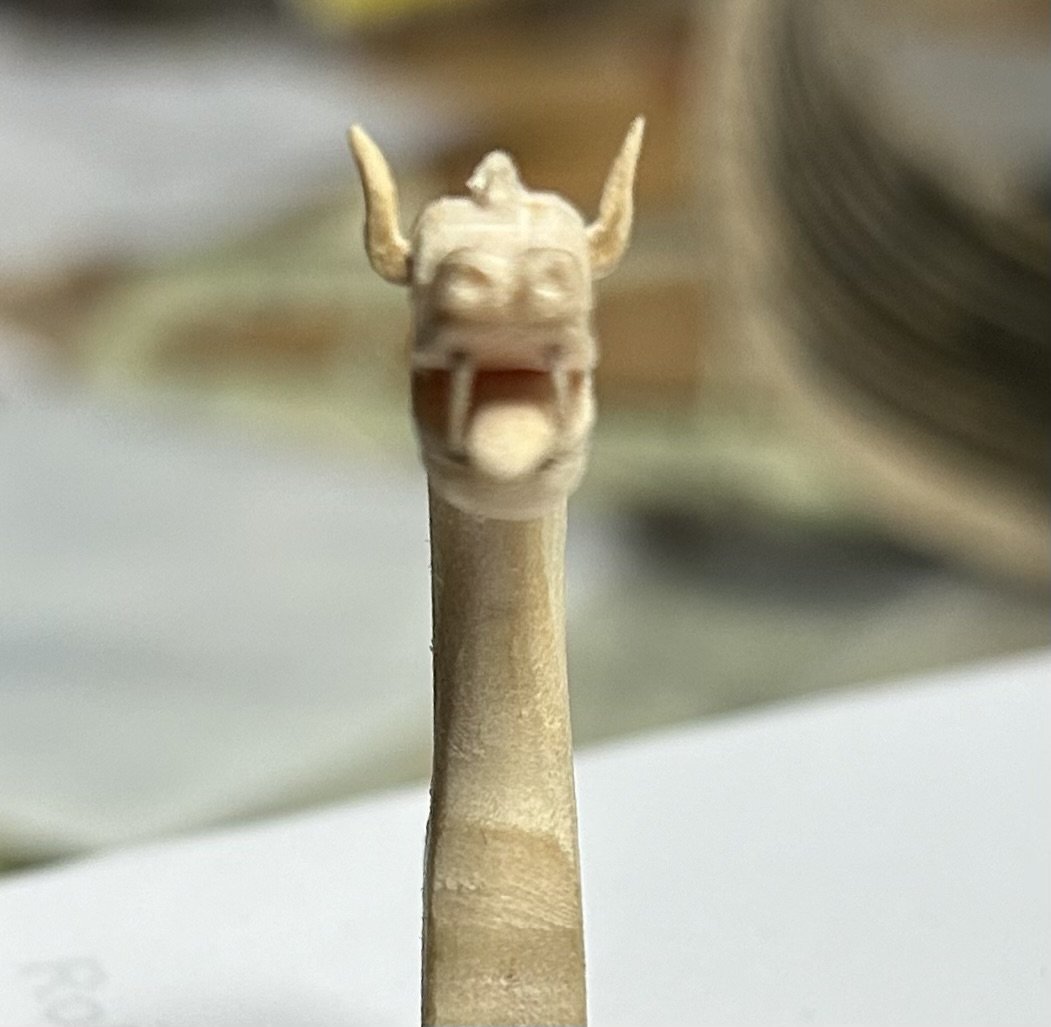
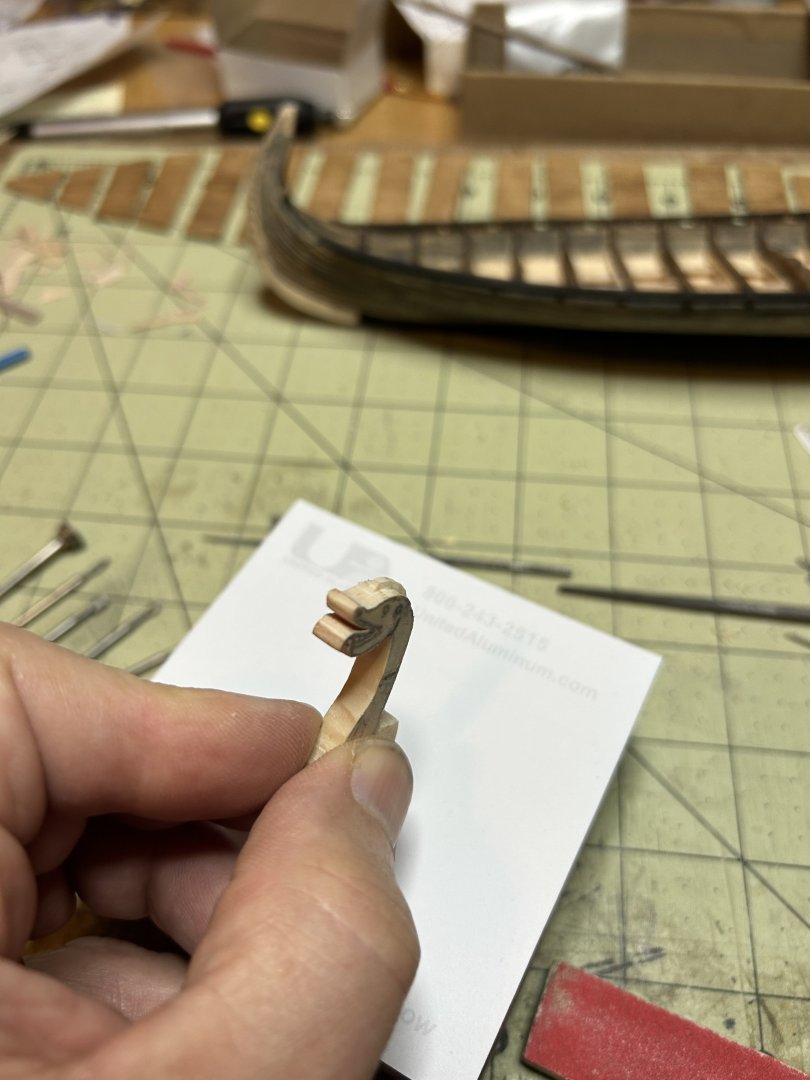
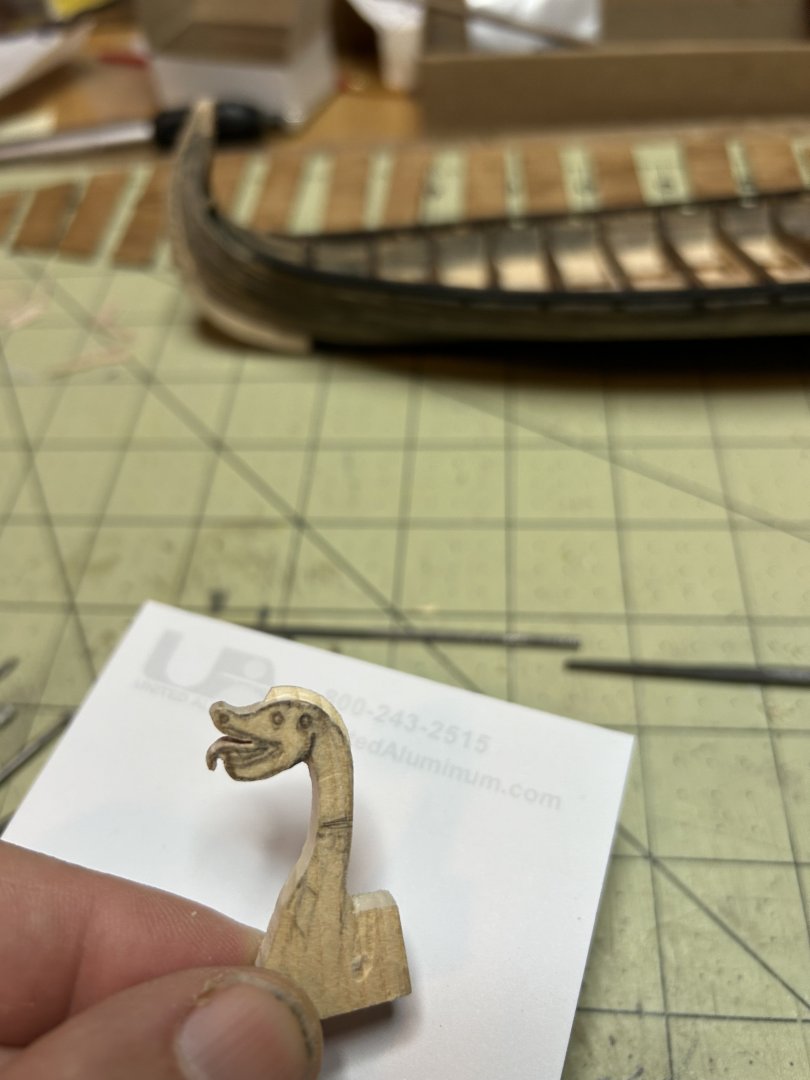
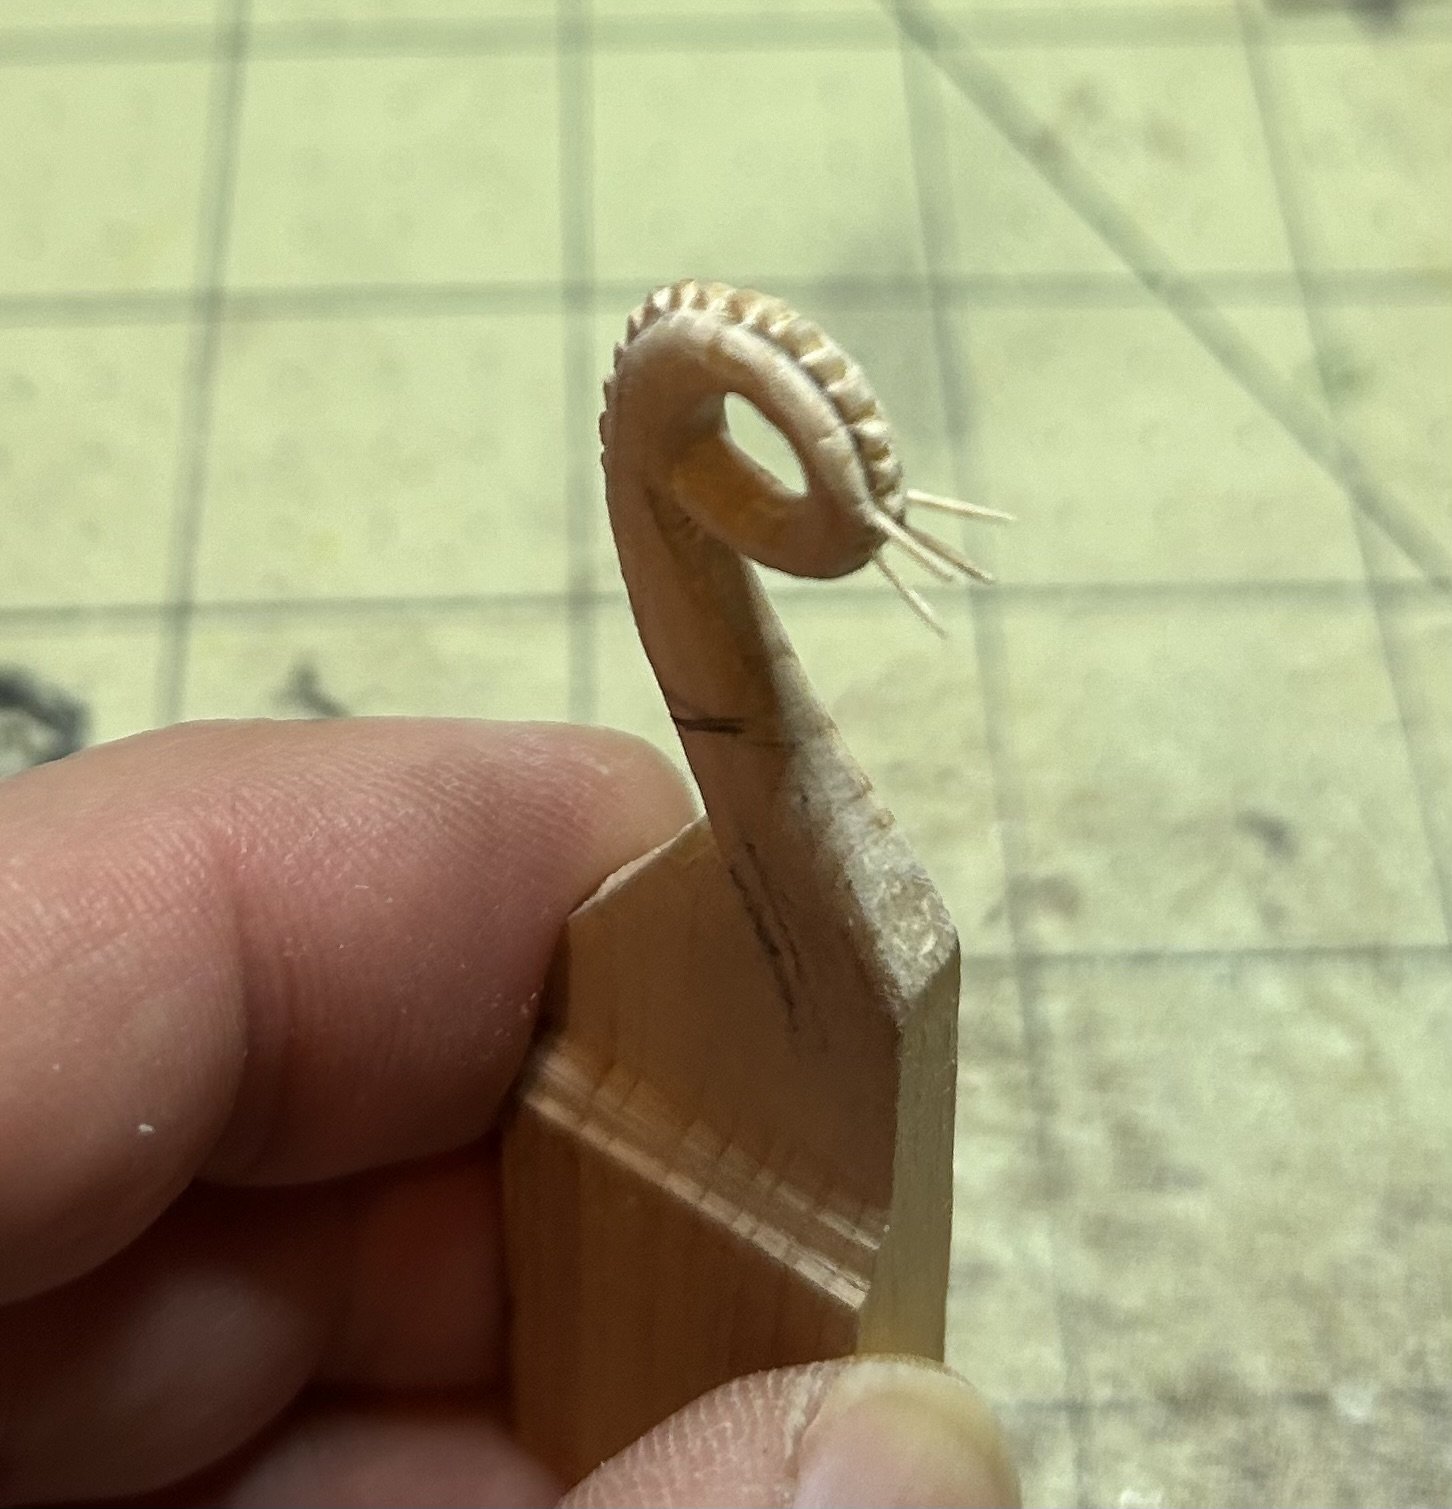
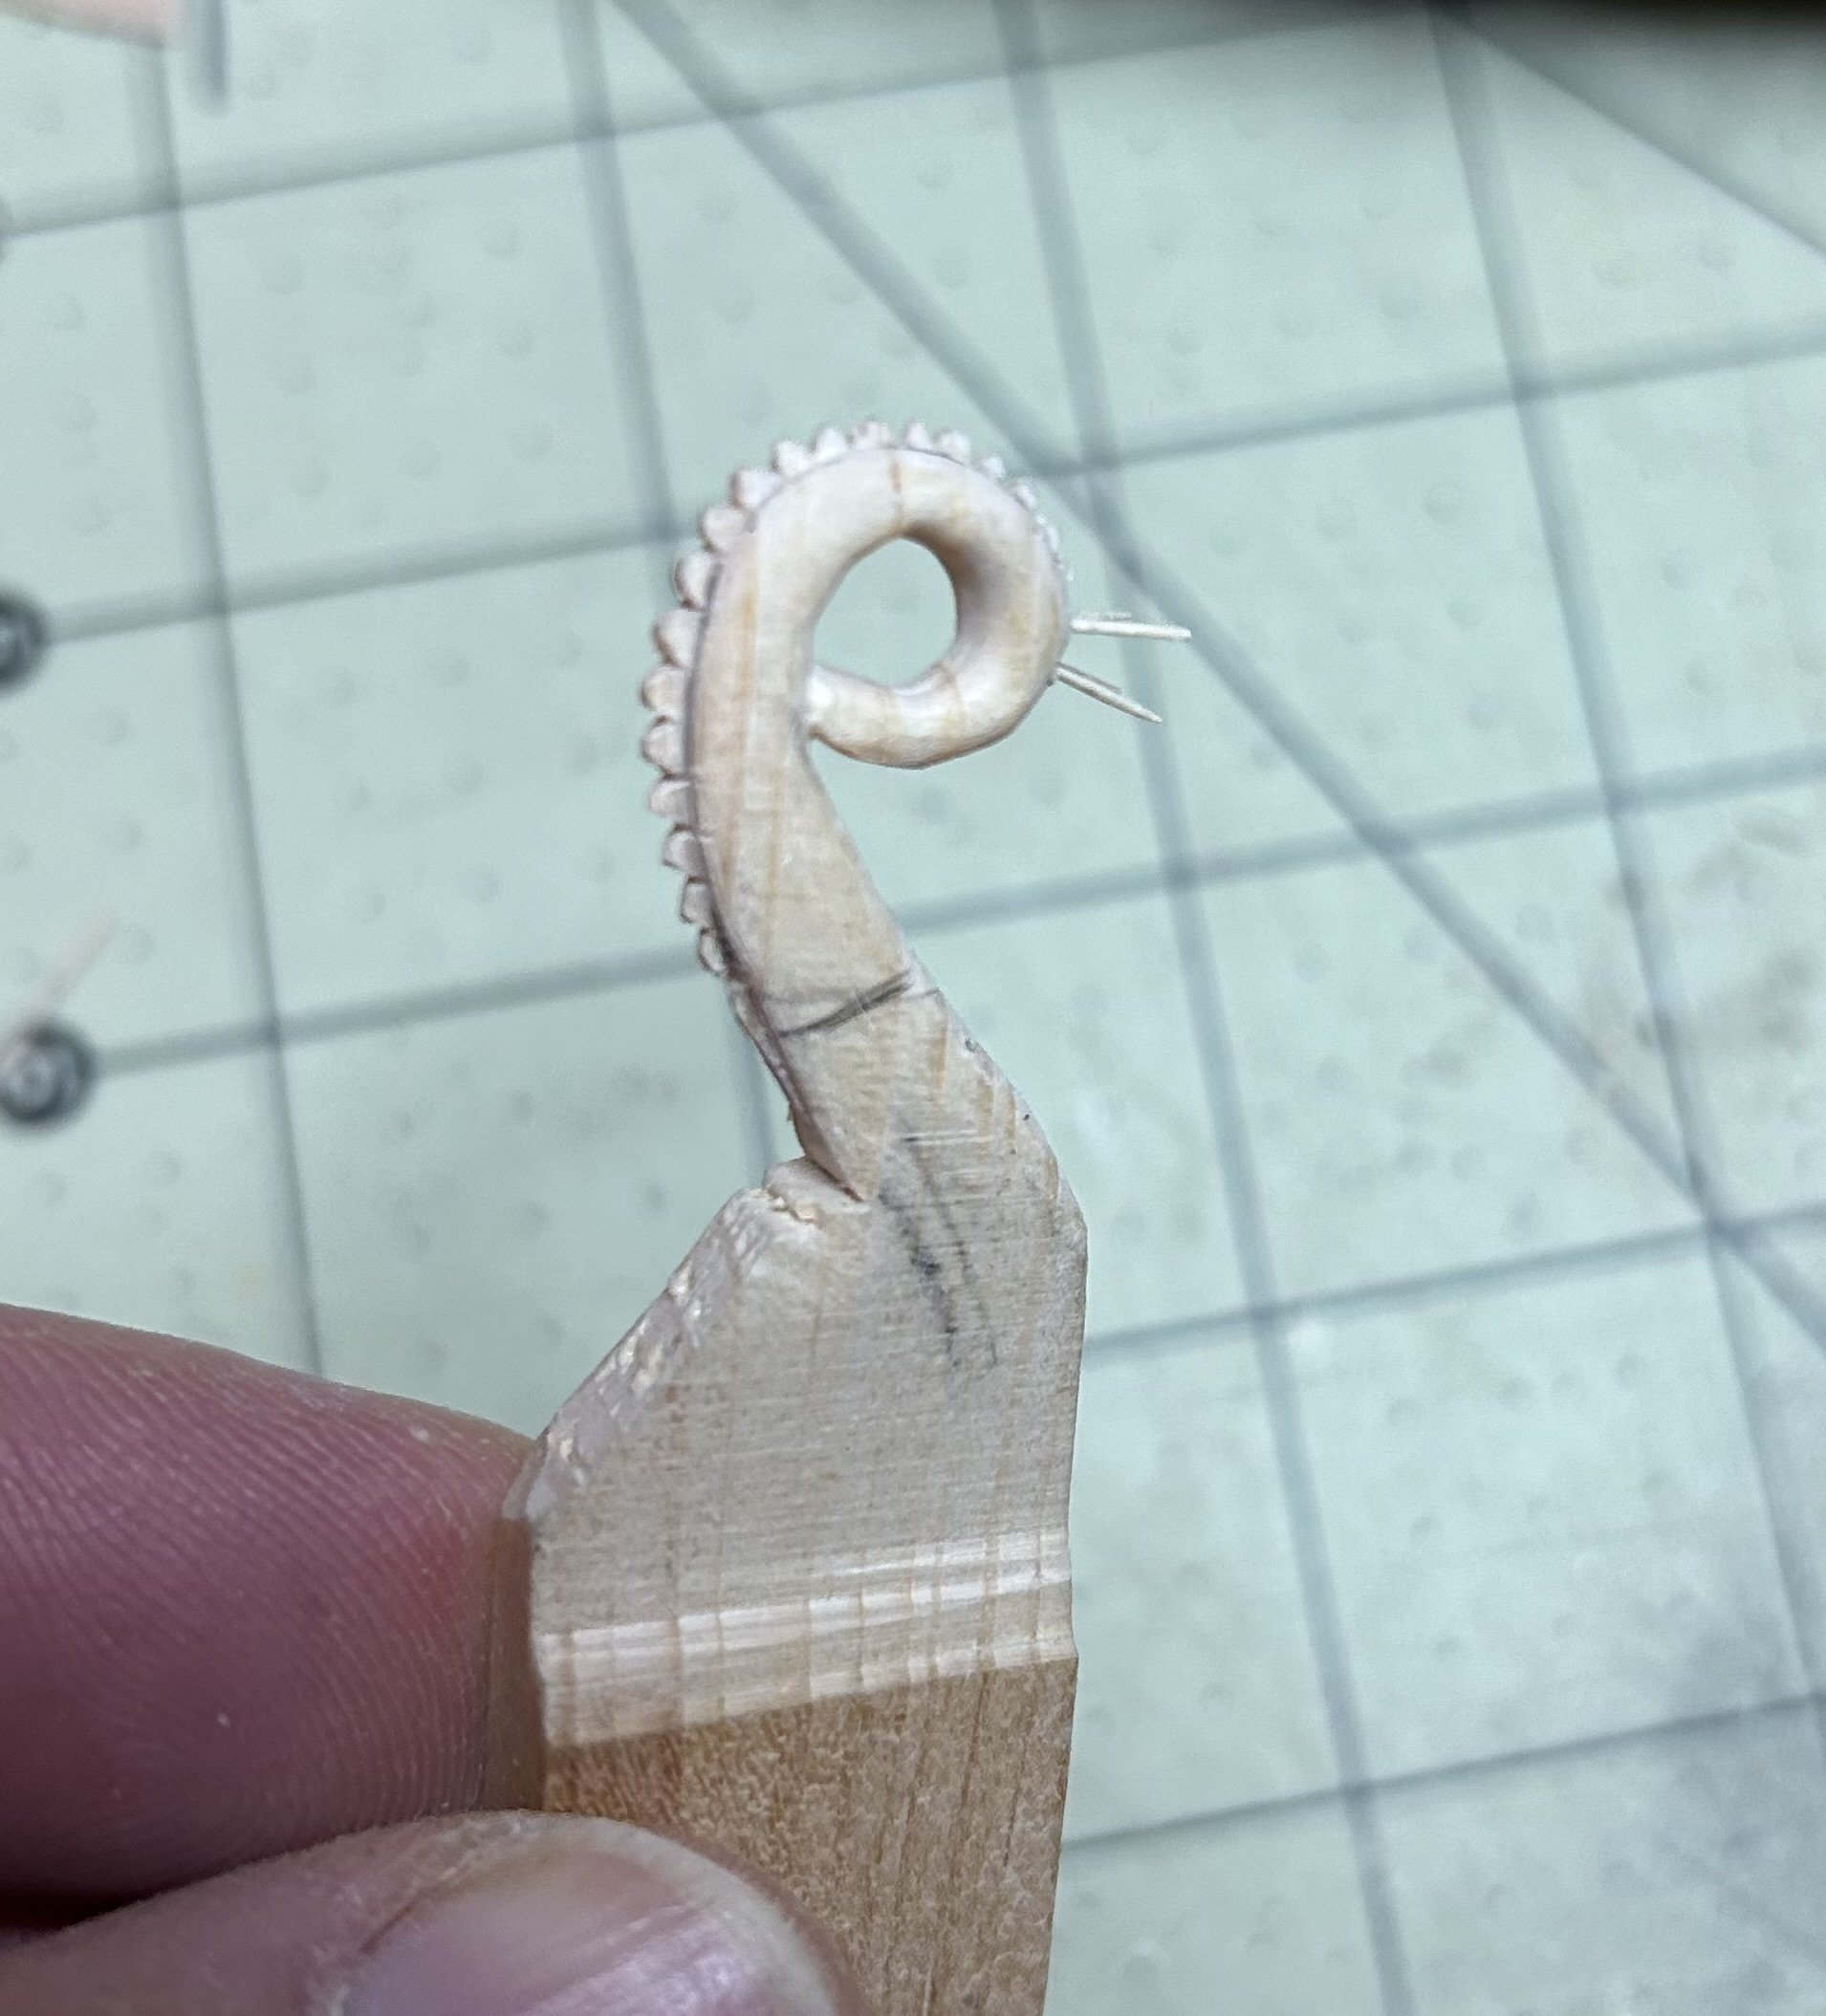
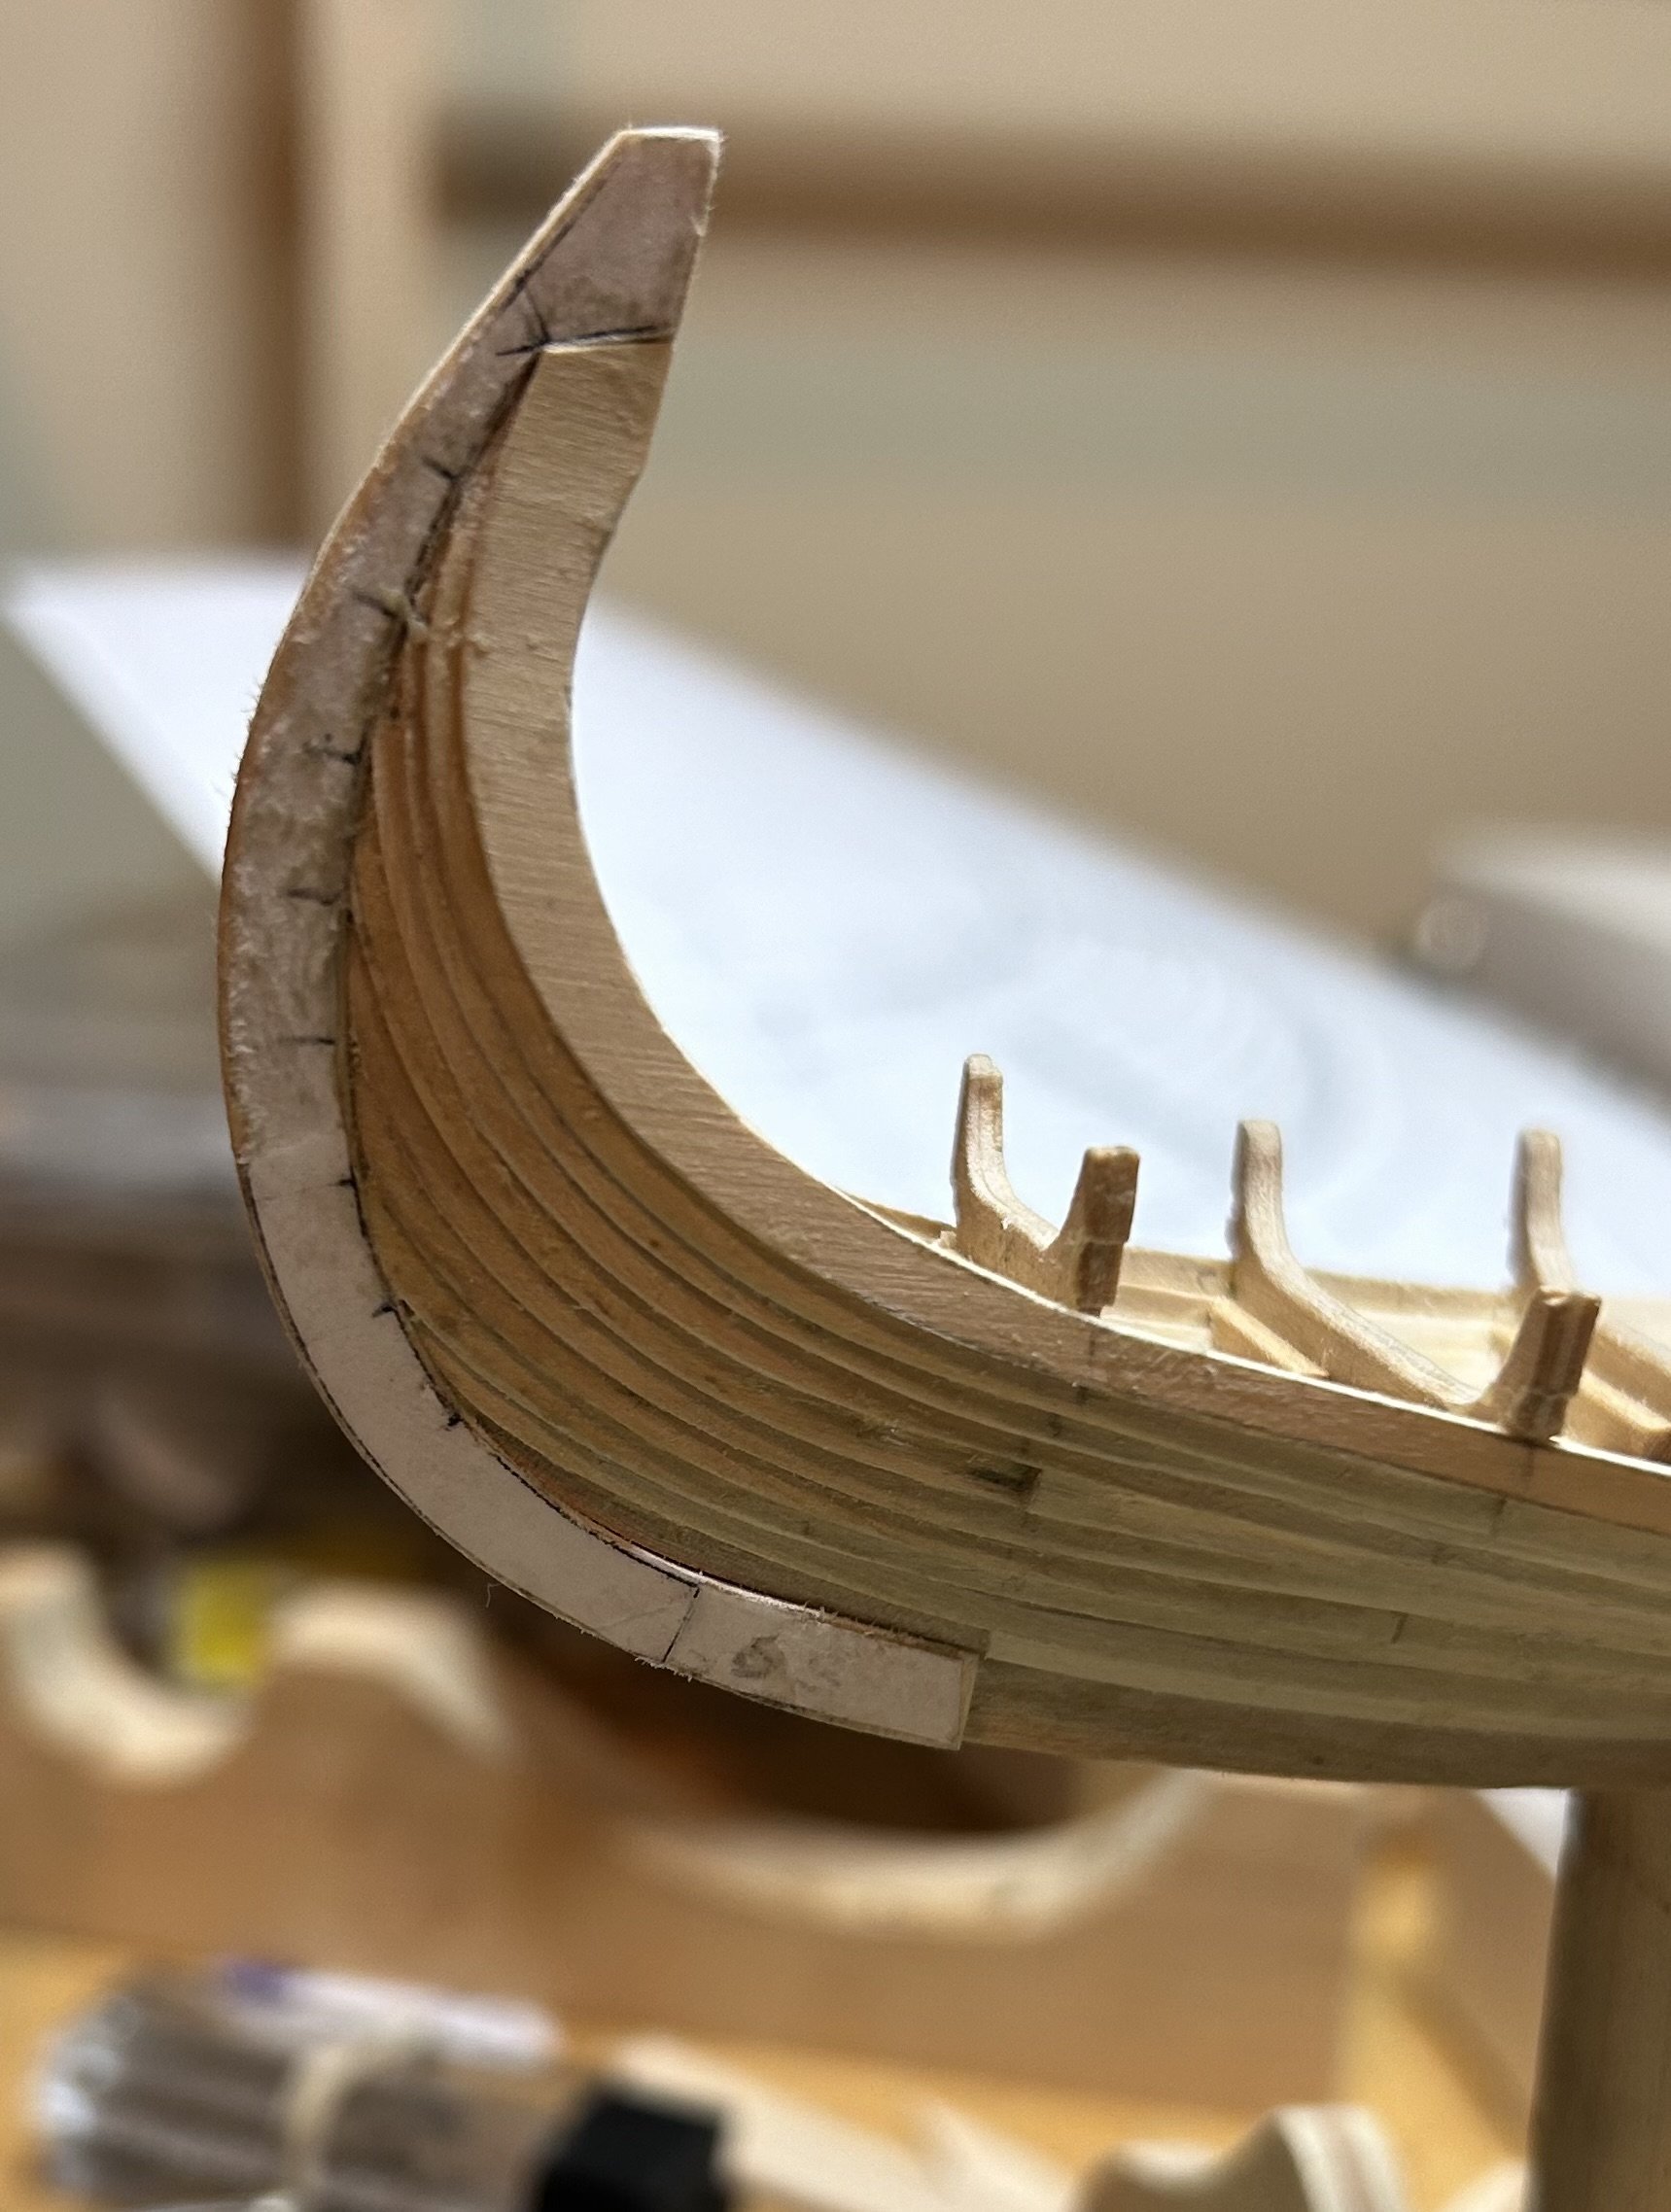
So here is my tail on the third try. The first one broke along the grain. I was a bit to aggressive with rough cutting the shape. ☹️. The second one looked more like a ground snail all curled up. 😂. The one below is the latest and the one I am going with. It took me almost 3 1/2 hours total so far but I am happy with it. I thought the tail would be easier than the head but it posed a whole new set of problems!
I added some spikes to dress it up a bit. Right now they are just dry fit and maybe just a bit too long.

Tom
-
-
Hi Ian,
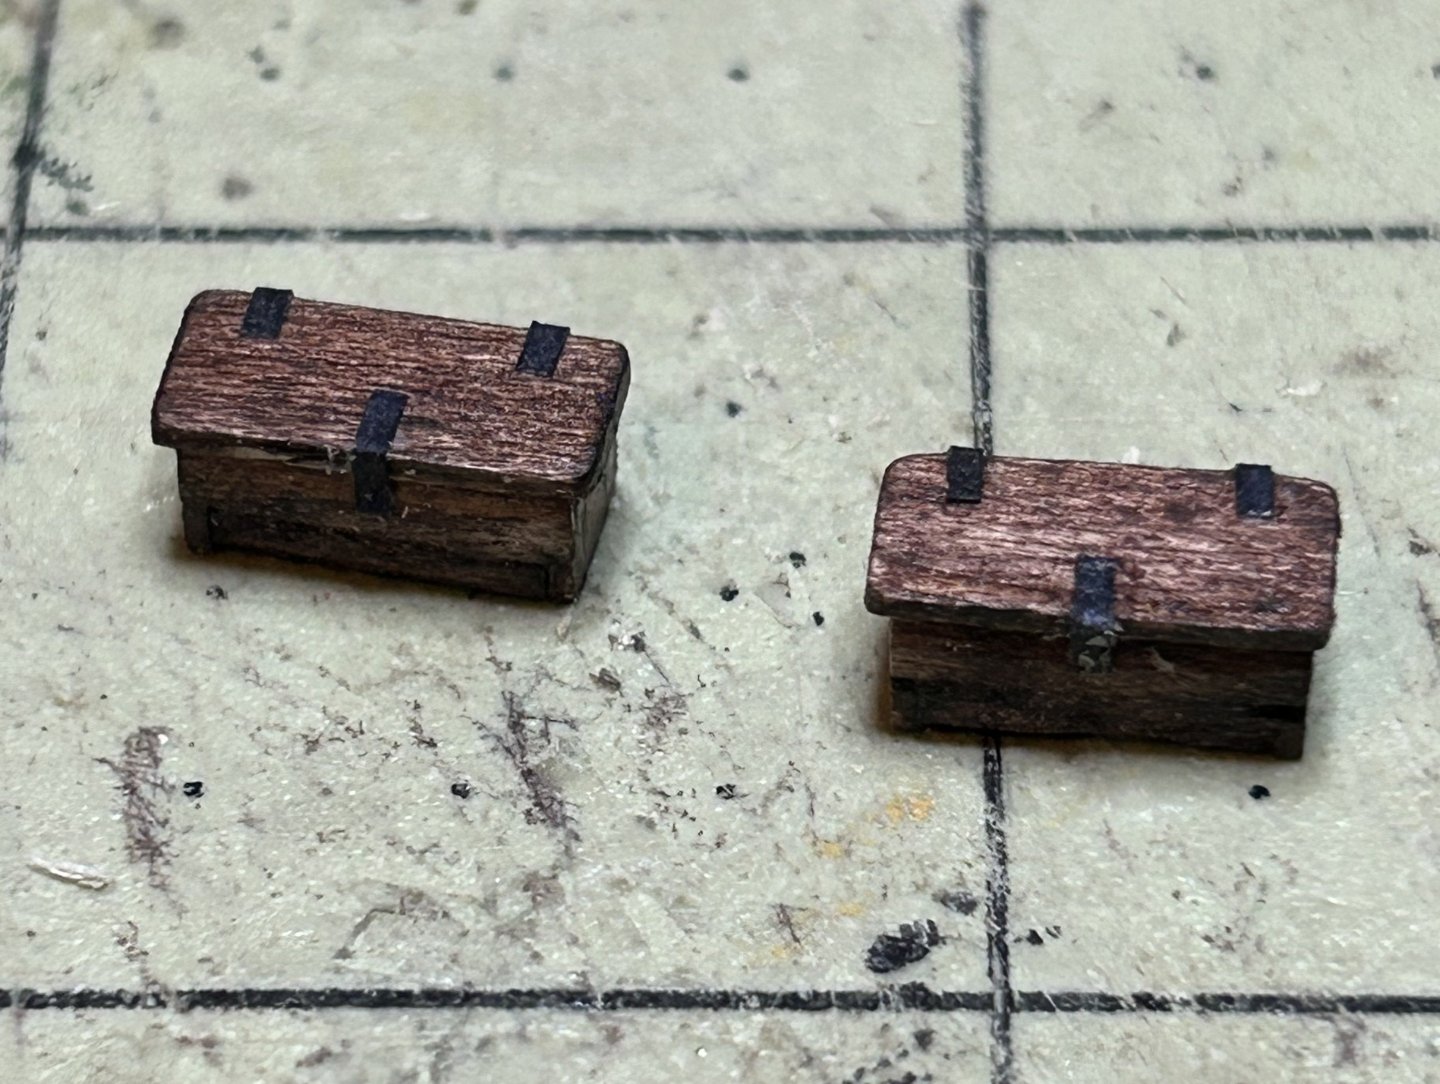
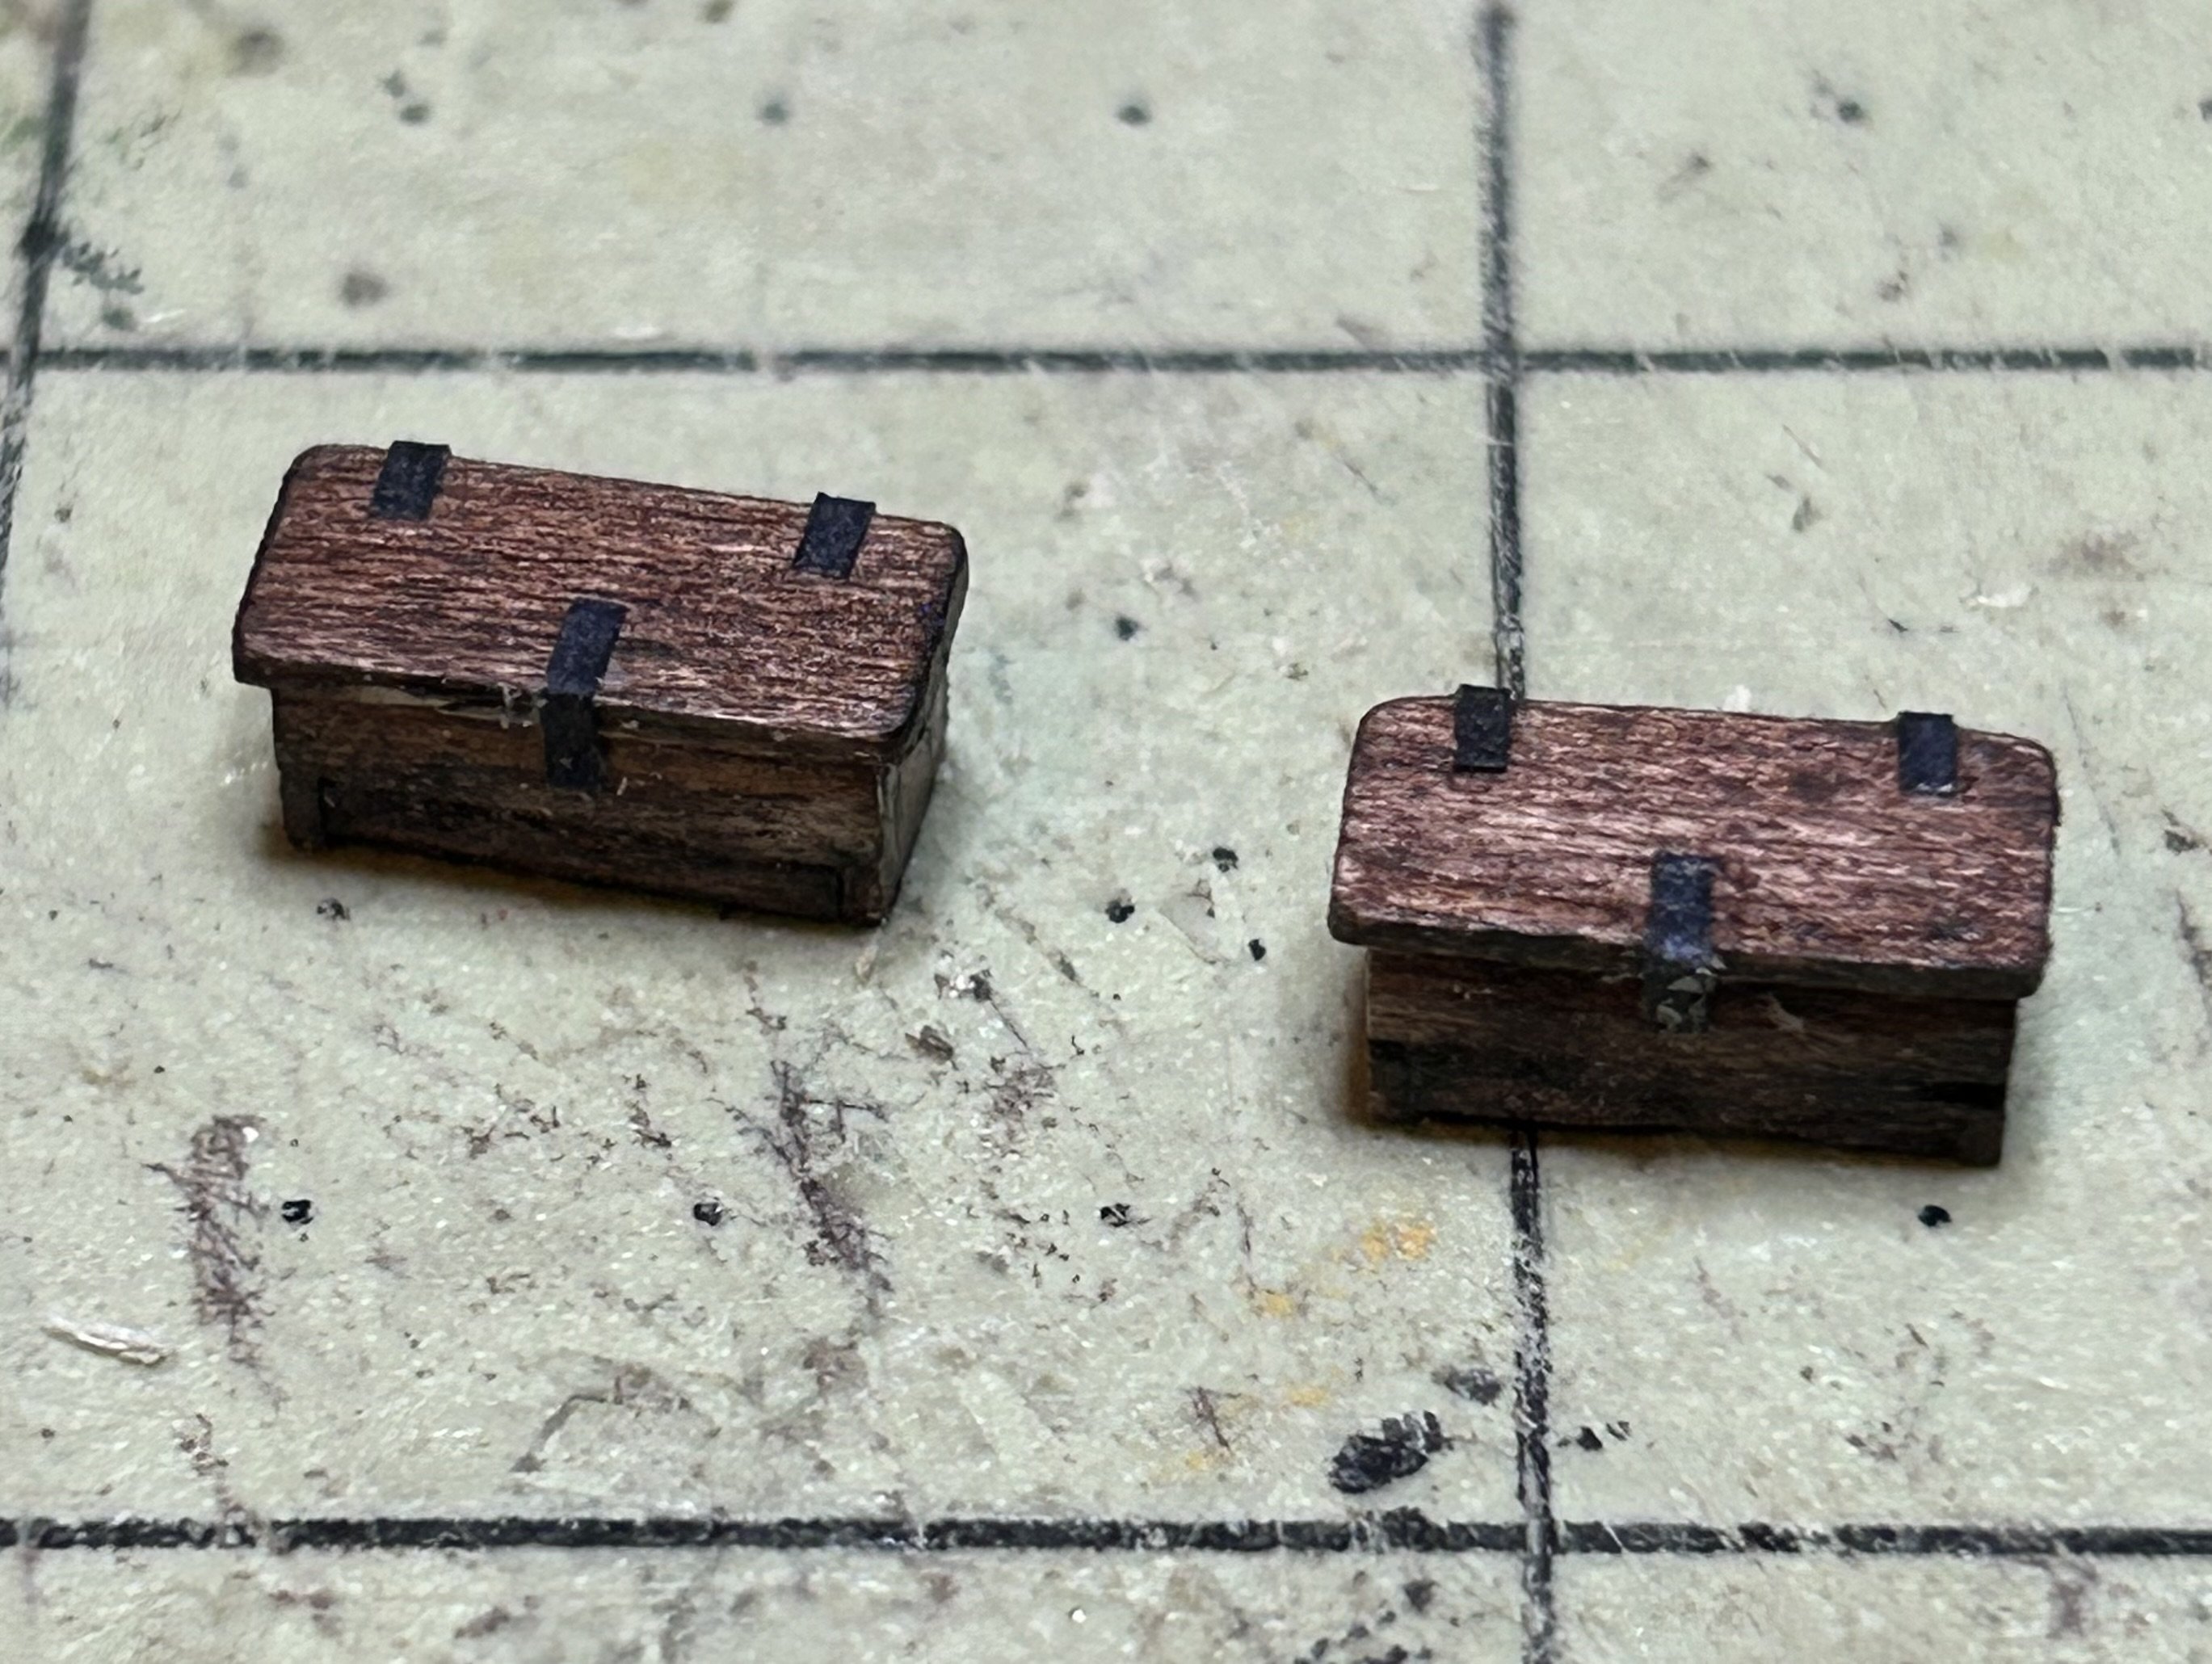
The hinges and hasps for the sea chests are nothing more than paper strips colored with a black Sharpie pen. They are about .020” wide by about .100” long. I glued them down with ordinary wood glue.
Tom
- mtaylor, Seventynet and Ryland Craze
-
3
-
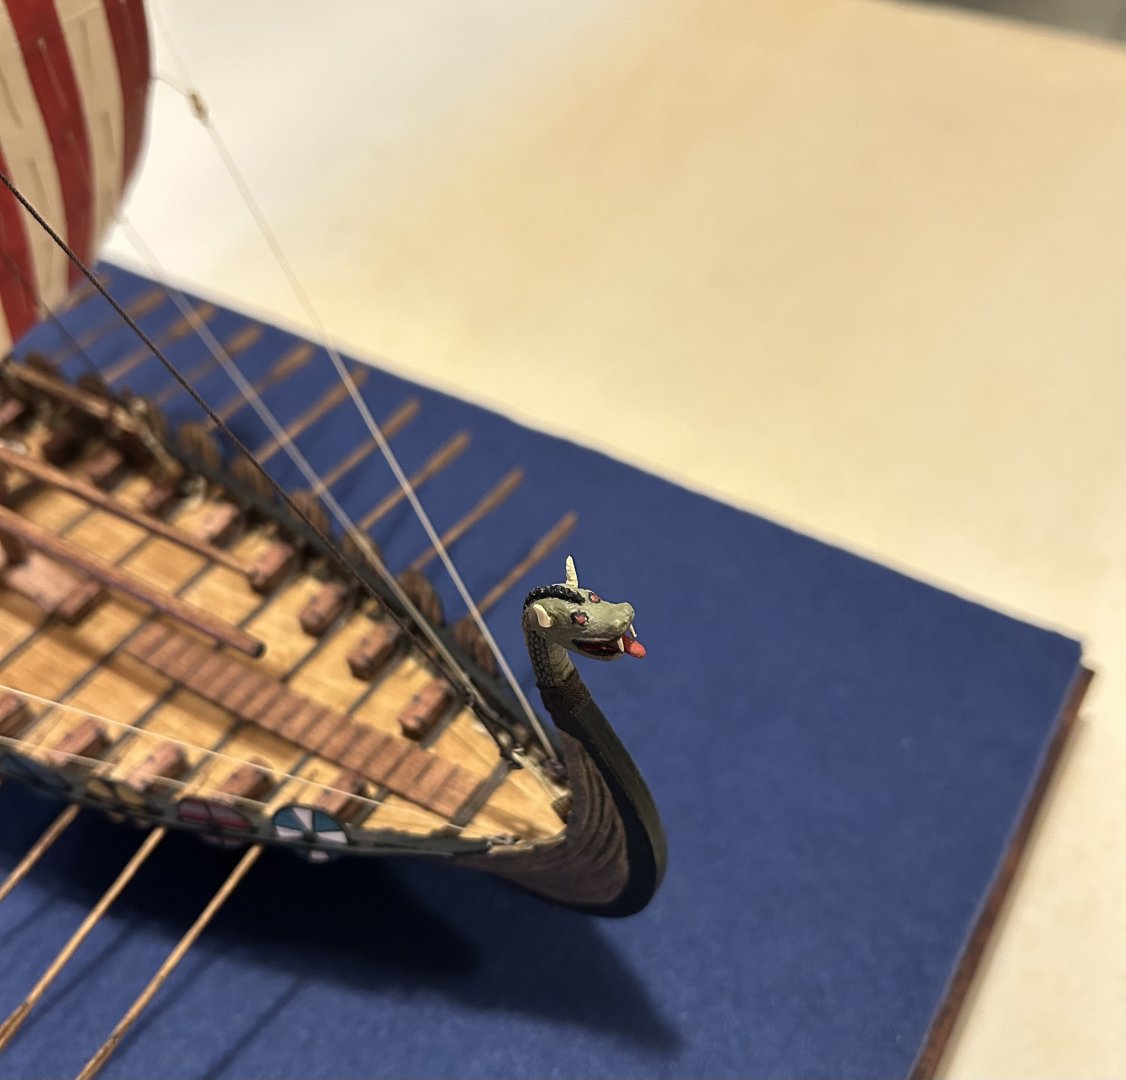
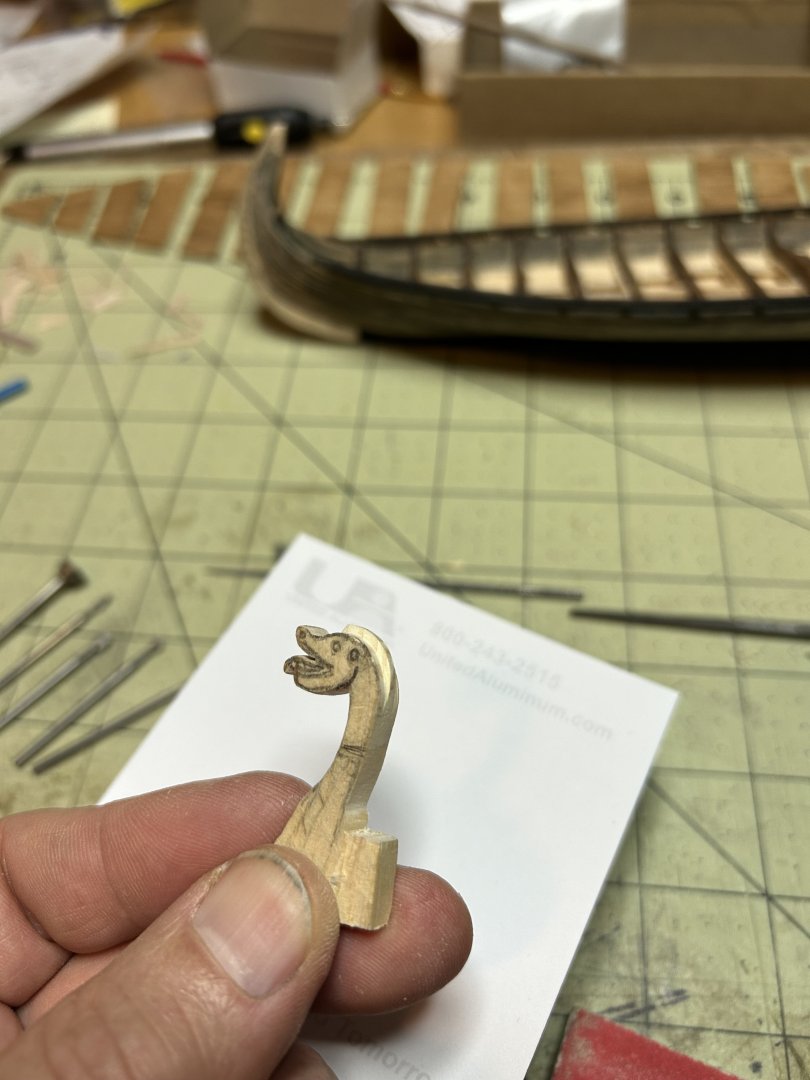
Carved up some details today and got them dry fit. Now he’s a fierce and formidable escort complete with serpent horns, tongue and saber teeth. Okay, so he only measures about 3/16” wide by about 1/2” long from nose tip to nape but he has a mean bite. 😂. I would have made him fire breathing but being part of a wooden boat, it didn’t seem like a good idea. 🤪
Careful, don’t get too close! He bites.
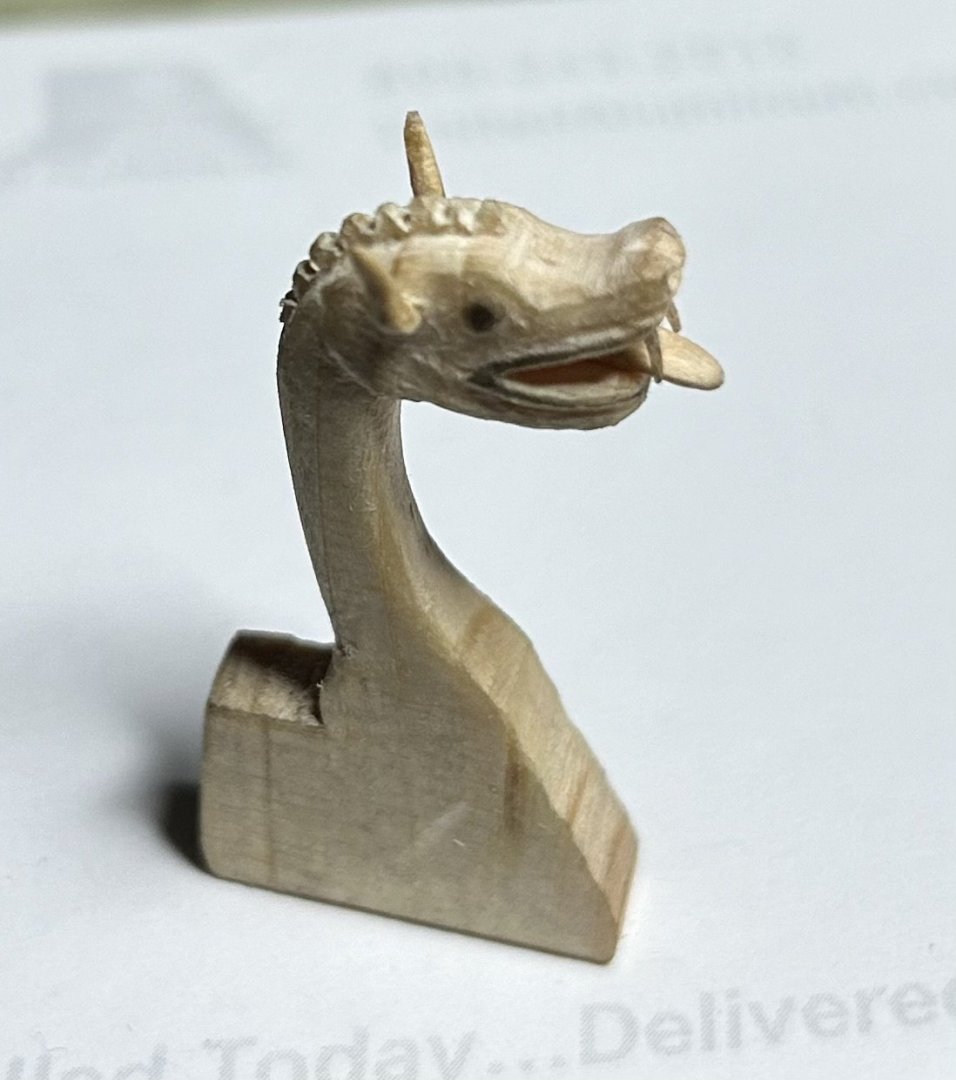
Tom
-
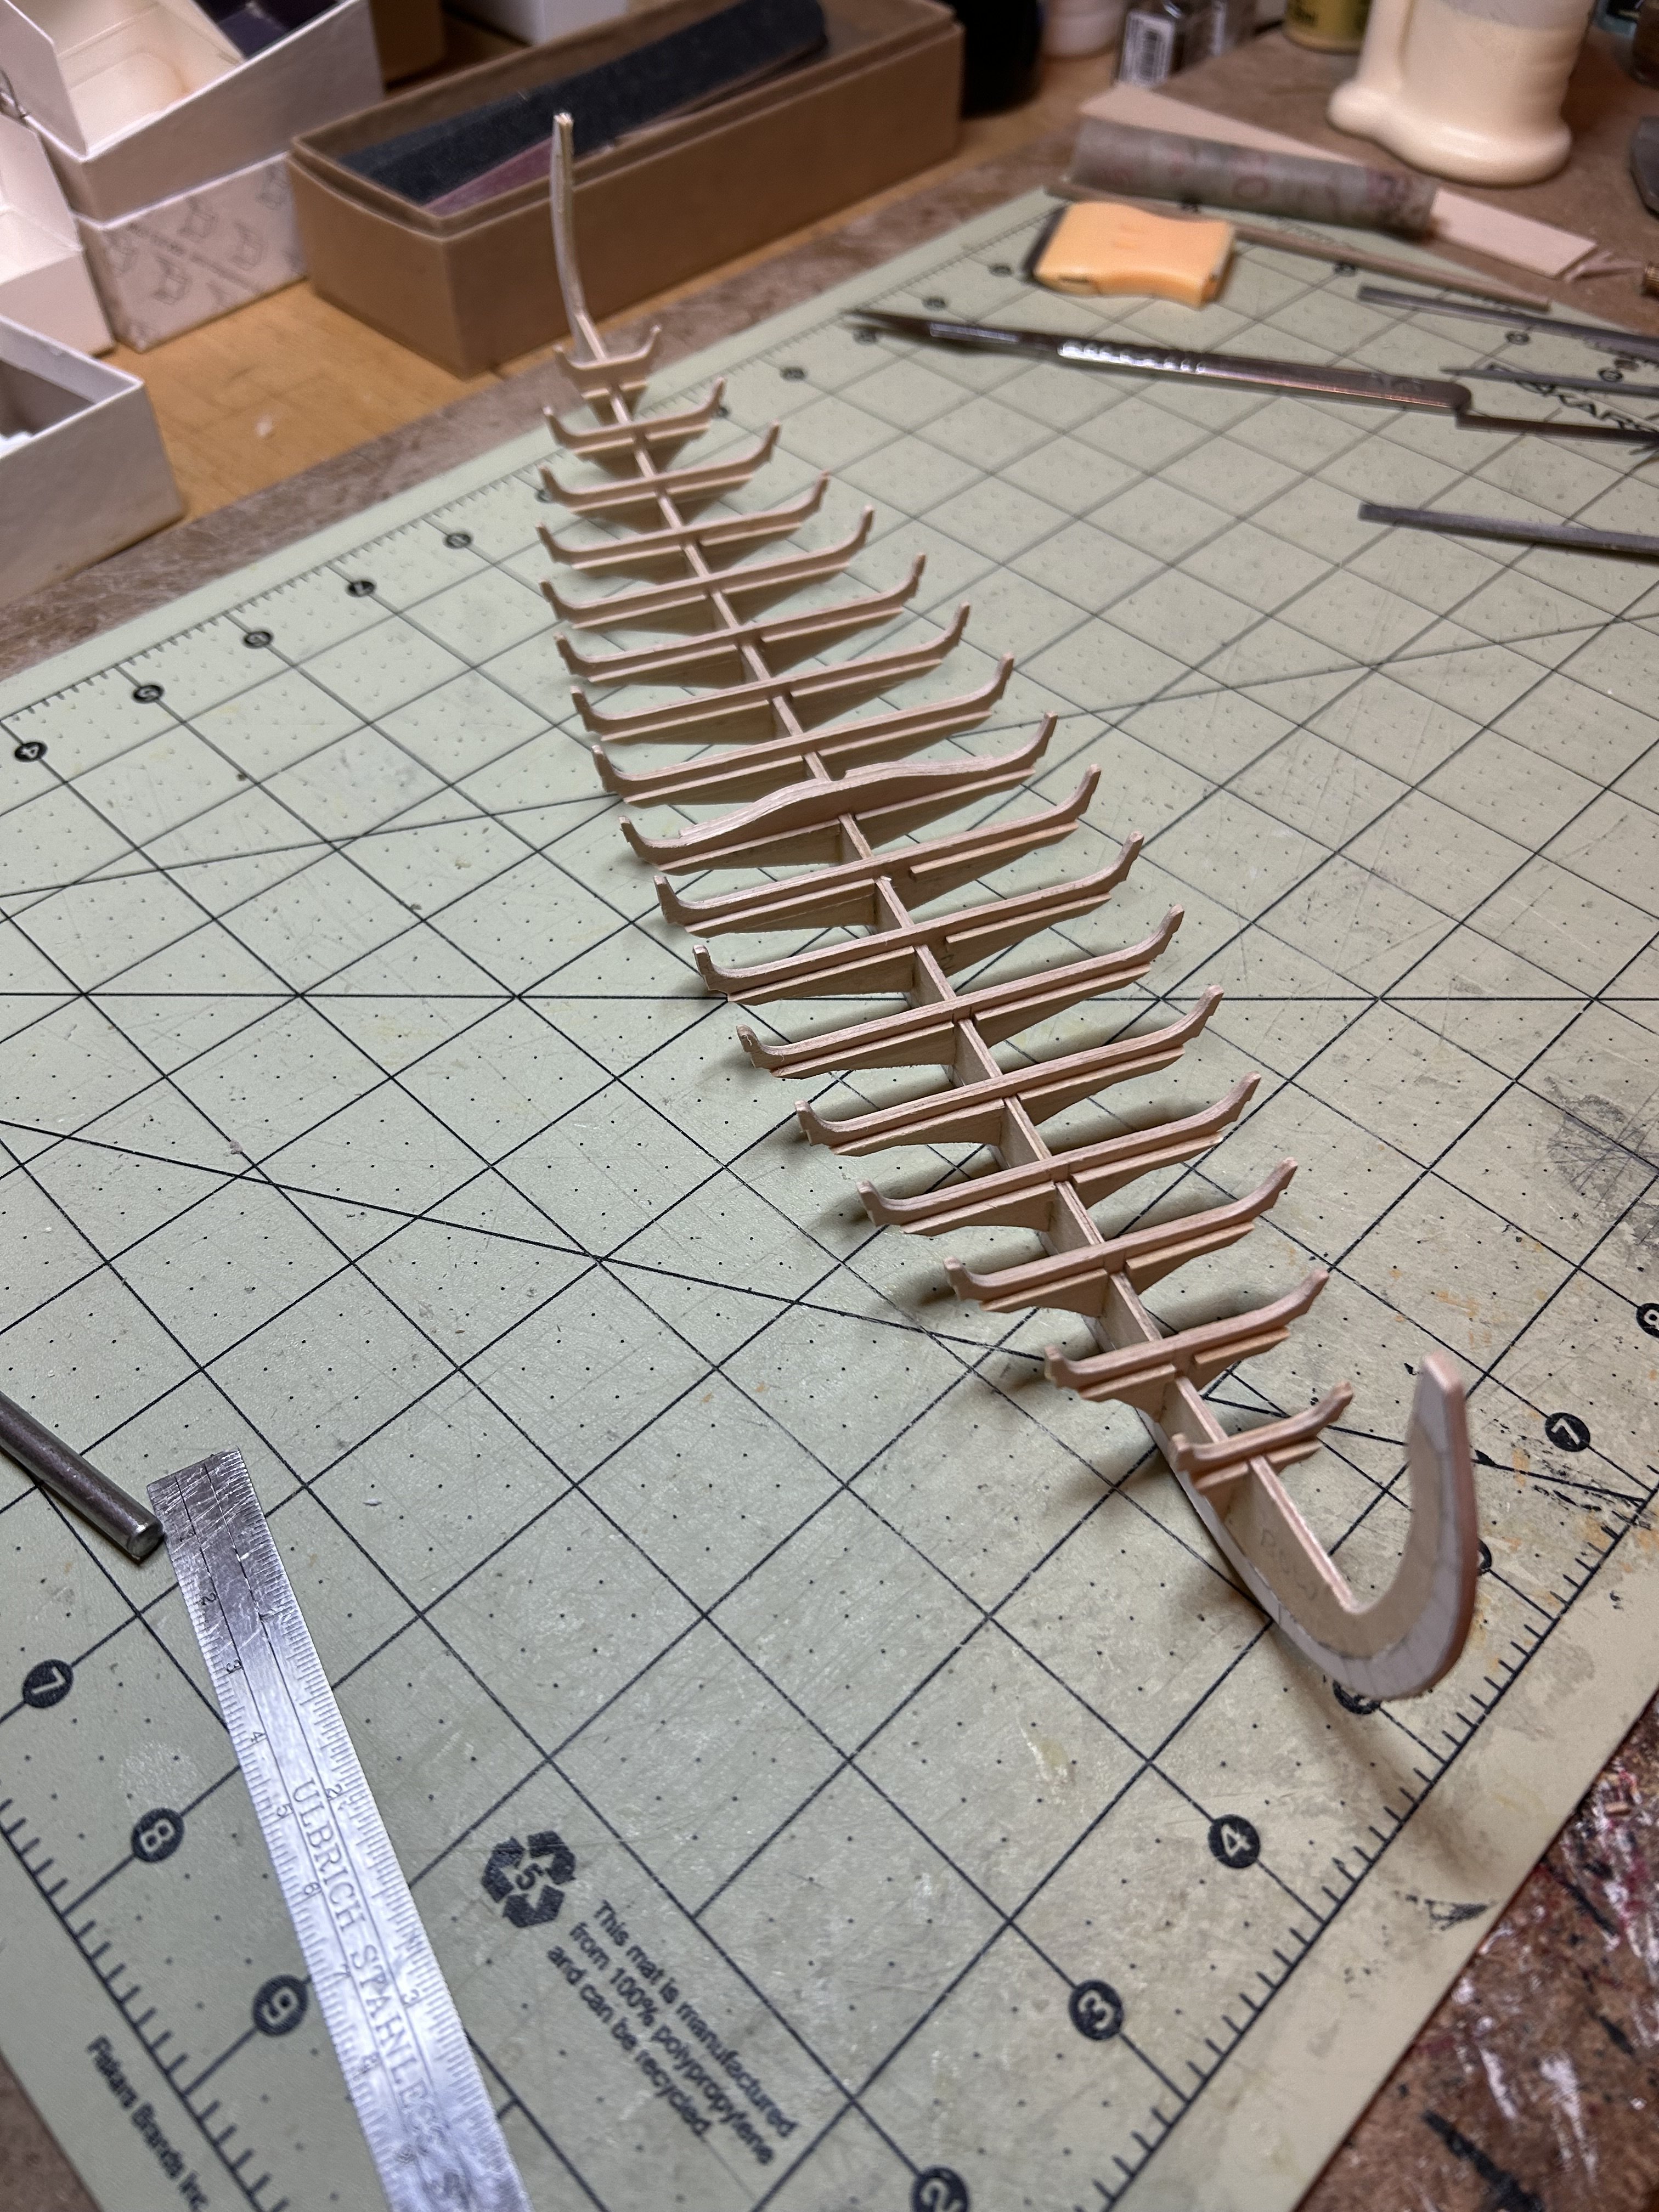
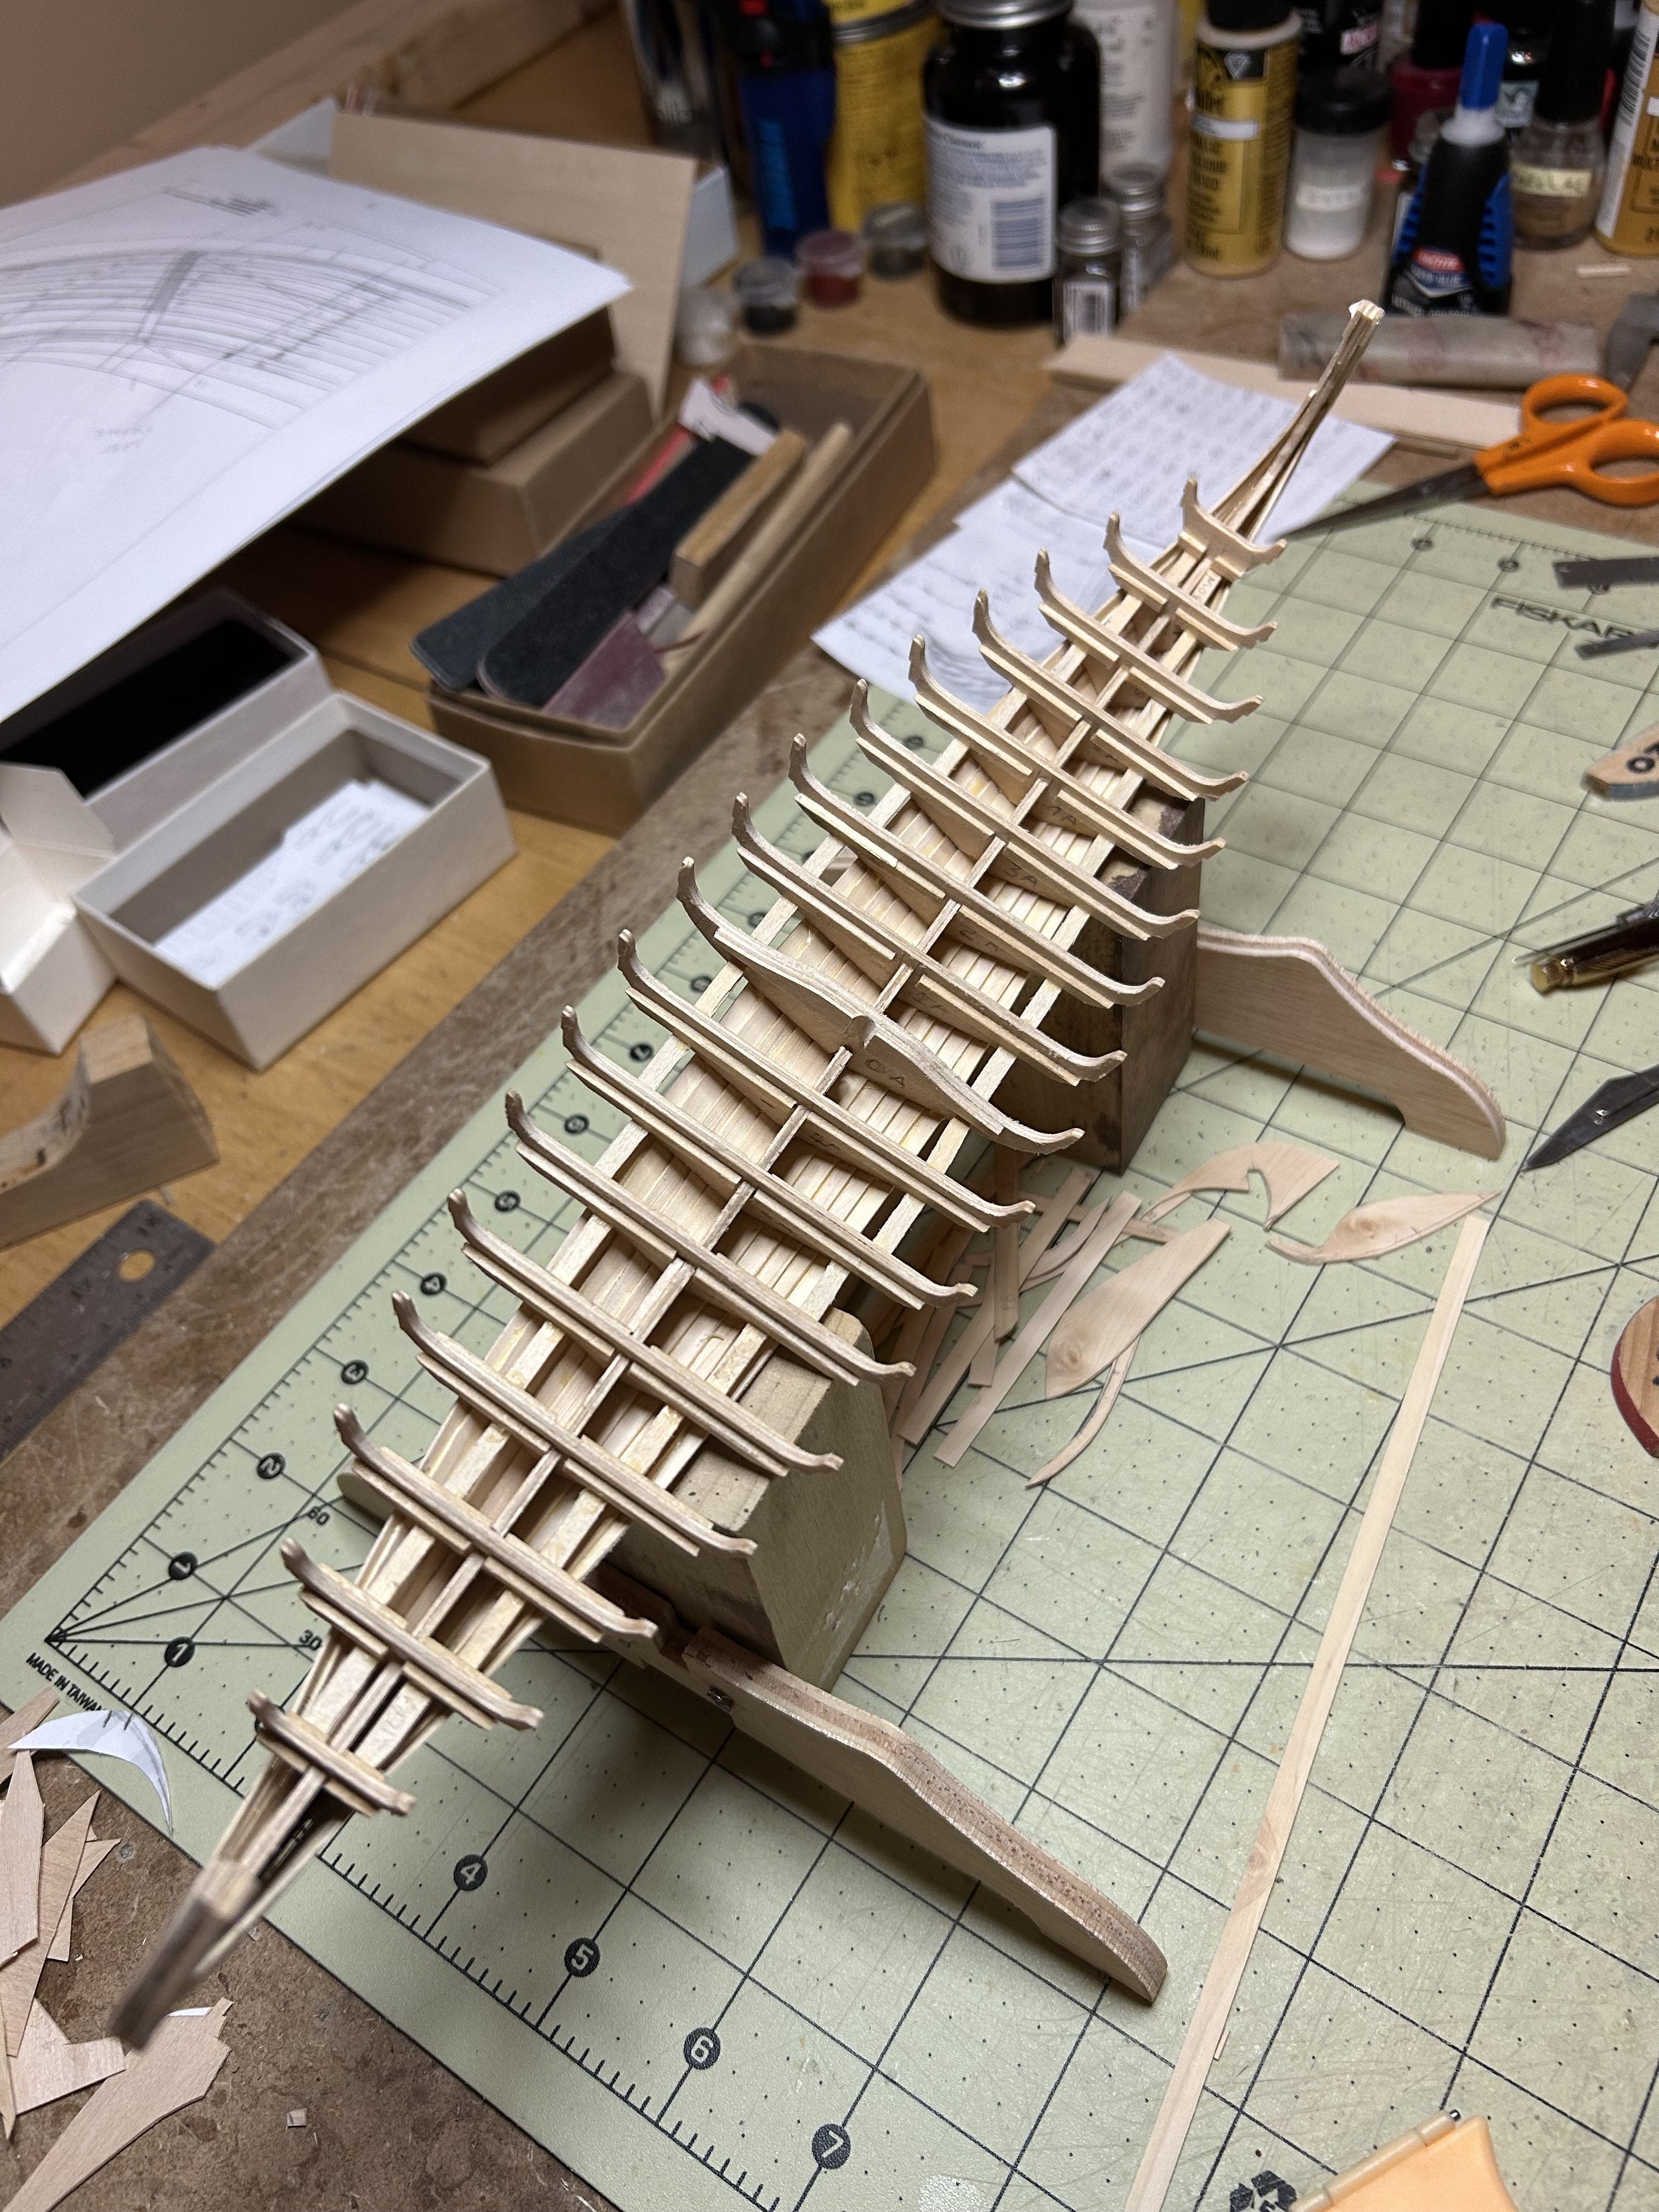
Chugging along with this build now that I have all my fall clean up finished. I made all the pieces except the sail and the dragon’s tail. I have started on the head and for my first ever carving and I am feeling pretty good about it. 😁 Here are a few pics.
Here are some of the finished pieces.
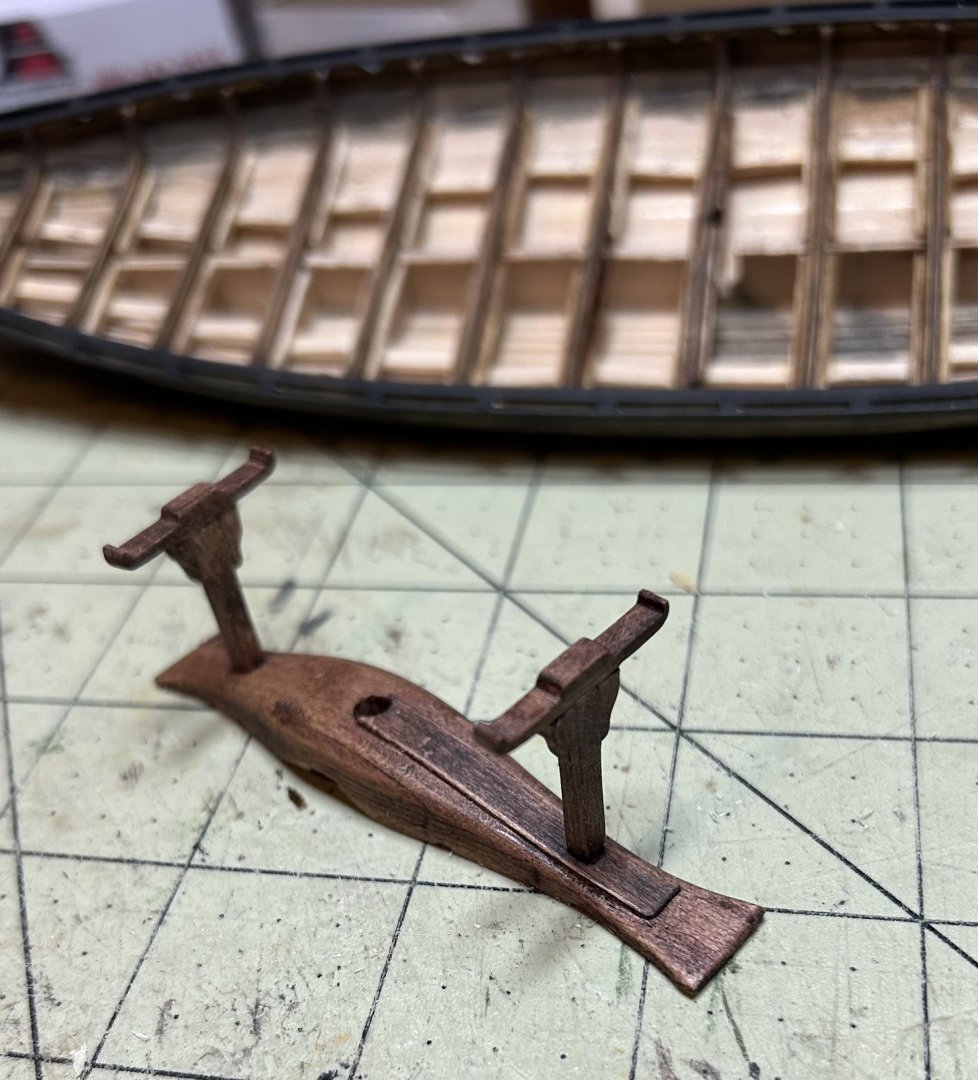
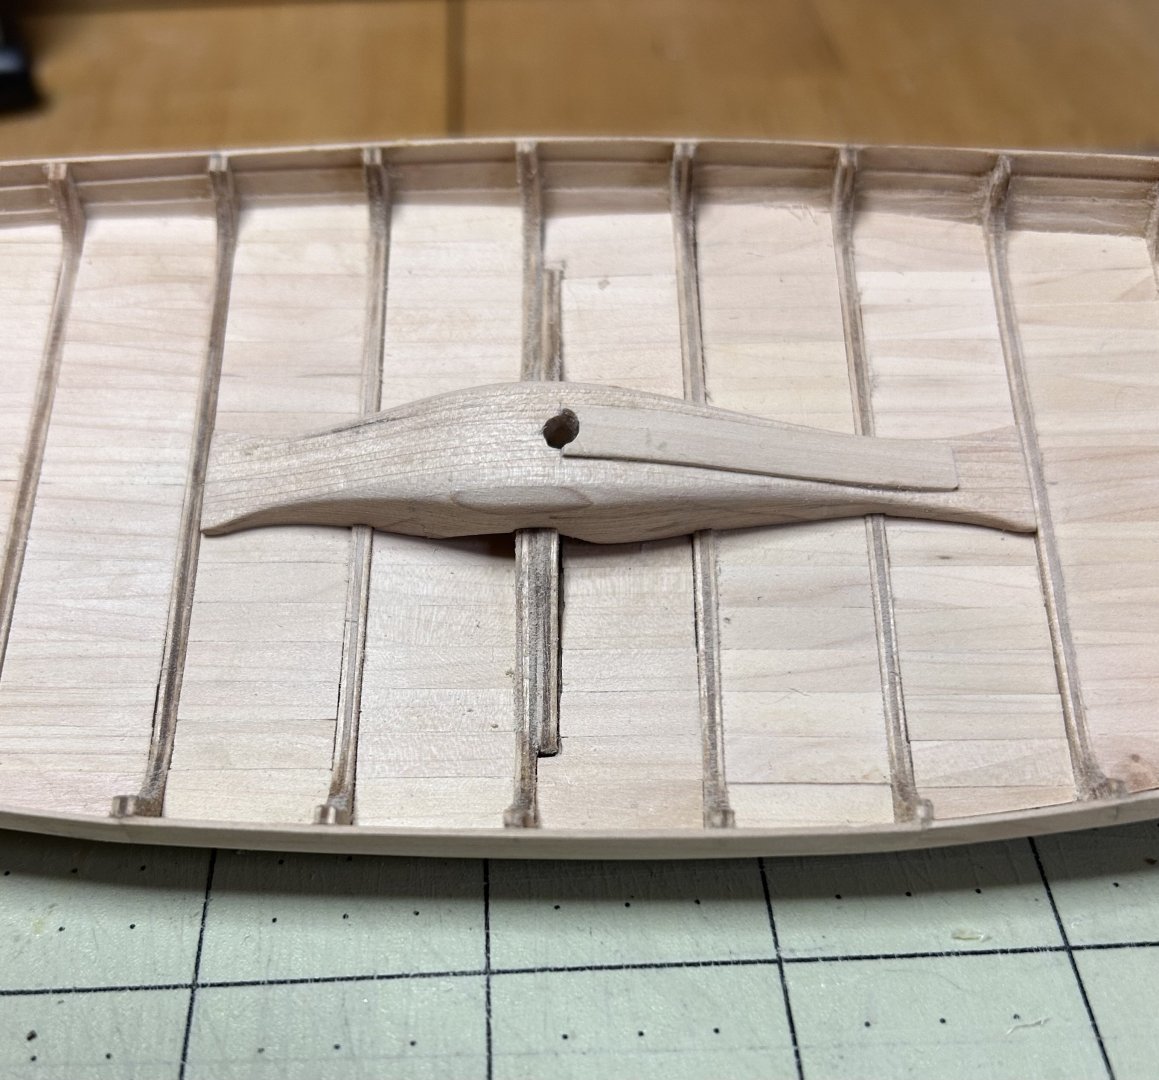
The mast post or “fish” with the oar holders dry fit. The squares on the cutting mat are 1 inch just to give an idea of the scale.
and two of the 31 sea chests I made, complete with hinges and hasps.
I also decided on a grayish mottled color for the hull with black shield rails for contrast and accent. I was thinking the main color of the dragon will be an olive drab green with black accented relief carved scales covering the stem and stern posts. We will have to see how that ends up.

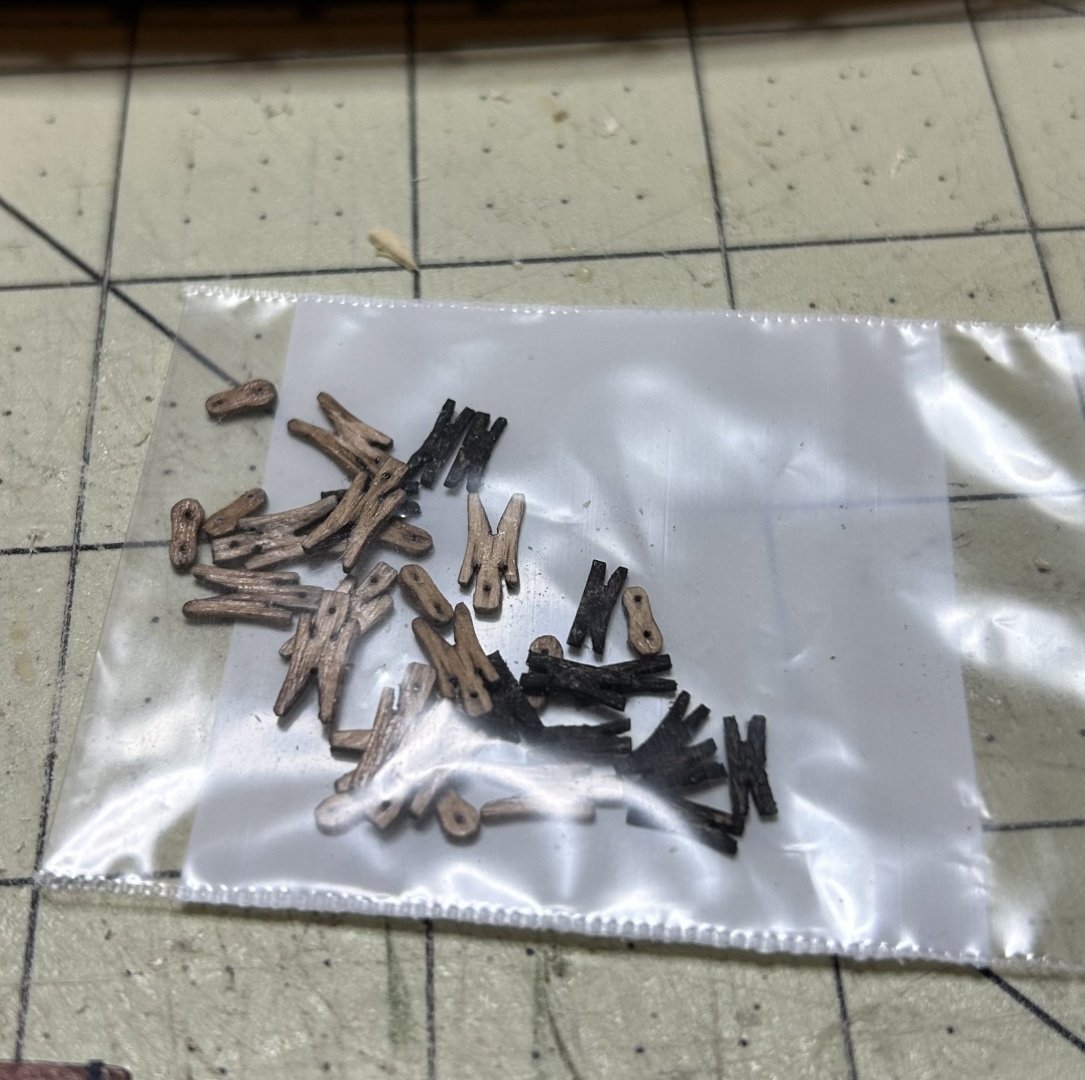
I also finished making all the rigging fittings like the “blocks”, connecting fiddles and cleats. Those were fun to make at this scale (he says sarcastically). 😉
I need to come up with an idea for the look of the sail. Not sure what I want yet. I see a google search in my future 😂
Tom
- Seventynet, woodrat, GrandpaPhil and 8 others
-
8
-
3
-
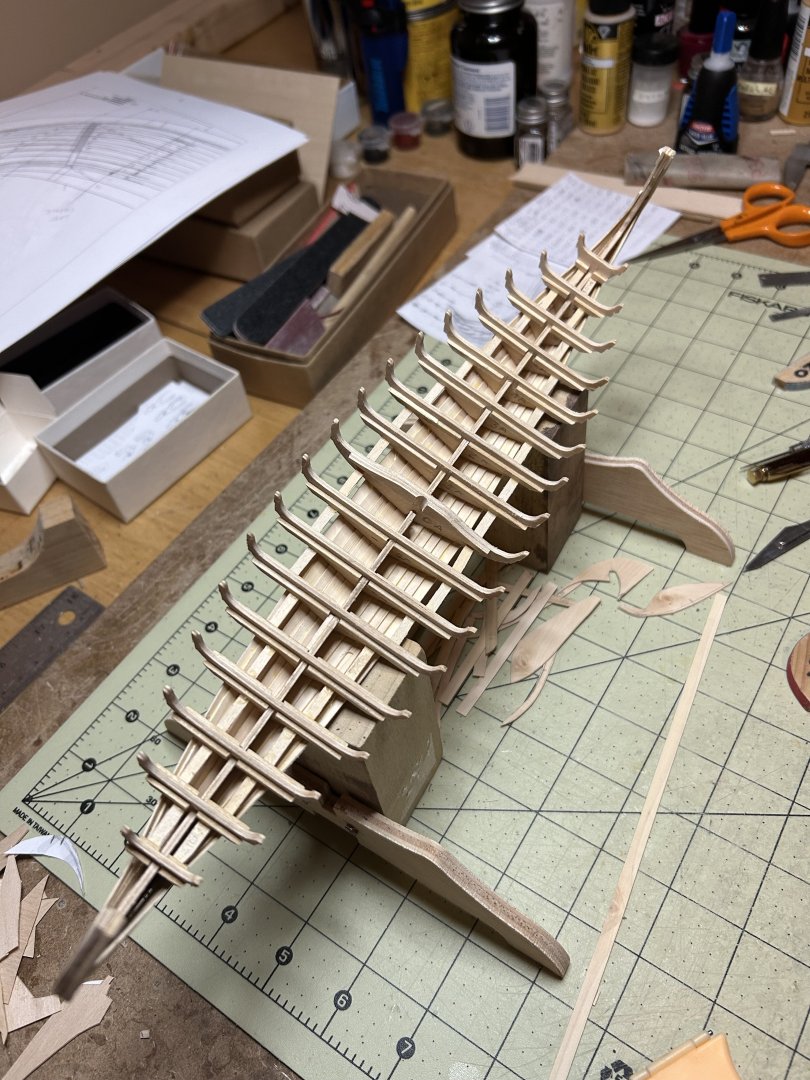
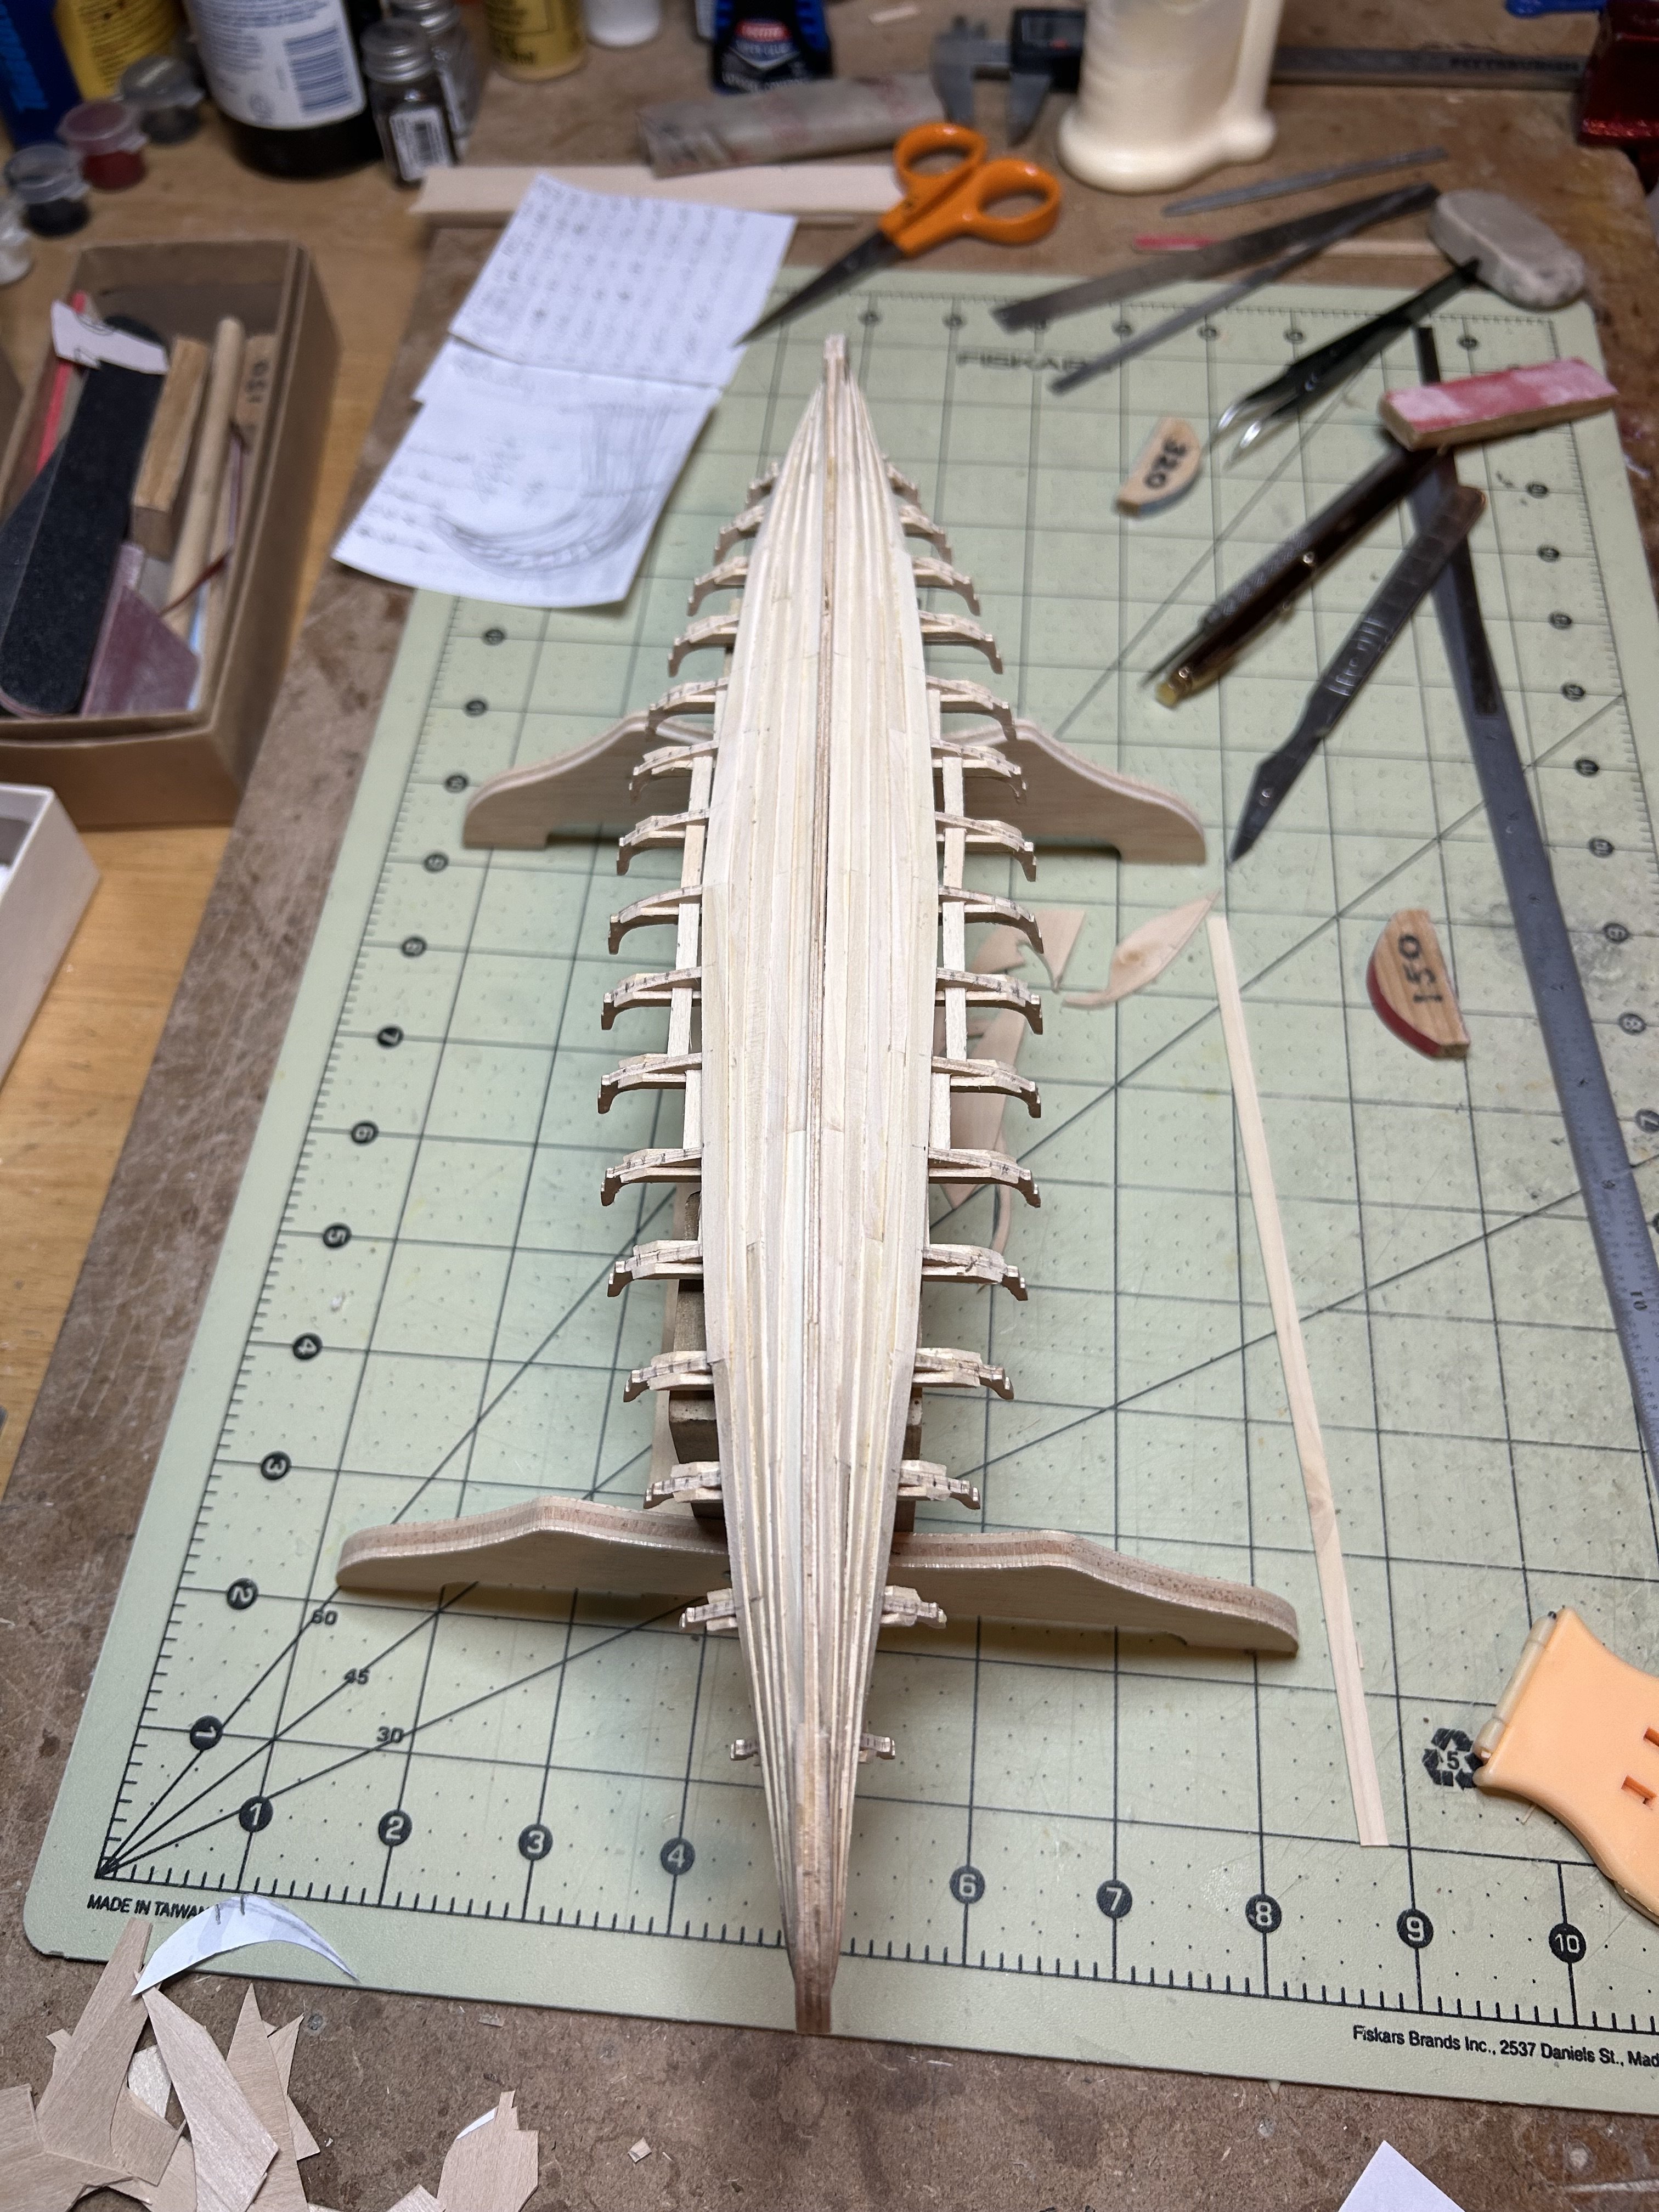
Managed to put on some rails to hold the shields in place. Inserted one of my scrapped shields to test it out.

Tom- GrandpaPhil, Freebird, Seventynet and 6 others
-
9
-
Thanks Steven for the dragon head ideas. That is the next hurdle which frankly scares the fire out of me. 🤪.
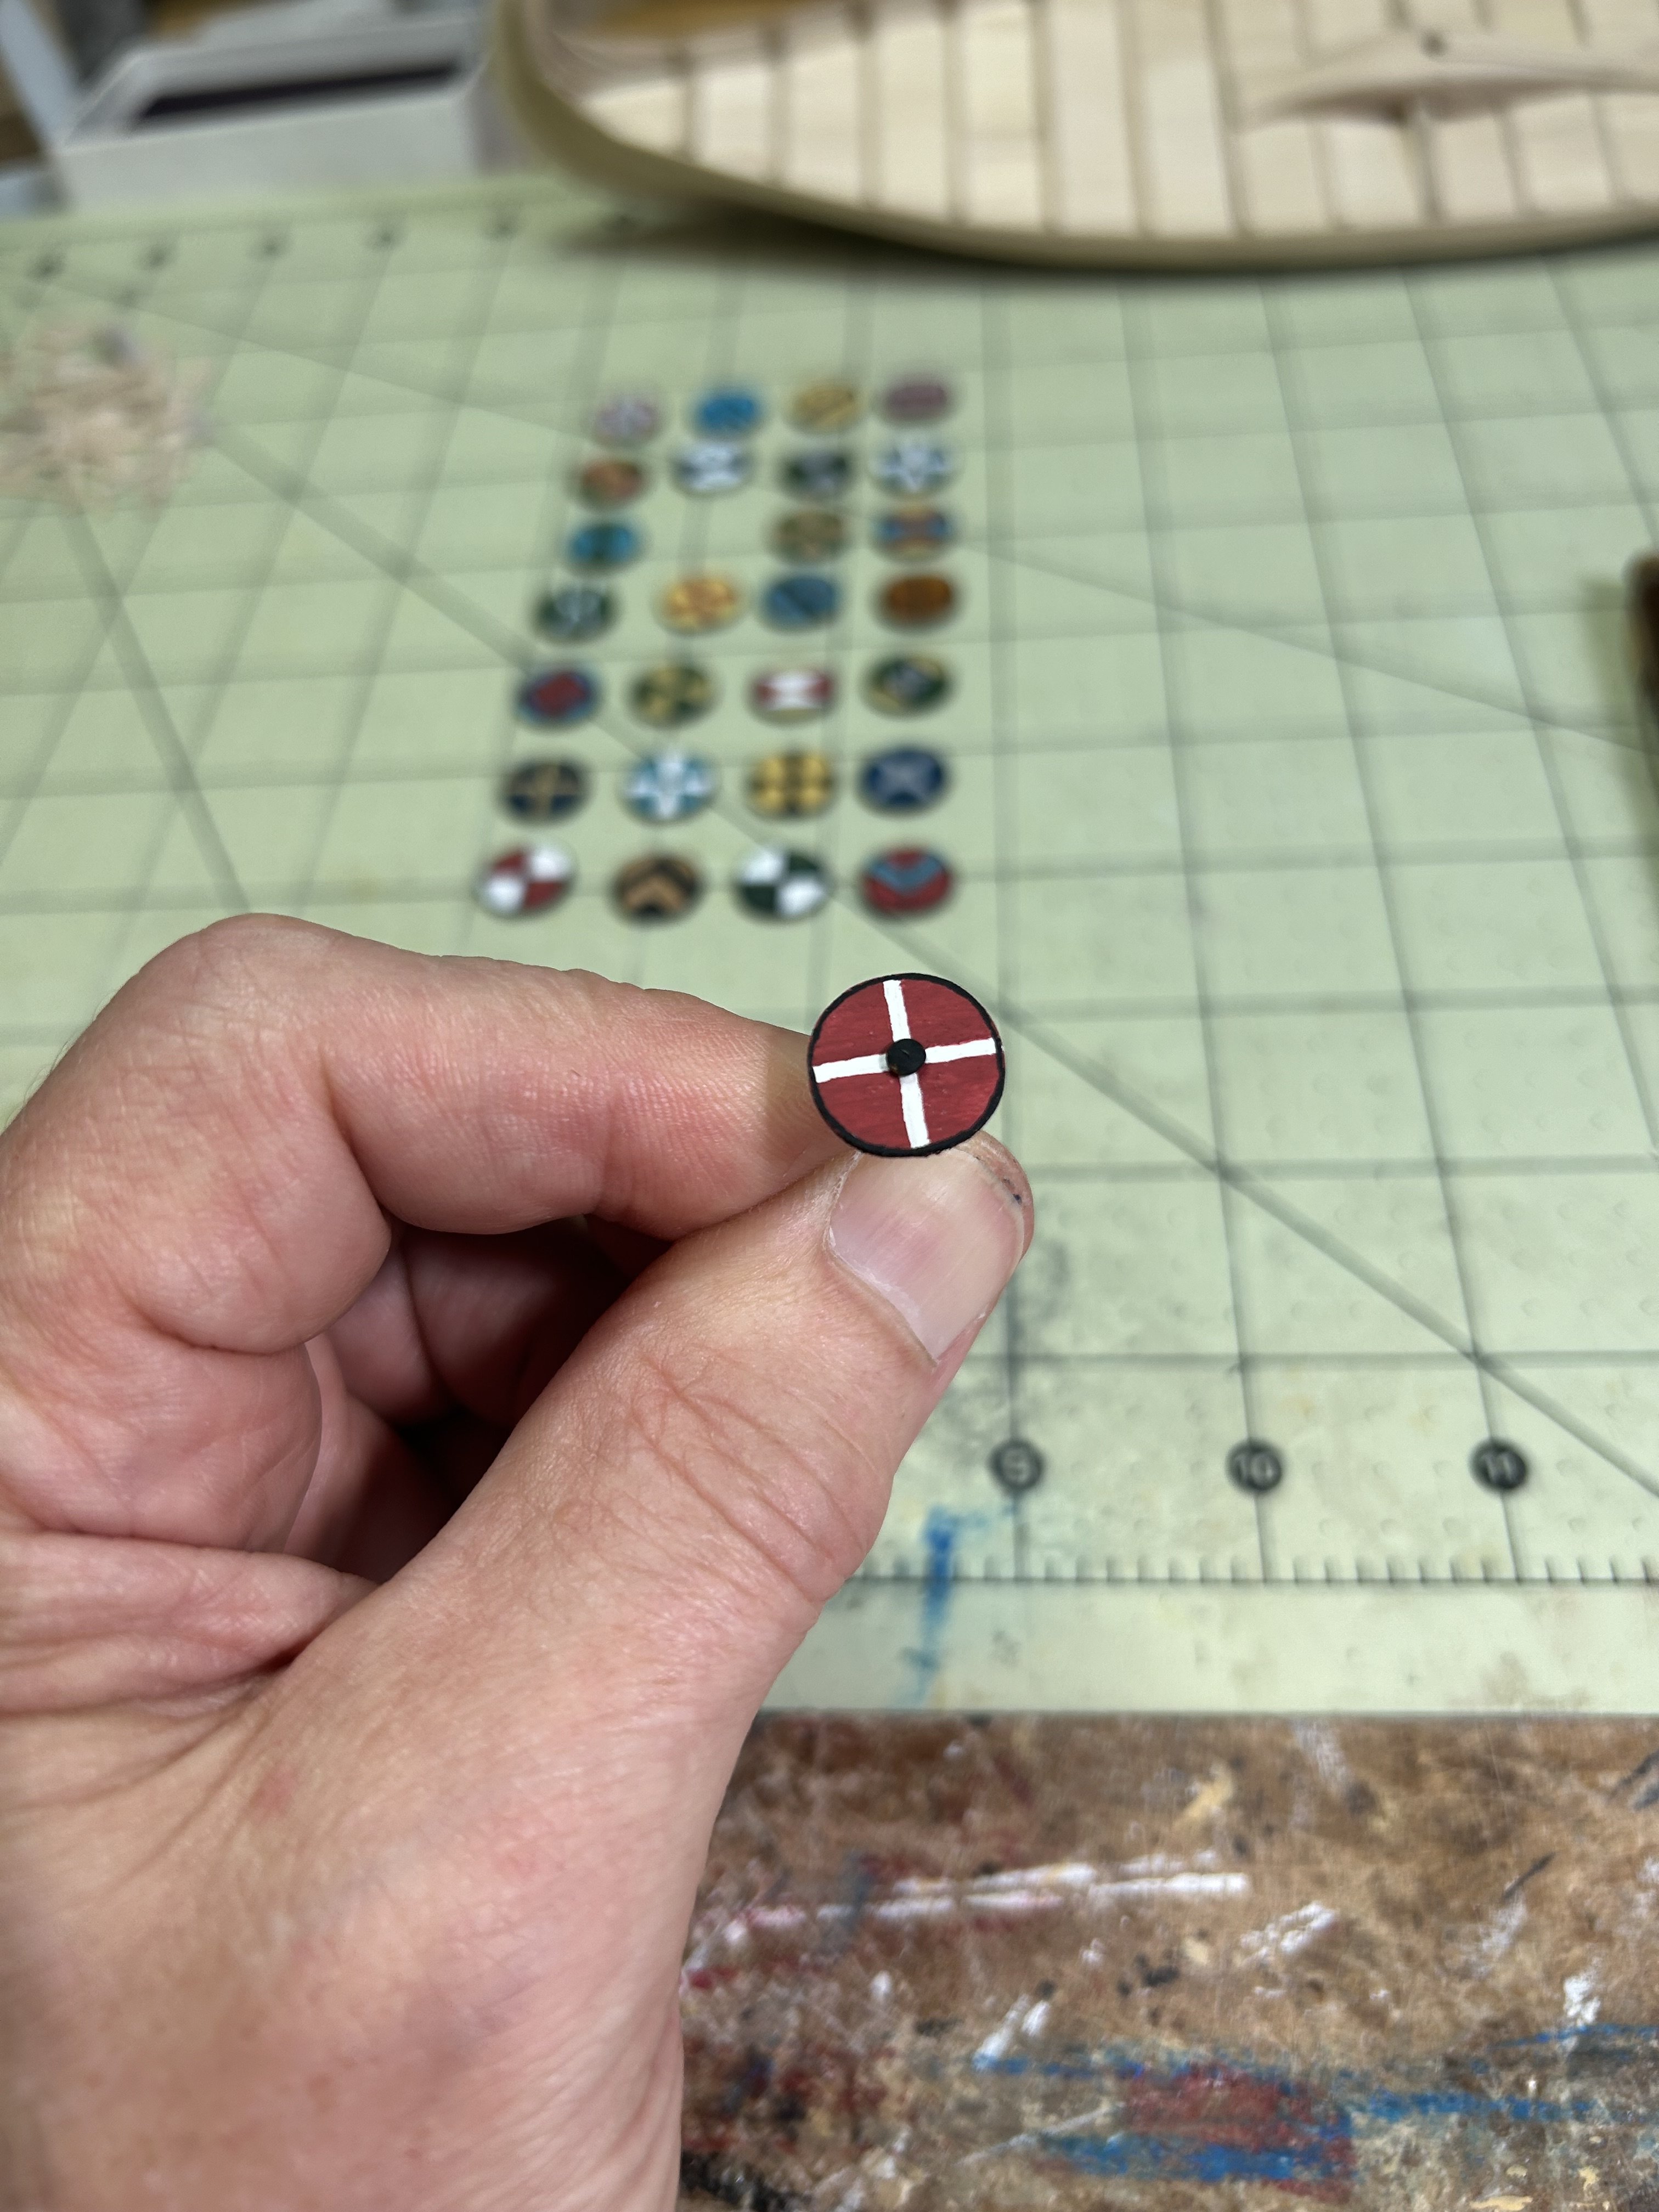
I did manage to get the front sides of the shields painted. Just need to stain the backs and work on attaching a handle. I will definitely check out the link you sent.

It was a bit tedious but they are done. The actual diameter is .520” (13.2 mm). I will be using blackened escutcheon pins for the center hand protector. Not sure about the handles yet. They will be pretty small.

Tom
- Seventynet, JacquesCousteau, ccoyle and 8 others
-
7
-
4
-
I decided to make some of the “accessories” for a change of pace.
The mast stop was fun with all the 3D shaping and sanding.
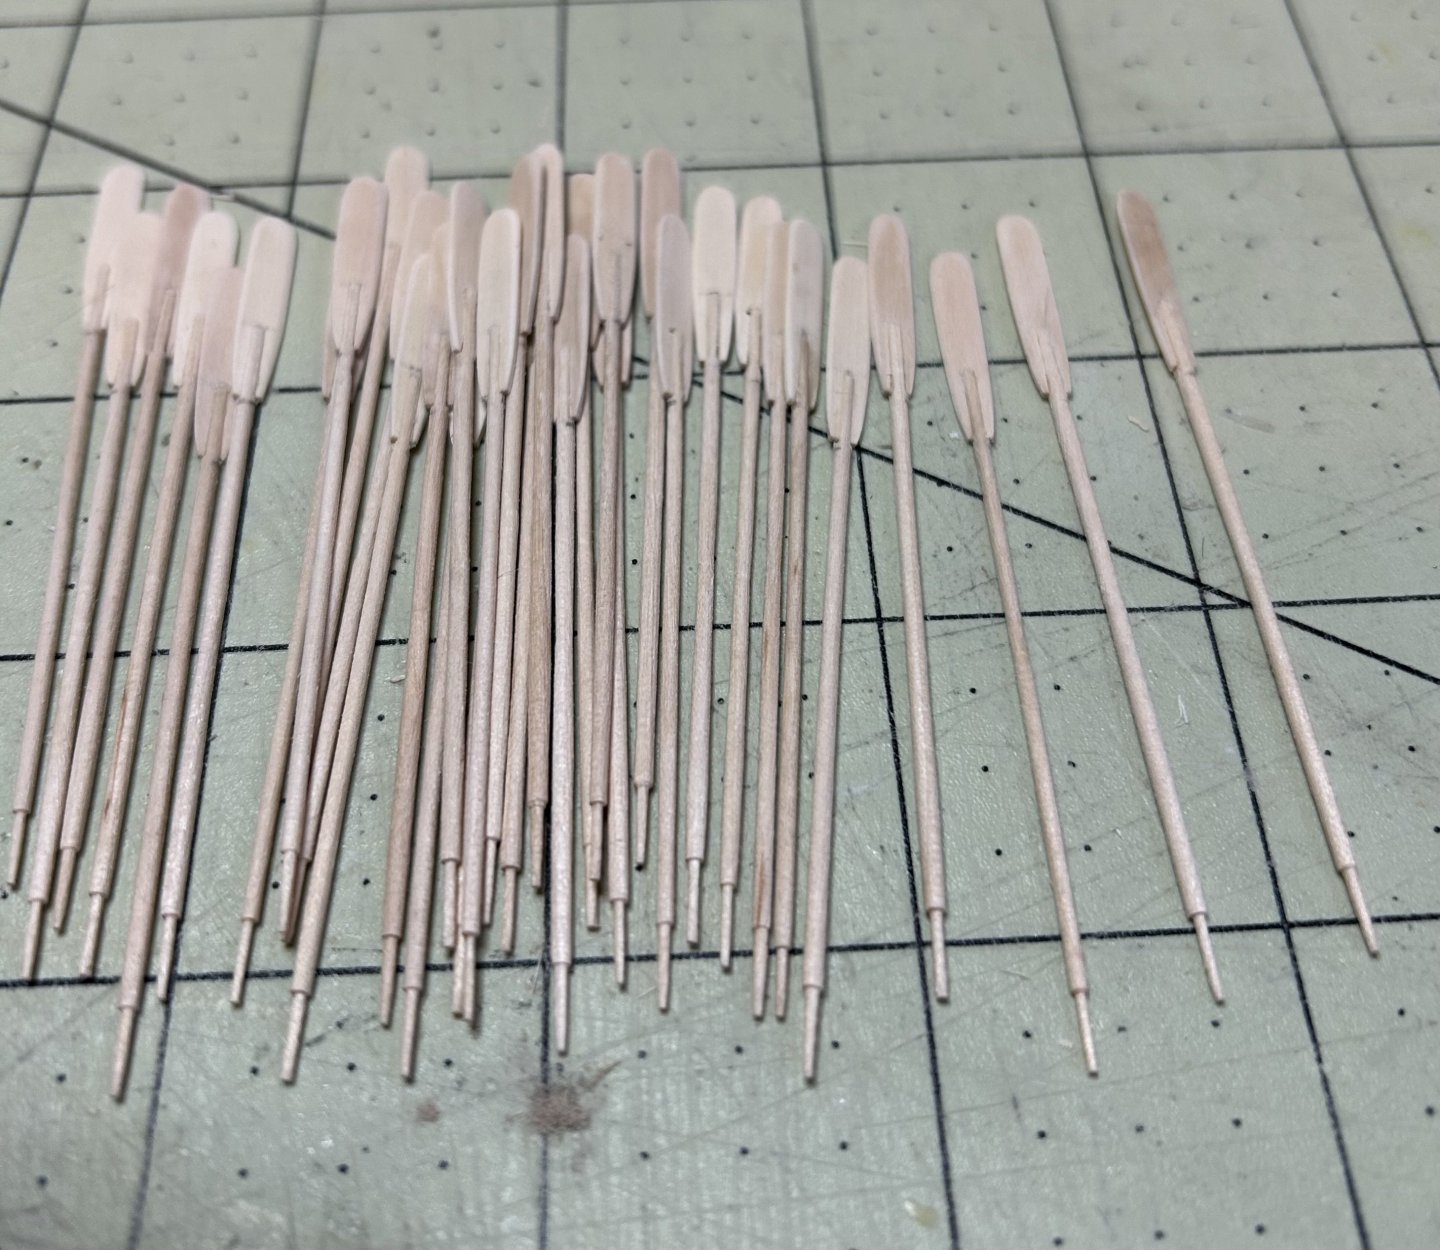
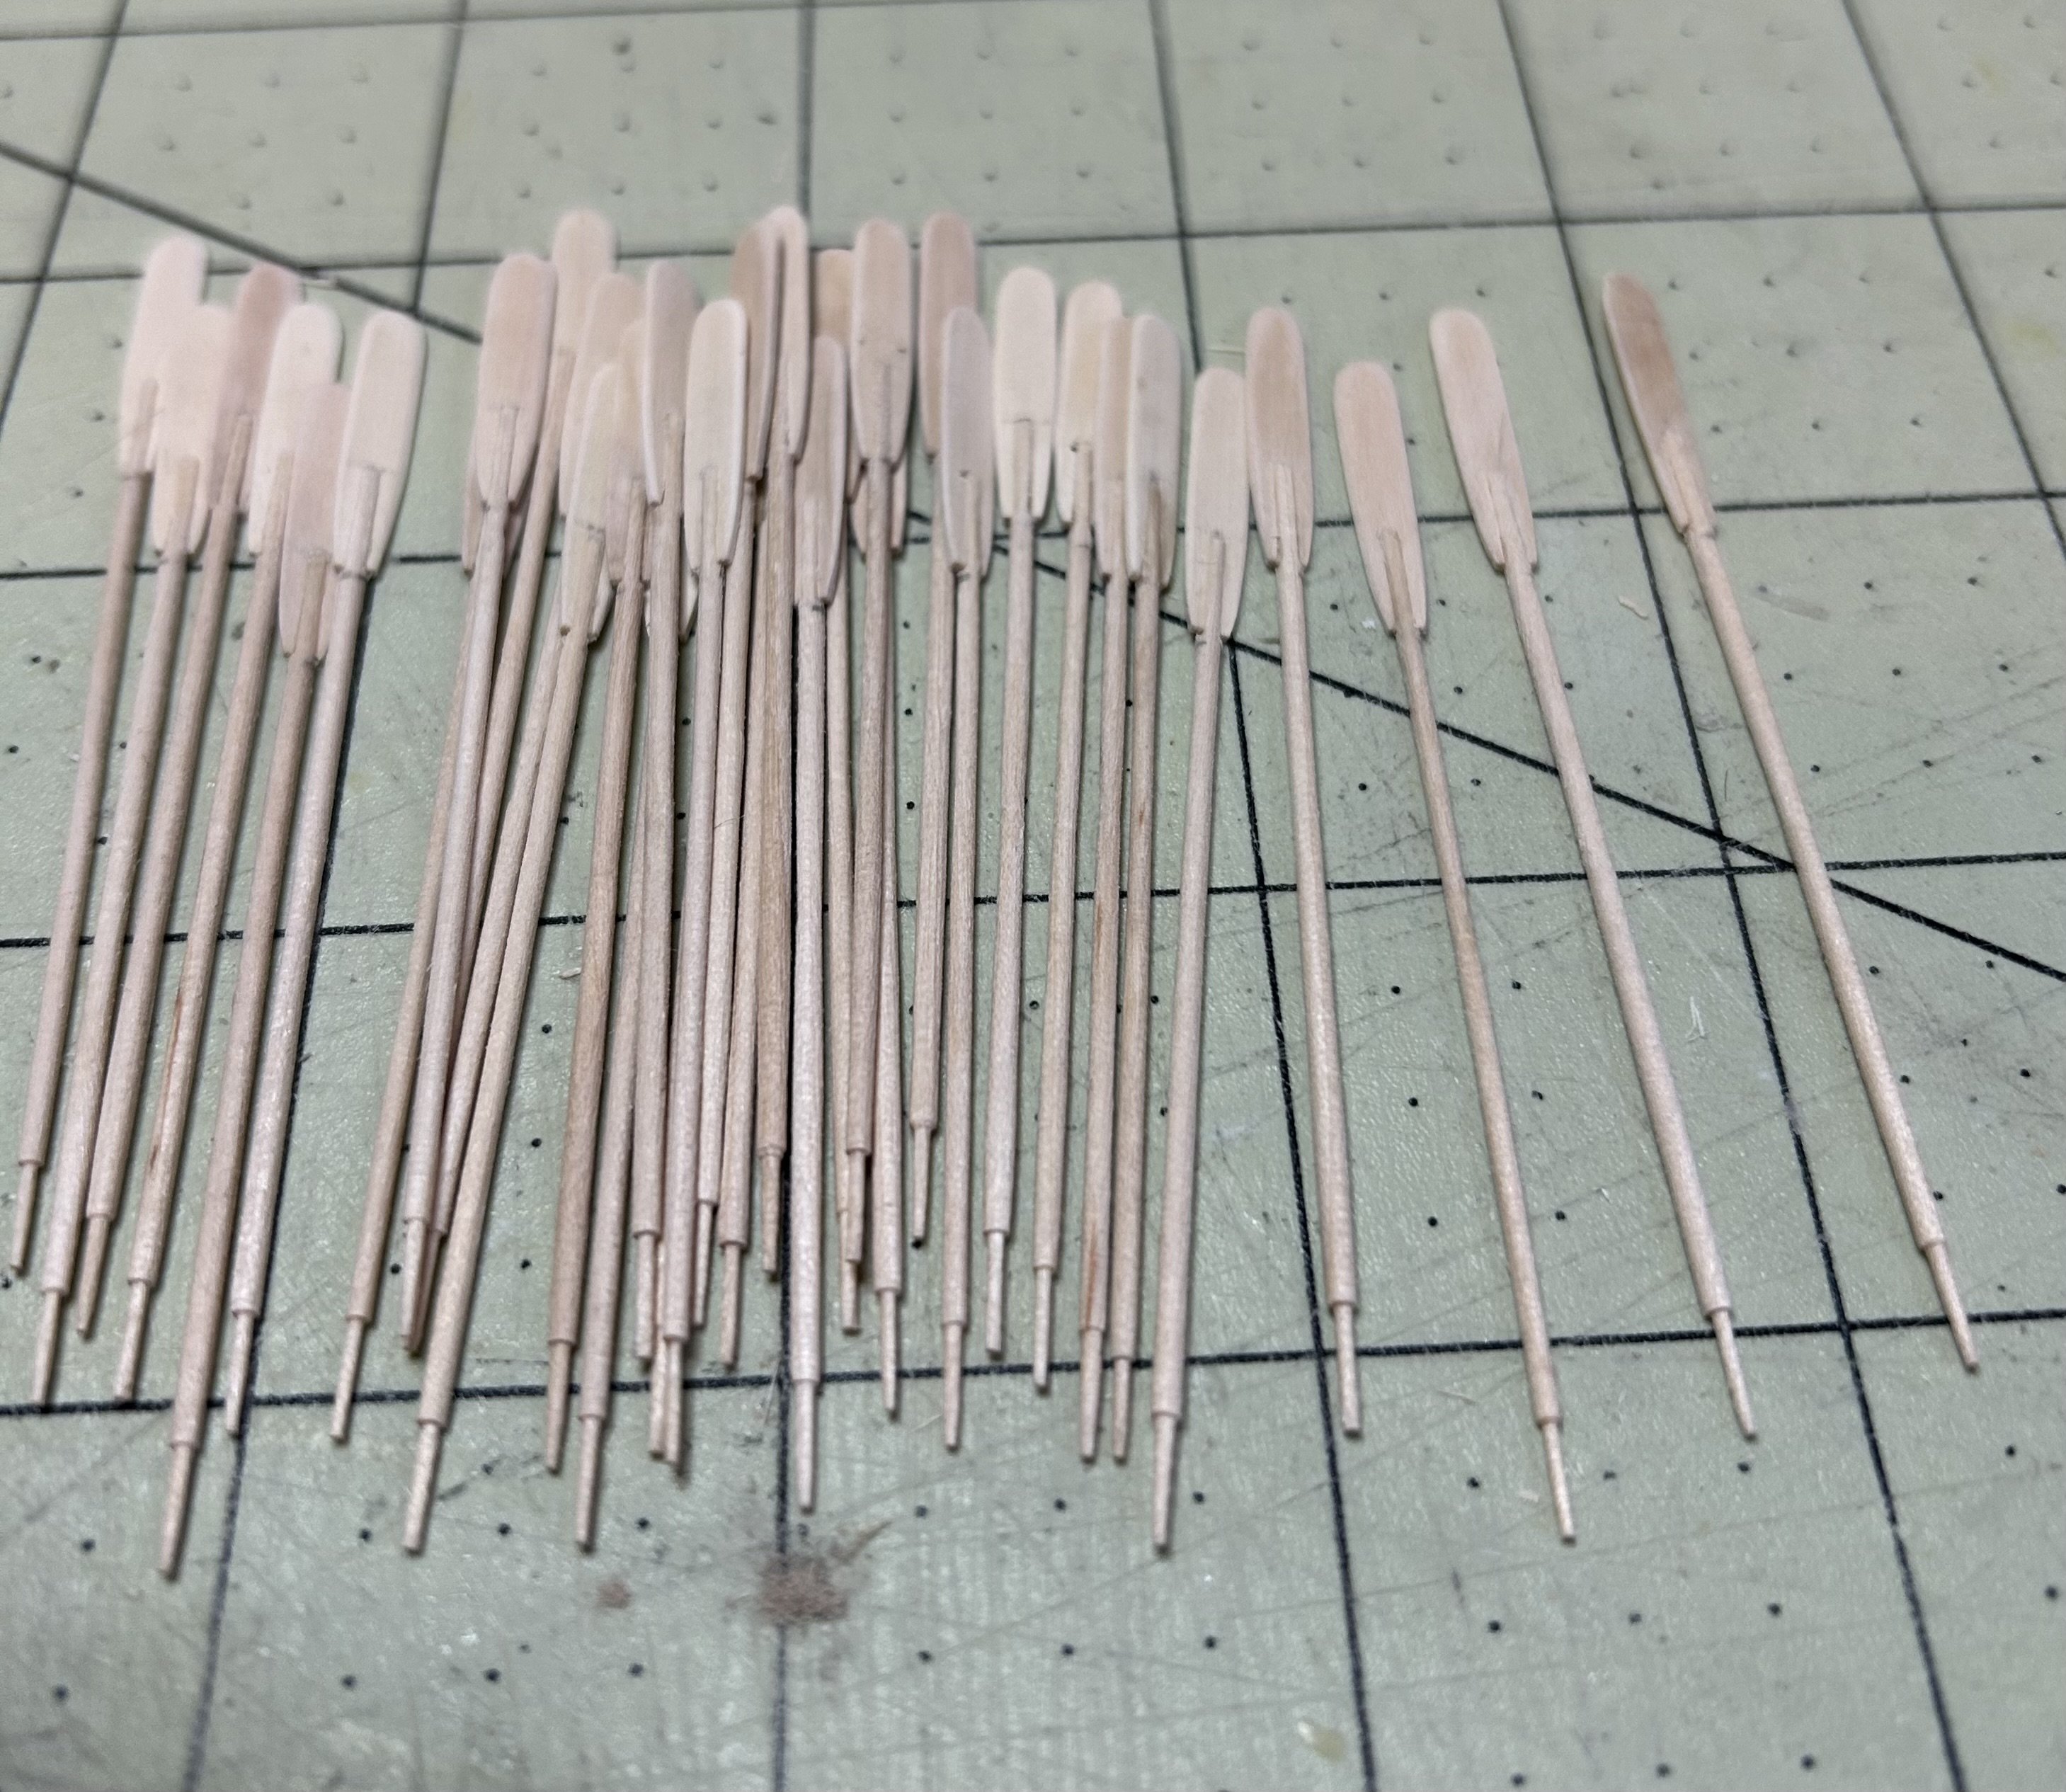
Also made all the oars along with a few spares. They are a bit delicate so I made a few extra just in case something “unplanned” happens. 🤪
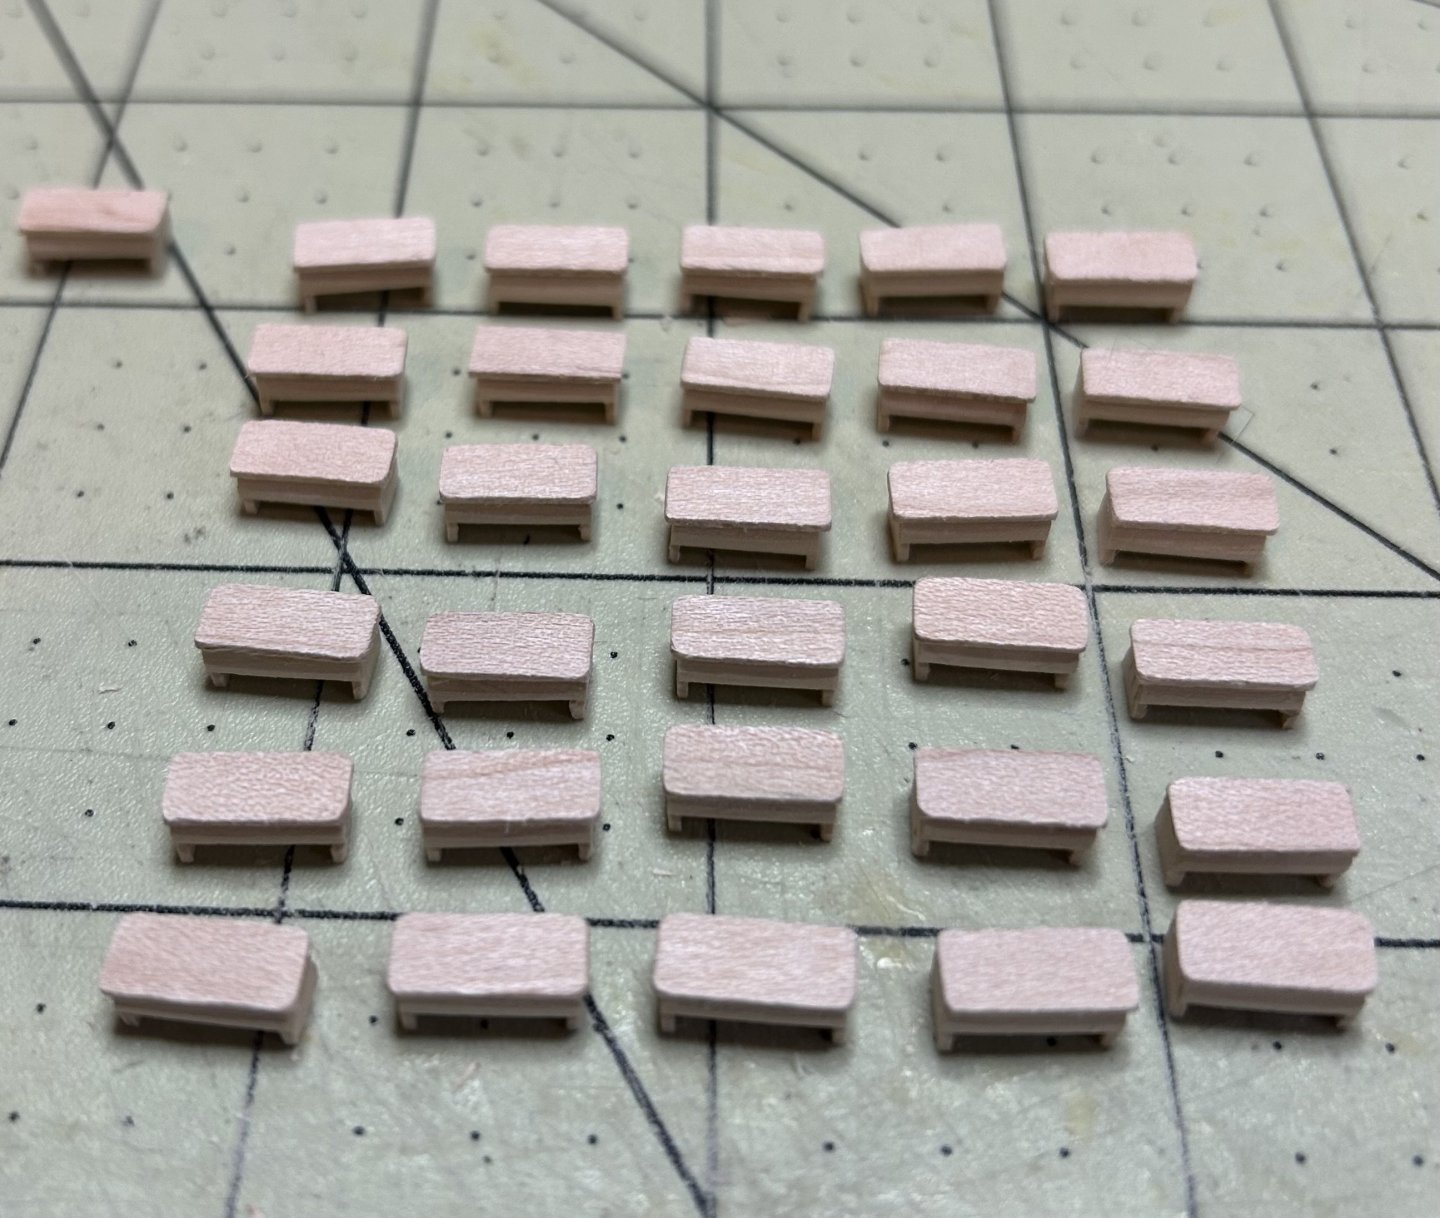
I also made all of the little benches for the oarsmen. They were a bit “fiddly” to make and took a bit more work and time than anticipated but doesn’t everything?
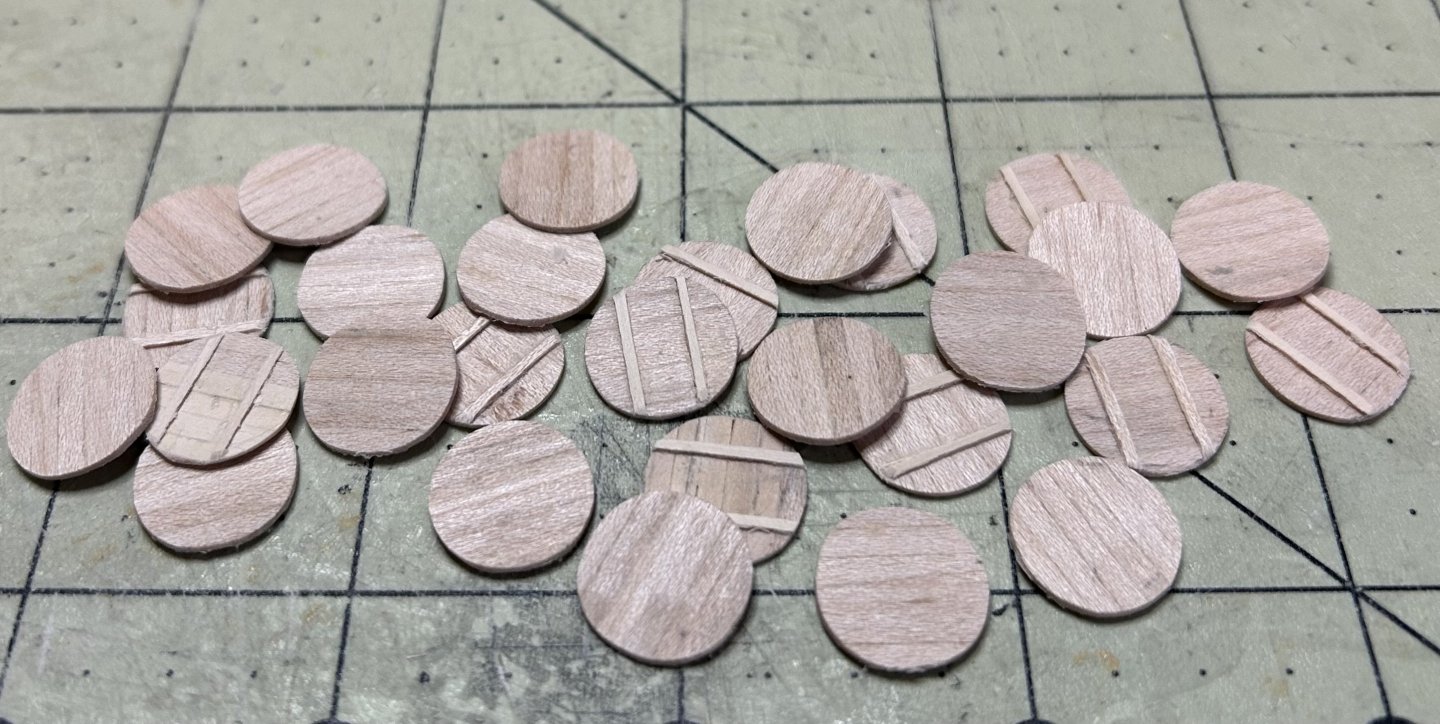
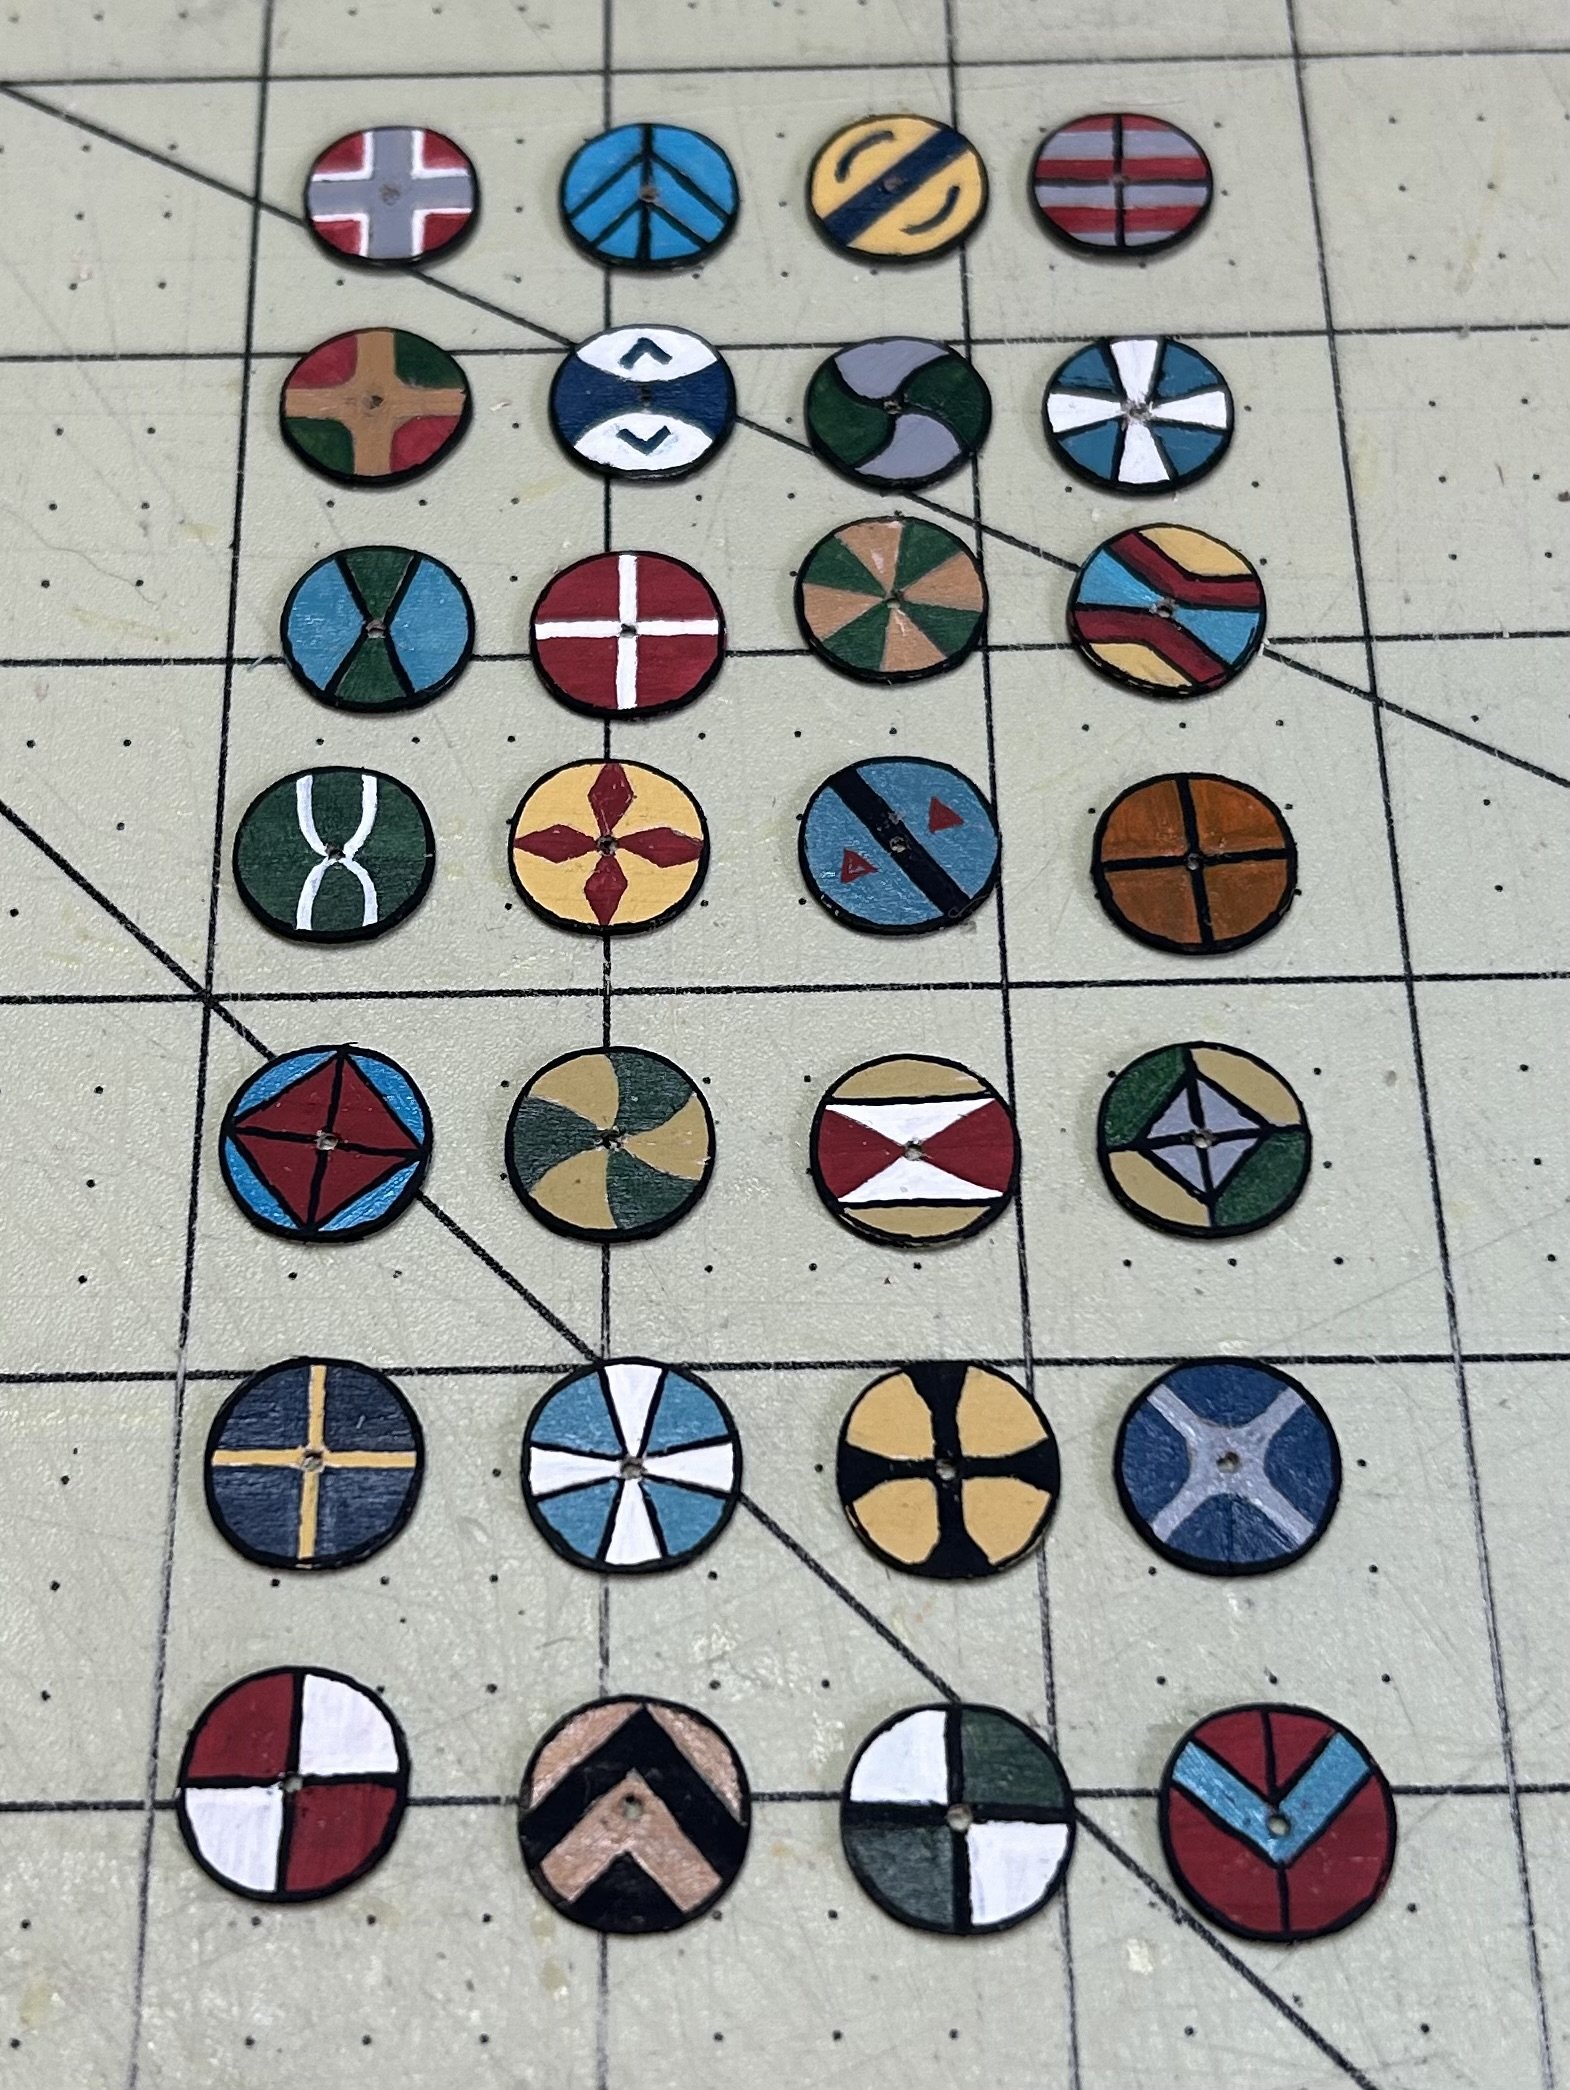
And finally made all the necessary shields (28 of them) for the sides of the boat. I still have to drill the center holes and then place the hand protector metal cup over it. Then on the backside, put a gripping handle the will also serve as a mounting point to tie the shield to the hull. Then of course is all the painting of the different shield designs. I am thinking 7 different patterns.
Still a ways to go to finish up the shields. That gives me more time to decide on the overall color scheme of the hull and deck.
Then I need to come up with an ornate looking pattern to put on the curled part of the keel. That will be a challenge. I am thinking of a dragon head for the bow and tail for the stern. I have seen some pretty interesting ones on the internet. I just have to figure out how I am going to make them at this scale.
Tom
- CiscoH, GrandpaPhil, hollowneck and 7 others
-
10
-
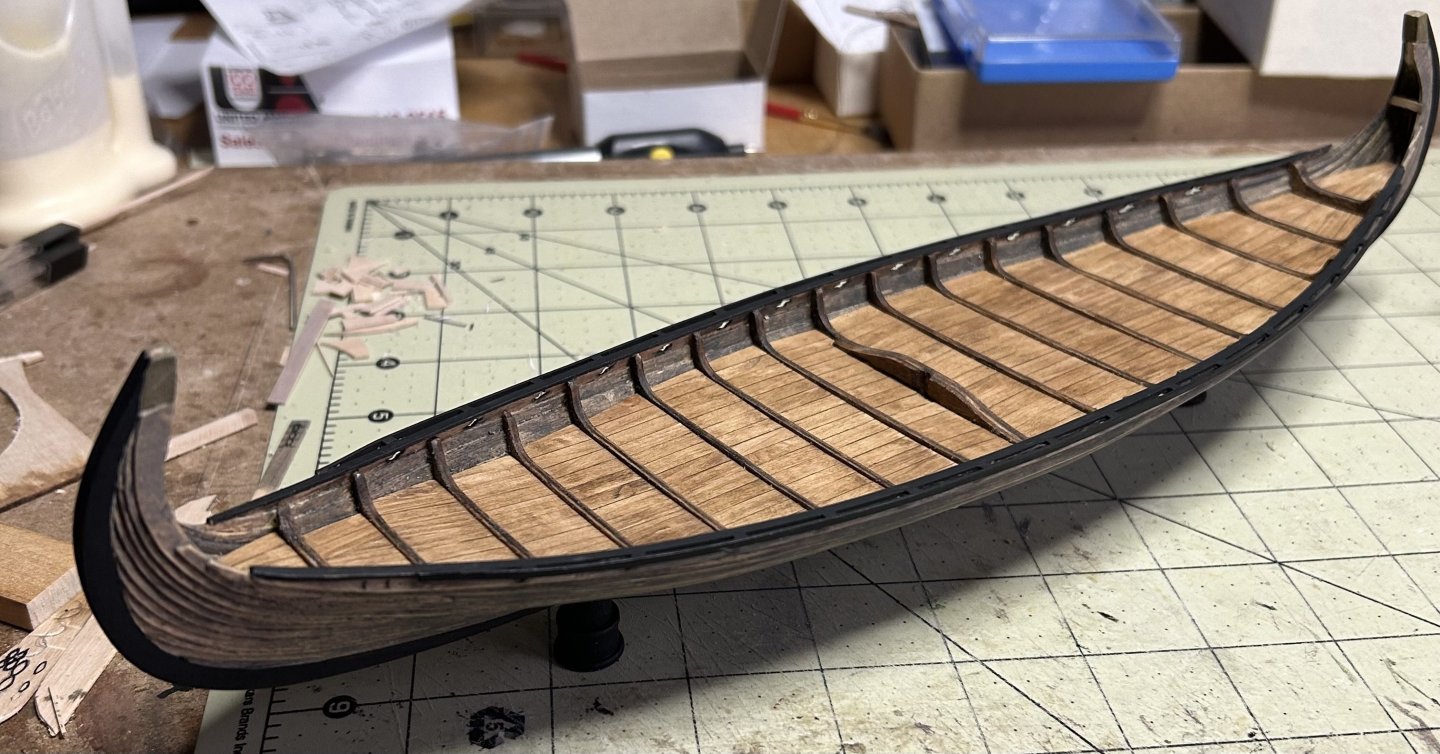
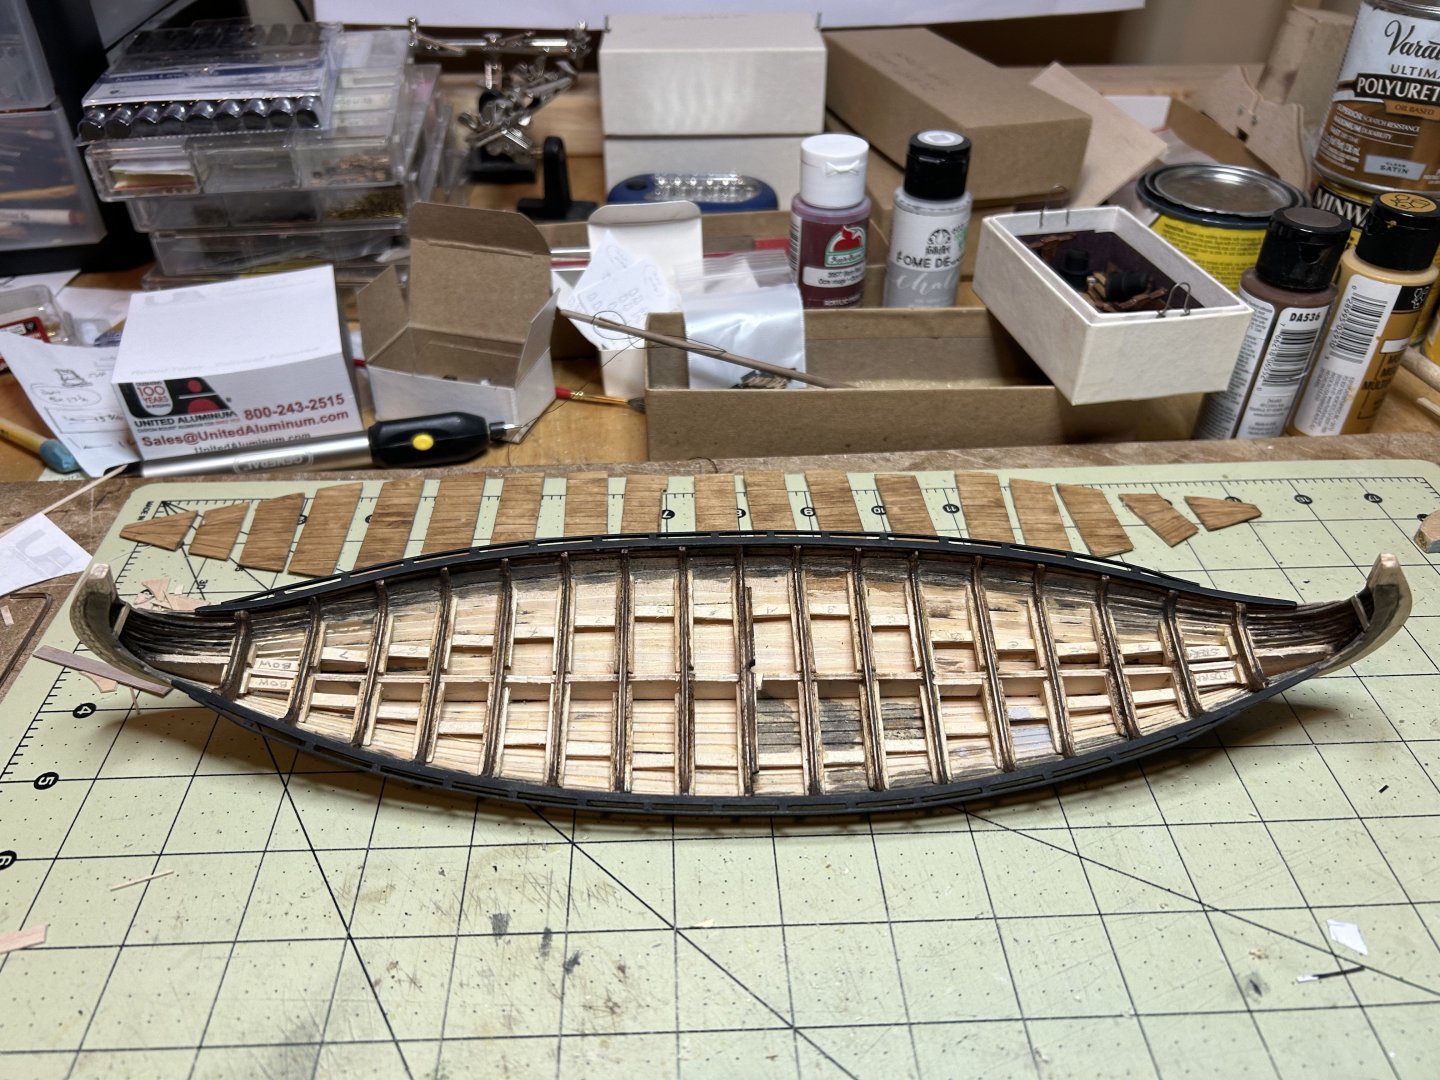
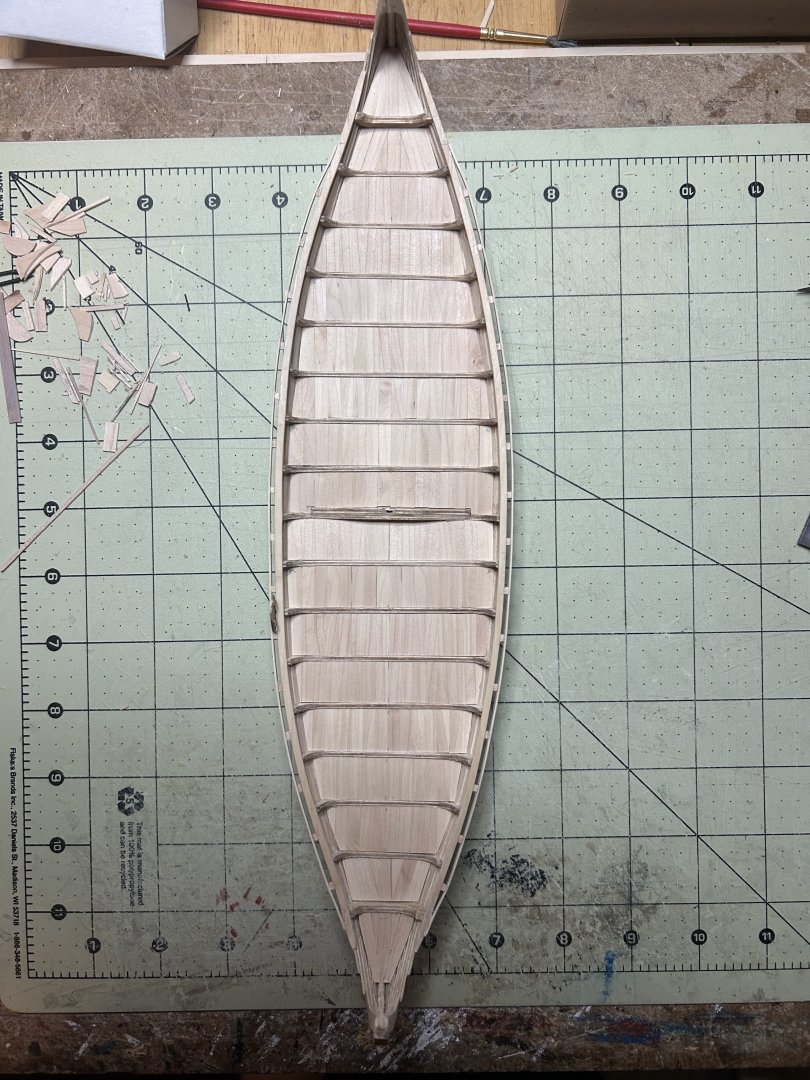
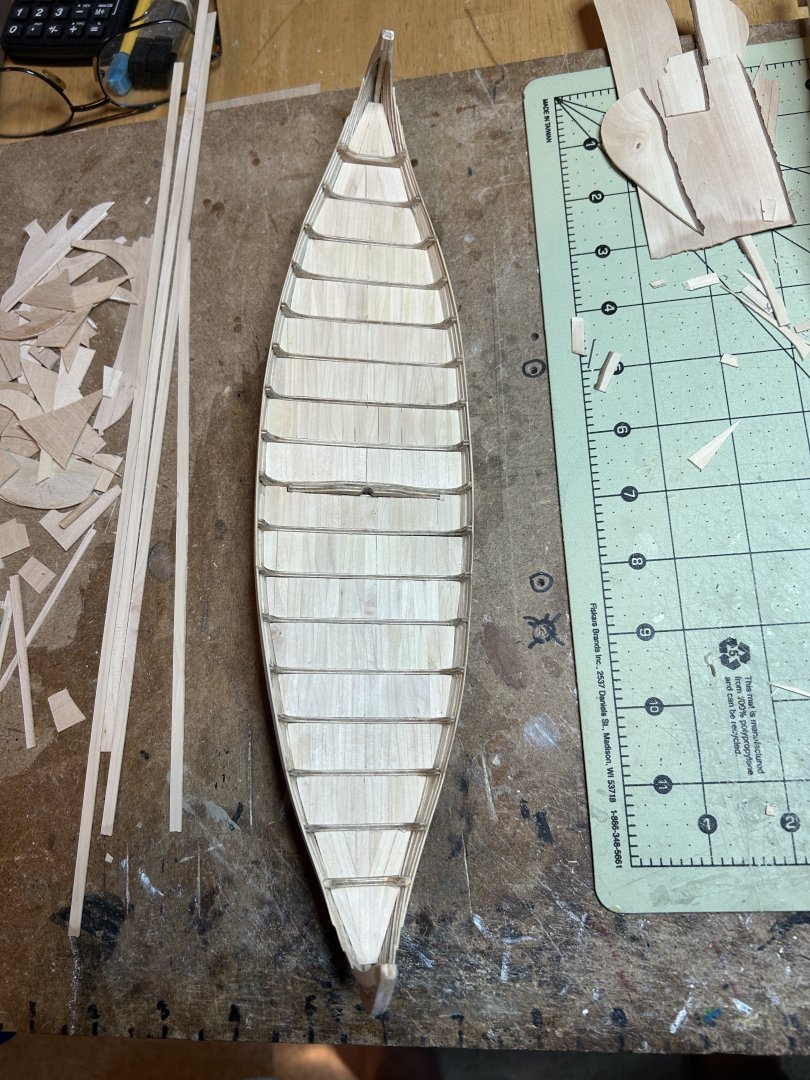
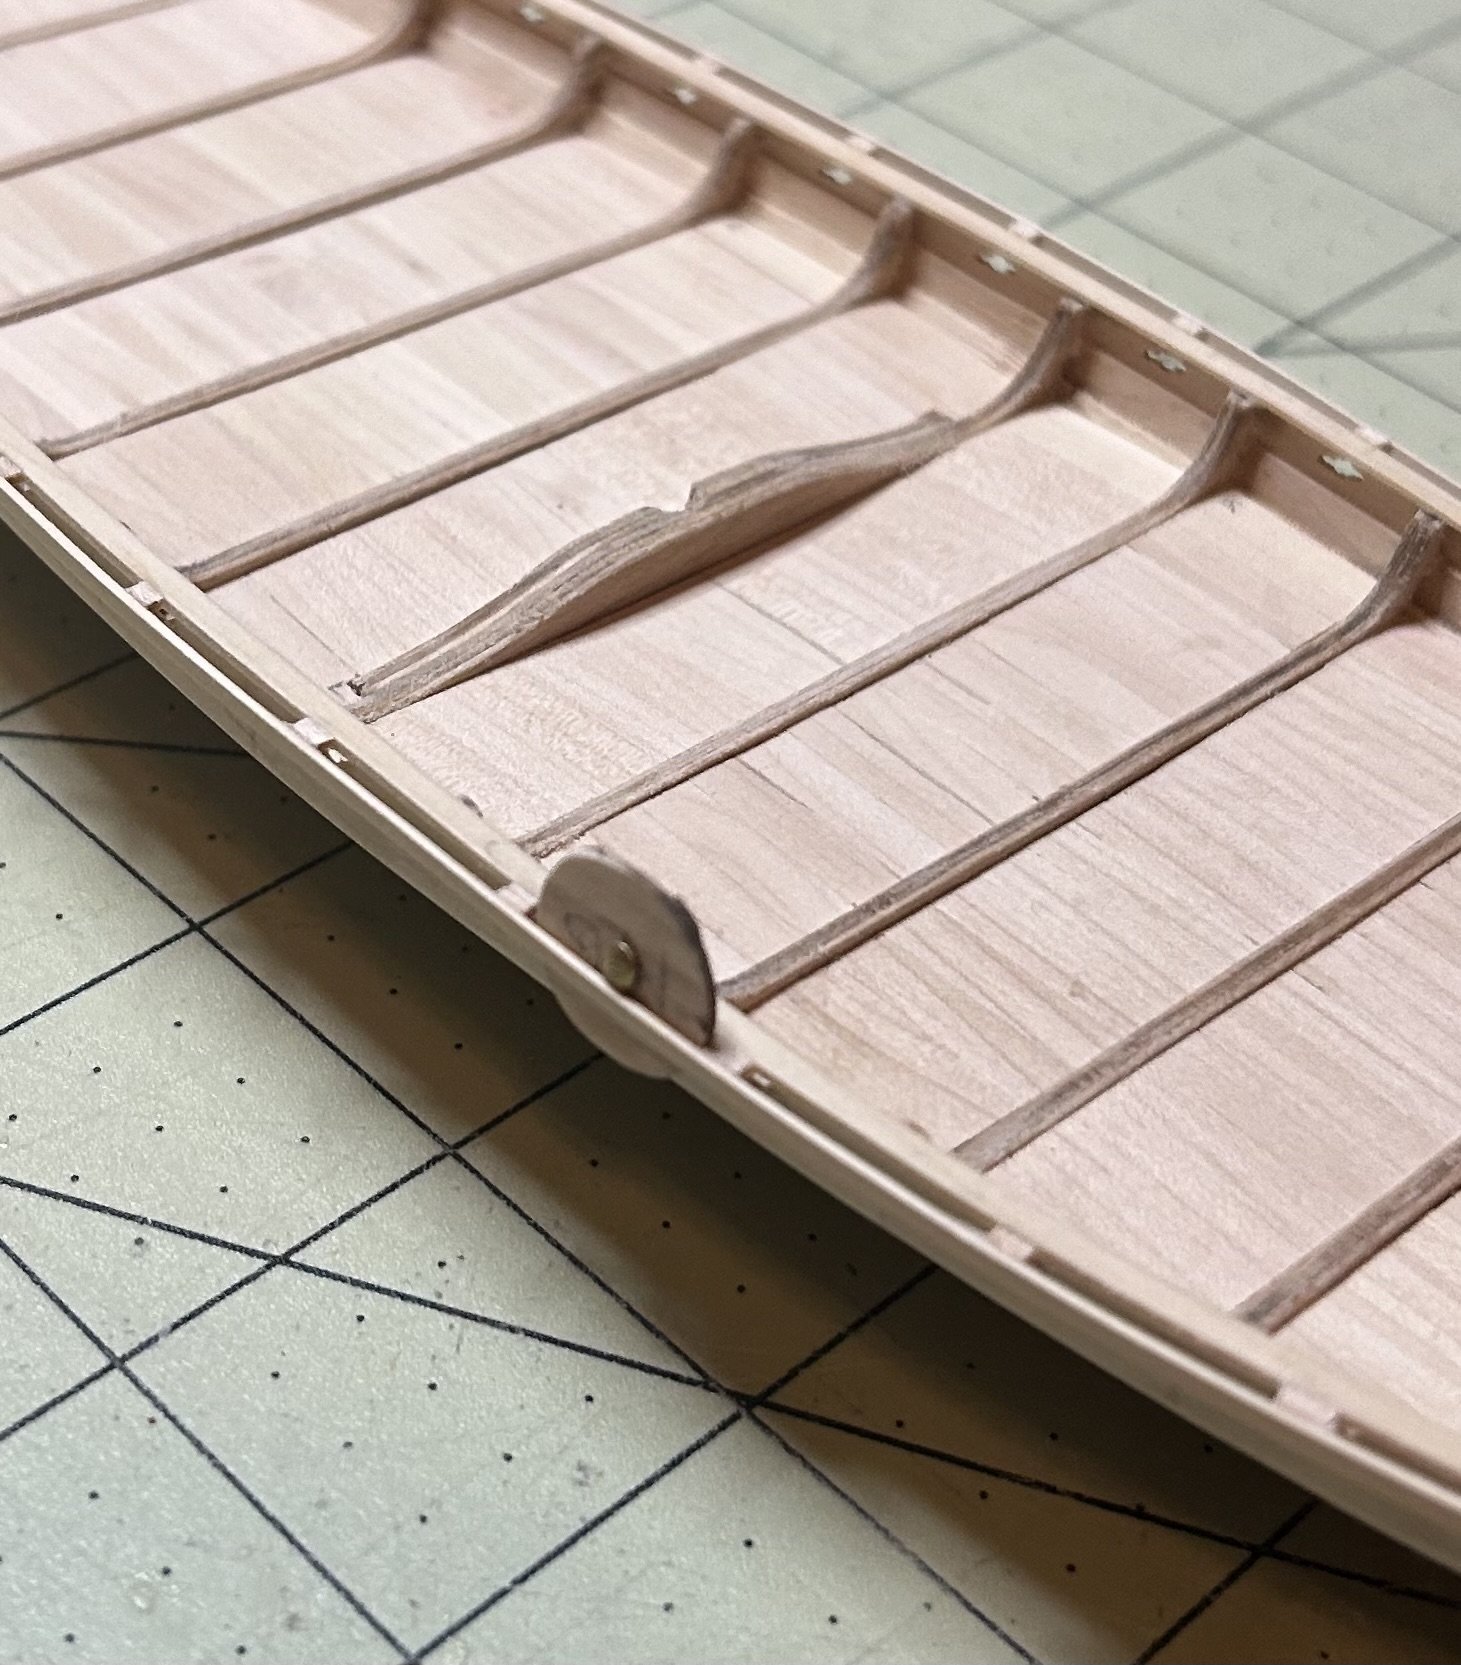
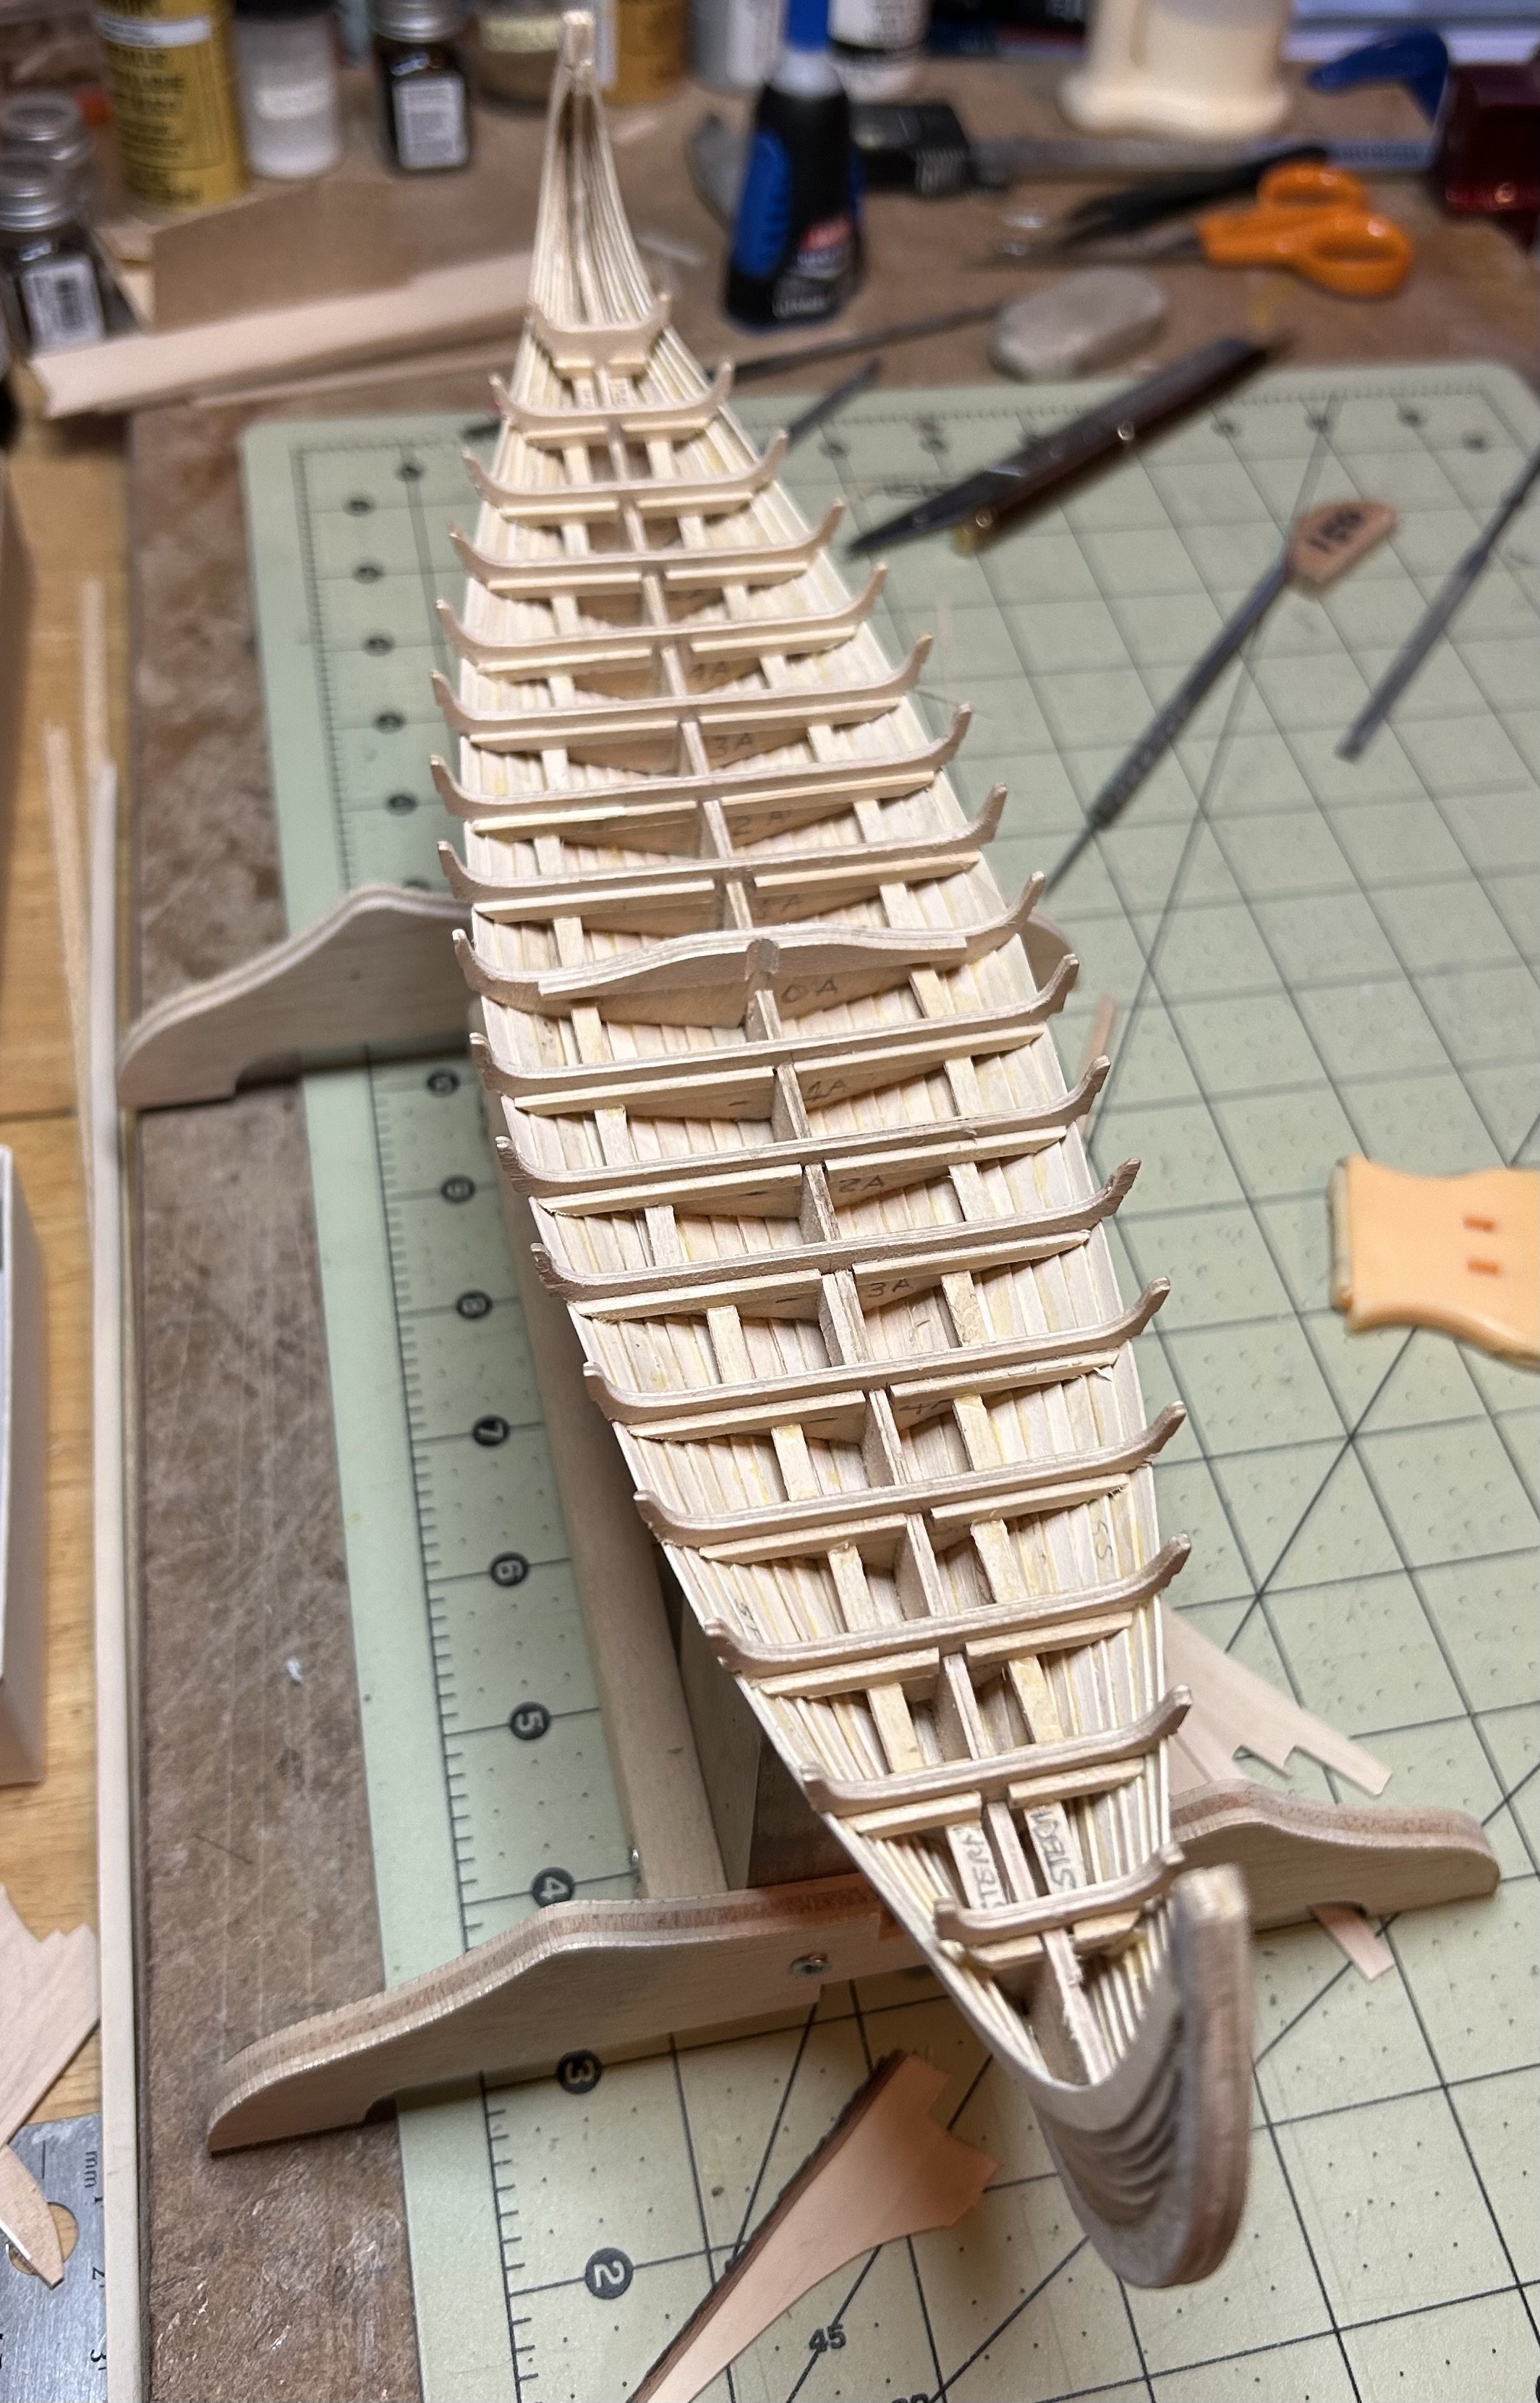
Some more slow and steady summer progress. I finished the hull planking and the deck sections. The deck sections are made using a 1/32” thick piece of basswood and shaping it so it is a snug fit to the inside contour of the hull. Then I glued .025” thick pear strips on top for the finished piece Finally, the edges were sanded to a close fit to the shape of the hull. Everything is still dry fit until they absolutely need to be glued in place. This gives me the option to remove pieces if I run into some problem with the order that I am assembling everything.
I think the next step will be to cut the slots in the hull for the oars. That should be fun. I also need to start thinking about a color scheme.

Tom
- Freebird, hollowneck, Thukydides and 5 others
-
6
-
2
-
Hi Dave
I have seen the model by Pavel. A fellow modeler brought it to this past Northeast Conference. It was under construction so only the hull and decking were completed. She did an amazing job on it.
I actually have the model (won it at the Northeast Conference a year ago). I decided not to build it because it is very large. For this particular model, I wanted to do it in a much smaller scale which is why I am scratch building my own version.
Tom
- mtaylor, Freebird and Ryland Craze
-
3
-
-
It’s summer so progress is very slow in the shipyard. I did finally get the hull planked up to the sides a.k.a, “the hard part” on this model. At least I think/hope so. 🤪😁
Still have to do some sanding but it will get there eventually. 😜


Tom
- Ryland Craze, Thukydides, Knocklouder and 6 others
-
8
-
1
-
My 2 cents. I like the blocks in the second picture. In the top picture, they seem a bit on the reddish side. Maybe it is just how the pic came across on my phone.
Tom- thibaultron, CiscoH, Canute and 3 others
-
6
-
Hi MSW,
I was going to take the summer off from building anything but alas, I have the sickness. Being inspired by watching all the Viking series movies on Netflix, I started building my own Viking longboat. I am using a paper done by Dr. Biscoff on the Oseberg as a guide. It is quite detailed so there should be more than enough information to scratch build something similar. I will make up my own carvings for the bow and stern to personalize it.
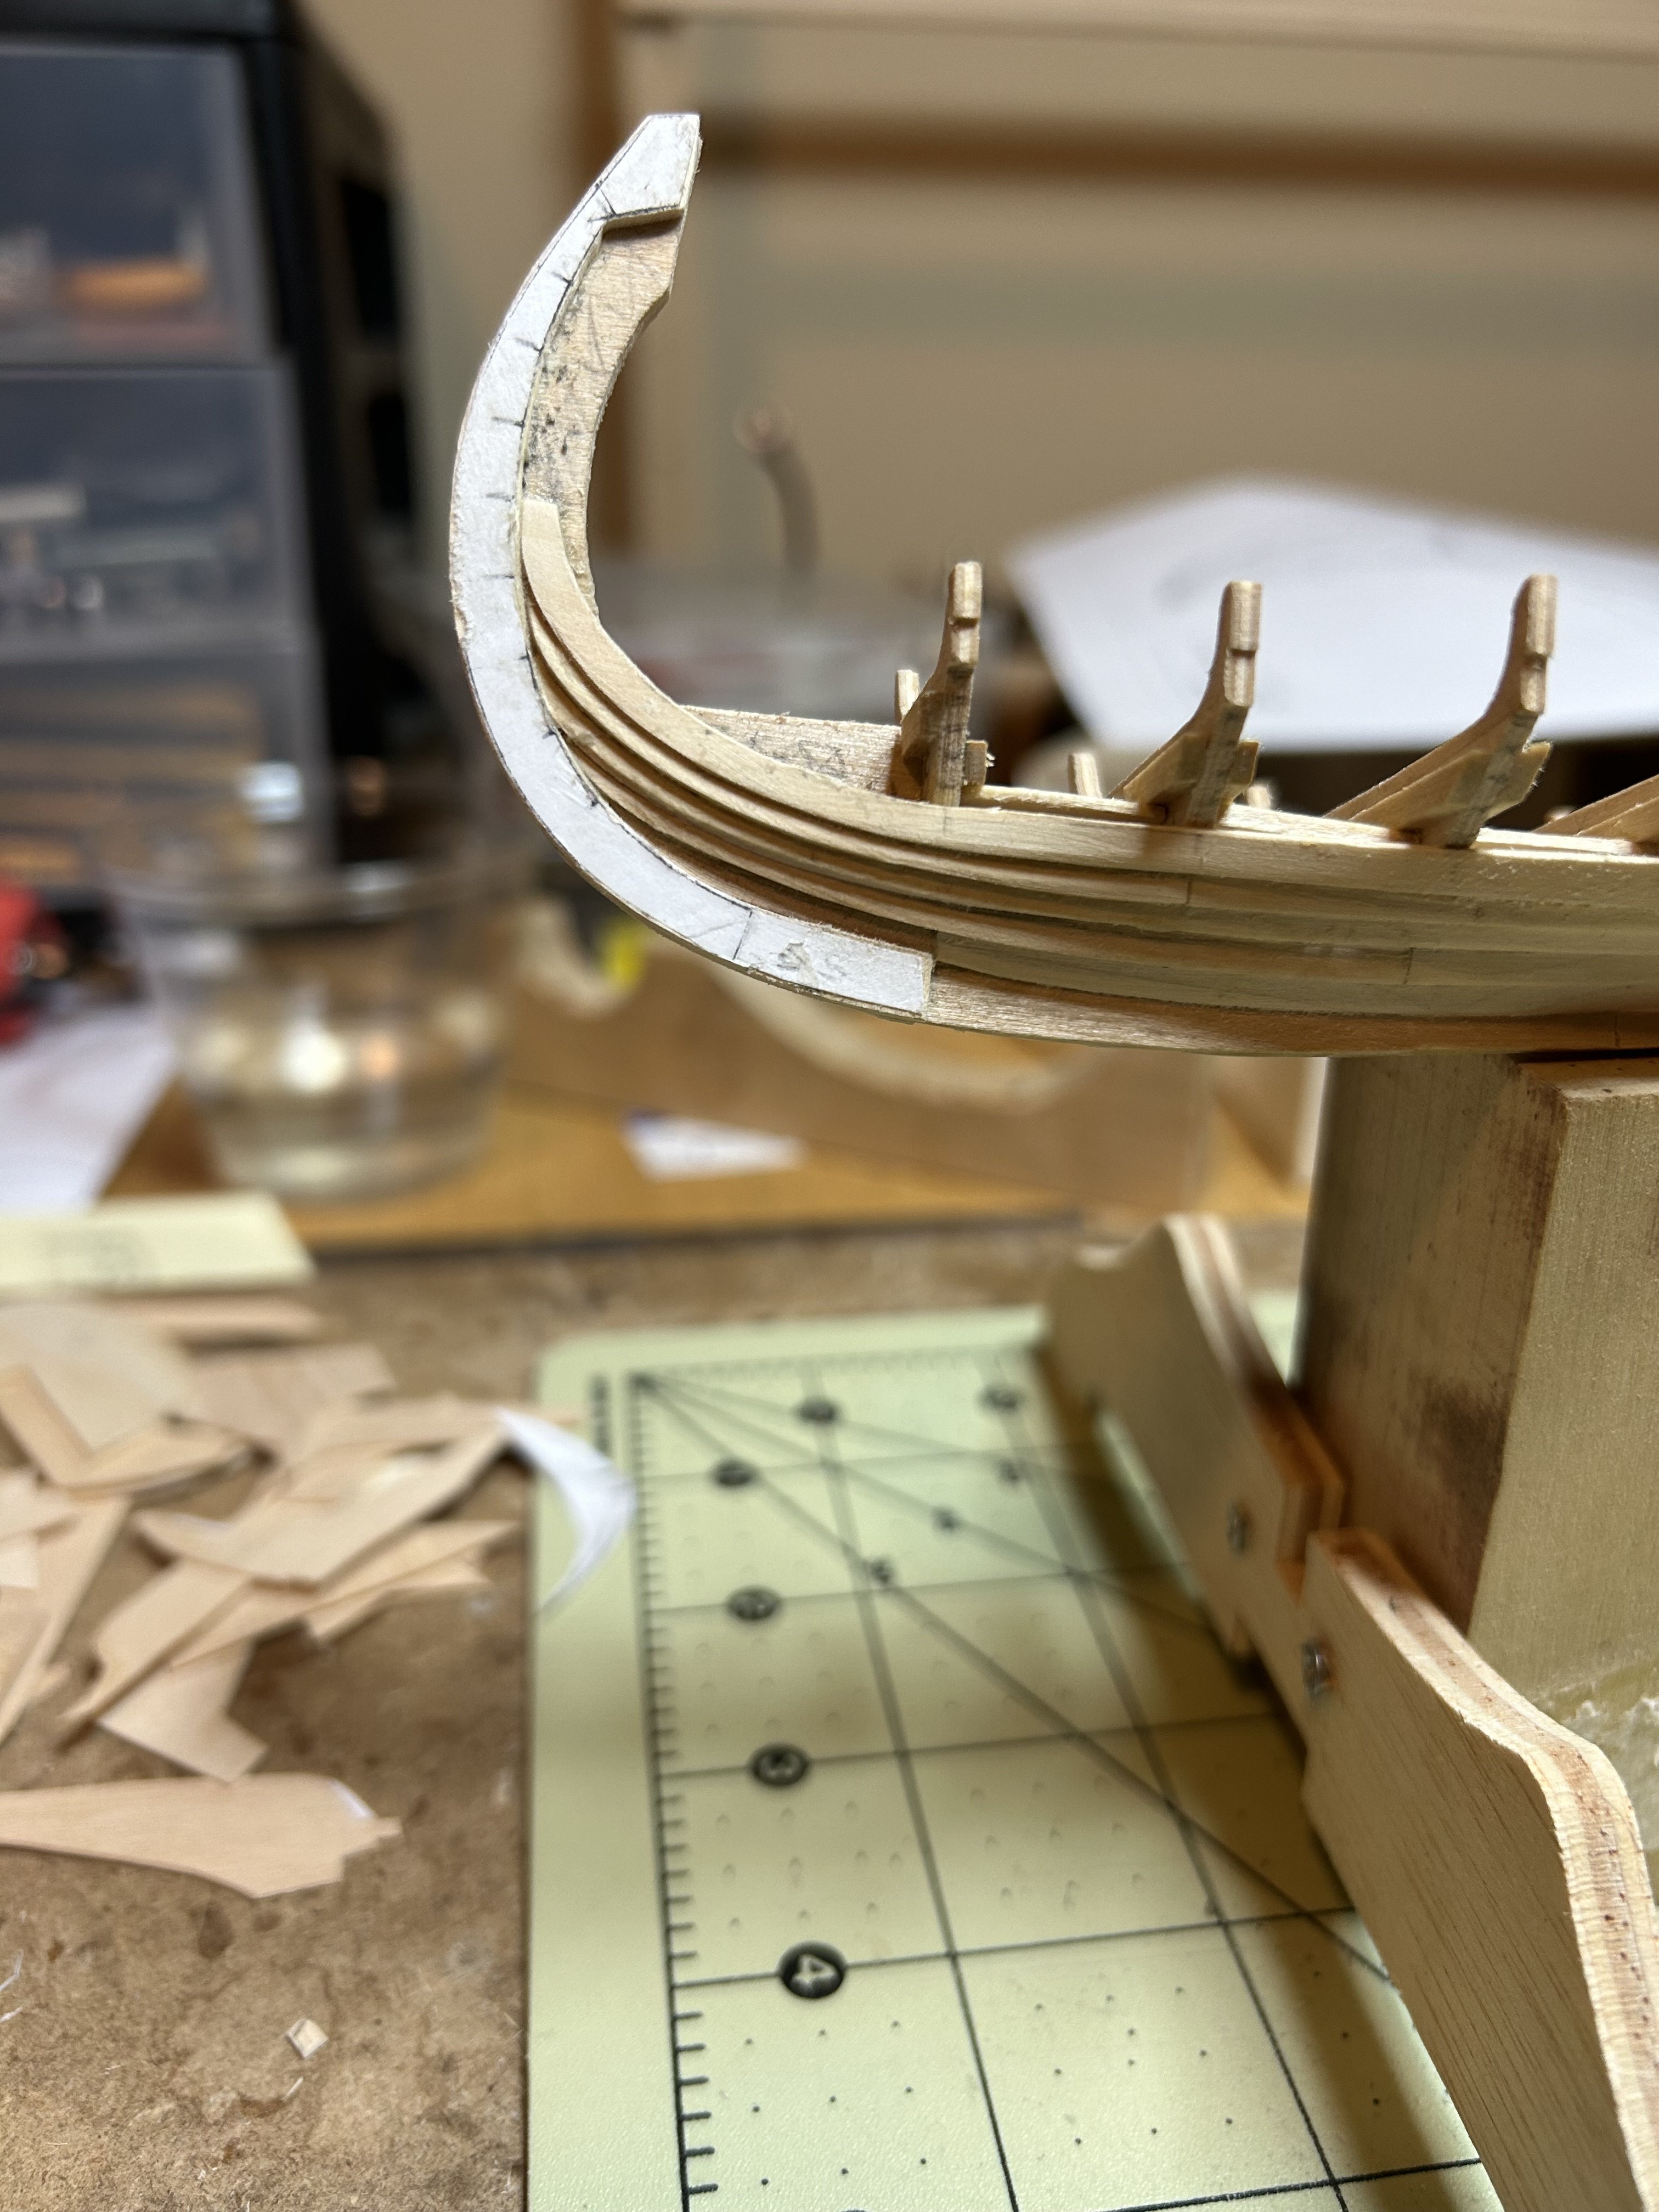
here are some pics from the beginning of my journey. The keel is made from .080” thick plywood I made from some basswood I had lying around. The frames and planking are made from my neighbors’s pear tree we cut down last summer. I guess I went overboard with the scratch idea by cutting down and drying my own wood 😜


Tom


Viking longboat by toms10 - FINISHED - scale 1:64 - late 9th century
in - Subjects built Up to and including 1500 AD
Posted
Hi Ryland
Thank you and yes the plan is to bring this to the conference.
Tom