HOLIDAY DONATION DRIVE - SUPPORT MSW - DO YOUR PART TO KEEP THIS GREAT FORUM GOING! (Only 69 donations so far out of 49,000 members - Can we at least get 100? C'mon guys!)
×


ca.shipwright
-
Posts
483 -
Joined
-
Last visited
Content Type
Profiles
Forums
Gallery
Events
Everything posted by ca.shipwright
-
 I am also going to super detail my Victory. It will be interesting how much these ships will resemble each other. I now how you get so much done so fast. I spent my first ever 8-hour shift in the boatyard, even skipping lunch, and was amazed how much I got accomplish. This is the way to go.
 -
What I usually do to glue the bulkheads to the center keel after getting them in the correct position is to take a paint and brush a nice bead of Wellbond glue (it dissolves with alcohol) on the four 90 degree angles. This is much like caulking and I have never had a joint loosen. Hope this helps
-
one more. reposted Screwed up with the photos

-
Very nicely done. I will continue to watch as my Victory comes along. Regards
-
Your build log will be a great reference for my future build. You are doing a great job. Thanks for sharing. Regards
- 1,350 replies
-
- 3
-

-
- constitution
- model shipways
- (and 1 more)
-
Could not resist the $349 price from Model Expo. It now resides on the shelf awaiting it's turn. I will be watching your build with great interest. Regards
-
Thank You Richard!!!!!!!!!
-
Dave, It just keeps getting better and better; a true joy to look at and only wish I had a fraction of the skills that you exhibit. Please keep posting Regards
-
Hi Les, Check my March 31 post if you haven't already. It may give you some ideas. As everyone says, the work is in the preparation, filling and sanding to very smooth. Then a primer. Several thinned coats work much better than one thick coat. Regards
-
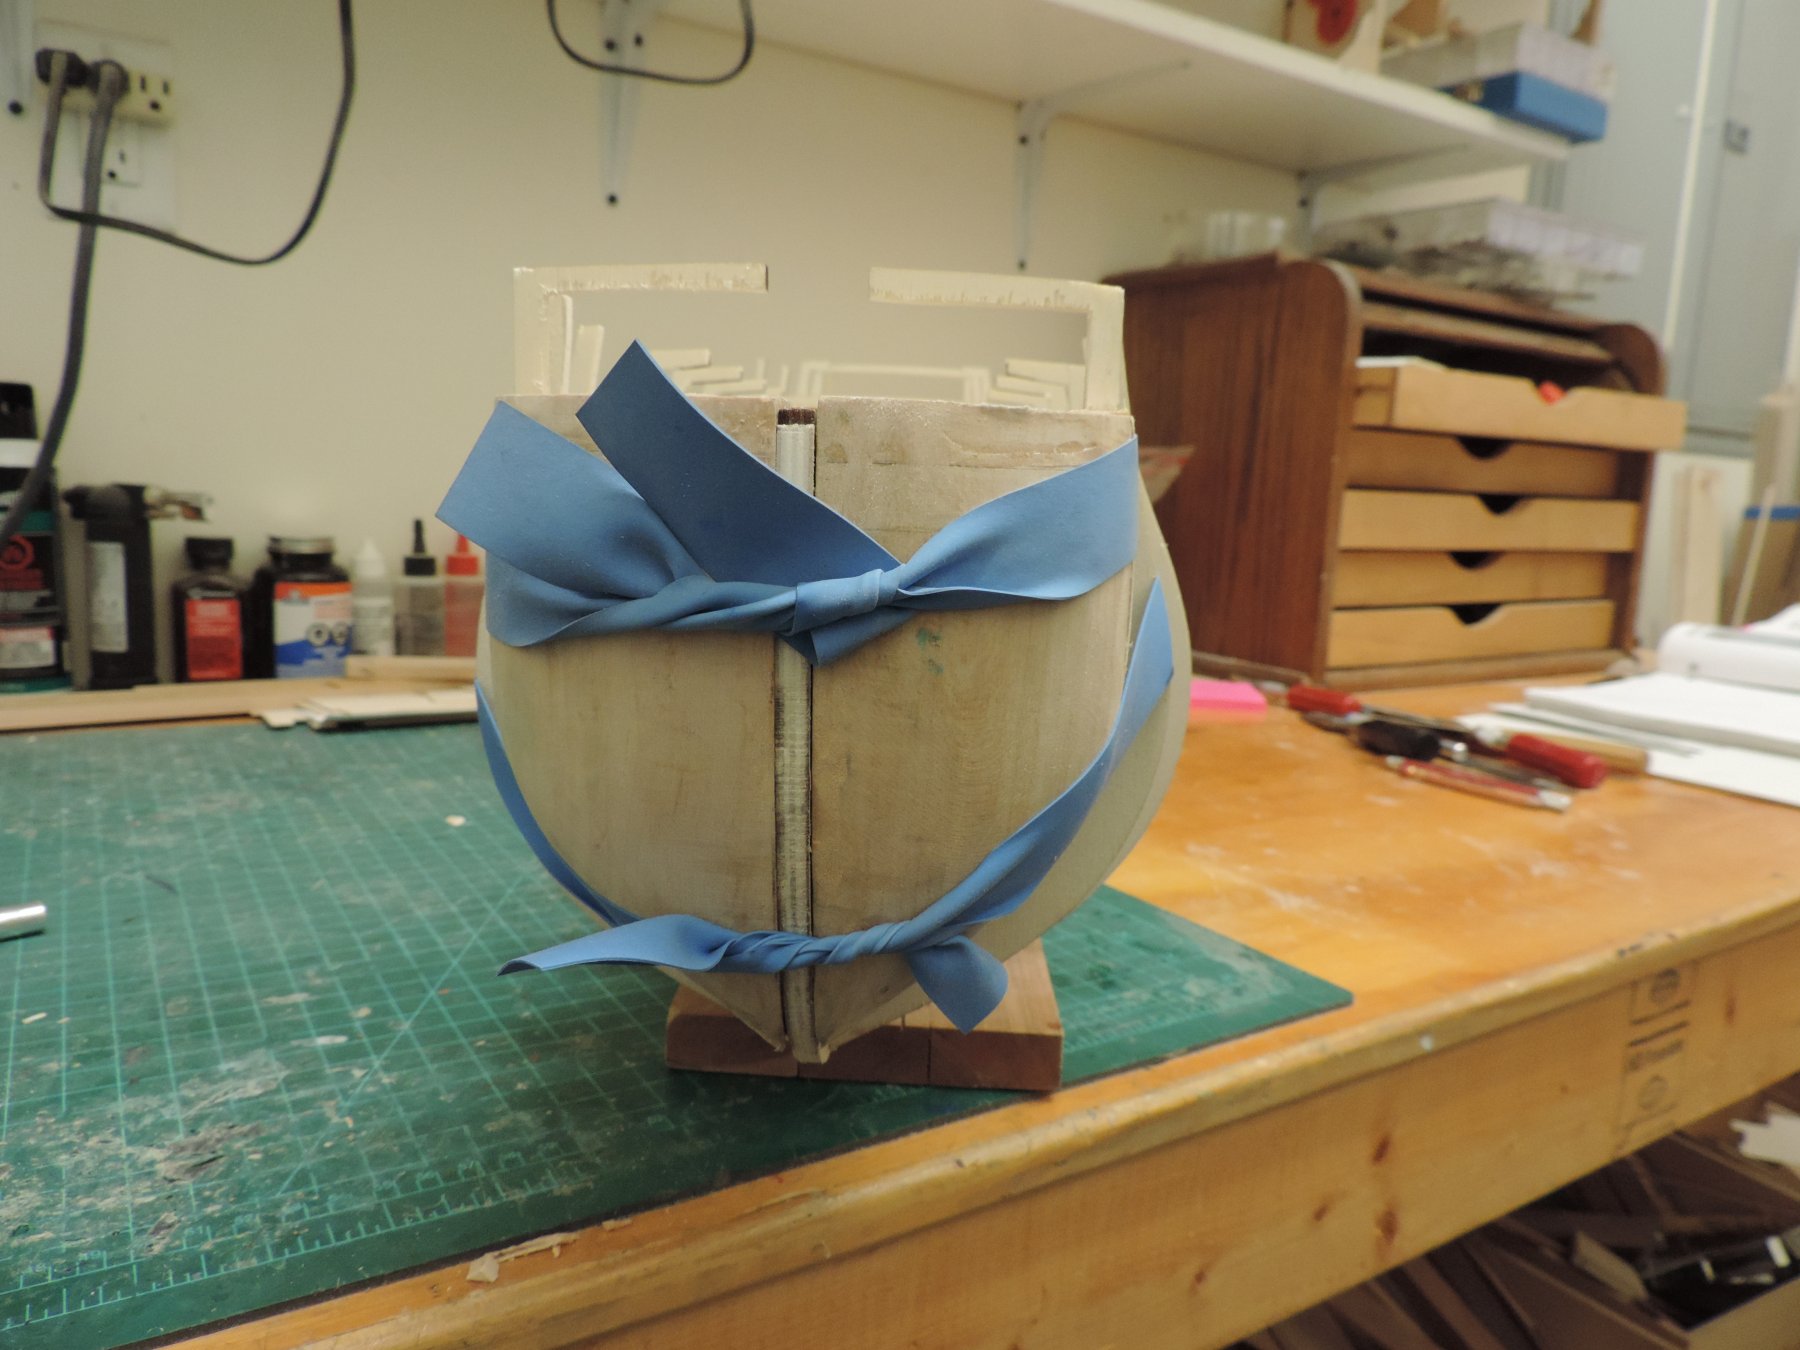
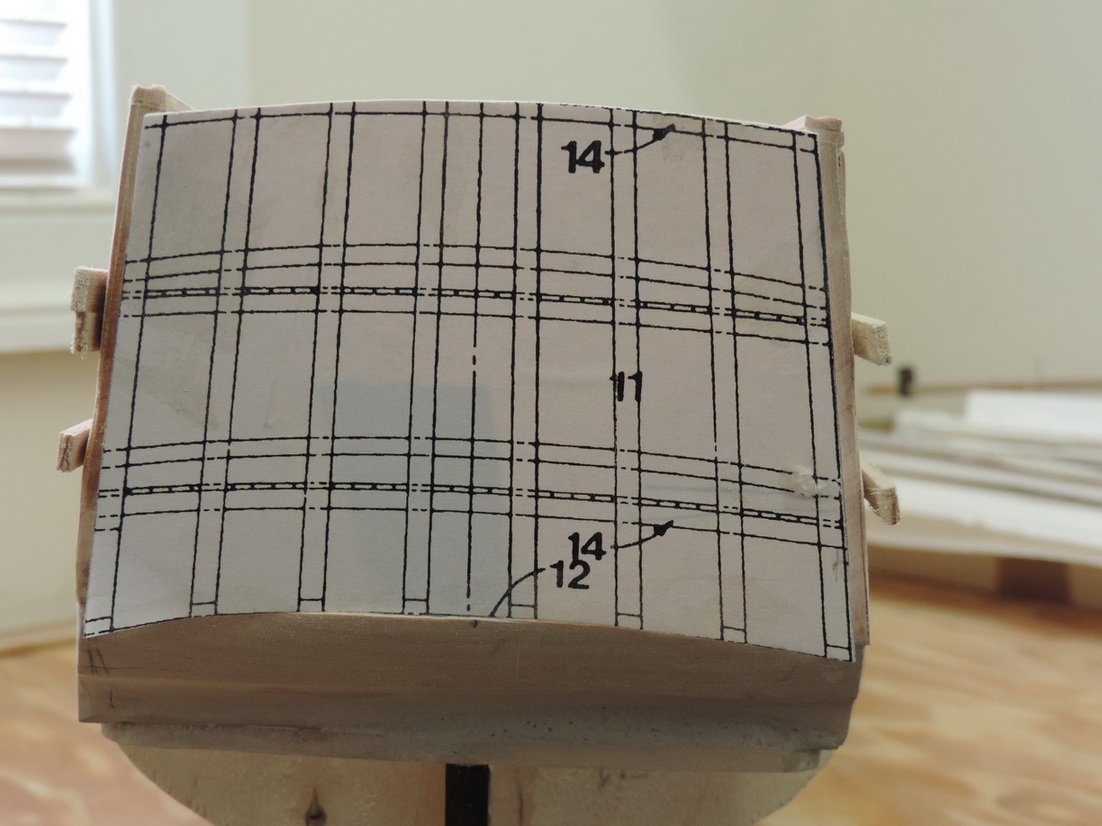
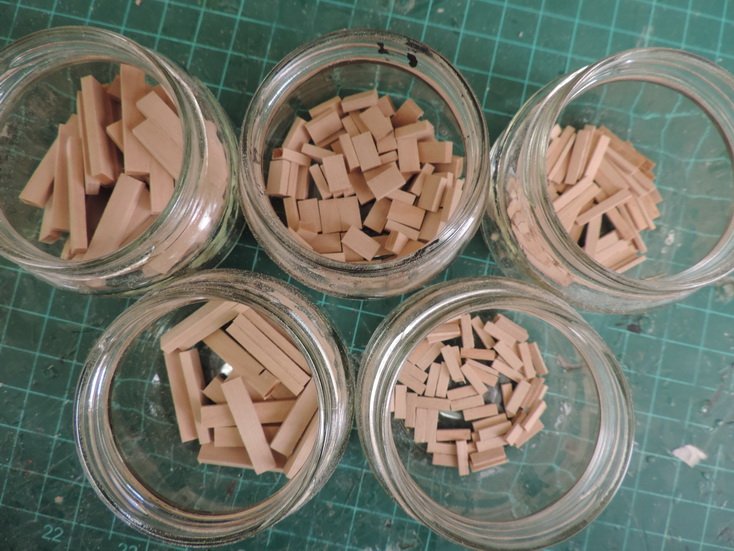
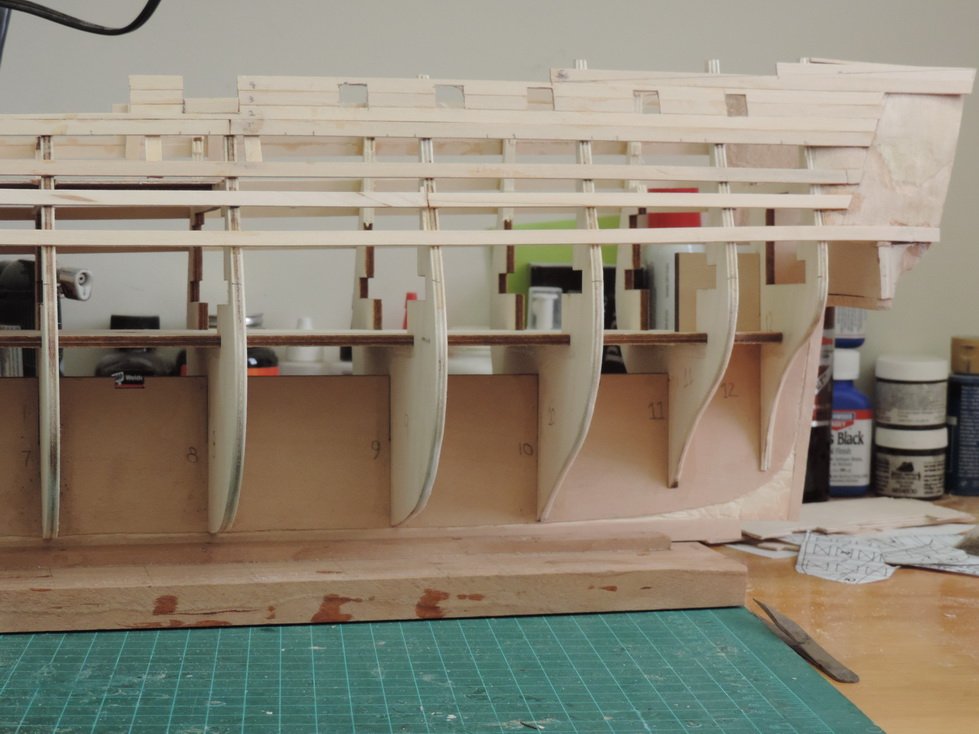
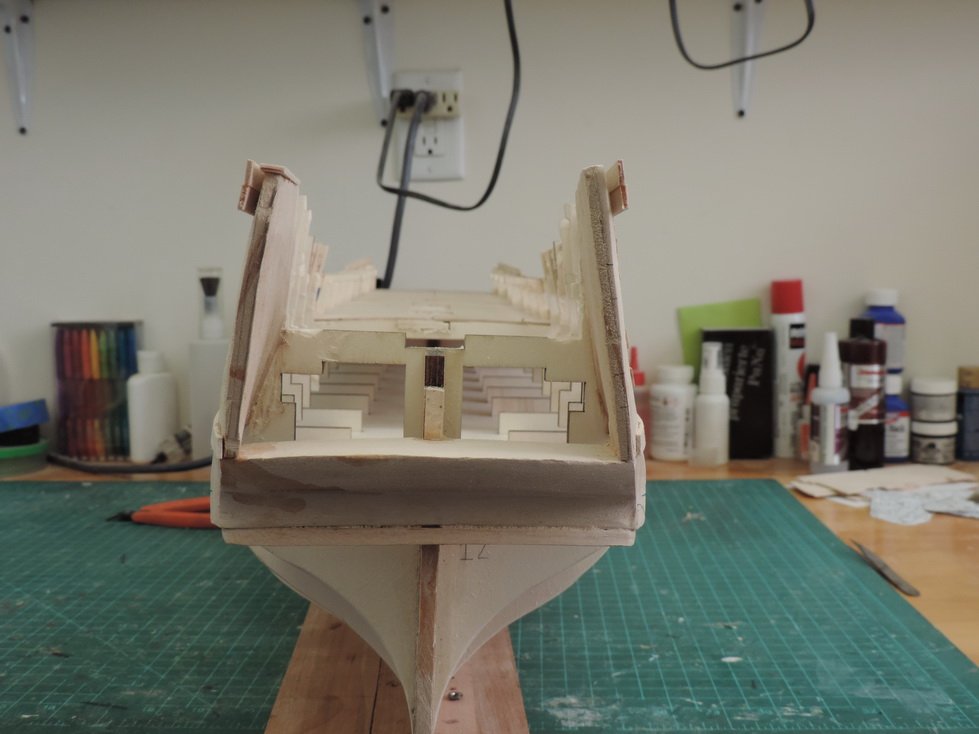
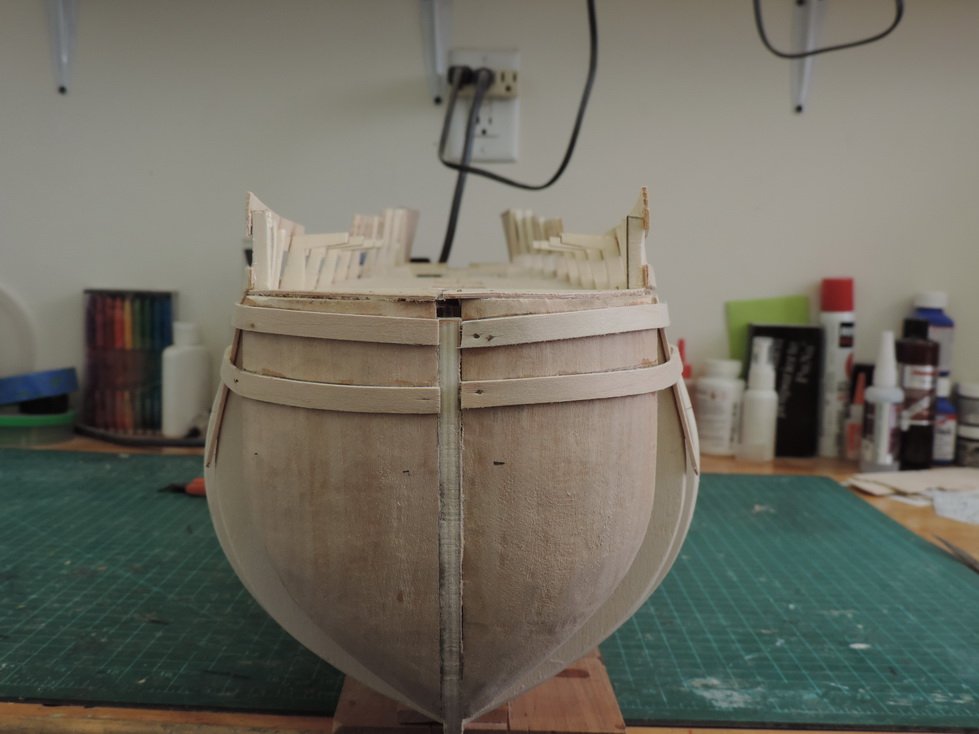
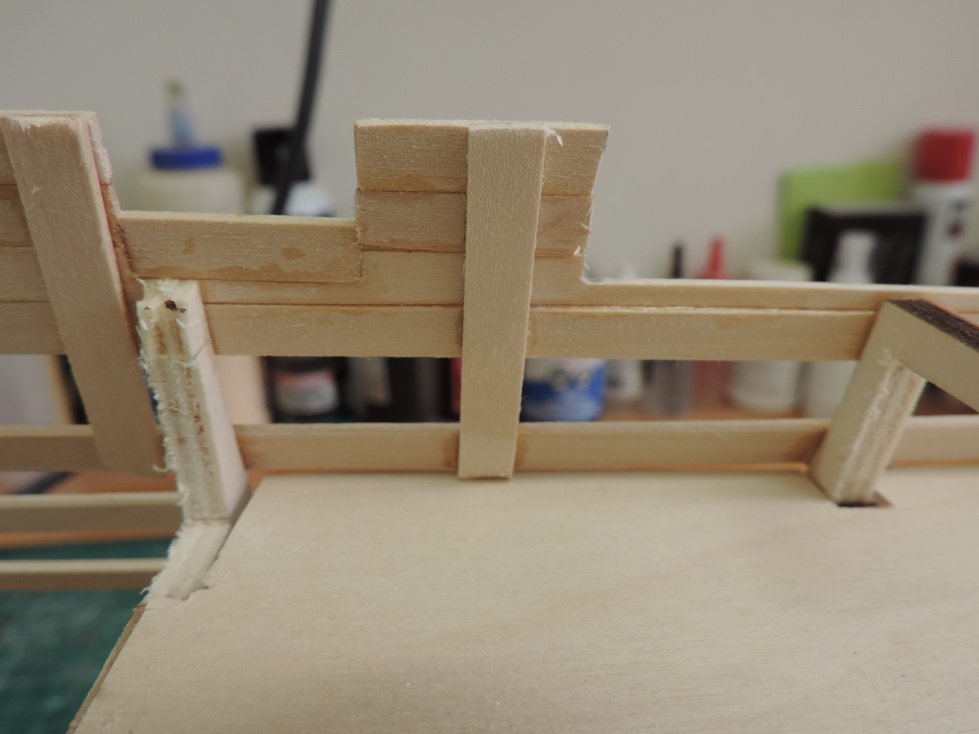
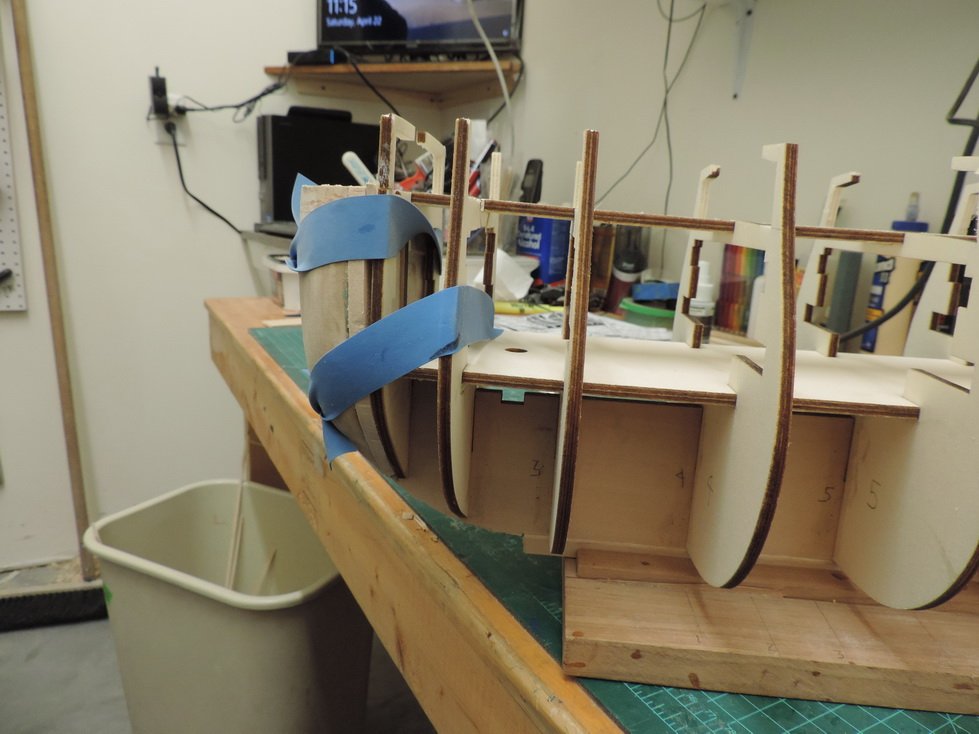
Greetings, Time for another update. I started over last week after receiving the new framing from Mantua and have just about caught up to where I was before. There are several pictures and I will have several photo posts along with this. The ship is coming along rather nicely. A couple of millimeters off here and there to be adjusted later. The first photo shows how much less the beam is on the model than the actual ship according to the AOS. The blue bands that are holding the bow blocks together until the glue sets are the disposable tourniquets that the blood suckers err phlebotomists are using now. They work real well on any non parallel surface. There are many recurring measurements on this ship that introduce a chance of small errors from repeating viewing. I remembered a method from my wood working days of cabinet and furniture making that helps. They are called story sticks. You put the distance on the stick one time and draw the line on the work piece. It's a lot easier that moving a ruler around each time and gives me more consistency. The jars have all the pieces for the gun port frames that I made while I was waiting for the parts to arrive. You can see two braces that I installed on the quarterdeck bullworks. I got tired of breaking these pieces off because there was no framing support. They are thin enough to disappear when the inside planking goes on. Here come the photos _______________ Michael Zemmel Midlothian, VA Completed: AVS, MS Benjamin W. Latham Building: Corel HMB Endeavour, Panart HMS Victory, "Buy all your toys before you retire" ma.zemmel@gmail.com

-
Very nice indeed.
-
It looks like there will be a cascade of problems associated with that 1 mm. Mantua got the money and I got the replace parts for the framing in 4 days. Great service! Assembled all the framing, counters, bow filler blocks, and cut the rabbet. I have misplaced my ebony stern post. Hopefully it will show up or I will make another out of boxwood. When I was cutting the bow filler blocks, the top view as taken from AOS was wider than the first bulkhead. This caused me to scratch my head and what the h***. I then copied the entire forward portion of the main deck and lay it across the ship from the bow to mid ship. Surprisingly, it was at least an inch wider than the Mantua hull framing. It looks like Mantua took some liberties the the kit design. The entire ship's beam is at least 1 inch narrower the the AOS drawings. She is still a monster. Terry- I was following Bob's practicum with my homemade framing parts. This is not an easy build, but, Bob's practicum is so detailed that you almost can't go wrong if you read the section once, and then read it again. If you do purchase the practicum, and I highly recommend it, there are a couple of errata that I can fill in for you. Not having the correct dimensional material and my lack of skills all added to the continuation of the problems. The biggest was that almost all the gun ports had to be cut into the bulkheads. This was not a task I was willing to try. And, it would have seriously degraded the structural integrity of the hull. Photos will follow soon Regards
-
Greetings, It appears that that little 1 mm that I wrote about last has jumped up and has bitten be you know where. When laying out the gun port openings on the main deck, several are directly over a bulkhead. This requires removing the top of the bulkhead which supports the upper deck. I cannot see a remedy for this other than to cut off the tops and re-glue them to the inside of the planking. This will give me some support for the upper deck., but, not a lot of strength. Maybe Bob has another idea. If not, then it looks like Mantua is going to get their money for the replacement parts. What a bummer.
-
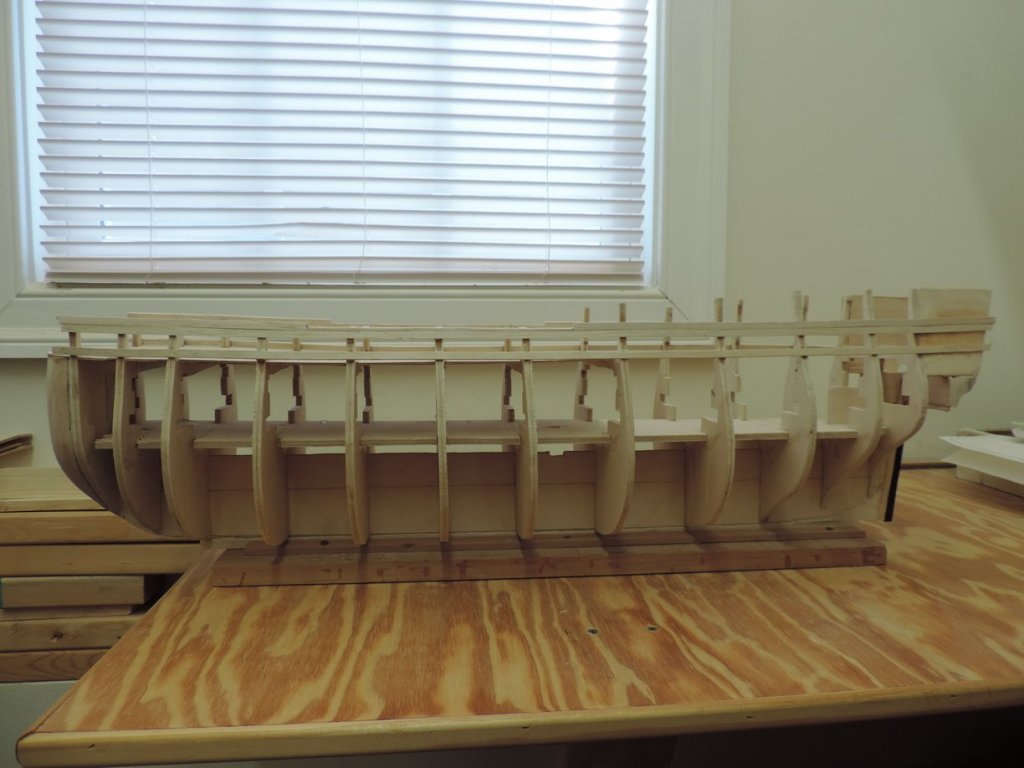
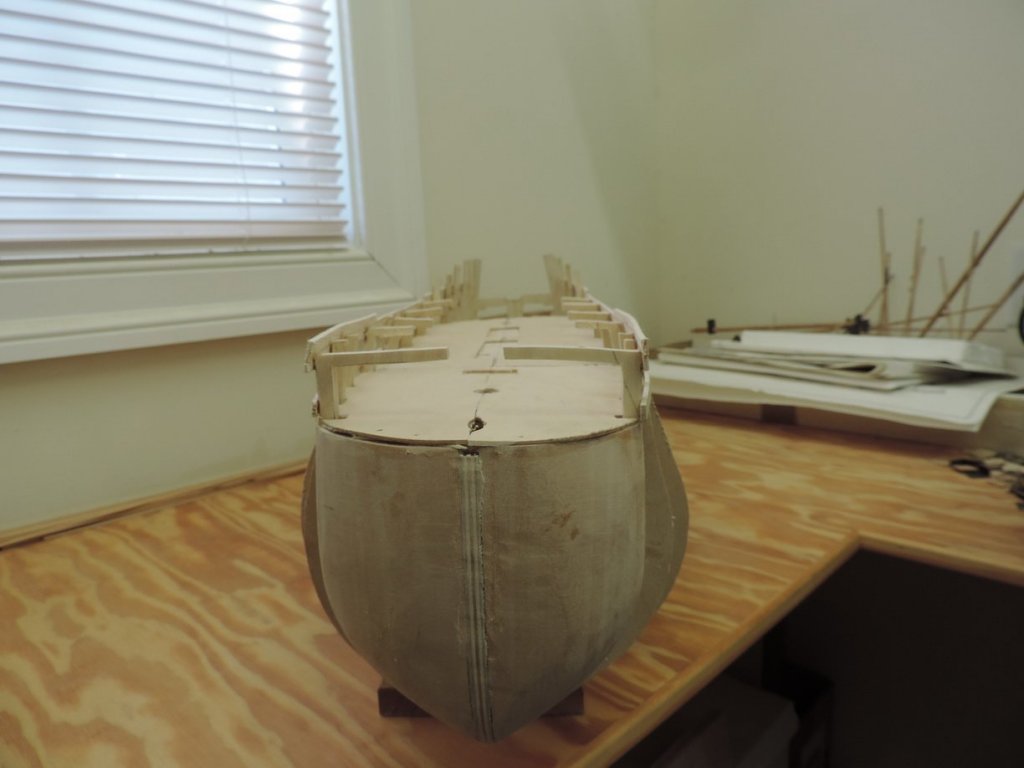
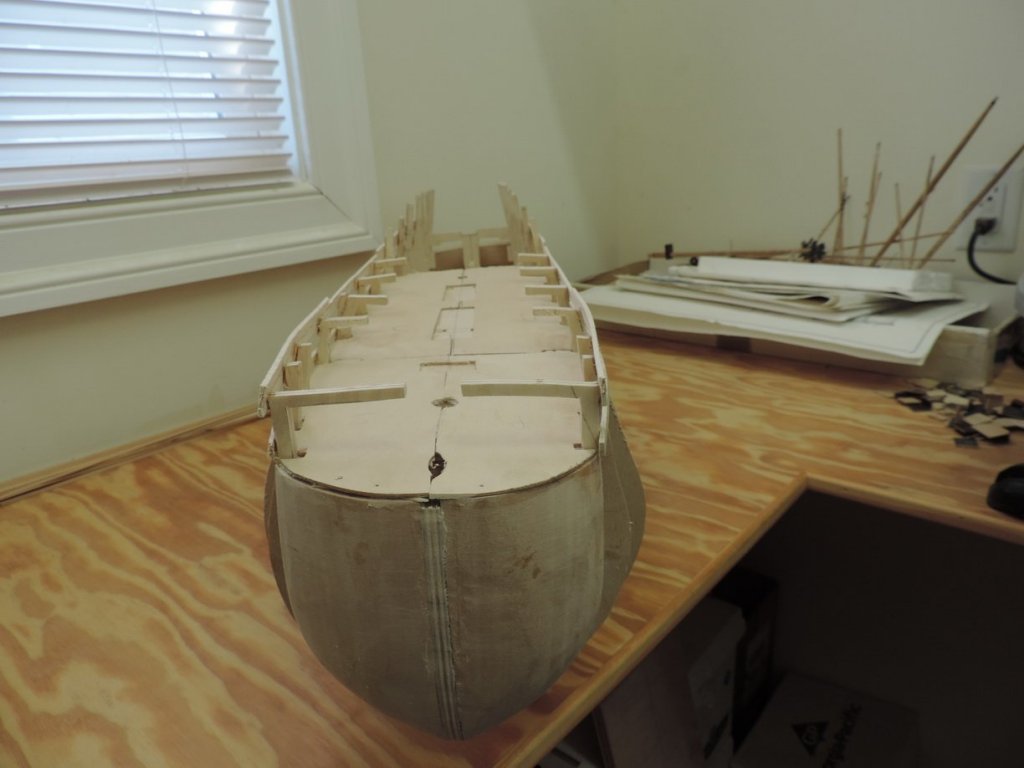
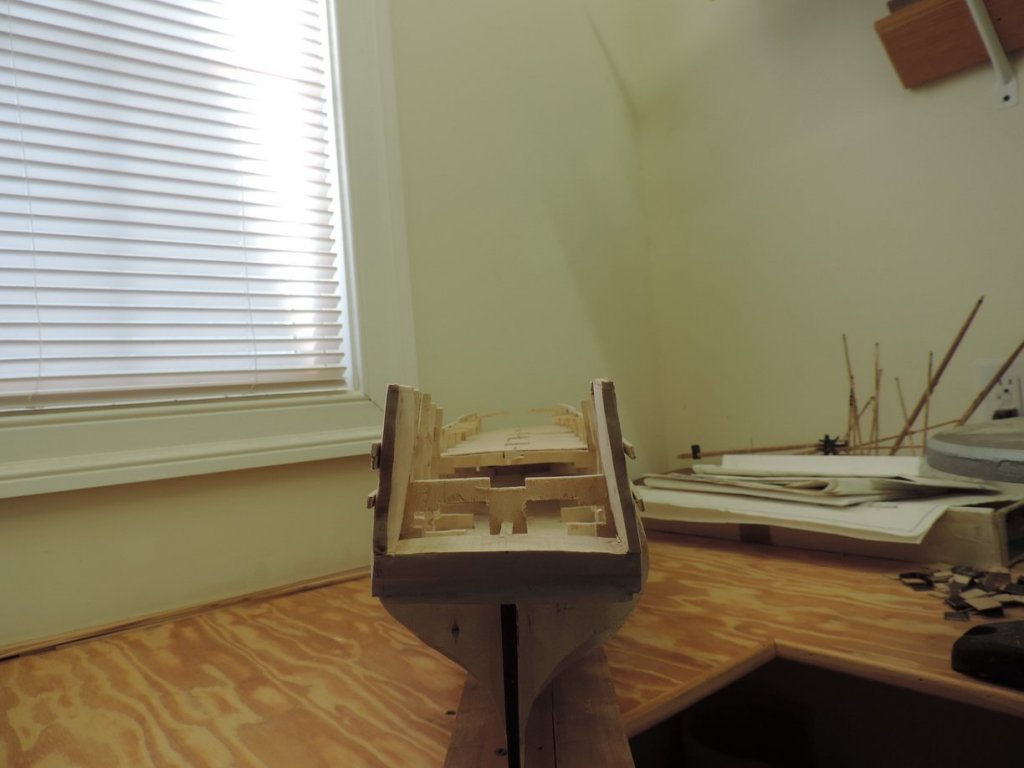
Greetings, Finally got enough done to post an update. First, you never know how the bulkheads are going to work until you start planking. This is when the defects show up. As you know, I decided to make my own bulkheads and center-keel as well as the rest of the hull formers and sub-decks myself. This became quite a job and there are some discrepancies in the parts. I don't know how or why they didn't work better, but, perseverance and cussing and we prevailed. I think a big issue was the fact that I used 6mm plywood and the kit used 5mm. A silly little mm, but, it adds up when you consider that the 12 bulkheads means a variance of 1.2 cm over the length of the ship. This made for adjusting all the slots to make them bigger and re-cutting the sub-deck slots around the bulkhead. Not a problem because all of this will be covered by planking. I consider it a moral victory that I wound up within 1/8 in. of Bob's published numbers. The big delay was in making and remaking the transom sides. Finally figured it out with Bob's help. Looking at the photo, it looks almost exactly the same as Bob's in the practicum. I consider this a huge win. I hope I'm right. There are two places where there is a slight bulge in the planking. I may have shimmed the bulkhead to much. This will be corrected. I have to say, I looked and looked at the fairness of the hull over and over and didn't see this until the photos. I took a break from building and milled all the pieces for the gun port frames out of boxwood. I really like making sawdust. It must be some primal feeling that I get as well as the smell of freshly sawn wood. Much like the satisfaction of freshly mowed grass on the golf course. Photos to follow in this post and the following. Greetings, Finally got enough done to post an update. First, you never know how the bulkheads are going to work until you start planking. This is when the defects show up. As you know, I decided to make my own bulkheads and center-keel as well as the rest of the hull formers and sub-decks myself. This became quite a job and there are some discrepancies in the parts. I don't know how or why they didn't work better, but, perseverance and cussing and we prevailed. I think a big issue was the fact that I used 6mm plywood and the kit used 5mm. A silly little mm, but, it adds up when you consider that the 12 bulkheads means a variance of 1.2 cm over the length of the ship. This made for adjusting all the slots to make them bigger and re-cutting the sub-deck slots around the bulkhead. Not a problem because all of this will be covered by planking. I consider it a moral victory that I wound up within 1/8 in. of Bob's published numbers. The big delay was in making and remaking the transom sides. Finally figured it out with Bob's help. Looking at the photo, it looks almost exactly the same as Bob's in the practicum. I consider this a huge win. I hope I'm right. There are two places where there is a slight bulge in the planking. I may have shimmed the bulkhead to much. This will be corrected. I have to say, I looked and looked at the fairness of the hull over and over and didn't see this until the photos. I took a break from building and milled all the pieces for the gun port frames out of boxwood. I really like making sawdust. It must be some primal feeling that I get as well as the smell of freshly sawn wood. Much like the satisfaction of freshly mowed grass on the golf course. Photos to follow

-
Dave, Just keeps getting better and better. How do you get your fingers in as crowded as the deck is? I must have a case of "fat fingers." Regards,
-
I built the Bluenose II and wanted a midnight blue color for the upper hull and a rust red for below the waterline. I couldn't find what I wanted in any brand of paint. I went to Lowes and looked at all their paint color chips and found the colors I wanted. I had them make me a trial jar of each color using eggshell acrylic base. I thinned this 20% with distilled water, Brushed on several coats, and finished with a satin Wipe-on-poly. Came out very nice. At $3.95 for an 8 oz. jar, you can't beat this.
-
Jesse Lee, I have found that there will be one or more bulkhead extensions that break more than once. After the first break, I soak the extension with extra thin CA glue on both the free and fixed piece while holding them together. This produces a "weld" that is indestructable. The only down side, it takes extra elbow grease to fair this piece as it get extremely hard. Regards
- 1,306 replies
-
- 7
-
-
- syren
- model shipways
- (and 1 more)
-
Dave, As usual, impeccable work. It's so nice to look at your photos. They are grand. Regards
-
Beautifully done E J. Your photos are super- keep them coming. Regards Sold my La C.- can't work in 1:100 anymore. But I am continuing to follow your log. It is very inspirational as is the LSR. Regards
- 608 replies
-
- 3
-
-
- la couronne
- corel
- (and 1 more)
-
Outstanding. I am totally in awe of your metal work, especially the studding sail brackets. I wish I could do this type of thing. But somehow, the soldiering iron and I just don't seem to get along. Any advice on the how to would be greatly appreciated. Regards
-
Ahhhh. The never ending planking story. I built the Model Shipways Constitution in 1:76 scale. The planks were 1/8th in wide. I thought I would never finish. If I remember correctly there were about 150 planks needed. Thankfully there were some sub-assemblies that I could work on for a diversion. Your SLR is looking good. Drive on!!!!!!!! Regards
-
As usual your work as superb. Regards