


vossy
-
Posts
590 -
Joined
-
Last visited
Content Type
Profiles
Forums
Gallery
Events
Posts posted by vossy
-
-
Hi, can anyone suggest a method to make flat rope coils to lay on the deck behind gun carriages etc?
These cause me all sorts of grief.
Thanks.
-
I have done the Amati Santa Maria and the Mantua Santa Maria. Both are good kits that can be further enhanced by a bit of good old fashioned bashing.
Both have pro's and cons like all kits really. I would say of the 2 I prefer the Mantua. But you really need to cut down on the ratlines on that one. There's way too many.
You might also like to check out this newer version from Pavel Nikitin
https://shipsofpavelnikitin.com/details?code=CSM01
I will definitely be getting this one day.
- mtaylor, Knocklouder and GGibson
-
 3
3
-
Handrails added and dry fitting of flag locker and tiller housing.

-
It used to film here regularly until the main star was accused of sexual misconduct against many female performers over the years. I must add though, that I think he was exonerated of the charges. But it still stuffed his career.
- mtaylor, grsjax and thibaultron
-
2
-
 1
1
-
Is a shame I live in Australia as I have long admired this model, Amati Bireme Greca Scale 1:35 $75
I am sure you will get many offers.
-
First dry fitting of rudder. Needs more work, but getting there. I replaced the Amati kit supplied hinges with longer Corel ones from the same era vessel.

- Louie da fly and Knocklouder
-
2
-
More progress on the stern decoration and quarter galley windows. Rudder next I think.
- ccoyle, Knocklouder and Thukydides
-
3
-
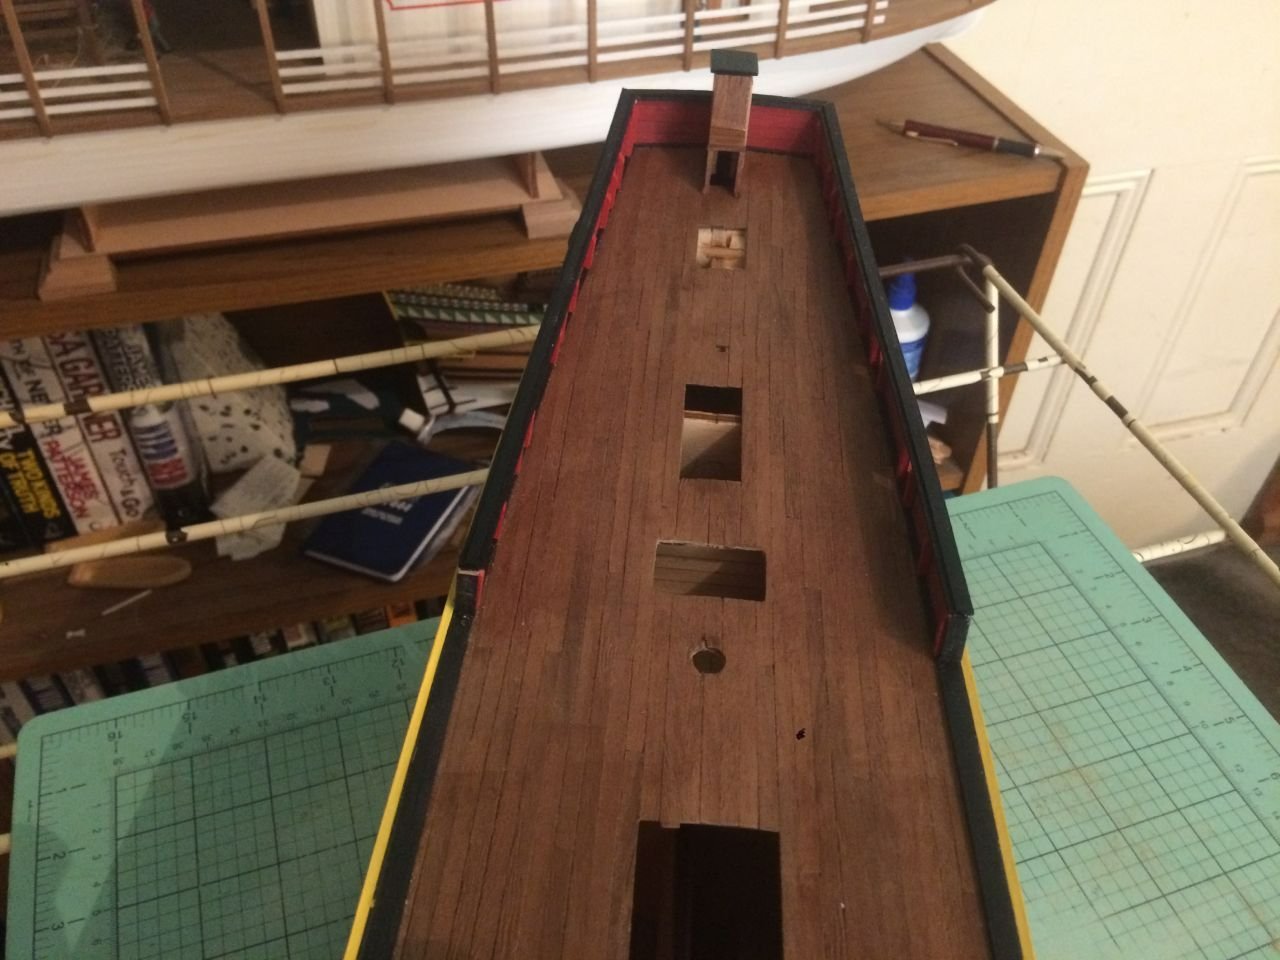
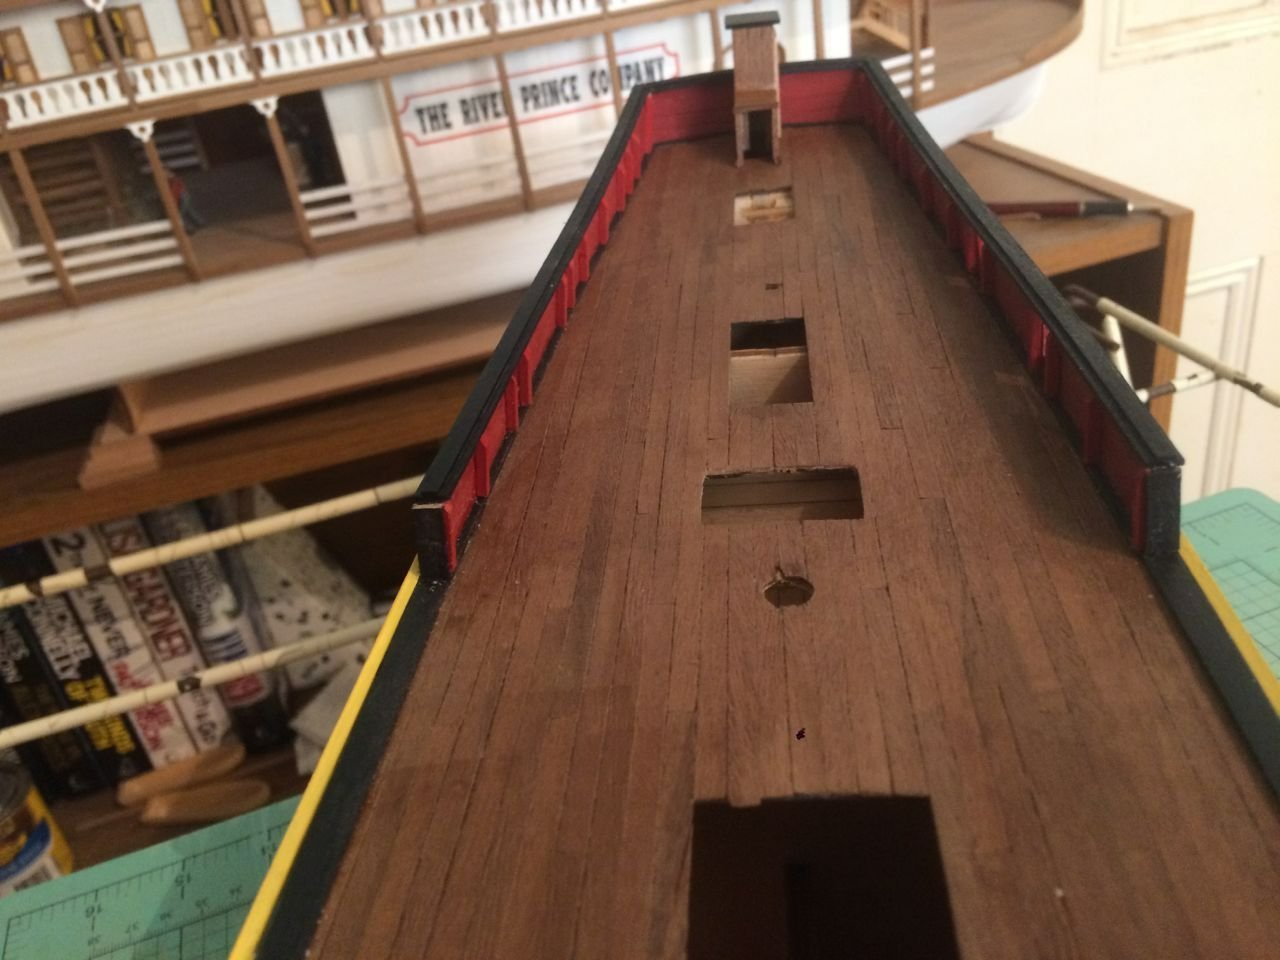
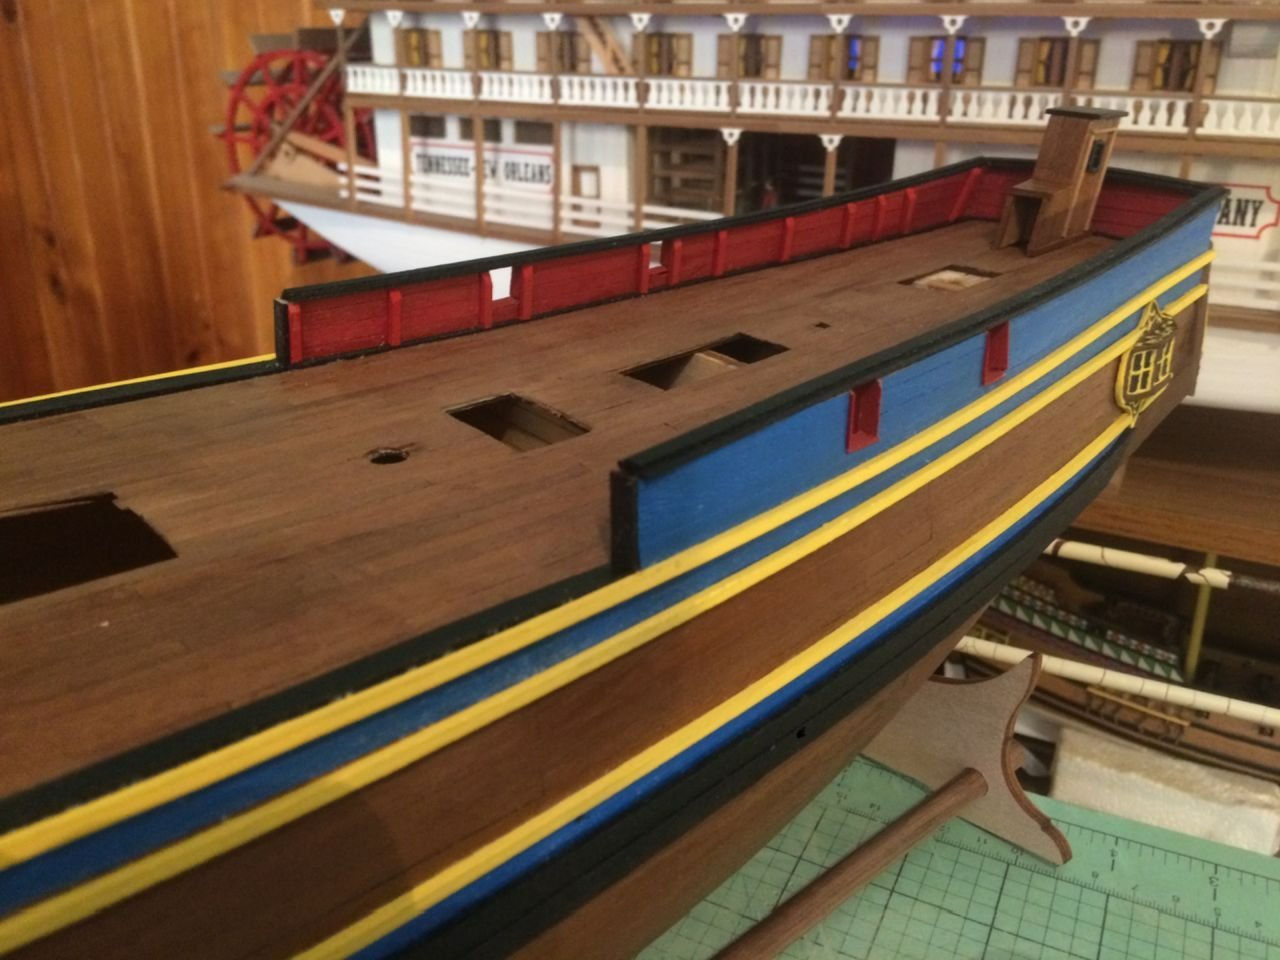
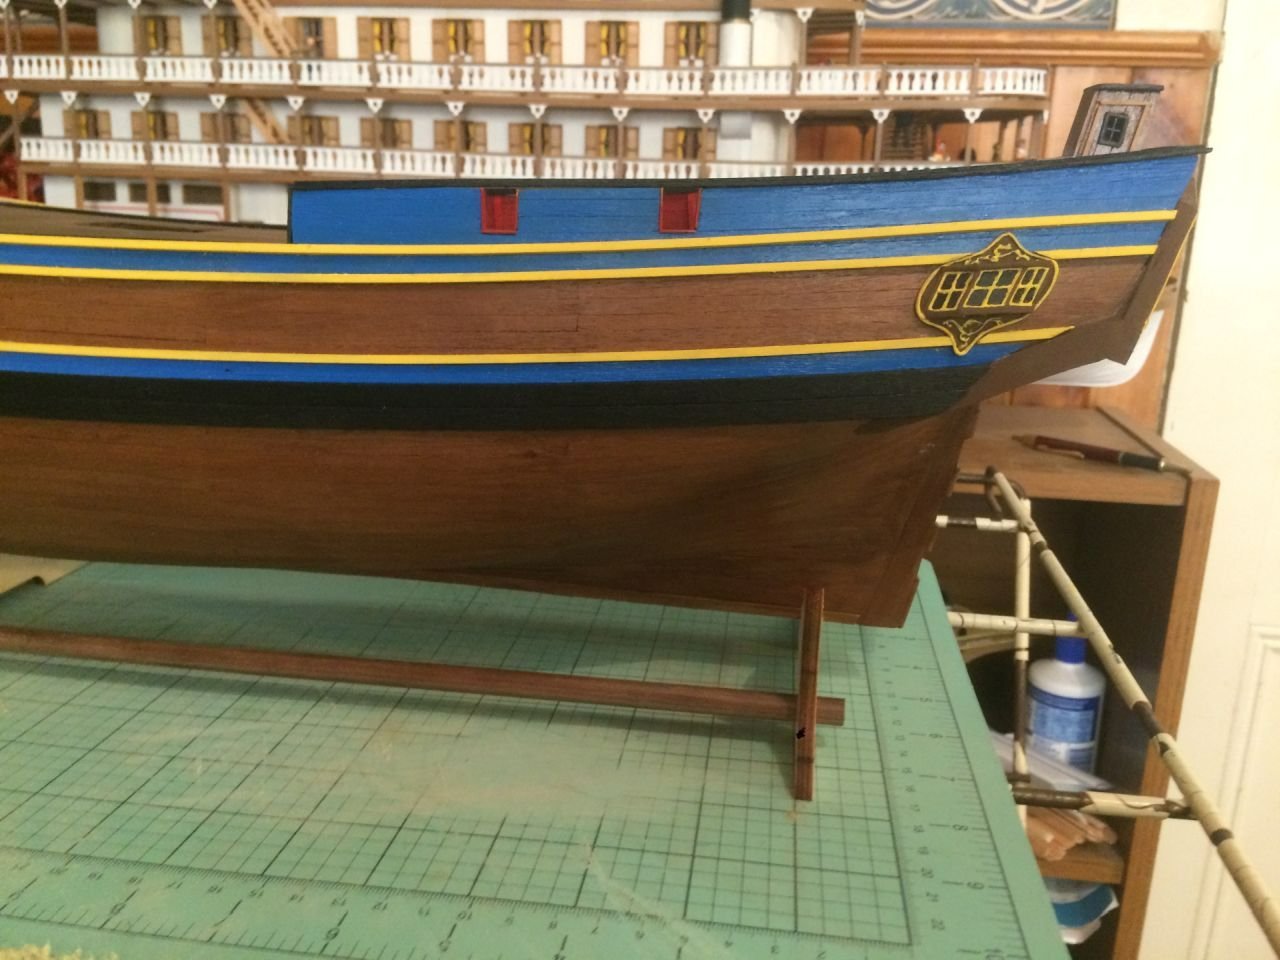
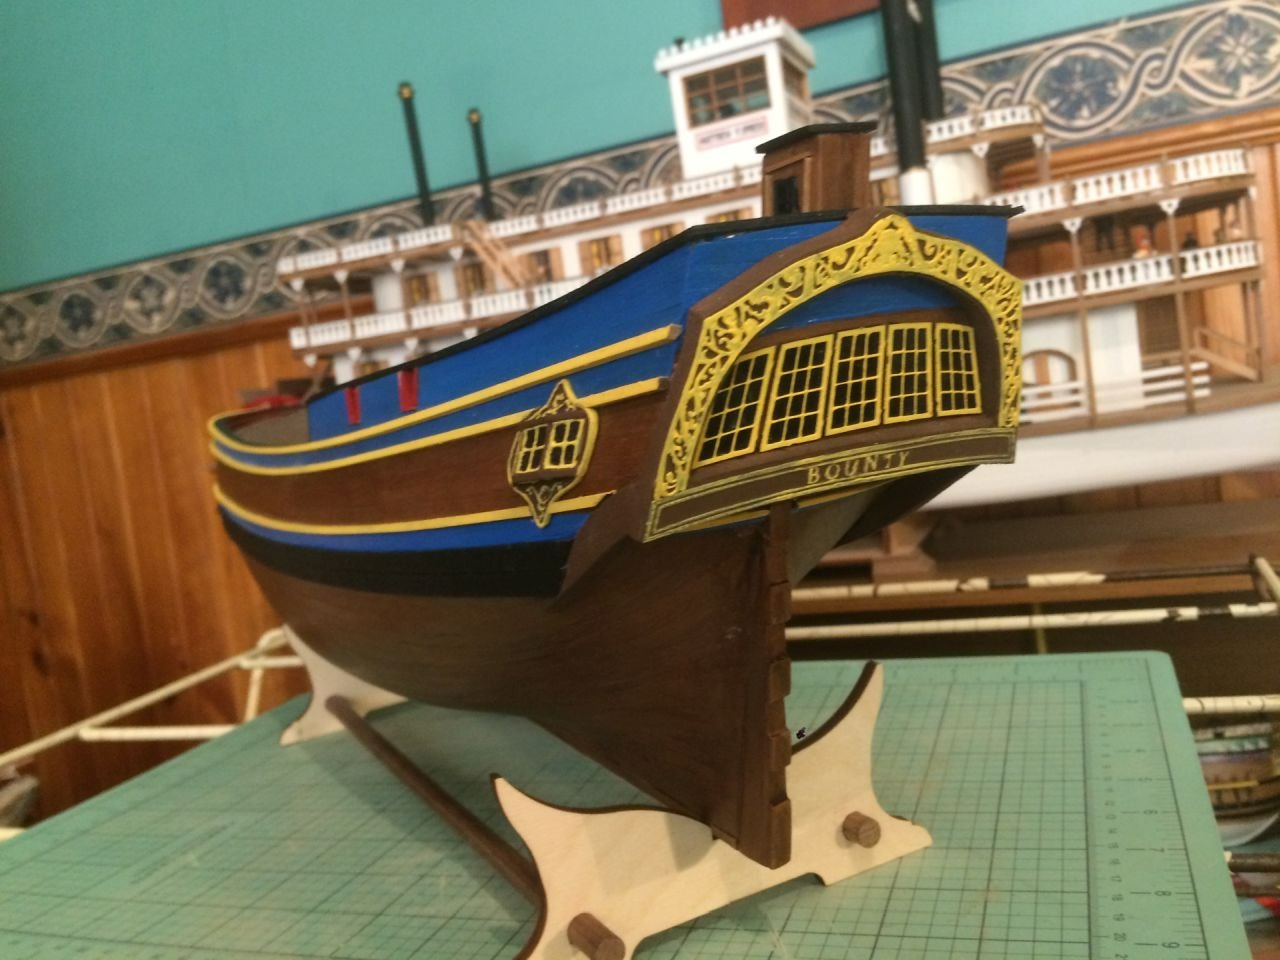
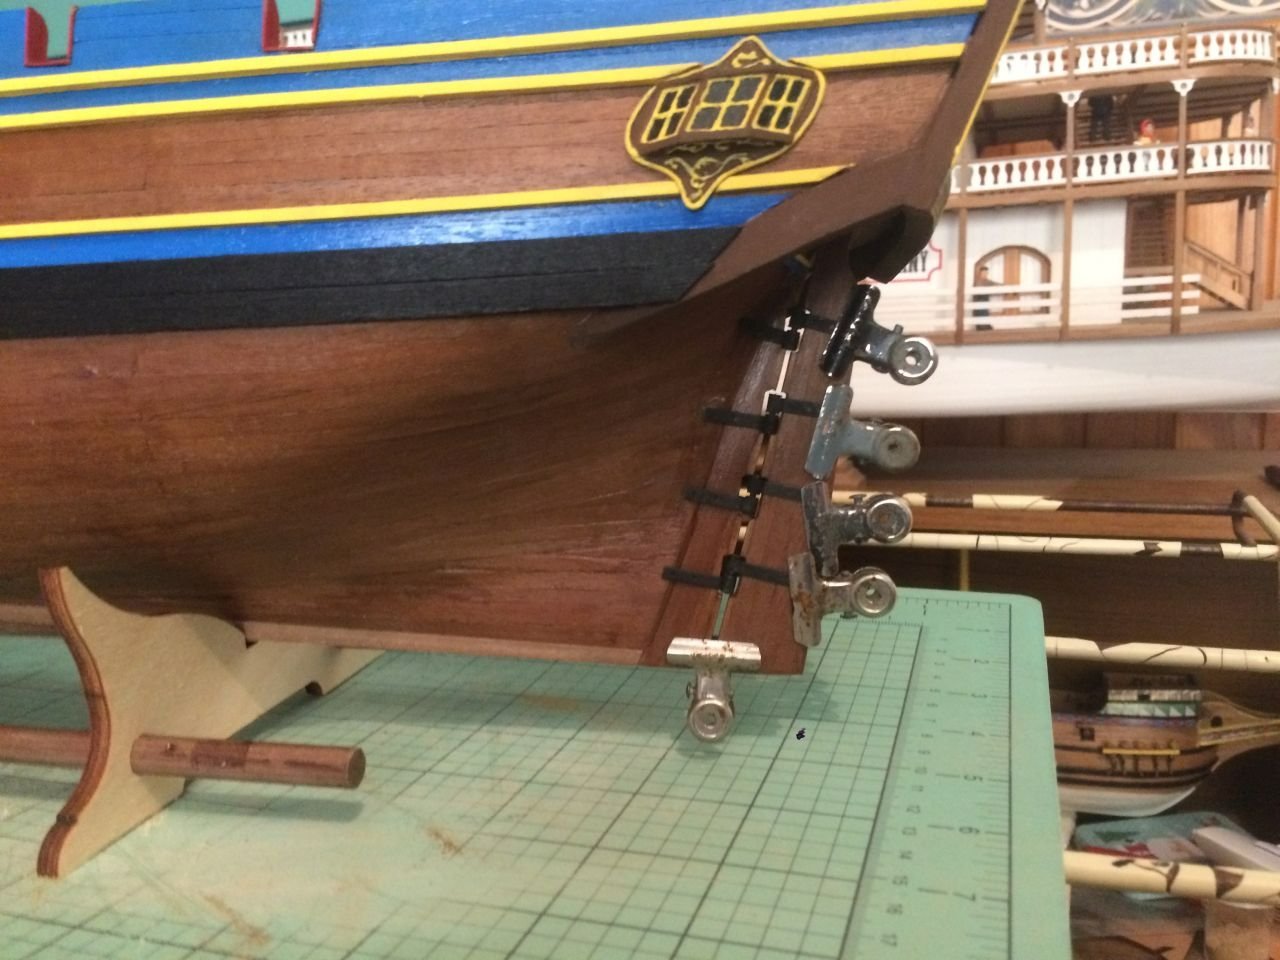
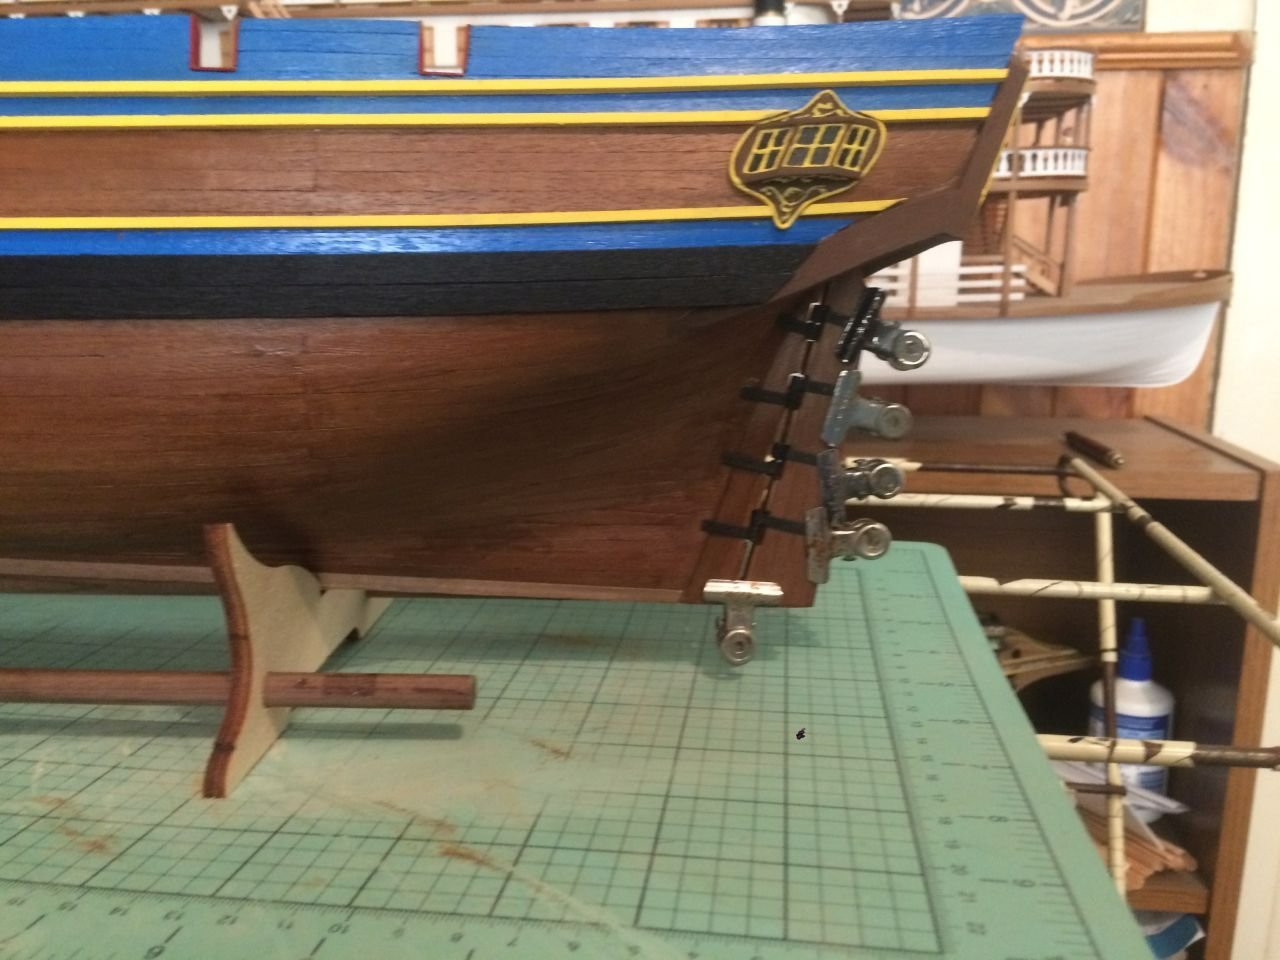
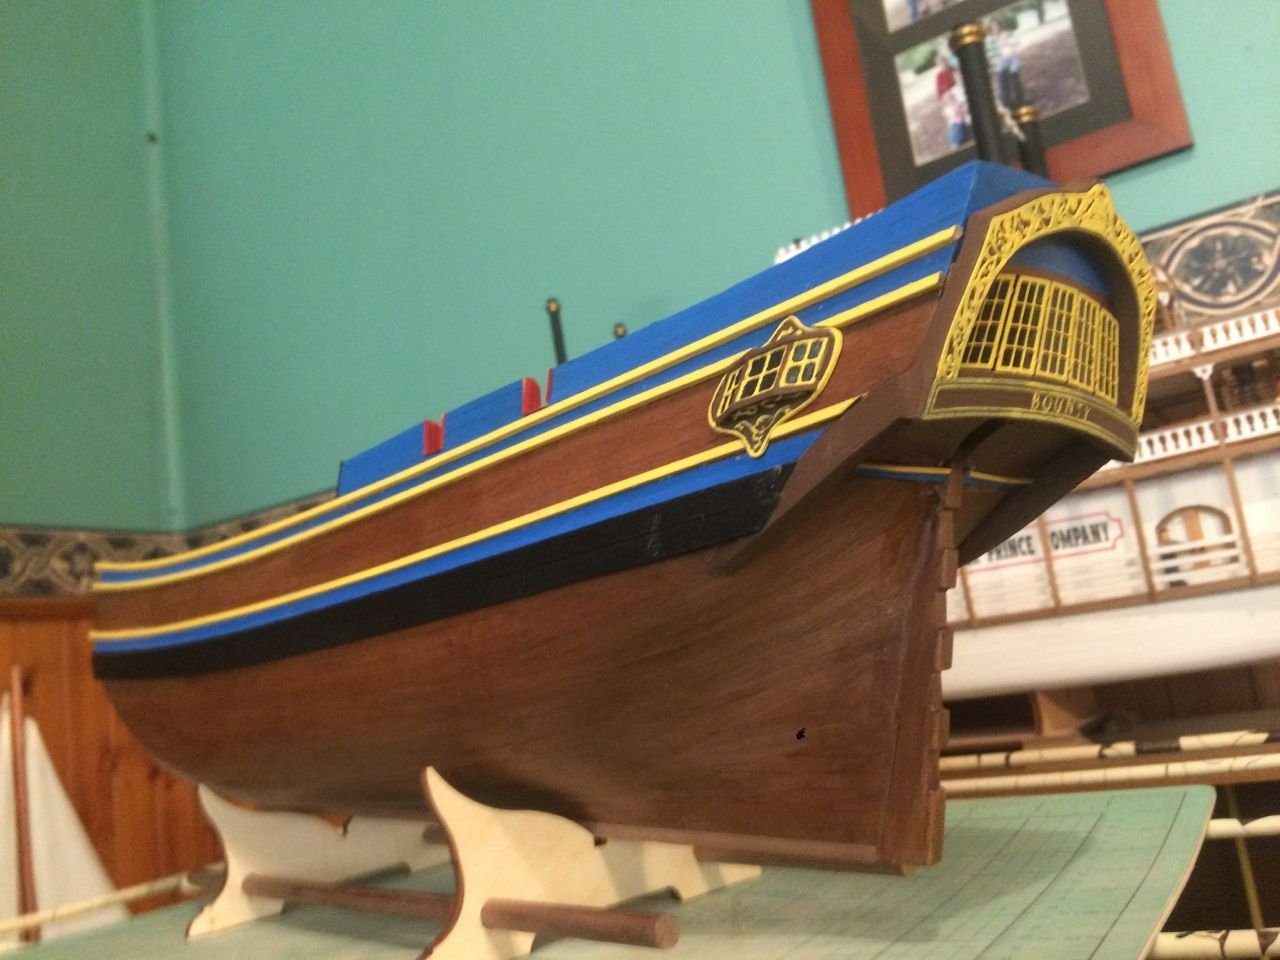
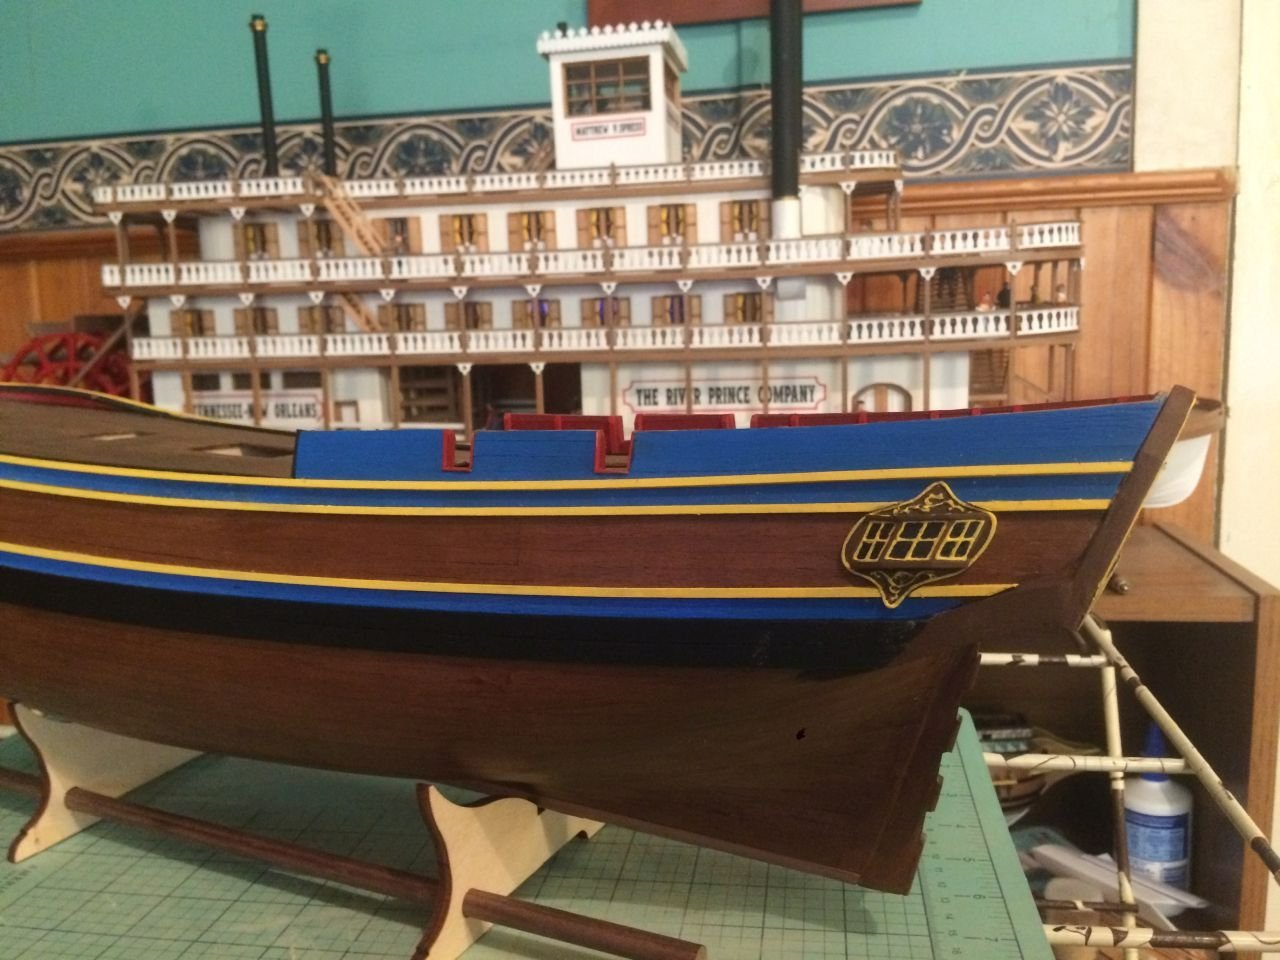
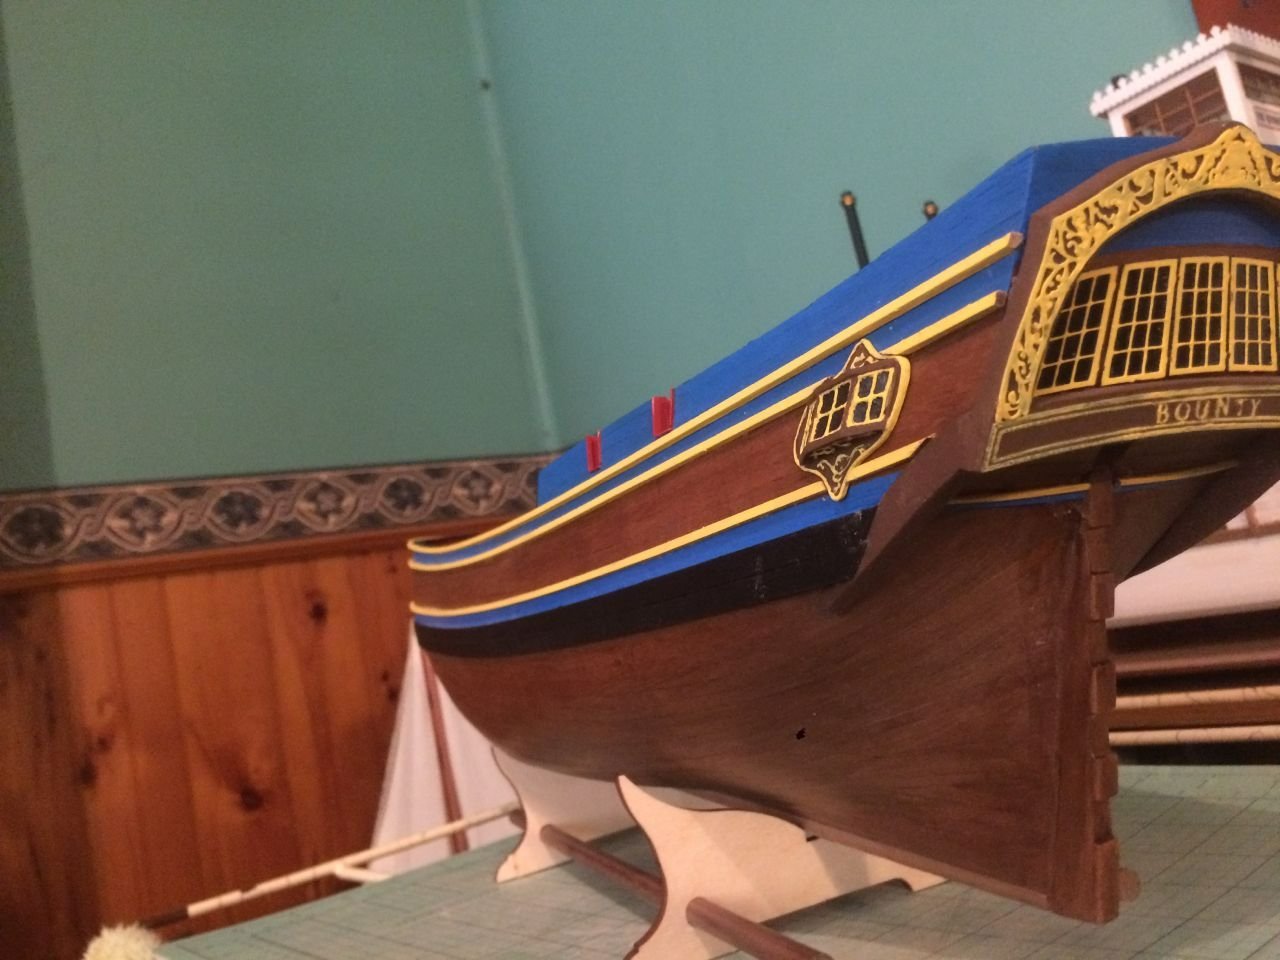
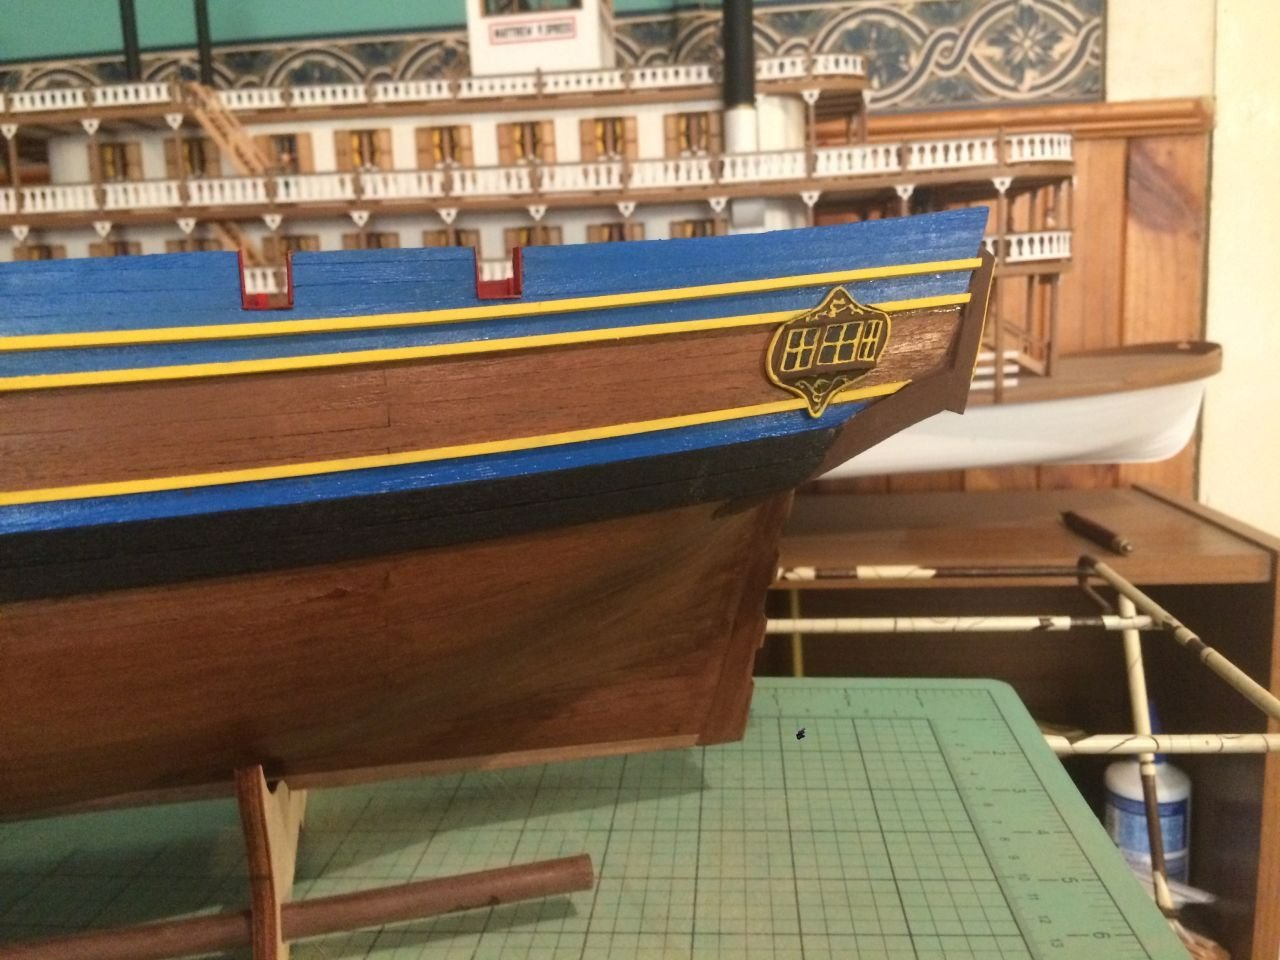
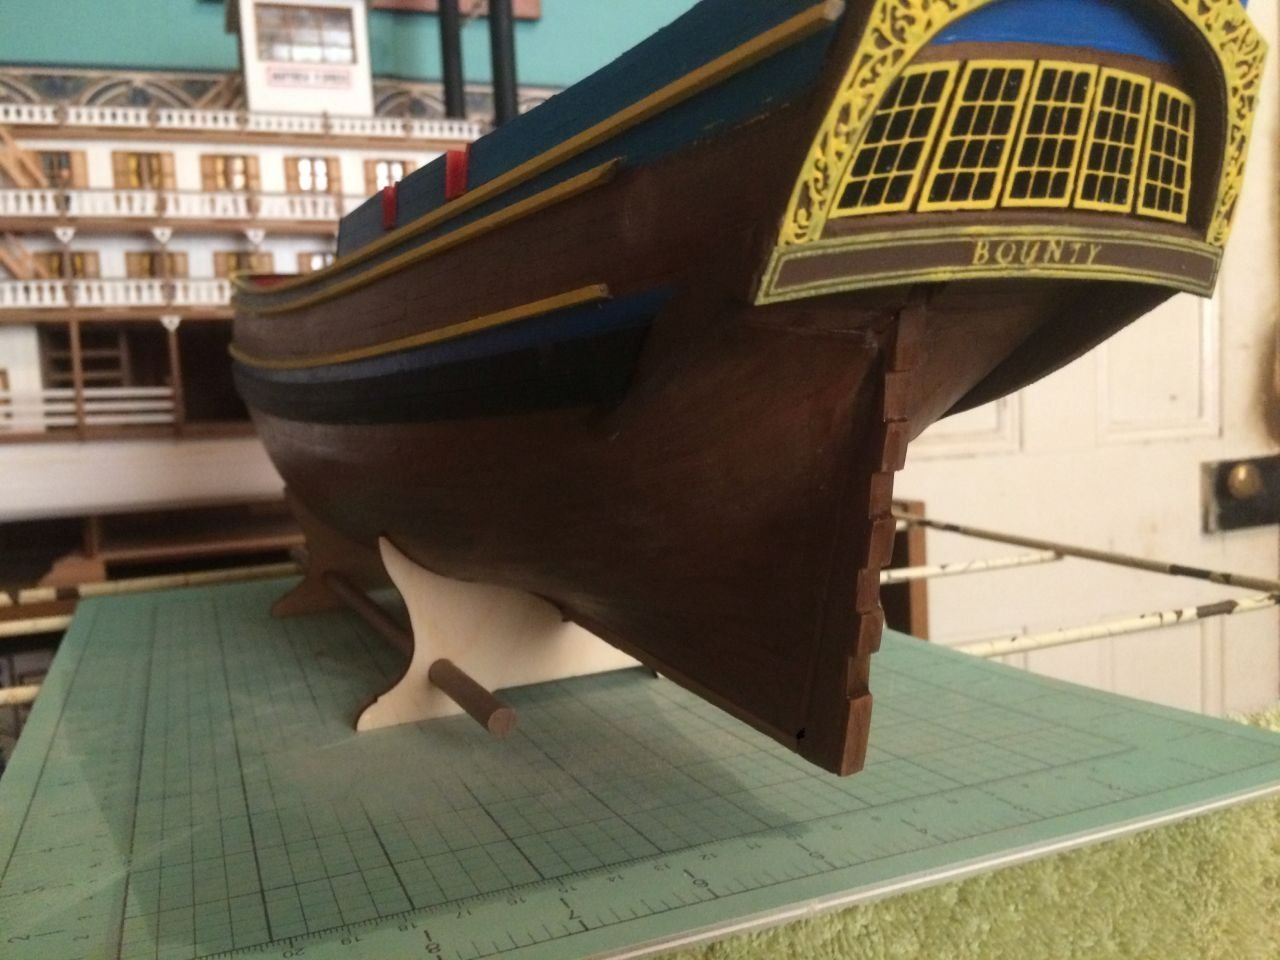
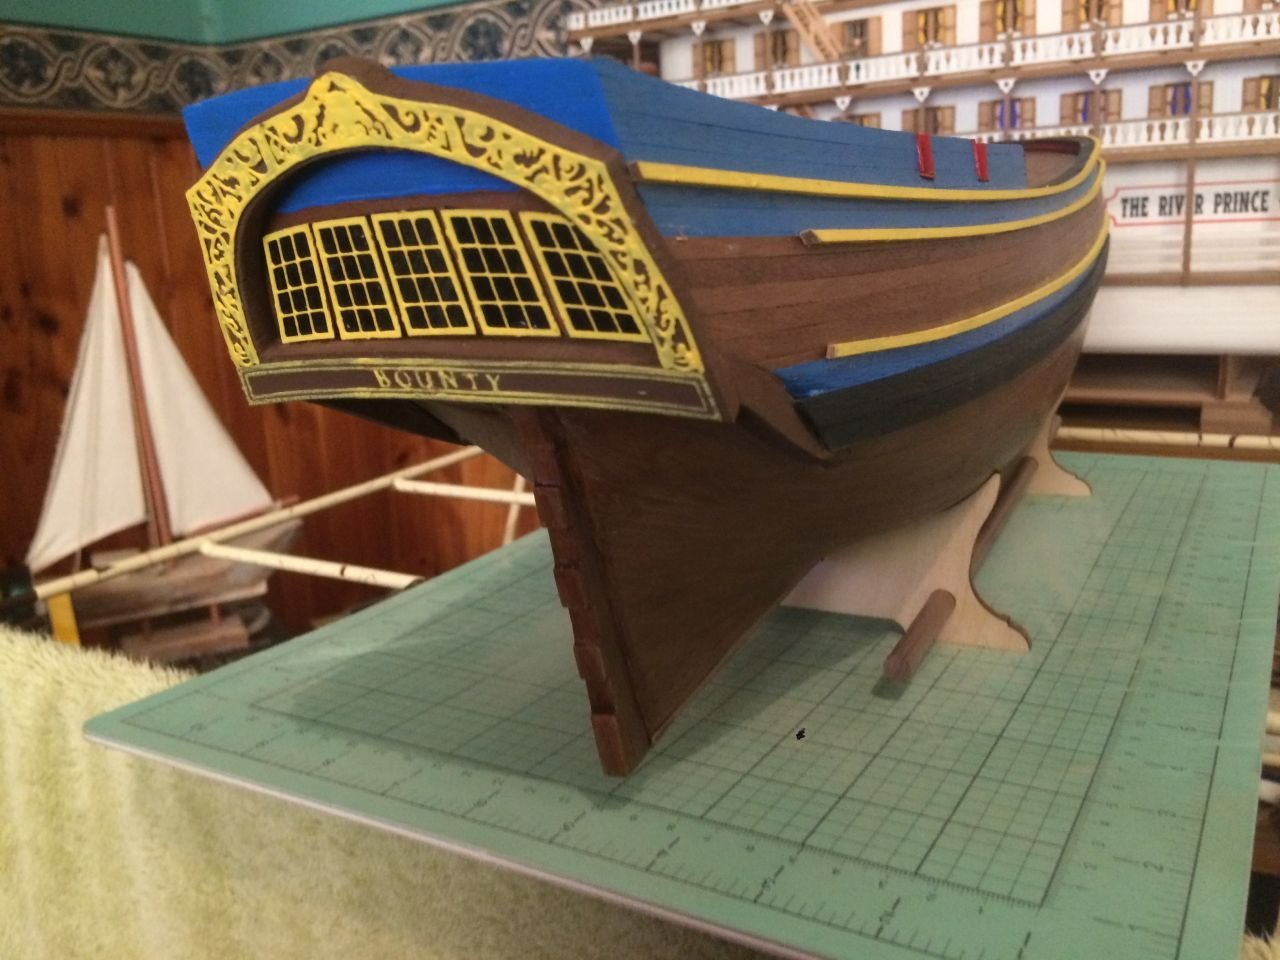
Hopefully not too late to revive this log. I have been working on this ship for a few since the last update. Sorry for my absence.
Anyway here are a few pics in her current state. I must say, this particular kit isn't for the faint hearted. But I think it will eventually make a pretty nice model.
Borrowed the color scheme from a build of the same kit by Navis Factorium (hope I got that right?) I liked the colors better than the box art.
My camera skills still haven't improved and as per usual, high definition pics show a lot of errors. But in real life I am very happy with how this is turning out.
![IMG_0189[1].jpg](https://modelshipworld.com/uploads/monthly_2024_01/IMG_01891.thumb.jpg.3c23867a80ac581afb318fc741d22667.jpg)
![IMG_0193[1].jpg](https://modelshipworld.com/uploads/monthly_2024_01/IMG_01931.thumb.jpg.c00ef76be7a7567e7409a0f0e720095d.jpg)
![IMG_0194[1].jpg](https://modelshipworld.com/uploads/monthly_2024_01/IMG_01941.thumb.jpg.5555248e121e610674488a550589344b.jpg)
-
-
I think the Amati Bounty turns into a great model but be prepared to undertake a LOT of heavy bashing.
The entire stern galley configuration really needs to be scratch built as the kit supplied soft metal castings simply do not match or fit the fine decorative pieces that are supposed to cover them. I am up to this stage on mine and whilst I think it has turned out pretty good, it has taken months to get it right. Similarly, you will find the overall plans not very good with many wood strips wrongly sized etc. The main wales for instance.
The pre-cut gun ports also need to be addressed as you will find your guns pointing at an obscene downward angle unless you come up with a plan. I rectified this by completely cutting the top off the gun port, doing away with the horrid metal port lining, and replacing the entire assembly with fine painted wood strips.
I will try to post a few pics here a bit later, (probably should have carried on with the log I started a few years ago here), but in the whole I believe the Amati 1:60 kit will make a great model, just takes a lot of forward thinking to get it that way. There are a few logs out there for this kit and they are helpful, plus I can give you a heads up along the way if you decide to go with this kit. Good luck.
Cheers.
-
Hi, I would suggest starting with something like the Amati Santa Maria. It has all the elements of larger, complex ships but being such an early vessel (15th century), those elements are not as daunting as a Victory, San Felipe, Wasa etc.
With the Santa Maria you will still have to double plank. But being an older ship the shape is far easier to obtain. Tricky bits on Victory like the bluff bow and stern area are not required on a vessel like Santa Maria.
With SM you still have to apply channels, plates and ratlines so you can get a great guide as to how to go about that before tackling more complex models. Rigging is more than substantial enough for a beginner and you can add sails if you wish.
Also as an added bonus, Santa Maria, whilst being one of history's most famous ships also lends itself to many interpretations as there are no known drawings or plans of the actual vessel. So you can add extra deck details etc. as long as they are from the period who is to say you are wrong?
But my final observance would be this: Santa Maria is the most awesome vessel that ever sailed! Just build it. You know you want to!
-
Your racing through it now David. It looks awesome. Well done. I like the flag addition too.
Chris
-
Welcome and good luck Sam. Ask heaps of questions!
Chris
- mtaylor, Keith Black and Ryland Craze
-
3
-
My first wooden kit was the Amati Santa Maria. Probably not considered a "true" beginners kit but I chose it because I loved the subject. I found it challenging but totally rewarding. Sure there were many parts that really perplexed me at the time, but by asking here, and reading many books and posts I managed to produce what I consider to be a really nice model.
So I always say, with some caveats, choose a subject that interests you. The caveat? I would steer clear of "expert" kits like large Victory's etc. You will see very experienced builders on this forum sometimes can run into problems with those type of kits. Also, I think you should probably prepare yourself for the fact that every kit, no matter what level, will likely present problems of some sort or another. No kit will fit together 100% perfectly the way the instructions say it will. They all require some sort of tweeking to come together.
Building a model ship is a very repetitive process and can even get boring. Especially if you start with something too big. Ask some of the advanced builders on this site how much fun it is rigging all the cannons or doing the ratlines on a large scale Victory? My Santa Maria offered me the chance to do simpler cannons, less ratlines and probably most importantly for a beginner, a far simpler planking due to the shape of the bow. I would steer clear of bluff bowed vessels like Victory, Bounty, Endeavour etc. I would also recommend any vessel you undertake to have double planking. The first planking will give you a great idea as to how planking is done and doesn't have to be perfect. It also makes the second layer, which you want to be a perfect as possible, much easier to do.
Good luck on your journey.
Chris
- mtaylor, Chuck Seiler, Knocklouder and 1 other
-
4
-
How about putting a small piece of modelling tape, like Tamiya Tape over the section to be drilled into? Tamiya Tape is very light tack but it should be enough to hold the brittle wood together whilst you drill through it, then you can easily remove the tape and be left with a nice small hole. Plus it wont leave tape glue on your deck once you remove it. Hope this helps.
Chris.
- mtaylor, RossR and Keith Black
-
3
-
-
Hey Bill, well you could argue authenticity about a lot of models. My favourite vessel of all time is Santa Maria. Has been for 50 odd years since I was a kid.
But, there is no definitive pictorial evidence of what she ever really looked like. Same for Columbus for that matter.
Apart from maybe, Victory and a few other super well known and documented vessels, you will find different model companies produce differing designs of
the same vessel. Bounty etc.
I just think that the San Bartolme from Pavel Niktin looks outrageously good. Is is accurate? Maybe not, but was the Mona Lisa?
I still want it!
Chris
- mtaylor, Knocklouder, Montaigne and 2 others
-
5
-
They look fantastic! I so want the San Bartolme. But be aware that postage (not his fault), may be extremely expensive. I know it is here to Australia.
From the super excellent unboxing of the San Bartolme on here the packaging and overall kit looks just so outstanding. I am currently following a
build of it on FB and so far all is going to plan. I obviously can't recommend them personally as I have never built one, but from what I have seen
online they get my vote for sure.
Chris
- mtaylor, scrubbyj427, Canute and 1 other
-
4
-
Looks great to me. I always have a "practice" side on all my models. Because boats are almost always a mirror image from the Starboard to port sides
I always do a part on the starboard side first before replicating it on the port side as the port side is almost always the side of the vessel I choose to be
viewed. This way if I muck up the starboard side I can rectify the problem on the "good" side.
Chris
-
Your channel is fantastic! Thank you for all the helpful tips. I love it!
Chris
-
Hi, for less than $100 you can invest in a suitable beginners kit from numerous reputable manufacturers that will guide you
through how kit hulls are constructed as well as other parts of the vessels. This might be a better option than jumping in at
the deep end on a scratch build with little or no knowledge. Also by building the cheap beginners kit it will give you a better
understanding of what order vessels are built in and what tools and techniques you need to acquire to achieve the result you
are after.
Chris.
- Chuck Seiler, mtaylor and Keith Black
-
3
-
I also think you need to take into account the nationality of the manufacturer and thus what language the original instructions are written in.
I think sometimes some meanings etc. can get a little lost in translations from Italian to English for example. This is where good diagrams also
come in handy, and of course a good build log to follow whereby someone has rowed a course for others to follow through somewhat tricky
water.
Chris.
- thibaultron, Knocklouder, mtaylor and 1 other
-
4
-
Good to see you back David. She looks great.
Chris
-
Whilst watching a very old film set on an old ship there was a character played by a young boy who looked about 6 years old. He was a cabin boy in the film and told one of the passengers that he was 12.
My question is: How old were the the youngest legal members of ships in the 17th/18th century etc?
I'm sure that some put their age up to escape poverty and seek adventure, but what would have been the legal age to go to sea on vessels?
Thanks.
Chris.
- Keith Black, mtaylor and thibaultron
-
3
![IMG_0189[1].jpg](https://modelshipworld.com/uploads/monthly_2024_01/IMG_01891.jpg.7bea8f8f72405d9602601d3c0dc06ca2.jpg)
![IMG_0193[1].jpg](https://modelshipworld.com/uploads/monthly_2024_01/IMG_01931.jpg.344025f51b3fa957edadb3b43c4bd298.jpg)
![IMG_0194[1].jpg](https://modelshipworld.com/uploads/monthly_2024_01/IMG_01941.jpg.c147e9fa53262b13d1f7dccc04165828.jpg)
How to make flat rope coils?
in Masting, rigging and sails
Posted
Thanks Pat, this is the exact type of solution I was hoping to find. Will give it a go.
Chris