


UpstateNY
-
Posts
466 -
Joined
-
Last visited
Content Type
Profiles
Forums
Gallery
Events
Posts posted by UpstateNY
-
-
My thanks to you as well Moonbug....Augie was most welcoming when I first joined MSW so it great to see his Confed finished so beautifully.
I am also sure, as Dave just said, that he is smiling down from on high somewhere.
Rest in peace Augie.Cheers,
Nigel.
-
Hi Carl,
Lovely work...these PE kits are just amazing and I hope the eyes are holding up!
One question is how do you get a good paint finish on without covering up all the etched details? Is there a primer/paint combo you use that lets you get good coverage with very few thinned coats, even with an airbrush?
Cheers,
Nigel.
-
-
Hi Greg,
Some amazingly patient and detailed work here...very much enjoying following along.
Cheers,
Nigel.
- Old Collingwood, RGL, cog and 2 others
-
 5
5
-
Thanks Carl...
I think it is time I invested in a similar magnifier...looks like it will work with the bifocal magnifiers I already have to wear so I don't bump into things....

Cheers,
Nigel.
- Canute, Jack12477, Old Collingwood and 2 others
-
5
-
Hi Carl,
Wow...the turrets and 25mm gun look amazing, but I finally caught up with just how small these PE kit parts are!
Are you using a magnifier or a microscope to put these together?
Cheers,
Nigel.
-
Hi Jack,
Thank you for sharing the details on how you thin gesso...very thoughtful.
Hi Nick...
Thanks for stopping by...will try to not fall off the build wagon again!
Beakhead planking has now been removed...a new razor blade inserted between the planking and the bulkhead popped the planks off cleanly with no other damage thankfully. Replanking is now in progress....2nd time hopefully will be the charm!
Finally, thanks for all the "likes"...much appreciated!
Cheers,
Nigel.
- Dubz, CaptainSteve, pompey2 and 2 others
-
5
-
Thanks for stopping by and for the thinning tip Jack....I will certainly try a test first.
Cheers,
Nigel.
-
-
Hi Carl,
Yep...easy until it doesn't work out as I just found out..

I also just went down to the workshop and gave the beakhead a good dose of looking at...yep...redo time! No point in spending the next 5 years or so building this model and being aggravated about the way the bow looks. I also just went over the planking section in the instructions and found a reference to using a #75 drill for the treenails so clearly I overdid the hole size! Need to find a way to template the design better as well so some tests are definitely in order.
Hi Dave,
Thanks for the welcome back, for the kind words and for suggesting bamboo...I will add that into the toothpick vs filler tests. I can use this work to set up for all the hull work to come to get the treenail technique sorted now. I was looking for a reason to get the Byrnes draw plate so every cloud has a silver lining!
.Cheers,
Nigel.
- Obormotov, SawdustDave, CaptainSteve and 1 other
-
4
-
Hi Carl,
Thanks..a bit worried the end grain of the toothpicks may also stain up too dark, but yep it is certainly worth a try. Of course if it works, then I'll need to do the entire hull that way down the road to match which was one reason I figured I'd try the filler method first!

Cheers,
Nigel.
- cog, CaptainSteve and Jack12477
-
3
-
Hi All,
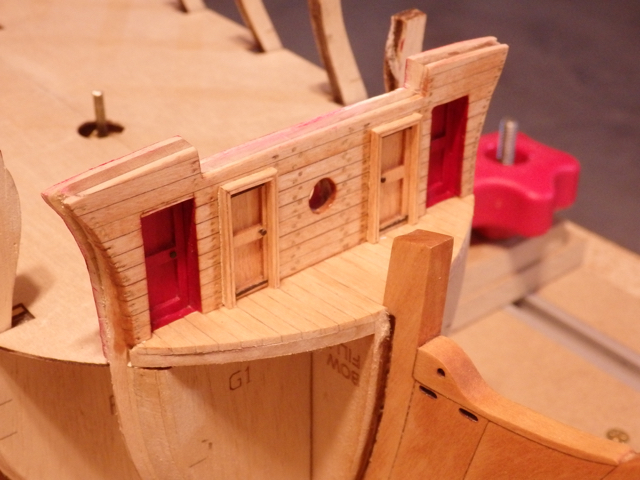
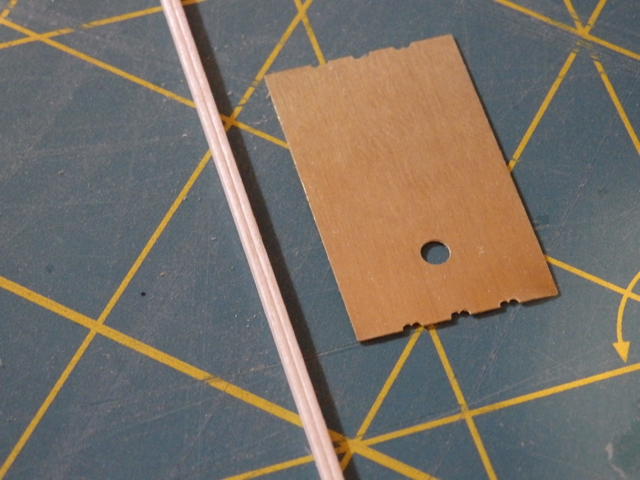
Slowly getting back on the wagon after a long break for work and family, but with the New Year starting, it seemed like the right time to try and make a fresh start. Amazing how fast time goes by...So, picking up where I left off on the beakhead, the first step was to paint the interior and the doors crimson. I found it hard to get an even paint finish even using multiple thin coats. I am wondering if I got some glue deep into the planks as the finish was really uneven. Unfortunately, I can’t recall which build now (my apologies!), but I remembered someone using gesso. By applying a thin gesso coat, followed by a very light sanding, I finally got a more even finish using many thin coats as Chuck recommends.Exterior deck planking followed and then I tried to treenail the front bulkhead I used a 0.65 drill per the instructions and Elmers natural filler to fill the holes. Unfortunately, after sanding them smooth and then re-staining, the treenails look too obvious and also rather uneven. I am going to think about it for a couple of days and start to run the battens for the gunport sills, but I may have a redo coming!A few pictures below...doors and frames are just press fitted.Good to be back modeling again!Cheers,Nigel.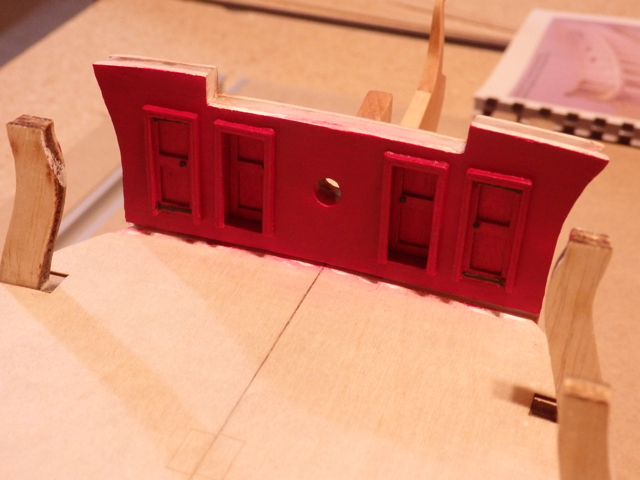

- cog, marktiedens, GrantGoodale and 12 others
-
14
-
 1
1
-
-
Hi Mark,
The progress you have made on your Licorne is simply amazing since I last checked in..she looks fabulous!
Looking forward to the very special day when you are able to finally remove the jig!
Hope you don't mind me rejoining your build log.
Cheers,
Nigel.
-
Hi Nils,
Amazing amount of progress...you must work many hours a day on your KWdG, but it is certainly paying off...quite a sight! I love the hull colors and all the detail you've put into the hull plating and all those deck features.
Cheers,
Nigel.
- Omega1234, Piet, Mirabell61 and 2 others
-
5
-
Hi Patrick,
Another jewel in the making i see...late to the build of course but will follow along now if you don't mind.
I see Shadow is a little larger so even more details to enjoy!
Cheers,
Nigel.
- cog, FriedClams, mtaylor and 1 other
-
4
-
Hi Popeye,
Hope there is still a little room for me to watch the fun!
She looks like a lovely model, but wow....building a clipper at 1:124 would scare the life out of me. I can't wait to see what you have in store for her!
Happy New Year!
Cheers,
Nigel.
- mtaylor, popeye the sailor, cog and 4 others
-
7
-
Hi Dave,
Lovely work as usual....hopefully still a little standing room at the back for me to follow along!
Cheers,
Nigel.
- CaptainSteve, Piet, mtaylor and 5 others
-
8
-
-
She coming along beautifully! Very nice work and I like the full length shot from above very much.
Cheers,
Nigel.
-
Thanks Elijah and yep, I am finding that using simple spacers and templates really helps to keep things aligned and evenly positioned.
A side benefit of using the decking strip as the spacer is I can now just slip the decking planking under the beakhead planking to get a neat finish.
Cheers,
Nigel.
- Elijah, cog and CaptainSteve
-
3
-
Hi Nick,
Good to hear you are starting your Confederacy and thanks for the kind words....I'll certainly watch for your log.
Hi Nils,
Thank you for stopping by and for your good wishes for my build...I will certainly need them as this will be a very long build! I also hope you are now feeling a lot better!
Well, things have been a bit slow in the shipyard recently given work and also all the lovely spring weather. I have made a little progress, along with starting to go up the learning curve on how get a smooth finish using basswood. For this I need to thank Dave Stevens for his interesting article in the Spring MSB Journal. Link below.
http://modelshipworld.com/index.php/topic/13061-spring-2016-issue-of-the-msb-journal/
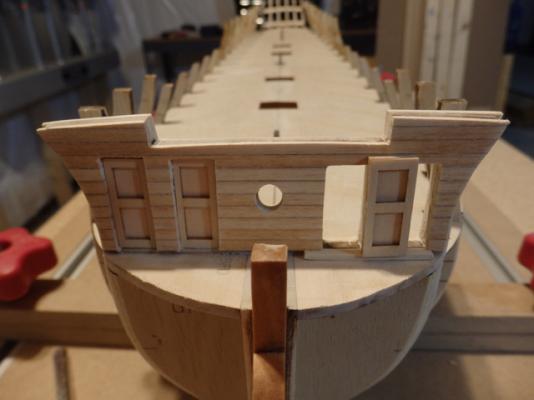
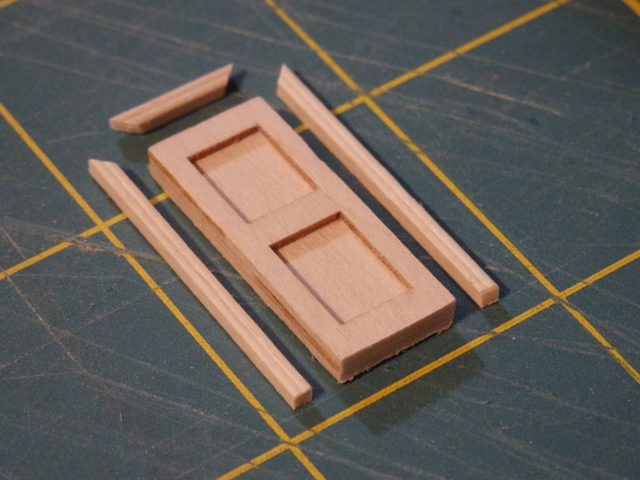
Once I got the all the door openings opened up, I decided to go ahead and make some door frames as the instructions suggested. I figured it would be a nice detail to add a profile into the frames so I used one of the brass profile tools included in the kit. Took more than a few tries to find the correct direction to create the profile by repeatedly using the tool at a shallow angle and light pressure. Eventually I managed to get a reasonable profile in a 1/16th in square strip. I then carefully cut some 45 deg miters so the profiles matched to create the top and side frames. I then glued them to the door frame so they overlapped the edges to hide the join between the planking and the door opening. Last picture shows the test fit in place.
Pictures below and thank you to all for the "likes". Always appreciated.
Cheers,
Nigel.


-
Hi All,
Not a real update, but figured I'd post this early in case this helps someone out. I know Udo is currently working on his beakhead planking.
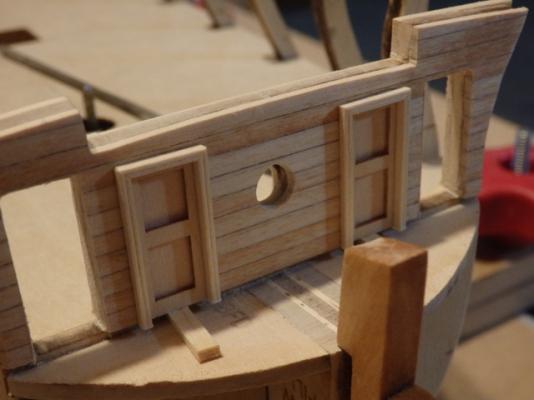
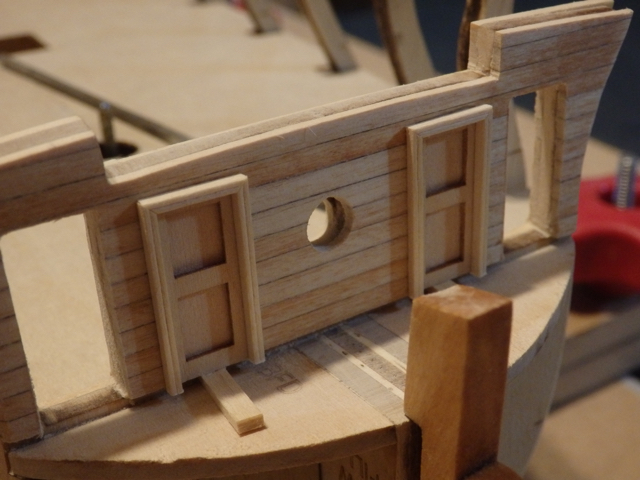
In doing a test fit of the beakhead doors, I found they did not fit as they were too high for the openings in the bulkhead. Checking the plans, I found the doors matched the drawing of the completed beakhead on sheet 4, but were indeed higher than the door openings for the beakhead bulkhead G as detailed on sheet 3. An early test fit of a door should show if your kit has the same issue.
I've now increased the height for two of the four doors as you can see in the picture below of a test fit. I've also put a door next to the unchanged openings as a reference using a deck plank to set the height. Pretty glad I found this now as normally the doors are added after finish out of much of the interior bow decking, furniture and painting.
Hope this is useful.
Cheers,
Nigel.
- Ryland Craze, Dubz, NMBROOK and 13 others
-
16
-

Red Dragon by UpstateNY - FINISHED - Artesania Latina - Scale 1:60
in - Kit build logs for subjects built from 1851 - 1900
Posted
Hi Stephen,
Thanks for the kind words and I hope you enjoy building your Red Dragon.
I had to check my own log to answer your question given it has been so long now, but I used Chuck's heat technique to preform the strips to shape. I illustrated this in posts 44 and 45, but I've copied Chuck's link below as well from my post given he shows this much better than I do. It took a while to get the shape correctly formed against the hull, but in the end if I recall correctly, I only needed very light pressure using some elastic bands and a couple of clothes pegs to hold the wood in place while the wood glue cured. I used Chuck's technique in multiple places and it really helped to avoid needing a lot of pressure.
http://modelshipworld.com/index.php/topic/8131-hm-cutter-cheerful-1806-148-scale-by-chuck/page-22
I hope this helps and best of luck with your Dragon!
Cheers,
Nigel.