kurtvd19
-
Posts
3,049 -
Joined
-
Last visited
Content Type
Profiles
Forums
Gallery
Events
Everything posted by kurtvd19
-

Replacement motor for Preac saw
kurtvd19 replied to Kevin Kenny's topic in Modeling tools and Workshop Equipment
Ship Ahoy Models has exactly what you need. He makes a conversion set with a larger motor and everything you need to make the saw more powerful. Kurt http://shipahoymodels.com -
I have been getting my brass strips & angles from Special Shapes - their web site now says --Go to K&S Brass........
-
You can always call the office and provide your card number to Mary. 585-968-8111. Kurt Wayne: The problems you describe do happen - a lot. We had to add a notice to the last page of the Journal because of this problem. What confuses me is why we get a Journal returned with "NO SUCH ADDRESS" stamped on the cover (they discard the Journal and make us pay $0.61 to get the cover back) from a member who's been with us for years and we call or email the member who says that's his address and he's still there. We send another Journal and all is well. The other thing is the USPS system that has to verify addresses (used by the bulk mail center) rejects 6 to 8 every time we print the Journals. We check with the member and the address is accurate but the "system" rejects it - this happens with most colleges for some reason - and we have to mail these from the office. We send they by periodic rate from Westmont, w/o a problem, but we are not automated here. Nobody I have checked with at the PO can tell me what's wrong with the addresses. We now mail almost 50 from the office due to this issue and they all get delivered but the automated system will not accept them. And you are correct that you do your best - the horror stories of foreign mail delivery make our system look very good in comparison. We find it almost impossible for our members in the Philippines to get their copies. Kurt
-
We ask for a phone number - not a cell phone number - but what is important is your email address. When we get Journals returned with a bad address (caused by postal errors) we need to be able to contact you. Without a phone number or an email address it doesn't make sense to try to contact you by letter with an address that has been deemed bad by the post office. So we wind up waiting for a disgruntled member to ask where their Journal is - now that we have contact we can deal with the problem. We do need the email section filled out. Kurt
-
Go to the link below and you can download the instructions and parts list for the kit to preview the entire build. https://modelexpo-online.com/model-shipways-pride-of-baltimore-2-1-64-scale This is a pretty small kit at 1/64 scale and in my opinion smaller kits are harder to rig. Have you looked at their Glad Tidings kit? It's a larger scale but not a large model when completed and the rigging will be easier at a larger scale (at least in my opinion). Kurt
-
Info about this paper Titanic kit I found at Goodwill
kurtvd19 replied to Lucius Molchany's topic in Card and Paper Models
Please check the copyright information for this kit. If it copyrighted making a copy to send to another is not legal. Copyright infringement is prohibited here on MSW. Kurt -
HMS Winchelsea - Special Offer
kurtvd19 replied to kurtvd19's topic in NAUTICAL RESEARCH GUILD - News & Information
Anybody joining or renewing for 2 years to get the free HMS Winchelsea access, please send an email to the NRG office after sending your payment to let Mary know that it is your intent to get access to the project/plans. It will save time by her not having to email you to determine if you want the access or not. Yeah, believe it or not some are just joining or renewing w/o wanting access! NRG Office email - nrghomeoffice@gmail.com Take care, Kurt -
HMS Winchelsea - Special Offer
kurtvd19 replied to kurtvd19's topic in NAUTICAL RESEARCH GUILD - News & Information
Sending you a PM Joe -
HMS WINCHELSEA - SPECIAL OFFER For a limited time, MSW members who join the NRG will be given free access to the plans here on MSW as our thank you for joining the NRG and supporting MSW. For the same limited time, any current NRG member who wishes to renew their membership for an additional two years will also receive this bonus. Your membership does not need to be getting ready to expire to take advantage of this offer. Use the MORE button at the top of the MSW home page to access the NRG web site to join / renew or this link https://www.thenrg.org/join-the-nrg.php Offer expires on September 30, 2019.
-
Kevin: Check out this video - he makes it look simple - but I can attest that you can't go wrong if you follow his advice and techniques. Paul is a MSW member. Kurt
- 141 replies
-
- 10
-

-
Digital subscribers can access their Autumn - 64.3 Nautical Research Journals now. The print copies will be mailed late next week. Kurt


-
- 4
-
-
They are a MSW sponsor and would not be allowed to be a sponsor if they sold pirated kits. Kurt
-
Yeah, I realized that later. But when you do I know you will be incorporating the extras I didn't included.😀
- 23 replies
-
- 1
-
-
- model shipways
- chaperon
- (and 1 more)
-
Russ: Glad to see another Chaperon on the building ways. I am almost tempted to build another and do some of the things that I didn't have time to do before (and meet the magazine deadlines). Eric and others have added the details and I hope you follow suit. Have fun... Kurt
- 23 replies
-
- 2
-
-
- model shipways
- chaperon
- (and 1 more)
-
Chris: Nerve pain can be real bad and the drugs are absolutely necessary. Please double check all your work once you are off of them as errors can creep in (ask me how I know...) - we don't want your kit to be mistaken for the typical kits that I swear were designed by people on some very serious drugs...🤐 Hope you feel better soon. Kurt
-
Changing the blade on a Byrnes Saw
kurtvd19 replied to fnkershner's topic in Modeling tools and Workshop Equipment
There is an opening on the front end of the belt guard. There are flats on the shaft for a 3/8-inch open end wrench to hold the shaft from turning. Kurt -
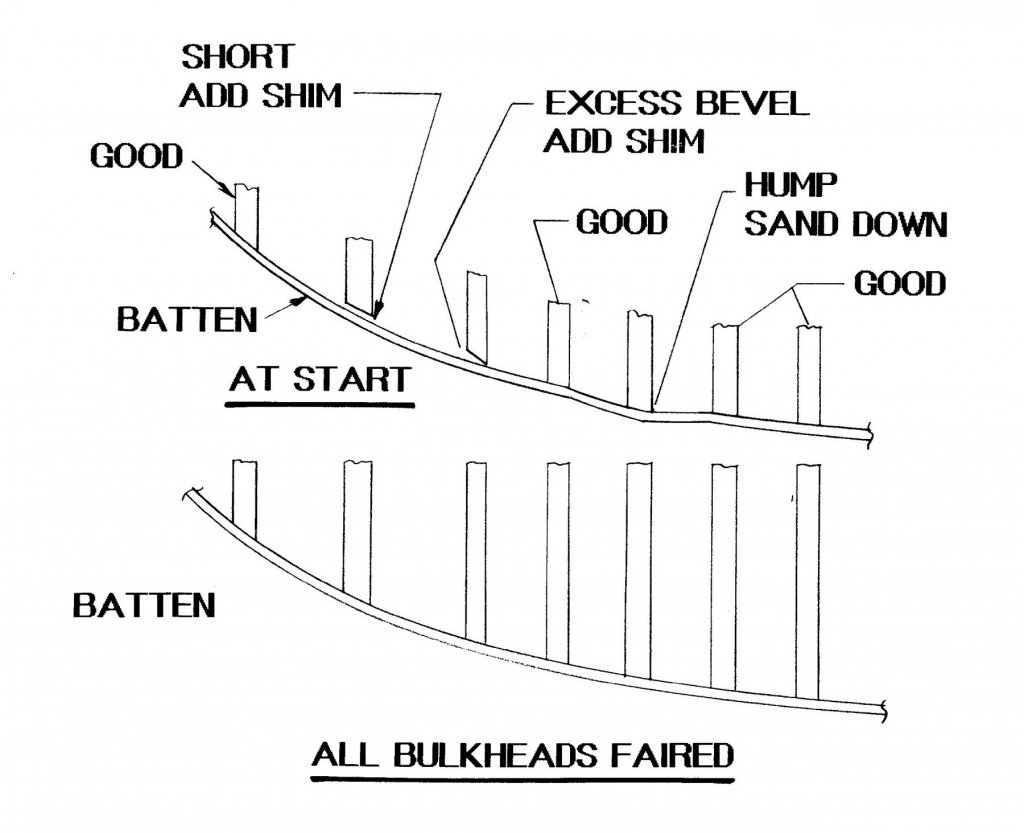
Bruce: I meant to include this drawing inmy previous reply. It was made to illustrate a single planked hull and how to check for fairness and the need to possibly shim some areas or sand others to get a fair run of the planks. But it shows how the planks can run straight between bulkheads. The kit this drawing was referring to had plenty of bulkheads for single planking - a rare kit - but the idea works to illustrate my point from earlier. Good luck on your build and please do a build log. Kurt
-
Double planking is done to provide a fair base for the final planking - usually because the bulkheads are widely spaced and the planks stretching between the bulkheads tend to flatten out rather than keeping the fair curve that closely spaced bulkheads would provide. The area that are not fair can be sanded down or filler added as needed to provide the fair surface. Same as planking a solid carved hull. If your bulkheads are close together double planking isn't needed. Kurt
-
Mike: I hope you have better luck at it than I have had. I had to work the NRG registration table and be at the hotel for the vendor and model room set up during the NRG Conference day there. So Sunday, with the conference over was going to be my day to tour the museum. A half hour before it opened it started to rain so hard walking around there was out of the question - so I got home earlier than planned. I attended the 2018 annual Joint Clubs meeting of the east coast clubs that is held the last Saturday in April in New London. Almost next door. Got to CT on Friday about noon to see Mystic before the Saturday meeting - and it rained the whole day. Got to walk around a couple of the buildings close to the entrance but there was no way to see the rest of the place. So, two trips with very little actually seen. I hope you have better luck - or have a full set of rain gear along. Kurt
-
The entire collection of Ships in Scale (except for 2011-2018 - coming soon) is available from the NRG store as Jaeger said. NRG members get a 20% discount from the prices shown. If you just want the one article contact the NRG office - see the web site for phone - ask Mary to have me make you a copy. We have many of the Journal articles available singly and some day will have them all and I do up ones that we don't have upon request - so I can do it for this article from SiS. The charge is $2.50 by pay pal and it is emailed as a PDF. Kurt
-
Pat: I wish you had brought the kit to the meeting last night so the group could see it - we haven't had a Syren shown yet. I agree 100% with your approach - build on what you learned from the first build. Kurt
-
Mike: Sorry but I can't give any specific recommendations on the paints mentioned as I have not used them - except the Tamiya spray cans. However, as you want to use acrylics and will be using an airbrush I think it is best to stick with the bottles of one brand. Please order adequate paint so you can practice with the airbrush before applying paint to your model. The model is not the piece to practice on. It is best to practice on the same material as the model, so if nothing else practice on painting the sprues or pick up a sacrificial simple plastic kit of some sort as a practice piece. Kurt
-
A new angle in precision sanding
kurtvd19 replied to Arcticbeaver's topic in Modeling tools and Workshop Equipment
I have the Dremel disc/belt combo - kicks up a dust storm - relegated to the wood shop where the dust doesn't matter. Got the Byrnes disc sander - it captures 99.9% of the dust, and is a world apart from the Dremel unit. I was impressed that the Byrnes unit keeps spinning for darn near a full minute after killing the power - that's a matter of mass and great balance. The disc runs true with no movement along the axis - the Dremel quits spinning in about 3 seconds and there is very noticeable movement along the axis. The Dremel disc will never be used on a model again - the belt is OK for non-model use but when the last belt I have is worn out the garbage guy can have the unit. All that said I personally think it's a better unit than the one that started this thread. Kurt -
Mike: I soak the photo etch in Lacquer thinner to remove any residual chemicals from the etching process - then rinse in water and air dry. As to thinning paint - some are ready for airbrushing and need no thinning and adding thinner would be detrimental to the coverage. If you need to thin paints for airbrushing use the mfg's recommended thinner. Usually the airbrush ready paints do not brush as well as the one that need thinning for airbrushing - just plan on multiple coats with the airbrush ready paints. Kurt
-
Optivisor Recommendations?
kurtvd19 replied to Landlubber Mike's topic in Modeling tools and Workshop Equipment
Mike: The Optivisor by Donagan Optical Co. with GLASS lenses is the one to get. The lenses come in different magnifications. Go to the Donagan web site to see all the different lenses available and then you can search Amazon for the best price. Stay away from the plastic lenses - I gave my plastic lens unit away after trying a set with glass lenses at a trade show - even before the new set arrived. They have a magnifying Opti-loupe that can be put on either side and I recommend you get one. I have the DA-5 and the DA-10 lenses - the 10's are for very close work. The Opti-loupe lets you get higher magnification w/o having to switch out the lens plate. I Highly recommend this untit. https://doneganoptical.com/product/optivisor/ Kurt