kurtvd19
-
Posts
2,853 -
Joined
-
Last visited
Content Type
Profiles
Forums
Gallery
Events
Everything posted by kurtvd19
-

The NRG annual Conference in St Louis 2014.
kurtvd19 replied to Chuck's topic in NAUTICAL RESEARCH GUILD - News & Information
The time is running out for the special room rates for the conference. The cut off date for the special room rate of $119 is 9-15-14 - after that it is full price. I just got an update from the hotel and the rooms set aside for the NRG are filling up and any open rooms will be released to general sales on the 16th. The hotel is currently sold out except for the rooms we have remaining in our block of rooms so anybody who delays might have to stay elsewhere or pay a lot more. Kurt -
The Westley's stuff works on both enamel and acrylics and it comes from auto parts stores. Kurt
-
I use Westley's Bleche-Wite (yes that's the correct spelling) meant for cleaning car tires. It's safe for the styrene - and it's not as hazardous as oven cleaner - and can go down the drain OK. Kurt
-
Chuck: To add a point of discussion and/or research - were the nails square cut or round? I suspect square cut. How to show a square - rectangular head - or better how do you drill the square hole for the nail? Kurt
-
The Badger Modelflex Marine Acrylic's have good matches. Hull Black ((#16-412) is a flat black - pure black. Either Windjammer Red (#16-424) or Navy Red (#16-402) would be close. For a slightly grayish black Wrought Iron Black (#16-413) is good for representing blackened metal and is also a good hull color - I use it a lot for hulls of larger models. Ages of Sail (an advertiser here) carries the Badger paints. Kurt
-
The series is going to go to 6 parts. Just started the rigging in Part 5 - due to be submitted very soon. I sort of worked myself into the proverbial corner - the pieces that hold the gun trunnions onto the carriages are a thin soft white metal and I didn't have much confidence in them holding the guns in place with just the kit designed pin and hoop so I glued them in place with C/A. And then I realized that it is best to remove the gun barrels after installing and rigging the guns while the rest of the build goes on (and mentioned in the instructions). So I resorted to getting the guns in place with their rigging attached and then pulling the eyebolts attaching the rigging to the carriage and setting the guns aside until work that would interfere was done. I would still use the C/A but not until the barrels were put back onto the guns. I always urge modelers to read the instructions all the way through before starting to build - I did this - I just need to remember what I read! Kurt
- 308 replies
-
- 1
-

-
- finished
- model shipways
- (and 1 more)
-
General Scroll Saw use
kurtvd19 replied to jdbradford's topic in Modeling tools and Workshop Equipment
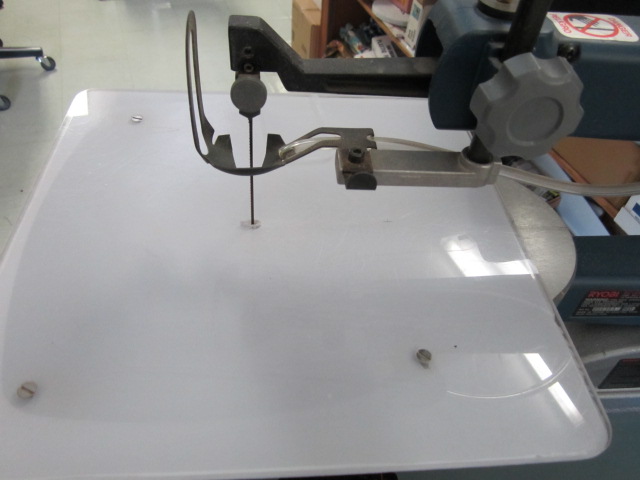
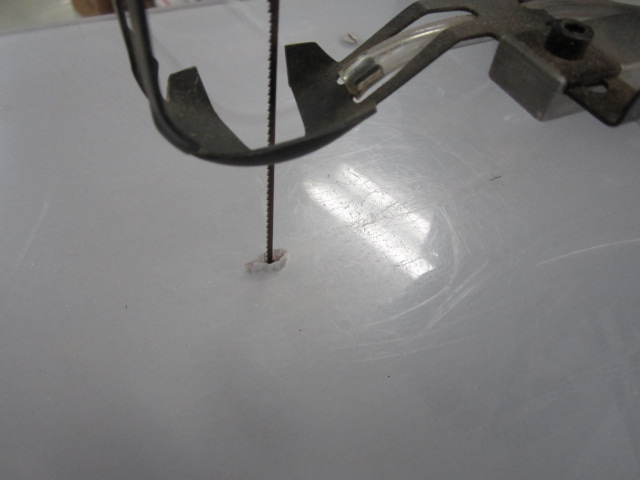
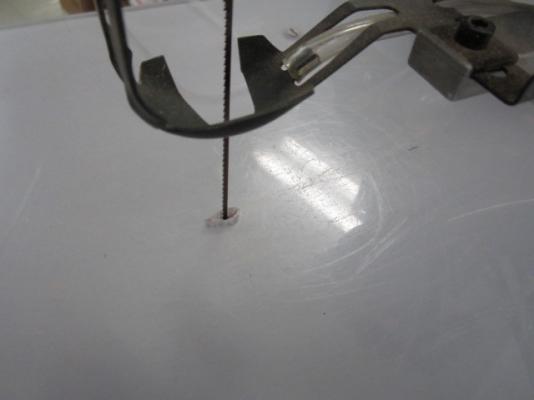
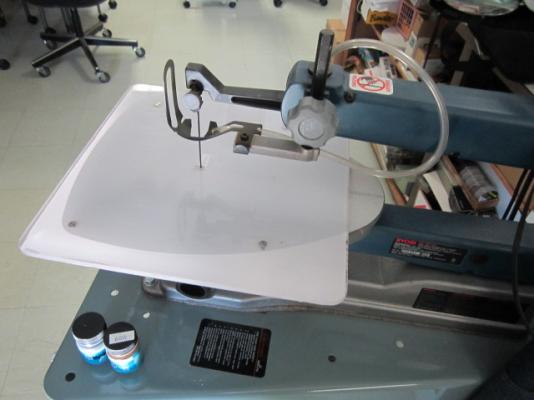
Here is what was done to my Ryobi to solve the problem - and it is adaptable to any scroll saw. A piece of plexiglass was cut to size (effectively enlarged the table size) and a small clearance hole was made in the center for the blade. It is permanently mounted - but removable - with flat head machine screws. One might have to tap the saw's table top but as most are aluminum this isn't a big problem - or the plexiglass can be attached with double sided tape. The protective paper was left on the underside of the plexiglass to brighten up the top and provide contrast to the piece being cut. The plexiglass is a very smooth surface and cuts down on resistance to moving the subject.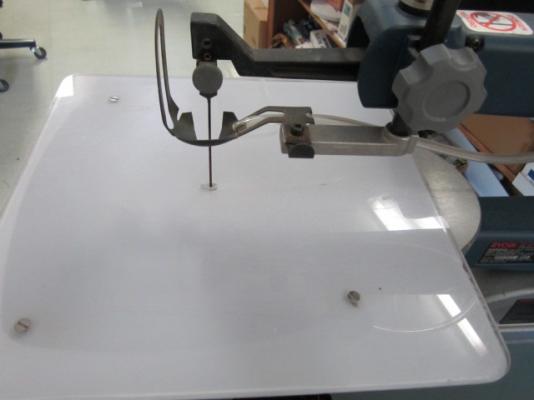
-
Ahoy: I have told many of my fellow club members about the Book Collector program I use to keep track of my library on my desktop. They are having a sale that makes it very affordable. I have no vested interest and I will not get a cent or anything if you sign up - I just wanted to let you know that if you had ever heard and thought about this program at all now would be a good time to get it. A free download that lets you manage up to 100 books is also available and I used it to see if I liked it before buying the program several years ago. I have the Book Collector pro version but I think the std will work for many people. I am able to track the original purchase price of the book, if it's autographed, all the data on it - pages, volume, etc. I purchased this originally when Mary threatened me with haunting me forever if I died w/o leaving her a list of the books and their worth if she needed to dispose of the collection. It has saved me from purchasing additional copies of books I already had...something I know many of us have done. Just wanted to let you know about the bargain. The link to the web site is http://www.collectorz.com/book/ The link to the sale is https://www.collectorz.com/shop/sale.php?book50pro=1&inf_contact_key=1d5eb42f913e91f755c3a625085ea212f5cf974ea323afd529e10d36025a9ea8 My apologies if this is posted to the wrong section but it's offered for information and I have no connection except as a very pleased user. Kurt
-
Anchor Question
kurtvd19 replied to _SalD_'s topic in Discussion for a Ship's Deck Furniture, Guns, boats and other Fittings
Sal: Check the drawing below. I believe the piece you are referring to is the stock with the keep pin removed and the stock moved to the left in the photo with the stock them dropping into place alongside the shank of the anchor with the ball at the bent end of the stock keeping the stock from passing through the eye of the shank. -
David: That's exactly what I use for my airbrushing. I originally got it for rigging - the up and down adjustability made it great for raising when I wanted to work on the deadeyes - with the chair lowered, or lowering the table and raising the chair when working on the tops. There are medical supply businesses that rent and sell this type of equipment for in home use and they routinely dispose of stuff all the time. When you get back home you can check this out. I will keep my eyes open for one. Kurt
-
I will be looking at the rigging real soon. Just starting the dead eyes today. Will let you know what I think about the lift blocks later. Kurt
-
Bob: The build in SiS is mine and Chuck and I have been sharing comments privately. I decided to duplicate the replica boat at the Lake Champlain Maritime Museum and have applied a finish to the exterior and interior as the boat at the Museum has. Chuck thought I was nuts to "weather" a boat that lasted just a few months before being sunk until I explained my reasoning. He may be right about being nuts - I do build model boats.... Kurt
-
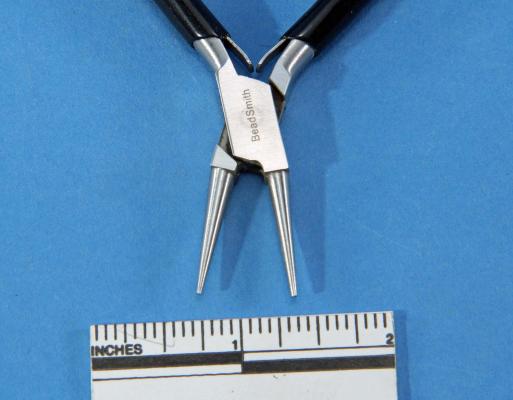
The pliers I use for making eyebolts, etc. are fairly inexpensive but a very good quality tool. The tips are 0.042 in diameter at the tip. An eye/ring of almost any size from 0.042 in. dia. up to 0.188 in dia. can be made. I make a mark on the tapered barrel to mark the spot to wrap the wire when I want to make a bunch the same diameter. These are also useful for making hooks with an eye - all with the same tool - no need to swap out tools or use a drill bit for the eye and then the pliers for the rest. I got this at Hobby Lobby and it's from their Beadsmith brand. Kurt
-
what is the ideal modelling table?
kurtvd19 replied to AON's topic in Modeling tools and Workshop Equipment
Don: Check out airbrushing with acrylic paints. No odor, no hazard, soap and water clean up. Even over-spray isn't an issue as acrylics are dry before the "dust" can hit the floor. Even a long painting session doesn't make measurable dust and a quick sweep and it's gone, but use a spray booth of any sort with a filter on the exhaust and that's not even needed. And a spray booth can be self made w/o the worry of an explosion proof motor as required with solvent based paints. Simple furnace filter is adequate filter at the back side. Kurt -
Marc: Be careful with Dullcoat. One coat does the job. Multiple coats don't make things duller - they actually build up making the surface smooth - and shiny. Of course, if you use a very thin coat via the airbrush, another coat might be OK, but if you use the stuff from a rattle can stop at one coat. Kurt
- 85 replies
-
- 1
-
-
- yacht mary
- mamoli
- (and 1 more)
-
Case for my Ropewalk
kurtvd19 replied to Geoff Matson's topic in Modeling tools and Workshop Equipment
Looks good Geoff. I could get that entered in the art gallery it looks so good. Kurt -
Chuck You can always try out the look of the "bumpy" mast and if you don't like it make it round and smooth. The problem that I see is that it might look to observers that you just did a poor job of the mast as it might not look as good at scale as it does full size. But, you are building the model for yourself not the observer who might not appreciate the authenticity of the bumpy mast. Share your efforts on this as you are ahead of me on the build and I am curious as to how it will look to scale. Take care, Kurt
-
casting metal parts including cannon
kurtvd19 replied to rtropp's topic in Metal Work, Soldering and Metal Fittings
Sorry not my parts so I can't share any secrets about them (as I didn't make them) except to say that they were done in RTV molds and are destined to be pieces in a kit. A friend shared the photo of the initial run of parts. However, I can say with certainty that this quality of parts is able to be done in pewter and RTV molds as I have others on hand cast by another fiend that are just as good. Kurt -
casting metal parts including cannon
kurtvd19 replied to rtropp's topic in Metal Work, Soldering and Metal Fittings
Each of the parts shown here were cast in RTV molds Kurt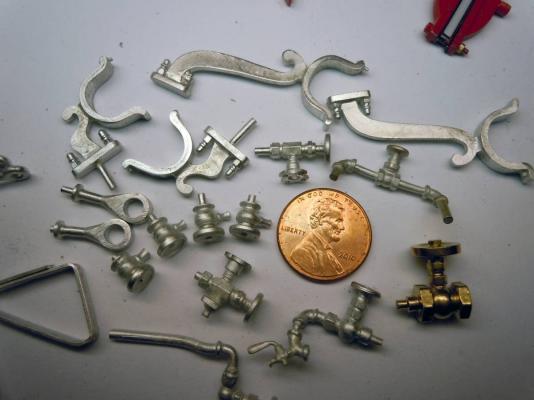
-
Looking real good Ryland. Kurt
-
Andy: I would call this a Semi-Scratch build with all the changes and additions you are making. Heck. you could call it IRVING and it would still be a great job. Kurt
- 382 replies
-
- 1
-
-
- stadacona
- sylvan scale models
- (and 1 more)
-
Scott: This tool or one like it makes working with photo etch so much easier and precise that I wouldn't work without it. Kurt
-
Andy: The boom looks great! I was going to suggest that you cut duplicate parts for each piece for the other side when you fit the first side but I got busy with a restoration customer and forgot to post. I always find it helpful to do this when I am building paired pieces. It's always easier - in my opinion - to cut duplicate parts and assemble the twin pieces at the same time. Cutting duplicate parts means not having to measure the first piece to duplicate it later and doing the assembly of the two parts sequentially avoids forgetting which part went on first or something else that can turn out to be a problem later. This will be a great model when completed. Take care, Kurt
-
Andy: The ship is owned by US Gypsum, the name is Gypsum Integrity, and you are correct that it's not on the Lakes. It is currently off the coast of Sierra Leone near Freetown. I just did a Google and located it using Marine Traffic. It was built in 2009. I was told it was built in Brazil as were the models. The models came in through NOLA and were then shipped to Chicago and someplace in Europe with the European model making it one piece. Very heavy stone bases and glass cases. I set the model on a table in my shop on top of a sheet and then took the case off and watched small pieces fall out. Didn't lose any pieces. As far as the Brazil build I was told this by the same guy who said it operated on the Lakes so I am not positive. I like what you are doing with the build and conversion of the model. Kurt
-
Andy: I envy you working in the larger scale. I have attached a photo of a self unloader boom that was part of a builders model of a gypsum carrier that I repaired. Looking behind the remounted boom you might note the absence of the superstructure. It, the boom and all sorts of stuff was in need of repair when the superstructure came loose during shipping of the model from S. America to Chicago. The model was in approximately 1/100 scale and some of the photo etched railings were almost tied in knots from bouncing around in the case - all were replaced as it's impossible to straighten small photo etched rails. The boat operates on the Great Lakes and I was able to work from photos of the full size boat as well as the other twin model that made it unharmed from S. America to Europe. The parts came loose because the "professional" model shop painted the Plexiglass deck and then glued to superstructure down to the painted deck and the paint didn't hold. The Plexiglass wasn't even sanded to make a good surface for the paint - but I didn't contract to fix anything that wasn't broken. Wish I had taken a photo of the model before I started the repairs. Kurt

- 382 replies
-
- 2
-
-
- stadacona
- sylvan scale models
- (and 1 more)