kurtvd19
-
Posts
3,043 -
Joined
-
Last visited
Content Type
Profiles
Forums
Gallery
Events
Everything posted by kurtvd19
-
 Ken: Thanks for showing this technique. Makes locating the ring foolproof and it's orientation can be very precise. I have filed this in my head for use in similar situations. I can think of several times when this technique would have saved me a lot of work remaking parts. When it comes to working with brass you are THE MAN! Guys, if you don't have Ken's book on modeling with brass your library isn't complete. Model Building with Brass, published by Schiffer - worth every penny it costs. I reviewed this book in the Spring 2014 Nautical Research Journal (59.1) with high praise. Thanks, Kurt
- 440 replies
-
- 3
-

-
- niagara
- model shipways
- (and 1 more)
-
Very interesting and a great fix. Fixing problem areas can be a real challenge sometimes. You nailed it. Kurt
-
Welcome to MSW Sam. Let us know if you decide to post photos of the model in the completed build area. Kurt
- 308 replies
-
- 2
-
-
- finished
- model shipways
- (and 1 more)
-
Ken: Really nice with great detail. I will certainly use the glue drop method for bolt head detail sometime. Kurt
- 440 replies
-
- 2
-
-
- niagara
- model shipways
- (and 1 more)
-
2015 NRG Conference Update - MYSTIC
kurtvd19 replied to Chuck's topic in NAUTICAL RESEARCH GUILD - News & Information
Jack: MSW members are Associate NRG Members. You will need to show MSW in the NRG Member # space on the form. In order to verify that you are in fact a MSW member and thus an Associate NRG Member we will need to know your MSW ID - yours being Jack12477. Yours will fit in the space completely but others may need to add it in the margin if mailing the form. If calling the office, just tell Mary your MSW ID. Hope to see you and a lot of the MSW members in Mystic. Kurt -
No, it is the kit with a lot of added details. The modeler was entered in the Novice class - by virtue of his award his future entries will be in the Intermediate class.. A gold medal automatically moves the modeler up one class minimum. Kurt
- 308 replies
-
- 2
-
-
- finished
- model shipways
- (and 1 more)
-
Cathead: Do you have any documentation on the possible paint color of the boat? Is it included in the book? Kurt
-
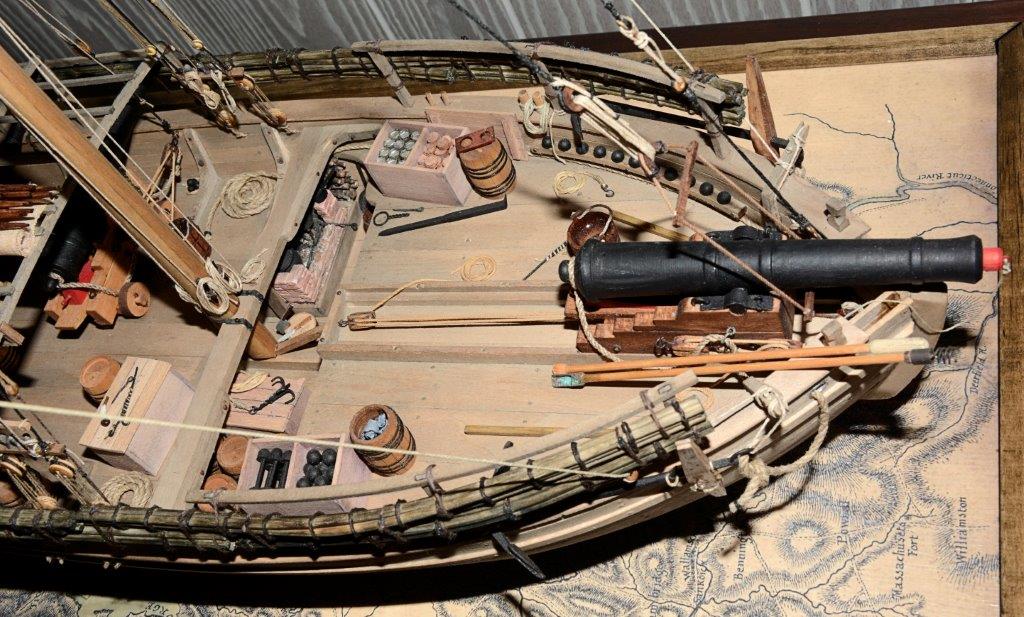
I have attached another photo of Sam Parent's Philadelphia for you guys to drool over. The details he has added are plentiful and truly make this a remarkable model. Sam is new to the NRG, I signed him up at the contest, and I am going to ask him to join in here. I gave a spiel at the modeler's symposium there about MSW and the NRG and I think we probably already have some new lurkers at MSW from there. Maybe he will share more photos with us. Photo by Sam Parent. Kurt

- 308 replies
-
- 8
-
-
- finished
- model shipways
- (and 1 more)
-
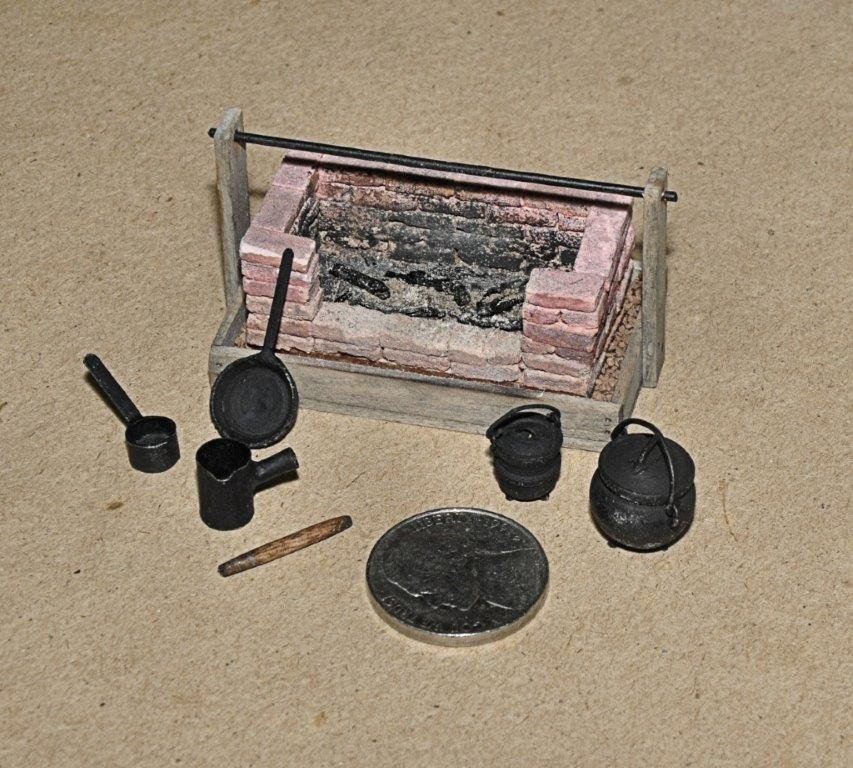
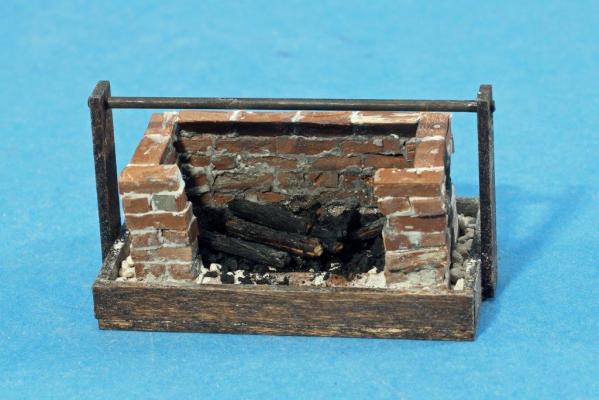
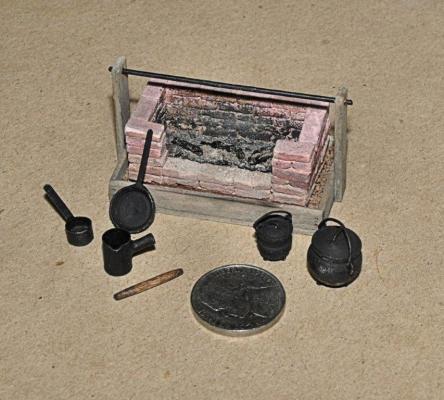
We had two great models of the Philadelphia entered at the Manitowoc contest last week. Both took Gold medals and one took the Best of Show award! Before anybody makes their fireplace cook stove read my article - Part 7 - the concluding article on this model, about how I made bricks for the fireplace and how the Best of Show model maker did his. I would do it his way if I were to do it again, but don't use the wooden bricks from the kit - make real bricks. I have attached 2 photos of the fireplace. The first one is mine. I worked at making it look like it wasn't done by a bricklayer, figuring that the builders of the Philadelphia didn't include brick layers. The other is made by Sam Parent from Winona, MN who won the best of show award. He also made a lot of cooking gear as well as a lot of the stuff needed to load and fire the guns. Excellent work. Sam's is more closely that of a brick mason's work. Photo of Sam's fireplace is by him. We both made representations of fires in the fireplaces. Kurt
- 308 replies
-
- 9
-
-
- finished
- model shipways
- (and 1 more)
-
Great job Ken. Brass stack is real nice - your comfort zone for sure. Kurt
- 440 replies
-
- 1
-
-
- niagara
- model shipways
- (and 1 more)
-
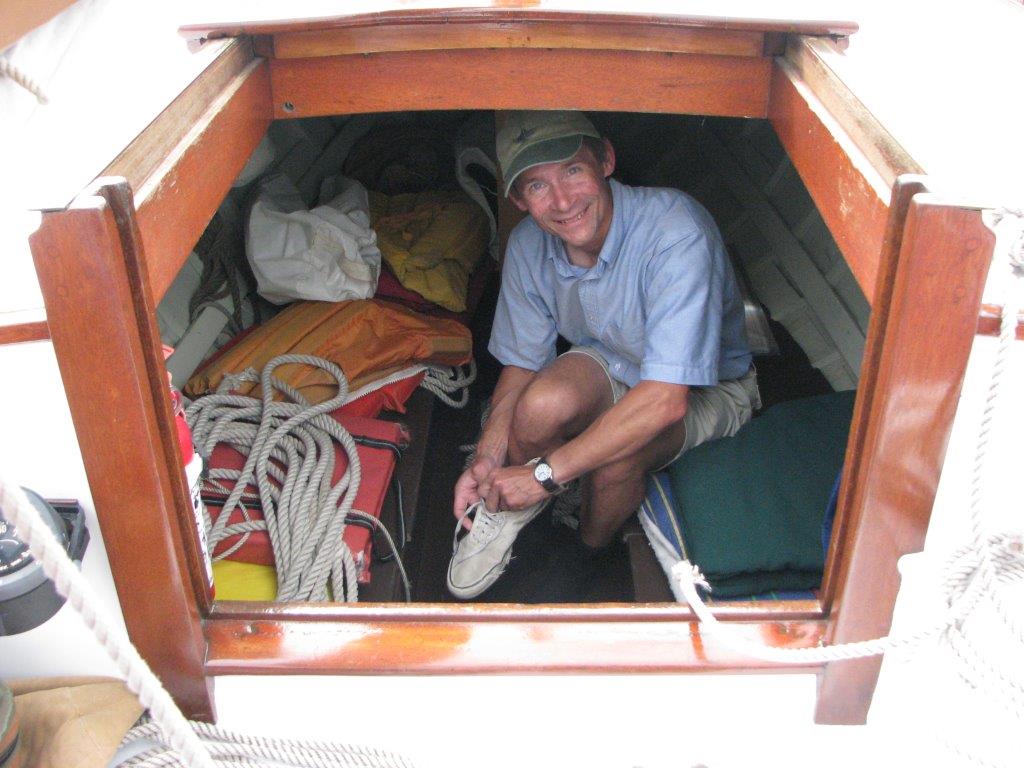
Ken: Nice job. Go with the stern side for the doorway. It was usually closed off with three or more horizontal planks that slide down in tracks on both sides to make a covering and when the sliding hatch is pulled aft the structure is sealed up against the weather. The doorway is aft for keeping out the water that would hit it from heavy weather over the bow - heavy seas over the stern happens but not as much as over the bow. Photo is of a smaller craft but the hatch and doorway is done the same. This one uses 3 crosswise planks to seal off the doorway. You can see the tracks. That's not me inside but the owner - the WI Maritime Museum hired me to build a model of this neat little boat in 1/12 scale. Have been out in it in Green Bay under the original Egyptian cotton sails - built in 1935 in Manitowoc, WI by Burger. They only bring out the original sails for boat shows, etc. Kurt

- 440 replies
-
- 3
-
-
- niagara
- model shipways
- (and 1 more)
-
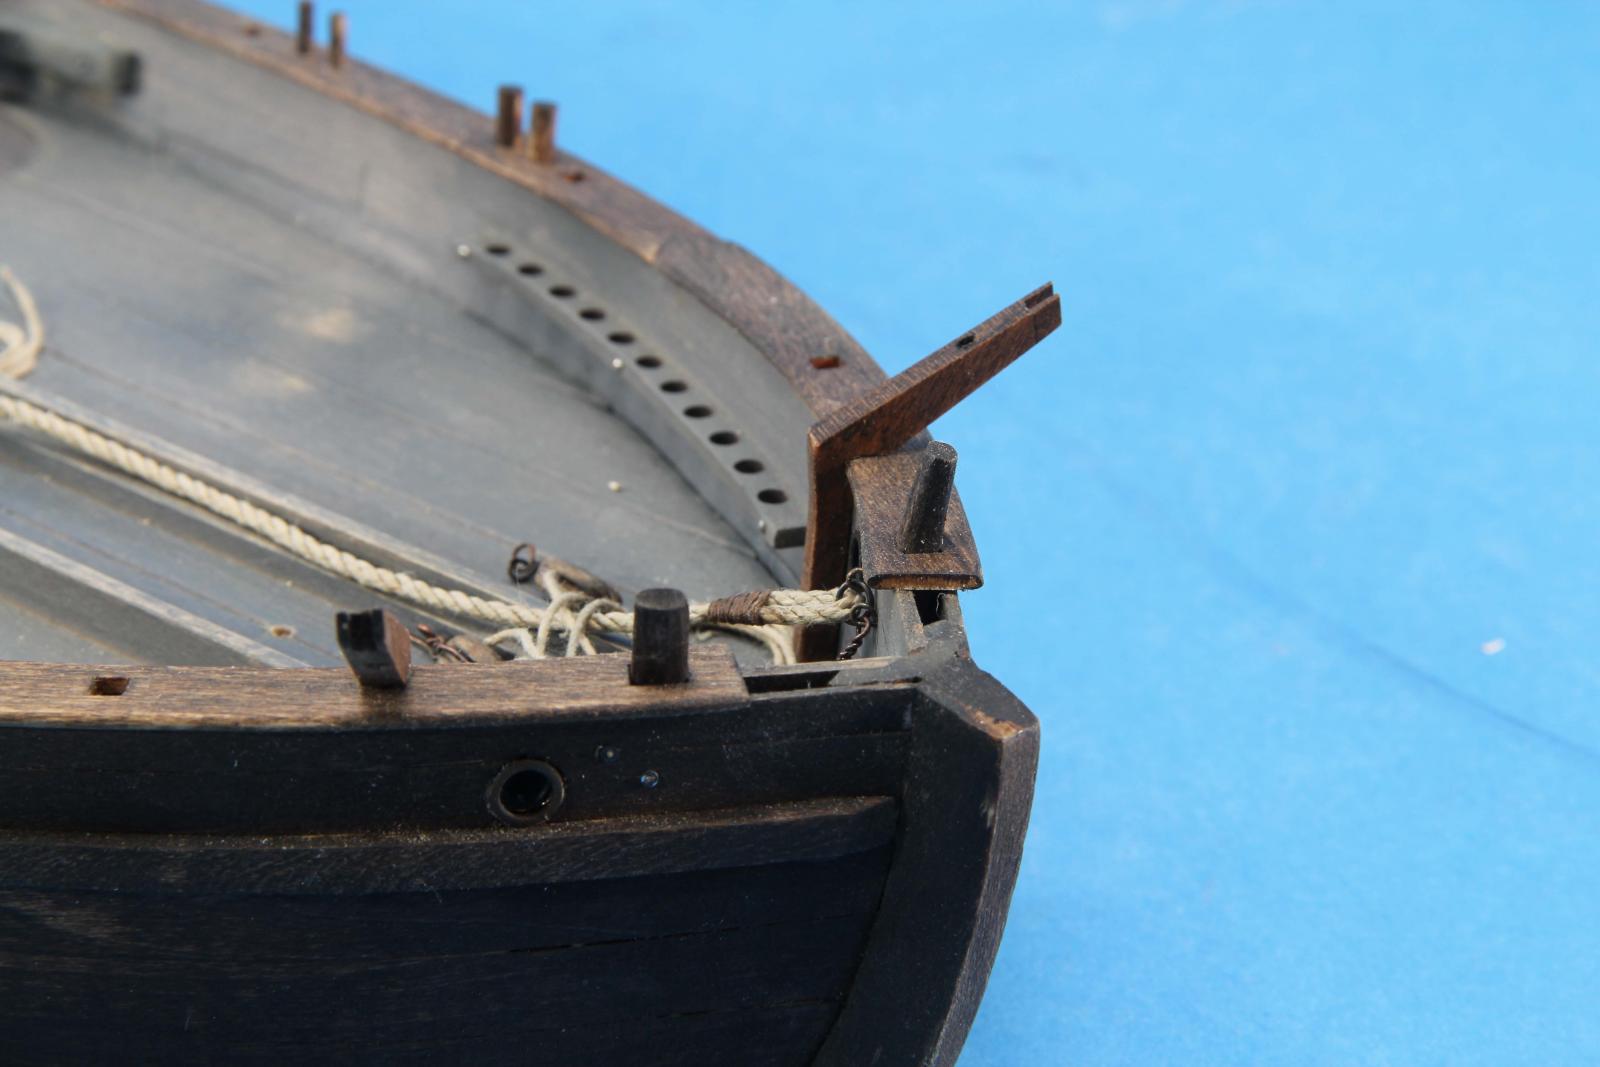
Here is what I did with the area in question. The Smithsonian plans seem to show something similar. Kurt

- 259 replies
-
- 3
-
-
- Gunboat
- Philadelphia
- (and 1 more)
-
Dan: It looks good mounted and everything is straight! Congratulations on a job well done. Kurt
-
I am checking again with our mail service as it seems that several members in Australia have not received their issues yet. When I spoke to them on Tuesday they said that the Australia issues are supposed to be delivered within 30 days of leaving NY. They were shipped on 3-16 from NY so they should be delivered by now. We are also tracking some missing issues for N. Ireland and several in the UK. I would ask that any overseas members to send an email to info@thenauticalresearchguild.org to let us know the date when you receive/received this issue of the Journal. Due to a mix up in Cuba, NY all but 3 or 4 non US members were mailed 2 issues of this Journal. Please let us know if you get one or two copies also. If you do not get a reply to your email to info@thenauticalresearchguild.org let Mary or me know with a PM here on MSW. Several members seem to have a problem with receiving emails from the info@.... email, but get emails sent from Mary's personal email - please check your SPAM filter before sending a PM. We are working to find out what has happened and we will make sure everybody gets their Journal.
-
Fred: To heck with the 20 years - think positive! My wife saw my stash when my new 26 x 42 shop was completed and all my kits and stuff was consolidated into one area - previously stashed in various closets, basement & garage. She saw it all in one place and said "You have to live to be 350 to build all of those kits/projects". So I decided that she had given me a goal. Everyday now when I wake up I look around, get up and say "Well, the plan is working - only 283 years to go - so far so good!" That's my plan. Kurt
-
Dan: Really nice. Glad you finally got the base. Kurt
-
Make it look like brass
kurtvd19 replied to rcmdrvr's topic in Painting, finishing and weathering products and techniques
There is a new paint from Krylon called Krylon Foil Metallic - the Gold color looks like polished brass when applied. It needs to go over a white primer (do not use Rustoleum under this paint). Coat it with a clear coat and it will do the job. Just used it on a non-ship project that had a lot of white metal parts that were brass on the original subject. This paint can be decanted and sprayed with your airbrush as I did for some of the parts. Others I used the spray can and it worked fine - it was a 1/12 scale project probably bigger than your scale so you might want to stick to the airbrush. I have a model boat - again in 1/12 scale that will have the "brass" fittings done in this paint rather than plated. Once it's in the case nobody will touch the parts again to worry about paint vs plating. Kurt -
Metal - brass or Ali - turnbuckles
kurtvd19 replied to Tallshiptragic's topic in Metal Work, Soldering and Metal Fittings
I agree with Mick. If RB Models - the source I use for turnbuckles - has anything close to what you want, but y them and alter the body or ends as needed as this will be a lot less work. I have not been able to find left hand thread taps in the sizes I have needed to even consider making them from scratch. Kurt -
Simple Drying Rack
kurtvd19 replied to hornet's topic in Painting, finishing and weathering products and techniques
This is a great idea and I will be making up a very similar drying fixture. Thanks for the idea. Kurt -
Tracing light-box
kurtvd19 replied to Jason Builder's topic in Modeling tools and Workshop Equipment
I got an X-Ray light box from a vet and have used it many times as well as loaned it out to fellow club members. With the move to digital x-ray viewing there are lots of excess light boxes out there. Ask you vet or Dr. I have even seen them at garage sales and some time ago saw one at the Goodwill store. Their lighting is very even. If you make one from plate glass like the one initially shown in this thread you can stretch a translucent panel across the supports below the glass to even the light out. A fluorescent light panel works as does a white shower curtain type of material - which also works as a diffuser for photographic lights. Kurt -
Household Ammonia
kurtvd19 replied to Q A's Revenge's topic in Building, Framing, Planking and plating a ships hull and deck
The bit below was originally posted last year. Kurt Posted 10 October 2014 - 09:12 AM I have never used ammonia to bend wood - it just isn't needed. The bit below is a reprint of part of my article on building the Gunboat Philadelphia kit in Ships in Scale. I doubt anybody who attended the NRG Conference I reference has ever used ammonia since hearing it. Kurt AVOID AMMONIA SOAKING At the 2007 Nautical Research Guild Conference in Manitowoc, Wisconsin Alex C. Wiendenhoeft of the U S Department of Agriculture Forest Services Center for Wood Anatomy Research at the Forest Products Laboratory in Madison, Wisconsin explained how and why this damages the wood. After this length of time I do not remember all of the details of his talk, but the point was well made and I don’t think that any of the modelers who listened to his talk that day has ever used Ammonia again. The very non-scientific points I remember is that soaking in Ammonia breaks down and liquefies the Lignin in the cells making the wood more bendable. When the Ammonia evaporates while the wood is clamped in place to the desired bend, the Lignin solidifies in a somewhat degrade state weakening the wood. Ammonia also causes some woods to discolor when they dry out. This might not be critical when the wood is to be painted but if it is being stained or clear finished the discoloration would not be acceptable. Concentrated Ammonia fumes are used commercially to darken some woods with oak being very susceptible to this process. Mr. Wiendenhoeft explained how and why soaking in water or steaming wood made it bendable while not damaging the cellular structure of the wood. Again, a non-scientific explanation is that there is a chemical bond with water in the cellular structure of wood that varies between 0% and 30%. Soaking or steaming wood with water raises the percentage of water within the wood, called “free water”, above the amount bonded within the cells temporarily. This makes the wood swell and more easily bent. When the wood dries out and the bonded water stabilizes back to 30% or less, the wood retains the shape it was formed to by the clamping while it dried while retaining its strength. I have only mentioned drying the wood while clamped in place but the application of heat using some sort of plank bending tool or other heat source works the same way as clamping just at an accelerated rate. -
Meet Your NRG Directors and Officers
kurtvd19 replied to tlevine's topic in NAUTICAL RESEARCH GUILD - News & Information
Chuck - next week. That's a threat !!! Just so busy I fell way behind. Kurt -
The Archer "rivets" are minute bits of C/A on decal film. The strip of rivets is cut from the sheet and applied like any decal. The film is very thin and a bit of clear coat blends the edges into the surface so the edges of the strip are completely invisible. I have done the hand applied drops of C/A and the Archer rivet decals - will never do the hand application again. They also have weld seam decals that work the same way. Depending on the scale you are working in would determine the scale of the rivets or welds you applied. Ho or the larger 1/48 scale decals might both work on the same model depending on the size of the rivet being replicated. Kurt
-
I usually leave the commentary on the Journal articles to others, but I have gone beyond my inspection of the proof copy of this issue. I have been reading a couple of the articles off my computer screen because I couldn't wait for the printed copy. This is unusual activity for me - I hate reading off the screen (but not so much since I got the big 27" screen). I think the cover photo is fabulous as are the photos that accompany the article. I think a lot of members will be very interested in the author's thoughts on the subject of updating dockyard-style modeling. We should go to press Monday. Kurt