

trippwj
-
Posts
3,156 -
Joined
-
Last visited
Content Type
Profiles
Forums
Gallery
Events
Everything posted by trippwj
-
 that planking is absolutely SUPER. Your skill continues to BOWL me over!!! (think that will make it past the licensing folks???)
- 2,191 replies
-
- 4
-

-
- confederacy
- Model Shipways
- (and 1 more)
-
Continuing to look good, Eamonn. They seem to be matching up well on both sides.
- 1,039 replies
-
- 1
-
-
- ballahoo
- caldercraft
- (and 2 more)
-
Looks great, Sjors - the tree nailing came out very well! :dancetl6:
- 1,616 replies
-
- 1
-
-
- caldercraft
- agamemnon
- (and 1 more)
-
Good luck with that one, Mark! maybe, just maybe, if that side project for "She who must be obeyed" is of suitable result, she may relax the requirements for just this once...maybe.
-
And at the time of launch, the name was mis-spelled as GLENMHOR (I found the pictures on boatnerd.com once I had a name!!!)
-
Assume you mean the laker being launched, not the tugs or small craft? :huh: Gee - a Laker - that was unexpected! :P :P
-
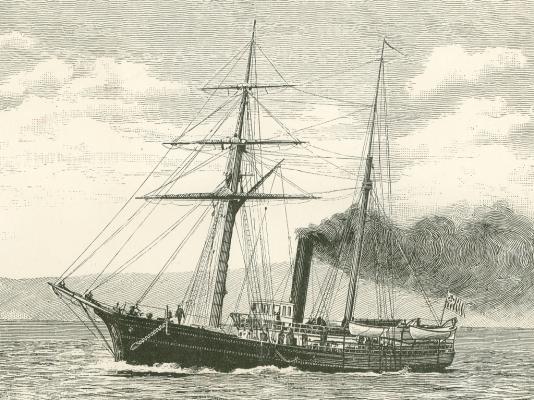
Well played, Eamonn! It is, indeed, the USRC Thomas Corwin The U.S. Revenue Marine Steamer Thomas Corwin, also known as simply Corwin, was completed in 1876 and was commissioned on 17 July 1877 in San Francisco, California, which remained her home port during her career with the Revenue Marine. She was then under the command of Revenue Captain J. W. White. She sailed for Sitka, Alaska on 30 July 1877 where she began a patrol in the Arctic Ocean, returning to San Francisco on 28 August 1877. She then made annual cruises to Alaskan waters. She also patrolled the waters off Washington and Oregon when not in the Arctic. She enforced fishing regulations, customs laws, prevented the trafficking of liquor with the local native populations, established the authority of the U.S. Government on the new territory, and assisted mariners in distress, among other duties. On 9 April 1898 Corwin was transferred to the United States Navy during the Spanish-American War. She served in the San Diego, California area until 15 August 1898 when she was returned to the Treasury Department. She was sold on 14 February 1900 for $16,500. She was used as a merchant vessel after her sale and continued sailing the Bering Sea on a charter basis. She was a topsail schooner with an inverted cylinder steam engine; single propeller Your turn!
-
Been a long time since i got one right! Try this one on for size...
-
Seeing the post by Bob on the Crother's book AMERICAN-BUILT PACKETS AND FREIGHTERS OF THE 1850'S (http://modelshipworld.com/index.php?/topic/5376-american-built-packets-and-freighters-of-the-1850s/?p=154501), I went on-line to see what my options are for buying (and to add to the wish list which I periodically send to my Admiral and kids). Lo and behold, there is an additional title coming out this summer: The Masting of American Merchant Sail in the 1850s An Illustrated Study Print ISBN: 978-0-7864-9399-9 Ebook ISBN: 978-1-4766-1569-1 ca. 45 photos, glossary, appendix, bibliography, index softcover (8.5 x 11) 2014 Not Yet Published, Available Spring/Summer 2014 About the Book This book describes the intricacies of construction and fabrication more than 150 years ago of masts and yards installed in American merchant vessels, particularly those spars which were "built" or composed of multiple pieces bound together by iron bands. These were referred to as "made" spars as opposed to spars which were constructed from a single tree. It also contains instructions for developing the shape and proportions of various spars. Very little information is available on this subject. Generally, the external sizes of individual spars can be found but intimate details are sorely neglected. In addition the book includes the spacing and location of masts in a ship, and the rake. It also includes a discussion of the types of wood that are most desirable in the construction of spars. Price is listed as $55.00 at the McFarland website (http://www.mcfarlandpub.com/book-2.php?id=978-0-7864-9399-9) and also on Amazon.
-
- 3
-
-
- masting
- merchant sail
- (and 1 more)
-
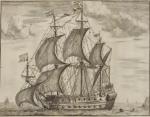
The steam battery Demologos (also refereed to as the Fulton for her designer). An interesting center paddlewheel steamer. Lived a rather mundane existence for the US Navy.
-
Those are the items of interest, Augie. Will go check out Rustyj's Granado - THANKS!
-
Fantastic repair, Sherry. I agree with Danny and the rest - I can't pick out the lines either!
-
She is coming along very nicely, Scott. That metal work came out wicked sweet! Look forward to the next update -
-
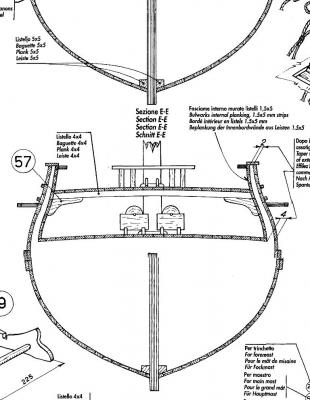
Welcome to the slow show, Sjors - glad to have you here! Have put the first glue to wood. Took a bit, but have built the former and installed the bulkheads and the filler pieces fore and aft. Next step is to add what look like reinforcing pieces between the bulkheads at the keel end - is this the way you see the pieces at the base of the frames in the cross section and the hashed line between them in the side view? Pictures (probably) tomorrow evening.

-
Surely you don't mean to imply that Mobbsie would use such language as to peel paint from a barnacle???? :D :D Looks good there, Mobbsie. Very impressive!
- 1,279 replies
-
- 1
-
-
- agamemnon
- caldercraft
- (and 1 more)
-
Coming along quite nicely, Eammon. Good luck with the planking - I know now where to run to get filler when the stores are sold out!
- 1,039 replies
-
- 1
-
-
- ballahoo
- caldercraft
- (and 2 more)
-
Look forward to following this build, Stan - Enjoy!
-
Yo, Mobbsie - WOW!!! Looking fantastic, mate. Well done!
- 1,279 replies
-
- 1
-
-
- agamemnon
- caldercraft
- (and 1 more)
-
Looks great, popeye, but gotta agree with John. Are you really sure? Maybe a small bar, towel rack....
- 552 replies
-
- 1
-
-
- maine lobster boat
- Midwest Products
- (and 1 more)
-
Fantastic job, Popeye. I love all the little touches you add to these!
- 552 replies
-
- 1
-
-
- maine lobster boat
- Midwest Products
- (and 1 more)
-
My computer...
-
Looks great Augie. Off to New Jersey today to help keep the Super Bowl safe!
- 2,191 replies
-
- 4
-
-
- confederacy
- Model Shipways
- (and 1 more)
-
Thanks, Augie - will check that (and your jig) out as possible solutions to my problem. It is the lower (keel) side of the planks that don't want to lie flush against the bulkhead, so this may be a partial solution. Thanks, my friend - will keep you posted!
-
Stan - Thanks for stopping by. I have put this one back on the shelf for a spell. I just can't seem to get the hull faired right for the planking to sit flush, so instead of using the axe and chainsaw to correct my goofs I opted to put it safely out of my reach until I can figure out how to fix that which I up-ge-fluggeled (highly technical Homeland Security term meaning messed up badly). Will be watching yours to get a better idea of how it should be done!
-
Off to a great start, Eamonn. Looks nice and squared off.
- 1,039 replies
-
- 1
-
-
- ballahoo
- caldercraft
- (and 2 more)


