MORE HANDBOOKS ARE ON THEIR WAY! We will let you know when they get here.
×


dafi
-
Posts
2,415 -
Joined
-
Last visited
Content Type
Profiles
Forums
Gallery
Events
Everything posted by dafi
-
 Thank you!!! Painted the side parts of the entry port, first yellow ochre ... ... added the gold ... ... starts to look quite noble :-) Then the old question about closing the port: Just for discussion: once like a gunport lid solid ... ... and once painted sailcloth on a wooden frame like the bulkheads. Both Versions ... ... on the backside once a solid board, once as a frame, both with eyebolts to hold. And now again the question - how was the side entry port closed?!? Asked Karl Heinz Marquardt, he knows of no system, even speculates on leaving the port open. I believe there must have been something as there were sleeping hammocks just beside. As all doors or other permanent fittings were sooner or later represented in models, I guess upon a flexible solution, a board or a frame with sailcloth, logically fixed on the outside like a gunport lid but held towards the inner side by eyebolts and rope. So any idea or even better proves how it was fixed ?!? Cheers Daniel XXXDAn
 -
And now some other important steps in life :-) Applied a very thin layer of paint to judge the situation ... ... and realised immediately that some steps were applied a bit crooked. So taking them down carefully, reglueing and filling the gaps. (see #573 ) Prepared the doorway of the port ... ... carved the panelling ... ... and it looks already more friendly than some days ago :-) XXXDAn
-
... they already have the beef in the mouth but still are chewing for quite a while already ... ... thats why they still sit for so long in front of the now empty plates ... ... or are they waiting to be served as the helper with the barrel wanting to catch the rations still is waiting in front of the stairway to heaven - means the companionway that leads into nowhere towards the not yet done stove above on the still non existing middle deck ... ... ... smells like mutiny could break out soon ... ... ... XXXDAn
-
Worth every "like" given :-) And even more!!! Cheers, DAniel
-
Always a treat to see! XXXDAn
-
Sooooooooo it looks already a bit more friendly by now ... ... closed the gaps with Evergreen and Apoxy-Sculpt ... ... and the new steps are a awaiting :-) A good trick to get an even result ist to just first fix every second one ... ... and use the ones in between to average out the rhythm :-) And to finish put the crown onto its place :-) Cheers, Daniel
-
@amateur ... anyway his place is on the quarterdeck, where the plaque is "here is where Nelson will fall" @keith ... yeah, the beaf appears to be a bit tough at times ... XXXDAn
-
... as if I ever knew what I was planning ... ... would save a lot of work from the devastation team ,-) The pale color was on purpose and much more a hint towards the flavorless food combined with seasickness. Was this too much or should I still add a faint green shade over the faces? Anyway, I think the lower deck still holds some subjects to discover for me and I am looking forwards to endeavor those realms of ignorance on my side. Let the odyssey continue :-) XXXDAn
-
:-) Thank you all, especially Matti, hope your thump swells down soon !!! @Dubz: ... do not forget davatation!!! @clearway: would hurt more to keep it it the way it was :-) @Jan: the stern is just snapped in and still removable to have easier access.
-
*blowingoffthedust* ... yep ... *coff* ... here we go again ... *wavingthedustcloudsaway* ... starter finished, now back to the main course :-) Where have we been? Okokok ... ... alright ... ... heavy partying ... ... with social games :-) And what to do as reentry to the topic ?!? ... ... ... ... ... of course ... ... ... ... ... ... ... ... ... ... destruction !!! I just realised, I never replaced the entry port and the side steps on the larboard side. Cheers, Daniel
-
vintage model shipbuilding articles by Capt. E. Armitage McCann
dafi replied to Bob Blarney's topic in Nautical/Naval History
I also love "mount a fish" page 83 :-) XXXDAn -
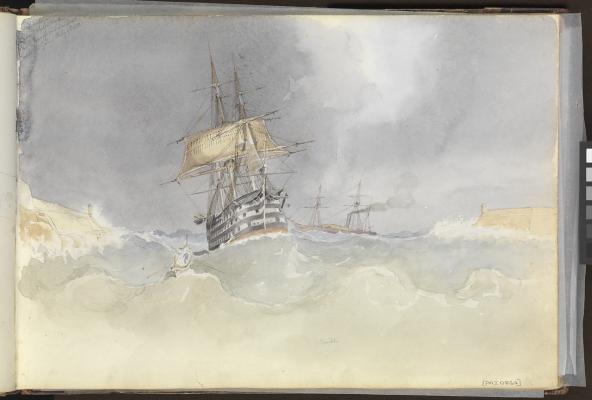
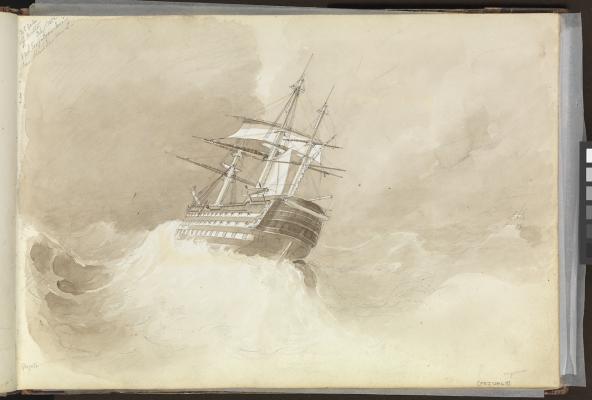
Just found these wonderful pictures and that add to the topic of lost rudders as a small flavor :-) HMS 'Trafalgar' losing her rudder-head in a north-easterly gale off Malta, 1 February 1852; PAI0863 http://collections.rmg.co.uk/collections/objects/150803.html HMS 'Trafalgar' sailing into Malta Harbour with loss of her rudder head after a gale, 9 February 1852; PAI0864 http://collections.rmg.co.uk/collections/objects/150804.html XXXDAn
-
Grandfather, what big hands you have ...?!? Magnificent work, as usually! Chhers, Daniel PS: Is there still a mast foot of the big one missing?
-
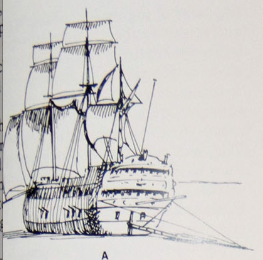
The sketch of Turner shows Victory after Trafalgar with all the bulkheads undernbeath the poop still stripped after Trafalgar. Also some 1900th pictures show the same. XXXDAn
-
Got worried, nice to know you back :-) XXXDAn
-
Moderators: Is there any possibility to copy this interesting discussion either to Building, Framing, Planking and plating or to Ship's Deck Furniture, Guns, boats and other Fittings. (Good question - is it considered hull or furniture?!?) Like this it we would be jamming this marvelous report and the discussion would be found more easily too :-) If not just delete this message Cheers, Daniel
-
It is simply easier to measure the circumference: Just take a piece of rope and wrap around. For the diameter you need a tool like a caliper. XXXDAn
-
Before facilitatied emergency steering one should retrieve the rudder ;-) XXXDAn PS: This way of steering with the pendants imho is only applicable if pintles are ok and only the rudder head (or the tiller including the spare one) is broken.
-
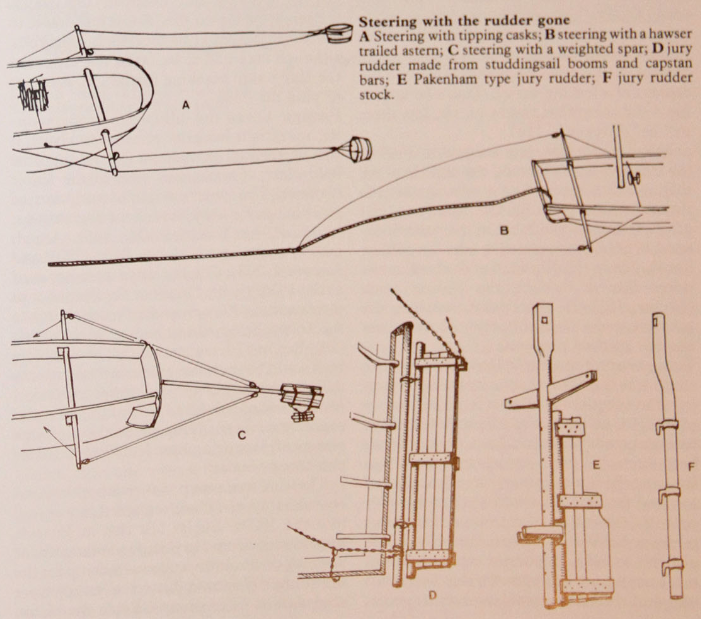
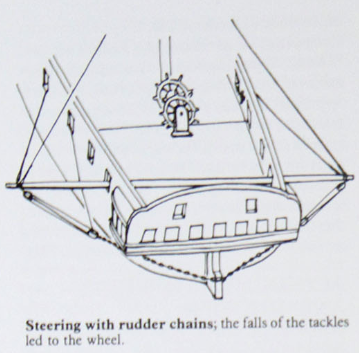
Here are some pictures aut of my Harland Seamanship, showing the steering by the chains and other stories. XXXDAn

-
I think Evan summoned the case nicely. The most important was the saving of the rudder. Even though Dave mentions the lock, history is full of broken or lost rudders - another example is the Cutty Sark in race with the Thermopylae, where she lost it in a storm and the need of several days to fix an emergency rudder under these conditions is still one of the great stories of bravery in seamanship. In my understanding the first purpose was to keep the rudder nearby the ship to recover the material. The chain is usually tied close to the stern, keeping the chain out of the water and out of the way and providing by the ties a kind of breaking point to give more line to keep the floating rudder as clear of the hull as possible. Once recovered it for sure was a first option to be used as steering help, but for reasons of lever forces, it was handled by some spars that were set outside as Evan described. This and many more options are nicely shown in the Harland´s Seamanship. Also Nares, Sheet Anchor and Ketch Anchor etc have big sections about replacing the rudder, so it was a well known and especially dangerous issue. Emergency systems contained the use of gun-carriages, barrels, old sails - an interesting and very exciting topic :-) XXXDAn
-
This is common in AOTS and I think it was thought as a mere simplification which results in those stupid errors. AOTS Victory has the same issue - same wrong pattern, all planks exactly 6 meters, split planks in between the coamings and not respecting that the butts should be atop a deck beam. I am even not mentioning that some decks have straight planks, other have curved ones ... XXXDAn
- 4 replies
-
- 3
-

-
- deck planking
- butt shift
- (and 1 more)
-
The loss of the rudder was one of the reasons for the loss of the HMS St. George (1785) at X-Mess 1811 at Thorsminde. http://en.wikipedia.org/wiki/HMS_St_George_(1785) The rudder was found some 200 years later and is in restoration at the museum. Has anybody seen it or has clear pictures? Does it have a turbulence groove? XXXDAn PS: THe german wikipedia is much more detailed: http://de.wikipedia.org/wiki/HMS_St._George_(1785) http://de.wikipedia.org/wiki/HMS_Defence_(1763) Also the museums site is quite interesting: http://www.vragmus.dk/uk-version/marin-arch-uk/rudder.htm http://www.vragmus.dk/uk-version/index-uk.htm see "Photos and find two of the rudder :-) http://www.vragmus.dk/uk-version/marin-arch-uk/methods.htm
-
@foxy, no you wont! Even though using some parts that I produced in my dim and distant past, you already found your own way to make this model your own! Anyway fork and knife or even better Nelson´s knife-fork it is up to you first ;-) Thank you Ian, Mark, Popeye and foxy :-) XXXDan
-
Thanks you Sirs, very kind! My small piece of cake found a temporary home in my Trafalgar shrine, beside the tankard displaying the battle lines, the Nelson magnifying glass, the photography of Nelson´s ghost and the the piece of original oak*** of the HMS Victory. Cheers and shiver in deverence, Daniel ***from ecologically certified dismantling ;-)