Chuck
-
Posts
9,701 -
Joined
-
Last visited
Content Type
Profiles
Forums
Gallery
Events
Everything posted by Chuck
-
 I havent tried yet honestly. The issue is they are so small they might fall into the machine or be very hard to keep from falling into places. It would be very difficult to rig blocks smaller than 1.5 mm the traditional way. Can you imagine stropping such small blocks?
 -
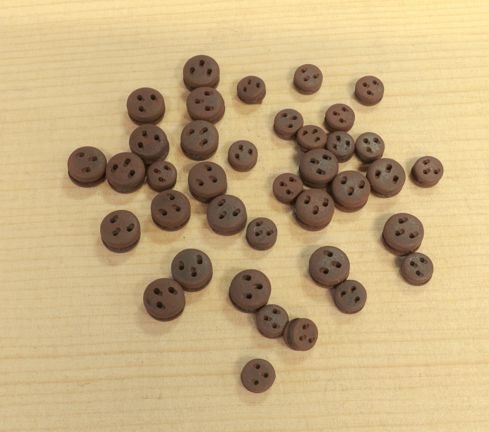
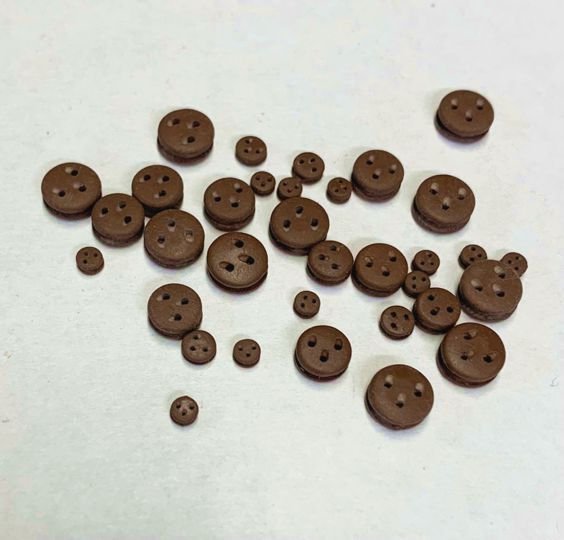
Thanks Rusty...you could get this color by dying wood deadeyes too but its so messy and takes time. This was easier. I just placed them in my tumbler with some weathering powder. Instead of sandpaper, a stiff cloth flap wheel buffed and colored them in about 2 minutes. I am not sure folks can get over the fact that they are not wood but it doesnt make sense to me since its basically the same stuff that 3d prints are made from and everyone is using 3d printed parts these days. I will be using this material and this color on my Speedwell for all blocks and deadeyes. Even if I never sell them. There doesnt seem to be any interest in them. Chuck
-
Just finished up a small batch of Syren deadeyes for a commission of sorts. 1/8"and 3/16" deadeyes. I used the new "Syrenite" material. These were laser cut from black Syrenite. Which would have been fine to use as is, but I prefer a dark brown...as well as my customer. The finished black deadeyes were tumbled in a dark brown weathering powder for about 30 seconds. Its really just a matter of tastes. The black will show through slightly. If you use them as is they are black...like ebony they look great. To kick them up a notch and make them look rich with more depth...a quick brushing with some weathering powder really does the trick as well as giving a lustrous satin finish.
-
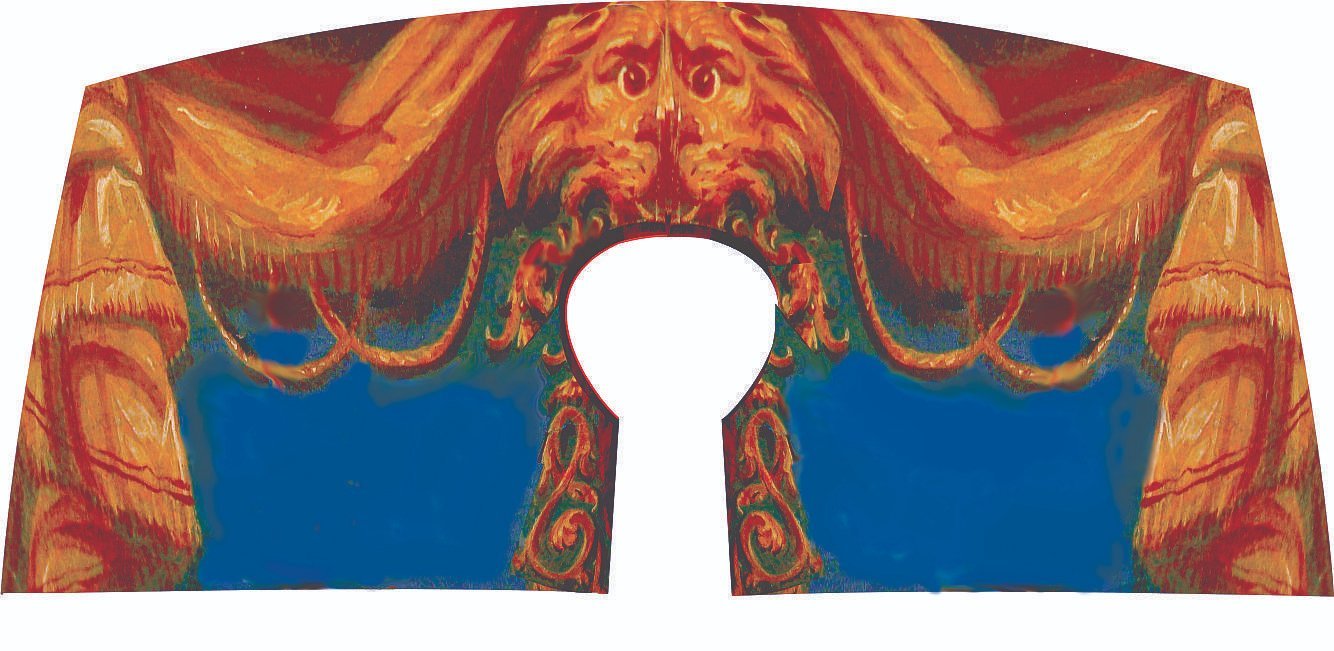
I will probably provide both. I like more of the blue field without them. Here is a pdf if folks want to print one out and see what I am working on. They are far from finished. I am still working on the colors and details... sternfrieze.pdf
-
Thanks Toni....its pretty crisp. I think it was just my printout. Two versions. One with tassels. Still playing with it though.

-
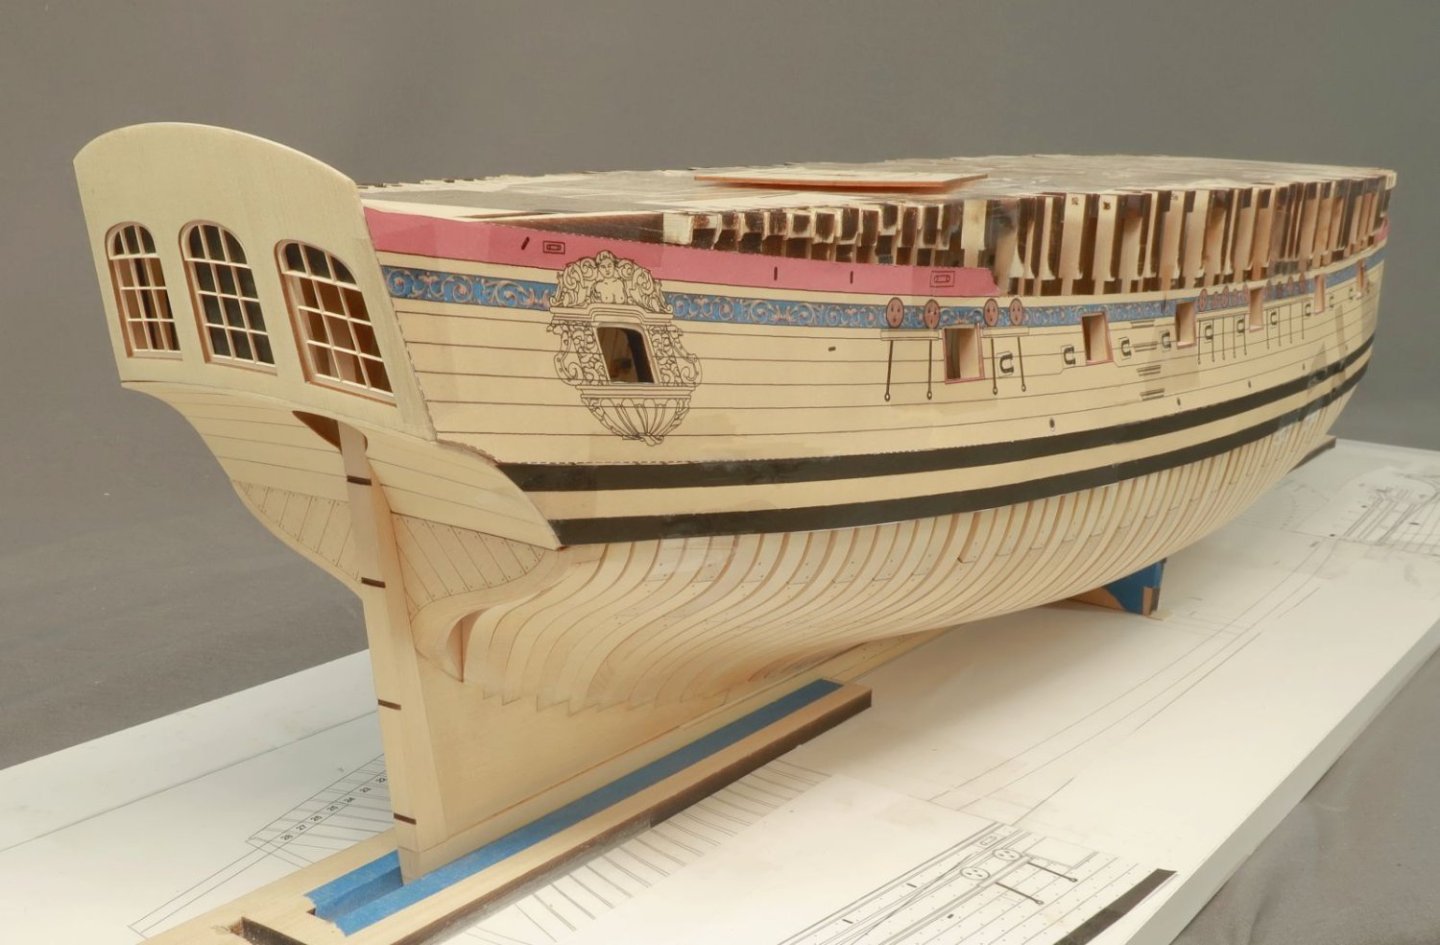
Thanks guys…its just a paper template so dont get too excited. Hopefully i can now make her look like that using wood. I will start planking in May after I get back from the Connecticut show. This is how she will remain until then. I am bringing the model if anyone happens to be going as well. I will also bring the completed Winnie.
-
The original model of speedwell is so filthy and faded its really hard to see the colors. Thats why I wanted to do a test of sorts. I want to see if these colors are good or if I should change the red to something else etc. But since the bulwarks and deck fittings are also red I figured why not just match that for simplicity. Look how muddy and faded the colors are below.
-
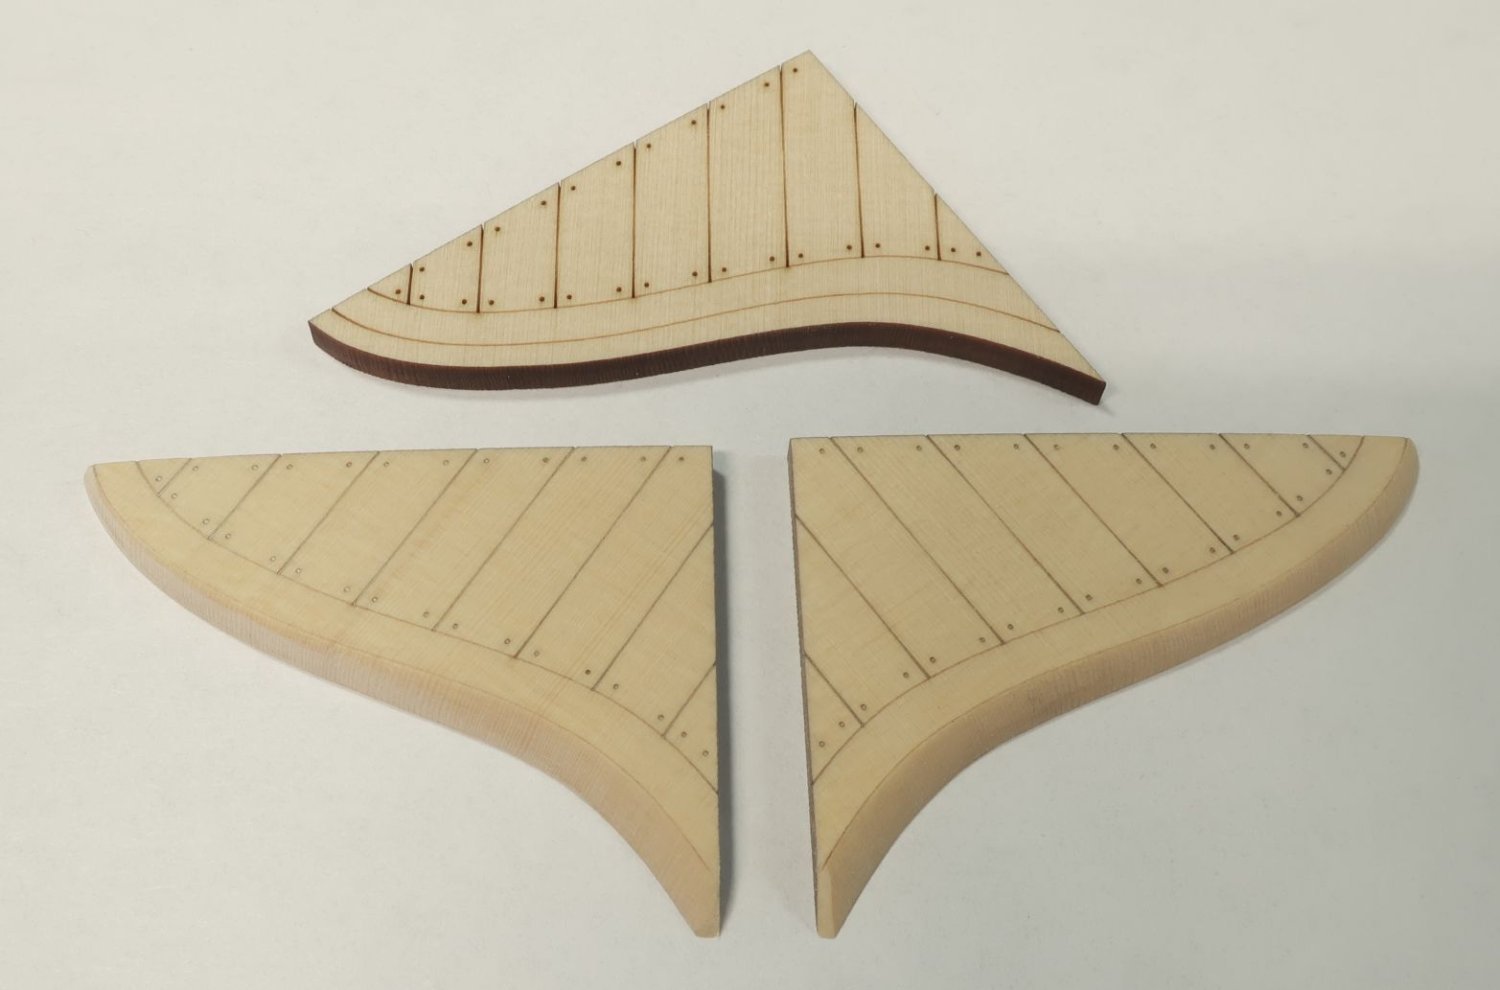
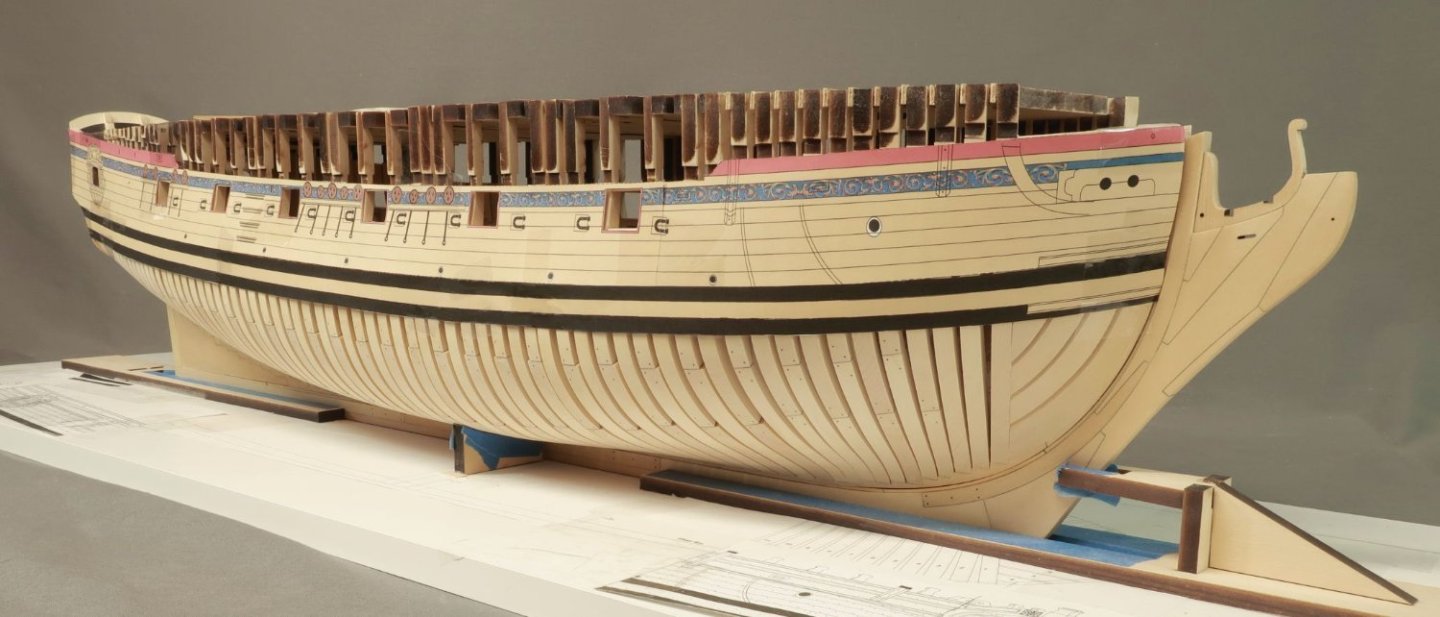
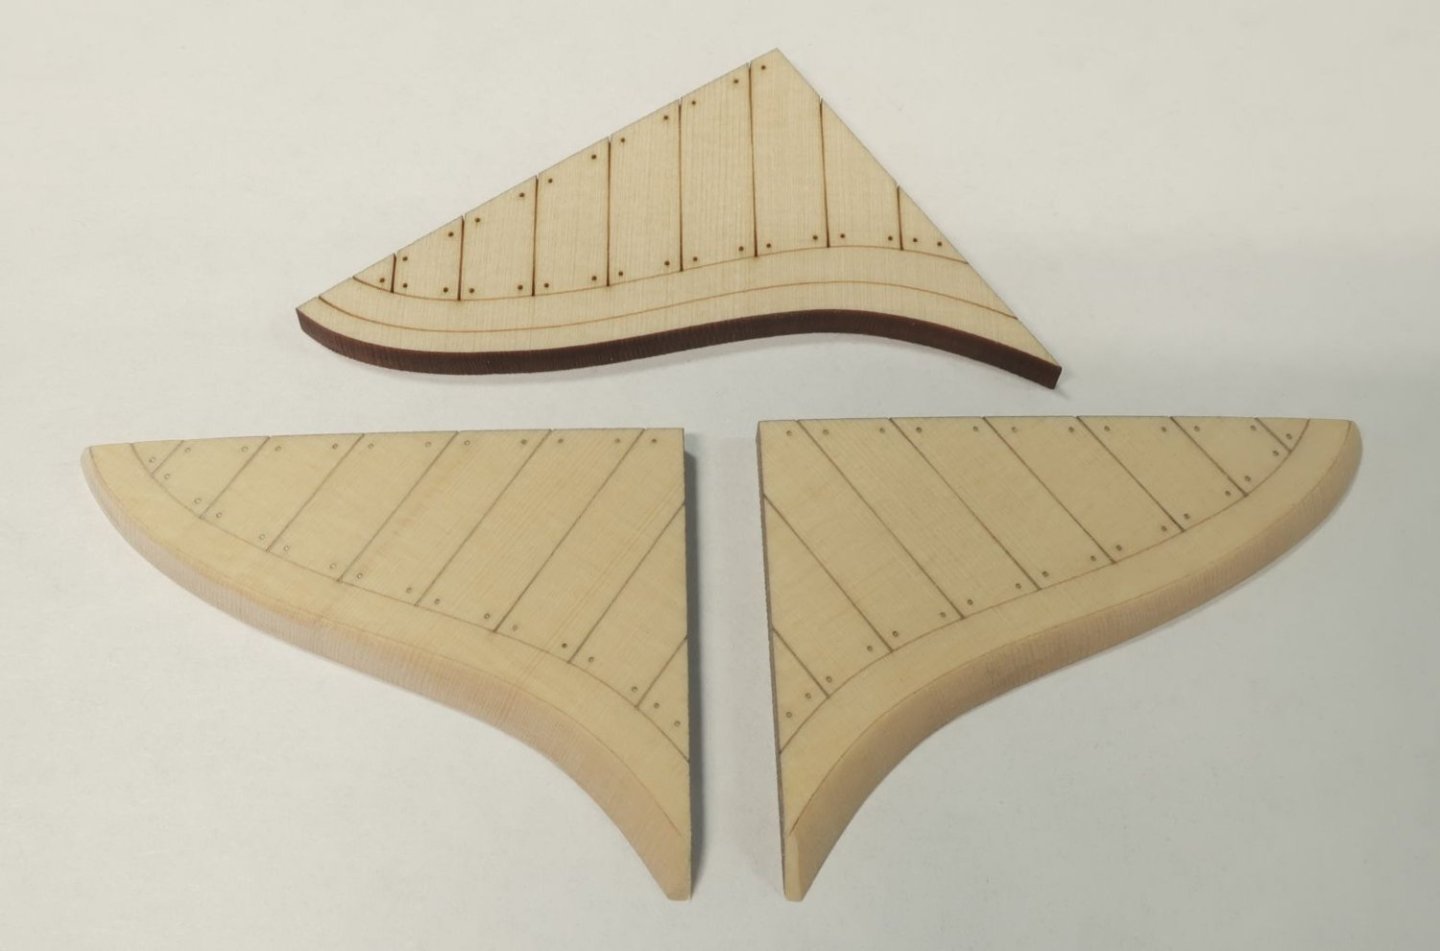
Thank You guys. I couldnt resist. While I am hanging around I thought I would create a template for the wales as well. It would not be a waste of time because now we have the spiled shapes for the wales as well. I colorized them in Corel Draw and taped them below the other template. This is as good a look at what the finished color scheme will look like. Along with the details on the external hull. Although with a very 2d look and feel...LOL.

-
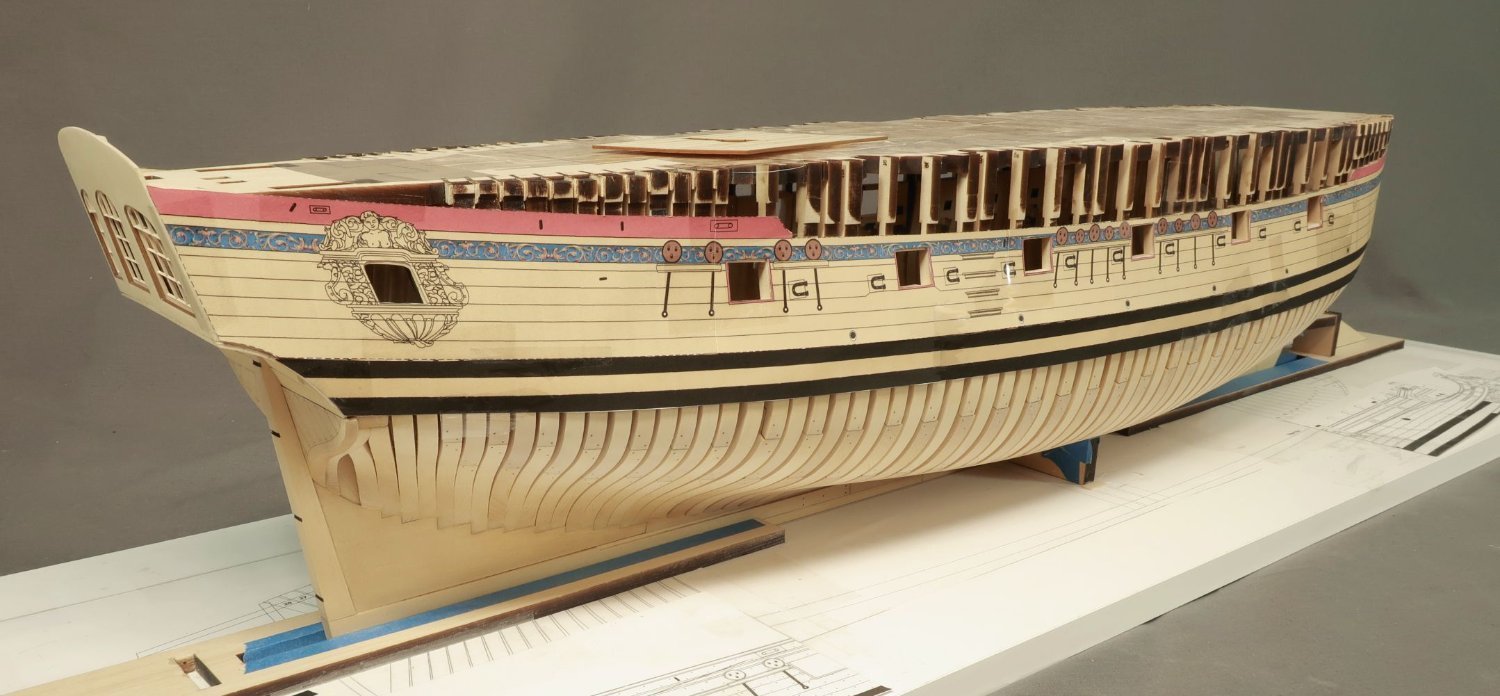
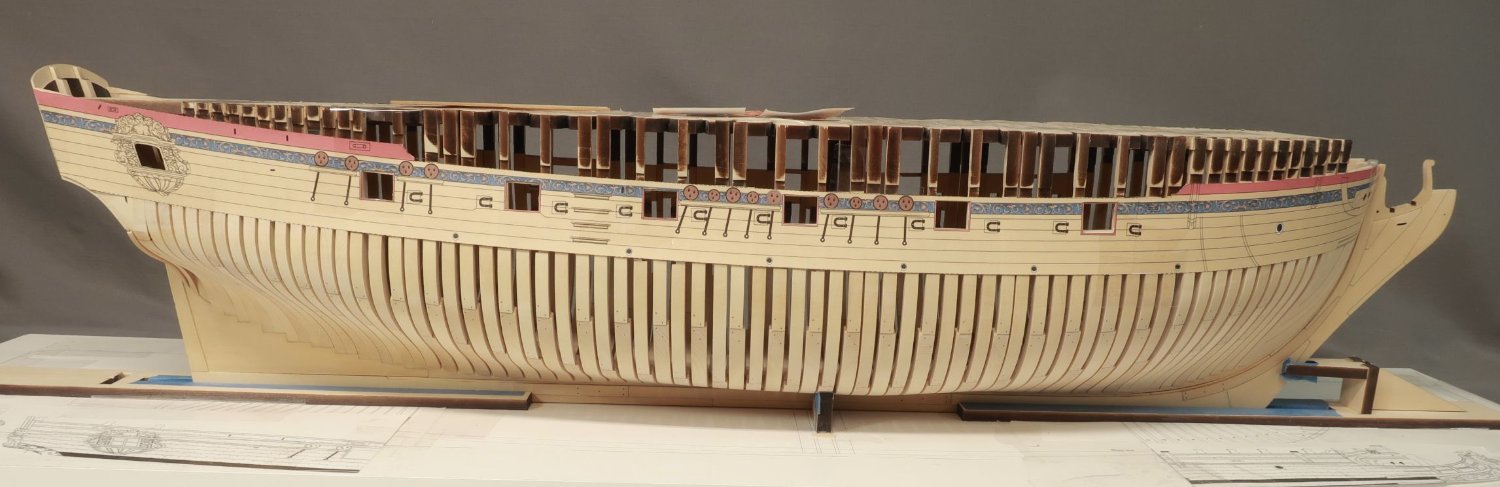
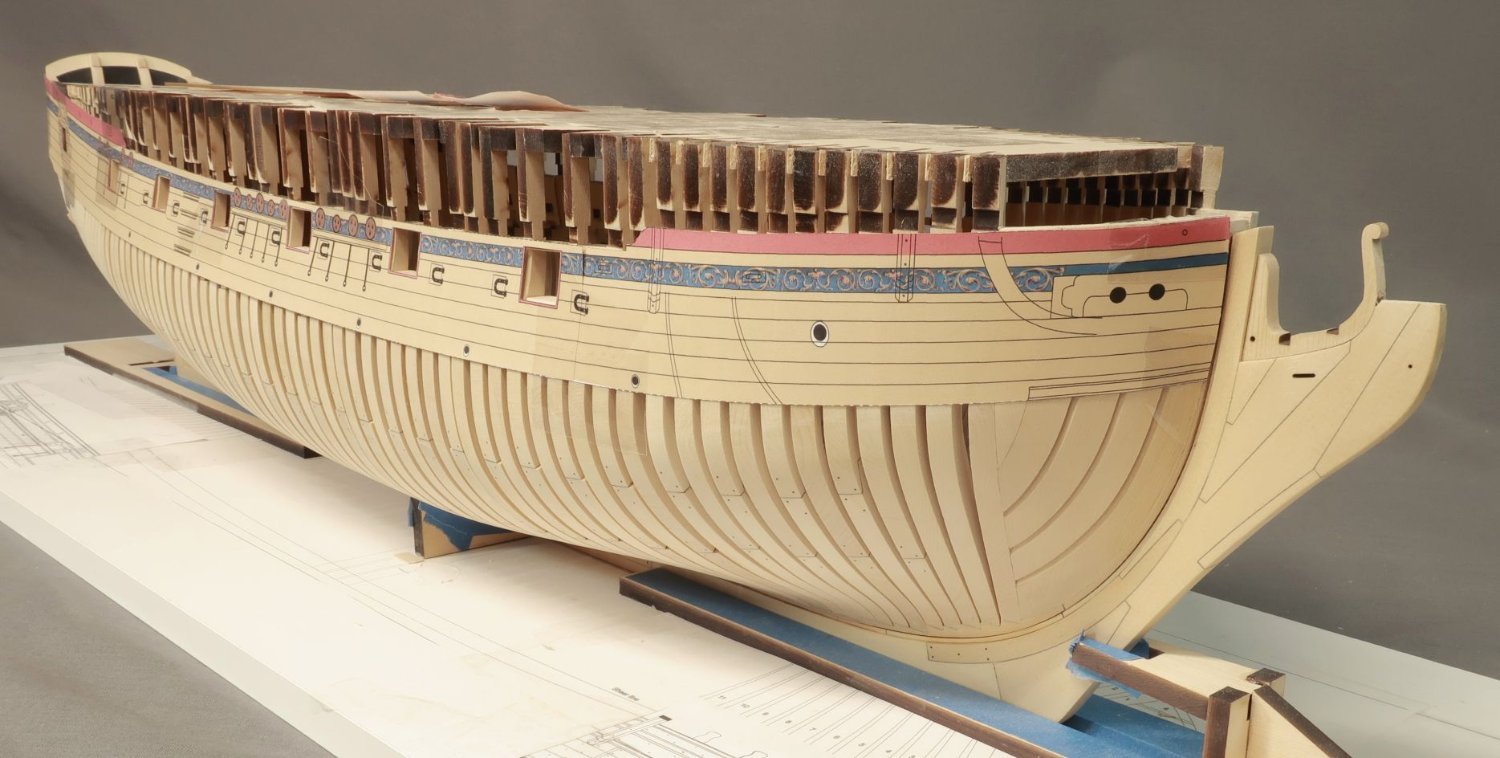
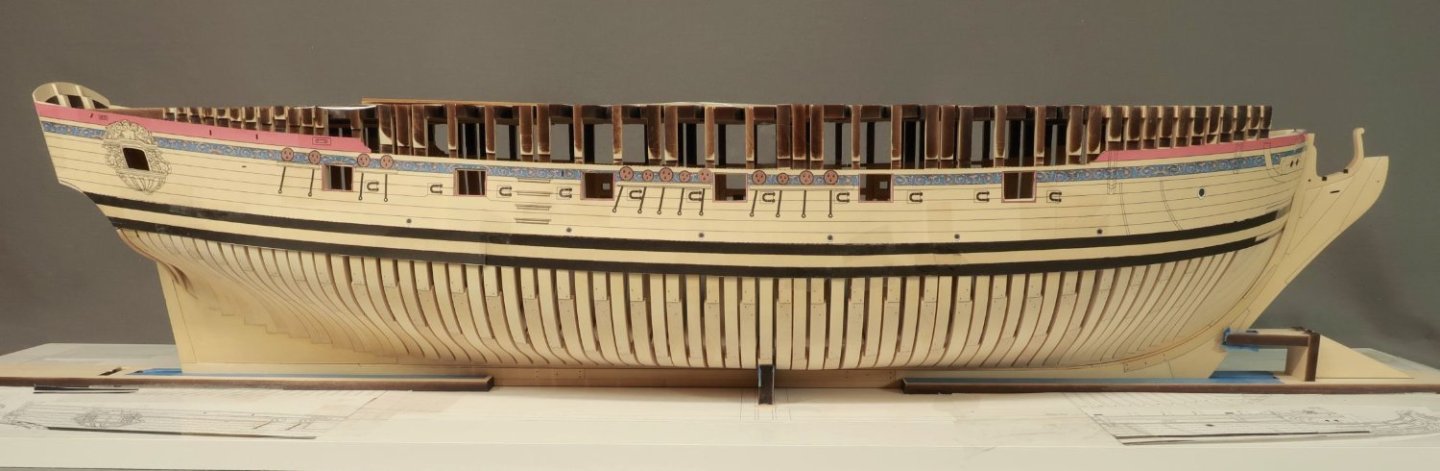
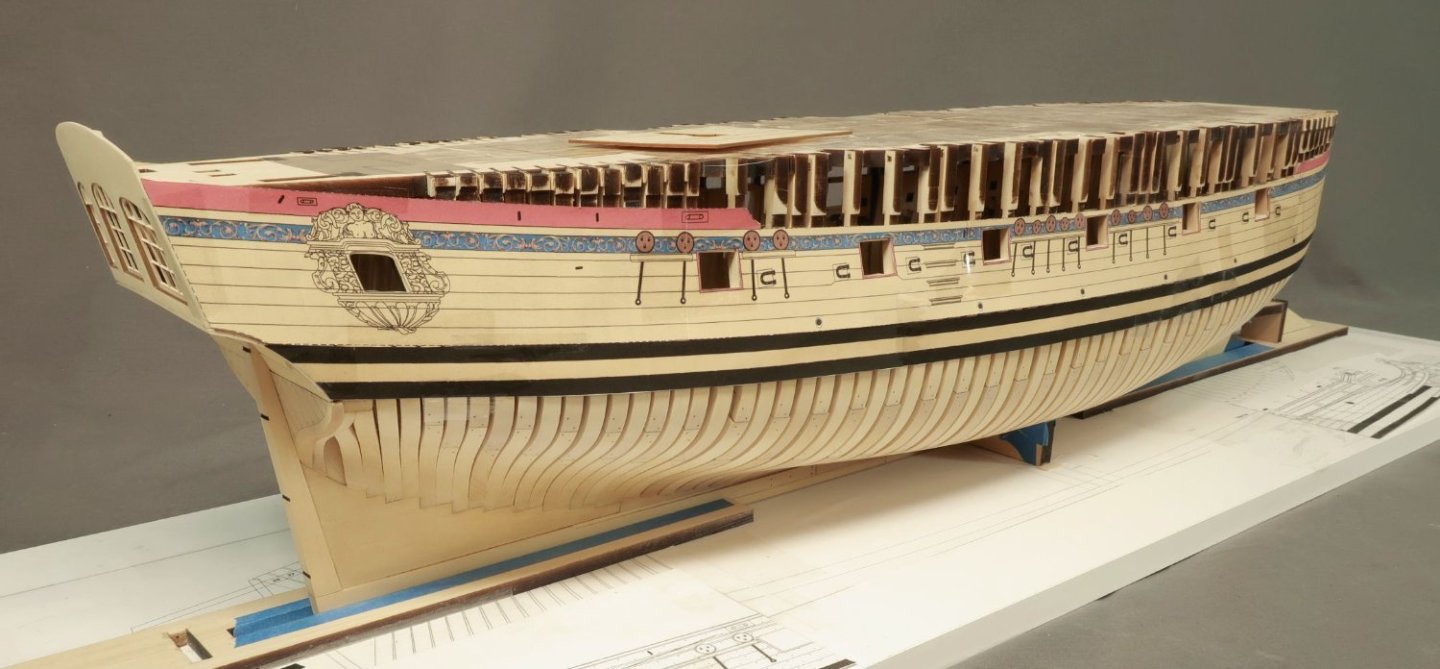
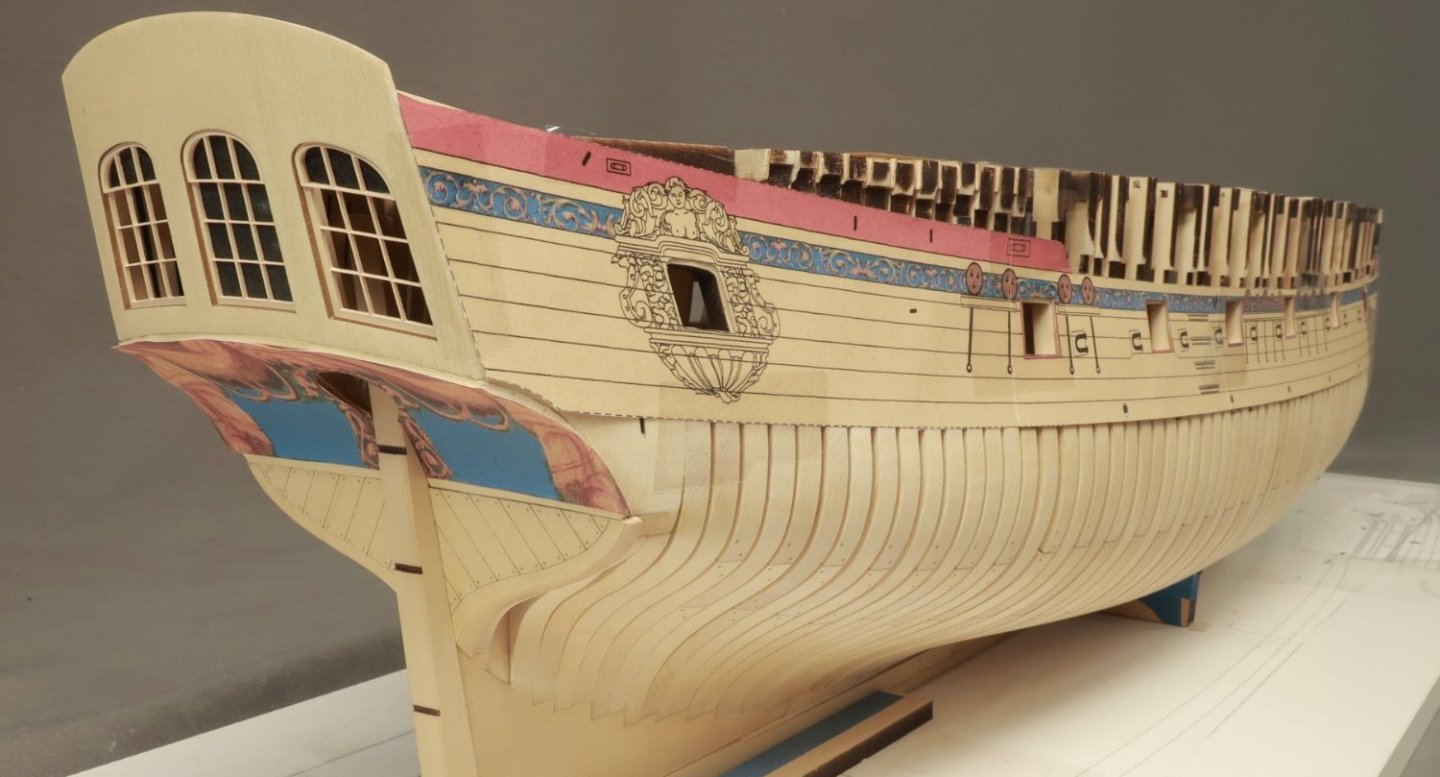
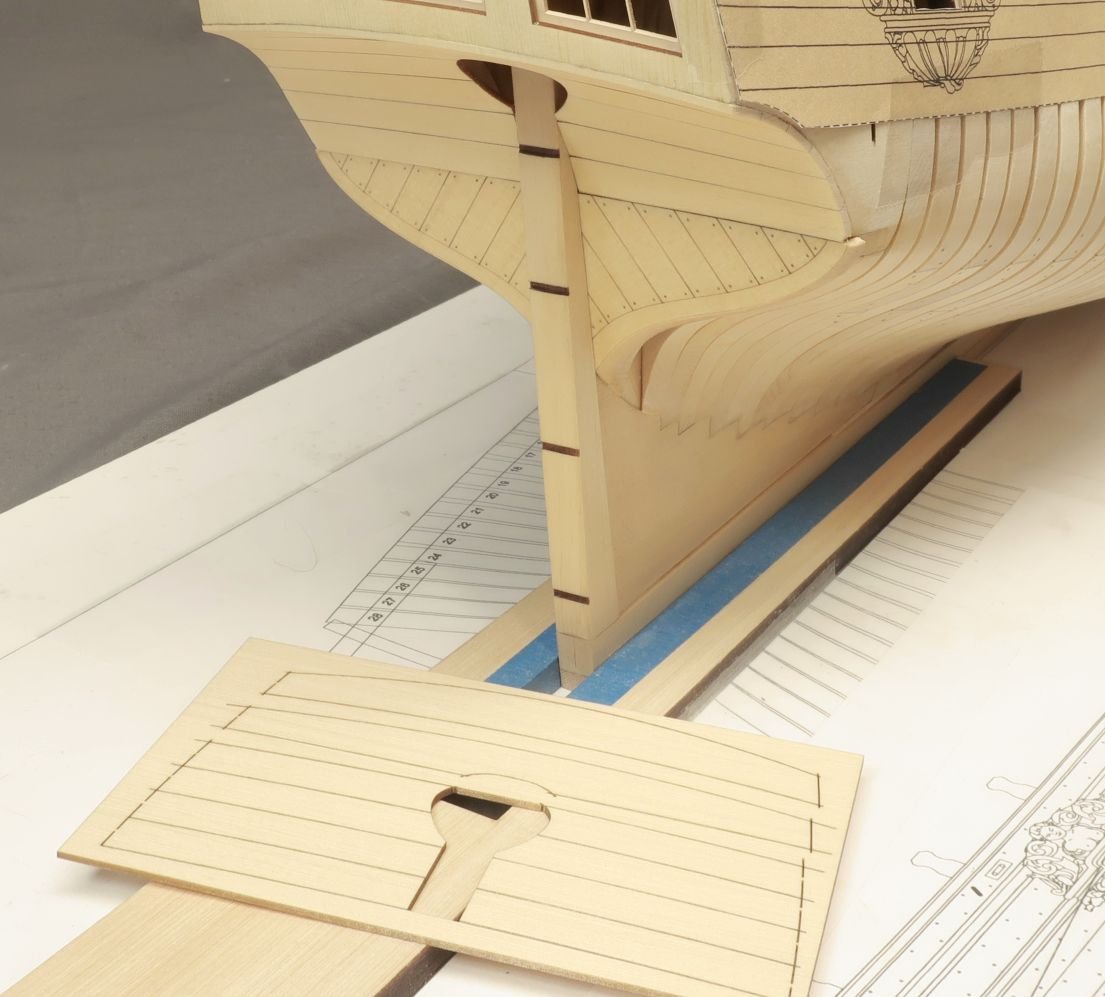
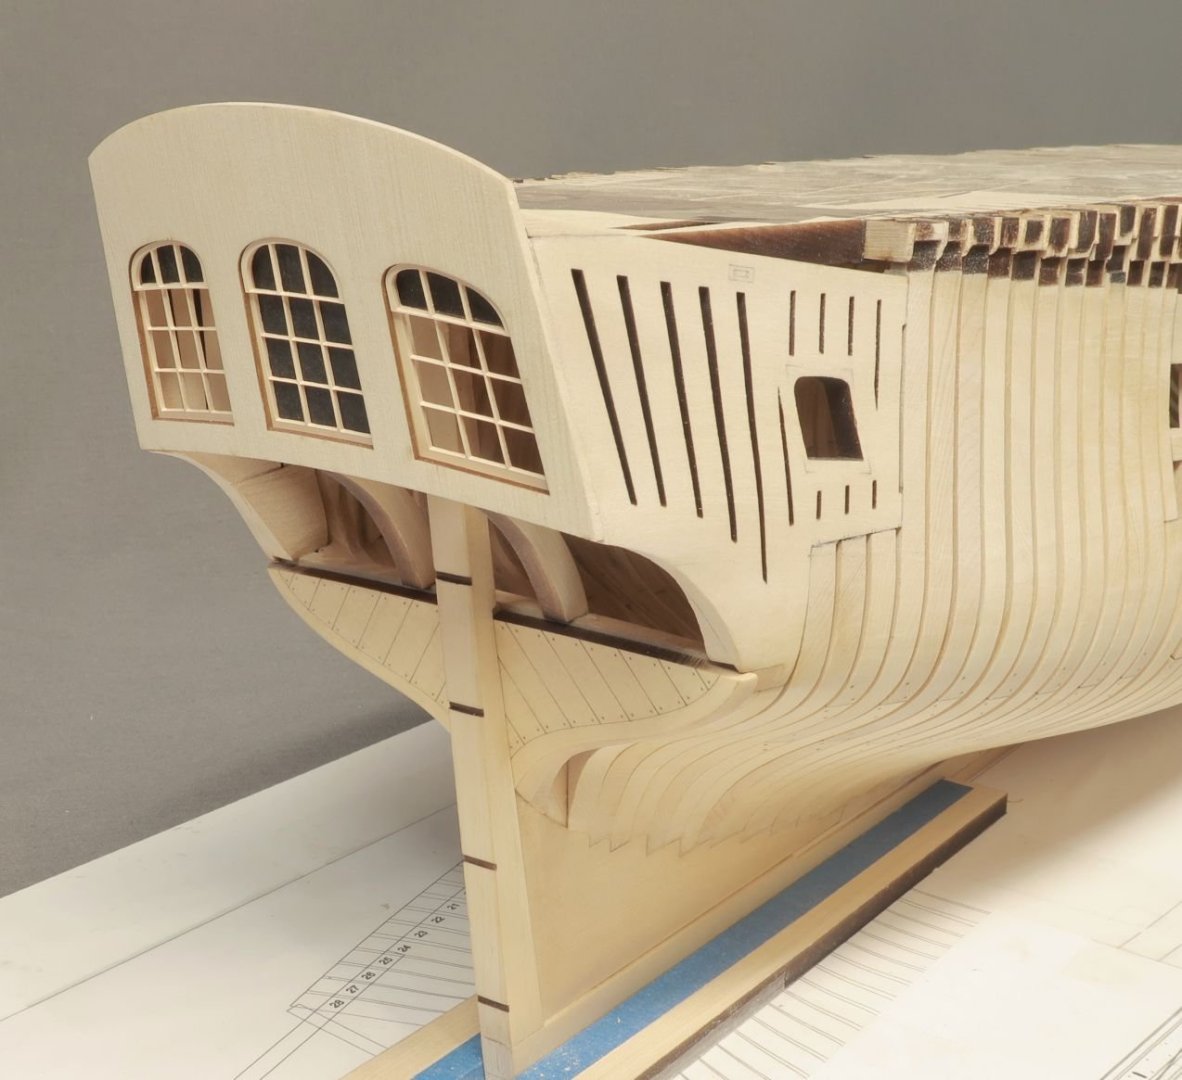
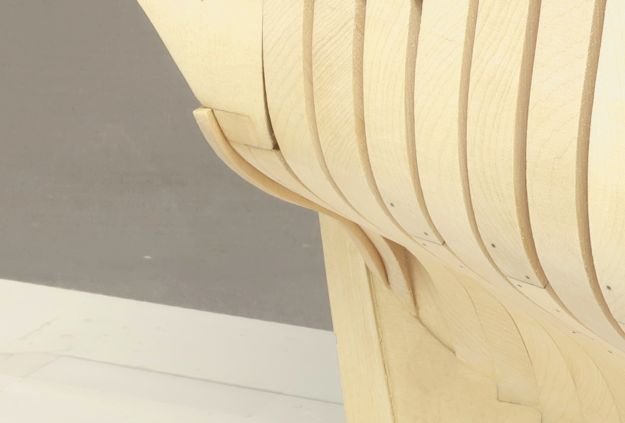
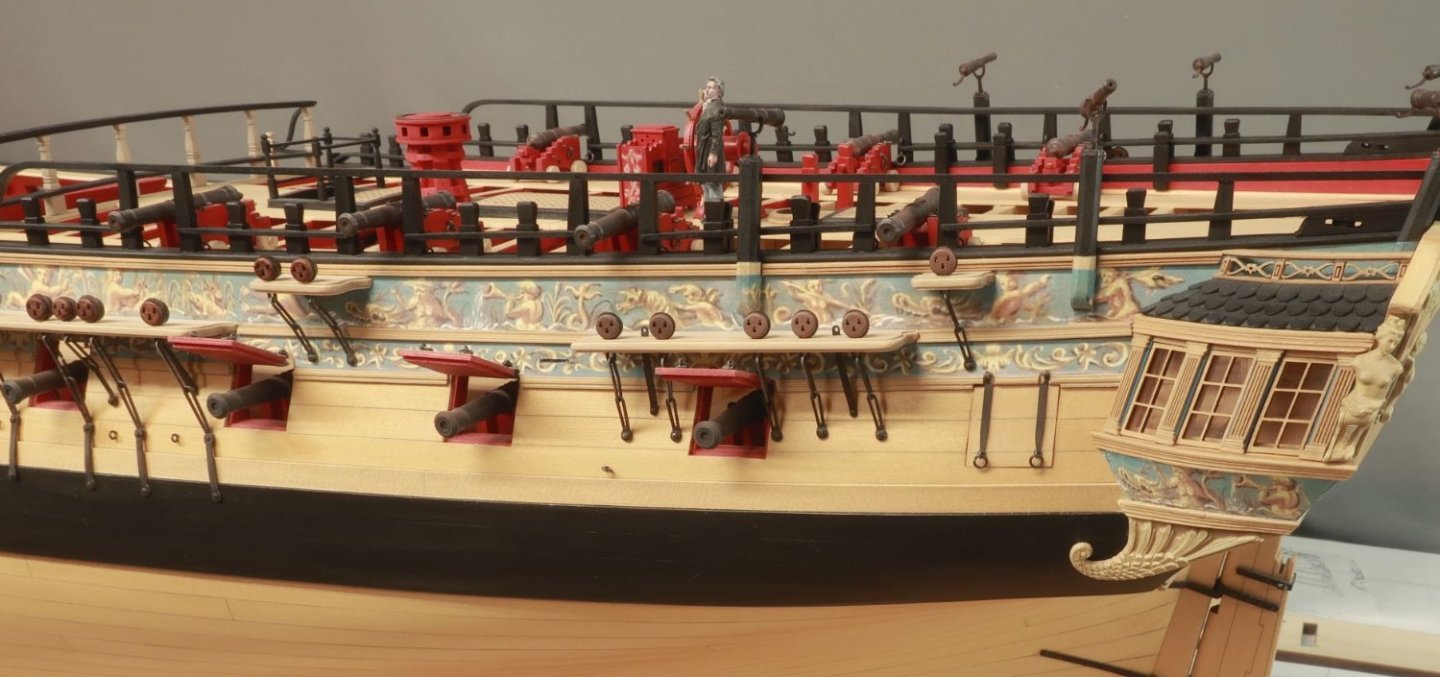
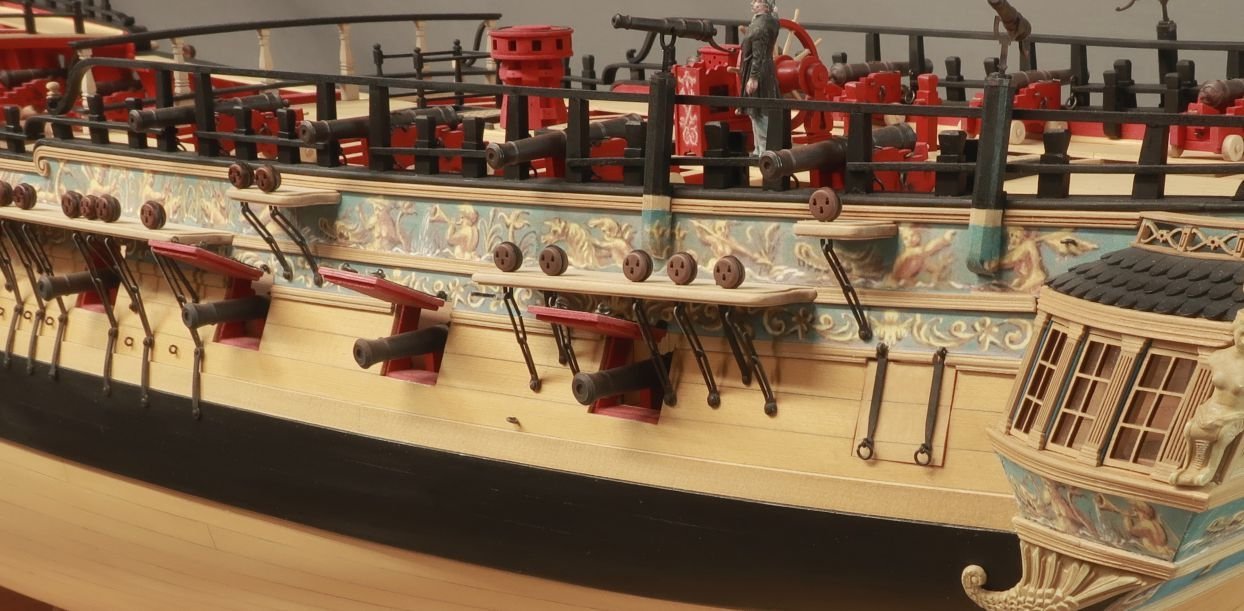
Well I am starting to feel much better although I am not making any rope or blocks yet. Still very exhausted. So my inventory will have to wait. But I did spend a relaxing day yesterday working on Speedwell. Mostly out of boredom. I dont know how some folks can sit around all day doing nothing. Anyway...this starts chapter 3. The square tuck and counter planking. Everyone knows a square tuck can be very very tricky to make so it looks good. Rather than fart around with individual elements I decided to take a shot at doing it the exact same way the model builder of the contemporary model did his square tuck. Unfortunately for him...he didnt have a laser cutter. It took a really long time to get the shape absolutely correct so I liked how it fit. But once that was done, it took about 15 minutes to bevel the outside edge. There is a laser etched line for that so it was easy. I also added the planking within that tricky framework as laser etched lines. This included treenails. But the treenails are for placement only. They are same size as we will treenail the hull planking. So you can drill them and use 15 pound black or dark brown fishing line for your treenails. OR...just use the laser etched ones as the final because it still looks pretty darn good. Then glue them on the model making sure they are lined up port and starboard. Keep in mind how a square tuck was used and its purpose. The plank ends would butt against this frame on the forward side. So it needs to stand proud of the frame already on the model when positioned. This should be by about 3/64" all the way down. Then its time to plank the counter. The counter planks are laser cut just like on the Winchelsea model. They are pretty straight forward. Sand the sides flush when dont with the hull so planking the sides of the hull will be nice and neat. With that done I wanted to take a stab at seeing what the colors of the model will eventually look like. The contemporary model is painted with solid areas. The counter being almost a dark blue gray...almost black. A dark blue stripe down the sides of the hull with a read stripe above that. I wanted to see what a frieze might look like keeping the same color scheme rather than just paint solid areas like the Contemporary model. So in my sick boredom state...I colorized the template and made a first go at a stern frieze and hull frieze. Just to see how they would look. They are just taped on. Now I realize this might look weird with not seeing the black wales present, but it actually does give you a good sense of what this color scheme might look like. Once the moldings and wales and stern carvings are added it might look very good. Imagine the insides of the ports red and the bulwarks as well....In fact I think I like this far better than just painting the hull with solid colors. What are your thoughts...Any comments?


-
Funny!!! But I guess no good on the deadeyes??? No comments at all. Good or bad so I dont waste my time any more.
-
I am resting....I am just playing in the shop. Its when I have to make tons of parts that I get worn out. I am just drafting some designs and solving some problems on the computer. Its all good. No inventory is being made today for sure. Just a leisure slow day in the shop sipping tea. Chuck
-
They do offer a darker brown in this material but I selected this medium color for the test. I think I am going to have to replace all the deadeyes on my Winnie now. The dyed deadeyes on the main channel look so muddy and non-descript by comparison. Or maybe I should test the darker brown as well. Anyway... The details are so much more evident on these new deadeyes. I will certainly go ahead and make a full compliment of these and blocks also for my Speedwell. I will only start mass producing though if there is enough interest. I hope so as I think these look so much better than the old ones.
-
Thanks for the well wishes… would you guys be interested in dark brown deadeyes that dont require dying? These are just like my current build them yourself deadeye kits. 3mm thru 7mm There are just two layers for each deadeye. Just glue the two halves together for seven deadeyes at a time with thin set CA and remove them from the spru. Then tumble them to suit . They are super crisp. I like how Greg dyed my blocks on Speedwell and I am trying to develop a full line of blocks and deadeyes that dont require messy dying. I want to use them on my Speedwell when I rig her. Here is Gregs model with deadeyes dyed with Fibings dark brown.
-
Yes I agree. In fact, The Admiral has given me orders so I dont get pneumonia. She has ordered me to shut down the store for at least a week or maybe two so I can get well and restock slowly. She is a smart lady. So unfortunately guys...forgive me for shutting down again. I have nothing in stock anyway so it will give me some time to catch up. But not for a few days at least. I need a few days to get better. It really knocks the hell out of you. Chuck
-
Well I am not up to making rope or making parts like the factory is going full tilt. So I am just poking around the shop playing and then taking a nap and repeating to take more nyquil. Its amazing how creative you get while high on Nyquil. I am in a haze of creativity. i am literally completely out of stock with rope and blocks so the next few weeks are going suck. I am already tired and I havent started making more yet. So I apologize for the delay. Its gonna take a while.
-
No only one package with plenty of leftovers. Only ten ports have lids…20 hinges.
-
Laser cut parts...CNC parts...3D printed parts They can only get you so far. This is certainly not like a lego set of the Millennium Falcon....LOL But having said this, the goal is to have it NOT look like a kit when you are done. I strive to make my projects look as close to a scratch built model and contemporary model as possible. Otherwise I wouldnt make them. But I admit they are more advanced and more deceptively finicky than other MFGs. But yes...it looks real easy in the pictures. Wait till you see the miniature model take shape. Chuck
-
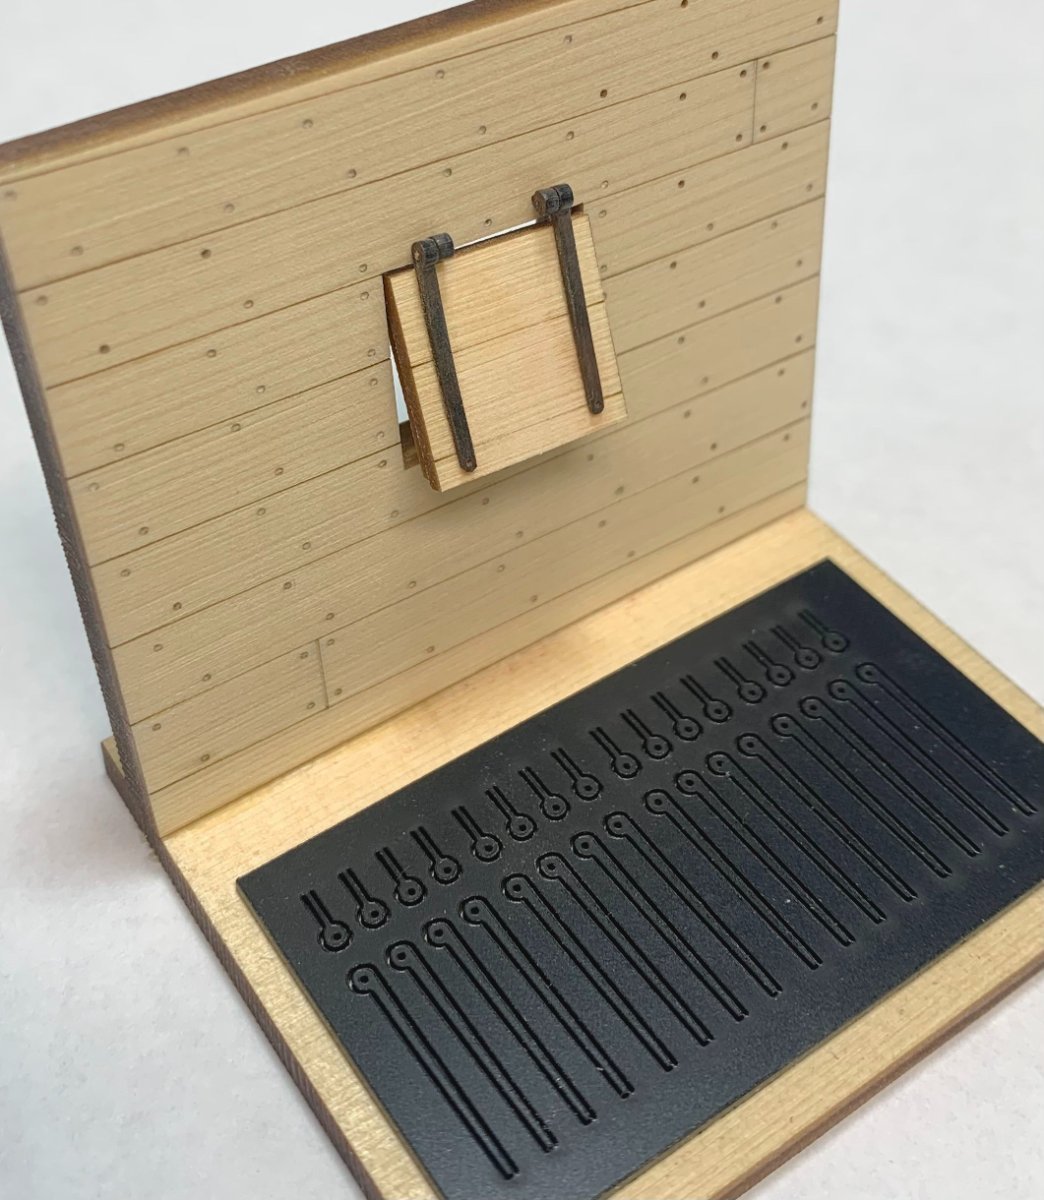
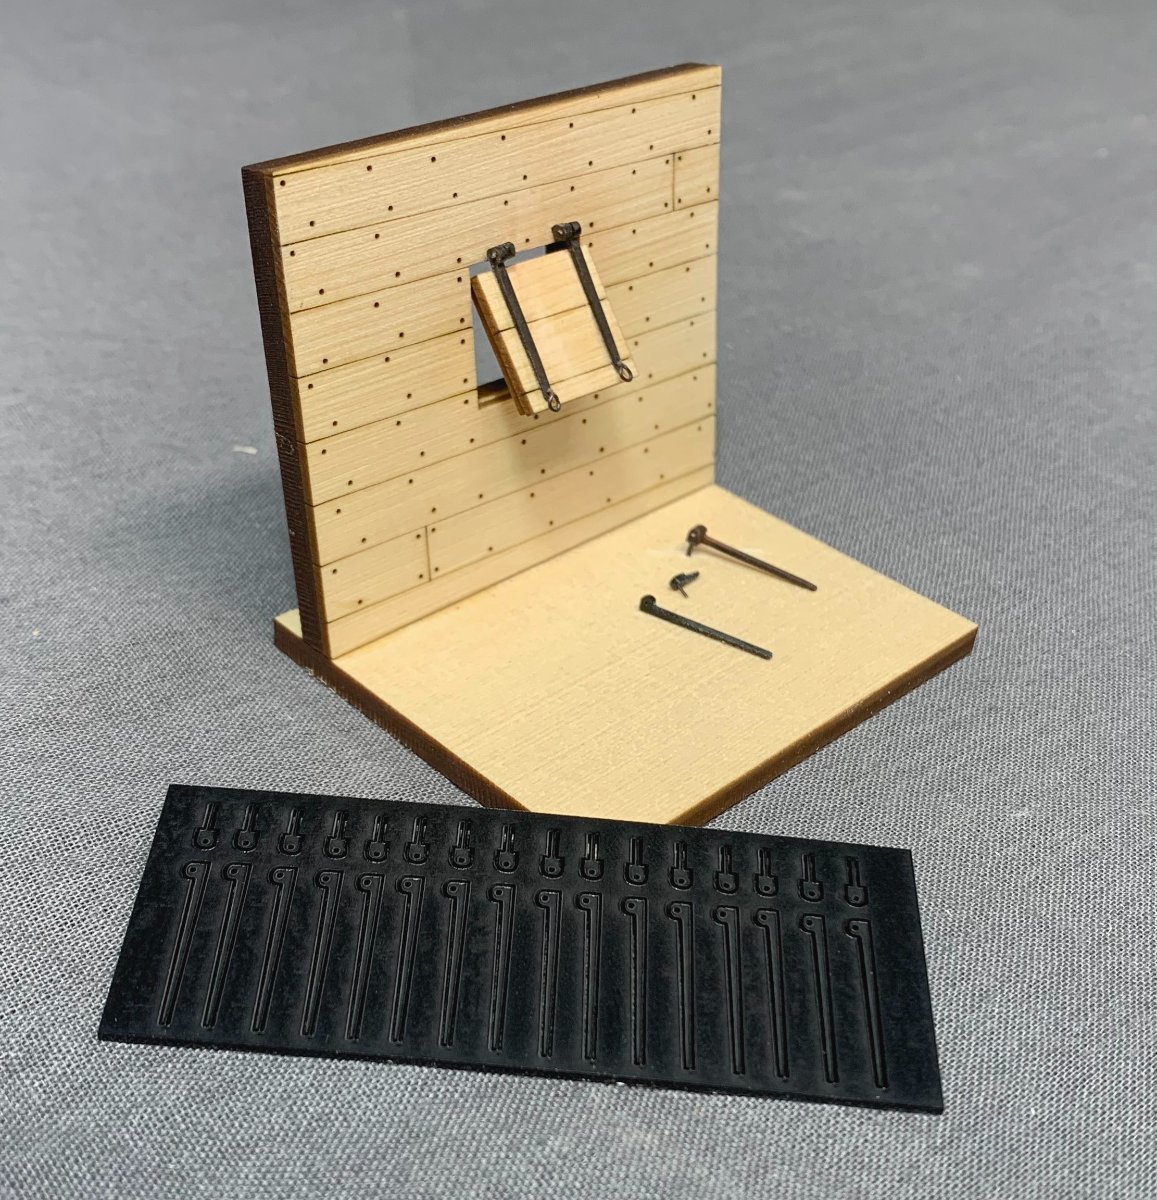
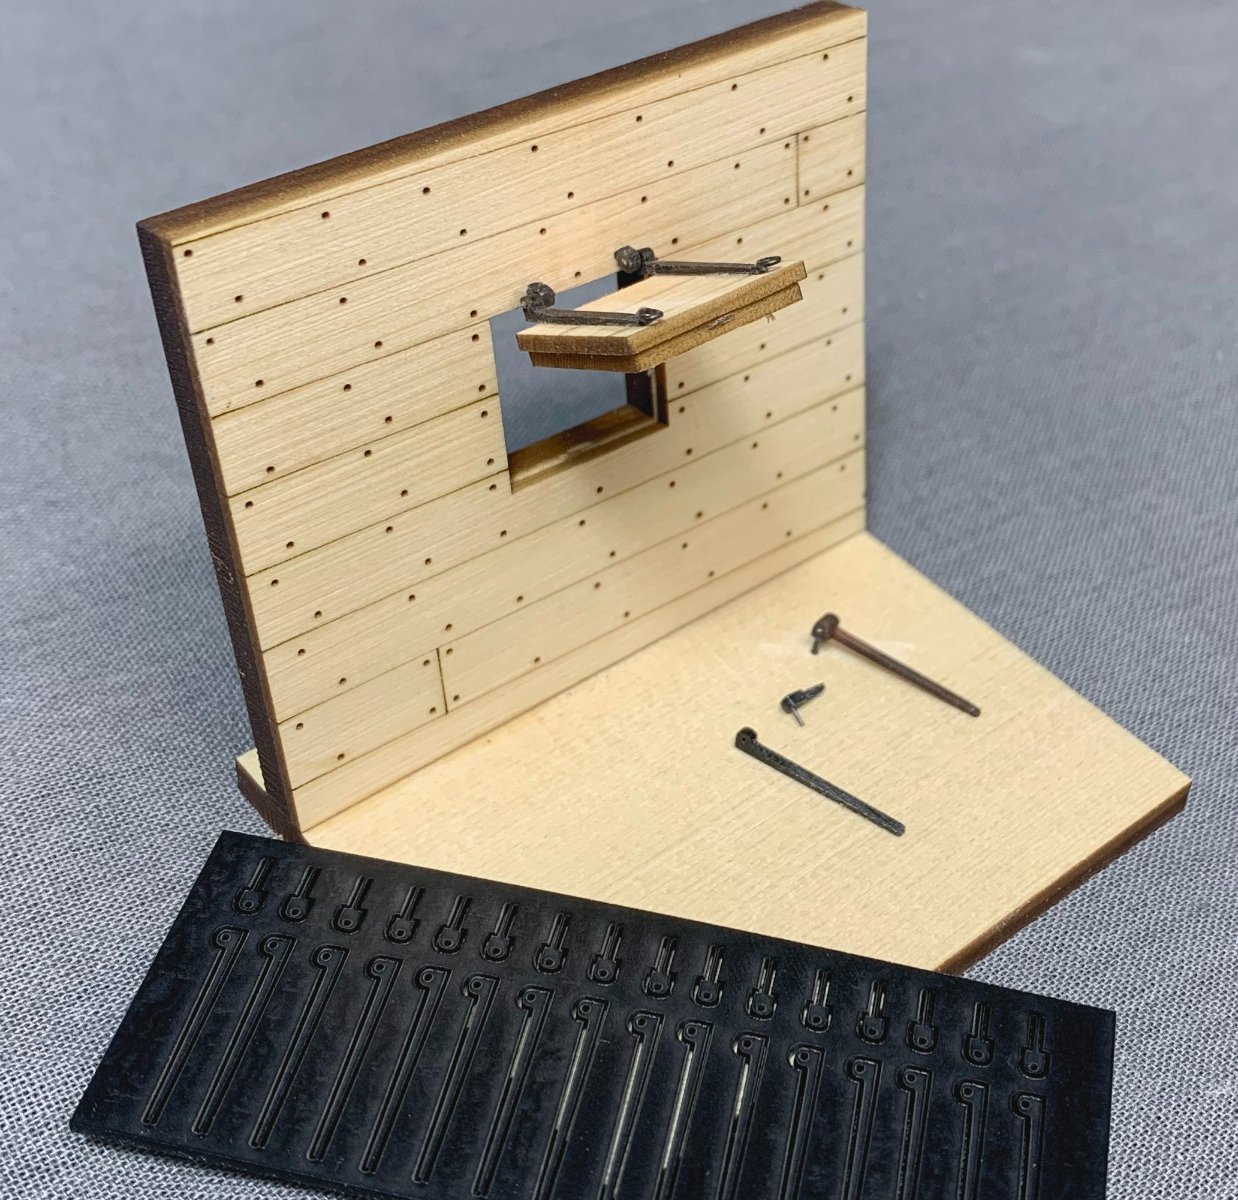
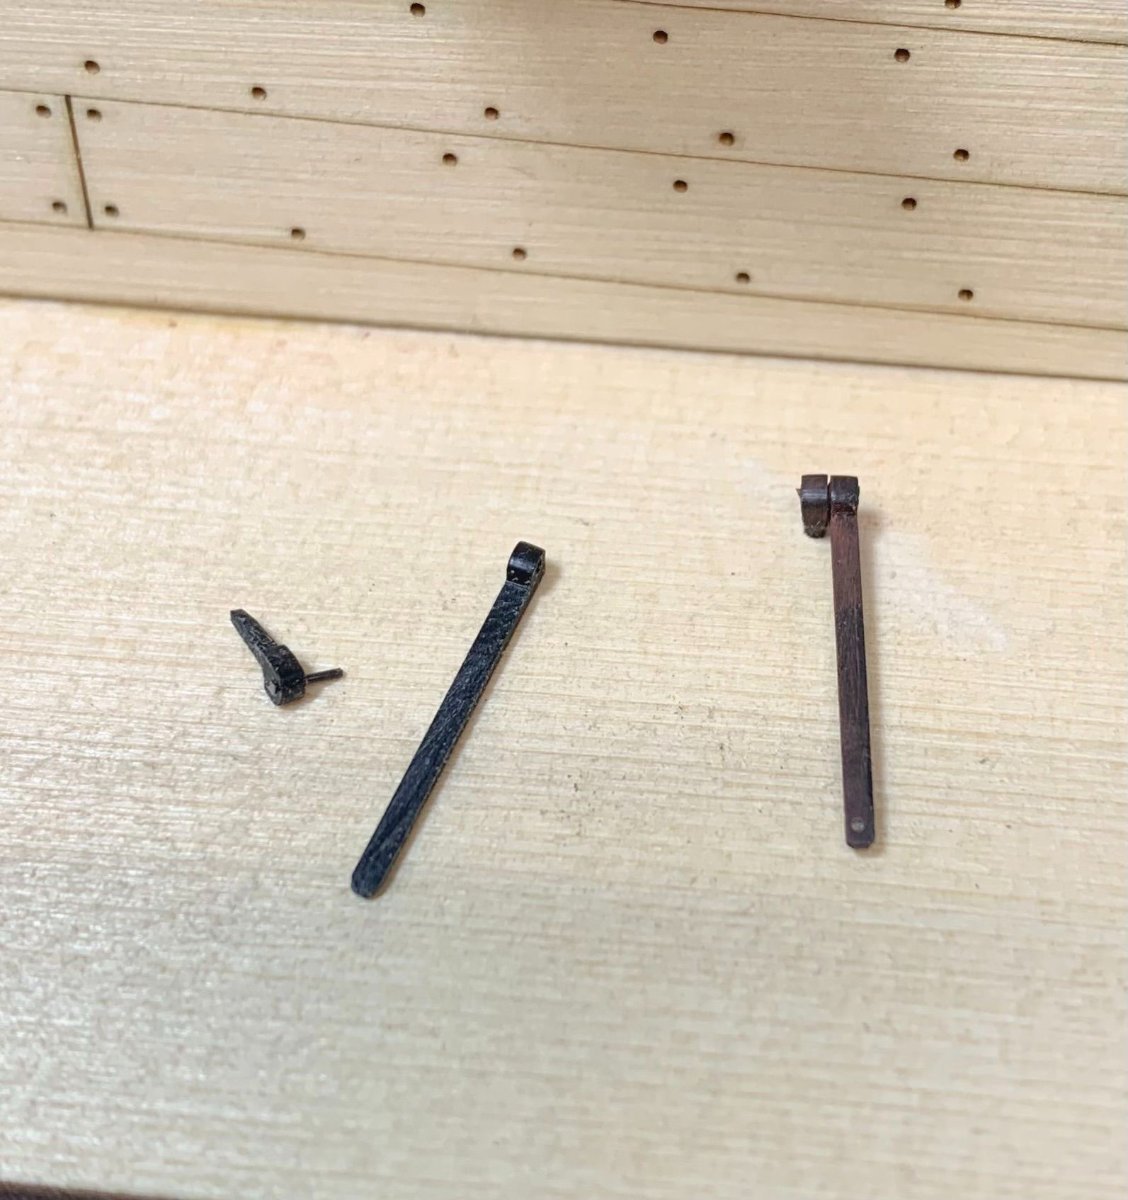
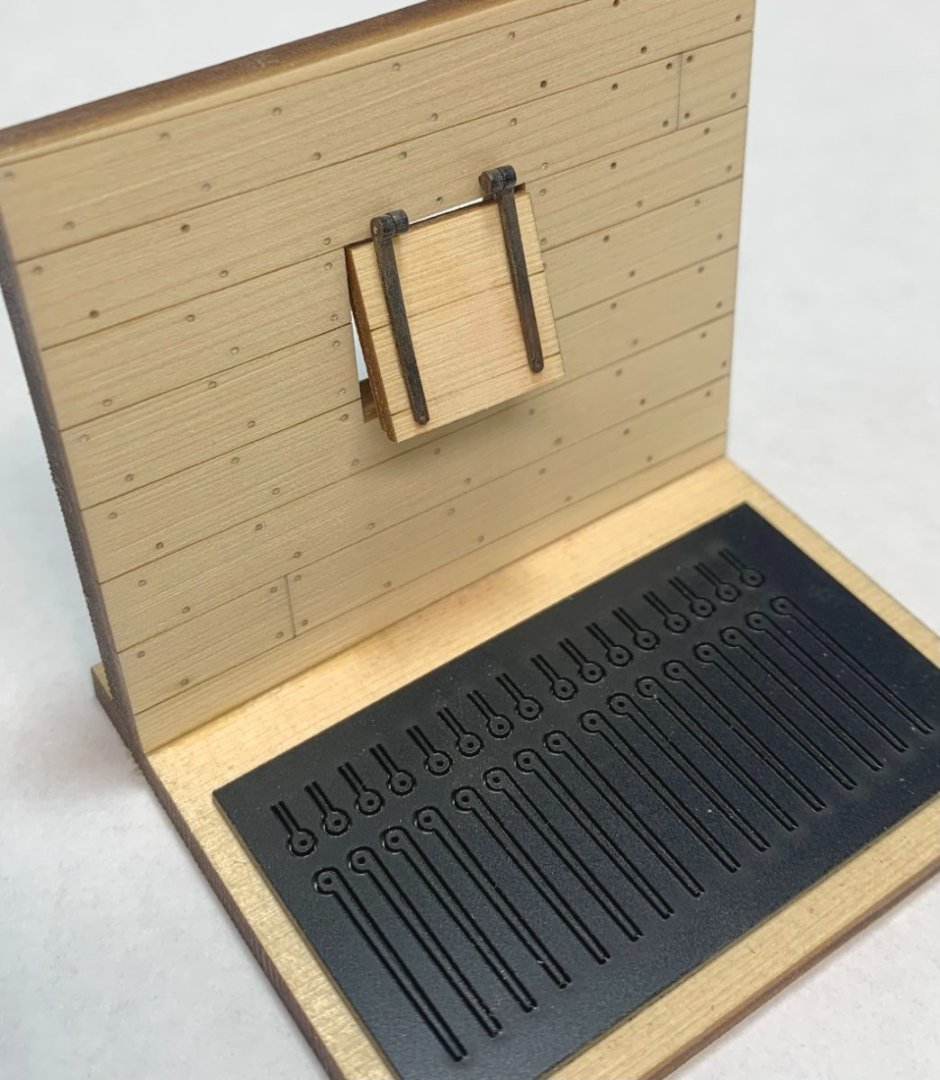
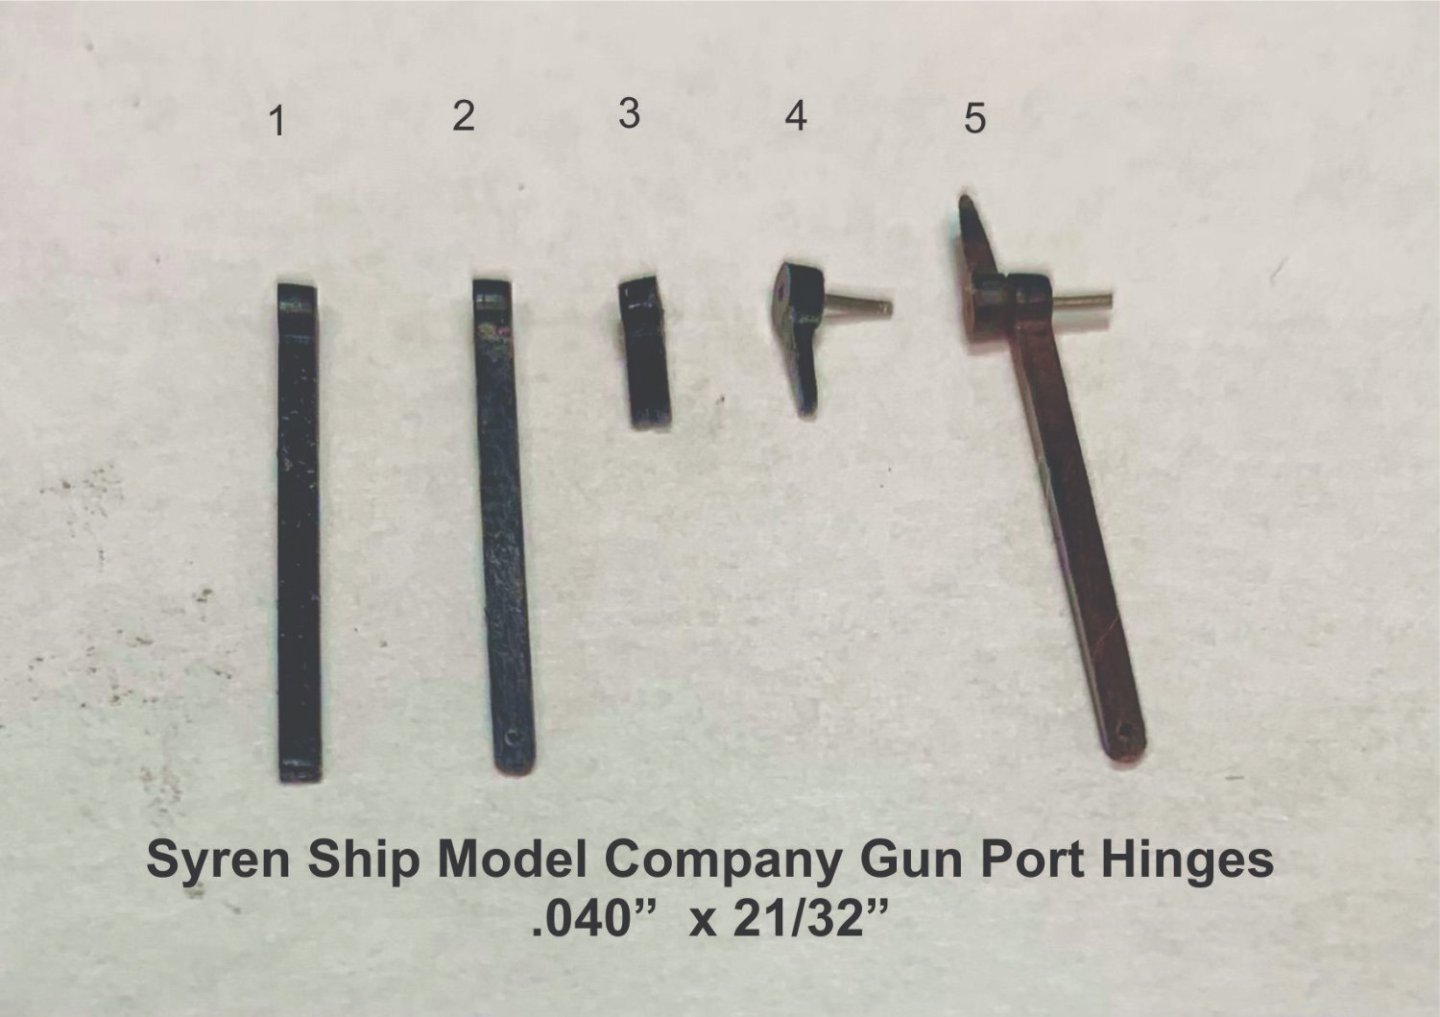
New Gun port hinge mini kits will be available tomorrow. They are laser cut from a special high density plastic. These were made specifically for the Winchelsea but I am sure they will fit other models. They are .040" wide and 21/32" long. I have ordered some material that will also produce 1/16" wide hinges (slightly wider). But that hasnt arrived yet. Some prefer a wider strap. Those can easily be shaped differently too being extra wide. I will show that after I get them. But these are the narrower ones and perfect for the Winnie or even Cheerful. There are 36 hinges per package. They can be made shorter if needed as well. 1. What a hinge looks like straight off the sheet. 2. Round off the bottom with fine sandpaper. Drill a small hole for the split ring if needed. Use a #76 drill bit for a 28 gauge wire ring. 3. What the gport hinge pin looks like straight off the sheet. 4. Sand the actual pin slightly thinner and to a point. This will be inserted and glued into the hull above the port. Also insert and glue a length of 28 gauge black wire into the laser cut hole and cut off the excess as shown. Use CA glue as it is plastic. 5. Join the hinge strap and hinge pin by slipping the wire pin into the hole of the strap. This makes a working hinge. Once glued onto the port lid, you can sand the straps even thinner. Just gently sand the face of the port with fine sandpaper and taper the hinge straps even thinner if you like. Apply weathering powder if you like that look. Make some split rings (not shown) and add them on the hinges as is typical. The store will reopen tomorrow as I am mending from a really bad flu....cant do much so I am just hanging around the shop till I get over this. I had to shut down the store because I am out of stock with other things and just cant make any more rope until I feel better. But there are about a dozen packages of these in stock. Chuck
-
Thanks guys. Speedwell is 3/8” scale. I wont be making it in other scales other than a miniature at 3/32”. But the plans are in fact available in Davids book by Seawatch. So they can be resized to Whatever size you prefer. It is extremely difficult to resize and change scales. Nearly every part would require redrawing not just changing the size. I have no plans to release every part on my plans set because David already shows them on his set in the books. This includes patterns for every frame etc. This project I am making will only be available as laser cut parts. It is not easy at all…and super expensive to make kits in other scales. I will stick with just one. And the mini too which needs a lot of plan redrawing if I am going to make it for public consumption.
-
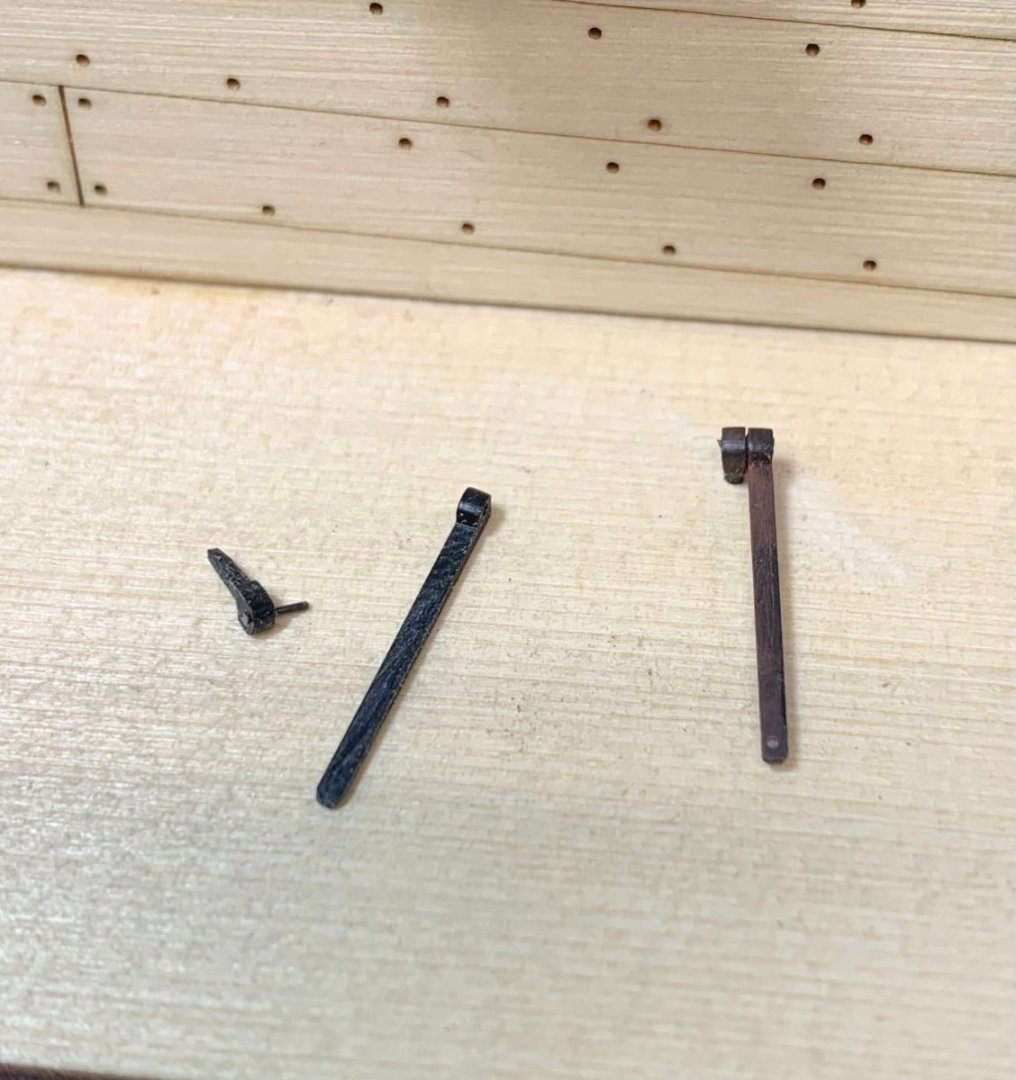
Its hard to say. This is all brand new and its a brand new product. I am just gonna go for it and use the color that matches the wood perfectly. It will be years before it changes color. I doubt it will. Mica for windows...LOL...of course you can. But not as a mfg part. The kit will get acetate. Somebody mentioned gun port hinges earlier. Photo etched hinges are a pain as well. This material is not good for them but I did find another material and its interesting that you mentioned it. I had been experimenting a while ago with gun port hinges. Just havent had time to make a bunch for sale yet. If I wasnt making rope and blocks every day like I was working in a Chinese sweat shop, I could have so many more interesting products and ship model kits. It just eats up so much of my time. But my brain is full of neat things I would like to try if ever I could find the time. This was a quick mock up I was using to test each attempt. Its a bit crude but look at the hinge and not the hull. Also excuse the cellphone pics which are a little blurry. These are also laser cut and unlike anything on the market yet. You will probably see them soon as they are easy to make and I am sure somebody will steal this design concept at this point. These are .040 wide hinge straps. This mock up was made using the Winnie ports as a guide. I know folks hate making them from scratch using brass strip. This was to be my alternative and they should be available soon. I just have to write instructions for them and make them when the time permits. Speedwell doesnt use port lids so these wont be used on her. But I will sell these soon with 32hinges per package. AND I will be discontinuing my old laserboard hinges. Two part hinges.... you insert a tiny length of 28 gauge blk wire in the small piece that gets secured to the hull. Cut it short to make a hinge pin. The hinge itself slides onto it. Its a working hinge and quite strong actually. The bottom end is rounded off and a hole drilled through it for the rings. They are super easy to prepare and place on the model by comparison to any others I have seen. They are all the same length although they can be cut to any length so they can be used on other models that arent Winchelsea.


-
Its a little too brittle for port hinges. But the experimentation will continue. You cant bend it like metal....but it is very flexible. I will continue to post updates on what I find useful with it. Chuck
-
I will probably do just a sheet because its easier for manufacturing. But I guess you could do that as a bash with these.
-
If you guys are familiar with the scrollwork and molding on my winnie project, I think that was a game changer. I still dont think any kit maker has come close to laser cutting scrollwork like that. If you would allow me to be modest. But there was one huge drawback. They were incredibly fragile being made from Boxwood. And it was tedious and tough to remove the laser char without breaking them. I tested my cut file for those on the new material... No laser char at all. They are strong as well. Keep in mind these have not been shaped yet. This material can be sanded. I would like to see what these look like if I rounded off the edges with fine sandpaper. But this was just a test...I didnt alter the file at all from when I cut them in boxwood. The top one is hard to see but it is gilded. They have a gold material as well. Think about it....the possibilities are endless. This would certainly be a game changer for headrails, bulkhead pannels with a raised center....fancy hull molding...fancy stanchions and rails. Acanthus leaf carvings. So yes I am gonna keep this one exclusive for now. These are extreme brutal close up photos as well. But I imagine I could go even smaller with these now and do more interesting things. These are right out of the laser cutter....nothing has been done to them at all.
-
I am keeping that close to the vest for now!!! We all need a leg up on the competition. And yes there is a lot of it out there. I havent finished experimenting with it yet. It also comes in quite a few thicknesses. So before I let the competition know how wonderful it is, and exactly what it is capable of doing, I want to at least take it to the limit on one of my own projects first with exclusivity.