Chuck
-
Posts
9,703 -
Joined
-
Last visited
Content Type
Profiles
Forums
Gallery
Events
Everything posted by Chuck
-
 Its a little too brittle for port hinges. But the experimentation will continue. You cant bend it like metal....but it is very flexible. I will continue to post updates on what I find useful with it. Chuck
 -
I will probably do just a sheet because its easier for manufacturing. But I guess you could do that as a bash with these.
-
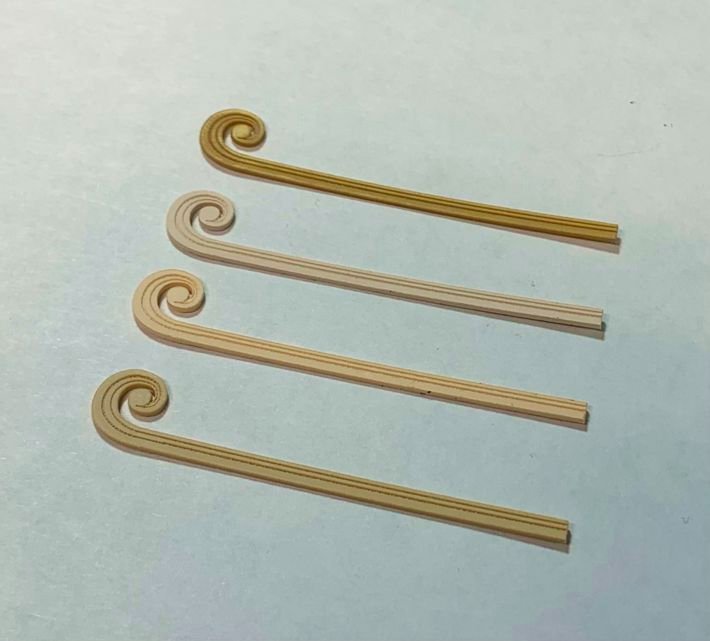
If you guys are familiar with the scrollwork and molding on my winnie project, I think that was a game changer. I still dont think any kit maker has come close to laser cutting scrollwork like that. If you would allow me to be modest. But there was one huge drawback. They were incredibly fragile being made from Boxwood. And it was tedious and tough to remove the laser char without breaking them. I tested my cut file for those on the new material... No laser char at all. They are strong as well. Keep in mind these have not been shaped yet. This material can be sanded. I would like to see what these look like if I rounded off the edges with fine sandpaper. But this was just a test...I didnt alter the file at all from when I cut them in boxwood. The top one is hard to see but it is gilded. They have a gold material as well. Think about it....the possibilities are endless. This would certainly be a game changer for headrails, bulkhead pannels with a raised center....fancy hull molding...fancy stanchions and rails. Acanthus leaf carvings. So yes I am gonna keep this one exclusive for now. These are extreme brutal close up photos as well. But I imagine I could go even smaller with these now and do more interesting things. These are right out of the laser cutter....nothing has been done to them at all.
-
I am keeping that close to the vest for now!!! We all need a leg up on the competition. And yes there is a lot of it out there. I havent finished experimenting with it yet. It also comes in quite a few thicknesses. So before I let the competition know how wonderful it is, and exactly what it is capable of doing, I want to at least take it to the limit on one of my own projects first with exclusivity.
-
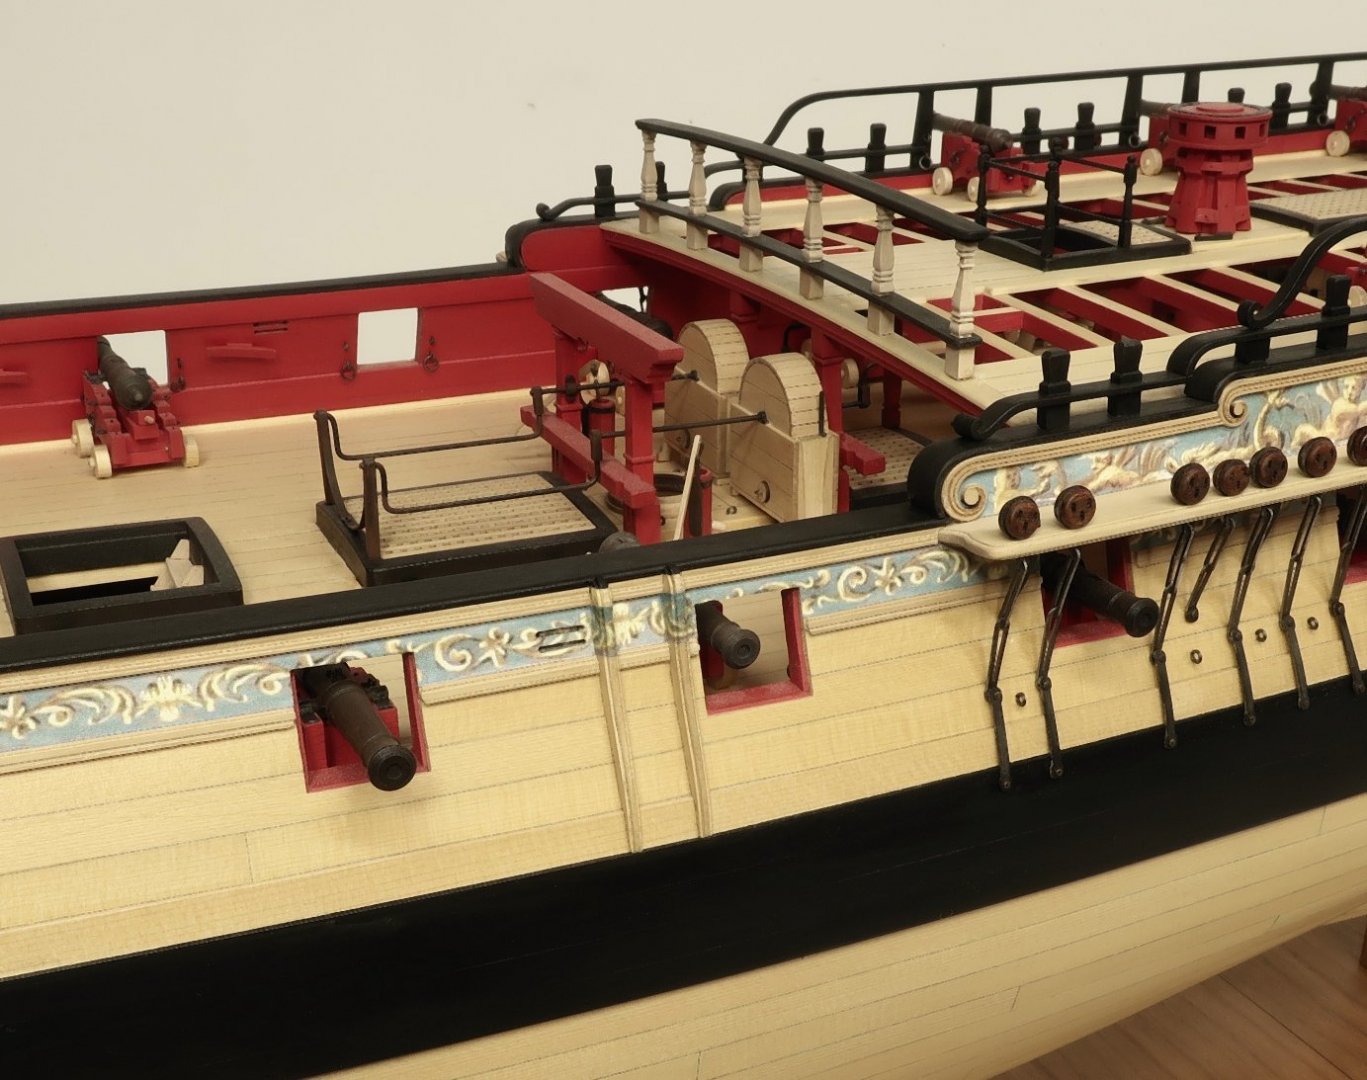
Ok here is the final iteration for now. Center light made the same as the outer lights. I reworked the shape and configuration as Greg suggested. These are not glued in yet. But using yet another color I think these are probably a winner. I have not installed any acetate for the glass either. But these are as close to a contemporary model version as I have gotten thus far on a project. They do look very crisp and clean as well. What do you guys think?
-
I have been looking at that very hard and its impossible to tell. That would be easy to do though. I will give it a try. I am a long way from needing to add these permanently. So I can keep adjusting.
-
Yes that is a good point. I will either go with this last color or that earlier one which is just a hair darker. Chuck


-
Thank you for the feedback. Yes it can be painted. But there are so many colors I dont think I have to. This particular color is called warm ivory. I think this might be the winner. I also thinned down the mullions quite a bit and it is more in scale. It looks very fragile but in reality it isnt. I am quite happy with the fit and scale of these. I have some time to pick a color and it might look completely different after the carvings and columns are added. But having so much flexibility with the color is so nice.

-
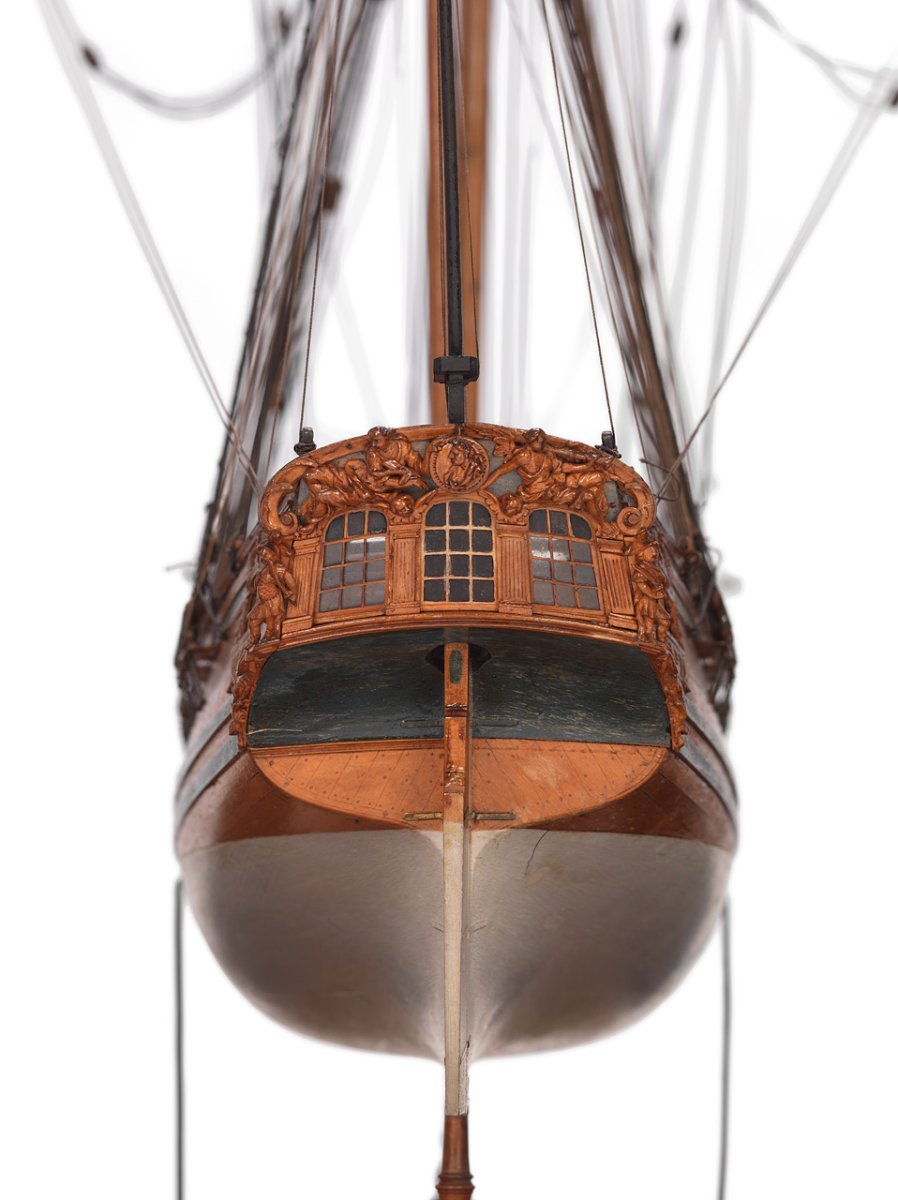
Thank you for saying. If you would allow me. I couldnt wait to test the stern light in position. They fit wonderfully. But more important is that I found and tested a new material. These are cut from wood on the Winnie and other projects I have done in the past. But this new material is wonderful. It laser cut perfectly and leaves no race of laser char at all....not one bit. Just check out the inside edges of the window panes. No char. This is a a huge win plus it is very very strong and I dont have to worry about folks breaking these. They wont break. I am just unsure about one thing. Too many color choices. This material comes in so many colors. There are about 4 choices of Tan and wood colored material. There is also white...or Ivory. I am not sure if I should go with white since I do paint my models and have friezes. White might be a great choice. Something different. If not I also have a color that is a perfect match for Cedar or even boxwood. As you can see. What are your thoughts on the color? I also acknowledge that the thickness of the panes (mullions) are too thick. I originally made them that thick because they were going to be cut from wood like the Winnie. I needed to for strength. But now I can go back and make those extrs thin which will be a huge improvement as well. But which color?? I had looked at the Amazon model which uses white for the mullions and windows. I like the look. Also note how the top of the windows...the false panes are in another layer. This is also true of the Speedwell. But just the two outboard stern lights.


-
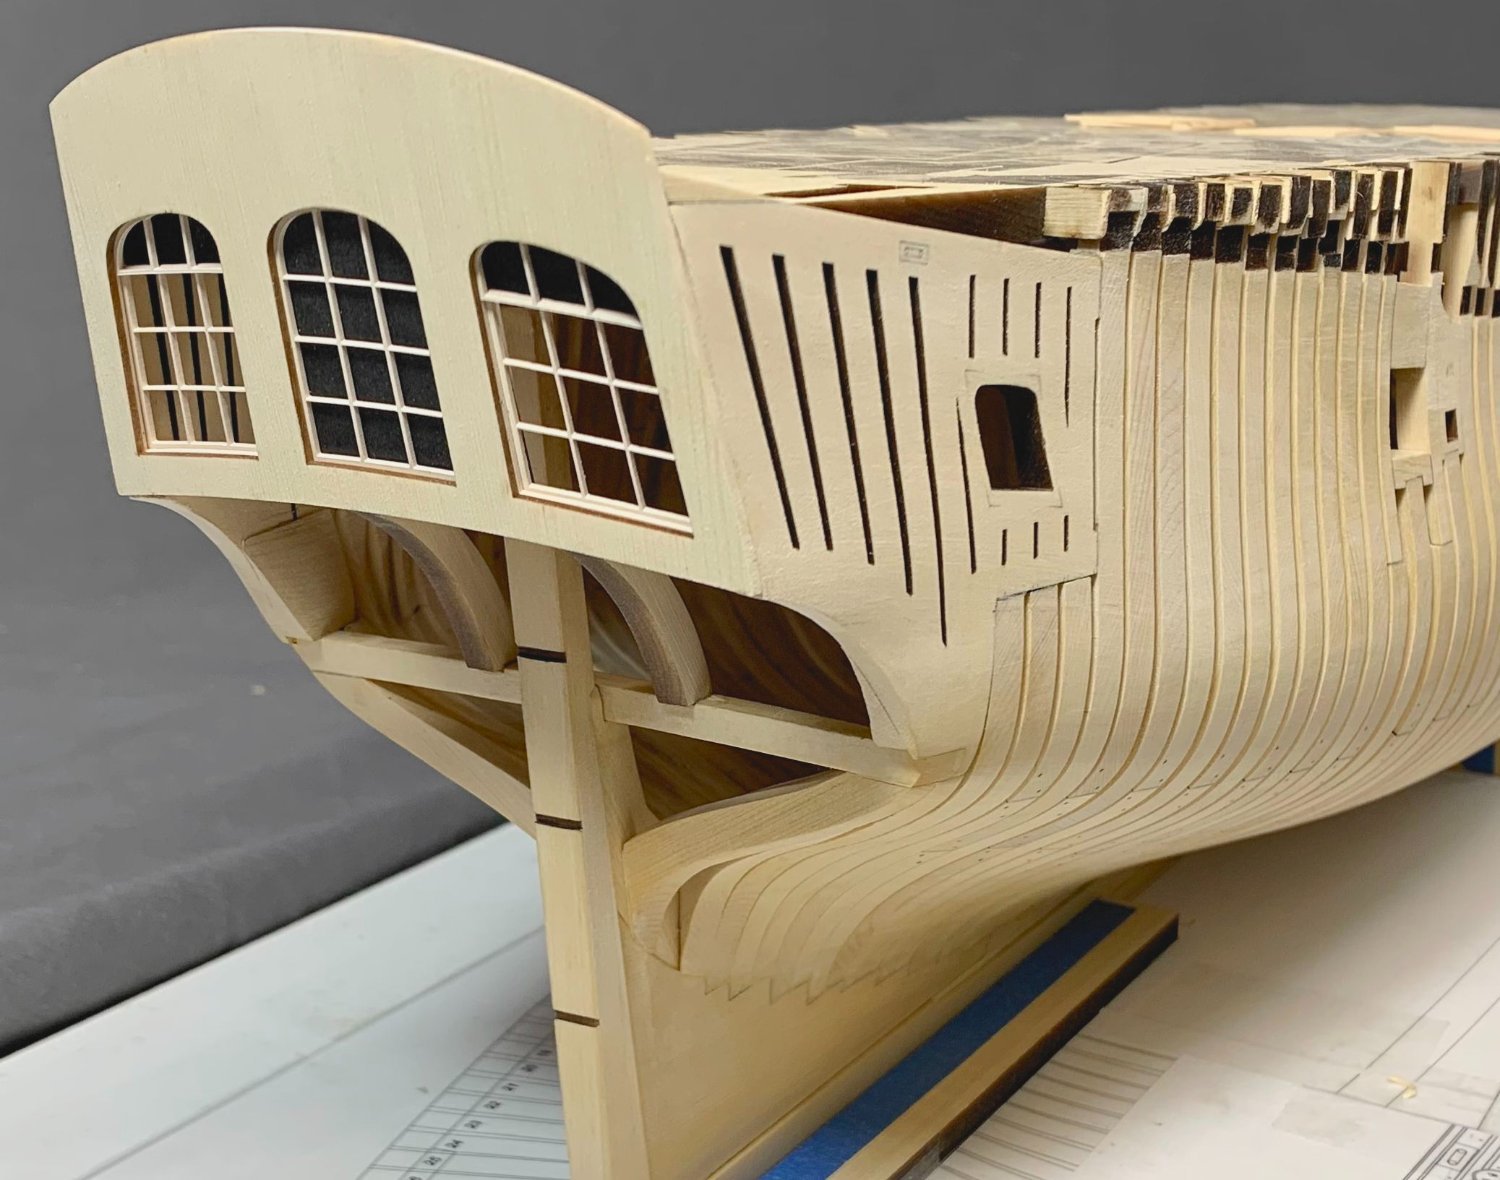
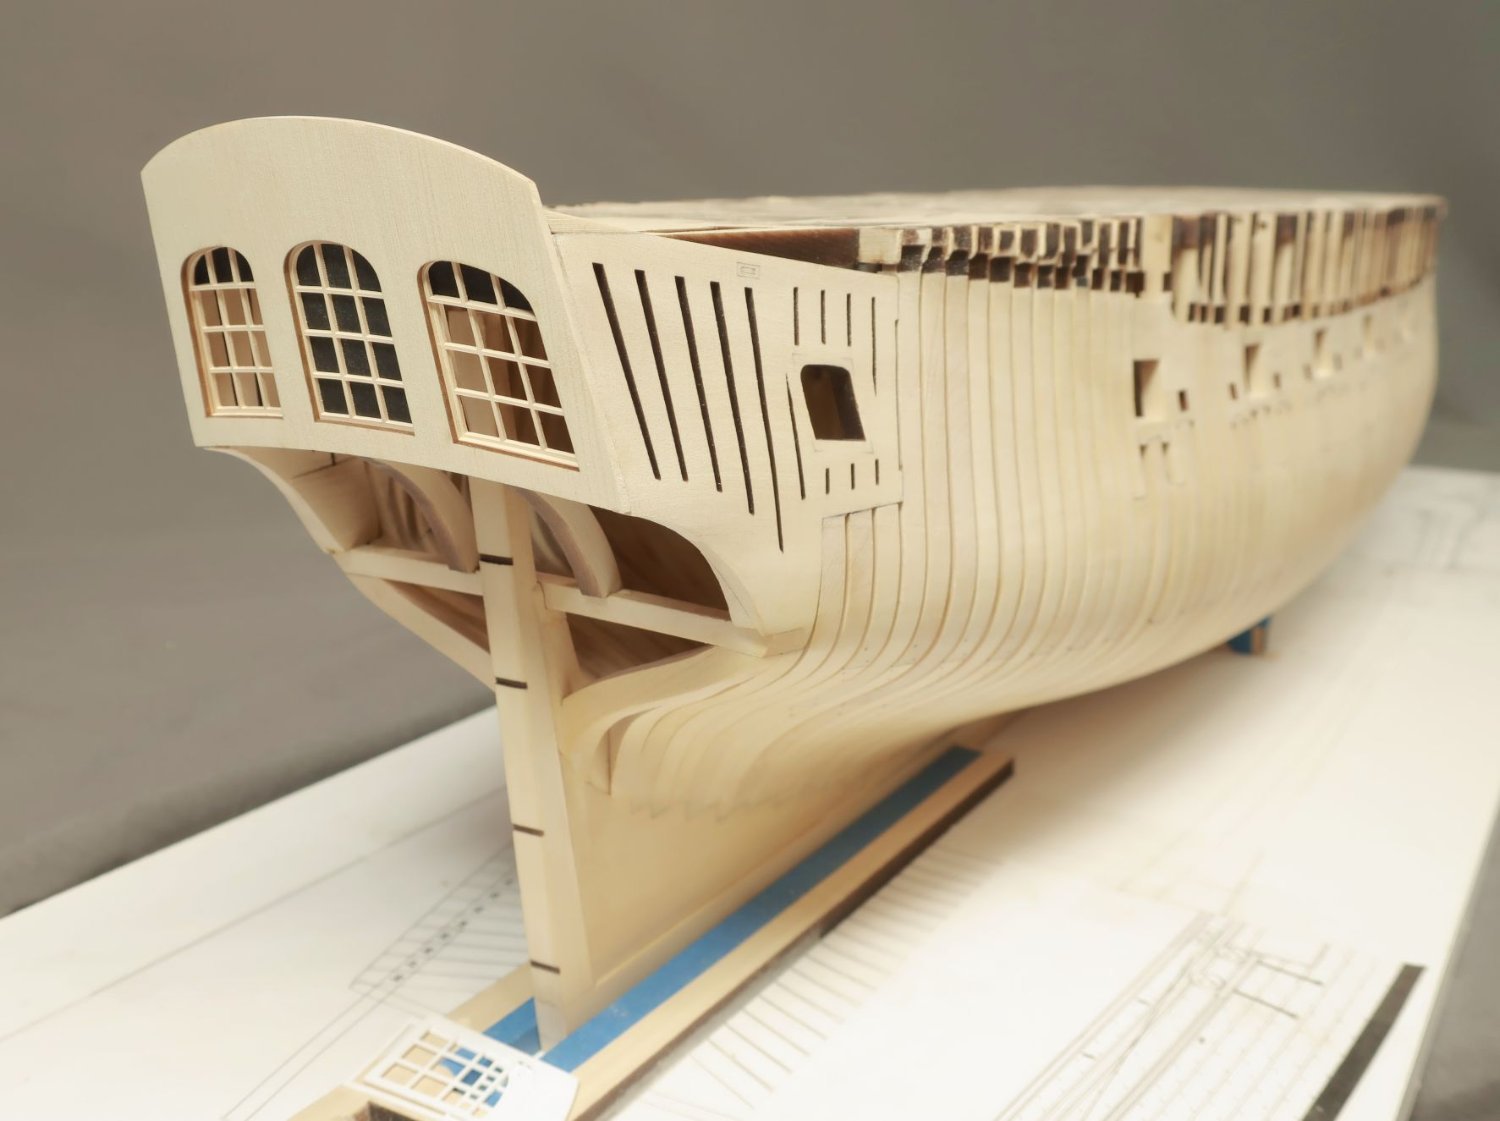
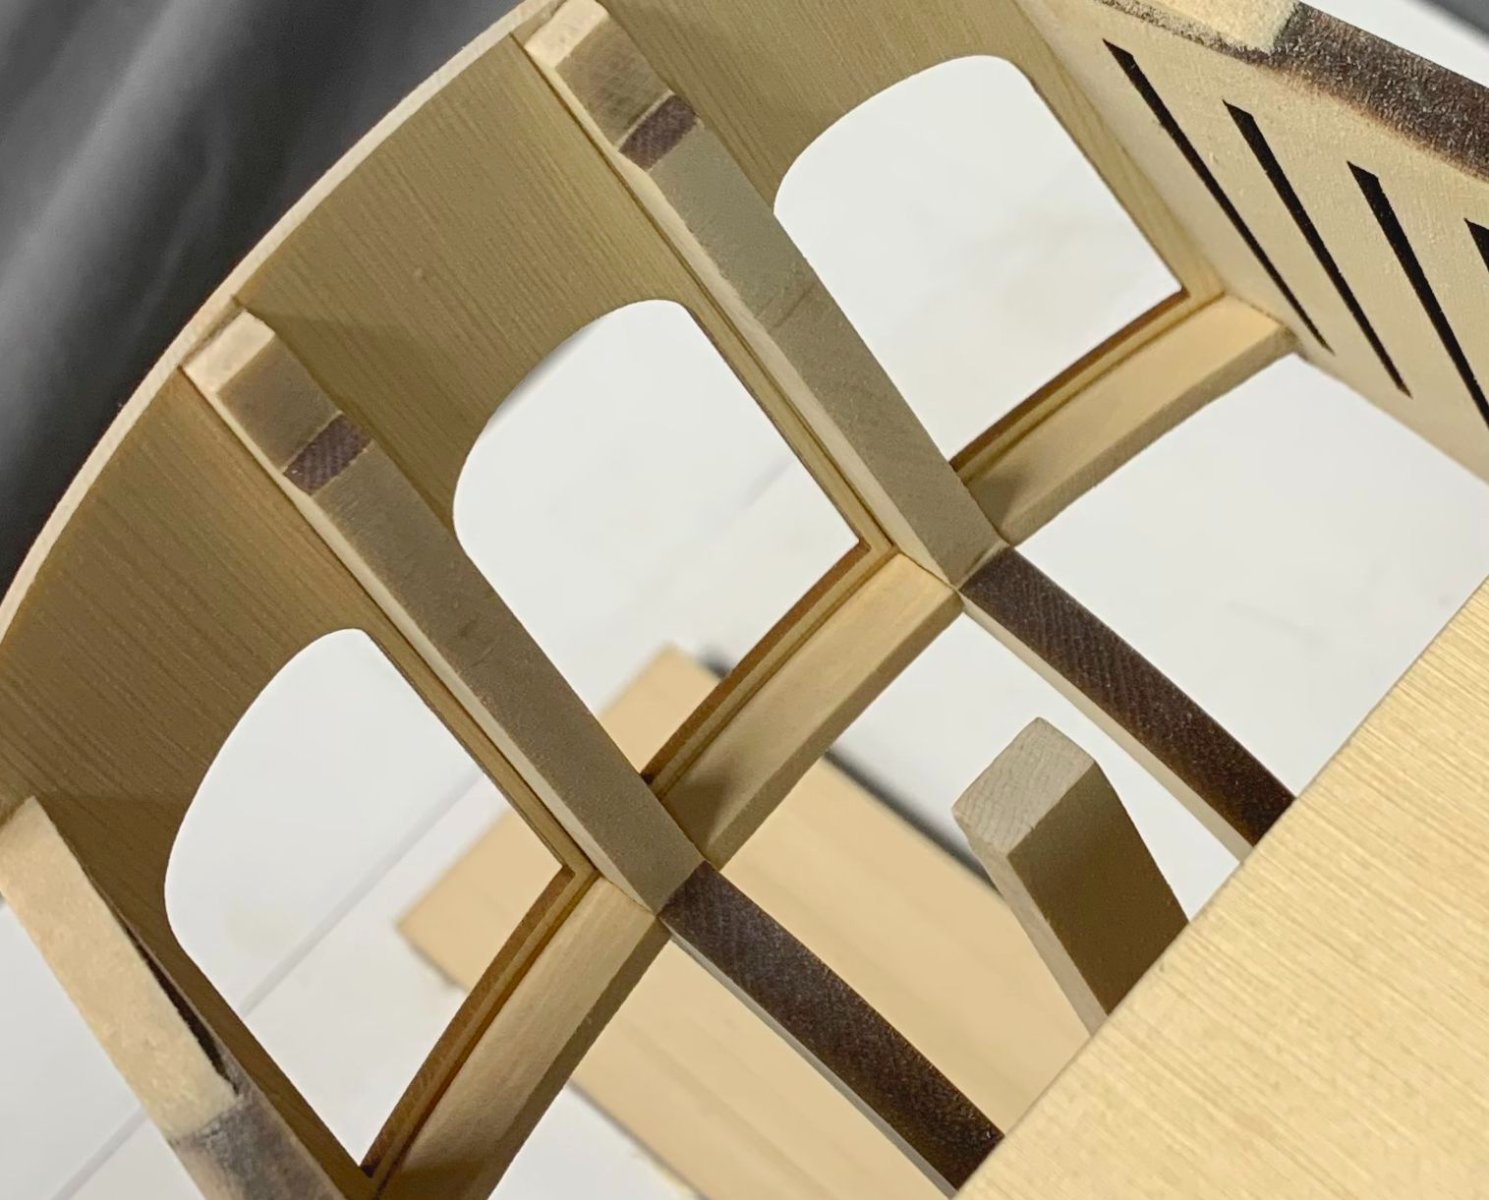
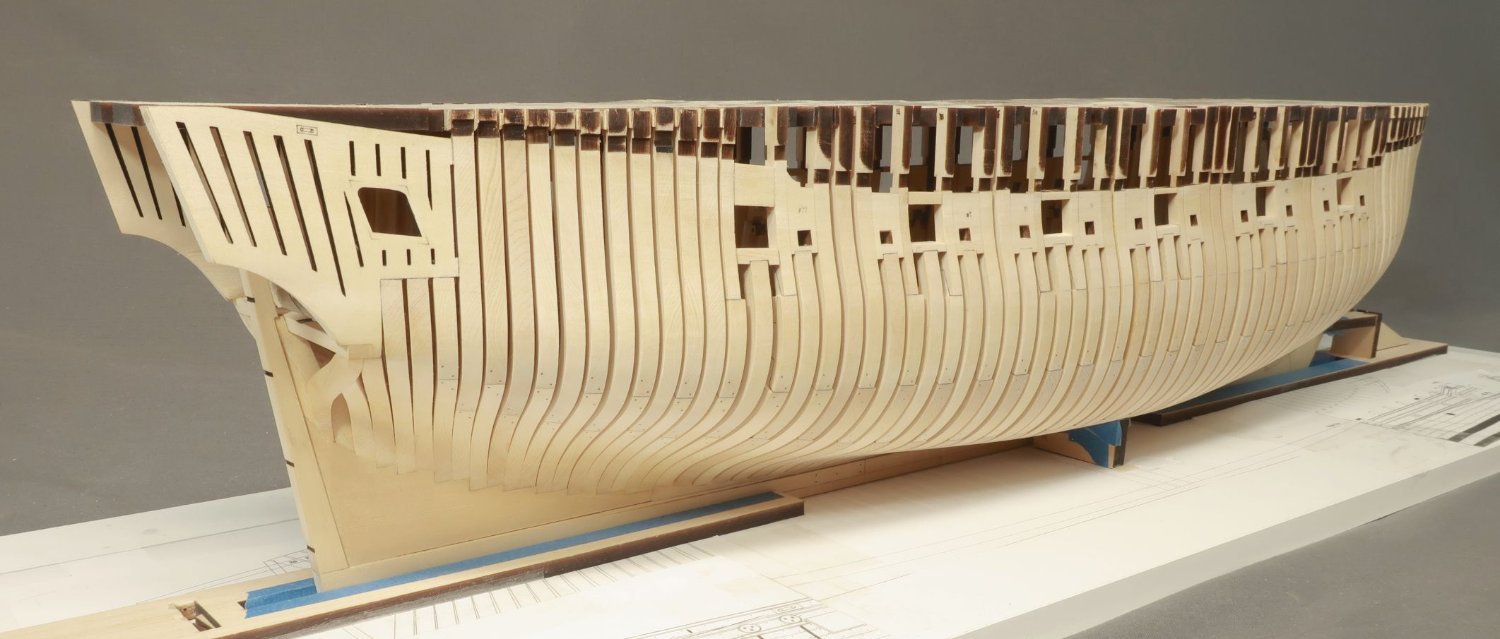
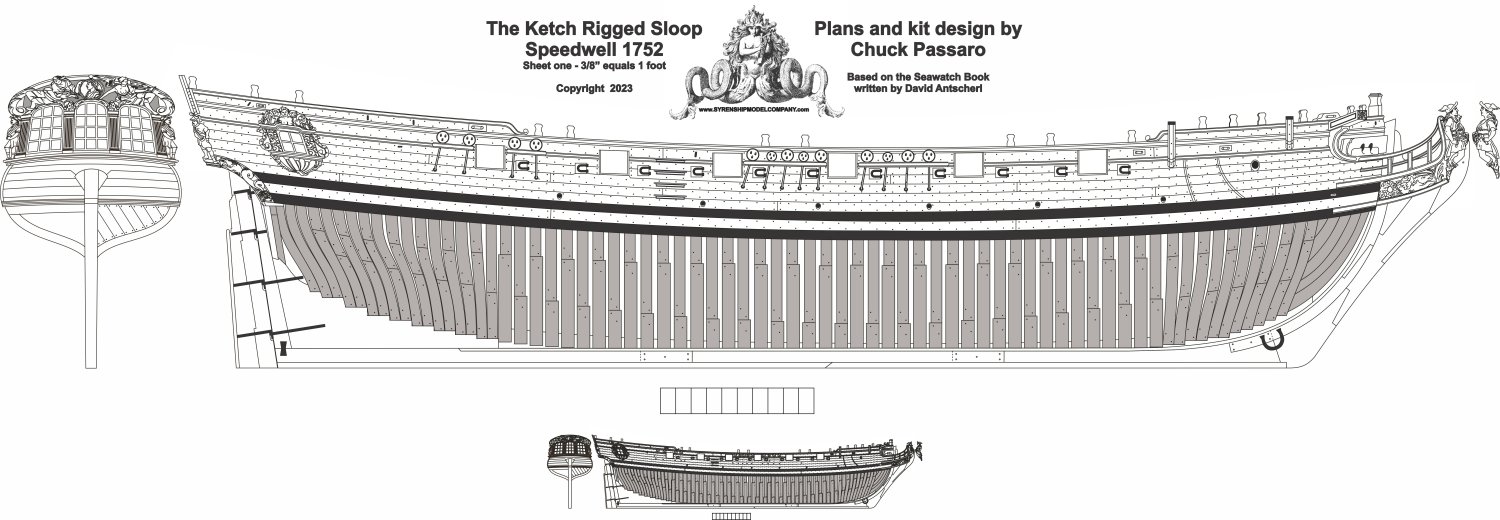
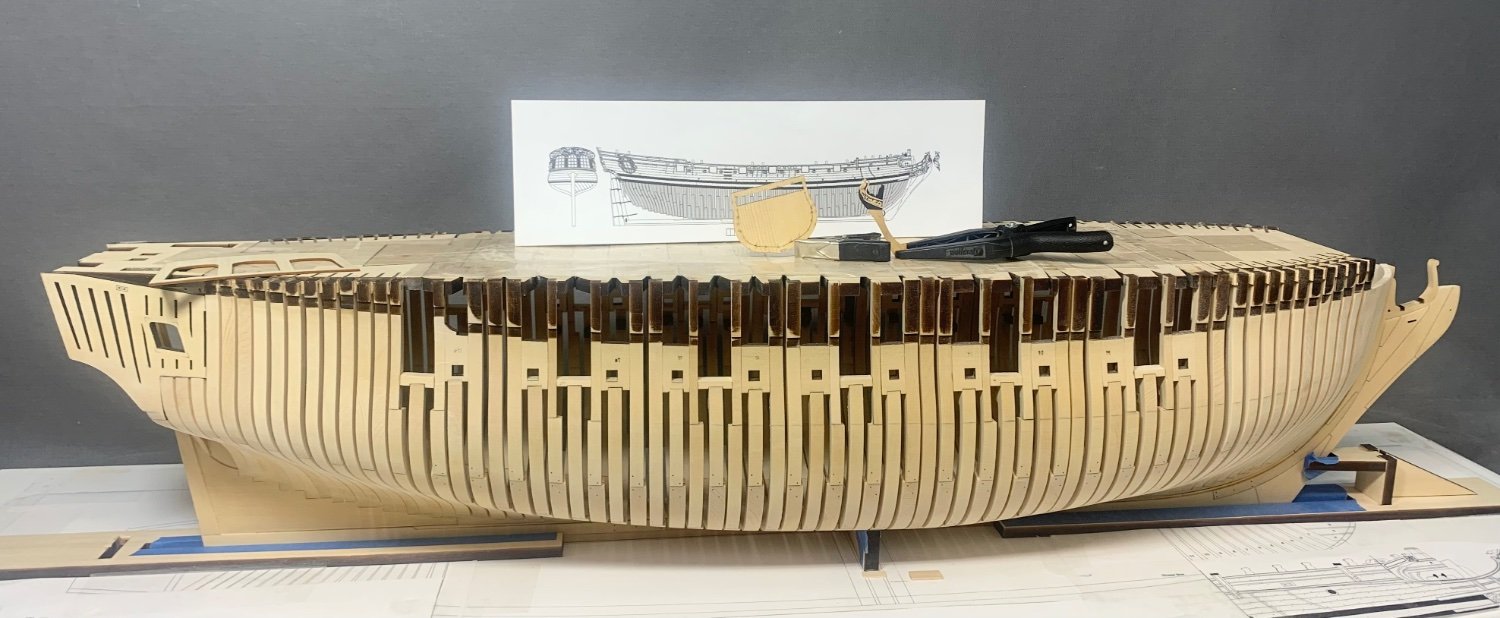
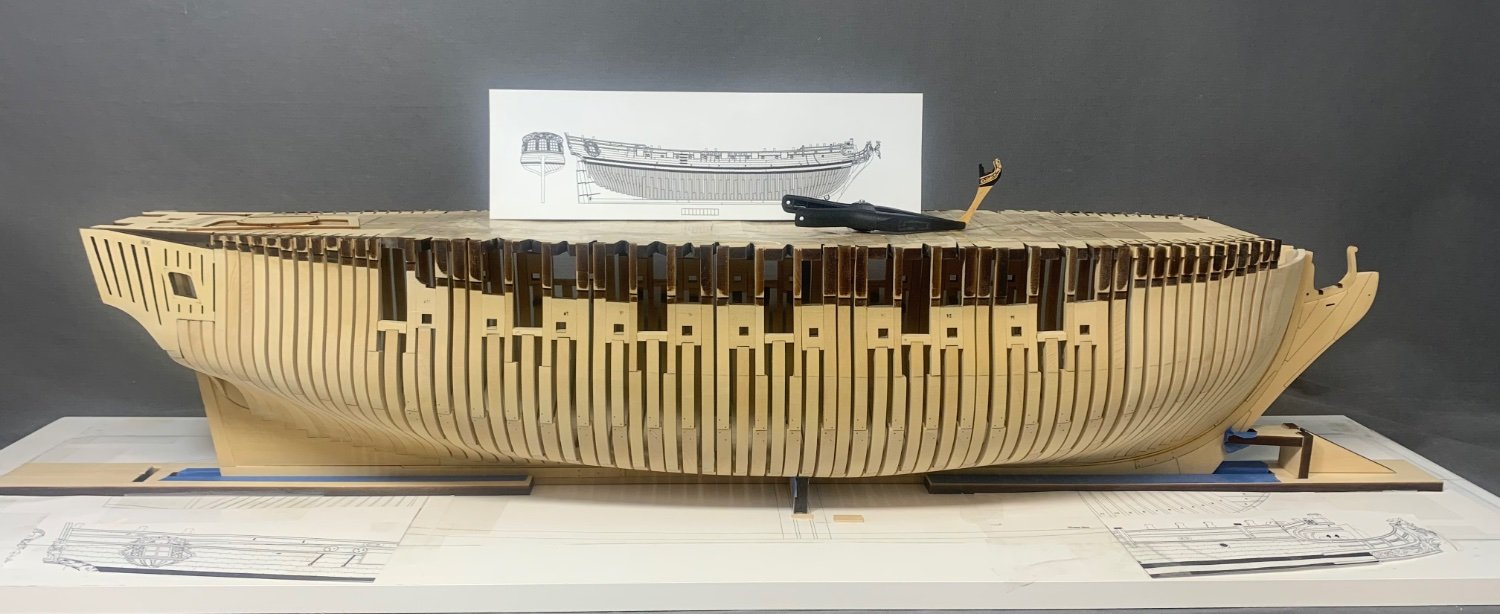
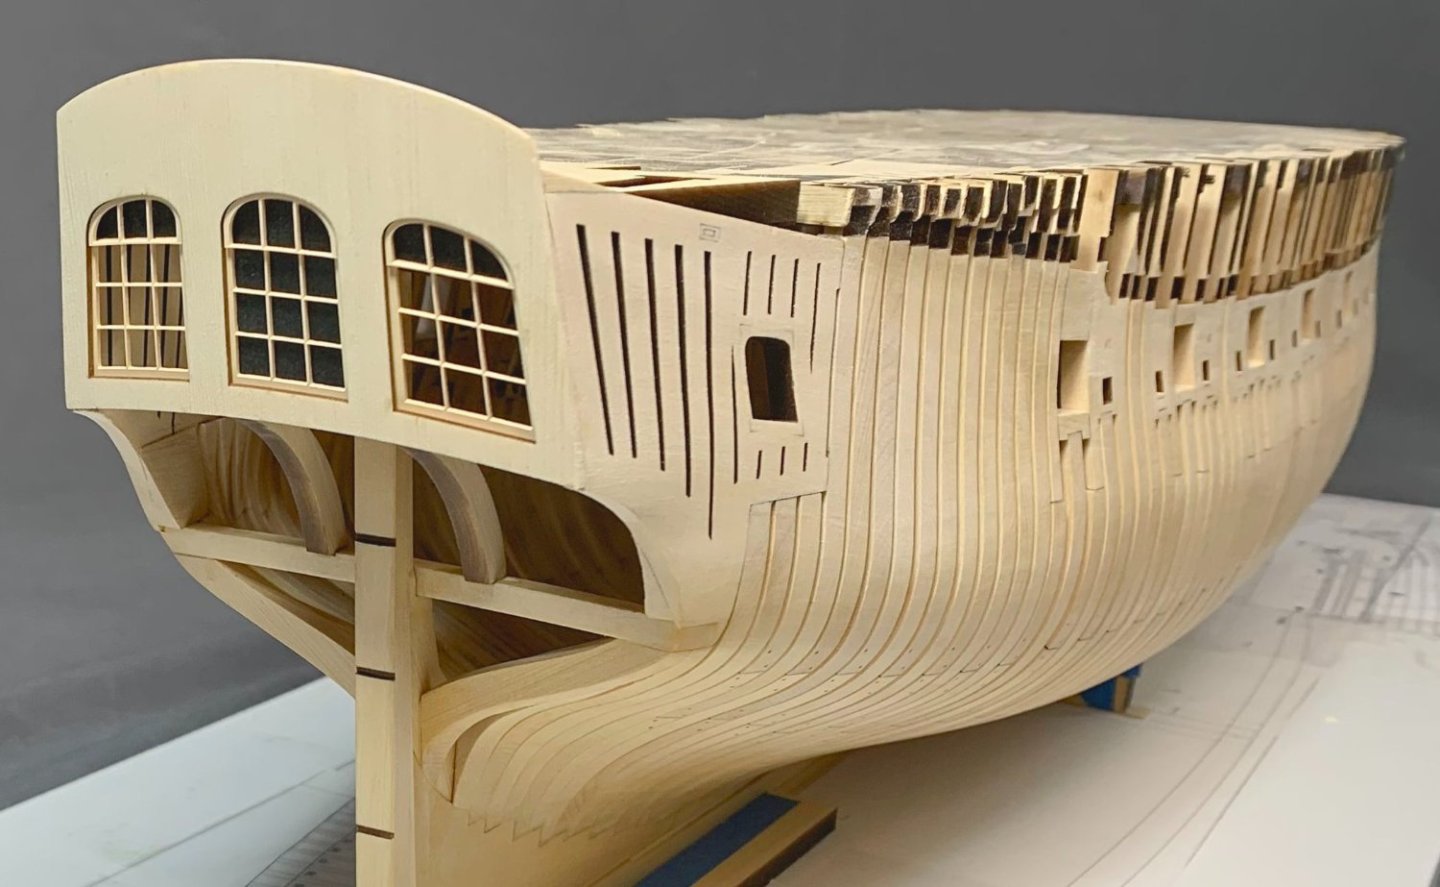
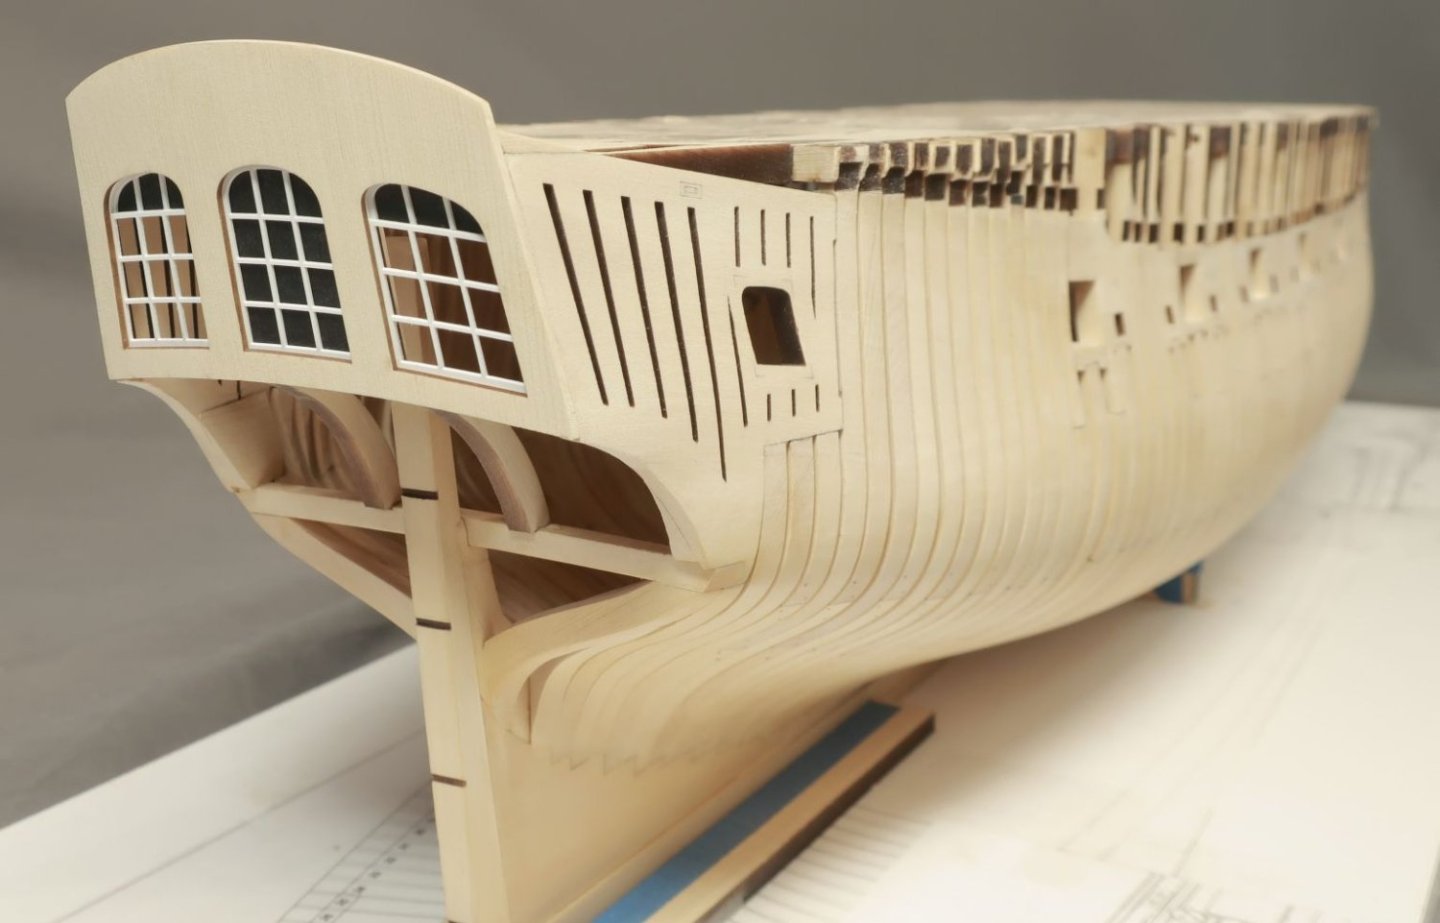
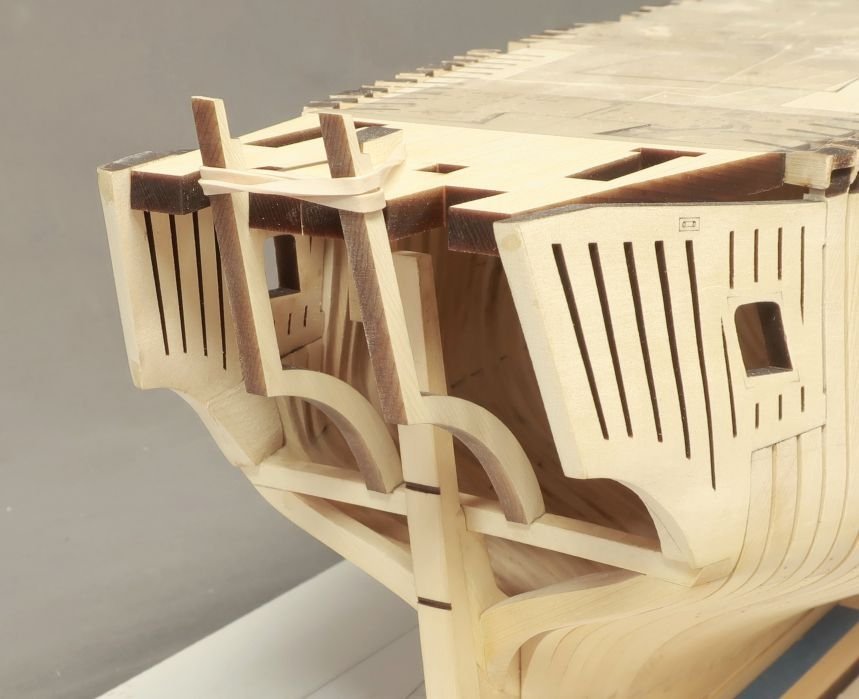
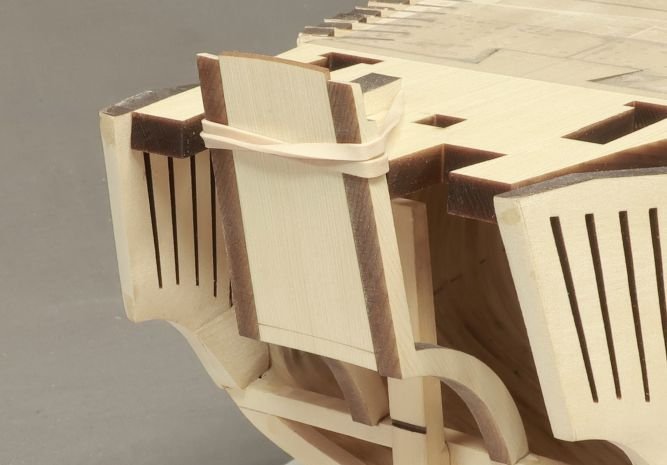
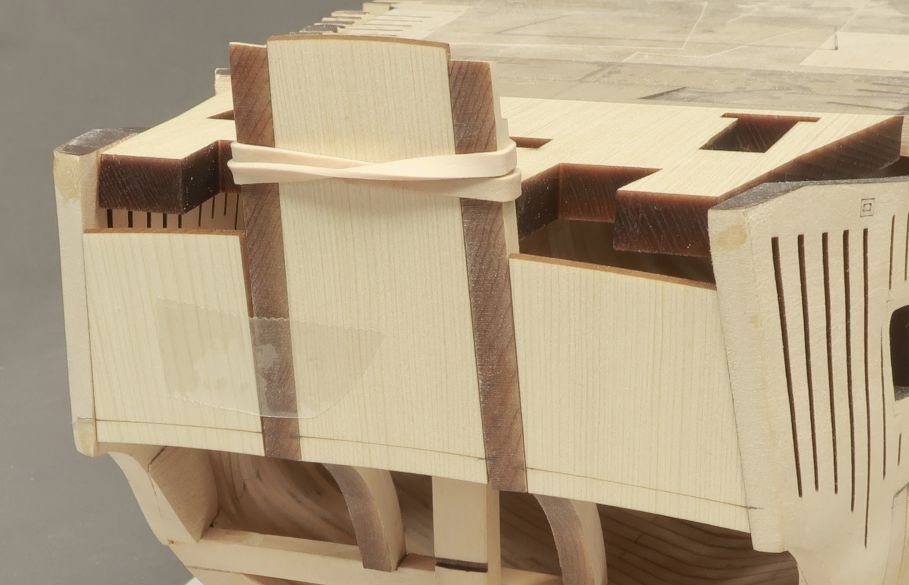
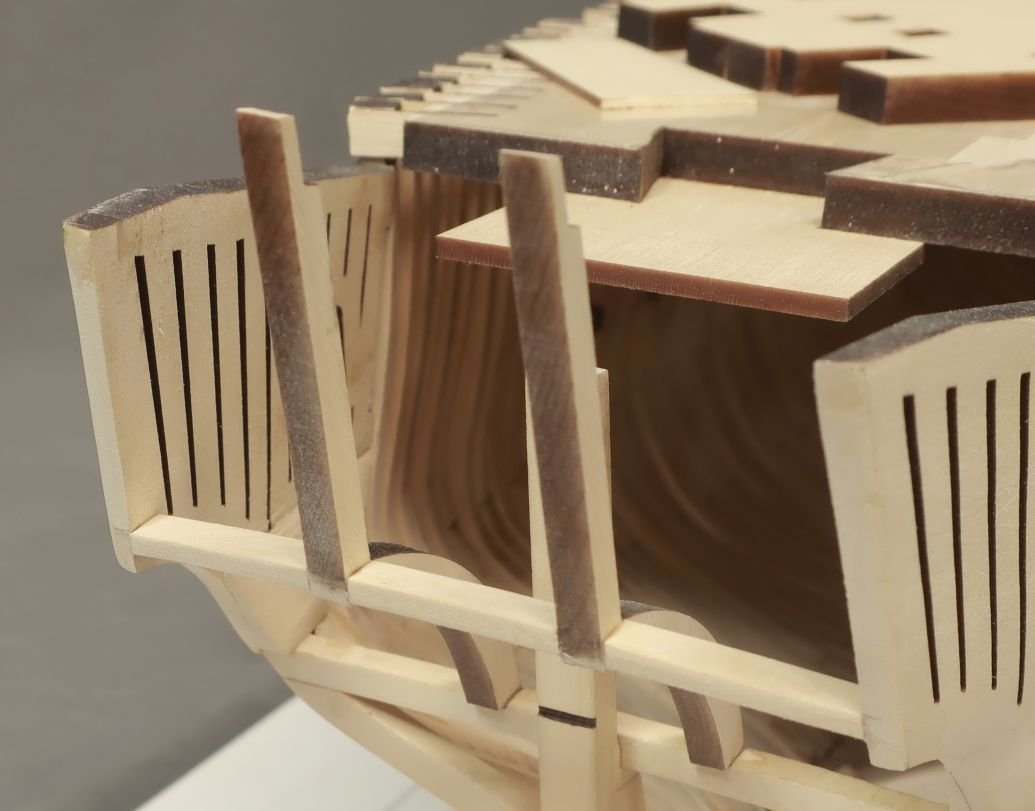
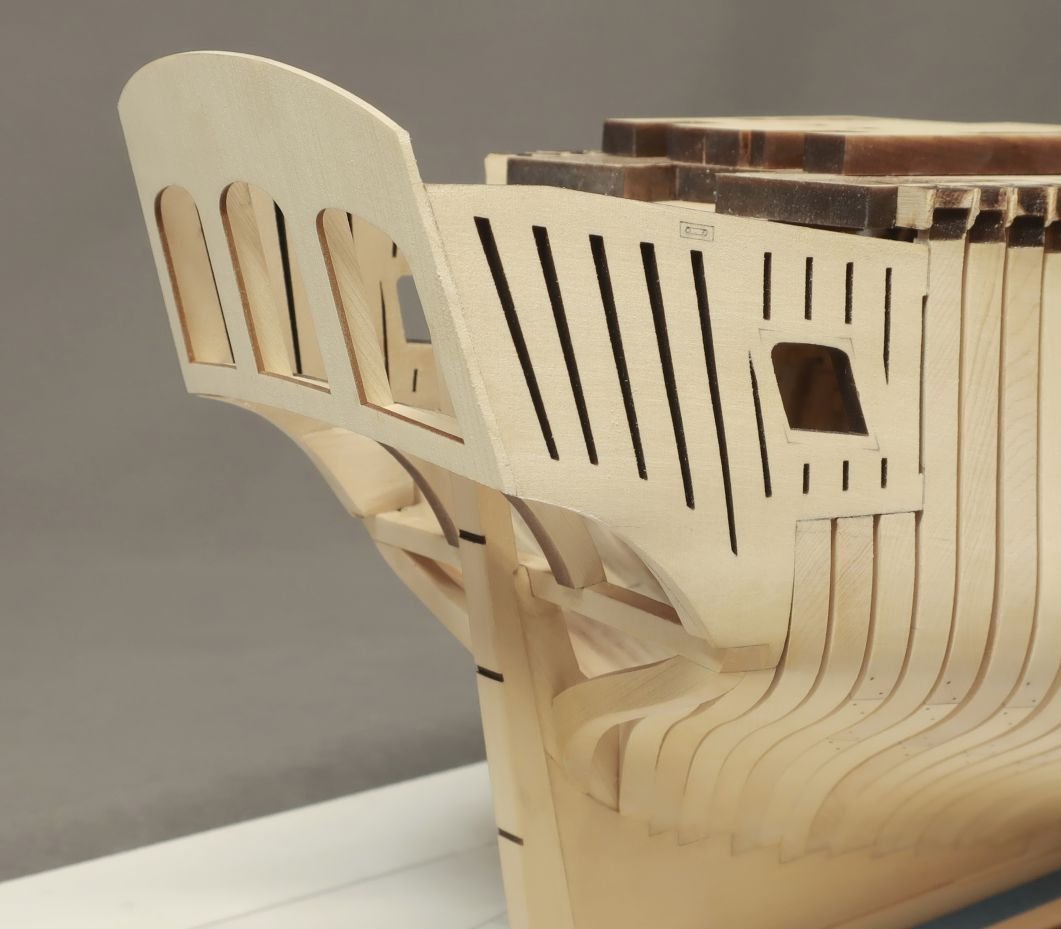
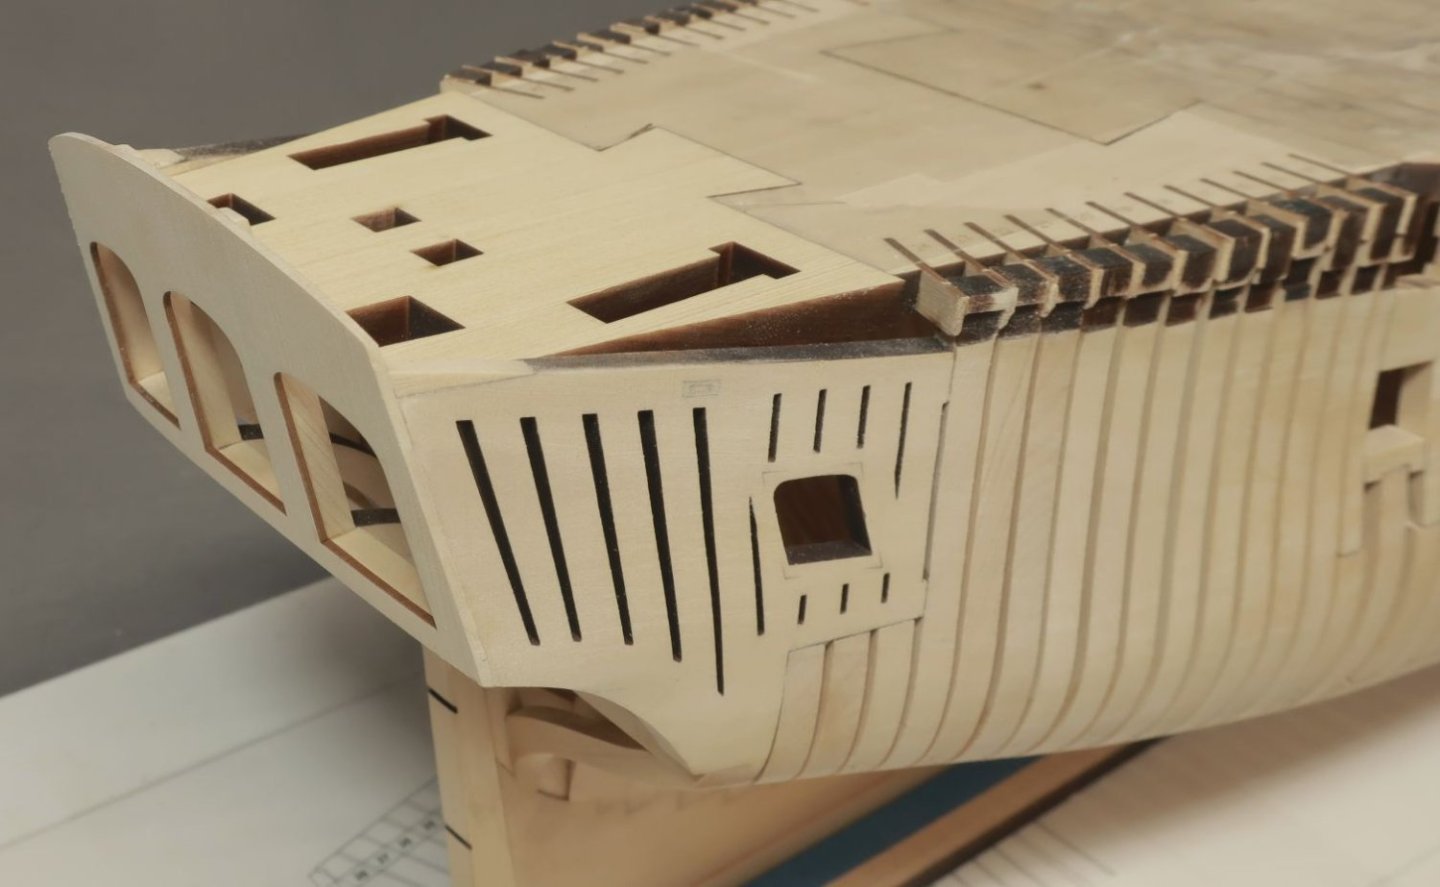
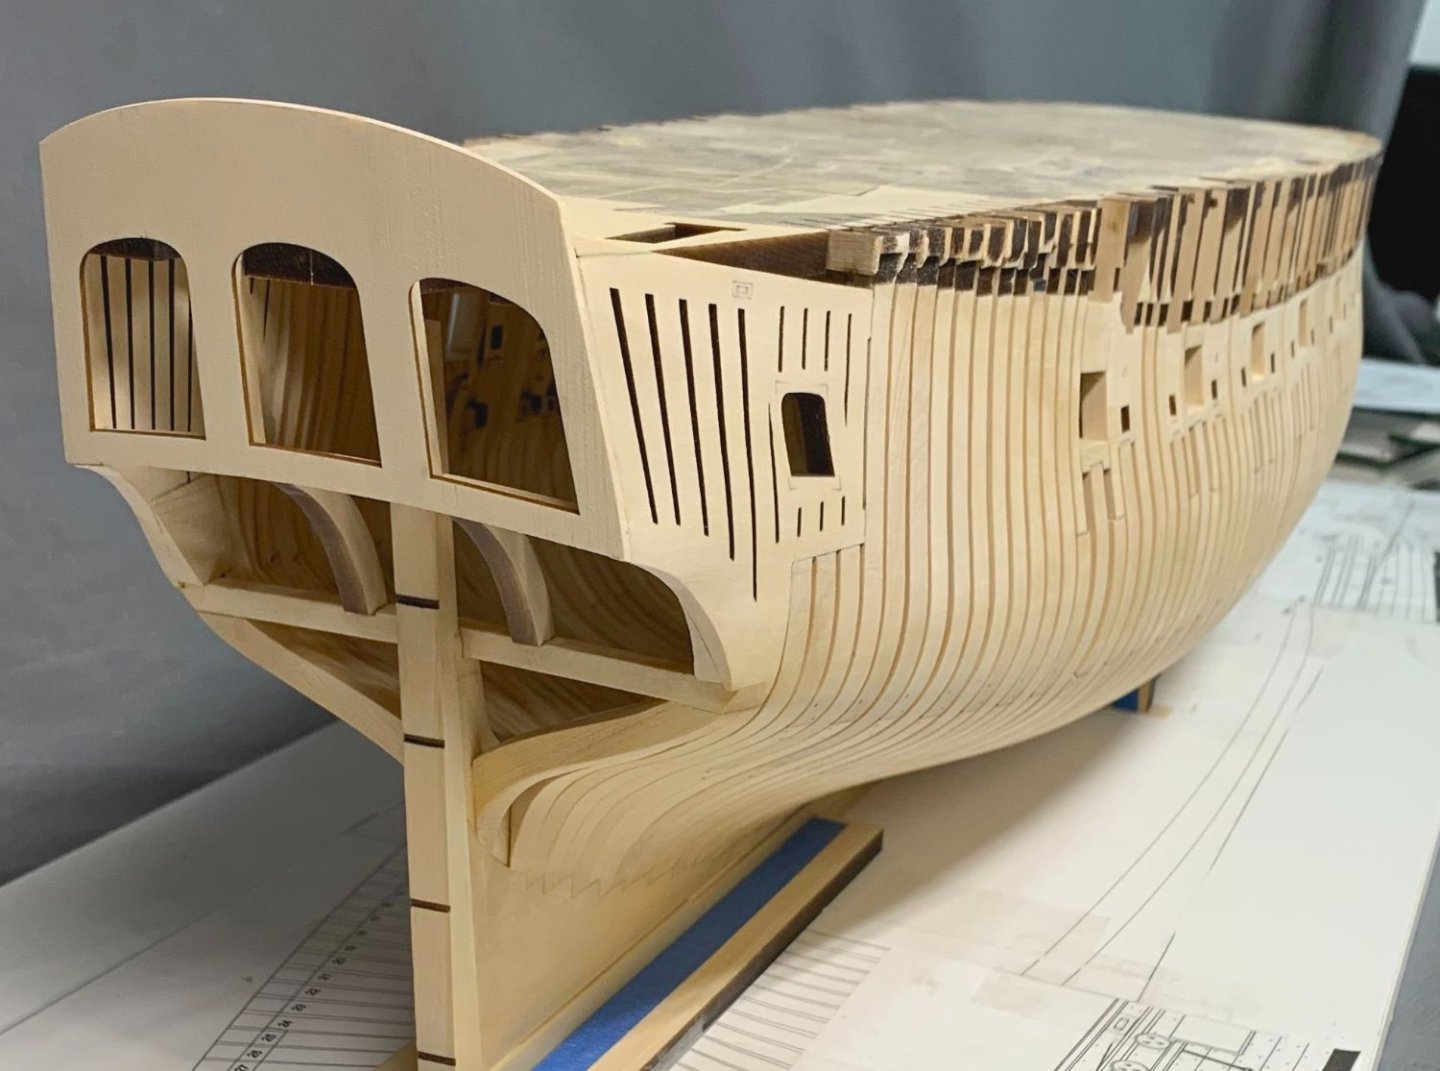
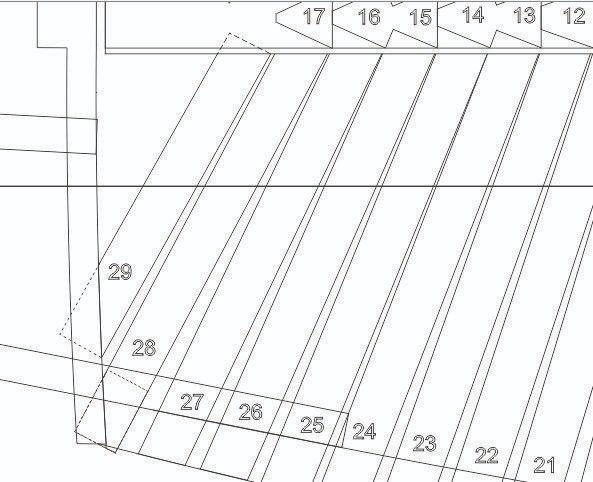
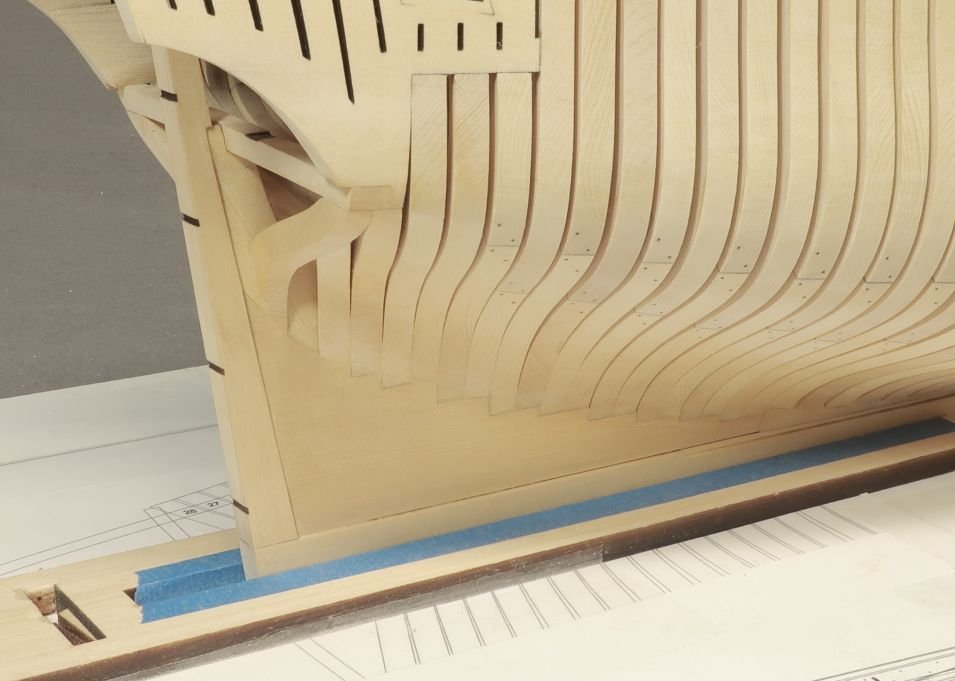
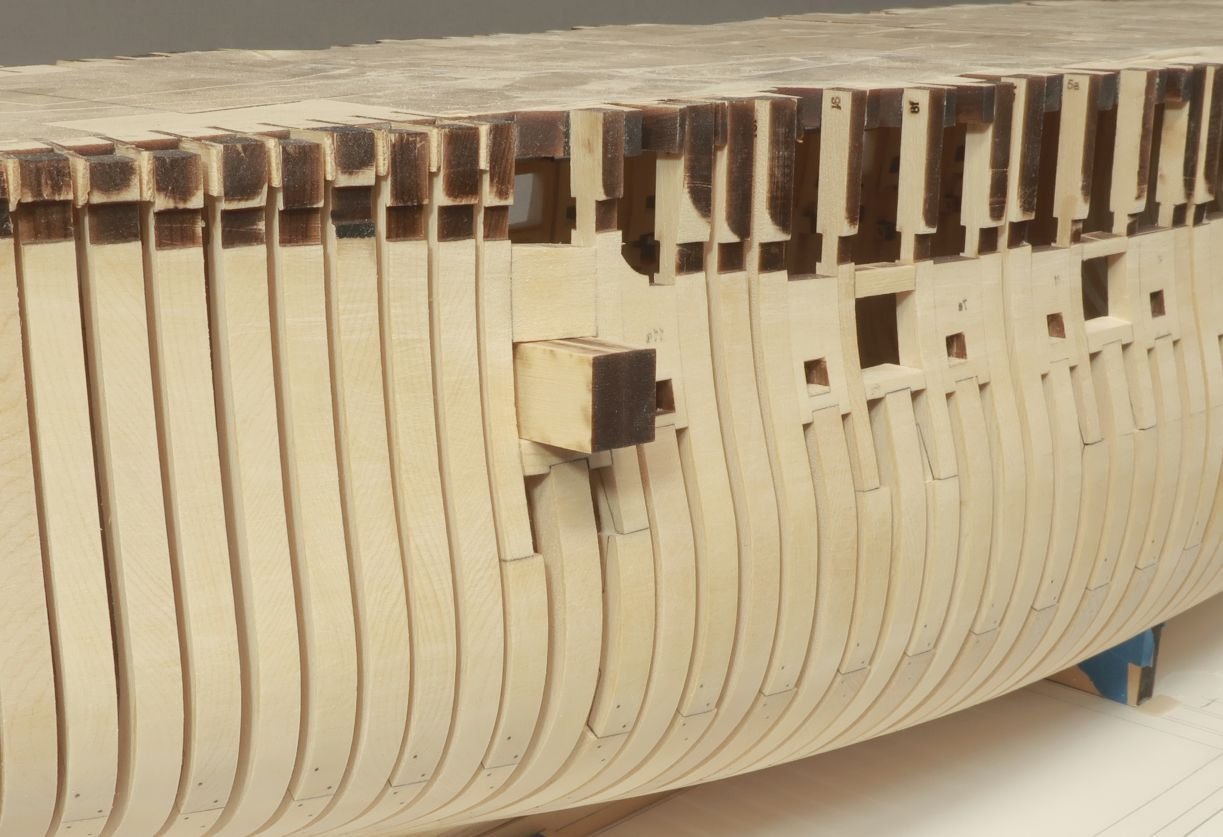
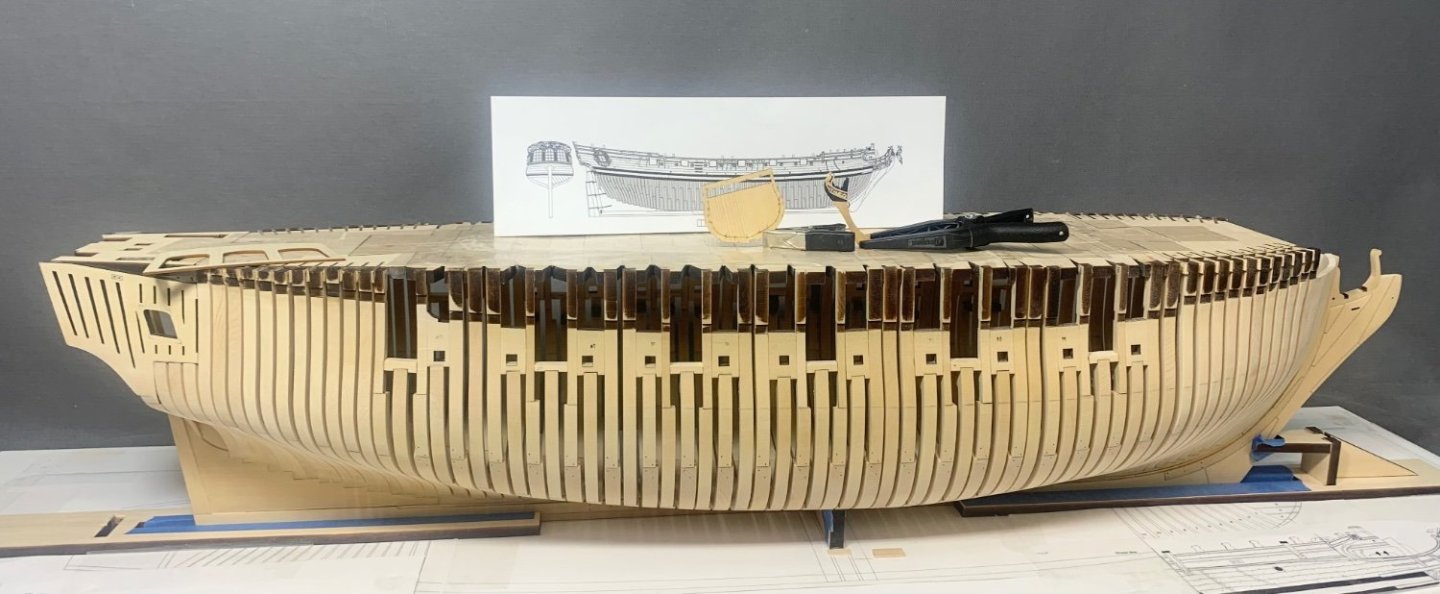
Chapter two has been completed... I managed to complete the stern framing. Its much easier than a larger frigate like the Winnie. Its just a matter of going slow and taking careful measurements. I have also added some features which will make alignment pretty tough to do wrong. Here are the steps...sorry for the long post but these are my notes for the instructions while I remember them. To begin...take the two center stern frames. Sand the laser char from the forward side and the the sides. No reason to do the aft side. There are slots on the top of the wing transom where the bottom of these frames will be positioned. The forward edge of the stern frames should be flush with the forward edge of the wing transom. You will notice how the aft edge of the stern frames hang over the aft edge of the wing transom. This is by design. The top of each stern frame will rest in the notches laser cut into the jig on the top of the hull. Just rest them in the notches but dont glue them here. The stern frames are only glued onto the wing transom. A rubber band holds the top of the two center stern frames together and in the notches of the jig. Put one or even both of the keys back into the jig (the keys for centering the stern post earlier) to help pull the stern frames forward so they sit firmly in the notches of the jig. Then slide the laser cut spacer (3/64" thick) between the two center stern frames. This may cause the stern frames to spread apart a little. That is fine. The filler are a perfect fit. Dont sand anything off the filler. Have it sit flush with the aft edge of the stern frames. The bottom edge should also sit flush to the bottom of the stern frames as shown. Note the laser etched reference line for the stern window sill along the bottom. This will be important really soon. Then add the two remaining fillers on either side. You may have to tape these in position. If you didnt fair the inboard side of your quarter pieces enough they may be too tight. Dont sand the filler pieces to fit. Sand the inboard side of those quarter pieces on the hull so they fit. Use apencil to precisely mark where the stern light (window) sills will be placed. Just draw a reference line on the stern frames and quarter pieces. We will now add the stern window sills between the stern frames. These are laser cut for you. Clean the laser char from the top and bottom of these pieces. They have been laser cut slightly longer than need. There are paper templates on the plans for these three pieces. They are used to shape the gentle curve of the transom. Glue these to the top of each piece. Sand them to shape. The one on the left has been sanded already....remove the template and get ready to install them. Leave the center filler between the two stern frames for now. We will add the outer sills first with these in position. Install these using your pencil reference lines for their proper placement. Sand the sides to get them to fit snug as they are laser cut slightly longer. Make sure you dont spread the open space apart because your sills are too long. That would be bad. Make sure they fit snug but with no movement in the frames or quarter pieces. See below. Then remove the center filler and do the same with the center windowsill. Note how I removed the aft jig on the top of the hull at this point and set it aside. This will be important in the next step. I also sanded the the outboard edge of the sills to fair them into the general shape needed. You want the transom to sit flush against the stern frames in the next step. OK were going to add the laser cut transom next. You may want to do a test run with just tape initially. It is 3/64" thick. One side of the transom has laser etched reference lines on it. This is the INBOARD side. Those lines are to help you position it correctly. In fact, it is more important that use look at the inboard side while you test fit this. Maybe with some tape first. This is how it looks outboard... But inboard is where the magic happens. Its how you will position it properly. If you look really closely...at the back edge of the sills you will seethe laser etched reference line on the transom. That line is used to establish the height. If you placed your sills properly then you can align the transom so this reference line follows the top edge of the sills. This will leave a nice lip above it for inserting the stern windows later. Ihope that makes sense as I explained it. There are also etched lines for the two center stern frames. They may be harder to see above but they are there. This will help you position the transom port to starboard. So after this test fit you know what you need to do to get this positioned correctly. Its time to glue it on. BUT Dont just add some glue to the aft side of every stern frame and quarter piece and the sills and go for it. That would certainly be a huge mistake. There is no way you can get this positioned correctly in one shot before the glue sets. So...do it in stages. Step one....Only apply glue to the aft side of the transom below the reference line for the sills. You should only glue the bottom of the transom in place first. Make sure the etched line is flush with the top of the sills. Make sure the center stern frames are "centered" between the reference for them. There is no glue on these so just use it to center to the transom port and starboard. At least down low where the sills are. Maybe your alignment is perfect for these toward the top of the transom and that is just fine right now. The cedar is soft and the frames are flexible as you are probably aware by now. Let that glue set firmly. Step 2....Glue the sides of the transom to the quarter pieces. NOT the center frames yet. You can easily get a toothpick with some glue on it between the transom and the quarter pieces. Glue one side at a time. You only need glue on about 1/4" down the aft side of the quarter pieces. With the sides of the transom secured... Step 3...glue the center stern frames. Apply some glue on the aft edge of the stern frames....between the frames and transom. No need to apply glue all the way down to the sills. Just about a quarter inch down the stern frames is fine. Flex the stern frames so they fall right between the laser etched lines on the transom for them. Hold or clamp until the glue sets. Repeat for the remaining center stern frame. This is how I managed to position it so perfectly. Dont be impatient and try to glue it on in one shot...it wont end well. Now as long as your sills were positioned properly your transom will be as well. One last thing in this chapter....two small "triangular pieces" laser cut need to be added. You can see it below. They sit on top of the quarter piece and against the transom to complete the run of the qdeck bulwarks. You do have to bevel the aft edge so they sit flush against the transom. They also sit flush with the outboard side of the hull. You can sand them flush with the outboard side when you are done. Also sand the top edge smooth so you get a nice run into the quarter piece. Note....you may have noticed that I didnt sand the laser char of the transom edges. I am specifically talking about the inside edges of the window openings. I did this on purpose because I dont want to alter their shape. I will leave the char or paint it later. Better to have a good shaped window opening. That is more important. I also slipped that top jig back into position. You dont have to but it couldn't hurt to have more support at this stage. Just remember that if you turn the hull upside down from here on out, you will need to prop up the hull first. You dont want to damage the stern transom and stern framing. Thats it for chapter two...the framing is completely done. Next up will be planking. I will start with the square tuck and counter. Then I will plank from the wales up.


-
Beautiful work as always....a stunning Winnie model for sure.
-
Yes that is best. Just make a new piece after cutting the clamp away. It shouldnt be too difficult and its exactly what I would do.
-
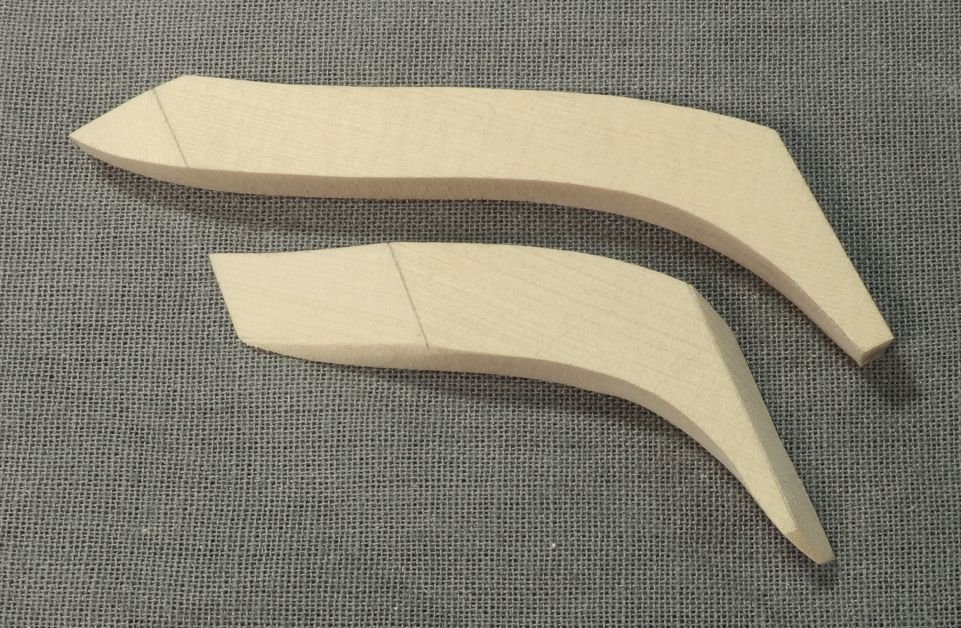
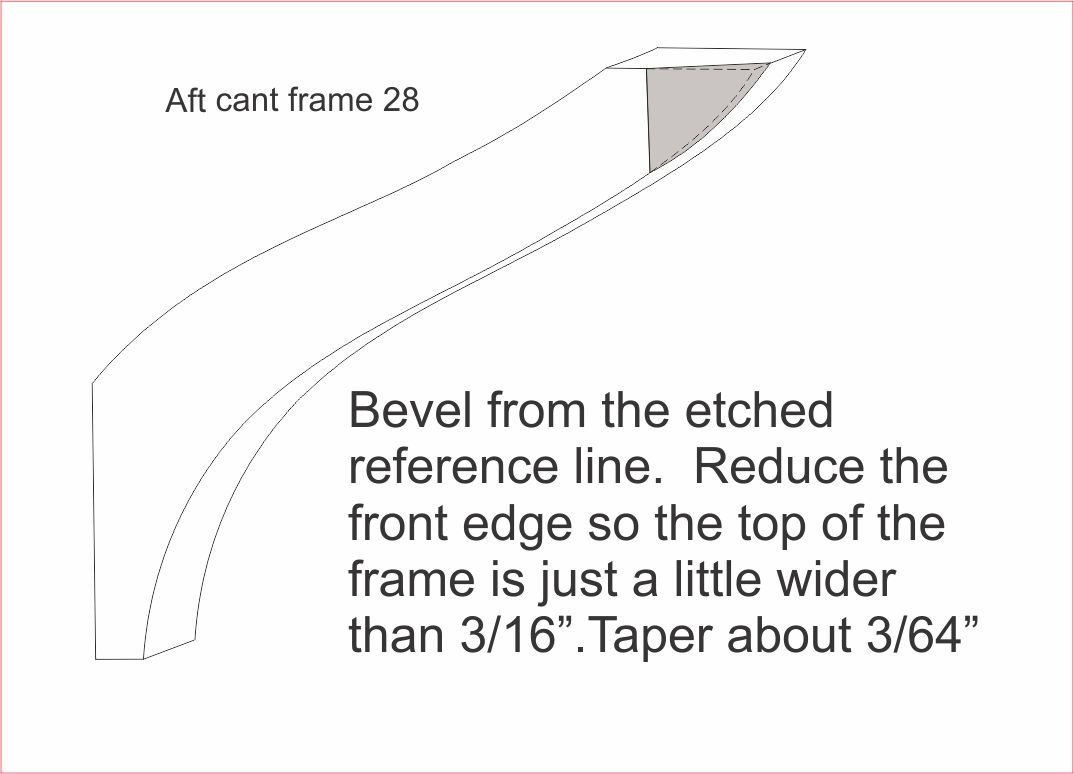
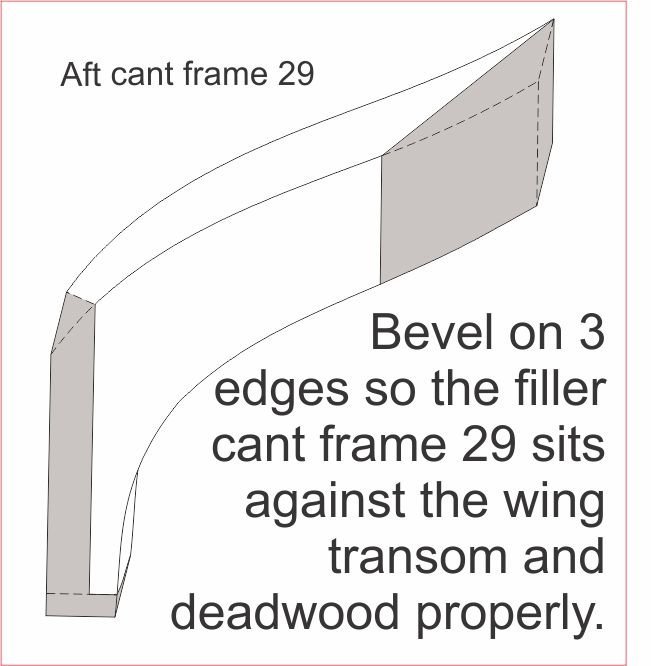
29 is the one on the bottom....you would know if you had the piece unshaped in front of you. You just need to bevel the heel to sit against the deadwood. Same as any traditional cant frame. The other side or the top is beveled also. From the line shown to the corner so its a sharp diagonal point. This bevel sits against the forward edge of the wing transom. Chuck
-
That looks awesome. Well done
-
Thank you guys. It is much appreciated. The problem solving and design is just as much fun as building her. Its like solving a crypto-quote. A very large and complex crypto-quote.
-
Lovely!!!
-
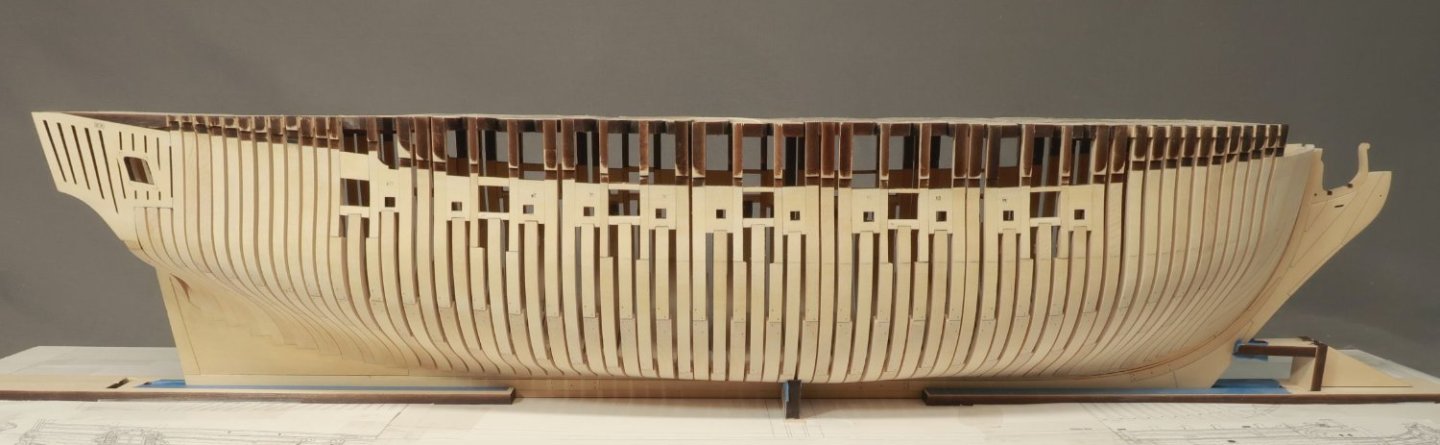
Yes it looks like that will happen. But keep in mind this is all new to me. So how viable it will be will be determined after I am assured I can do it. I will start a new build log for the mini speedwell once I get started. I have to start over and take pictures...I will also need to do some redrafting to incorporate what I learned from from experiments up to this point. I will also also admit that I dont own any of his books or any books on making miniature models. So I will just wing it and see how it turns out. I could start reading up on how everyone else does these extreme miniature models but I have decided to stay pure to my own unpolluted experiments. We shall see how it turns out. Getting back to the full sized 3/8" scale version....another first for me as I have never built a POF model before.... Work continues on the framing. The last two cant frames number 28 and 29 were added. These looked very challenging after reading Greg's account of building them. But once the proper shapes were drafted after about 5 attempts at tweaking them, they were surprising easily to bevel and add. Here is a look at the two aft cant frames after shaping. They are laser cut of course. With etched reference lines for the bevels required. The first ...number 28...was easy enough. Just a bevel along the top. This illustration should explain it better than I can describe in writing. Then it was glued into place using the last remaining slot in the deadwood. Aft cant frame 29 or as Greg and David describe it...a filler frame, was done just the same. But there are more bevels that were sanded into them with a sanding stick. I disc sander would do the trick in about 30 seconds. But as I mentioned, I am building this entirely by hand without power tools as I know many folks dont have those. Its beveled to sit against the wing transom. But it is also beveled to sit against the deadwood. There is no slot created by those wedges for this one. The heel must be beveled in the traditional way. Laser etched lines show you exactly were to start the bevels. It doesnt take very long to do. Lastly a bottom of the heel was sanded on a curve to match the bearding line. Then it was tested in position. Tweak it if you need to but mine fit rather well on the first go. I got lucky. Glue them in and fair the hull frames for one final last time. Here is a picture of those last two aft cant frames which you can see. This was taken after fairing. I also added the treenails for all of the frames to finish it up. This completed all of the hull framing except for the upper port sills. So that was next. These are also laser cut and rather simple to glue into position. I also laser cut a spacer that is the correct height. You can make your own that stretches all the way from port to starboard but this small length worked just as well. The spacer is laser cut in two layers. Just glue the layers together so you have a nice wide spacer. Rest it on the lower sill and position the upper. Its really very easy. Do this for the six upper sills on each side. They were laser cut slightly longer than needed. Just sand it to fit nice and tight and glue them in. Then fair it into the hull. This actually finishes up all the hull frames. All done and it took 5 1/2 months from design to completion at this point. I only have the stern framing left to finish up chapter two. Then its on to planking. Here are some pictures. I am actually quite pleased since I had never built a POF model before. It was like diving right in the deep end. But surprisingly it all worked out according to plan. Withought any major challenges or redesigns. I have posted an image of the framing plan right beneath the last photo so you can see how it all followed the plan as developed quite well. Who would have thought!! And one last drawing......showing the difference in scales between the 3/8" and 3/32" scale Speedwell models.


-
Beautiful work. Really nice model.
-
Really nice work…And built right out of the box. I have provided everybody with two sets of those. Some folks maybe even got three sets if I had enough made. Well done on a challenging part of the project.
- 642 replies
-
- 2
-

-
- winchelsea
- Syren Ship Model Company
- (and 1 more)
-
I am about half way through laser cutting more longboat kits. So soon. Chuck
- 421 replies
-
- 1
-
-
- medway longboat
- Syren Ship Model Company
- (and 1 more)
-
I will start a log after I finish framing the larger 3/8” version. This way I can just reduce the plans and parts by 75% and make adjustments. No promises on a kit because this is all new to me…POF and building miniature models so small. I have no idea what challenges lie ahead or if I can even do it. Yes rigging will be a huge issue. I will cross that bridge when I get to it. Chuck
- 29 replies
-
- 10
-
-

-
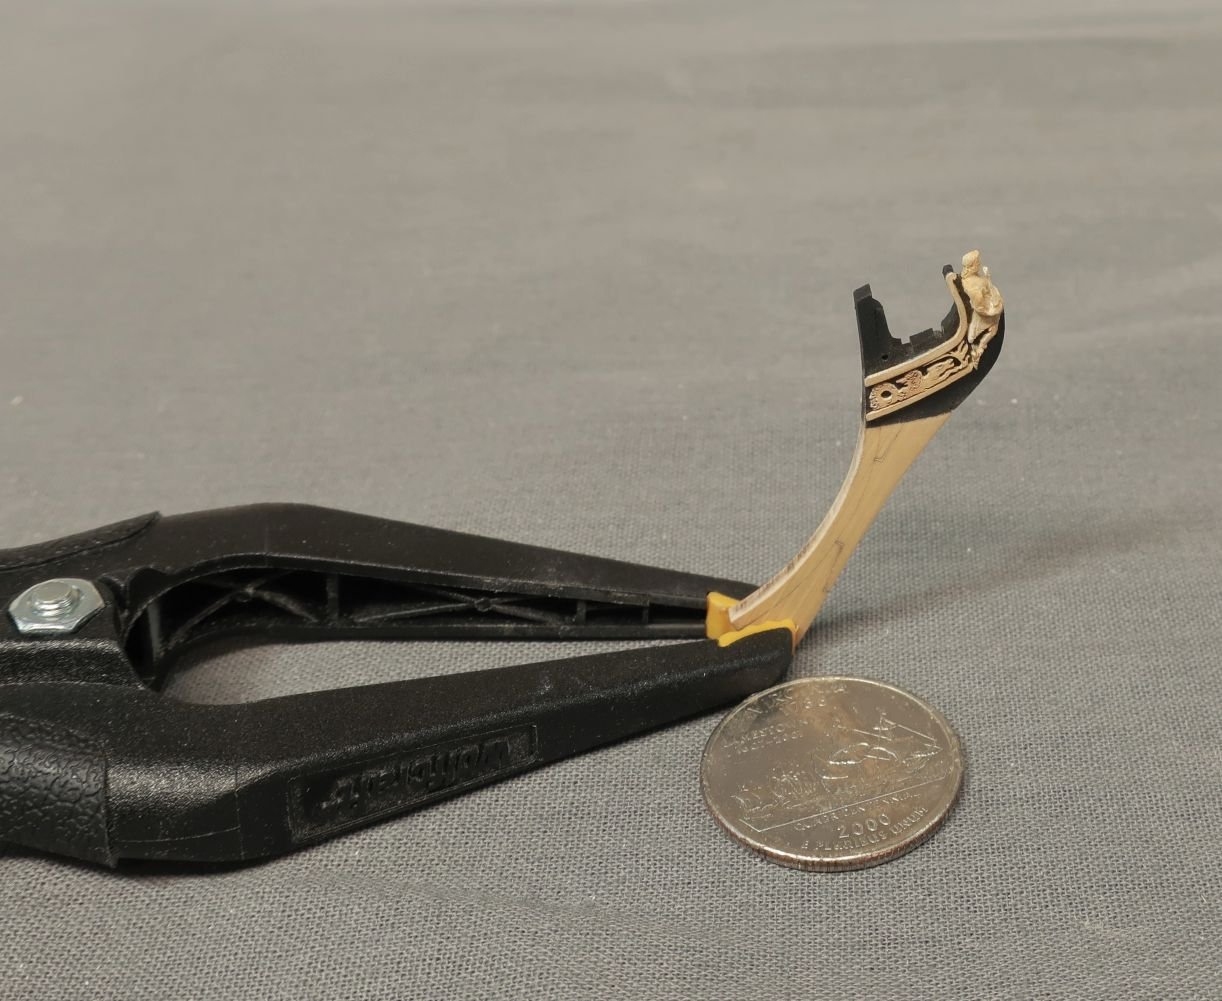
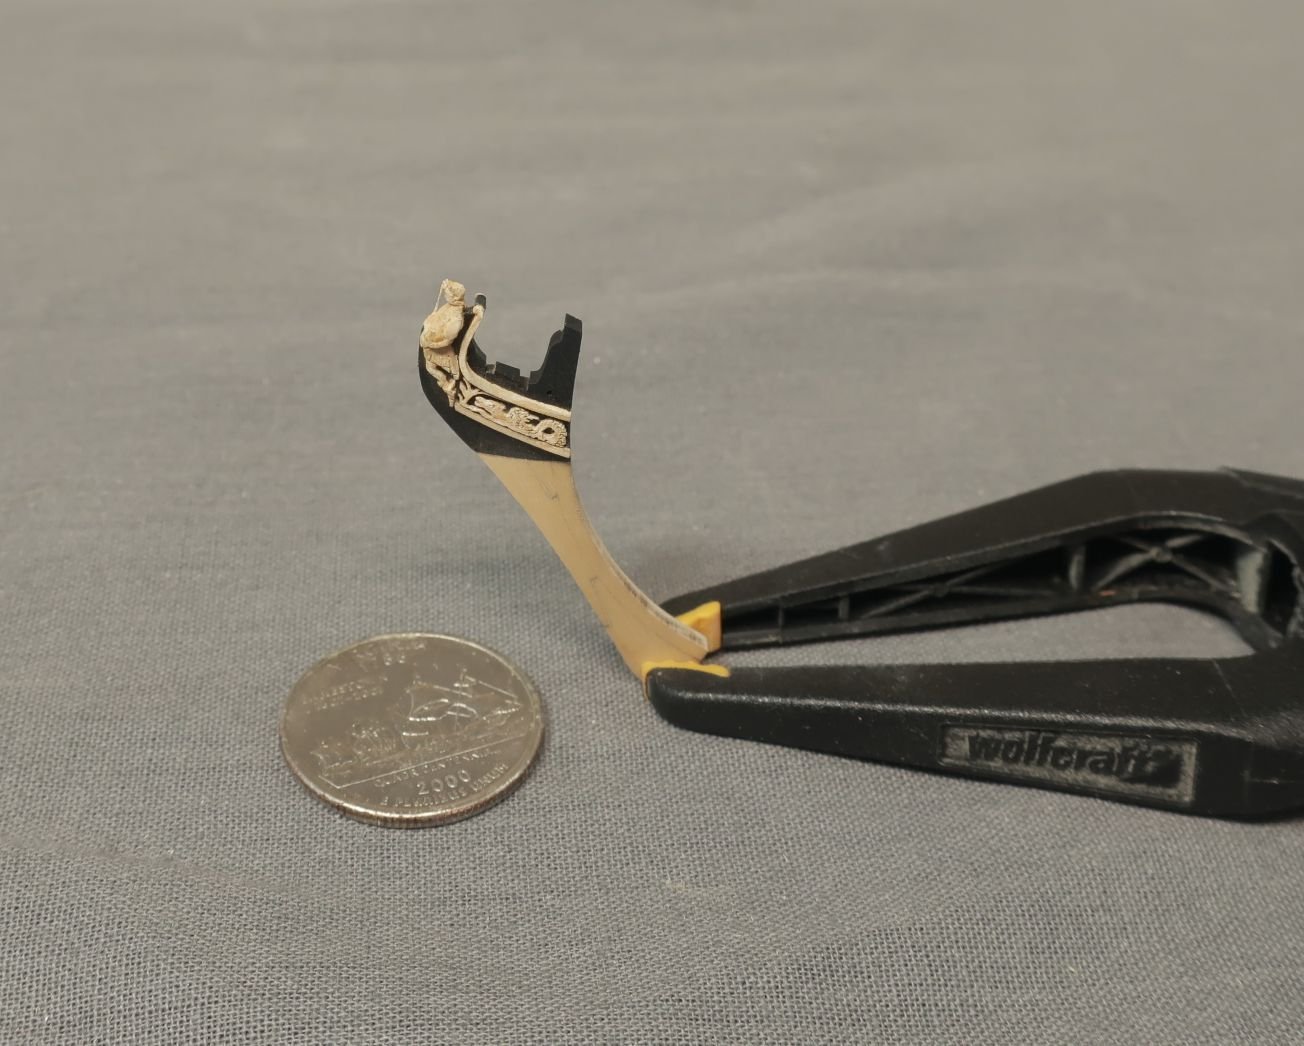
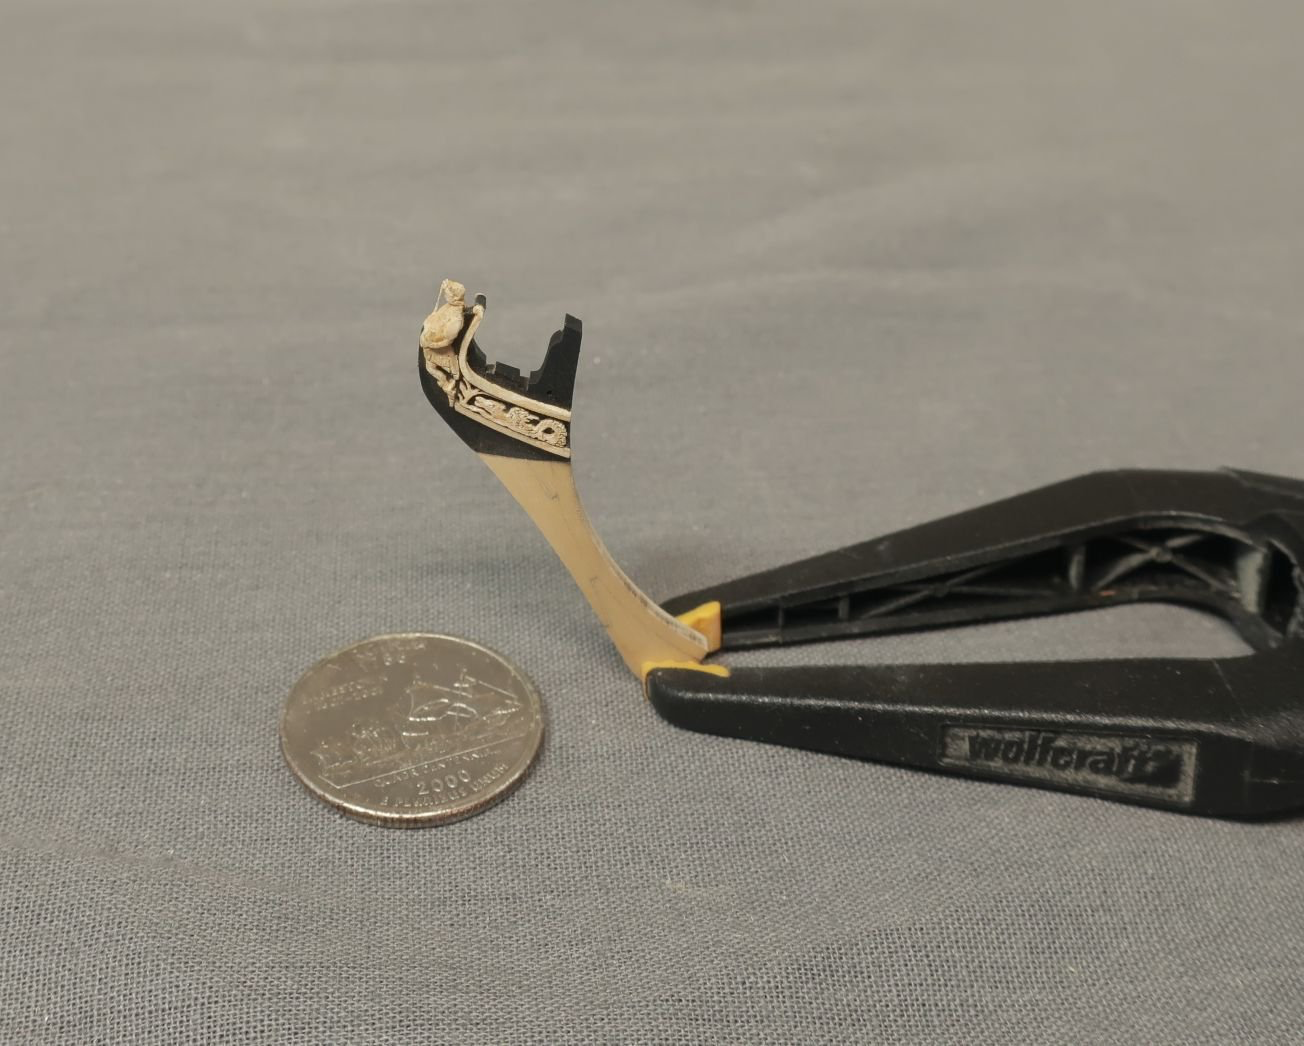
Greg must have a sixth sense. I started building a mini Speedwell just for fun alongside the big one. How could I not after seeing Phillip Reed’s 1/16” scale Speedwell. its not 1/16” scale. Mine will be 3/32” scale. I had no intention of selling it as a kit but as I just mentioned in my log…I will if there is enough interest. Here are some pics of the stem and figurehead. I havent started the framing yet because I am waiting to finish the framing on the full size version. The hull will be 7 7/8” long and 1.75” wide unrigged. All the parts on that are laser cut including the figurehead. If there is enough interest I will start another log and detail my journey with it. Working this tiny certainly has its challenges. Its not easy. But it is fun.

- 29 replies
-
- 13
-
-
-
Originally I was gonna make just ten of those mini speedwell kits for a limited edition for joint clubs…if there is enough interest i will not do that. I will choose this other model I have had on the drawing boards. A limited run never to be be made beyond the ten kits for joint clubs. I need to start work on this asap….so this is how I am leaning.
-
If I do this keep in mind that building a miniature is not easy. These scales are harsh on the eyes and the parts are super delicate. The hair brackets are .015thick boxwood. The trailboard carvings are laserboard. This will be a super advanced kit just for the dexterity and light hand you will need. The framing will be very similar to the longboat kit...just much smaller. Frames will have a break-away center. But the mid-ship frames will be only 1 3/4"wide. The hull will be 7 7/8" long and the breath will be 1.75". mid ship frame below… My original intent was to just build this mini for fun...and then it morphed into making a limited run of ten kits to give away at next years joint clubs. Our New Jersey club is hosting next year. I may still do that. But if I do make them for joint clubs I will have switch gears and just work on the mini for a while. One year isnt exactly a huge amount of time. But if there is broader interest I will just work both together and think of something else for next year's joint clubs show. so if there s any interest please let me know so I can plan ahead.
-
Thanks Ben... No progress on the 3/8" scale model. But hopefully this weekend. There was another topic started elsewhere on the forum about interest in building models like those by Phillip Reed. I always thought considering such sorcery was beyond comprehension. But I must admit that anyone who has built Speedwell or is thinking about it, probably has come across the photos of her as built by Phillip Reed. It is just a superb model. Its 1/16" scale. Madness indeed. I thought building her at 1/4" scale like Greg was crazy. But you always wonder if you can do something like that. When I started on the 3/8" scale version I couldnt help myself. So I have been clandestine and also drafting plans for a mini Speedwell. I am not crazy enough to build it at 1/16" scale like Mr. Reed. That model has a hull about 6" long. But I did reduce my Speedwell drafts and framing plans to 25% of the the 3/8" scale version. This makes a 3/32" scale Speedwell which is still absurd. The hull is about 8". I havent started cutting parts yet but I have been working on a fun side project. Just to see how viable it is. Keep in mind I dont have a 3d printed set of carvings. Chris is going to try and print them at this tiny scale but I doubt it will be possible. The carvings are tiny at 3/8" and reduced to this fun Phil Reed scale the figurehead is just 7/16" tall. But this is what I have been playing around with....all parts including the figurehead are laser cut. Most from Boxwood except the trailboard carvings which are laserboard. You can see it in comparison to the regular sized model. The plan in the back is also at 3/32"scale. I am not sure I will continue but I may do so and Chris is going to run some tests on the 3d prints. But the laser cut parts for the trailboard came out great with just the laser cutter. The figurehead is laser cut in five layers...the first center layer is integrated into the stem. Then you build up layers on either side to make the figure fully rounded. You just round off the edges of each layer and do a bit a shaping. It doesnt have to be precise. At this scale all you need is a suggestion of detail. The staff is a length of 30 gauge wire with some paper wings glued on top. Really tiny paper wings. Anyway...if there is interest in such a thing let me know and I will continue working the small one as well. Chuck