HOLIDAY DONATION DRIVE - SUPPORT MSW - DO YOUR PART TO KEEP THIS GREAT FORUM GOING! (Only 13 donations so far - C'mon guys!)
×


Chuck
-
Posts
9,660 -
Joined
-
Last visited
Content Type
Profiles
Forums
Gallery
Events
Everything posted by Chuck
-
 Such a beautiful Cheerful model. Looks fantastic.
- 113 replies
-
- 1
-

-
- Cheerful
- Syren Ship Model Company
- (and 1 more)
-
Actually I do very much. Problem solving a design concept is just as much fun for me. Its like solving any puzzle game. Although I dont know if folks building my designs would agree. I think they might be uttering some words as they try and build some of it, but hopefully the results speak for themselves once its all put together. Some of the solutions can be quite challenging. But I think they are also great teaching tools when it comes to other projects folks might work on when similar puzzles present themselves. We shall see when Mike and Rusty start getting into the framing of this if it all works out like it did in my head. LOL
-
Looking lovely.
-
Not really…I have been contemplating different POF design concepts for a while. So this is just a great subject to test those concepts out on. In fact, now that the hull framing is almost complete, it is pretty much just like any other project. Although I have some new ideas for certain features I want to try as well as some new materials I may test on the Speedwell. Its all about having fun with the design. The biggest challenge for this project will be later…when it comes time to mfg it. There are so many parts to make.
-
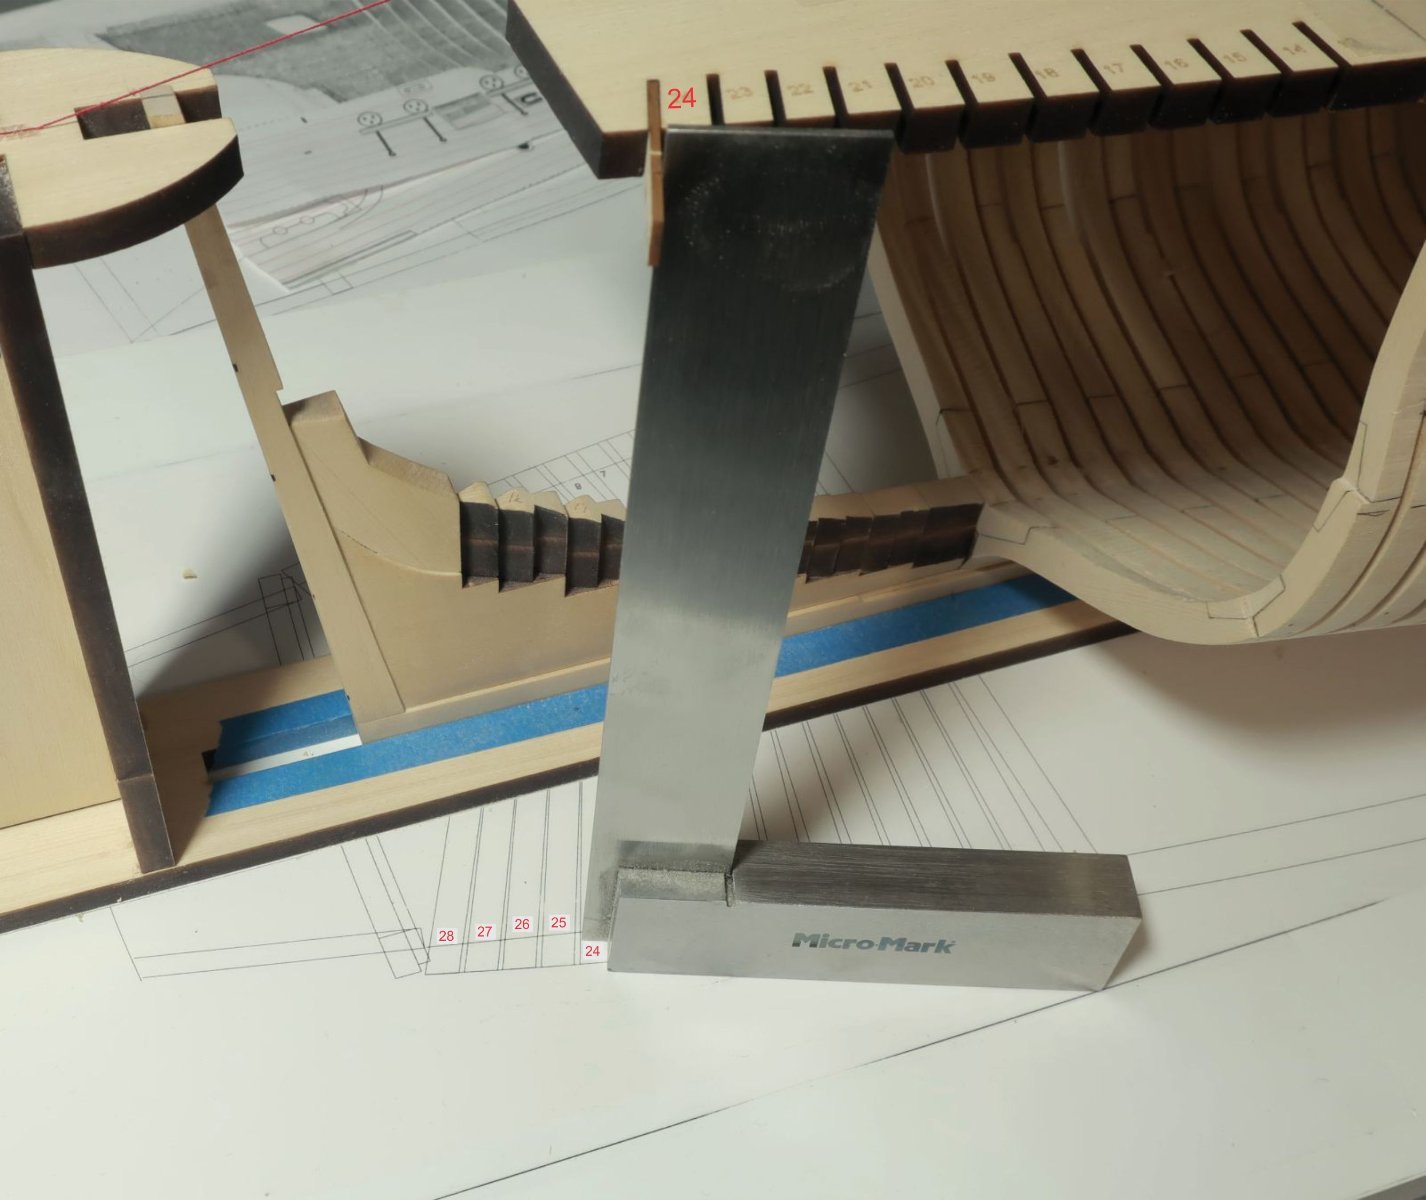
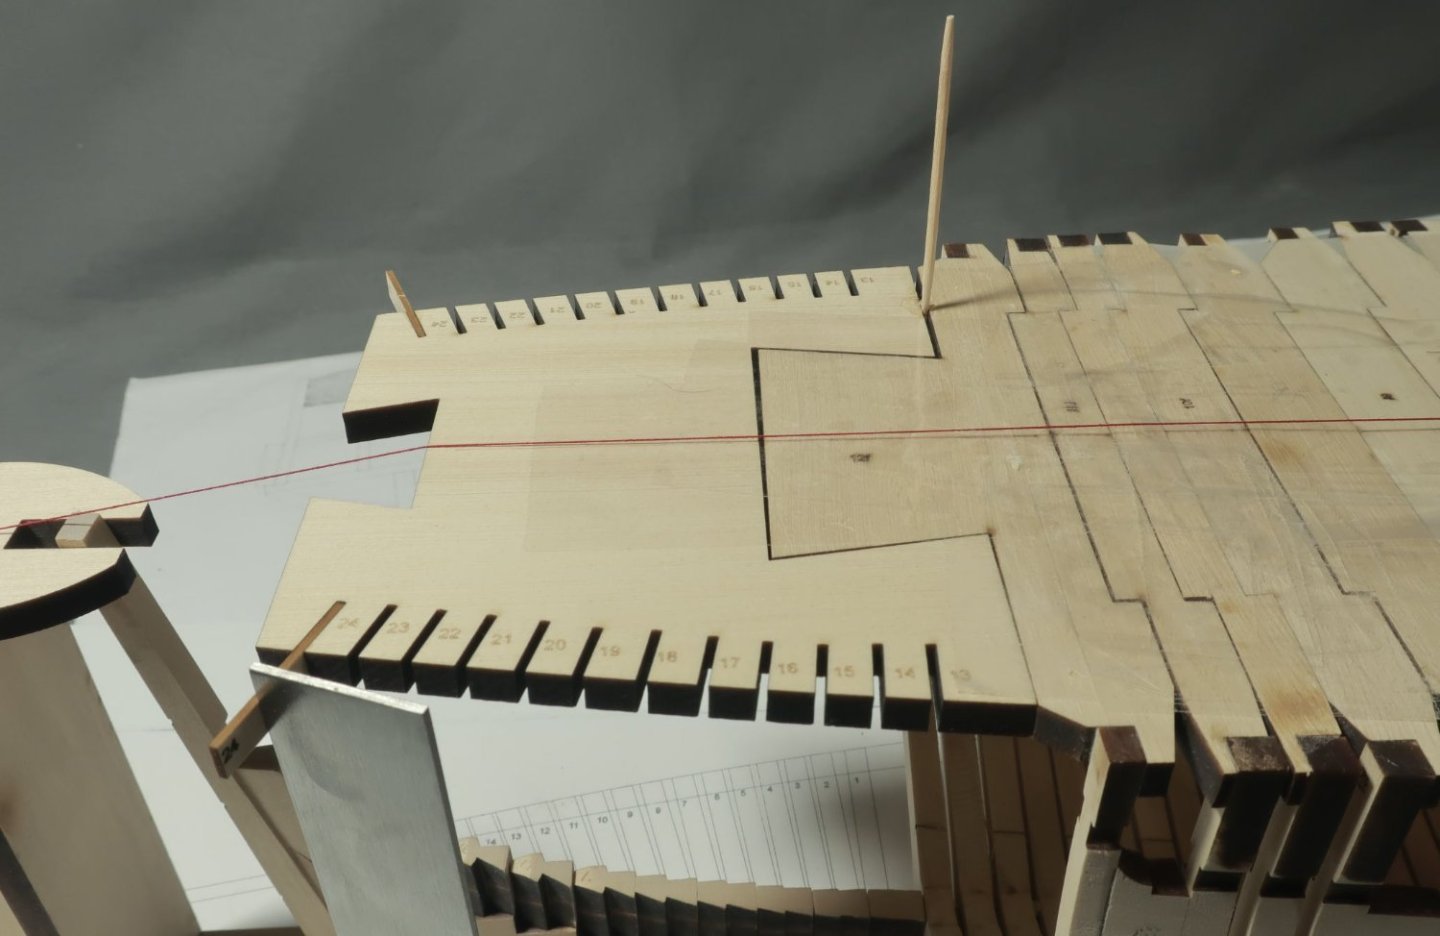
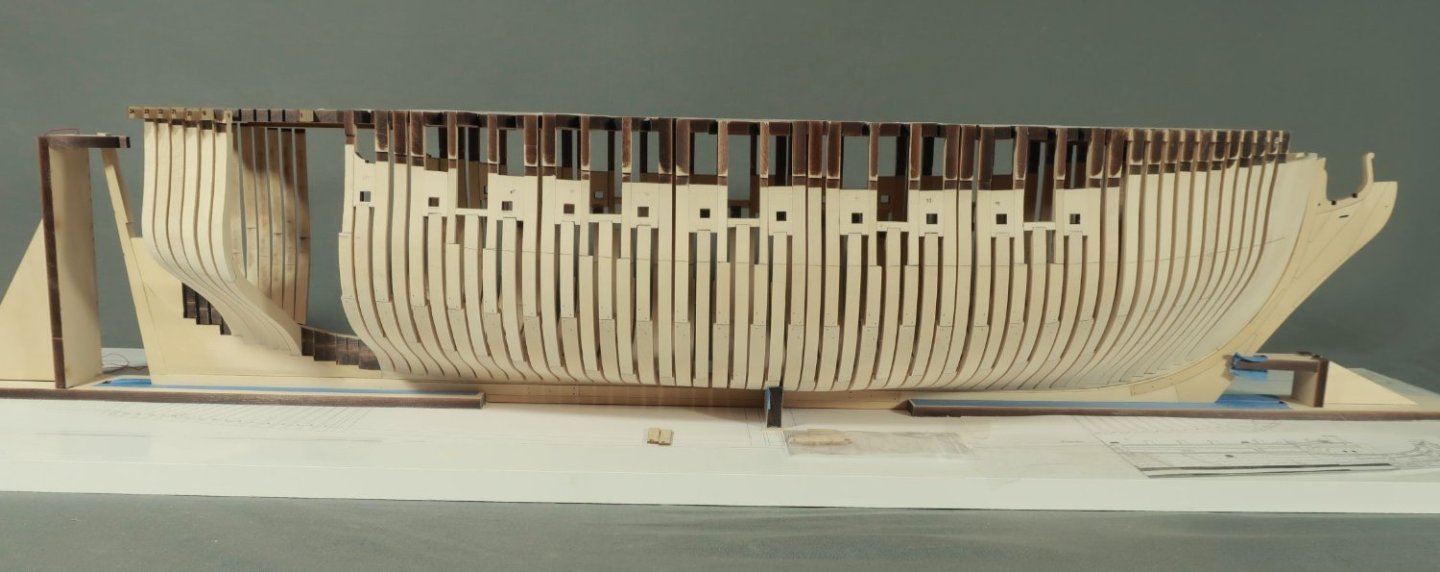
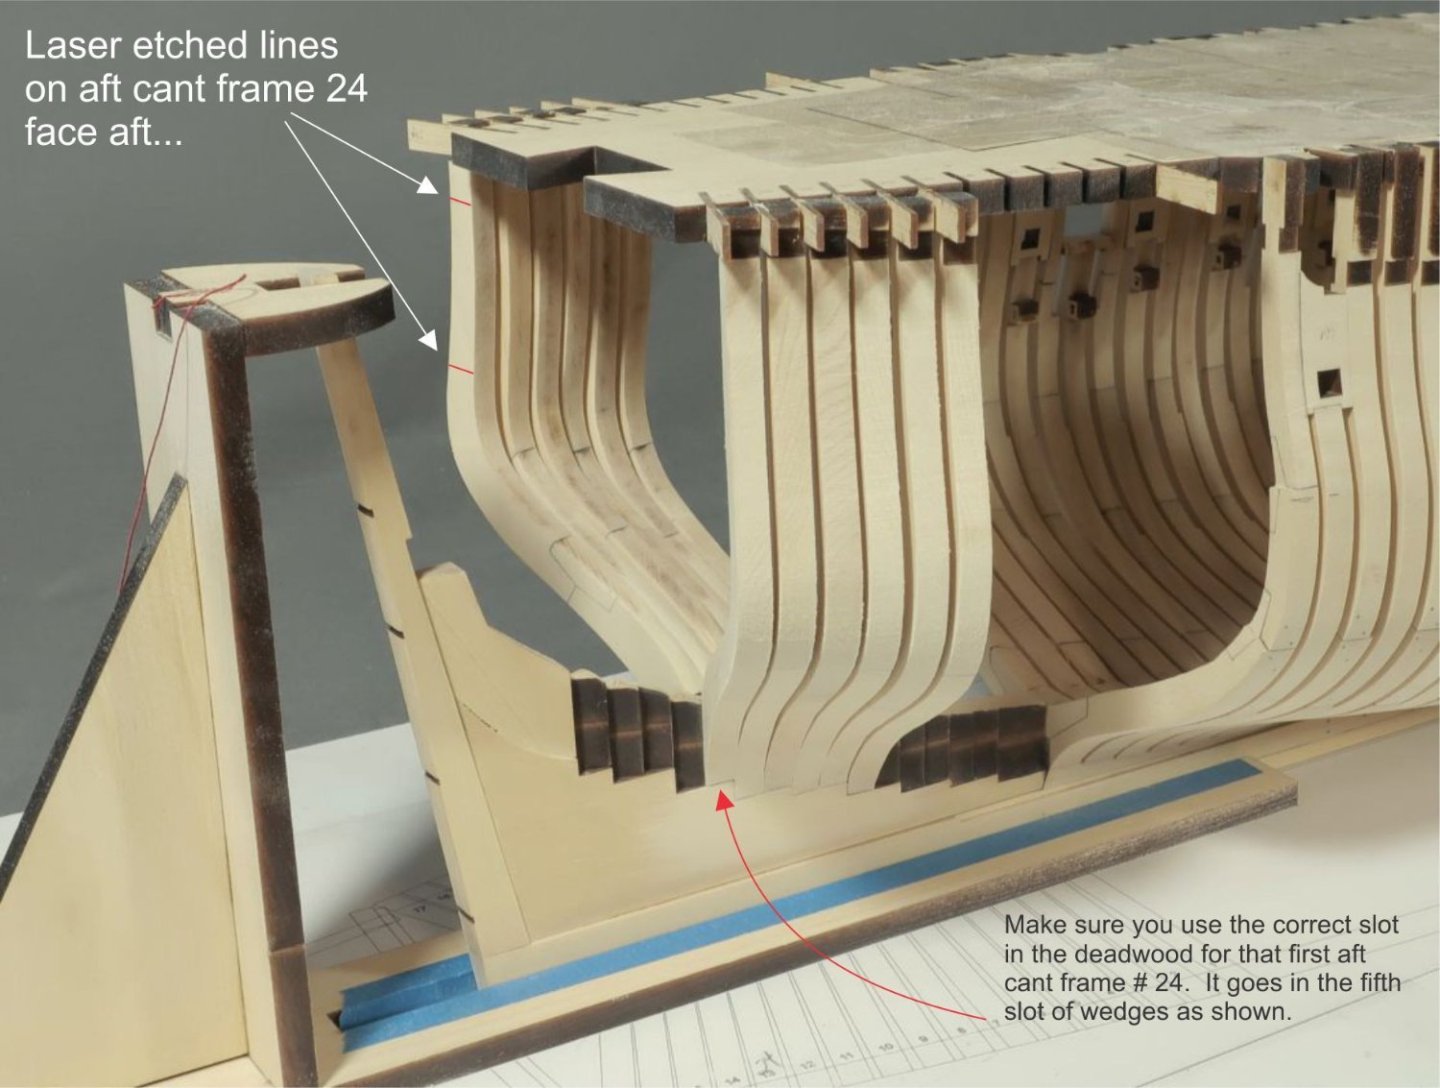
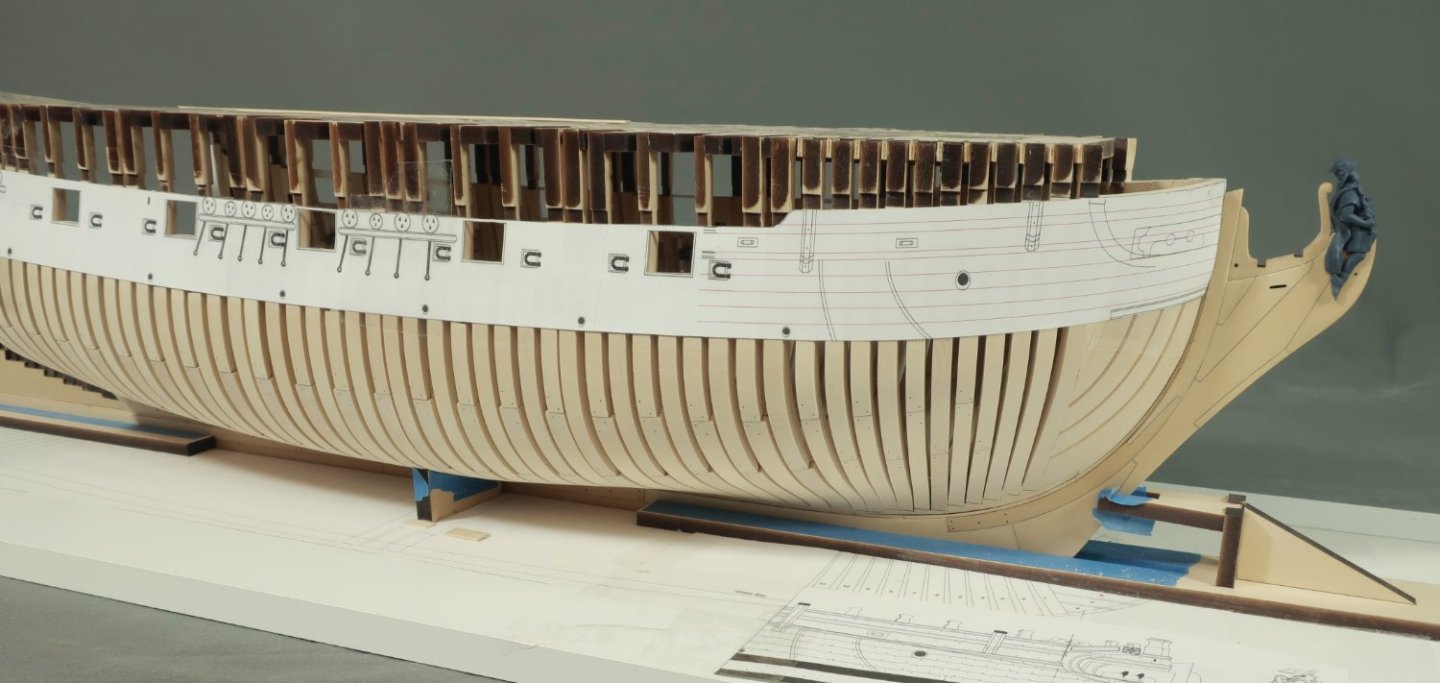
Work continues. Started on the aft cant frames. The first thing that needed to be done was to add the aft cant frame jig. This is added the exact same way as the fore cant frame jig. Glue the small laser cut square under the last cross beam. Then add the jig. The jig like all the cross bars are not glued. They are just taped together. That works very well. Make sure to line up the jig with your center line thread. You have the etched reference lines on the cross jigs to do so. But you will notice I also added the small cant frame strip for our first cant frame. That is aft cant frame 24. It is the last slot in the jig. You will need to line up the forward edge with the same mark on your base board plan. Lining up this jig so your cant frames are even on both sides is very important. As is making sure all your square frames were perpendicular to the keel and the same height etc, and all follow the center line. If for any reason you need to tweak this jig or any of the others, I have left some wiggle room. Do that before taping. In fact, if I didnt mention this little tip before, you can just add a toothpick as a shim on one side to adjust the aft jig until l you are back on the center line and your cant frames all line up with the base board plan. This is a neat trick you can use with any of the cross bar spacers for the square frames as well. It works really well to keep you on that center line. I exaggerated in this photo so you can see how to adjust any of them. Lining up the strip with the baseboard plan below... Then just like the fore cant frames are started working my forward after assembling each cant frame. They are made in two pieces. I have added six working my way forward. But now I will switch directions and start working from the other end of the jig for the next six. More pictures will follow when I get that done. Note how two laser etched lines on that last cant frame 24 face aft. Shown in red. That is important because we will need those to line up our some pieces later. Also not how the first aft cant frame on the jig I added, that same number 24...you have to make sure you place it in the correct deadwood slot. This is what the hull looks like at the moment. I will work on the remaining aft cant frames this weekend. Im getting close to completing all the hull framing. It wont be long now.

-
You dont have enough posts to sell stuff yet. Folks need to get to know you first and you must be a member in good standing. You must have at least 25 posts to sell stuff. This helps us avoid people scammers who just sign up to sell stuff and do little else. Its to protect our members and we have been scammed before so this is what we did to help ensure we actually know who is selling stuff. You only have two posts with none making an introduction in the "welcome" forum so folks can get to know you. Chuck
- 3 replies
-
- 10
-
-

-
Really looking good. Neatly and crisply crafted.
- 642 replies
-
- 2
-
-
- winchelsea
- Syren Ship Model Company
- (and 1 more)
-
Wonderful model and I think you will enjoy Cheerful. In many respects it is an easier build. But just more stuff to do. I cant wait to followalong with your cheerful project.
- 155 replies
-
- 3
-
-
- Medway Longboat
- Syren Ship Model Company
- (and 1 more)
-
Yes indeed, that looks great Eric.
-
That looks great...
-
Lovely photos Ben...cant wait to see more details on either project.
- 399 replies
-
- 2
-
-
- winchelsea
- Syren Ship Model Company
- (and 1 more)
-
Very nice...its time for that build-board. Take a lot of pics because I didnt. This way folks can see how that is made and all lined up. Then its onto the frames.
-
Yes that wont work at all. I will absolutely do so. Once I put the final touches on the template I will print both and show them.
-
Dont forget to sort any hull or deck planking by color first so you dont end up having a zebra striped hull. Keep any grainy or dark colored strips for areas that will be painted or not seen.
-
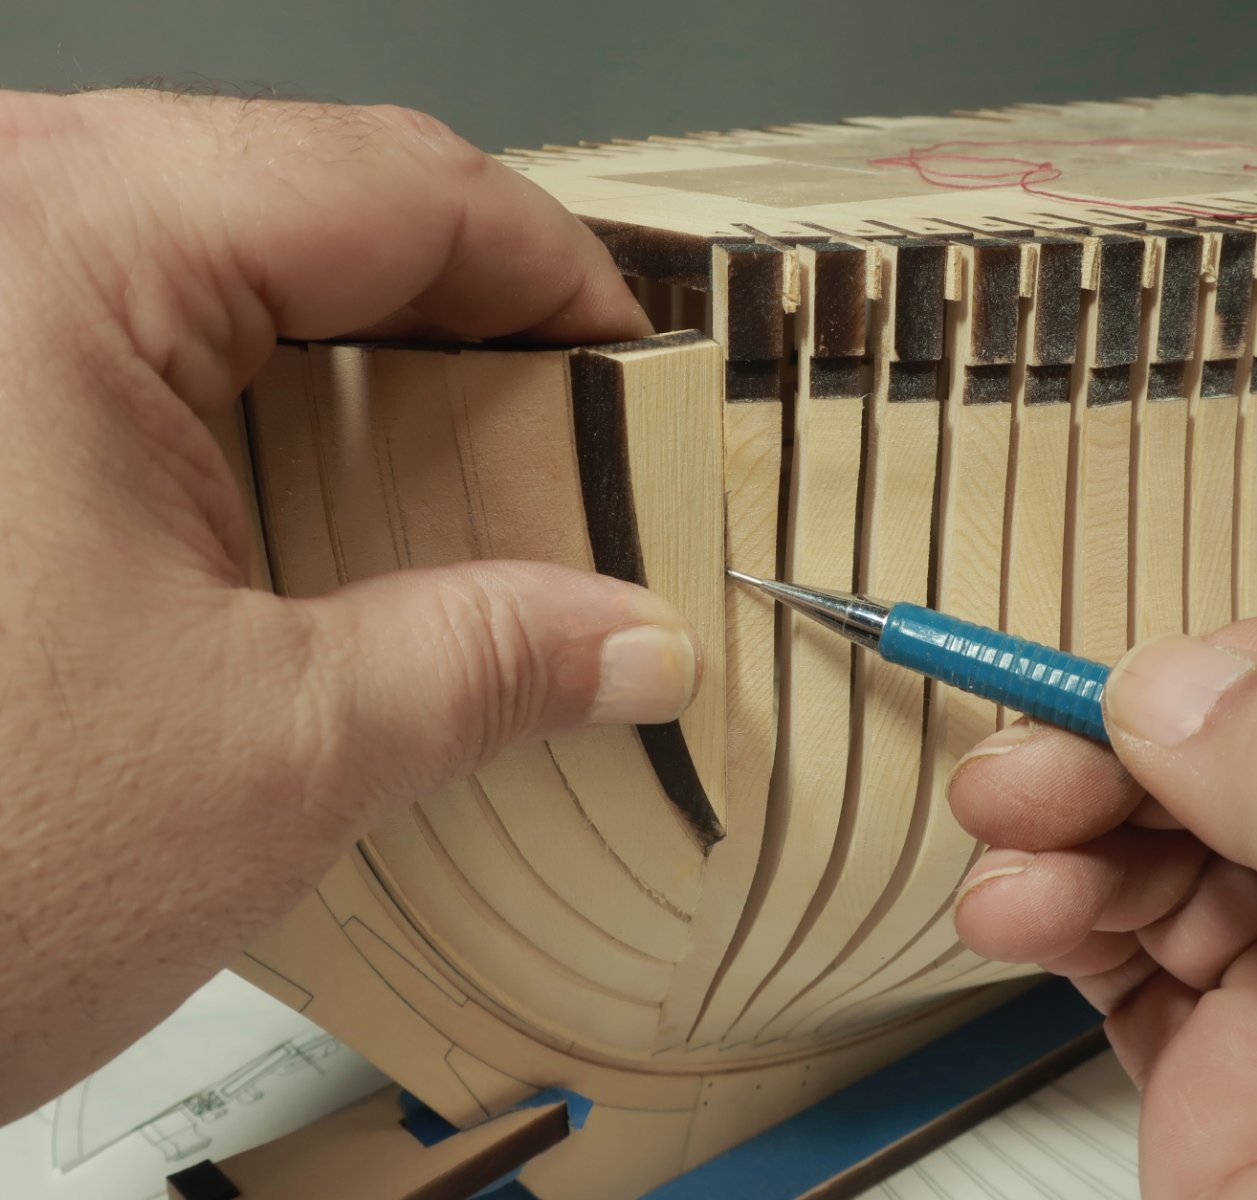
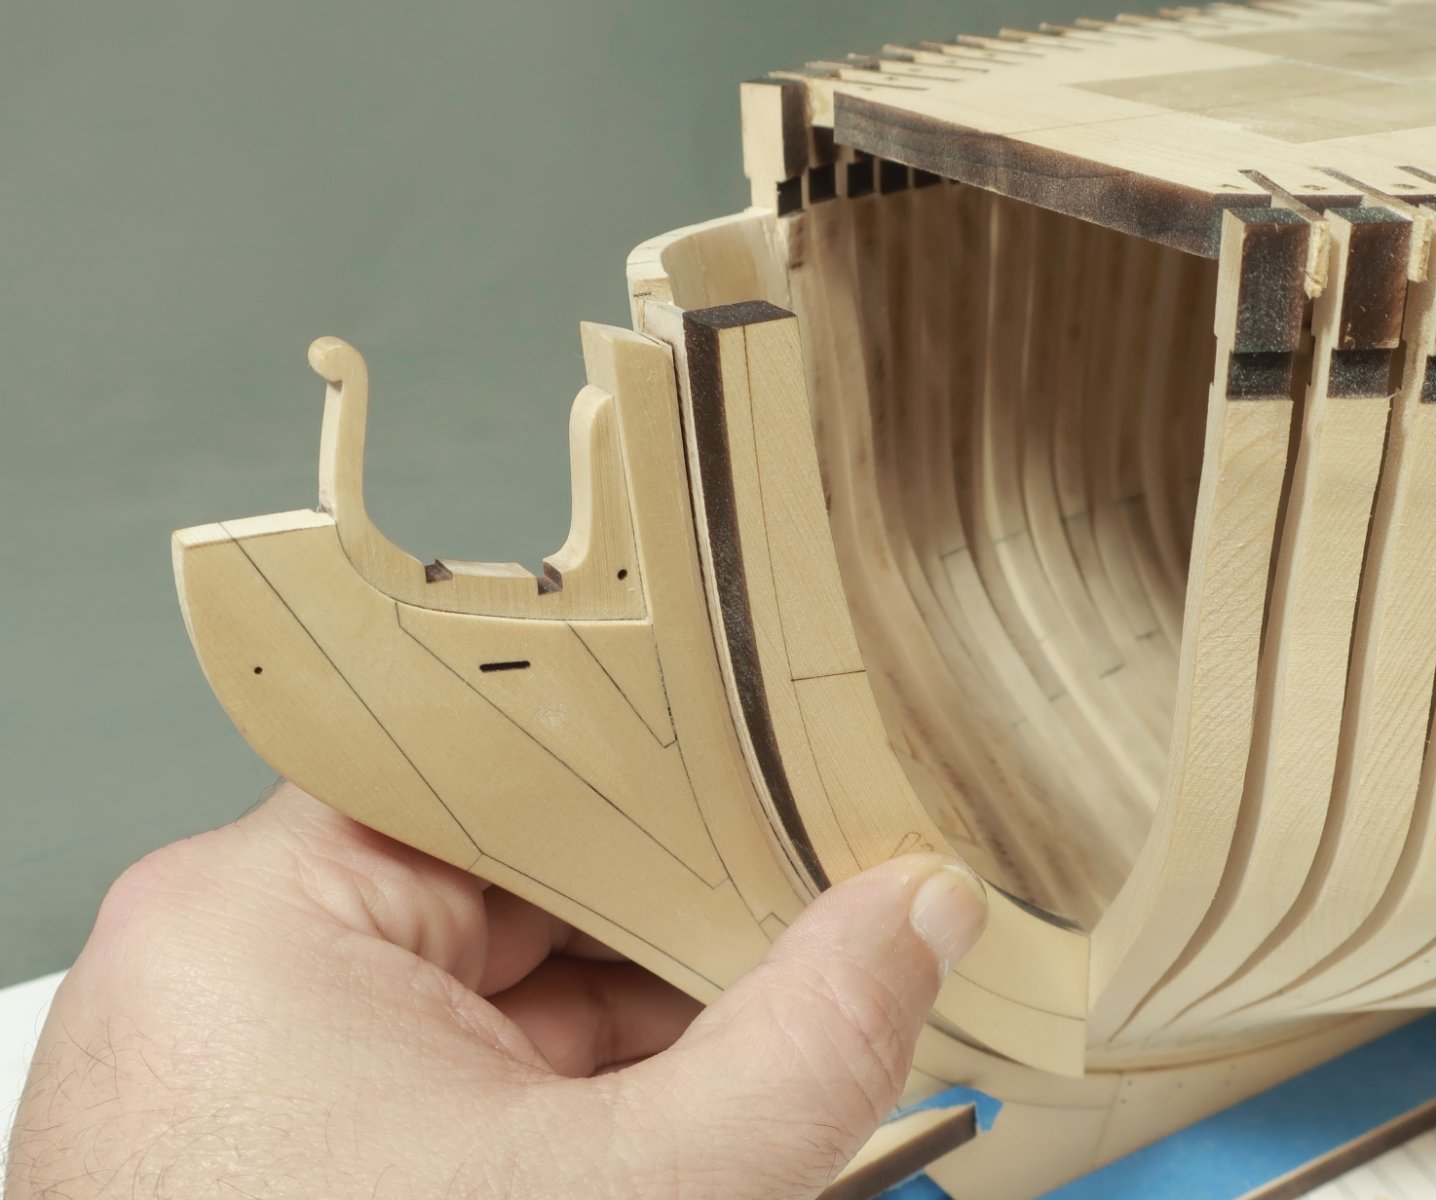
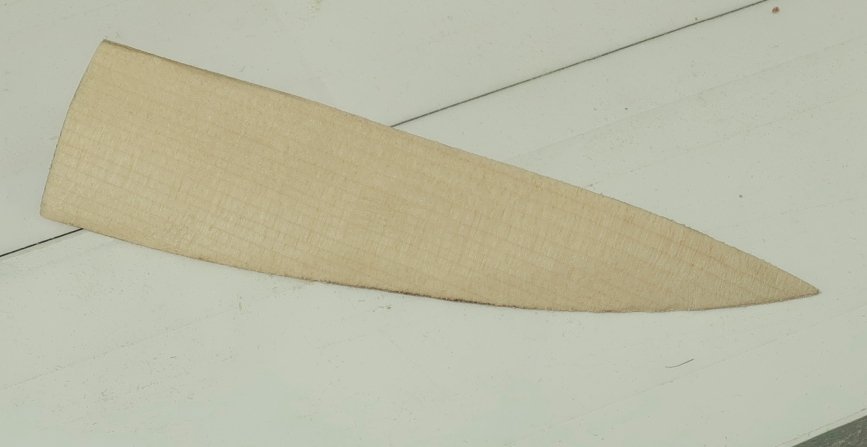
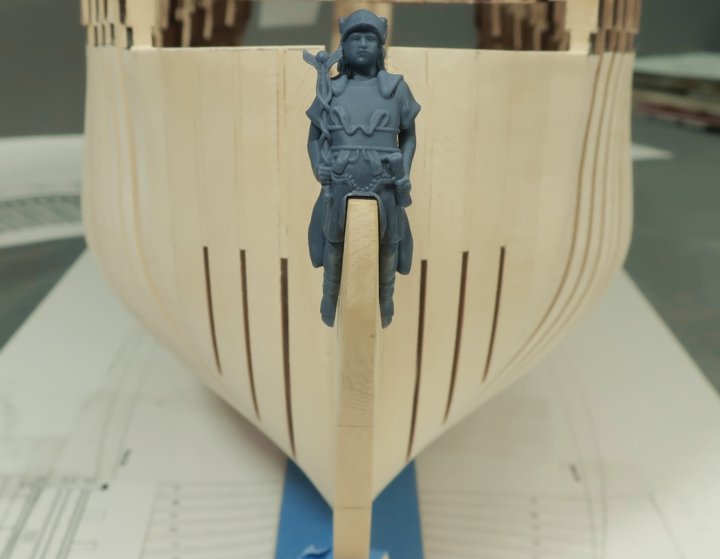
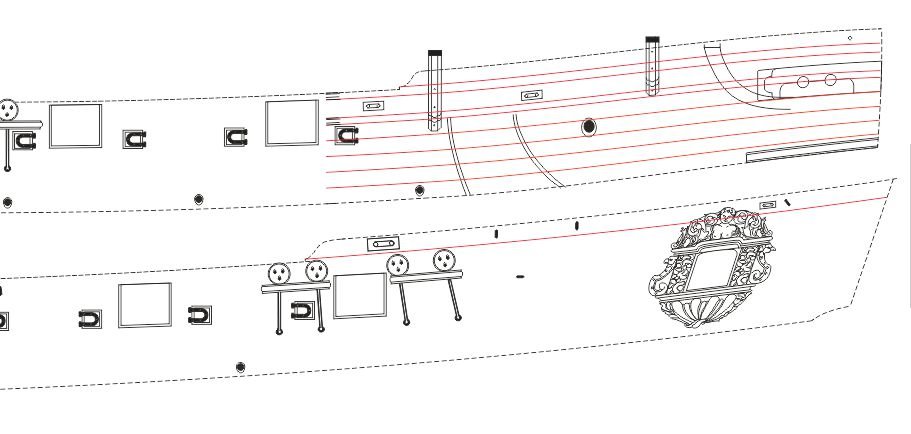
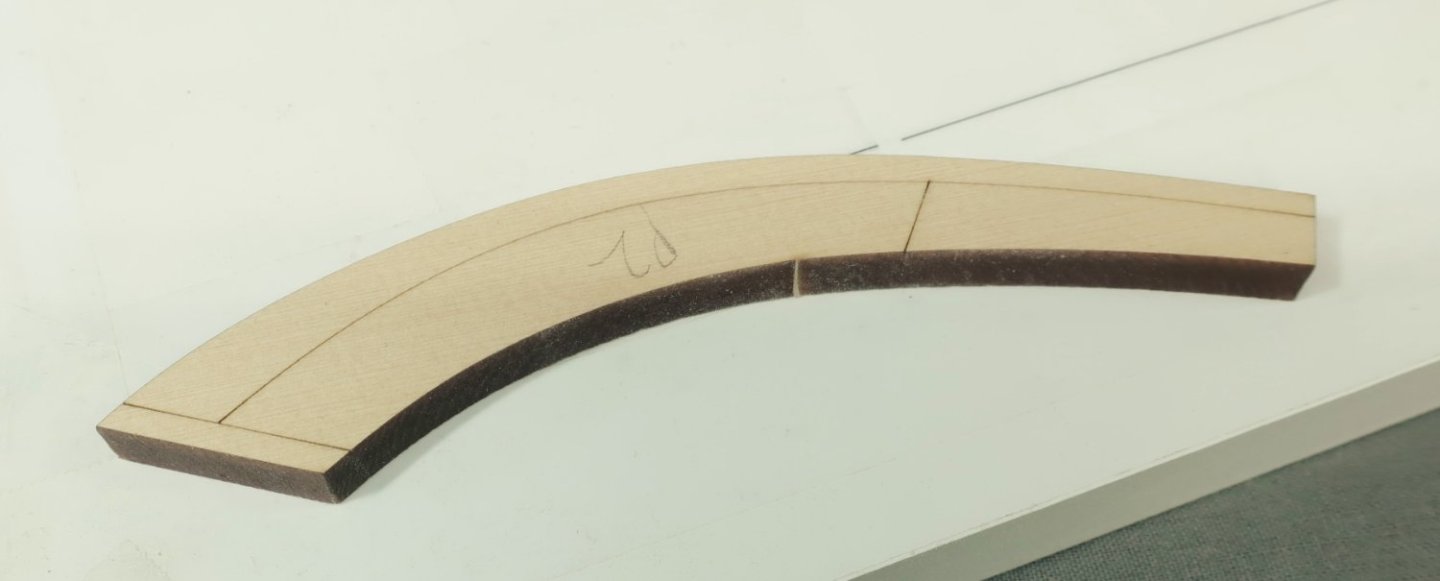
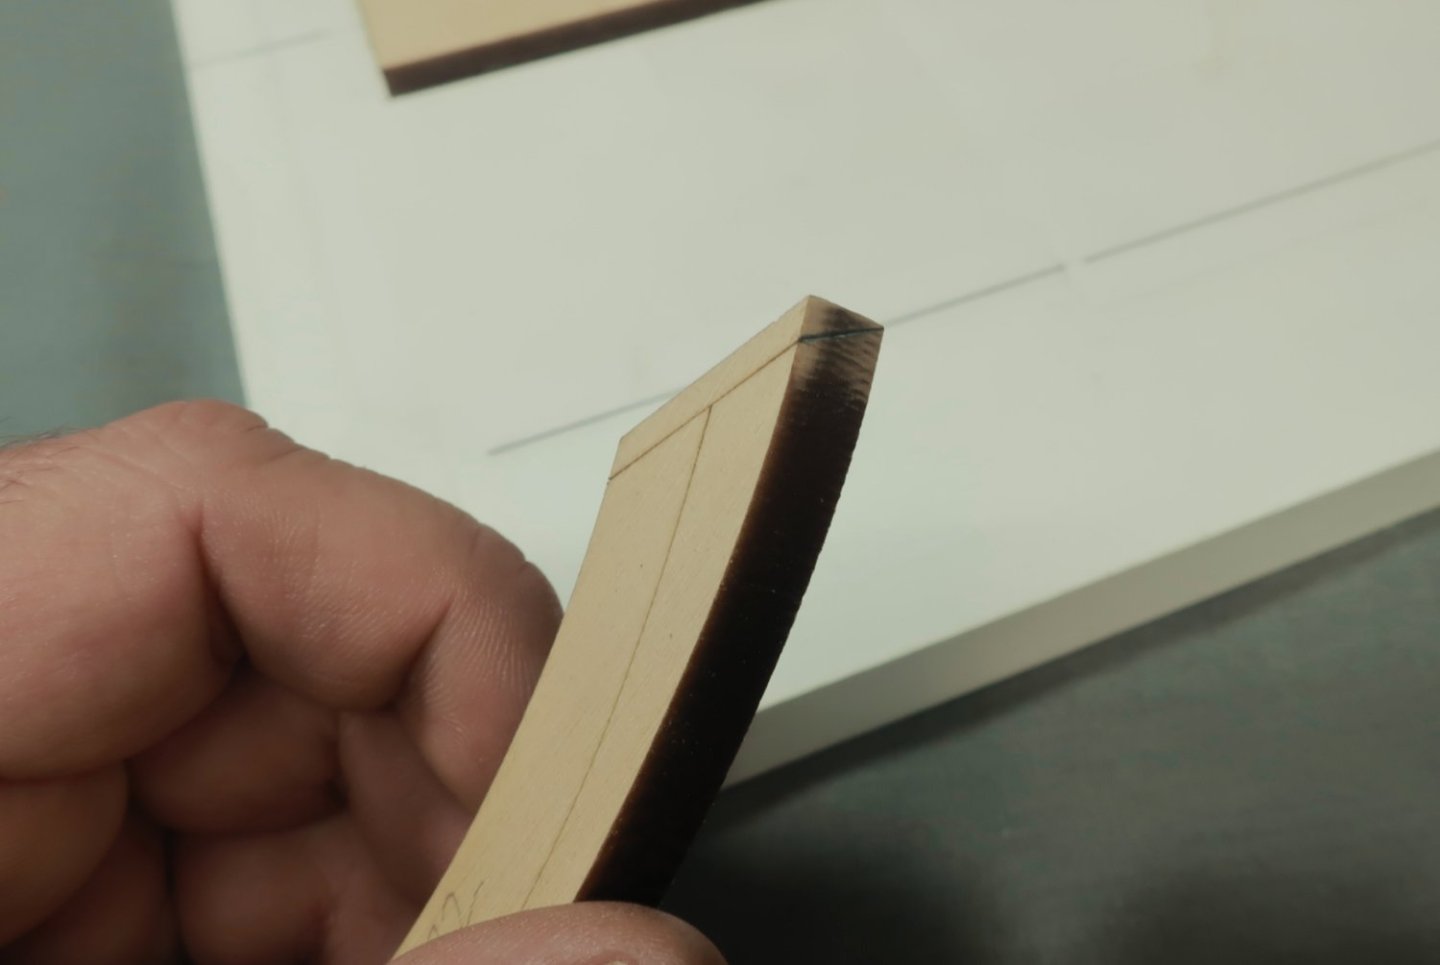
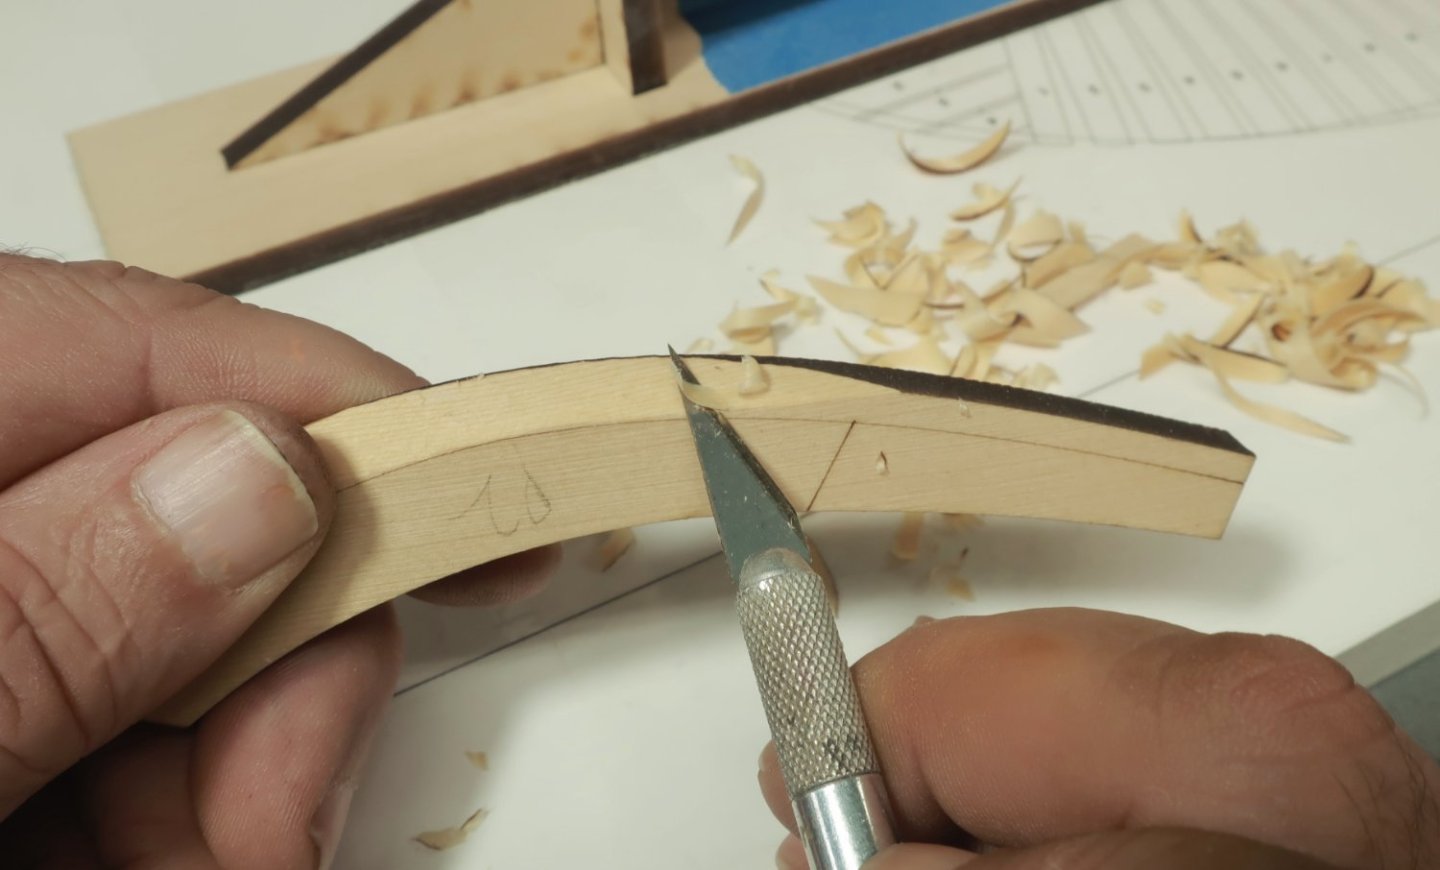
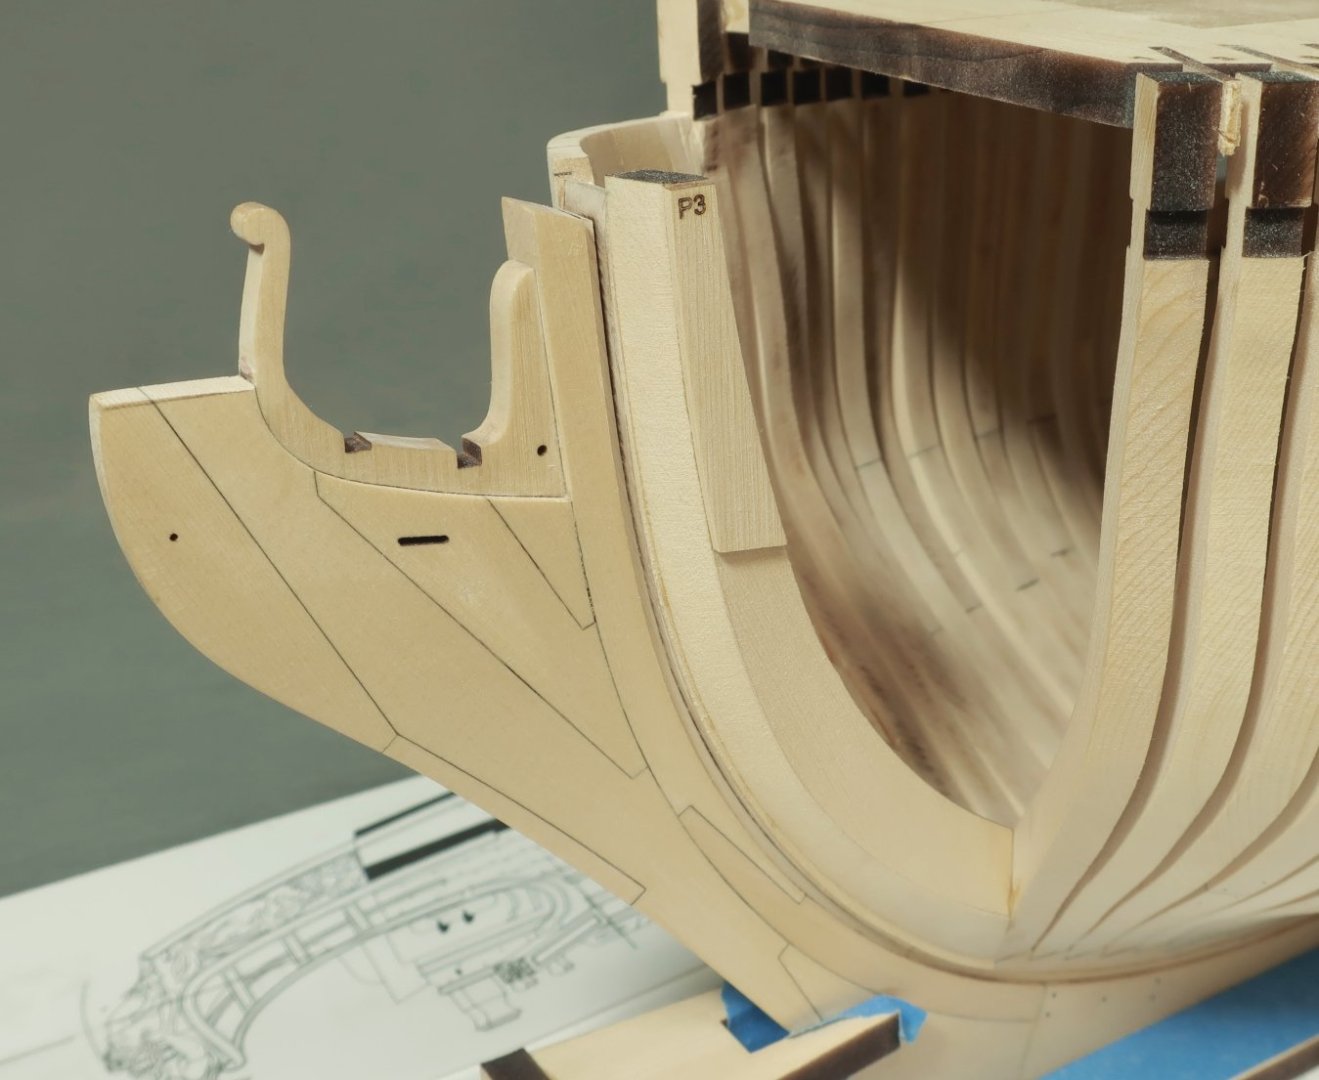
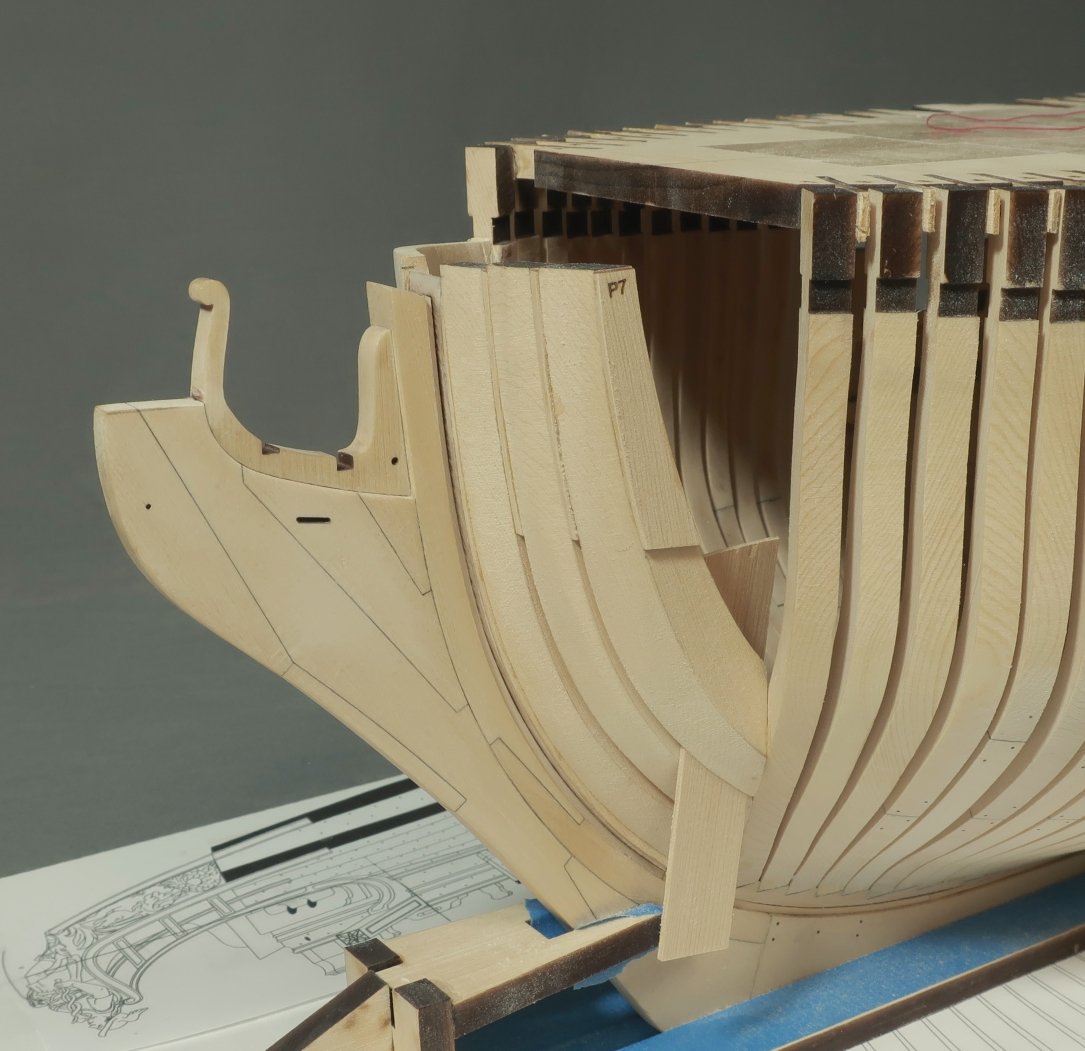
To finish up the bow timbers I had two more to go. The first of those was done exactly like the previous three. But the last one is a bit different. The filler that closes the gap is just a little bit different. Step one is the same. Shape the angle that will fit against the cant frame. No biggie there. There is a laser reference line for that just like the others. But that is the only reference line laser etched. Once shaped to fit against the cant frame, test it on the model. It should fir pretty good. Then you need to take a sharp pencil and draw the next reference line yourself. Just trace the shape of the cant frame edge onto to the filler as shown. This will be your outboard hull reference. Use that line and bevel just as you did in step two for the previous bow timbers. It will look like this when you bevel and clean it up with a sanding stick. You dont have to bevel the inboard edge. We will need to trace that in pencil against the cant frame too. But that is kind of tricky at this stage. Once you take a look inside there you will understand. There really isnt much to bevel inboard actually. It is best to just leave the inboard side as is until after we remove all of the jigs and fair the inboard side later. That will be done after planking. But now you can go ahead and fair the outside bow timbers. Fair them into the cant frames nicely. Use a long batten to check how true and smooth the run of planks will be. You dont want any dips. Dont be afraid to really sand it good with coarse sandpaper first and then switch to a finer grit on your last pass. You will notice that the bow timbers are too high and the tops should be trimmed down to match the sheer. That can be done after fairing outboard. Almost done fairing outboard below. The tops of the bow timbers have been trimmed down as well. How do you know where to trim down the head timbers? Well you could measure up from your build board using the plans. But I decided to take some considerable time to create a template. Its quite an extensive template actually. Basically its an expansion drawing to scale that shows every last detail of the outboard hull fittings. This includes the run of the planks at the bow and all ports....swivel stocks...scuppers and fixed blocks and channels with deadeyes....etc. The bottom of this helpful template represents the top edge of the upper wales. This is in fact how we will transfer the correct lines for the wales later. But you can also use it to check the positions of all ports and also trim down the bow timbers to the sheer. Just make sure you put it on both sides of the hull and have them even. This template lines up at the bow based on the cheeks. You can see on the plans how the upper cheek sits right on top of the upper wales and then transitions onto the stem. You want to line up the cheek on the template where it will transition onto the stem. This is important because you want to have everything line up when we work on the hawse holes and bolsters and headrails. It will make locating everything quite easy I think. I dont believe any other kit or even monograph has such a template and expansion drawing like this. I thought I would try something new. Time to start the aft cant frames...yippie!!! Here is a quick look at the template. When flat the expansion clearly shows the gentle "S" curve at the bow for planking run. I folks have a hard time getting this right so this should be a life-saver. In fact, with all the planks at the bow now shown with their shape and taper this leaves no guesswork at all. When the time comes we will transfer those planking lines to the frames. No tick strips needed. Lining off will be much easier.

-
Beautiful work as always. She looks really spectacular.
-
Very nice Ben. Neatly made little stove.
- 399 replies
-
- 1
-
-
- winchelsea
- Syren Ship Model Company
- (and 1 more)
-
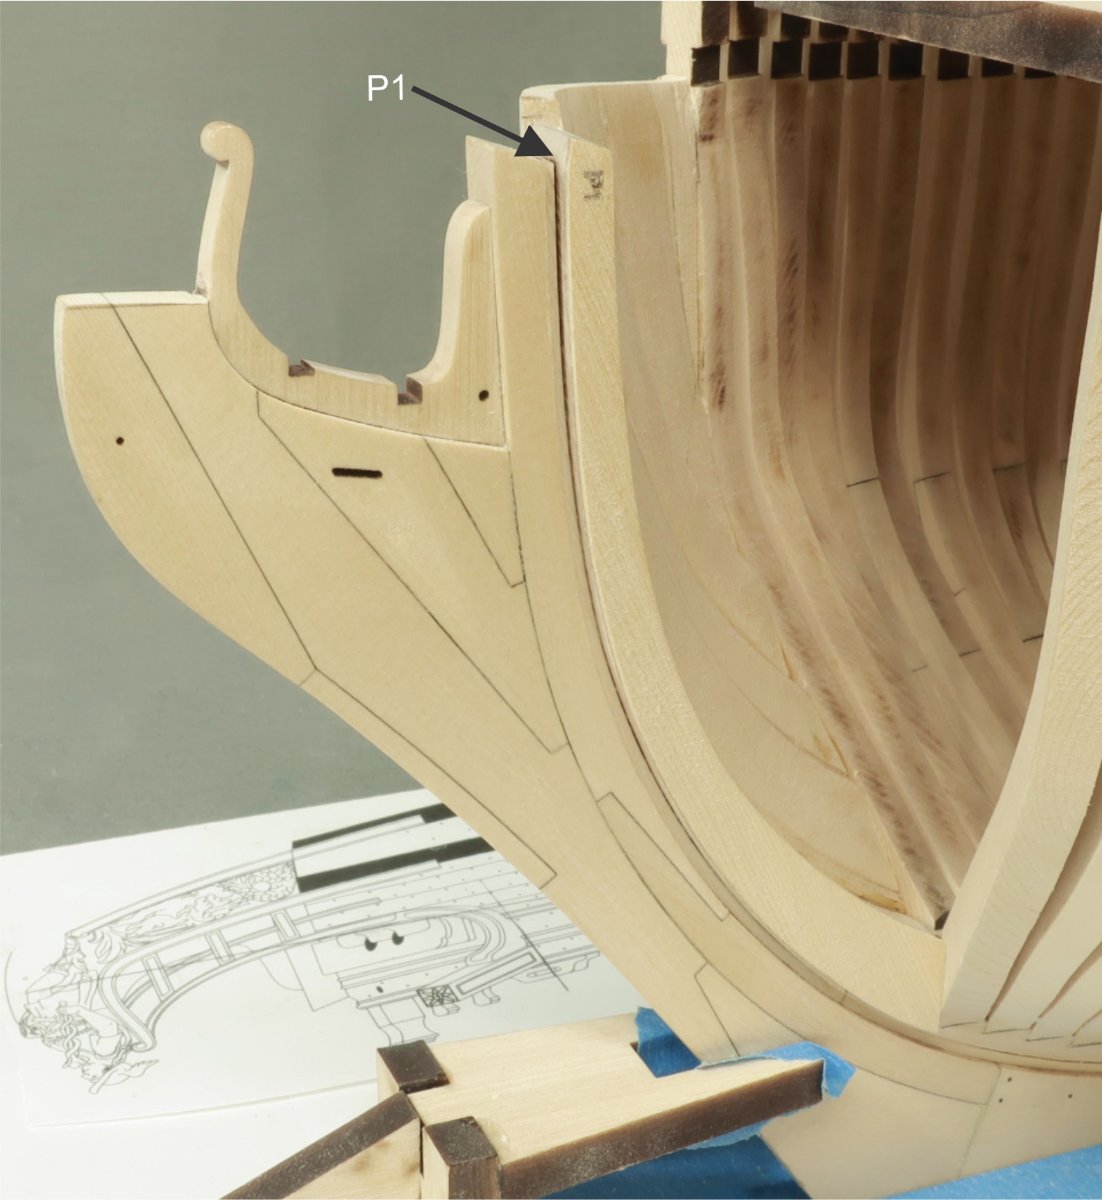
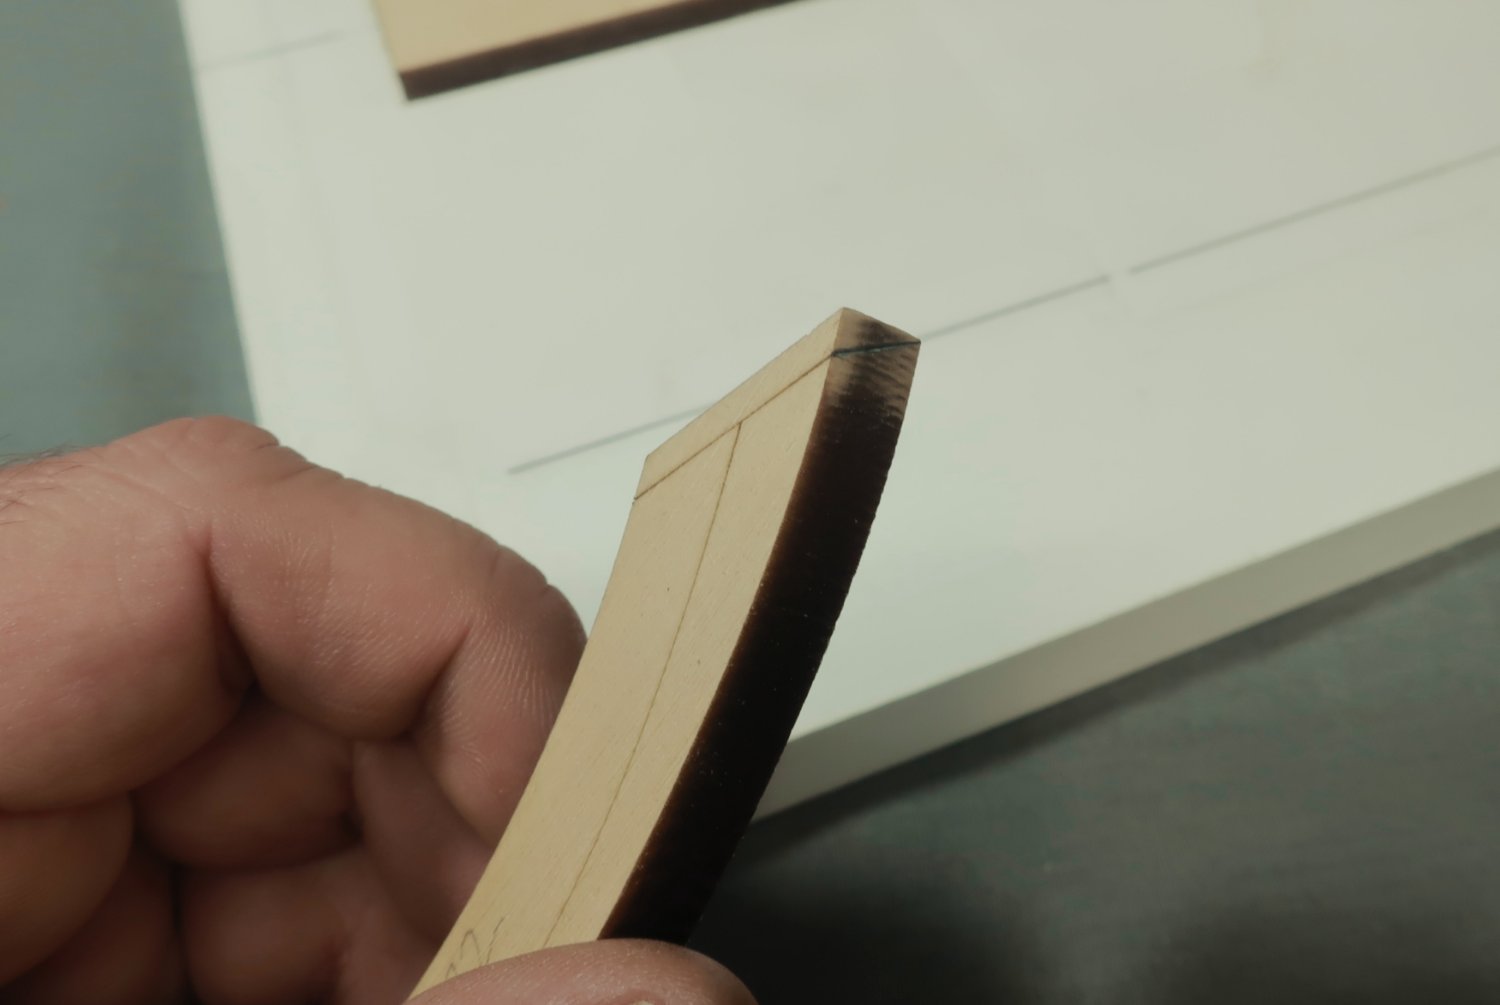
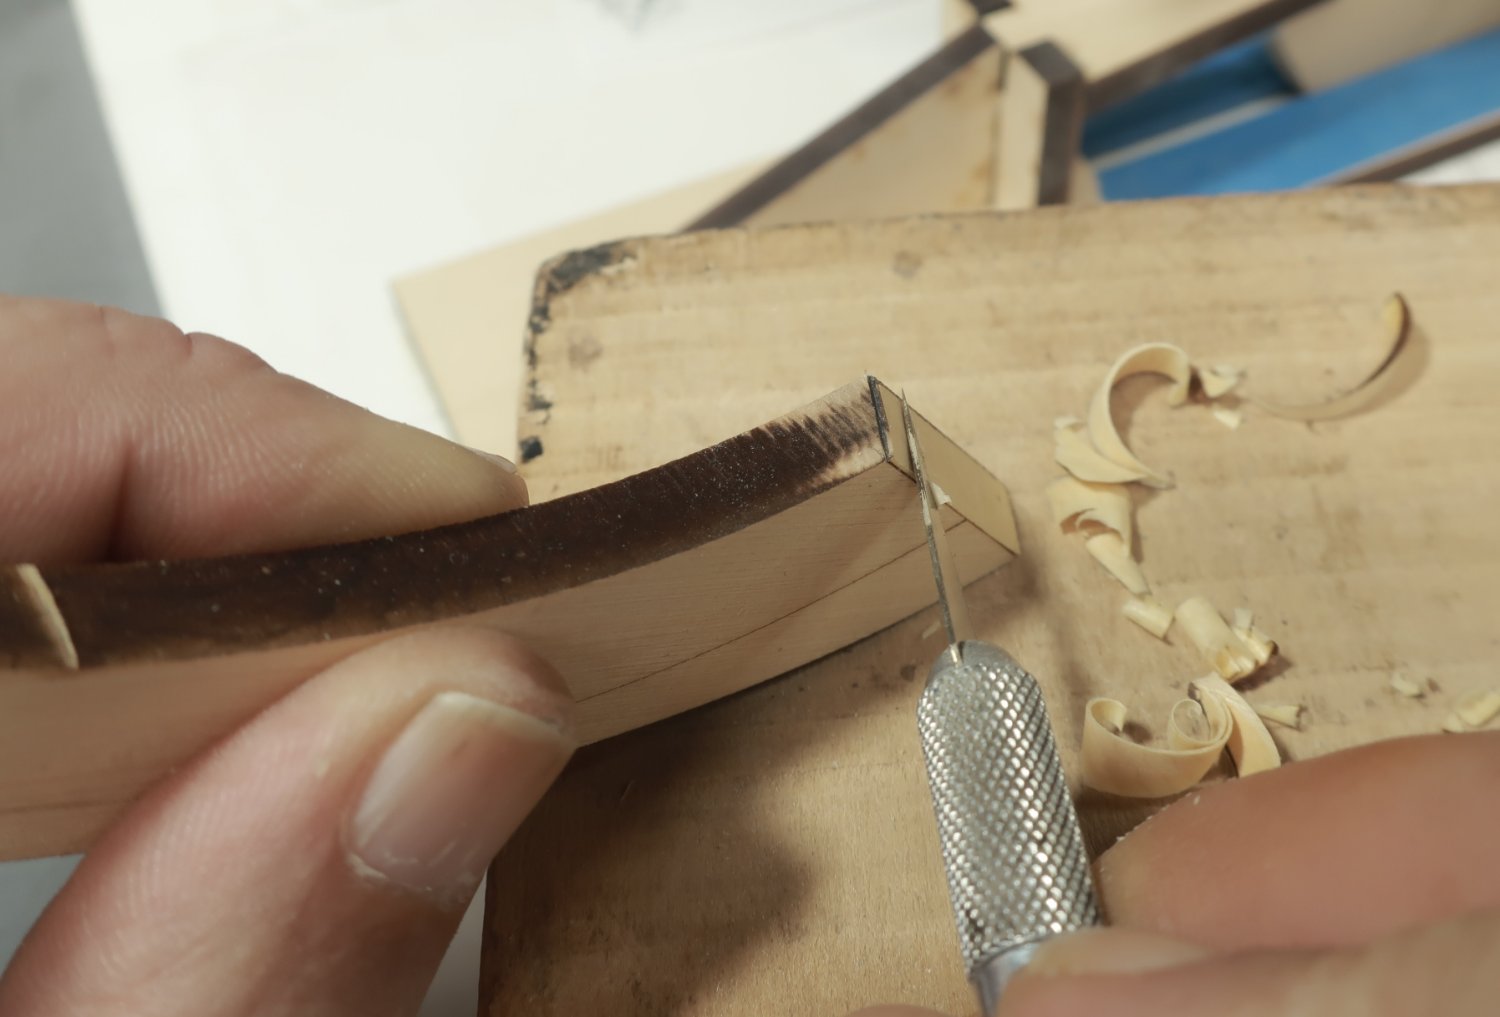
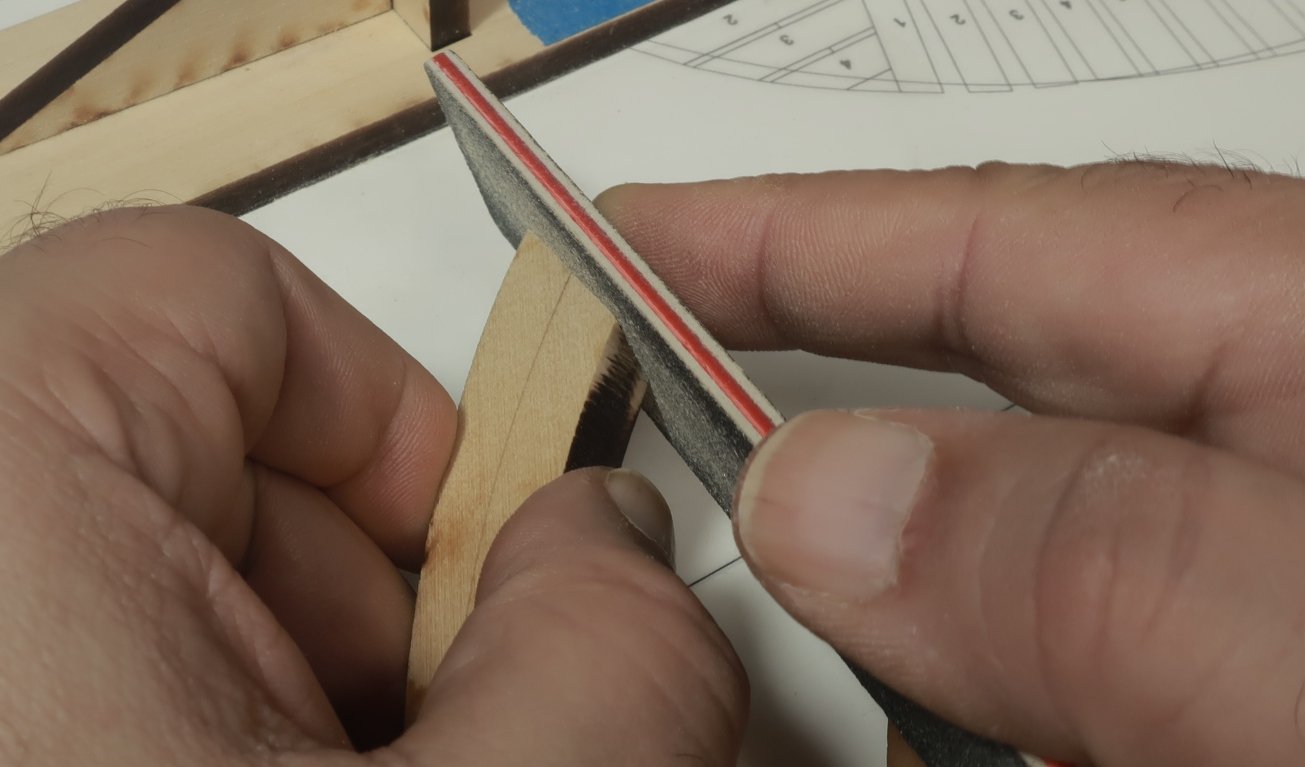
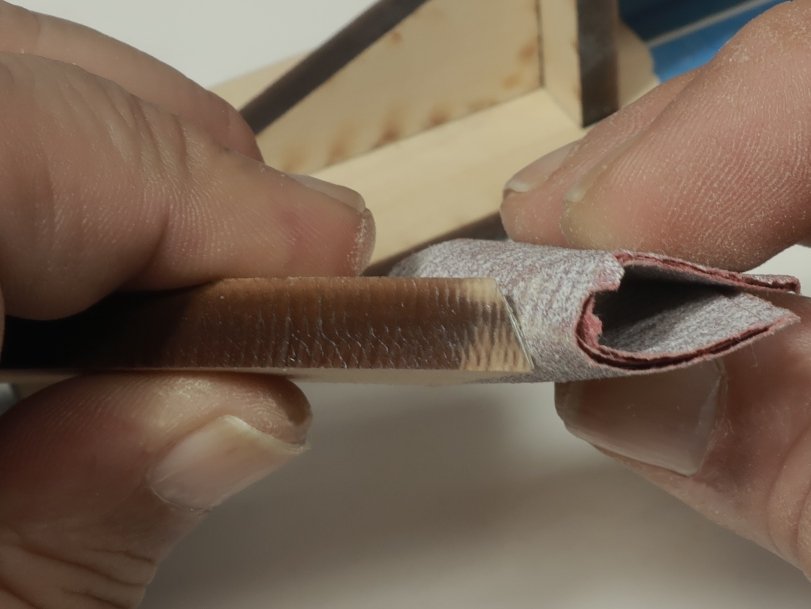
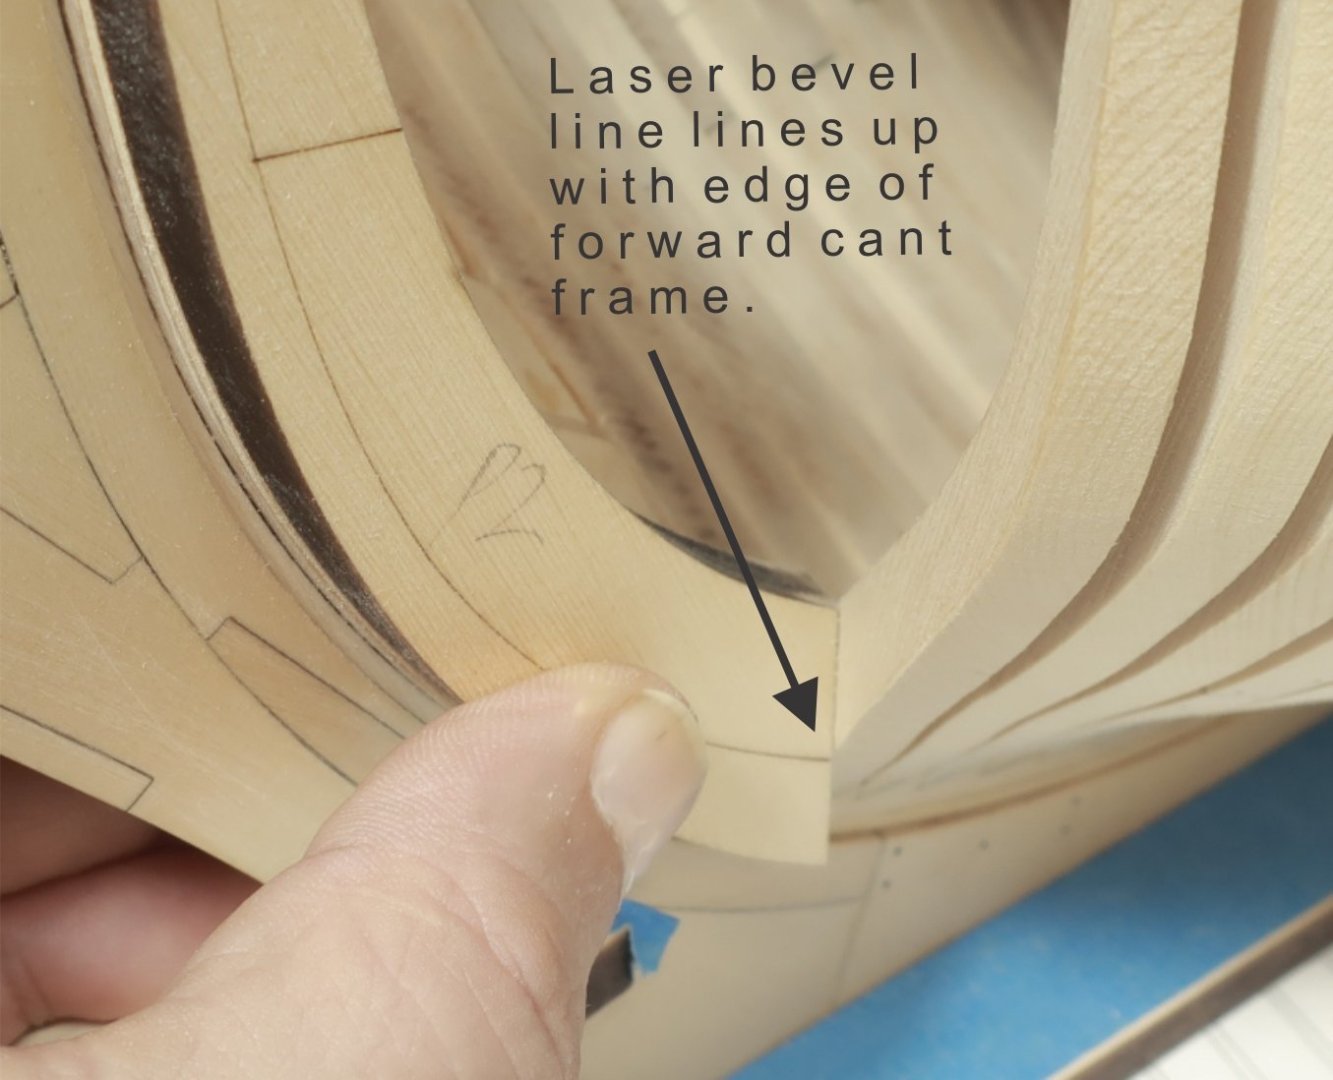
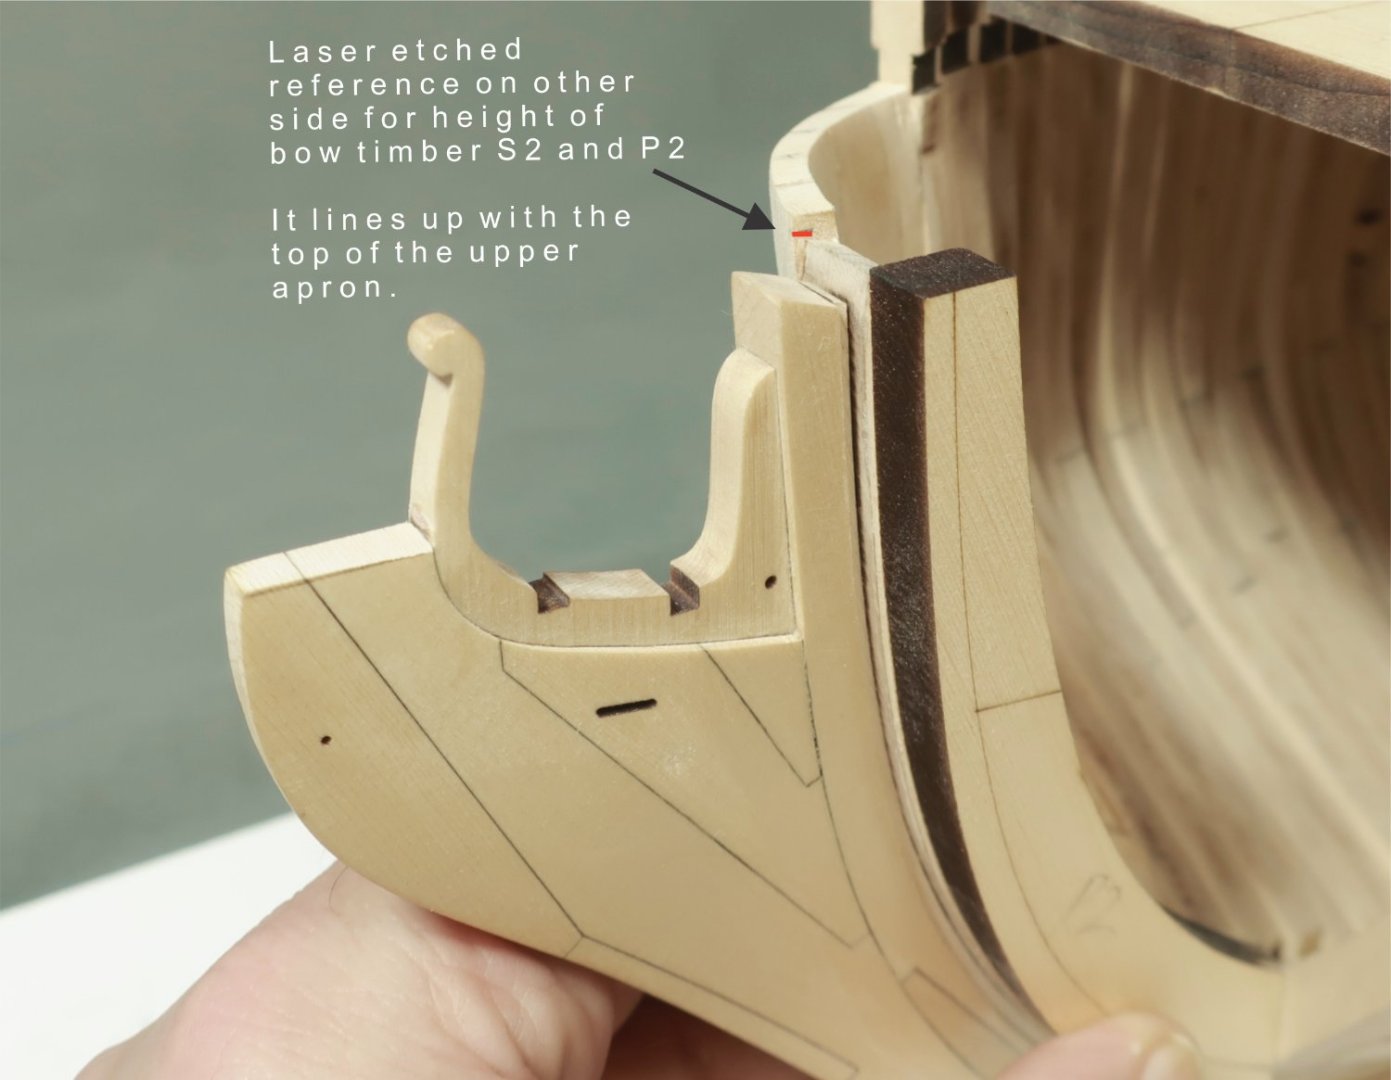
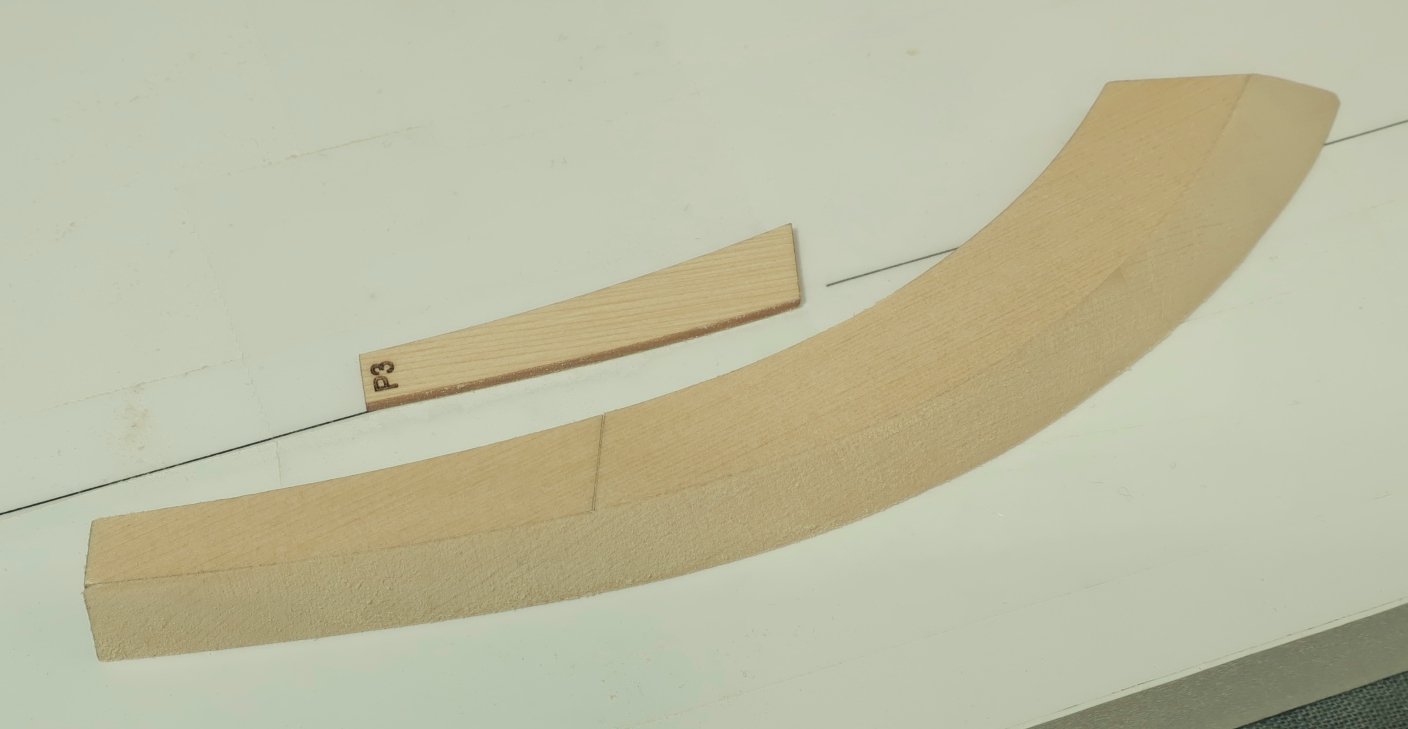
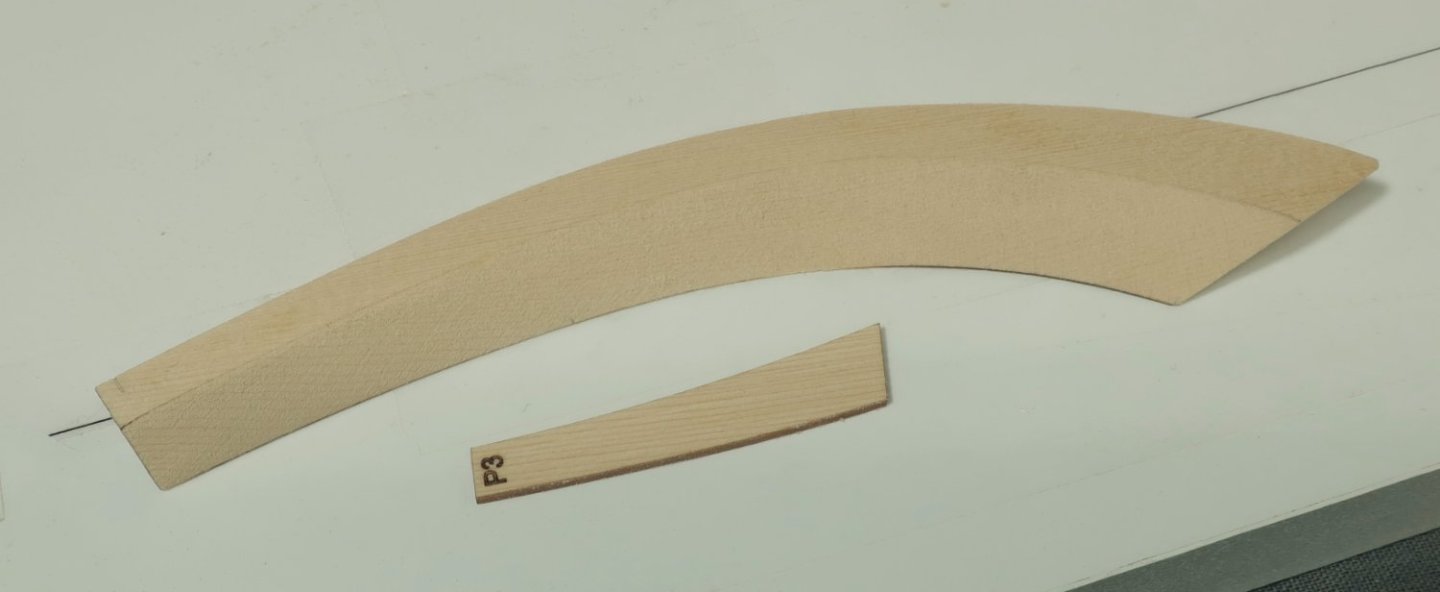
The Bow Timbers These arent very difficult to make and build. But yes...you do have to take your time and go through all of the steps with each bow frame. They are laser cut with all kinds of reference lines on both sides of each frame. There are also laser cut spacers that go between each bow timber. They are 3/64" thick. In fact the first piece we will add is right next to the upper apron. It is 3/64" thick and the easiest part to add. This is being used for one purpose only. It is being added to make the upper apron wider before we add the actual bow timbers and spacers. They are labelled P1 and S1....respectively for the port and starboard sides. You do have to bevel the heel to fit tight against the cant frame. But thats pretty simple to do with a sanding stick. To position this piece properly on the side of the apron, Just make the forward edge flush with the shape of the upper apron. See the arrow in the photo. Below is the first actual bow timber (bollard timber) on the port side....P2 Lets start shaping it. Note all the reference lines. There are more on the other side. This shouldnt be scary at all for folks who havent done this. Just carefully go through the steps one at a time. This would be so easy if you had a disc sander etc. But as I mentioned, I will be doing all shaping and sanding by hand. I am just using a #11 blade and some sanding sticks and sandpaper. Thats it. I know that many of you dont have a disc sander. Step 1...Concentrate on establishing the angle on the heel of the bow frame. This angle is the same for every bow timber. There is a laser etched line on one side for this purpose. But to help see the correct bevel, I lightly sanded both sides to remove some char. Then I drew a pencil line to better see the actual angle and what needs to be removed. This is done on every Bow timber as step one. There are countless ways to create this angle....sanding....cutting...disc sander...you name it. But his was how I did it. I first used my #11 blade to slice most of the meat away. I did this carefully only taking off a thin slice with each pass. The blade actually slices through the cedar like butter. Just get the heavy stuff off close to the reference line for now. Then use a wide flat sanding stick to take it to the finish line. Keep the stick flat and always touching the surface. Sand slow and you wont round off the face as is typical if you quickly stroke back and forth. Go slow and deliberate. If by chance you actually do round off that beveled face its OK... You can take some medium grit sandpaper and bend it loosely. Then once again sand slowly and deliberately. But this time keep the folded sandpaper only in the center of the face as if you were trying to make it concave. But in actuality you are just removing any rounded areas to get it back to a perfectly flat face. This shouldnt be needed if you are careful with the sanding stick. But yes a disc sander would take care of this in about 30 seconds. But you can get a really tight joint doing it by hand…the old fashioned way. Test the bow timber on the model.... How does that beveled angle sit against the cant frame? Nice and tight? Note the bevel line and how it lines up with the edge of the cant frame. All of the bow timbers should all line up this way or at least be very close. How do you know how high against the upper apron this should be placed? There is a laser etched reference line on the back side that lines up with the top of the apron. See below. After this all of the remaining bow timbers and spacers will all be at the same height basically. We will trim them all down to the nice shear line later after they are all placed on the model. Ok that was step one. Not so bad although I am trying to give you a ton of detail. Now step two.... Adding the bevels (basically pre-fairing each bow timber inboard and out). Once again my preference is to just use a sharp #11 blade. Replace your blade the moment it gets dull. I am just shaving from the edge to the etched reference line. Go slow. Only shave a little at a time. Dont go all the way to the line yet. Use a sanding stick for that. But this goes pretty quickly. What is most important is to shave with the grain. Not against it....just like your 5 o'clock shadow. If you shave the wrong way it just wont work. You will make a mess and break chunks off ruining the bow timber. But if you are going in the right direction...it cuts like butter...really. In fact here is a little tip. You will have to reverse directions on each half of the bow timbers. They are curved and the grain is different on each end. You will know what I mean when you try this. You will have a nice little pile of shavings. Then clean it up with a sanding stick. The outboard side looks like this. Note the spacer ready to be glued onto the bow timber. Do this before you glue it on the model. And the inboard side. All sliced with a #11 blade close to the bevel line...then cleaned up with a sanding stick. Step 3.....actually thats about it. I guess step 3 is just gluing the spacer onto the side of the bow timber. A laser etched line is there which shows exactly where is should go. Line up the outboard edges flush. Then step 4....glue it on the model. Dont forget to place this first one at the proper height. Use that refernce line on the back side I mentioned earlier. It is really not too bad at all... Then just repeat this with the other bow timbers...but dont forget to use another loose spacer when you glue it in position. See the pic below that shows the third bow timber just after gluing it. You want the air spaces to be nice and even between these timbers. So use another scrap piece of 3/64" thick wood along the lower end to help you with that. Make sure you dont glue it in place. You want to remove the spacer when you are done. I have just two more to go. I will do those tomorrow. Sorry about the long post but this log is really my notes for writing the instructions later. I dont want to forget anything.


-
Nicely done. That is just as she is supposed to look at this stage.
- 131 replies
-
- 2
-
-
- Medway Longboat
- Syren Ship Model Company
- (and 1 more)
-
A nice fresh start.
-
Thank You. Its instrument grade Alaskan Yellow Cedar. Some Yellow Cedar can be very grainy but if you hand pick the really clear stuff it can show quite beautifully. Really nice boards have no grain at all showing. Chuck
-
It really does look good. I hope the new planking billets will match in color close enough. You should cut some strips and then apply some finish as a check before you glue any down. You could easily remove those few planks on the qdeck if they dont match and just use the same new stuff.
-
Thank you so much...yes its super busy right now. But it still beats watching TV.