HOLIDAY DONATION DRIVE - SUPPORT MSW - DO YOUR PART TO KEEP THIS GREAT FORUM GOING! (Only 24 donations so far out of 49,000 members - C'mon guys!)
×


Chuck
-
Posts
9,660 -
Joined
-
Last visited
Content Type
Profiles
Forums
Gallery
Events
Everything posted by Chuck
-
 Just a heads up on the restocking effort. I finished making enough Blocks and now tan rope to reopen. I am about 85% finished with Dark Brown rope. I basically only have .018 and .012 Brown rope left to make. I figure 25 - 30 packages of each....but I am running out of steam, LOL. Thats about half of the amount I am usually at when fully stocked. So maybe a couple days before I reopen. After a full 8 days just making rope from sun up to sun down its getting really hard to stay focused. But I am almost there....If I sell out in one day again then I just quit, LOL. Chuck
 -
Rich...Just make sure you seal the wood first so the areas you dont want to darken can be cleaned up easier. Maybe apply some Wipe on Poly. Otherwise whatever you use will soak into every soft area and get dirty and wont be easily cleaned.
-
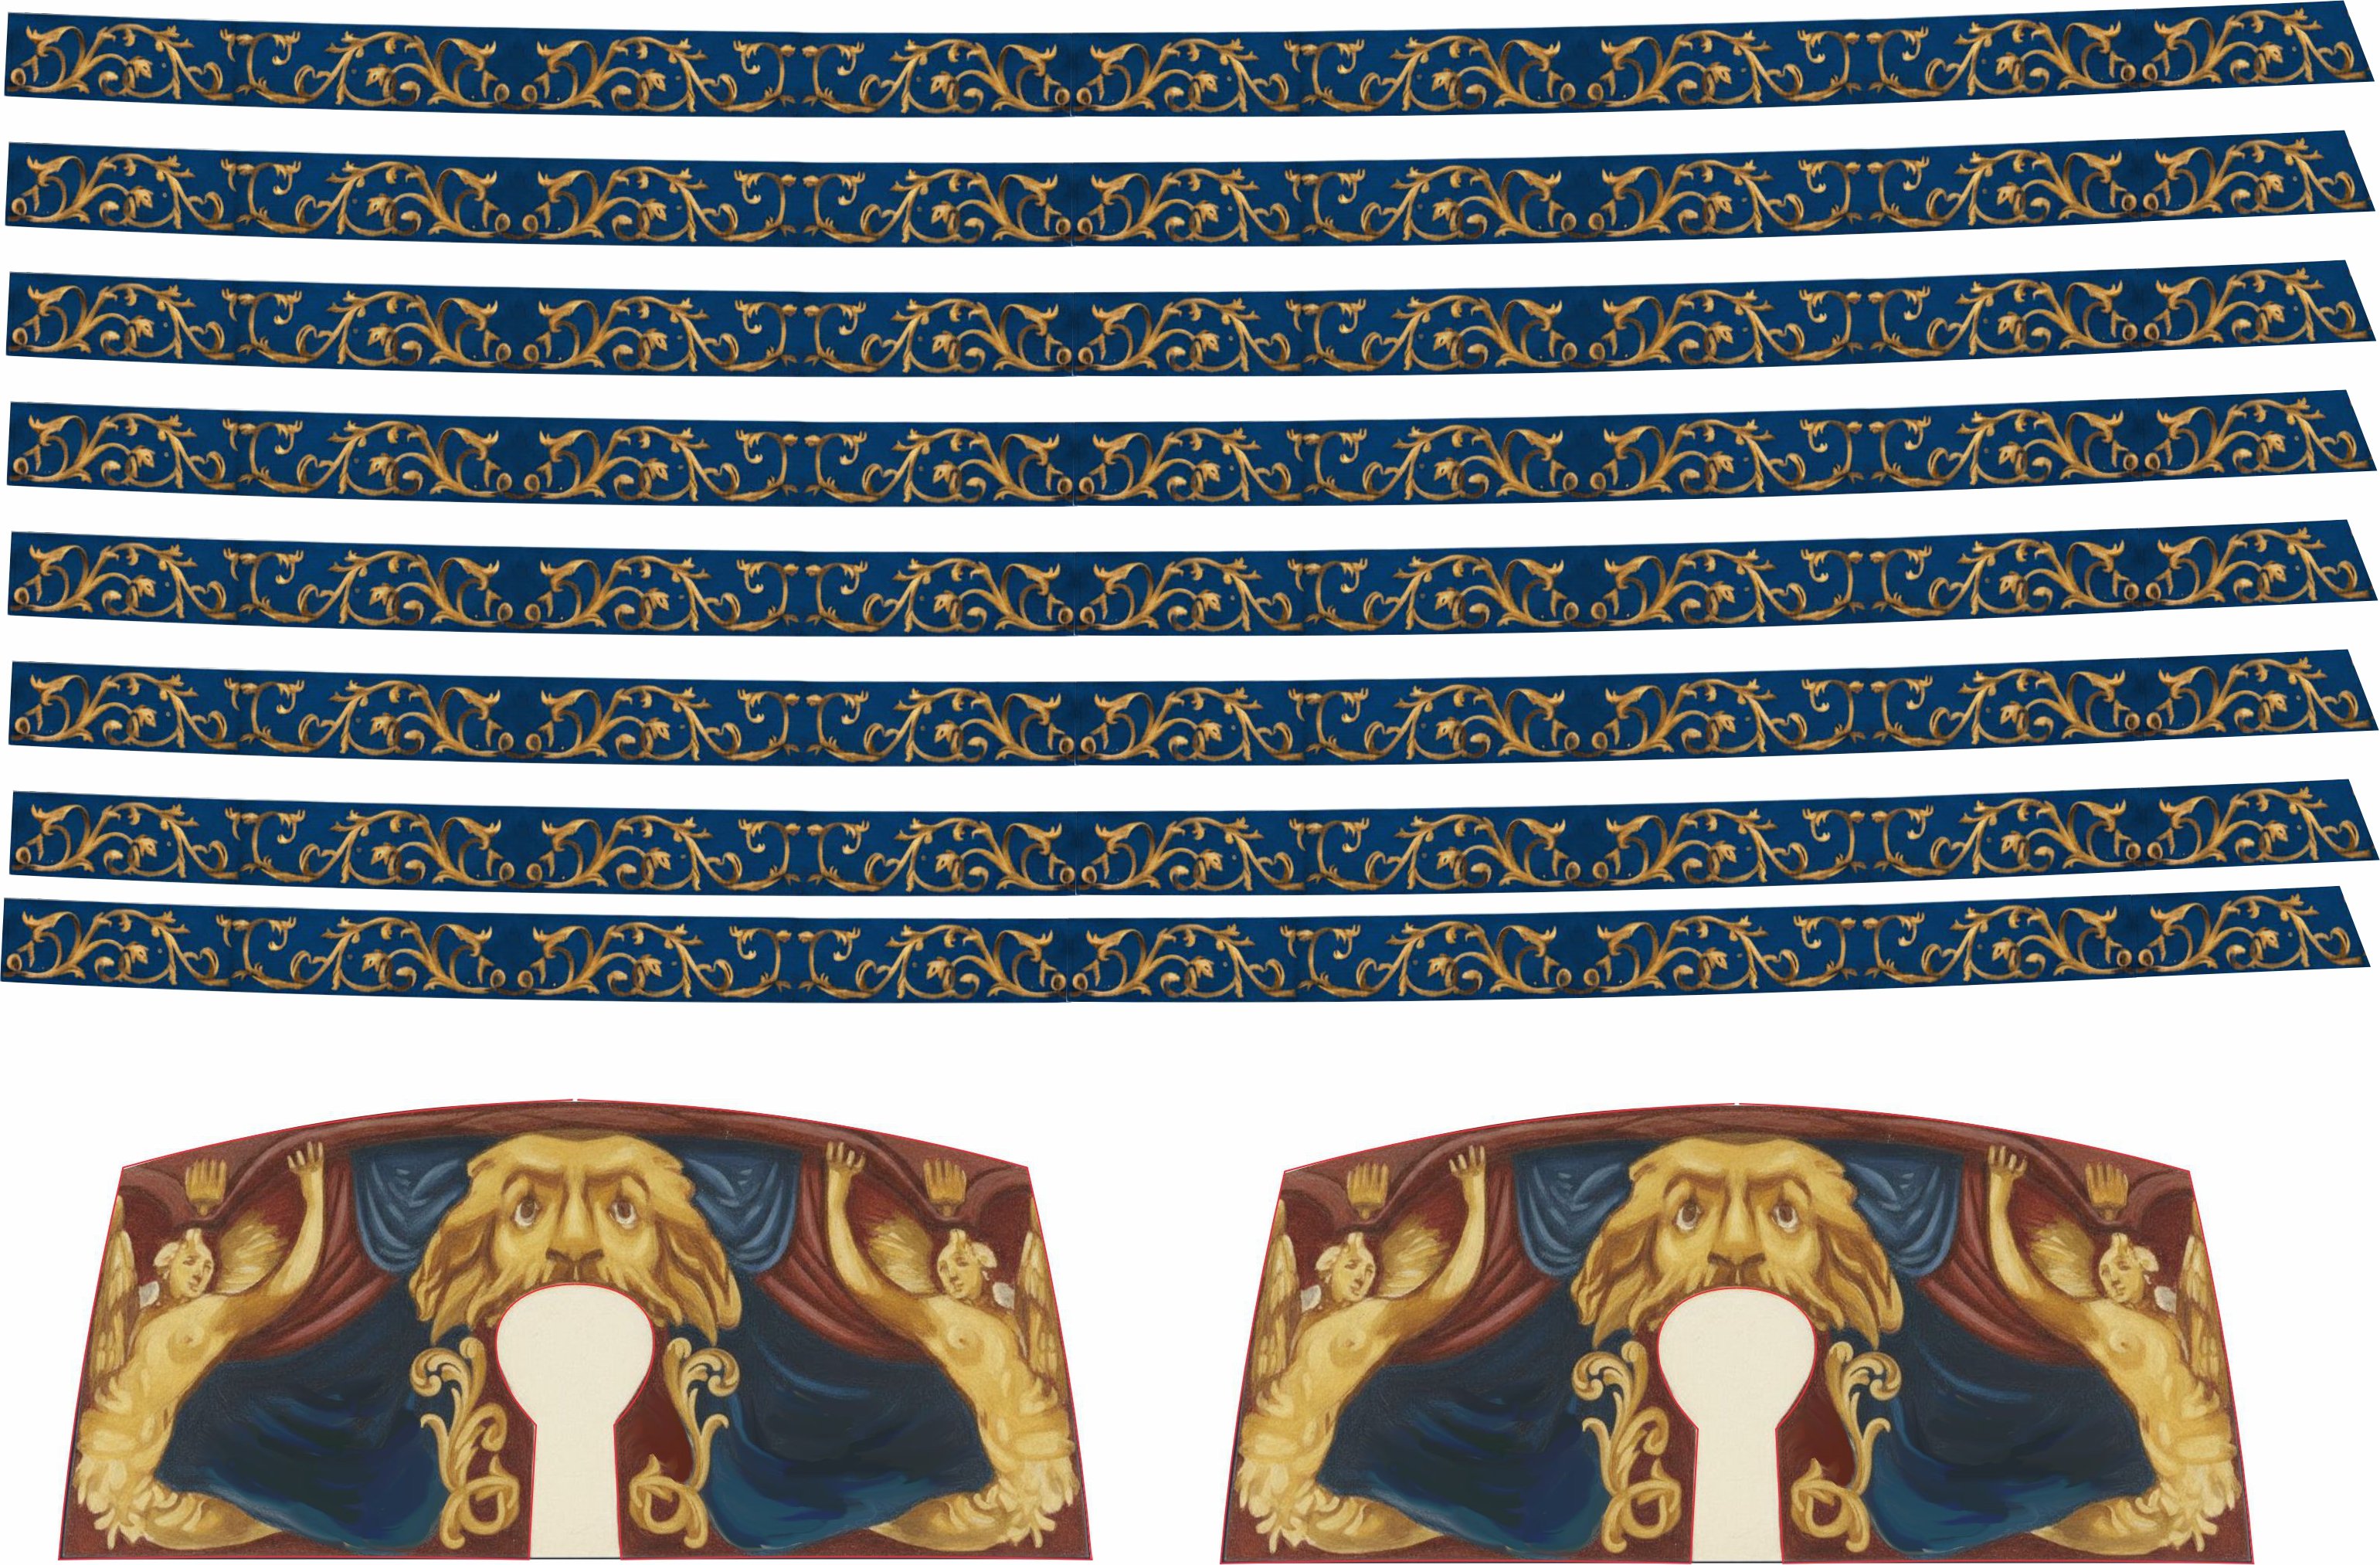
And here is the other version...or one of them just so they are all in the same place. This was the different lower counter design. sternfriezespeed.pdf

-
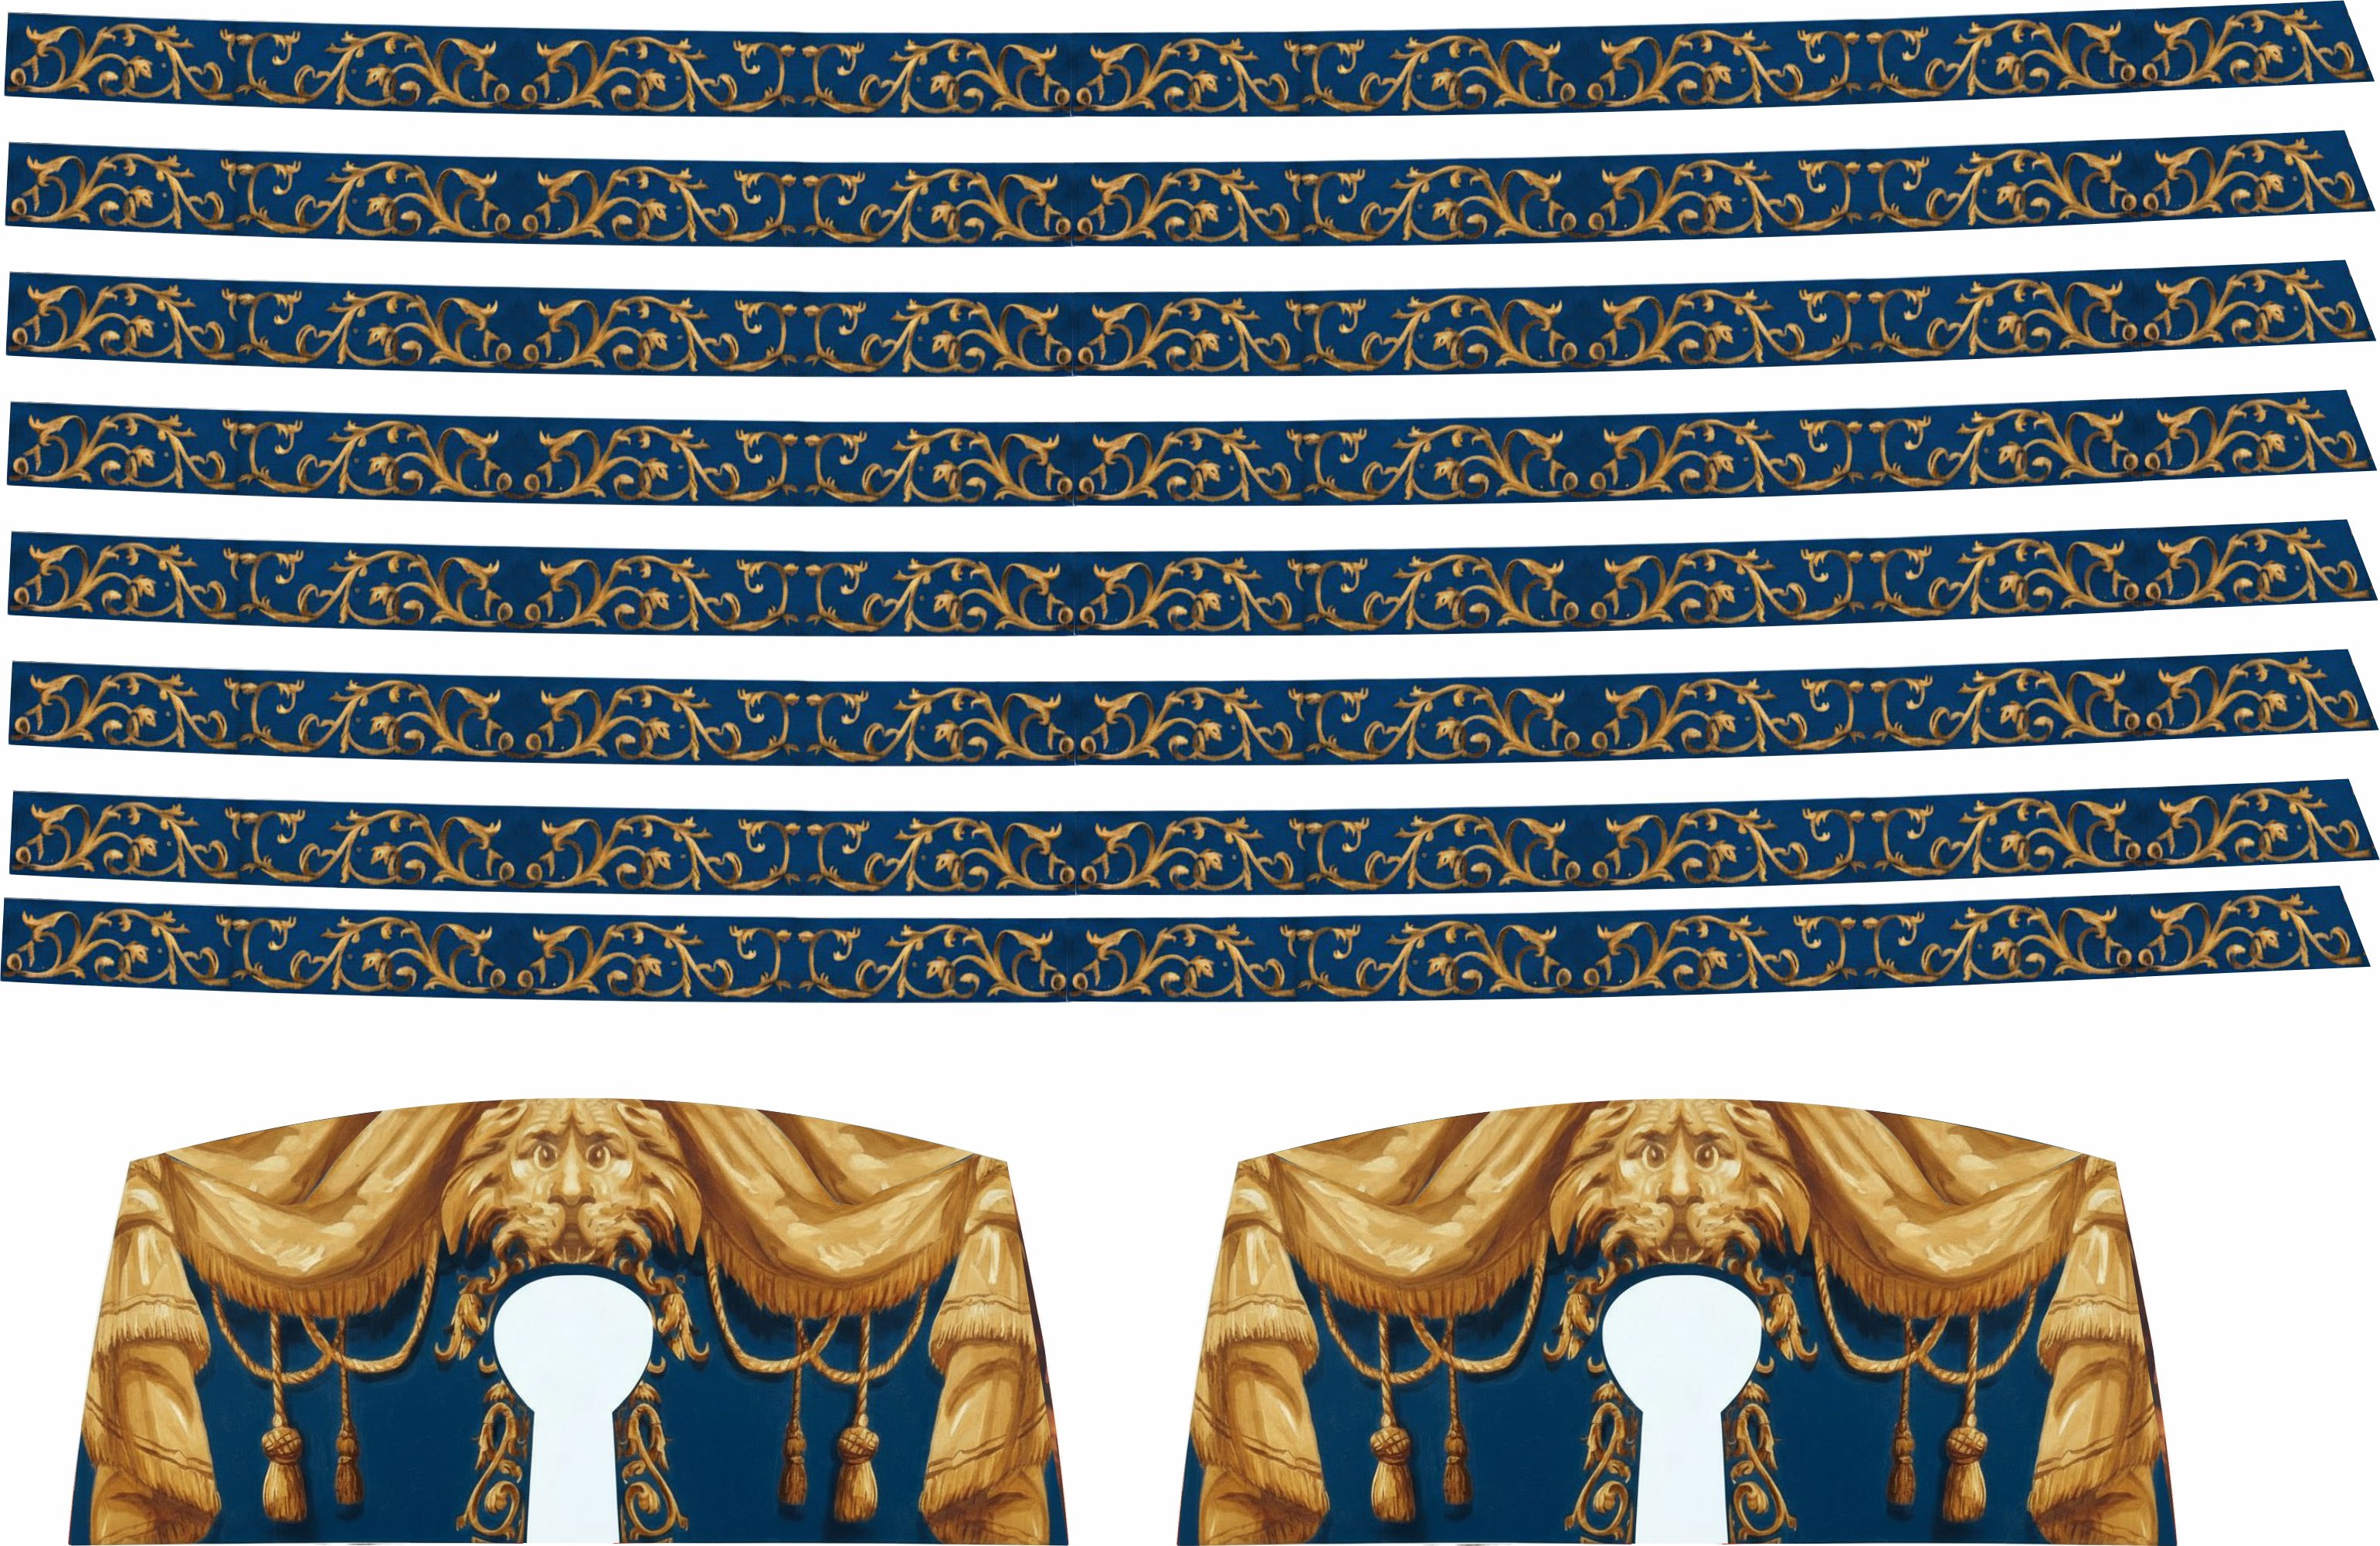
Reposting the painted friezes as someone asked if I could make them slightly more blue but keeping them dark rather than the usual light blue background for them....The frieze I am using is actually on a darkish brown background. But I think this will do the trick. There are now three versions. This will be the last one!!! You just cant please everyone. But try these if you want. sternfriezedarknew.pdf

-
I might have to update my chitbox, LOL I have only been using the free version. I should have looked at the other levels especially with the amount of 3D printing I have been doing. That really solves a lot of my heartaches. Thank You!!!
-
Wonderful....how do you create the boolean function...Can you do a step by step or point to a youtube video for us knuckleheads...screen shots would be great if you have the time. That I believe is the missing piece. At least for me to create what I need. I just have to find time to figure out how to master that boolean step by step in onshape. With these tools mentioned in this topic I think it is a complete introduction for anyone to make these stl files and refine them. It should prove to be a valuable resource without getting to technical ....I hope. Chuck
-
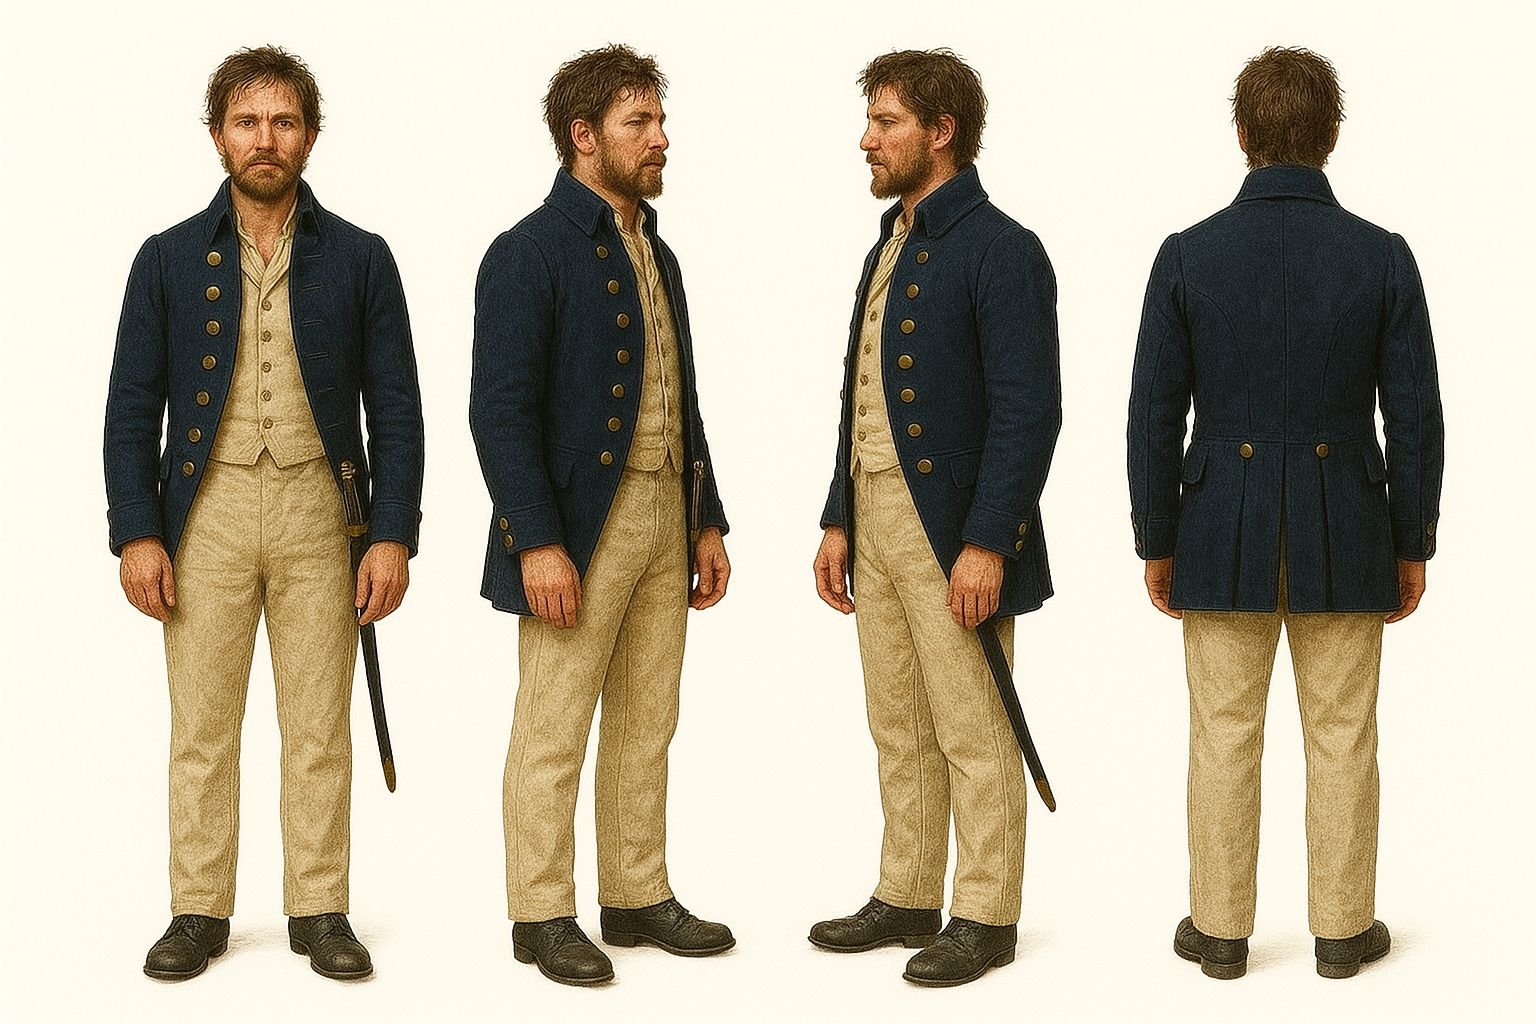
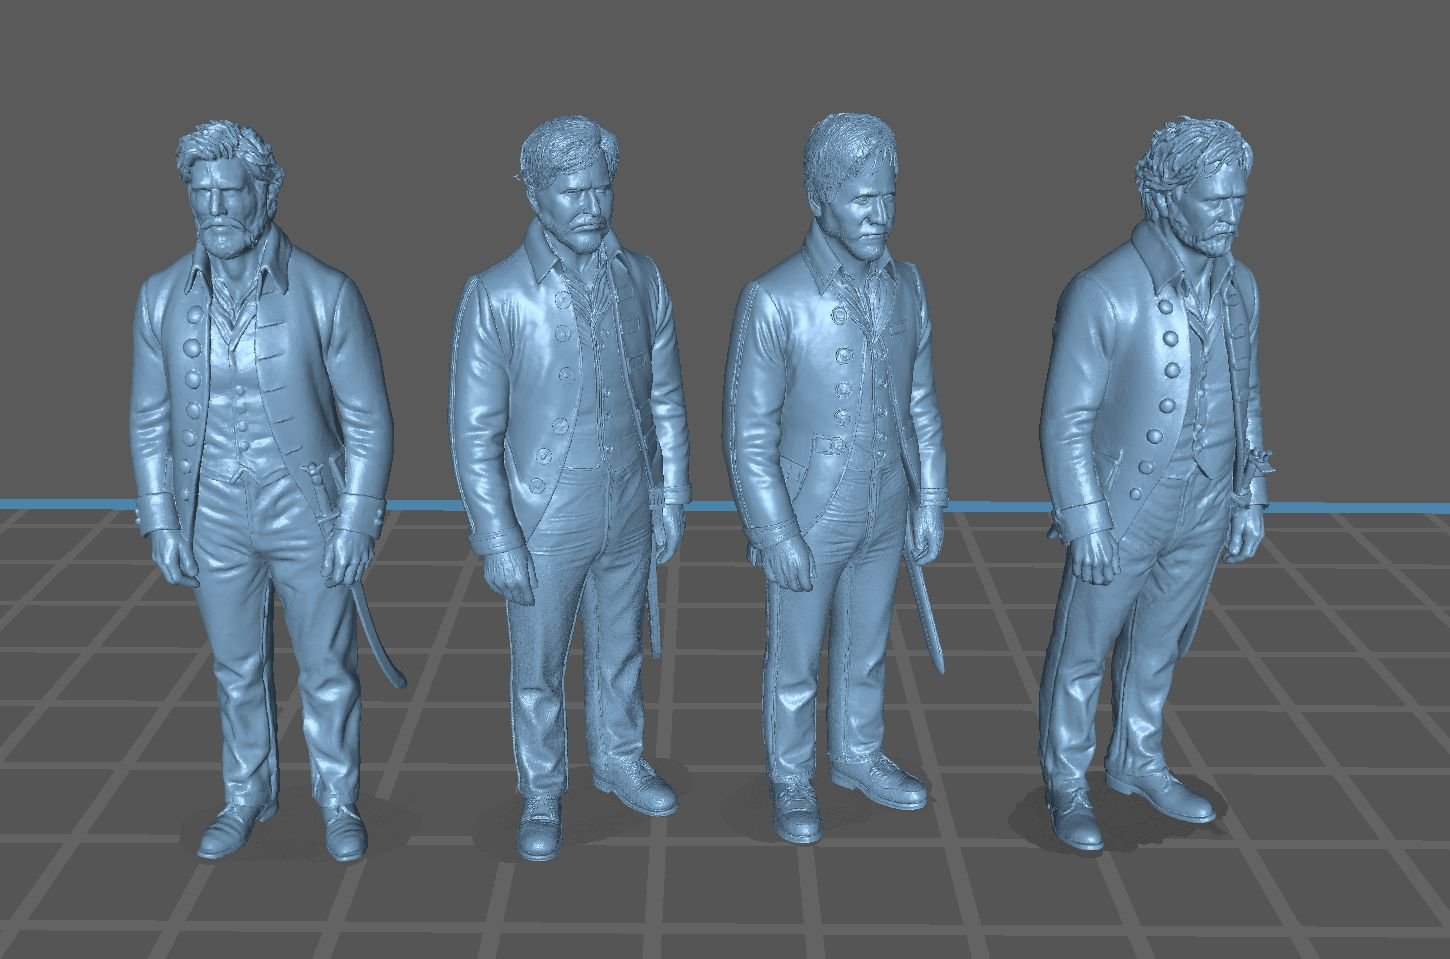
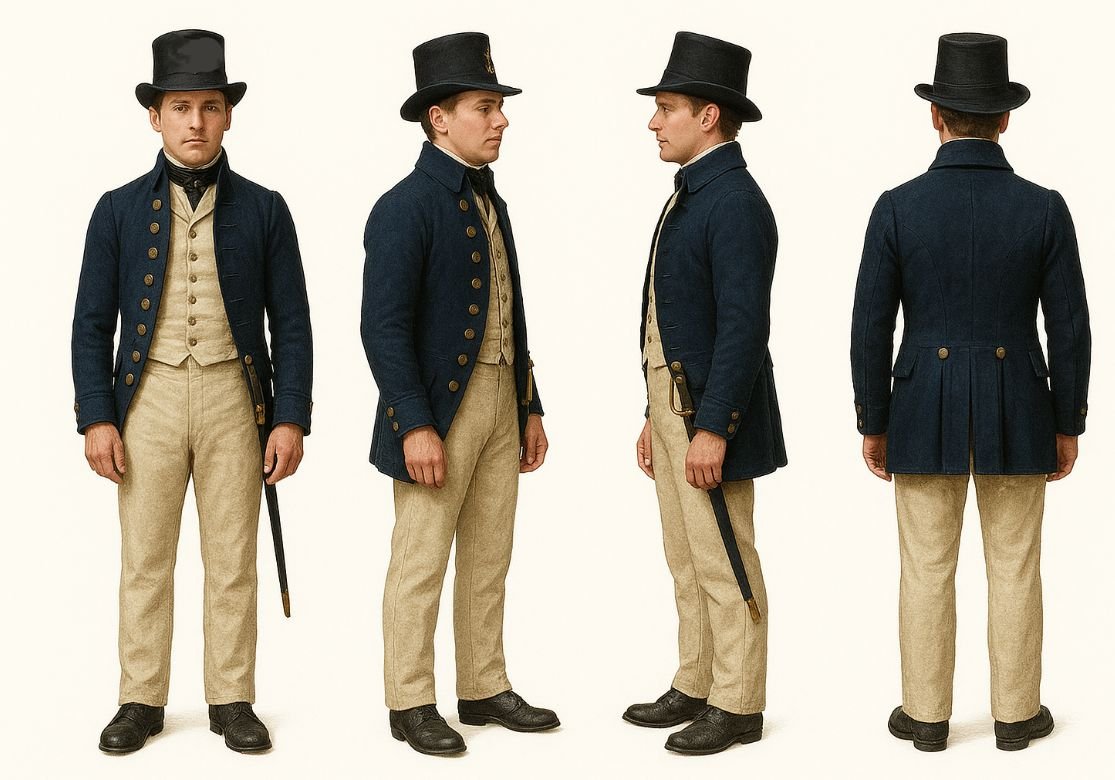
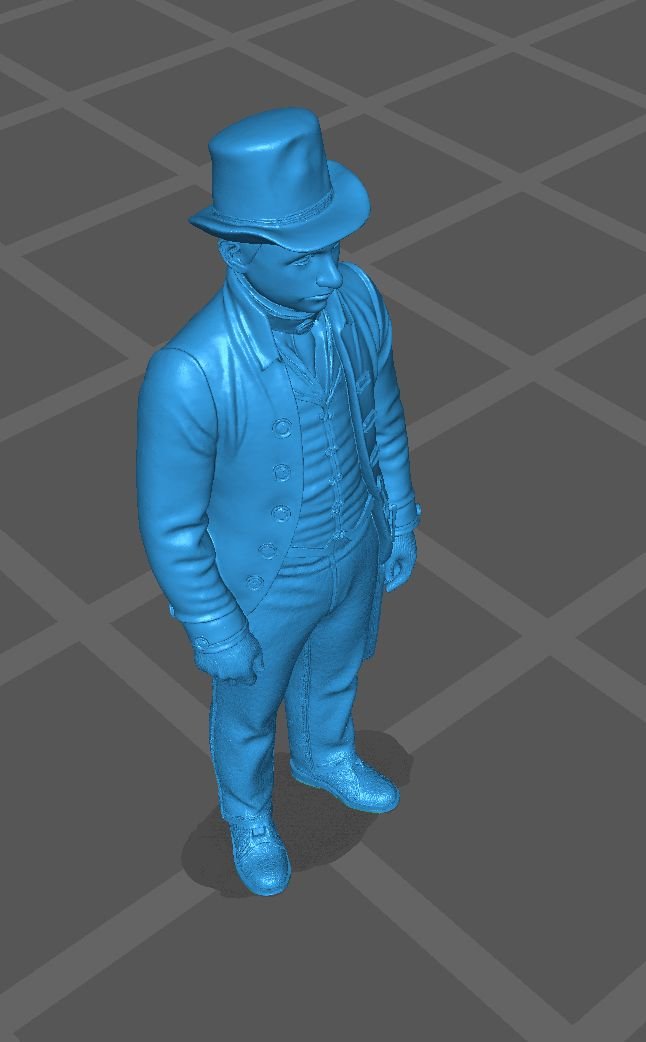
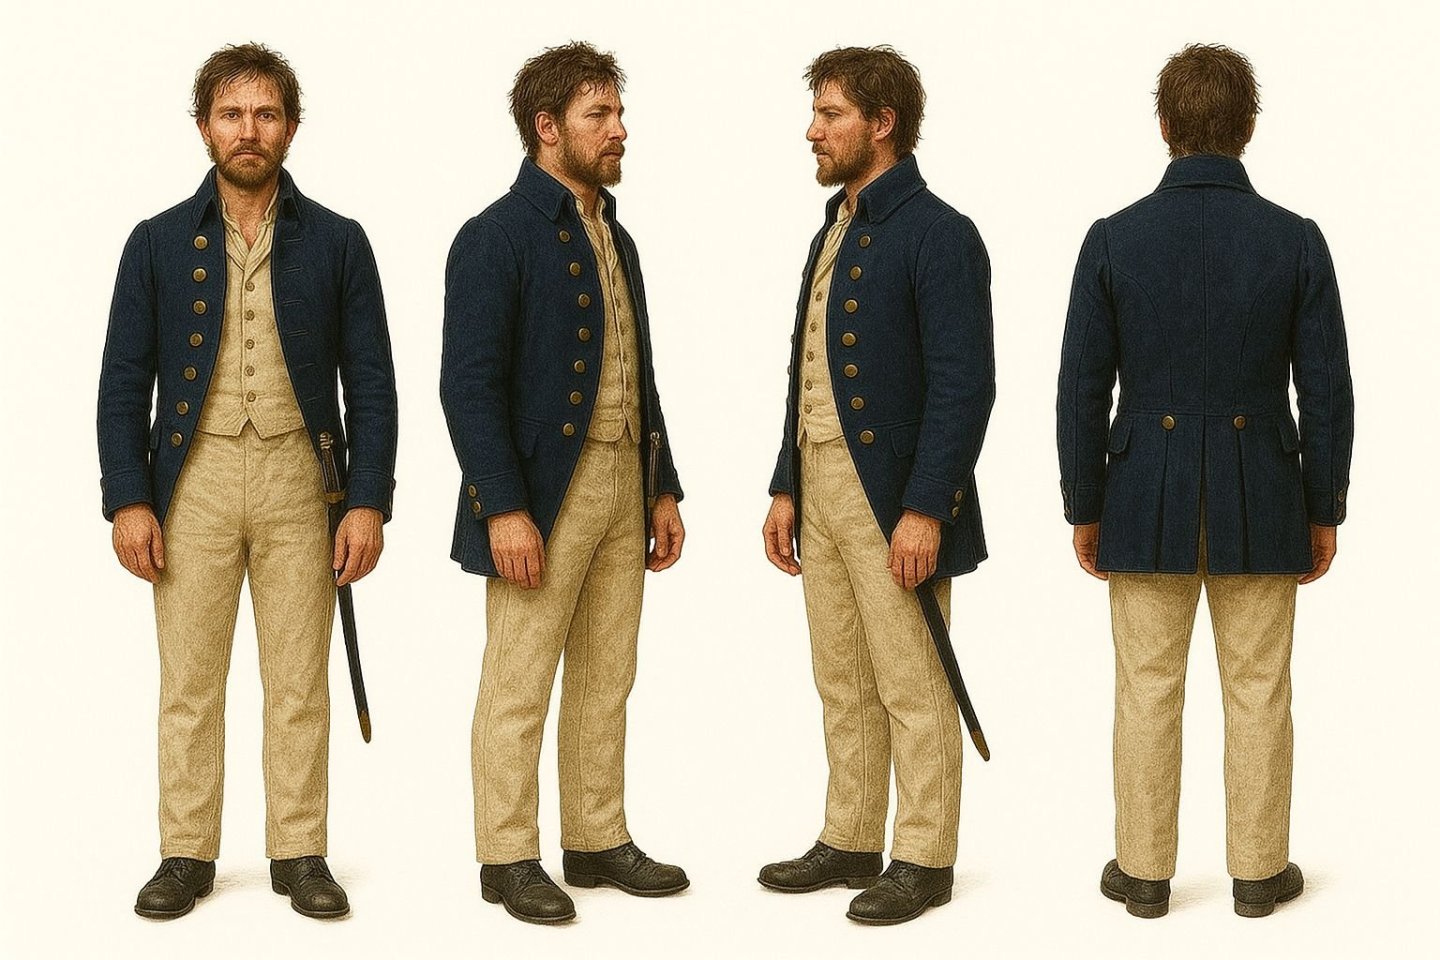
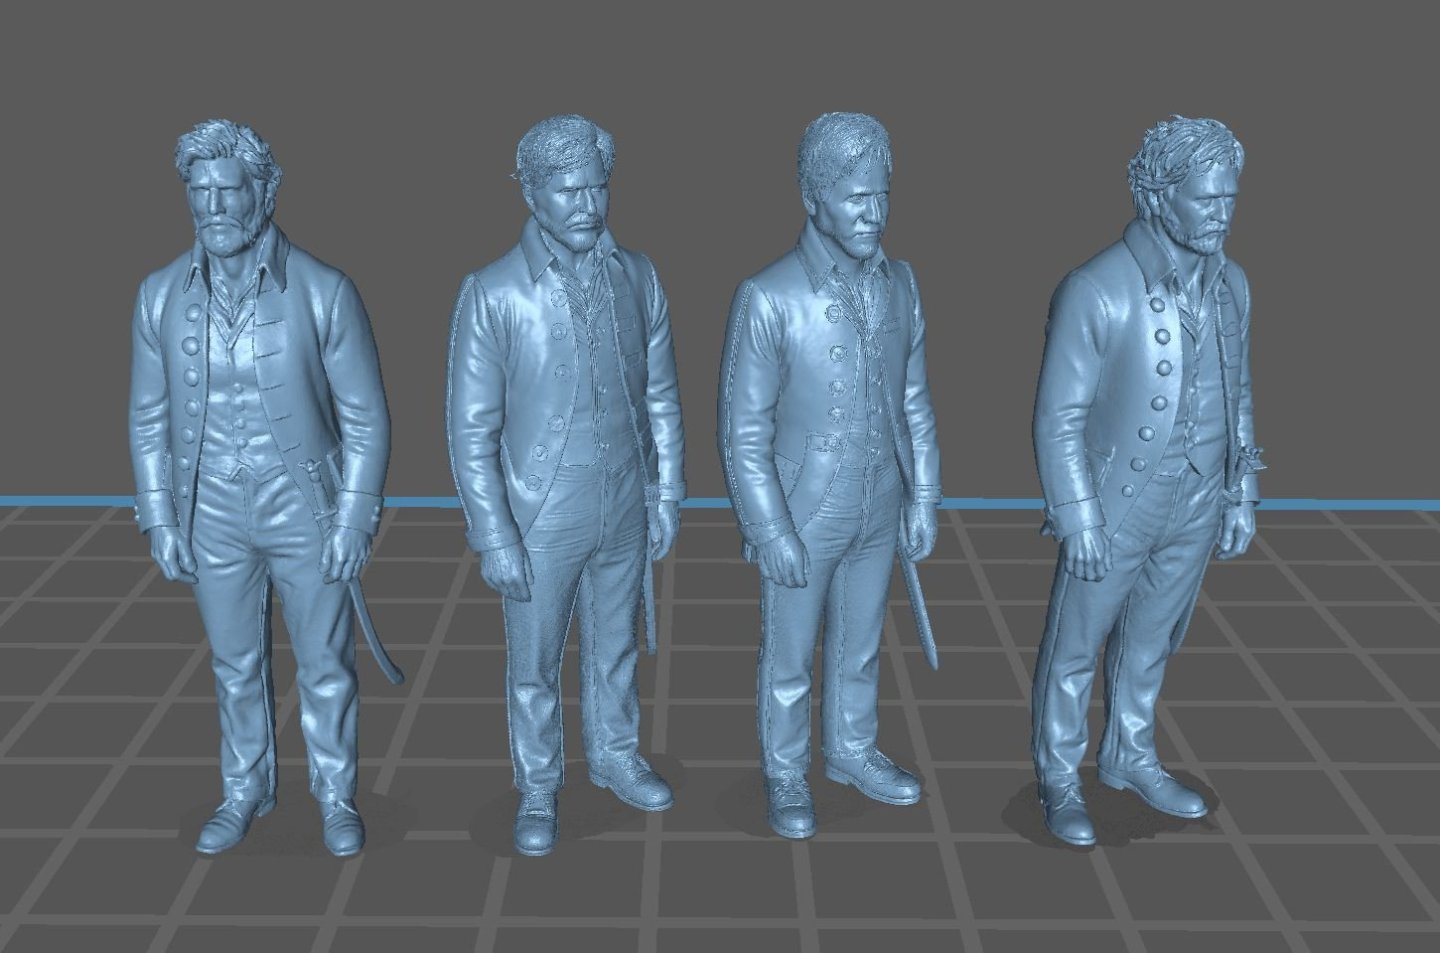
I am just going to keep adding tips and tricks I have learned along the way. Remember that we are all pretty much new to this. The more good images with any background you have the better your results. I can not vouch for the accuracy of this drawing but I wanted to document the method I used. In many of these image to 3D AI programs you can upload multiple images of an object from different views. Side , back, front etc. But it is hard enough finding one view of an image that is any good. So lets say you want to make a 3d printed figure of a midshipmen for your model. You can go up to any generic AI program like ChatGTP and ask them for it. But you must be very descriptive. For example I wrote this in ChatGPT. Create a highly detailed image of standing figure of a typical sailor midshipman on frigate in the British Royal navy in the period of about the year 1800. Can you create 4 differnt views of this standing figure with no background. Make each view separated by space so none of the views overlap. Leave some space between each view. I may have been able to make this request more detailed but I just wrote this on the fly. The image it made for me is this. Now is it correct to the period....I dont know, I would have to research that. But anyway... Next you take this into any photo program like photoshop and split it into 4 individual images. Load it into Meshy or any other image to 3D program. If I had time I would prob ask Chatgtp to redo this image without the hat and make him look a bit scruffier. But I really only wanted to demonstrate another tip or method. For those of you more experienced than me at this please feel free to post your tips here as well. Also for us neophytes....If anyone knows how to easily do this...If someone could create a step by step for how to create the slot for a figurhead so it can be slipped onto a stem I would appreciate it. Hopefully using free software. Maybe Blender or freeCad. I would like to give folks as many tools and tips for creating viable carvings and figureheads using this technology. But my knowledge is limited. So I am hoping those with the knowledge would be willing to share. Scruffier with no hat... And these are a few 3D conversions from meshy and hitem3D to show how very different the results are after using the same image from chatgtp. The free retries were used in each program to make two figures from each platform. The two center figures are from hitem3D. A very different result and I will leave it up to you which one is better. I know what my preference is.
-
That is what I prefer to do for my own models if I wasnt commercially making a kit of course. The folks who buy the kit get the perfect one but I will go in a rework it a bit before I glue it in position. I like to make the print look like it has a few carved faces and I do some undercutting to make it look better when the light hits your finished carving. Some careful cutting around the softer details makes them crisper as well. OK folks....you can also try HITEM3D This still has a free option and its also returning high quality and resolution prints....This is the only other site that I like the resolution and print quality. They also have the ability to upload multiple images of different views to make your rendering more accurate. The results are actually slightly different as this algorithm returns a slightly more stylized rendering. But they look great and you can download them. Here are 3 views in the Chitbox slicer...and yes for a figurehead you still have to bring it into another program like blender and cut a slot for the stem. Or you could do this by hand and just file out a slot after printing. I hate Blender and other CAD programs and just cant get the hang of it.
-
Lovely rendering. Yes I Broke down and paid. I thought they gave you a bunch of free downloads. Maybe they changed that. There are other sites that do this but Meshy 6 is the best out there. Chuck
-
Now is this American Indian figurehead perfect....No. But its pretty darned good. This figurehead can be printed to the size you need. Wash it and clean it good after it prints. But then dont put it in the curing station yet. All of the funky details the AI created can then be altered using some some sharp micro chisels. You have most of the hard work done for you....the face is wonderful...the hands and some of the clothes features need some work. So while the printed figurehead is still somewhat soft and not fully cured, you can finish it up with your chisels. This also helps the figurehead actually look like a carved piece rather than a "soft 3D printed" looking figurehead. It really is the best way to utilize this technology and really slip in there a little bit of hand carving. Once you finish your carved alterations, then you can stick it in the curing station to finish it off. Does this make sense? Please feel free to discuss this approach. Its the approach I prefer especially since you are not mass producing these commercially and just looking for a way to create a fantastic and unique personal ship model project. Chuck
-
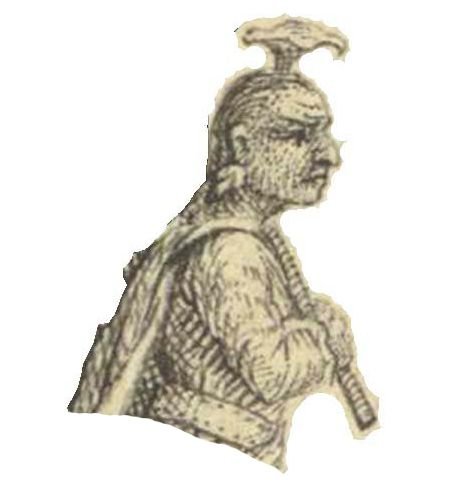
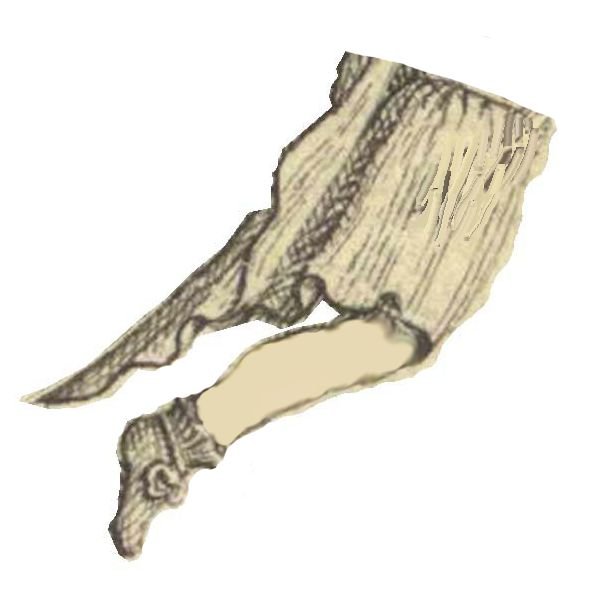
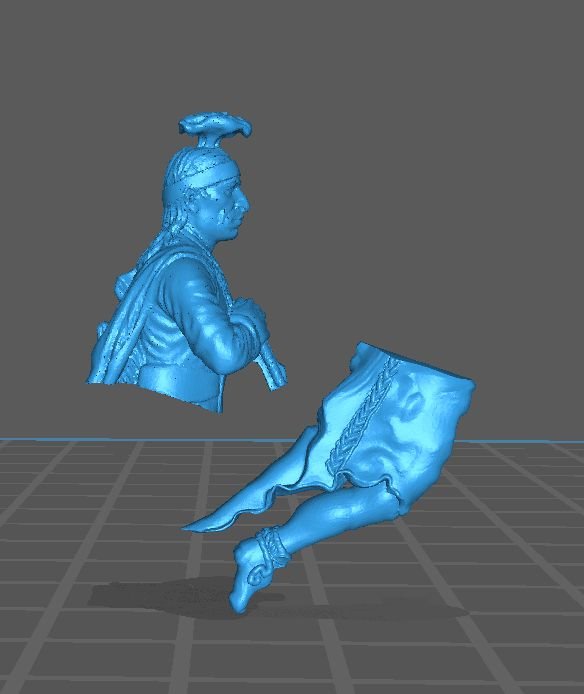
Gregory...try getting a little creative with your thinking here. Even if you click symmetry it really doesnt work well. One solution is to split your original drawing into two pieces and run them through meshy separately. The top bust....named properly in meshy before you hit generate. Then the bottom leg where it would need to be split by the stem anyway.... Take both of these and put them together in your slicer actually. Use the duplication feature and mirror feature of your slicer to create an identical right and left leg. Then put them together... STL attached indianstatue1.stl Chuck
-
Kenny you picked one of the parts that is really tough for AI to do properly. I am afraid that wont work . The drop is very complex and its shape can not replicated with meshy. My guess is that you rendering is completely flat rather than shaped to fit the hull curvature. Thicker and rounded at the top and narrower at the bottom in the other direction.
-
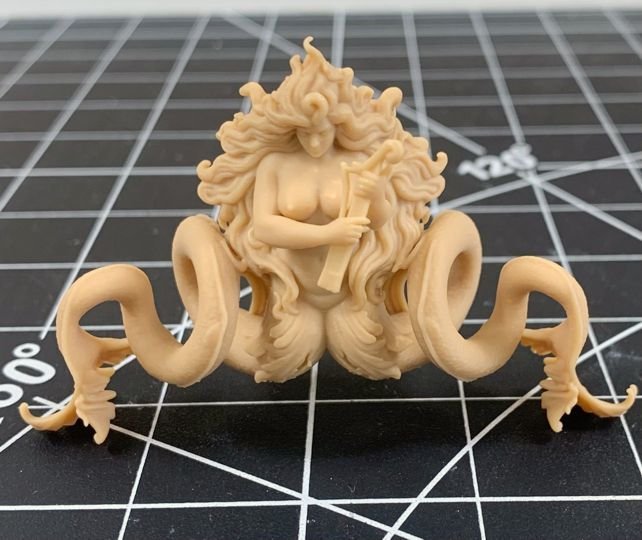
That is a wonderful decision. Give it a try. What is the worst thing that could happen? And yes I hate those white metal castings as well. I remember when I gave them this hand sculpted and carved figurehead and they turned it into the abomination you see in the kit. Maybe they should read this topic at Model Shipways as well. They turned it into this.... So yes you absolutely should.
-
Sam...great to see you... I already touched upon the cost for the equipment. That aside if you already have that....to produce the file and print it...about $1 (resin cost for one print) and maybe a 1/2 hour to produce the file and get it ready for printing. Then about 4 1/2 hours to actually print. I pushed the button on my printer to start the printing before I went to bed last night. When I woke up it was all done. I washed it and cleaned it and cured it.....all done.
-
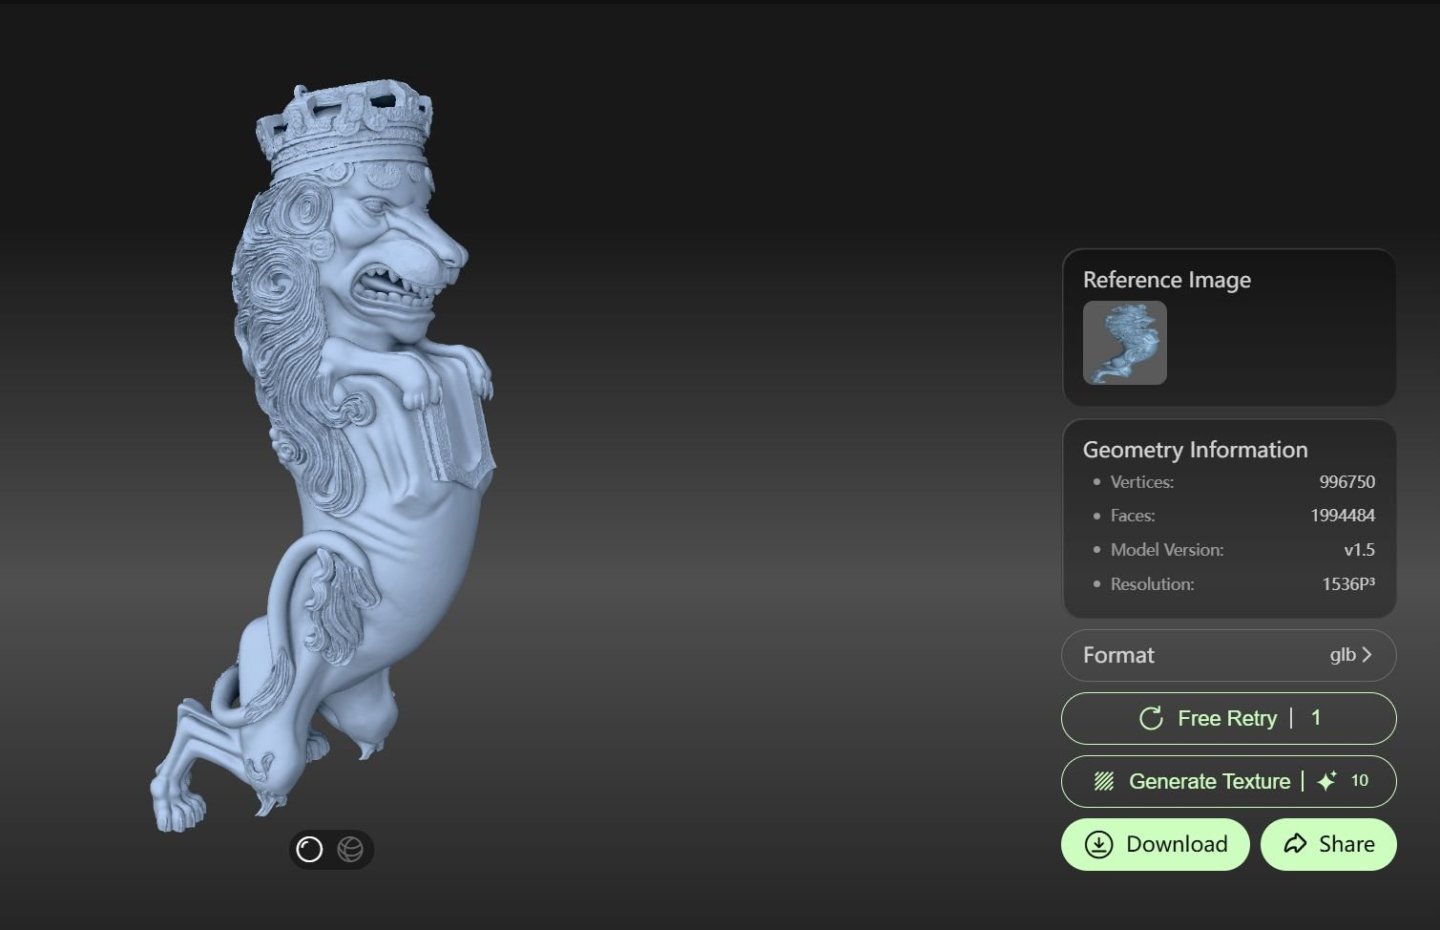
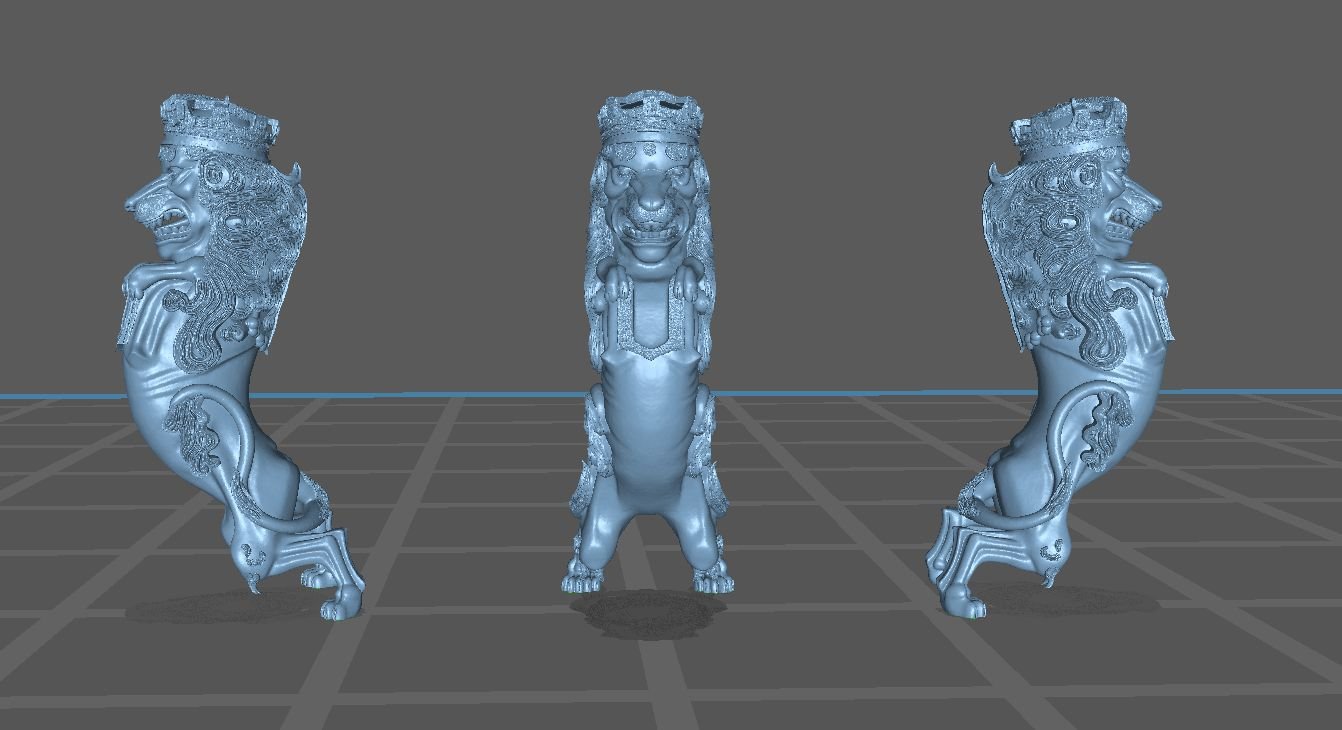
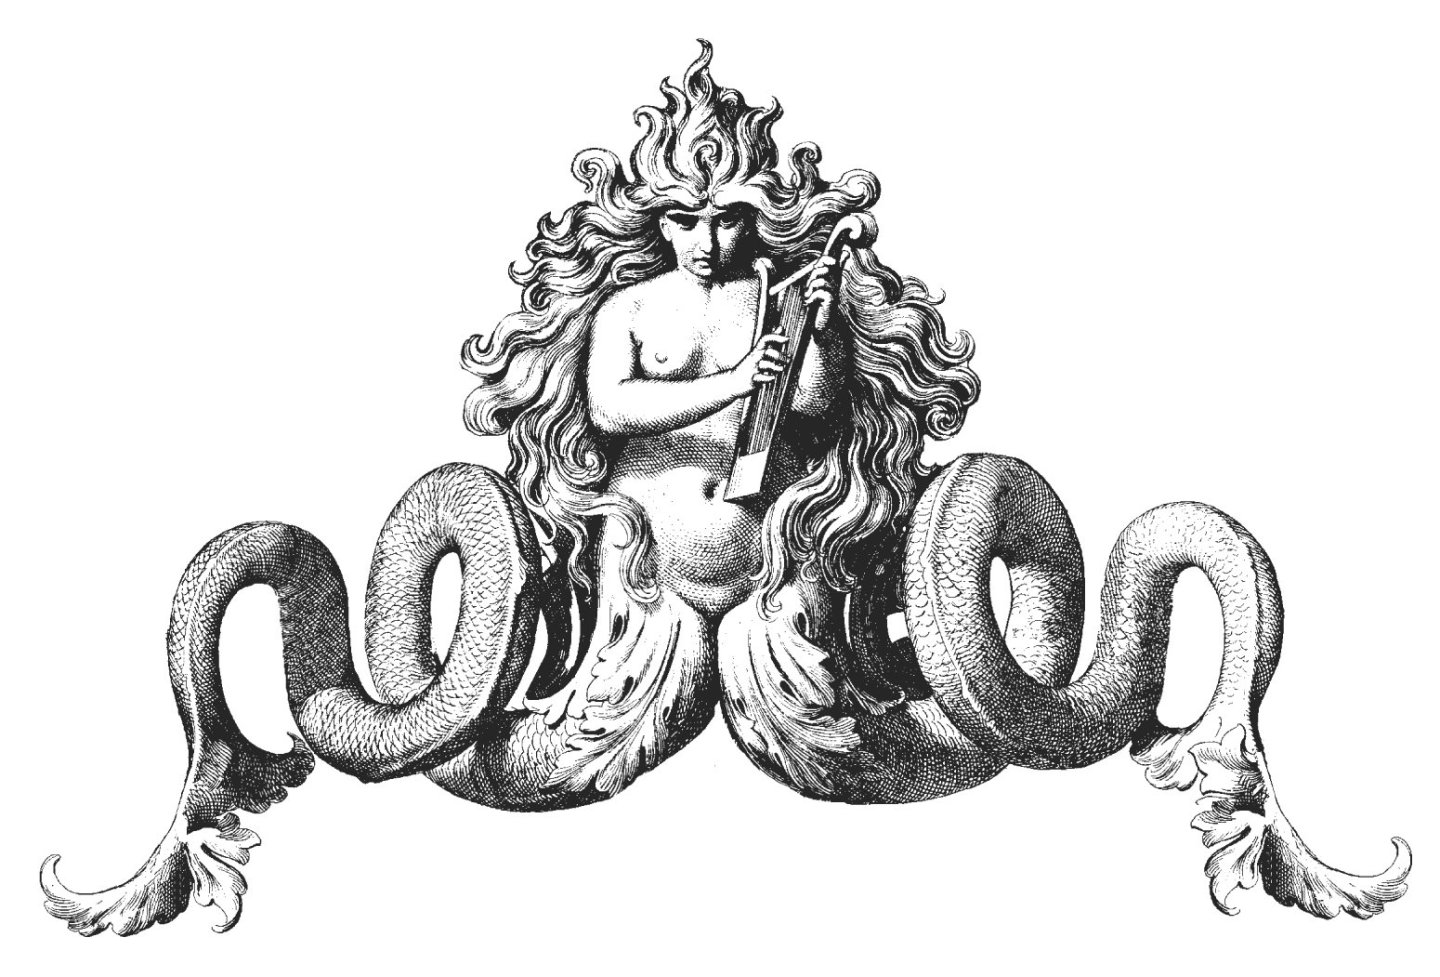
Its all very exciting. Now what good is all of this if you cant print these things. Or if the quality of the print is sub par. So on one of my tests earlier in this mini tutorial I went ahead and printed the file. This is a very very complex object. I wasnt sure it could be printed in one piece and how it would work with the supports I added to the object. Adding supports and establishing the optimal angle for 3D resin printing is an art unto itself. It really should have a topic of its own and there are so many discussions about this on the 3D printing boards. This was my logo....the fully in the round STL generated by Meshy. The drawing below. The STL File in Chitbox And the finished 3D print You can see how complex this object is and how well it printed out. Its very detailed. A bonus is that it stands on its own!! The supports needed for this where insane. You can still see some of the support nubbs as I only did a quick cleaning and de-nubbing.

-
That is wonderful. The lion looks great. Can you upload that stl here in this topic. I would like to examine it. I could just feed the same Drawing into meshy but I dont want to kill any more trees…as my kids keep reminding me. chuck
-
Yes that was the plan... I havent printed them yet as a test. I have so many ship model parts not yet tested. Gold Star for Druxey!!!!
-
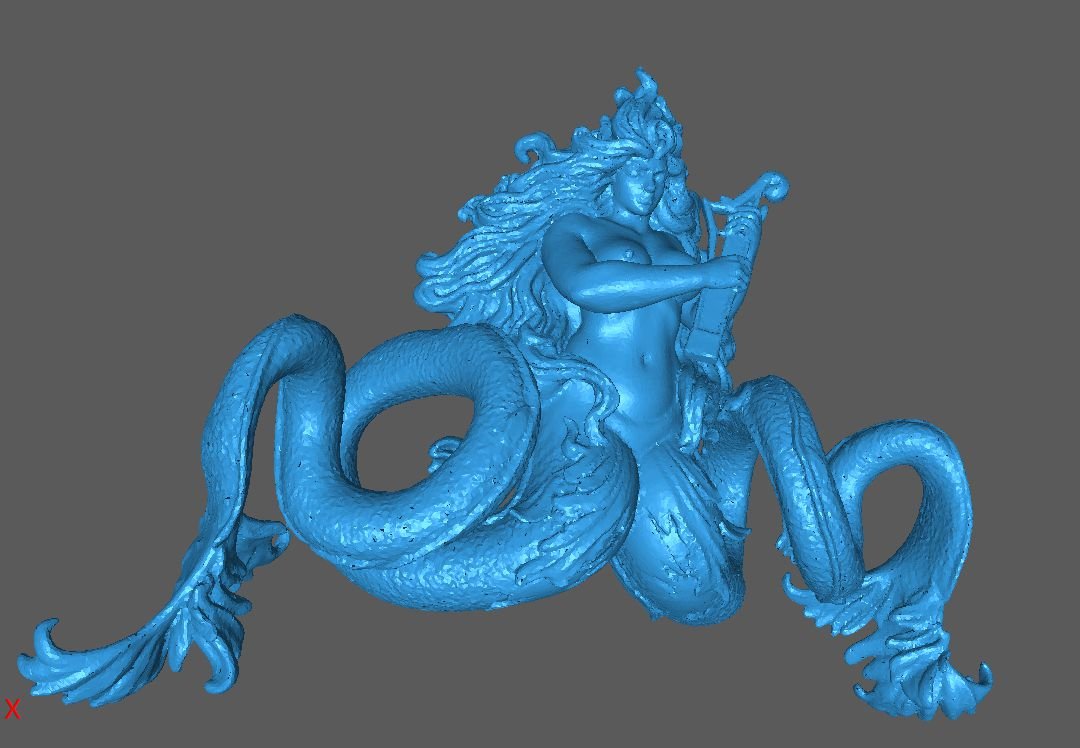
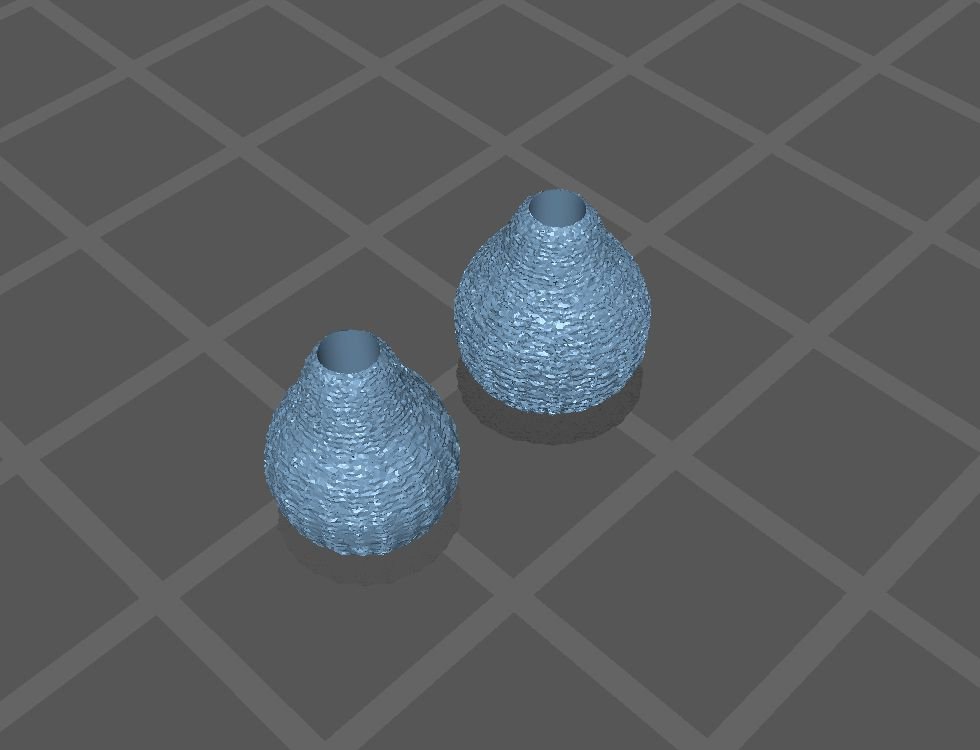
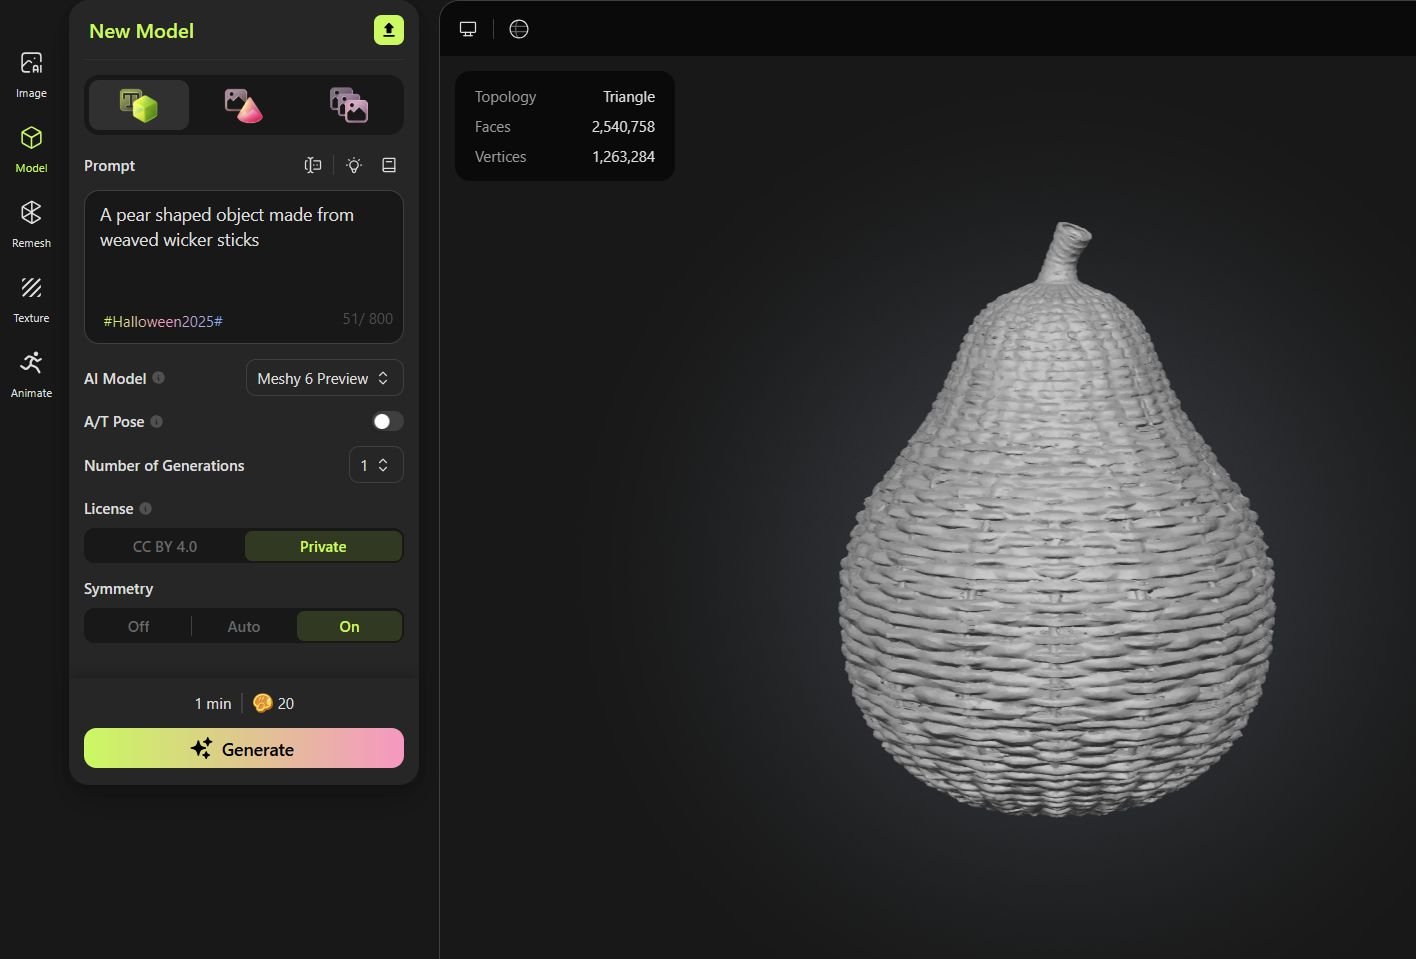
Yes that is very true also. But there are really some excellent advancements being made recently. One more example because you are correct it is all about what you put into these generators. Garbage in and garbage out. So you need to change your thinking a bit. I used the text to 3D method for this one. And how many people would have have thought to ask it this question....see my text entered on the top left side? I wouldnt know where to begin to create this in CAD from scratch. Way too complex for me. And what do you think this object will be turned into for me with a little editing so I can sell it to you guys. If the resulting prints prove effective. Ten points to whoever can tell me what this will end up being!! Just guess? The surface quality is excellent by the way.
-
Fair point but this is really no different than building any kit with what comes in the box. No difference. Except this time the carvings and items are not white metal heavy blobs. You are just improving and bashing. Having said that...to make the things that are very difficult for the average and even experienced builder is OK. But if you prefer to fully scratch build, that is even better and more rewarding. It just depends on what you prefer and enjoy. I mean this is just a hobby after all....for most of us. But yes I do enjoy carving from a block of boxwood too and actually dont mind doing that. But I will also admit I cant do it as good as my AI buddy....or the CAD guy I hired. LOL. "There is no such thing as Bad ART" I wish I had bought that Warhol painting of Soup Cans before ......and had it hanging on my wall. To each his own. Chuck
-
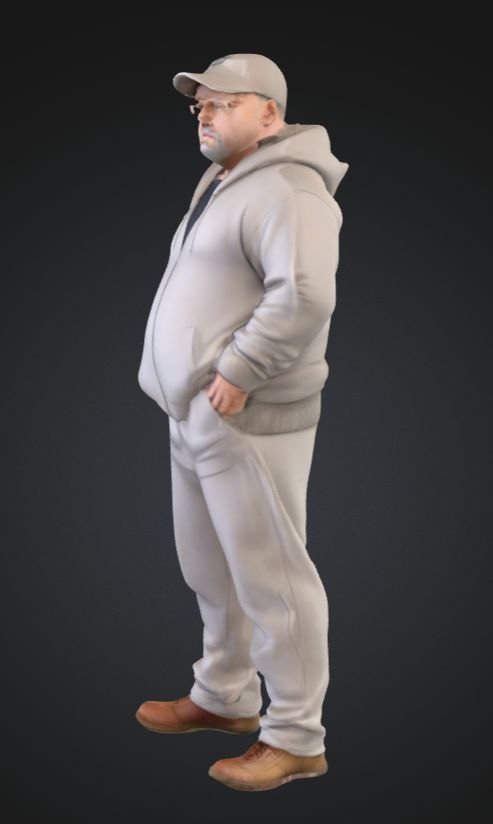
And lastly....A little fun. These 3D AI programs also have a text option. Meaning you can type in text to describe what you want it to model in 3D. One day while practicing with this stuff I got frustrated and I was very tired. So just for giggles, I used the text feature. Now keep in mind that there are no photos of me on the web or even on my computer. But the key to using this AI text to 3D model feature is to be very descrptive. So I typed in... Make me a standing figure of a Caucasian ship modeler who is mildly overweight and 60 years old with a greying GoatT wearing sweat pants and a gray zipper hoodie and a Beige baseball cap wearing glasses. It is sorcery I tell you. SORCERY. I will just leave it at that. For those of you who have met me or know me. Really I am trying to lose a few pounds!!! Scary scary stuff. WTF!!!
-
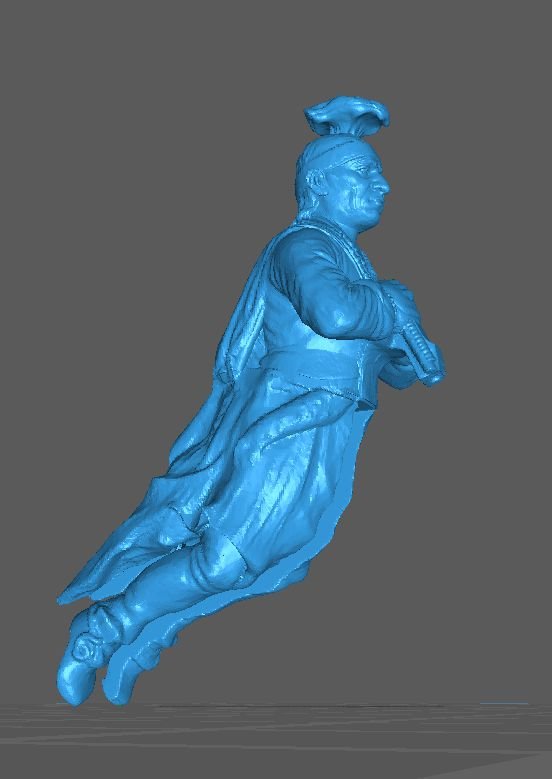
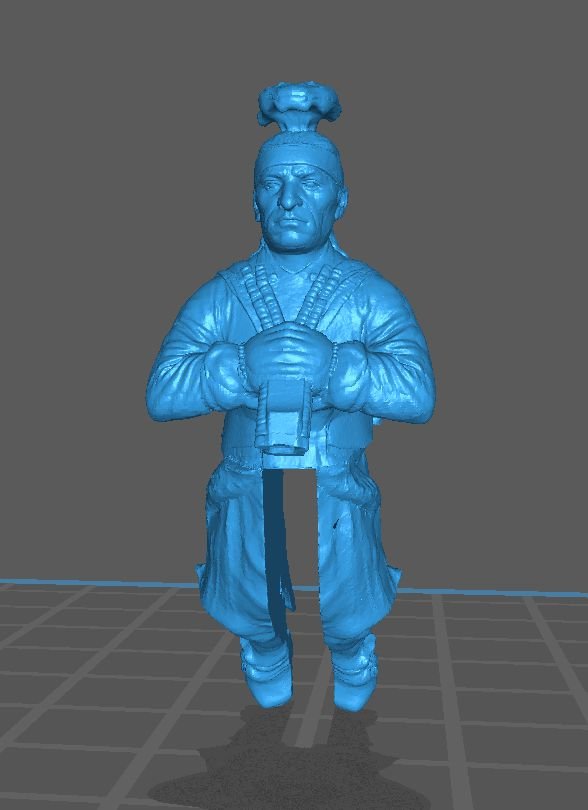
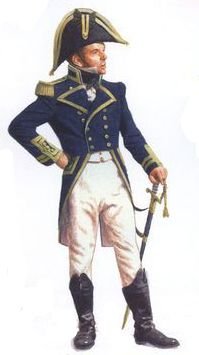
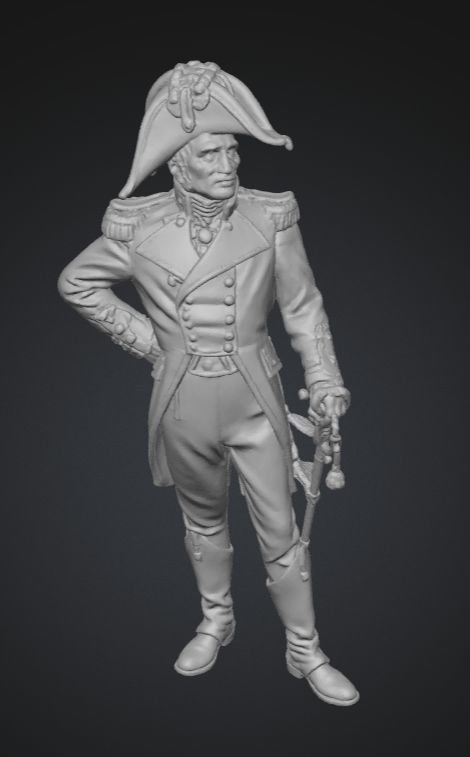
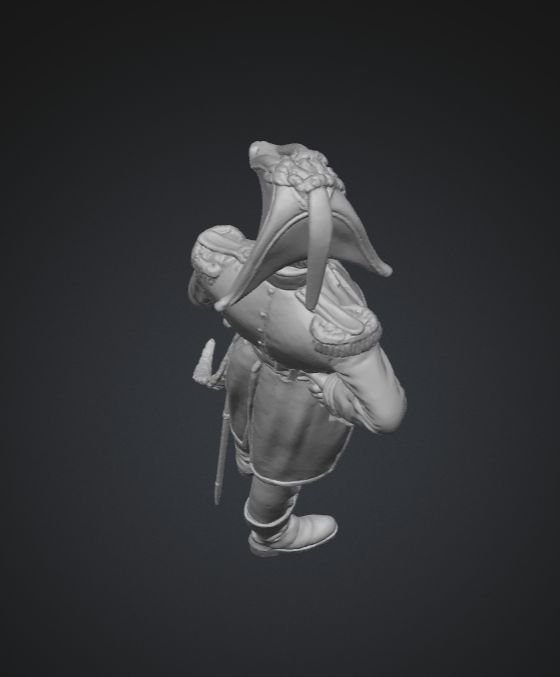
And one final thought....As good as these AI 3D programs are, they do need to get better still. But it is happening quickly. So try again in 3 months or 6 months and your results will be even better. Let me give you another example to illustrate the funky and sometimes amusing results you get. Maybe its not something that bothers you and the quirky things that AI thinks up will be fine with you and for your model. So let s take an image....a drawing really of a naval officer. I dont remember where I got this one. I think its an American Revolutionary war navy Admiral. Stick this in Meshy as described. This is what was made by the AI mind...its pretty good you say. Yes you can nit pick it from this view but essentially it looks pretty good and would be passible after painting. BUT...OK dont laugh now. Let me rotate this beauty so you can see it from another view. See the issue. Its actually pretty funny. That is a lovely hat!!!! Among other things. Now if you do know CAD, that is great because you will need to take this into Blender or something and do some CAD sculpting and correcting. But yes it is a pretty good starting point. Or maybe you just wont care since your family and neighbors wont know the difference when they see this on your model all painted up. My advice....find a drawing or image of an officer without hat to start with, LOL. There are just always some details it almost always never gets correct ....not even close. When Meshy 6 comes out with the ability to use multiple images for each attempt it will get better. Especially if you have 3 views ...FRONT Side and Back. Chuck
-
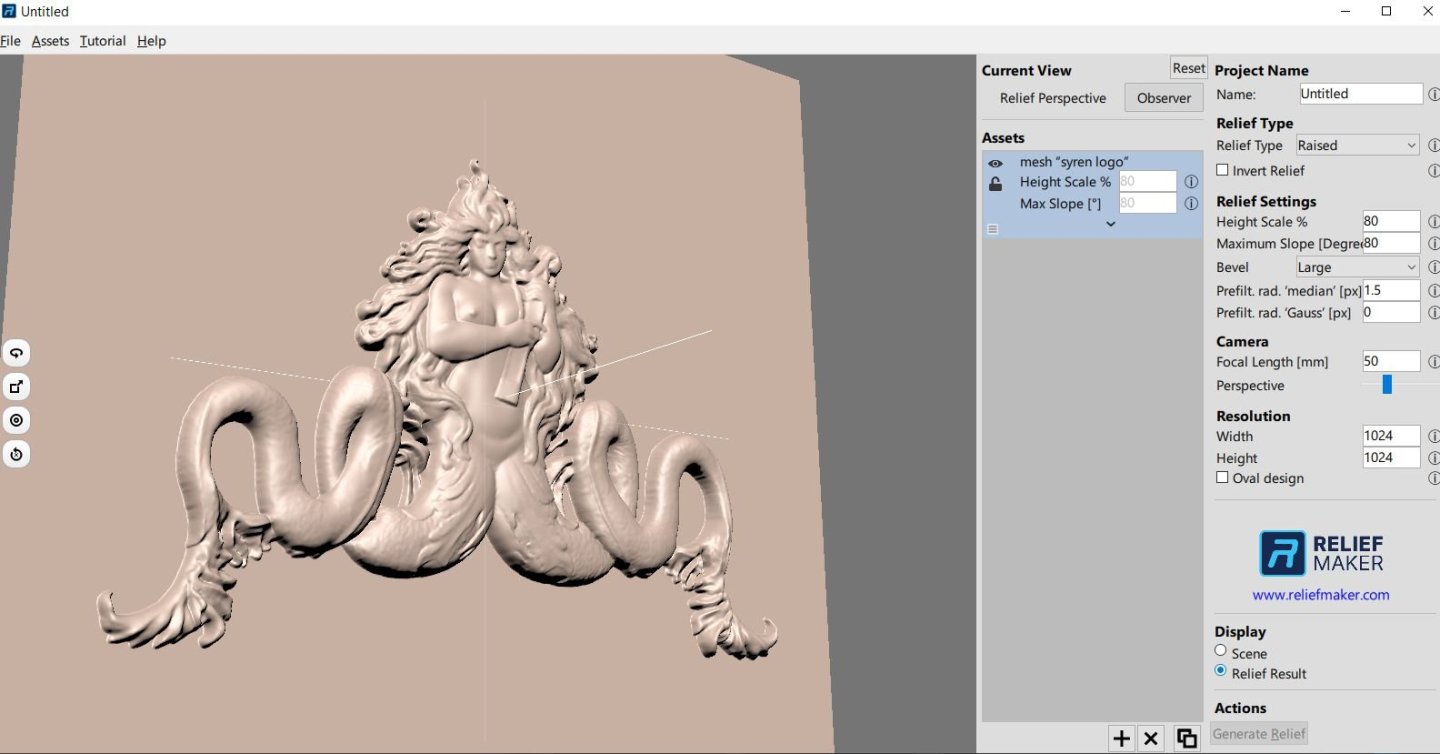
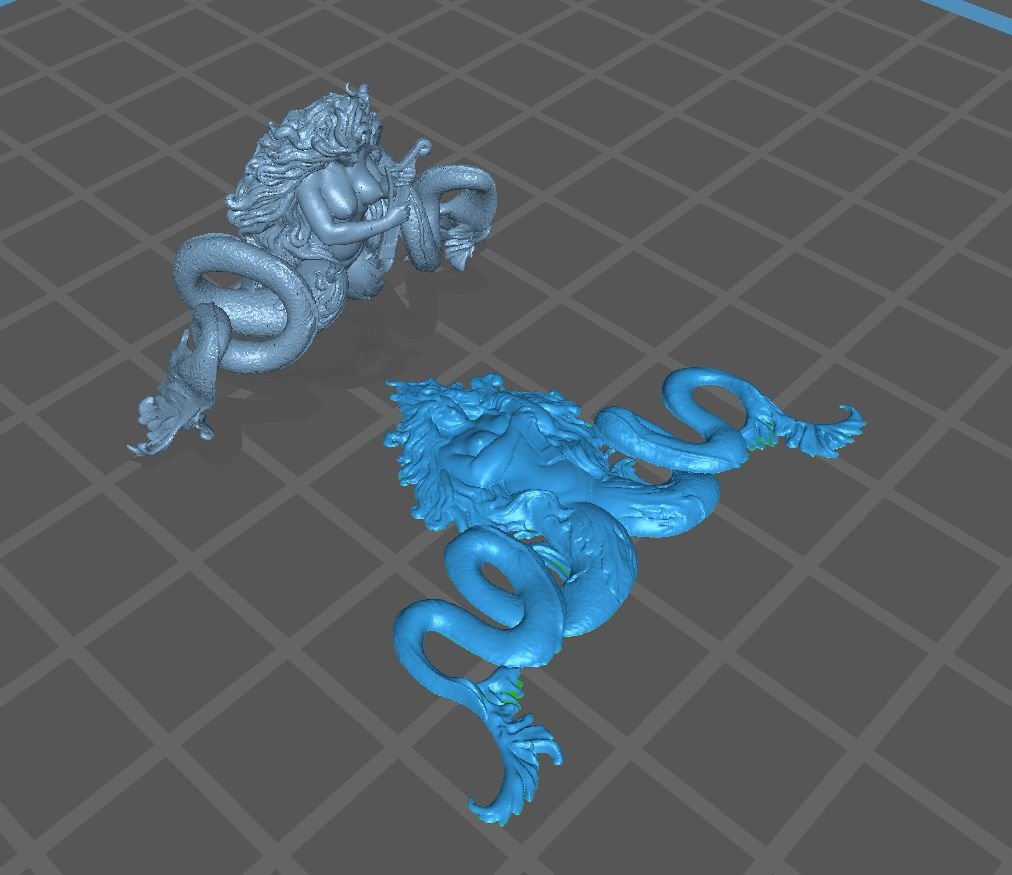
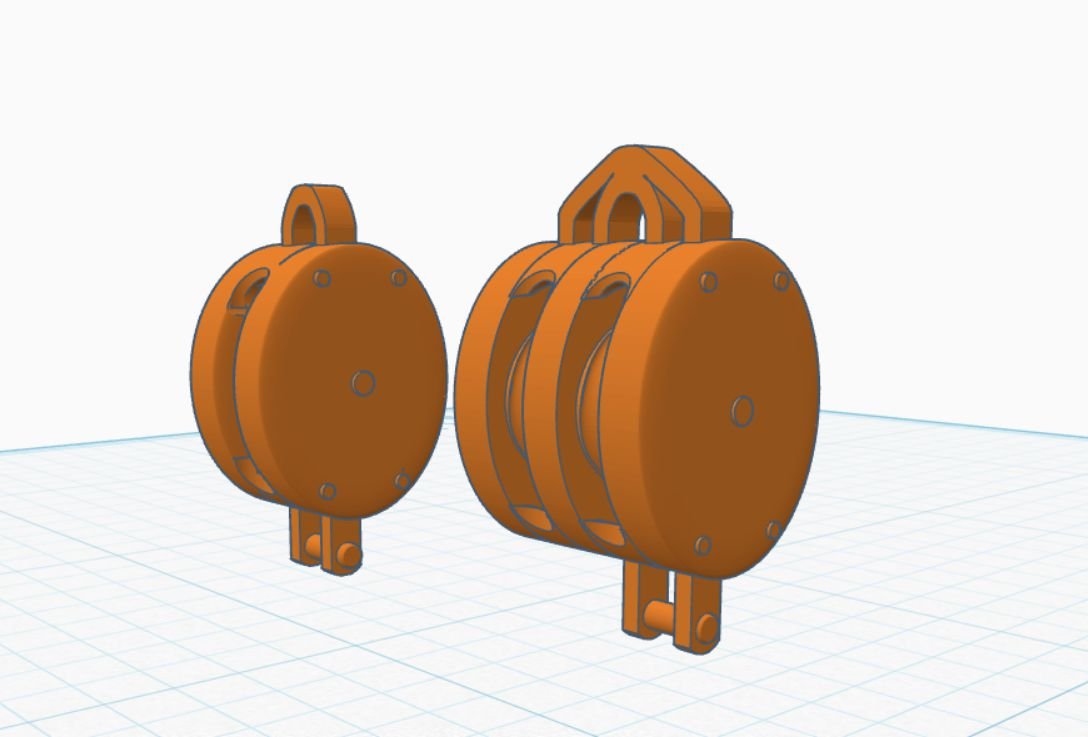
Let me finish up this mini tutorial. And its really just an introduction. You guys can play with the software because there are all kinds of effect you get. So as I mentioned, you can take a drawing or photo into Meshy and it will create a really good AI generated 3D object from it. I am using my syren logo for this exercise. Uploading to meshy will create something like this....The final product I am looking for is a bas relief or medium relief sculpture and not a full in the round sculpture. But Meshy will almost always give you a fully developed sculpture. I mean its pretty cool on it own but I do need a relief insted. This means you will need to use another software. These are harder to find for free but they are cheap or have a 7 day trial. So you can do what you prefer. I use RELIEF MAKER. I think Relief Maker is the best out there for its results. You do get a free 7 day trial but its also nice because you can sign up for just one month as well or 3 months. I think its like $12 for a month. You basically take your 3d STL file and upload it into RM. You can adjust for depth and a bunch of other features. Then click generate. It will convert it into a nice relief. Then you can export it. But make sure you select the option to download only the foreground or the relief carving. This program lets you create whole relief scenes with a background on a flat field. I dont want the background and oly want the relief carving. Again you dont have to know CAD or even be tech wiz here. You upload and then hit "generate". 45 seconds later you have a relief you can download. It is not scary. In the image below taken as a screen shot in Chitbox (your 3D printer slicing software) you can see both the fully developed sculpture and the relief made with the extra Relief Maker step. So that is it for this introduction and mini tutorial. I hope at a minimum it removes and fear and trepidation into trying to make your own carvings. I believe that once you start screwing around with these software sites and AI creations you will get more comfortable using them. Trying to learn CAD is a tough long road and you still cant do a lot of things like this. You will still need to know CAD to make some of the crazy fittings and parts...but this takes care of a lot of them and the carvings. A figurehead needs a few other steps and some knowledge...you have to create the slot for the knee for example. No AI is going to do this correctly. At least not yet. My next mini tutorial will be using another free program to make some fittings. I will use TinkerCad to make some cool stuff in an simplistic fashion with convincing results. This internally strapped block for example was made entirely in Tinkercad and Inkscape. Two free programs. Then you can 3D print them.
-
I am using an Elegoo Saturn 3. Like everything else, as soon as you buy one they will come out with a new version. I believe they are up to Saturn 4 Ultra now. But most of the printers are excellent these days. It just depends on how large a printing area you need. If its strictly for ship model parts then you dont have to go big. last I checked the Saturn 3 was around $300 more or less depending on if it was on sale or not. I have 3 of these machines right now all the same so I can interchange spare parts. I probably need a fourth. But one is all you will need. I do have a wash station but never use it because our parts are too tiny. So I use the 2 and 3 container method with IPA. This will be described in my group forum for printing the capstan parts. Its a lot like buying an ink jet printer…the printers arent that expensive but they get you on buying the resin. You can buy a bottle of resin for $18 or you can spend $100. They all print differently and its a matter of picking the brand and type you need based on your application. For example, my general resin cost about $20 per. My belaying pin and small part resin cost $38 per. My block resin is pushing $95 per. Luckily you get a lot of blocks out of one bottle. 90% Alcohol is also not bad depending on how much you print. I print a lot. So I buy 4 gallons at a time every 6 weeks or so. But seriously if you are just printing stuff for your own model then one gallon will last a while. Chuck