


Chuck
-
Posts
9,096 -
Joined
-
Last visited
Reputation Activity
-

 Chuck reacted to rdsaplala in Question regarding Lines of HMS Triton, 1773
Hi guys, just wanted to share the outcome of the my "experiment" on fixing the bulge on the bulkheads. Here's the half hull mock up I made (pardon the old, worn out ply I used for this project, I wanted to make sure I don't waste any wood if my efforts fail )
I think the bulge is now gone based on the run of the temporary planks I attached.
Now it's time to make a new hull using better ply....... on second thought, I think I could live with this dirty old plywood and just attach my spare bulkheads for the starboard side (too lazy to cut new bulkheads again ) Thanks very much again for all the help guys, I appreciate it
-
 Chuck got a reaction from Ferit in US Brig Syren by Augie - FINISHED - Model Shipways - 1:64
Here you go guys....some contemporary examples. Yes I used the model in the Rogers collection as my basis for rigging the tiller but you can use these also. Here are two more contemporary models that show a similar approach. Note: that even though the tiller is longer on the Rogers collection model, have a look at how the tiller rigging interferes with the last carronade in its port. After reviewing several other options, I thought it more important to make sure the rigging for the tiller is clear of the last carronade. On Syren and on Argus, the configurartion wouldnt have worked without making the last carronade useless in action.
But yes...the two blocks on the deck below the wheel should be added. I omitted them for two reasons. I found a good example in the lightley model which shows it that way...I knew folks would have access to it. The blocks supplied in the kit are huge as you know. They would have looked so out of scale and clunky that I took the aesthetic route and omitted them. If there were any kit builders that didnt take the time to reshape their blocks and just used the square ones supplied....it would have looked absolutely horrific.
The tiller is actually much too long on the Lightly model as well. It didnt match up with Chapelle's draft for the Argus or the Syren. I used his reconstruction for the inboard works with the help of English original drafts (raven and others) and contemporary models. Look at how far forward Lightly placed the ship's wheel. I saw no evidence on any other draft that this was done. Compare it to the English models. I also wanted to include the binnacle which Lightly had no place for since he moved the wheel so far forward. He has it lined up with the second port as compared to the way it is shown on the English drafts and contemporary models.
-
Chuck reacted to Jason in US Brig Syren by Jason - Model Shipways - 1:64
Filler Blocks and Fairing:
The filler blocks that I used are put together from several 1/2" X 1/2" pieces of balsa. I did not have access to anything larger in any store within an hour from here, and the tools that I have at present are really not capable of cutting much thicker, so I decided to have a go by making compound blocks. This is the first time I have had to put filler blocks into anything, but I think I might have hit upon something good by using the compound blocks at the bow and stern. As the profile of the ship sweeps in toward the center, or toward the keel, I was able to subtract blocks instead of cutting large chunks out of a single mass.
Fairing was an easy process until I stopped paying attention to what I was doing, I think something my four year old was doing in the next room caught my attention, and Snap! My stem piece was laying on the floor. That makes me two for two in breaking off stems on wooden models. The upside is, that it was a clean break, and the seam will be hidden by copper eventually.
-
Chuck reacted to tlevine in 18th Century Longboat by tlevine - FINISHED - Model Shipways - 1:48 scale - TriClub
Thanks, Bob.
I remade the seizings for the shrouds using fly tying line. It looks much better to me now. The starboard shrounds have the flag halyards tied off to them as well.
The rest of the rigging was installed per the directions without any difficulty. I painted the belaying pins tan and permanently installed the rest of the lines.
The mounting base is courtesy of Hobby Lobby. I broke the bank on it (79 cents...OK, 85 cents with tax). I sealed and stained it and then applied two coats of Watco's. The holes for the brass wire had previously been drilled into the keel. The rudder was removed for safe keeping.
I am getting close to the end of this little adventure. All that remains is making the rope coils, anchor and oars and touching up the paint.
-
Chuck reacted to fnkershner in Proper Rigging of a Hammock according to the Royal Navy
Here is an article I found on the rigging of Hammocks.
Hammocks RN.pdf
-
 Chuck got a reaction from flying_dutchman2 in Stay away from Best Ship Models.com
From the old site, I will once again create a post about this company. This guy is pure evil. If you you send him your money you will never see a product. He is also not licensed to sell any of them. He is a crook and it is well documented. I deleted a topic promoting it by an unsuspecting Jpet...
For those of you that dont know them.....stay away. Dont even think about it.
I hope that was clear.
This guy should be in jail.
There was a long topic on the old site where the owner and crook himself took part in the conversation. He is a disgrace.
Chuck
-
 Chuck got a reaction from SkerryAmp in Stay away from Best Ship Models.com
From the old site, I will once again create a post about this company. This guy is pure evil. If you you send him your money you will never see a product. He is also not licensed to sell any of them. He is a crook and it is well documented. I deleted a topic promoting it by an unsuspecting Jpet...
For those of you that dont know them.....stay away. Dont even think about it.
I hope that was clear.
This guy should be in jail.
There was a long topic on the old site where the owner and crook himself took part in the conversation. He is a disgrace.
Chuck
-
 Chuck got a reaction from Mcdood in Stay away from Best Ship Models.com
From the old site, I will once again create a post about this company. This guy is pure evil. If you you send him your money you will never see a product. He is also not licensed to sell any of them. He is a crook and it is well documented. I deleted a topic promoting it by an unsuspecting Jpet...
For those of you that dont know them.....stay away. Dont even think about it.
I hope that was clear.
This guy should be in jail.
There was a long topic on the old site where the owner and crook himself took part in the conversation. He is a disgrace.
Chuck
-
Chuck reacted to Rustyj in Bomb Vessel Granado by Rustyj - FINISHED - 1:24 - cross-section
Well the now infamous “set up” has continued. While I was doing some
cutting with the table saw I could hear the keel calling me and it was just
excited to hear the saw running. Well I just couldn’t disappoint it sooooo……
I figured a little "advanced" set up was in order.
I cut out the side and top profile plans and glued them to the pear and
started working on the hog. All pieces were left a little long and will be
trimmed to the correct length later.
I set the saw blade height to remove just enough wood to get to the plans line.
I then just started working my way down the hog adjusting as I went.
And here is the hog with all of the cuts made.
Time will tell if the "advanced" set will continue!
-
Chuck reacted to rameyke in US Brig Syren by rameyke - Model Shipways
I finally got a chance to upload the latest pics of my Syren. You will notice, she is now on a building board. I built that out of a scrap piece of oak from home depot and a couple strips of poplar. I laid the poplar next to a straight edge to make sure they did not have a curve or warp in them before screwing them down. The strips are just tight enough to hold the keel and still let me pull the whole thing out and replace as needed.
I dry fitted all the bulkheads and finally glued them in. I am now working on the filler blocks made from some scrap that I had laying around.
overhead of the whole thing
I think everything looks pretty straight.
from this angle too.
Thanks for watching
-
Chuck reacted to shipmodel in Swan 42 by shipmodel - FINISHED - one-design racing yacht
Hi all -
Thanks for the compliments. I hope that you will continue to enjoy the journey as I work my way up the learning curve for a model like this one.
This post takes me to the companionway and its various components and materials. Here is what it looks like. The vertical side is composed of three plexiglass panels of diminishing size. They slide down in a channel behind the chrome strips to either side The top is one panel with a teak handle and three non-slip areas etched into it. It slides into the channel under the roof. To either side are chrome handholds next to the line brake ramps.
Here is my completed companionway. The panels are clear plastic with the reverse painted flat black. The panel lines are scribed, the anti-skid areas are paper appliques. The retaining strips and handholds are chrome plated brass. Almost nothing is permanently mounted at this point, since I may want to remove them and replace them with better efforts.
Most of the time since my last post has been taken up with learning how to electroplate. Here is the kit from Caswell that I used. It should be perfect for the amount of electroplating that I will be doing on this model. There are only three components - the plating wand with its fabric cover, the chrome plating solution, and the power supply.
In this setup I am not using the wand as a brush, but as an electrode dipped into a plastic container of the solution. The other electrode is clipped to a brass piece to be plated. The clothes pins support both and keep them off the floor of the container. Once this is set up, the power supply is plugged in and the plating begins. It is no more difficult than that.
Here is the process for plating some brass rod to make the handholds. First the rod is bent to the shape that I wanted. Both handholds will be cut from this one piece. The rod is polished with a wire wheel in the Dremel, and not touched after polishing.
Here it is after 5 minutes of plating. There is some buildup on one section of the rod, but that piece will not be used.
Now the rod is polished with the wire wheel and the handhold section cut off. I leave one leg longer to be inserted in a hole in the model. The other end will simply rest on the surface. This make it very easy to install, without worrying about getting two holes spaced perfectly, but still gives a positive mechanical connection for the piece.
For contrast, here is the plated handhold with an unplated brass rod. The difference is clear.
And, again, here are the handholds temporarily installed on the model. With this magnification I can see that there has to be a bit more cleanup on the line brake ramps and tunnels. But I am closing in on 'acceptable' and working my way up to 'good.'
Comments and suggestions always welcome. It is much easier to change things now, and many eyes are always better than one somewhat biased pair.
Dan
-
Chuck reacted to Alex M in HMS Sphynx 1775 by Alex M - Scale 1/48 - English 20-Gun Frigate
Hi,
the time for update here. Further work with chennels and chainplates, completting of them. I hope the images are explanable.
The guns are not fixed now.
Alex
-
Chuck reacted to rvchima in US Brig Syren by rvchima - FINISHED - Model Shipways
Masts Stepped
I stepped the masts last night. Plans on the wall to align the side view, plumb bob hanging from the ceiling just behind the main mast to make sure it's vertical from the front. I used 5 minute epoxy for the job. I've done everything else with 15 second medium CA, so the epoxy gave me 20 times the working time I'm used to.
Stayed up until 1 am making tiny wire links for the chain plate assemblies. Not the most fun part of the model. ;^(
-
 Chuck got a reaction from Jonny 007 in 18th century English Longboat by Chuck - FINISHED - c.1760
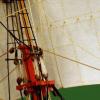
With several of you folks starting to rig the longboat I figured it would be good to post these images of a rigged longboat from the NMM. And before anyone remarks how they may be copyright...I checked into the images and they are not as long as you credit the NMM.
SO....."These images are provided generously from the NMM for our educational use" and are not stored in our database. Our site is pulling the images direct from the NMM site. We are just pointing to what is already made available to the public.
Collection images must always credit ‘National Maritime Museum, Greenwich, London’ and link to the original collection record on the NMM collections website. Collections OnlineThe NMM has developed an Application Programming Interface (API) to make it easy for individuals and organisations to share its collection records and images with the public. If you need to download more than 25 images at a time, you are encouraged to use the API.
Collection images must always credit ‘National Maritime Museum, Greenwich, London’ and link to the original collection record on the NMM collections website. Do not make an unreasonable number of API calls or compromise the experience of other users. As a guide, you should make no more than 3000 calls per day and no more than one request per second. We may place more formal limits on the API in the future. The maximum allowed enlargement of images is 1200 pixels along the longest length of the image. Do note that these images are made available for non-commercial use only. Please contact the Picture Library if you would like to use the NMM’s collection records under different conditions.
Got that out of the way.
Enjoy. They show the rigging very clearly. Click on them and they are even larger.
Chuck
-
Chuck reacted to dvm27 in 18th century English Longboat by Chuck - FINISHED - c.1760
Thanks for the terrific photos, Chuck. So we may post any of the Plans and Photos pictures so long as we credit them? This is good news as their library is very extensive.
Greg
-
 Chuck got a reaction from fnkershner in 18th century English Longboat by Chuck - FINISHED - c.1760
With several of you folks starting to rig the longboat I figured it would be good to post these images of a rigged longboat from the NMM. And before anyone remarks how they may be copyright...I checked into the images and they are not as long as you credit the NMM.
SO....."These images are provided generously from the NMM for our educational use" and are not stored in our database. Our site is pulling the images direct from the NMM site. We are just pointing to what is already made available to the public.
Collection images must always credit ‘National Maritime Museum, Greenwich, London’ and link to the original collection record on the NMM collections website. Collections OnlineThe NMM has developed an Application Programming Interface (API) to make it easy for individuals and organisations to share its collection records and images with the public. If you need to download more than 25 images at a time, you are encouraged to use the API.
Collection images must always credit ‘National Maritime Museum, Greenwich, London’ and link to the original collection record on the NMM collections website. Do not make an unreasonable number of API calls or compromise the experience of other users. As a guide, you should make no more than 3000 calls per day and no more than one request per second. We may place more formal limits on the API in the future. The maximum allowed enlargement of images is 1200 pixels along the longest length of the image. Do note that these images are made available for non-commercial use only. Please contact the Picture Library if you would like to use the NMM’s collection records under different conditions.
Got that out of the way.
Enjoy. They show the rigging very clearly. Click on them and they are even larger.
Chuck
-
Chuck got a reaction from fnkershner in 18th century English Longboat by Chuck - FINISHED - c.1760
There are many variations. This is just one example. I decided to go with a single banked longboat at only 26 ft long. This example from the NMM is much larger. But you may add more oarlocks if you like. It would not be historically inaccurate Also The way the shrouds are shown here are more accurate. They were simplified in the kit rather than use the hooked method. You will notice that most of the lines are hooked.. The hooks allow for quick demasting when the boat is to be stowed or set up for sail. I did decide to add the hooked back stays though. Rather than just tie them off at the cap rail as I thought it would look too kit-like. The rope coils on the back stays are the falls from the tackle. They are belayed to the line above the block as done on the kit. Thats why I posted these. Just in case folks want to go the whole nine yards with it. The scale makes it difficult though but it would really kick it up a notch.
Chuck
-
Chuck got a reaction from flying_dutchman2 in 18th century English Longboat by Chuck - FINISHED - c.1760
With several of you folks starting to rig the longboat I figured it would be good to post these images of a rigged longboat from the NMM. And before anyone remarks how they may be copyright...I checked into the images and they are not as long as you credit the NMM.
SO....."These images are provided generously from the NMM for our educational use" and are not stored in our database. Our site is pulling the images direct from the NMM site. We are just pointing to what is already made available to the public.
Collection images must always credit ‘National Maritime Museum, Greenwich, London’ and link to the original collection record on the NMM collections website. Collections OnlineThe NMM has developed an Application Programming Interface (API) to make it easy for individuals and organisations to share its collection records and images with the public. If you need to download more than 25 images at a time, you are encouraged to use the API.
Collection images must always credit ‘National Maritime Museum, Greenwich, London’ and link to the original collection record on the NMM collections website. Do not make an unreasonable number of API calls or compromise the experience of other users. As a guide, you should make no more than 3000 calls per day and no more than one request per second. We may place more formal limits on the API in the future. The maximum allowed enlargement of images is 1200 pixels along the longest length of the image. Do note that these images are made available for non-commercial use only. Please contact the Picture Library if you would like to use the NMM’s collection records under different conditions.
Got that out of the way.
Enjoy. They show the rigging very clearly. Click on them and they are even larger.
Chuck
-
Chuck reacted to JerseyCity Frankie in HMS Sophie by JerseyCity Frankie – FINISHED - brig from Patrick O’Brian’s Master and Commander - Shadow Box
I finished this model four years ago and I have had some trouble finding the photo documentation since I had a computer die on me and files were all over. Likely I will add more as I find them.
This is a scratch built solid basswood hull model of a fictional ship based on the actual brig H.M.S. Speedy made famous by Lord Cochrane and fictionalized by Patrick O’Brian. Drawings were found on the web and the novel itself gives a great deal of useful information including measurements.
-
Chuck reacted to Jason in US Brig Syren by Jason - Model Shipways - 1:64
Hello All,
This kit has been languishing in my study for almost a year, waiting patiently in the box for me to start it. As I have noted in my 18 Century Longboat build log, this kit was a consolation buy for me during a move. I have long wanted a Model Shipways kit, and this one was available at my local hobby store. Not that Syren was my only option, I chose this one because I found the subject compelling, and the model quite beautiful. Once we moved, I found that my new work space was on the small side, so I chose smaller projects to work on in my free time. However, after building the longboat, and seeing so many other great builds on here, I was inspired to begin Syren regardless of the less than ideal space.
To begin the build, I made short work of the false keel, keel, and stem assembly. Taking time of course to make sure that all of the parts were properly aligned, and fitted. I unfortunately do not have any pictures of the bulkhead installation, not sure how that happened. I have seen many great and ingenious ways of making sure one's bulkheads are aligned on this site, and I decided to follow suit by borrowing some of my Son's Duplo blocks to use as squares. They worked great!
Over the next few days, I will be adding to this log, up to the point at which the build is currently. (transom framing) However, my building efforts over the coming weeks will be to wrap up the long boat. Unless of course the winds of inspiration blow contrary to the best of intentions.
-
 Chuck got a reaction from WackoWolf in Do we have a list of kits organized per scale?
Nope we dont.....but if you want to put one together or if someone wants to get that info in a spreadsheet...it would be awesome.
We would gladly post it. I am sure that old one that Floyd has probably needs some updating as well.
Chuck
-
 Chuck got a reaction from Fright in Sources for Boxwood Blocks
Its gonna be a while until I build up some stock....but "Chucky Blocks" are coming soon.
Lets take a look.
Model Expo price for 3/32" single blocks 100 QTY = $20 You know what these look like
Lloyd's price ..................................................... = $35
Jerzy's price - 2 mm .......................................... = $45
My price in boxwood will be ............................... = $27
Expo blocks compared to Warner's blocks below
My blocks compared to Jerzy;s (Jerzy's on the right) 2mm
And another shot of my 2mm blocks...the single blocks on the right have no finish on them yet the doubles have some wipe-on-poly. This is an old image that doesnt show any strop groove. I will have to take some new pics once I start up production. These were basically my tests....I have made some adjustments (sheave slots wider slightly so the holes for rigging can be larger).
Hopefully soon.....depending on how much interest in this there is out there.
-
Chuck reacted to Geoff Matson in Sources for Boxwood Blocks
Chuck
Simply outstand work and craftsmanship on the blocks. I will be waiting for them to become available.
-
 Chuck got a reaction from Landlubber Mike in Sources for Boxwood Blocks
Its gonna be a while until I build up some stock....but "Chucky Blocks" are coming soon.
Lets take a look.
Model Expo price for 3/32" single blocks 100 QTY = $20 You know what these look like
Lloyd's price ..................................................... = $35
Jerzy's price - 2 mm .......................................... = $45
My price in boxwood will be ............................... = $27
Expo blocks compared to Warner's blocks below
My blocks compared to Jerzy;s (Jerzy's on the right) 2mm
And another shot of my 2mm blocks...the single blocks on the right have no finish on them yet the doubles have some wipe-on-poly. This is an old image that doesnt show any strop groove. I will have to take some new pics once I start up production. These were basically my tests....I have made some adjustments (sheave slots wider slightly so the holes for rigging can be larger).
Hopefully soon.....depending on how much interest in this there is out there.
-
 Chuck got a reaction from molasses in Sources for Boxwood Blocks
Its gonna be a while until I build up some stock....but "Chucky Blocks" are coming soon.
Lets take a look.
Model Expo price for 3/32" single blocks 100 QTY = $20 You know what these look like
Lloyd's price ..................................................... = $35
Jerzy's price - 2 mm .......................................... = $45
My price in boxwood will be ............................... = $27
Expo blocks compared to Warner's blocks below
My blocks compared to Jerzy;s (Jerzy's on the right) 2mm
And another shot of my 2mm blocks...the single blocks on the right have no finish on them yet the doubles have some wipe-on-poly. This is an old image that doesnt show any strop groove. I will have to take some new pics once I start up production. These were basically my tests....I have made some adjustments (sheave slots wider slightly so the holes for rigging can be larger).
Hopefully soon.....depending on how much interest in this there is out there.