
MORE HANDBOOKS ARE ON THEIR WAY! We will let you know when they get here.
×

dgbot
-
Posts
3,993 -
Joined
-
Last visited
Reputation Activity
-

 dgbot reacted to JerryTodd in Constellation 1856 by JerryTodd - 1:36 scale - RADIO - First Class Sloop of War
Running around town a lot today, so I only managed a little bit of paint.
-
dgbot reacted to JerryTodd in Constellation 1856 by JerryTodd - 1:36 scale - RADIO - First Class Sloop of War
Finished making and installing the mizzen bitts.
Built up the bow bulwarks and padding the bowsprit hole.
-
dgbot reacted to Laxet in US Brig Niagara by Laxet - FINISHED - Model Shipways
Well, this is it. As far as I'm concerned, she is done. Here are some more final pics. It's been fun. I'll be monitoring this forum in case anybody wants to discuss anything.
-
 dgbot got a reaction from Piet in Symphony by Omega1234 - FINISHED - 1/200 scale - 112' Ketch
The easiest way to do the frames. The only drawback is going to the trouble of making a half hull then the pain of slicing it up. I have always liked the look of a half hull. You are doing it the traditional way. This should prove to be an interesting build log.
David B
-
dgbot reacted to BenF89 in Symphony by Omega1234 - FINISHED - 1/200 scale - 112' Ketch
Patrick,
You're following in the footsteps of old school naval architects and shipwrights. Your method not only makes sense, its a tried and true method for doing exactly what you want to accomplish! The main entry hall of the college I attended was lined with half hulls of all different ships, designed by the founder of the school and used for the purpose of lofting fair lines for making frames.
And, you look off to an excellent start. Keep on keepin' on!
-
dgbot reacted to Omega1234 in Symphony by Omega1234 - FINISHED - 1/200 scale - 112' Ketch
Hi everyone
Many thanks for all your comments and support!
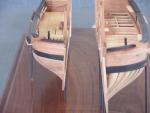
Well, my initial intention of using Ticonderoga's hull and adapting it to 'fit' the original boat just didn't work. So, instead, I decided to bite the bullet and carve a half model of the proper hull. The reason why I did this was so that I can get proper frame templates. The half hull consists of slices of wood, lightly glued together and then sanded to shape. Once I'm happy that I've got a nice and shapely hull, I'll then separate the slices to get the exact frame shapes.
After that, I'll use those half frames to make full frames for a plank on frame hull. The photos below show the progress so far.
I hope this makes sense!
Cheers
Patrick
-
dgbot reacted to src in HMS Dragon 1760 by Siggi52 - FINISHED - Scale 1:48 - English 74-Gun ship
Siggi, thanks for the information, it does help.
I agree, some mini tools would be nice along with that microscope.
Sam
-
dgbot reacted to Mirabell61 in HMS Pegasus 1776 by Mirabell61 - FINISHED - scale 1:64 - 16-gun sloop
Build log part 87
Update
have started to coil up the line-ends (separate coils)
Nils
several lines to foremast bits and to bow pin rails
-
 dgbot got a reaction from firdajan in Santa Maria 1492 by firdajan - FINISHED - CARD - 1:96
Well done.
David B
-
dgbot reacted to shipmodel in Queen Anne's Revenge 1710 by shipmodel - FINISHED - 1/36 scale
Hi all and thanks for the likes and comments.
At the end of the last segment I had finished and hung the square sails. Now I turned to the staysails, most of which will be shown furled.
The sails were made up much like the square sails, but as triangles rather than trapezoids. Here are the two from the first set that were made. They were discarded because the panel lines are wrong. The pattern with a central seam and angled panels is much more modern than would have been in use in 1710. I made a hasty assumption before checking my sources.
1
So here is the redone main staysail. It is reduced in size for purposes of furling, but is otherwise appropriately rigged. As explained by R.C. Anderson, the lines and blocks for the foreyard braces would have interfered with the staysail sliding up the stay. So a false stay was rigged under the mainstay and the sail is spiral laced to it.
2
The lower end of the false stay is secured to the foremast by a collar that rides just under the thumb cleat for the forestay (indicated by the arrow on the left). A small deadeye is turned into the collar and a matching one seized into the lower end of the false stay. The lanyard between them is tightened and the running end is frapped around it (see the arrow on the right). Lacing this in, around and through the previously rigged lines was one of the most delicate operations I have ever performed in my years of modeling. Suffice to say that I will pre-rig this next time.
3
The upper end of the false stay is comparatively easy. There is an eye splice turned into the end of the line, which is then seized to the mainstay just above the euphroe lashing. A single block is seized to the stay between the euphroe and the mouse to run the uphaul line for the staysail.
4
Once the sail was rigged, the lines were loosened, the sail misted with water and drawn down toward the foremast. It was furled, twisted, and wrapped with one leg of the sheet line, the other was used to secure the furled sail at the deck to one of the deck cleats. When I was happy with the look it was painted with matte finish to stiffen it.
5
Similarly, the main topmast staysail was rigged on its false stay.
6
The mizzen stays do not have any brace blocks rigged to them, so the staysails do not need a false stay. Here is the mizzen staysail.
7
And here is the mizzen topmast staysail.
8
The fore staysail was done in the same way.
8a
The fore topmast staysail was set and shown billowed, its shape mirroring and complimenting the mizzen lateen sail. I first ran it down the t’gallant stay, but this did not seem right. First, it put it too far forward to look good to my eye. Maybe more important, rigging it that way would have one of the largest sails being run between one of the smallest diameter masts and the end of the jib boom, also not that large a timber. This is a broken masthead waiting to happen. Instead, I looked at some contemporary French models and usually saw a line running from the topmast head to the end of the jib boom. This looked much more likely, and gave the sail a nice angle and shape.
8b
So here is the model with all sails set and rigged.
9
Next I turned to the flag. Although no one truly knows what his flag looked like, the Internet has one that is called the Blackbeard flag. It is a demon holding a glass in one hand and a spear in the other, aimed at a red heart with three red dots in the lower corner. This was the one selected by the museum.
I took the image and imported it into my computer. Using Photoshop I resized it, then used the skew function to bring down the lower outer corner of the flag. This helps it to hang more naturally without a buildup of material. A copy was saved and reversed, then both were combined into one image.
10
The double image was printed out on a piece of paper. A piece of thin fabric large enough to cover the image with some excess all around was stiffened, then taped over the upper image and run through the printer. This put an image on the first side. The fabric was cut loose, turned over and positioned over the lower image. Since the fabric was somewhat transparent it was easy to locate it exactly over the previously printed image. Again it was taped down on all sides and printed again.
11
After allowing the ink to dry for 48 hours the flag was stiffened to lock in the ink, then cut out, leaving a bit of excess along the fly edge. The hauling line was set in and the flap glued over it and ironed down. The ensign staff was built up with a small block at the top and a cleat mounted at easy reaching height for a man. With the staff mounted the flag was misted and curled.
12
So here is the model almost done.
14
The next segment should be the last. Only the stern lantern to build and the anchors to mount.
Back soon.
Dan
-
dgbot reacted to firdajan in Santa Maria 1492 by firdajan - FINISHED - CARD - 1:96
Thank you, friends.
After finishing of the second part of running rigging and some details ( rudder, anchors ), I can say - the model of Santa Maria is finished. It was one of my wishes - to have models of the whole fleet of Christopher Columbus. Now it is fulfilled.
I would like to say a big Thanks for your attention, comments and likes.
Thank you very much !!!
See you at next ship model.
Jan
-
 dgbot got a reaction from WackoWolf in Le Fleuron by Gaetan Bordeleau - FINISHED - 1:24
Gaetan do you hire carpenter ants for this fine workmanship? Marvelous.
David B
-
dgbot reacted to Hank in USS NEW JERSEY (BB-62) 67-69 by Hank - FINISHED - Trumpeter - 1:200 - PLASTIC
Well, here are some photos of the After 02 Level/Midships 02 Level superstructure that I've been working on lately. Since I AGAIN can't see the attachment info in the edit box, I'll make my comments here rather than after the photos due to the reason just stated - I have no way of telling where the photos end to continue my comments.
This area of the superstructure is modified from the kit in that NEW JERSEY had her center (6) 40mm mounts removed and replaced with (4) Zuni Chaff Rocket Launchers and a Mk. 56 Fire Control Director platform in the center tub area. The Mk. 56 Directors were added in the mid-50s but were relocated on this central athwartship platform in her 67-68 refit. The Mk. 56 FC Directors will be scratchbuilt at a later time, as will the various life raft racks that were located throughout the superstructure. I have these drawn up in CAD but haven't created the brass PE sheets that they will come from.
The after 40mm tubs were refitted with Ready Service Lockers and a hose/cable reel just to the after wall of each tub. The center photo shows the refueling/high line transfer tripod also added during this time period. As well, various equipment along the bulkheads have been added/modified for this configuration. One of the other modelers on another forum to which I also post this build has mentioned a problem with the deck level around the (3) 5" gun mount bases. I will research that prior to continuing any other work on the 02 Level so that if this also needs to be rectified it can be done before anything gets put in the way of those open areas. This issue will also possibly affect the 01 Level 5" mounts (2).
I hope to do further work by adding the forward superstructure unit next week to this assembly and then move on to the 01 Level which will also require various modifications. I have also done work on the lower bow to bring it closer to the actual "bulb" that was not present in the kit hull. As I've mentioned before, the kit hull "sucks" - it simply isn't correct and will take further work to correct the after 20" or so which is not shaped properly. Various methods/schemes/modifications are under investigation so nothing has been decided upon at this time. It will NOT remain out of the box I can assure everyone of that!
-
dgbot reacted to CaptainSteve in Licorne 1755 by mtaylor - 3/16" scale - French Frigate - from Hahn plans - Version 2.0 - TERMINATED
Looks pretty darn good at 3"-from-monitor-using-super-exploded-resolution scale, as well.
Nice work, Mark !!
-
dgbot reacted to mtaylor in Licorne 1755 by mtaylor - 3/16" scale - French Frigate - from Hahn plans - Version 2.0 - TERMINATED
One small step for Licorne, one big step for me. I got the forward outer bulwark planked to my satisfaction. Happy Dance!!!!
The planking goes from one plank to three. I got the middle one cut in as a proper stealer topmost goes under the ebony strip per the planking diagram (a different French frigate, but it showed me how it was done).
Here's the pic of the starboard side, and onto the aft ones.... The pic is super macro from about 4" out. Looks better at galloping on horse back scale.
-
dgbot reacted to ianmajor in HMS Unicorn by ianmajor - Corel - Scale 1:75, 1748 to 1771
Three lengths of 1mm thick N/S were tacked together and then drilled and milled to make the handle brackets. A slot was sawn in the end of each piece to take a handle.
The best two brackets were then each soldered to a ring.
Three pieces of 0.5mm N/S were tacked together and drilled/milled to make the handles.
The next photo shows the various stages. At the top are the blanks produced by milling. The middle shows the blanks filed to final shape. The bottom is an assembled pump.
A final photo shows the pump in my agriculturals for scale. The handle wiggles up and down!
The metalwork is still to be blackened, then after some final adjustments the whole pump cluster will be ready for permanent installation in the waist area.
-
 dgbot got a reaction from gjdale in Le Fleuron by Gaetan Bordeleau - FINISHED - 1:24
Gaetan do you hire carpenter ants for this fine workmanship? Marvelous.
David B
-
 dgbot got a reaction from popeye the sailor in USS NEW JERSEY (BB-62) 67-69 by Hank - FINISHED - Trumpeter - 1:200 - PLASTIC
I agree with CC your patience is and attention to detail is astonishing.
David B
-
dgbot reacted to catopower in HM Cutter Alert 1777 by catopower – FINISHED - Shipyard - 1/96 scale - CARD
So, here's the model as it looks, planked, but no keel, stem or sternpost. The inner bulwarks is only test fit and not glued into place yet.
I've just installed the shear molding under the gunports, laminated many of the parts to give them thickness. I also made the mast coat, hawse pipes, prepped some of the mast top hardware, began shaping the wooden dowel mast, and glued up the anchor stocks, but haven't been added yet.
Parts are in the process of construction, so still look rough, particularly the round ones.
Some deck hatches. The only thing I'm not super happy with is the gratings since they're only printed. I know I could just make scratch gratings from wood, but it would be nice to see how the final ship looks as built from the kit.
View of the quarterdeck. I had a bit of a white gap at the bottom of the bulwarks and tried to even out the look with paint, but I got a little on the printed deck. After cleaning, I had to give the deck a wash of paint to even out the look.
A view of the bow showing the friezes, wales, stem and bow planking. Note the horseshoe. The one on the other side tore when I cut it and it doesn't look as sharp.
Close up of the bow planking.
Everyone who’s seen this model is amazed at how sturdy a card hull can be, including me. The lapstraked planking really makes this model solid. I also get a lot of people asking me what kind of wood was used for the deck planking, right before they say “this is paper?”
This being my first card model, I’ve learned to cut carefully and to soak parts with CA to make them stiffer and to make it easier to shape them and so that the edges don’t “fuzz up”. Plus, it makes it easier to cut very delicate pieces without them tearing up. I’ve also learned to cut out the hollow portions of parts before cutting the parts from the sheet.
Clare -
dgbot reacted to Gaetan Bordeleau in Le Fleuron by Gaetan Bordeleau - FINISHED - 1:24
Bolts for the first deck
Photo 1; the red rectangle with a shoulder is slightly thinner than the bolt and is used a guide to make a hole always at the same place. The parallel holds the guide in place.
Photo 2-3-4; preparing the planks for the channels
Photo 5-6-7; ouside bolts and the rest inside
I cannot print my log anymore! I lost the print icon at the bottom of the page. Same thing for others, but not all the other subjects. If someone has an idea I would be glad to hear it.
-
dgbot reacted to SawdustDave in Sovereign of The Seas by SawdustDave - FINISHED
Finished with the portside gun port panel figures....
The Scorpion....
The Scales and Scorpion installed....
The port side figures....
-
 dgbot got a reaction from Izzy Madd in Cutty Sark by NenadM
I pray that your biopsy comes up clean. What do they think you have. If it was not for my health insurance my fight would have cost me a half a million dollars. When I was at the Hope Lodge my heart went out to those who lost their ins and had to have medicare. They were alway doing battle every time they went to the hospital. My Dr. is one of the leading experts on my form of cancer and made me go through a two stage transplant. Medicare will only let them do one stage saying the second stage is not necessary. May god bless you and help you along.
David B
-
dgbot reacted to ortho85 in Dorade 1931 by ortho85 - FINISHED - Amati - scale 1:20 - Fastnet Yacht
Thanks for the support, everyone.
The last few weeks have been spent on the mast and boom. I decided to keep the mast natural timber colour.
When I woke early this morning, I thought "what have I done?". Oh, no!
I had (again) blindly followed the plan, and stained the boom mahogany. Only now did I think it might have looked better in a natural finish.
Too late, now - there's too much on the boom to backtrack. And The Boss likes it, anyway, so I'm safe.
First the mast received its 'crosstrees'. These are fitted into cuts in the mast:
Then finished with brass strips:
In the photo above you can also see the timber strip and eyebolts that run most of the length of the mast. On the other side (facing the bow) are fitted two brass channels. These caused a lot of trouble and stress in their cutting, fitting, and gluing!
At the tip of the mast goes a recessed pulley, requiring a cut through:
And with the brass fittings in place:
The ball on the top is a wooden bead, with the simple direction to paint it brass coloured. I've been unable to find this locally, so am trying gold spray paint.
Now to the boom. It's a miserable day here, so there's lousy light. Some are with the flash, some without - apologies.
Here's a fair colour match:
And the other side with bad colour:
And, finally, some detail views:
And the storm's about to hit, here in Brisbane, so it's time to close down.
Cheers,
Brett
-
dgbot reacted to mrangus in Scottish Maid by mrangus - Artesania Latina - first build
Well gents I had a little time tonight so here's what I did...
As you can see from pics, I cut out stealers and fit them as best I could between the two "problem" planks. I think they came out ok, although one side is a little better than the other. I included a pic of the stern post which will cover up most of the area that didn't look quite so good. So I think I'll go with this for now...
Rest of planking hopefully will go smoothly given the relatively straight runs now. I'm starting to get anxious on what I should use for finishing the hull. I was reading the other night about water based stain and urethane, which sounds a bit easier to use than other products. Anyone have thoughts on this?
Thanks again for the ideas, please keep sharing as it does help.
-
 dgbot got a reaction from NenadM in Cutty Sark by NenadM
I pray that your biopsy comes up clean. What do they think you have. If it was not for my health insurance my fight would have cost me a half a million dollars. When I was at the Hope Lodge my heart went out to those who lost their ins and had to have medicare. They were alway doing battle every time they went to the hospital. My Dr. is one of the leading experts on my form of cancer and made me go through a two stage transplant. Medicare will only let them do one stage saying the second stage is not necessary. May god bless you and help you along.
David B