


EJ_L
-
Posts
2,246 -
Joined
-
Last visited
Content Type
Profiles
Forums
Gallery
Events
Everything posted by EJ_L
-
 Thank you very much for the kind words. I am glad you enjoyed reading through and now can sit back and watch the new work!
- 608 replies
-
- 3
-

-
- la couronne
- corel
- (and 1 more)
-
Royal Louis by fmartins - multi-media
EJ_L replied to fmartins's topic in - Build logs for subjects built 1751 - 1800
Those side panels are called "bulwarks". I think you have a good plan to build them. What you have designed is basically what most kit instructions would have you do so I think you are good to go! Hope you finger heals well and quick. I've done similar injuries to myself over the years, hazard of my job and hobbies. -
I have a similar problem coming up on my build with the lamp arm. One thing I have done which has helped in the past is to mount the base of the arm on the side of a forward corner. This still allows it to swing to all the places that I need but also keeps it in front of the ship so there is less chance of it hitting a mast. Combining that with the lights on my OptiVisor, I am usually covered for safe lighting. Another option you could try would be to mount the base on the wall higher than your model. Then you can pull the light down and the arm swing should be above all your work instead of next to or behind it.
-
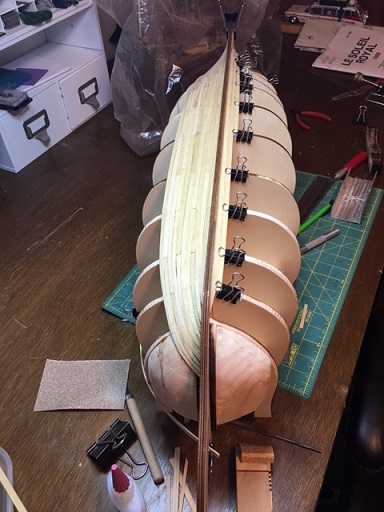
Quick progress update. I have completed the first 10 strakes on the starboard side and have now started the port side. Garboard strake is in place and strakes 2 and 3 have begun. Planning on getting a lot of work time in this weekend as we have an ice storm headed our way. Good time to just stay inside and build. My plan is to go 10 strakes on both halves of the hull and then I will stop again to switch back to La Couronne. While working on her, I will start figuring out where I want to run the wiring for the cabin lighting down and out the bottom. I am also going to look into the cradle design I want to use and make sure I can hide the wires either in it or in a place that won't be easily seen. I needed the bottom of the ship planked but not very far so I could still get inside to run the wires. I am having to do a lot more forward thinking on this one since I am changing the build so far outside the instructions. Adds some more excitement!
- 961 replies
-
- 11
-
-
You will have a great looking model and you are right, the vast majority of your viewers won't know the difference. First models are learning experiences. My first wooden ship is full of imperfections and quite honestly some horrible things. Still, she sits proudly in her case in my living room. I like to see where I started and have always said that as long as you are improving from build to build you are growing and learning. This hobby is as much about the journey as the finished product. Keep up the good work you are doing!
-
I guess the repairs come down to how much work do you want to put in and what do you want the end result to be? The easiest and fastest way is to simply split the space with two planks and fill it in. It will not be technically correct but it will fill the gap. The other way unfortunately would be to remove all the planking below the whoops and resuming planking from the remaining plank down to the keel. This will provide you with a much nicer finish in the end though it may cost you some replacement planks and will teach you an extremely valuable skill that you will use a lot while building model ships: the art of rebuilding!
-
Welcome to MSW Jim! I think getting glue on the windshields of our first model cars is a problem that plagues all of us as kids. That is a great kit to start with and as you have already found out, the build logs on here will be a great help to you. Have fun looking around the site and "sponging" up all the useful information on here. I will recommend starting a build log though. When you hit those tougher spots and have questions, the logs are a great place to get answers as we can see what you are struggling with and provide better answers. Good luck to you on your first ship build. I hope you enjoy it as much as all the other models you have done!
-
Your metal work is amazing. Just the details in that alone are a subject of study. Looking great!
-
Thanks for the compliments and I am glad you are learning as well. That is the greatness of this site. Showing off our work is good too but, being able to share in how we build so others can learn and grow is it's true success. Welcome to the log and I will go take a look at your build also.
- 608 replies
-
- 3
-
-
- la couronne
- corel
- (and 1 more)
-
You are off to a good start on your first build. Keep going and you will have yourself a nice model when done and gained a lot of skills for the next!
-
If I was, I would probably bleed out before I noticed it without the glaringly obvious red spots on white wood! Now that you mention blood wood though, I do have some out in the wood shop. I may look at ripping some down to use in lieu of red paint. I don't need a lot for this model so it might be worth it. Something to think about. Now if only trees produced royal blue wood....
-
Amati does sell their plans separately according to their website. Are you in the US? If so, try contacting Ages of Sail, see our sponsors list on the front page. They are a distributor for Amati and may be able to help you out in obtaining the plans.
-
When I packed up the old ship yard I had years worth of stuff everywhere and it all went in to boxes that are now stacked in my closet. I unpacked the stuff I use all the time and stuff that I know I will need but a lot of the extras that have been hanging around over the years are still packed away till needed. That combined with the fact that my table is now three times bigger than what I had at the old house and the clutter doesn't pile up as fast. Plus I am trying to keep up with the mess since it is a new house and all... I will have to take some in between pictures especially when I am planking so the true mess shows.
- 608 replies
-
- 5
-
-
- la couronne
- corel
- (and 1 more)
-
Interesting to watch you design and print this model. I think this is going to be a rather fun and informative build. Looking forward to seeing your progress unfold.
-
Welcome to MSW! I have seen a couple of excellent 3D builds on here now that were truly fascinating. They were of modern yachts though so I am very interested to see what you can do with an older ship like the Surprise. I will head over that way and follow along! As to your user name, you can call yourself what ever you would like. A lot of people though will put their first name down in their signature if they would prefer to have people use it. You can do whichever you feel most comfortable with.
-
Royal Louis by fmartins - multi-media
EJ_L replied to fmartins's topic in - Build logs for subjects built 1751 - 1800
The work you are doing on this tiny model is truly excellent. If you can do this good of a job on something this small, I am willing to bet a bigger model would be even more amazing. Get that dissertation fixed so you can get back to building! -
That planking came out sharp. Well done! Seeing the wales, bulwarks and stern windows coming together and finally moving on past the hull work must be a great feeling. I like the choice of stain and paint that you have used. She will be a beautiful ship.
- 291 replies
-
- 3
-
-
- bounty
- billing boats
- (and 1 more)
-
I have been having the same issues with rigging La Couronne. Anderson's books have been an invaluable resource and while they contradict the drawings from Corel at almost every step, I am trusting to their accuracy more so than the plan sheets. I have also been taking a lot of ideas from the Vasa and it's museum model. While they still may not be completely accurate to French practices or specifically the ones used on La Couronne, they are similar enough as the French based a lot of their design on the Dutch and the time period and style of ship are the same. I also have your great build and log to help guide me and discover the ways I do and do not want to do something. At the end of the day I am still just guessing but I try to make it as educated as possible.
-
Major milestone passed tonight as I have now shed my blood on the ship. I was wondering when he first time this would happen would be and it looks like hour 43 gets that distinction! On the plus side of things, I am happy to report that my plane is still extremely sharp and ready to continue working. I am never sure if this is a good sign or a bad one but, at least it is proof that work is being done! I do not think I have built a model ship yet that I did not become blood brothers with. I think the annoying part isn't so much that I manage to cut my fingers or sand the skin off, or any of the other ways I manage to draw blood but more in the fact that I don;t always notice that I am bleeding until I lift my fingers from the part I am working on and see the red dot or streak. I then sit there and stare at it with a WTF expression until it hits me that that sharp pain I felt a while back was indeed an actual injury....
-
Welcome to MSW Craig! Good luck to you on your Titanic build! I hope nothing else is missing from the kit. You might want to do an inventory of the parts as best you can and see if anything jumps out at you as missing that way when you contact Amati you can ask them for the replacement parts along with the plans. Looking forward to seeing your build!
-
Very nice. I like the way you displayed the furled sail and the rigging lines look clean and neat. Now is when the last of that "open" work space quickly turns into a tangle of ropes to get snagged on. Best of luck to you on a smooth rigging!
- 481 replies
-
- 3
-
-
- rattlesnake
- model shipways
- (and 1 more)
-
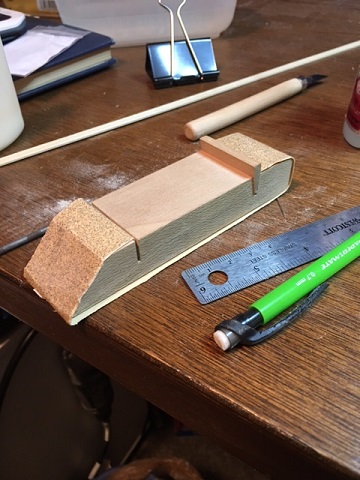
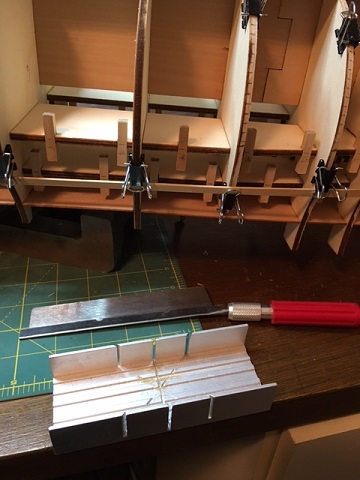
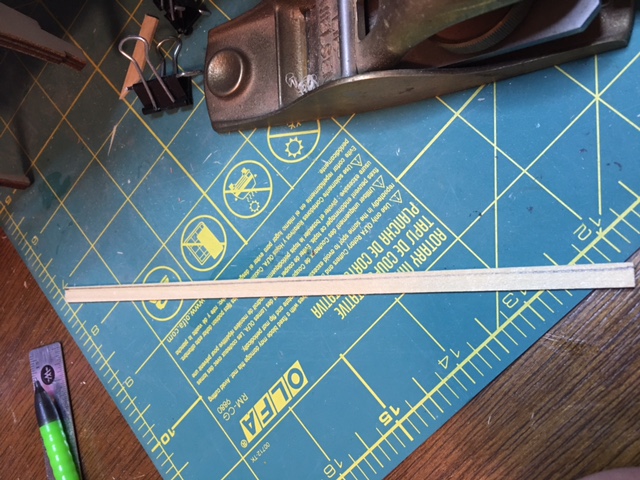
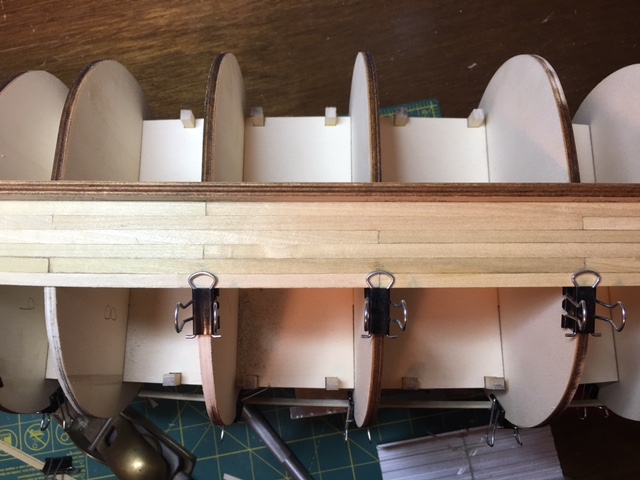
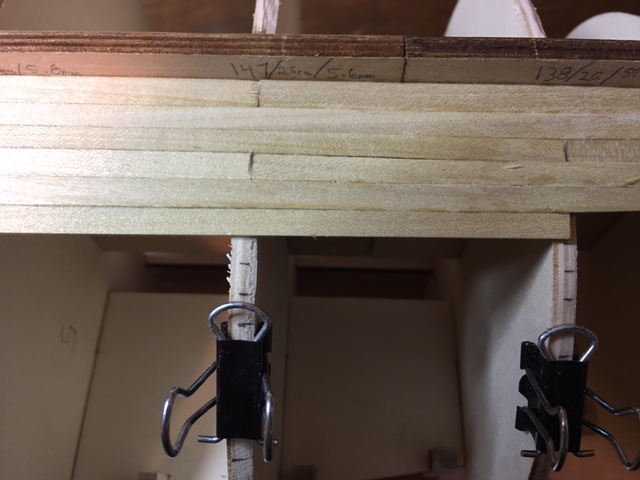
A few more planks have been laid down though I am still not very far. To get to the first false gun deck I will need 26 strakes and I now have 5 completed with the 6th started. I thought I would take a few pictures to show a little more detail on how I am planking this ship. Also I included some pictures of the tools I use. Simple ones are really all you need: ruler, sanding block, electric plank bender, paper clips, hobby knife, miter saw and box, glue and a pencil. I also use because I have it, a small plane, and needle files. Of course you will need plenty of sandpaper when the planking is done. Note, this is a double planked hull and it is a plank on bulkhead build. Therefore, this first layer of planking will not done in the exact way you should do an exposed planking. The overall techniques are the same but there are a couple of differences I will note. Plus you can cover the imperfections with filler later. So in an earlier post I talked about finding the widths of the planks, number of planks and then laying that information out on the edges of the frames to act as guidelines. Now I can start fitting my planks. I do not lay one solid strip of wood from bow to stern but instead I cut individual plank lengths and install them that way. Why? First, it is more true to actual ship construction. On a large vessel like S.R., there would not have been lumber available in the length required to span her entire length. Second, I personally find dealing with shorter pieces easier. Less material to have to fit especially around the sharper bends in the hull. To get my lengths I start in the middle of the hull and lay a strip of wood across four frames splitting the first and last in half so another plank can share the frame. Once cut to length I will then use my guidelines and established widths to draw my taper across the plank. Cut and sand smooth the plank and I always taper the bottom (side against the frame) edges inward so the top is slightly wider. This allows for a tighter fit edge to edge. Once cut and tapered, now you can bend it to shape. There are many ways you can bend wood. Typically I just use heat from my plank bender but if the curve is going to be sharp, I will soak it in some water first and then use the heat to bend. This is basically trial and error of the various ways until you find a method that works for you. Just keep in mind when sing water that the wood expands when wet and shrinks when dry. If you install wet wood, when it dries you will have gaps. Once the plank has been shaped glue in place. I use a combination of wood and CA glues and a lot of modified paper clamps to hold the wood in place till dry. The rest of the planking is basically a repeating of the above steps. Remember that you should not have to force the wood into place. If tapered, sanded and bent properly, the plank should just lay in place with the only pressure just being that to keep it from slipping as the glue dries. The pattern in the joints is one of the deviations from the finish planking I will address. The pattern itself of a joint, two solid boards and a joint is correct however, due to the bulkhead spacing, the pattern is not even and the lack of uniform plank lengths is wrong. If all of the actual frames were in place then I could run all the planks the same length as they would have equally spaced frames to attach to the entire length of the ship. On a P.O.B. model, you are restricted to the few bulkhead frames that are there. The second layer of planking will be done correctly as then it will be similar to planking a solid hull ship. To achieve the pattern know that all your planks will stretch across 4 frames. 1st frame split in half. 2nd frame cross completely. 3rd frame cross completely. 4th frame split in half. As you move on to the adjacent strake, start the first plank one frame to either the bow or the stern. Which way you pick does not greatly matter, just be sure to keep going the same direction. I always set one frame to the stern. Each following strake should always start it's first plank one frame back. Every 4th strake should see the joints line back up to create a pattern of joint, solid, solid, joint. (If you are looking to be historically accurate, you will need to do some research on the ship, era and countries practices as they varied in all those categories.) When I plank the 2nd layer I will explain how I create the pattern then. On a final note, be sure to pay attention to your guidelines. They will help keep you on track with your planking so that they all fit correctly and evenly. However, do not assume that you did everything right. Periodically double check the remaining space available and make sure the planking layout is still accurate. It is easier and better to adjust in small increments over the entire hull than end up with one or two planks at the end that are extremely wider or smaller than the rest. More to come!

- 961 replies
-
- 10
-
-
With your current tool selection I would recommend buying the wood from one of our sponsor sites that specialize in wood for ship building. They are on the front page, lower right. You can get milled lumber in any dimensions you would want as well as sheet material. This would be preferred as you do not have the tools to cut and mill rough cut lumber that could be obtained at a lumber yard. Starting a ship from a pile of lumber is a hard thing to do. I would start trying to modify kits and see what types of materials and tools you may want or need before diving into scratch building. This will familiarize yourself more with ship building and also allow a slower accumulation of tools which will make scratch building easier.
-
Mike, The build logs are actually the best place to start asking about questions on your model as we can see the model through your pictures which often helps in getting the answer you need. It does not hurt though to also ask it in the specific section as this opens up the question to other people who may not be following your build. There are no set rules other than try to ask in the right section. Often times the answer you seek can be found in the search feature but we will always be happy to help you out.
-
That is what I will do if they are needed. I always keep my extra wood that the bulkheads are cut from so I still have all the patterns needed. I have never thrown out any extra parts, wood or even the plastic spurs from plastic kits until the model is completely done and even then I keep a lot of that stuff. I have found too many uses for those leftover "trash" parts that I just throw them into boxes under the desk when I am done with the build.