EJ_L
-
Posts
2,246 -
Joined
-
Last visited
Content Type
Profiles
Forums
Gallery
Events
Everything posted by EJ_L
-
 Thanks Mike. It doesn't always feel very quick as I am rounding out the 700th hour probably tomorrow and I will be crossing the one year mark at the beginning of February. In all reality, I have been fortunate with my build time availability this past year. The admiral is in a clinical internship for her master's degree and so she is never around to stop me! As long as I take care of the dog, house and cook food for us to eat, I can build to my heart's (or at least my hand's, eyes' and butt's) content. I'm sure when the internship is over and she starts to regain some of her free time I will not have as much for the shipyard but that is okay. Actually, she is also very much into crafts and now has her own hobby room in the new house so I may not see her that much after all..... No picture tonight but I did start rigging the shrouds on the mizzen mast. Might get them done tomorrow evening depending on how things go. Then ratlines.
- 608 replies
-
- 4
-

-
- la couronne
- corel
- (and 1 more)
-
I can't believe you missed that glaringly obvious detail! Seriously, WOW! Great way to re-purpose those hinges and rings. Just more tips I file away for that day when I'm trying to figure out how to make all those tiny details. All your additions keep making me look back on my builds to see what extras I could/should add in.
-
Royal Louis by fmartins - multi-media
EJ_L replied to fmartins's topic in - Build logs for subjects built 1751 - 1800
Wow! I must sat that this is a very interesting build. Considering you are building such a large ship at such a small scale and scratch building everything this is going to be a cool ship to see completed. You are doing a great job as well and if you can do this on your first build, if you ever get the time to build another at a bigger scale where you can really work in some details I think you are going to be just fine. Looking forward to seeing more! -
The hull does curve at the bow and stern. Spiling is a good way to deal with this as it allows you to cut the curve into the wood. It does require you to use wood that is wider than the plank so you can cut that curve without losing the width in the middle or having the ends fall off. Usually sheets of wood are used for this and the planks cut out of the sheet. Another way is to edge bend the planks to take on the curve of the hull. You still taper the ends to the required width but by applying heat, you can bend the plank along its edge to fit the curve of the hull. There is a video on here which I can link to you later as I am not able to do so now that shows this. Or you can search for Chuck's Planking Techniques I think is what it is under. It shows how he edge bends his planks using only heat.
-
Hello From David - A new member
EJ_L replied to David of Berwick's topic in New member Introductions
Welcome to MSW David! Glad to have you with us. Indeed there is a lot more involved in ship building than one would think and I am glad to see that you are still interested and motivated after finding that out! Good luck to you as your builds continue and I look forward to seeing your work. -
There are many good books covering this subject. Do you have a specific ship, era and/or country you are modeling? That would help us to point you in the right direction as rigging practices changed over the years as well as between countries.
-
Happy New Year! Honestly, not much has happened on S.R. since the last update. I finished the layout and have her ready to go to start planking the lower hull. I am still planning on a two layer planking so this first layer will be out of lime wood. I intend to plank it properly but as everyone who has done plank on bulkhead builds, that can be tough as the frame spacing does not allow for the best curvature and supports. However, a nice planking can still be achieved and the practice is always good. So, to share with you all my plan so you are not kept waiting in the dark, I am building the mizzen mast on La Couronne and once it is stepped in place with stays shrouds and ratlines, I will be back to start planking. I'm hoping either this weekend or early next week depending upon how my free build time goes and how hard the crew is working after partying a little too much this past weekend. Once planking starts I plan on setting goals of every so many strakes I will stop and go work on a top mast on La Couronne. S.R.'s hull is rather big so this will still be a large number of strakes as I am thinking about 10 between breaks. I will try to photo document what I do well for everyone following along.
-
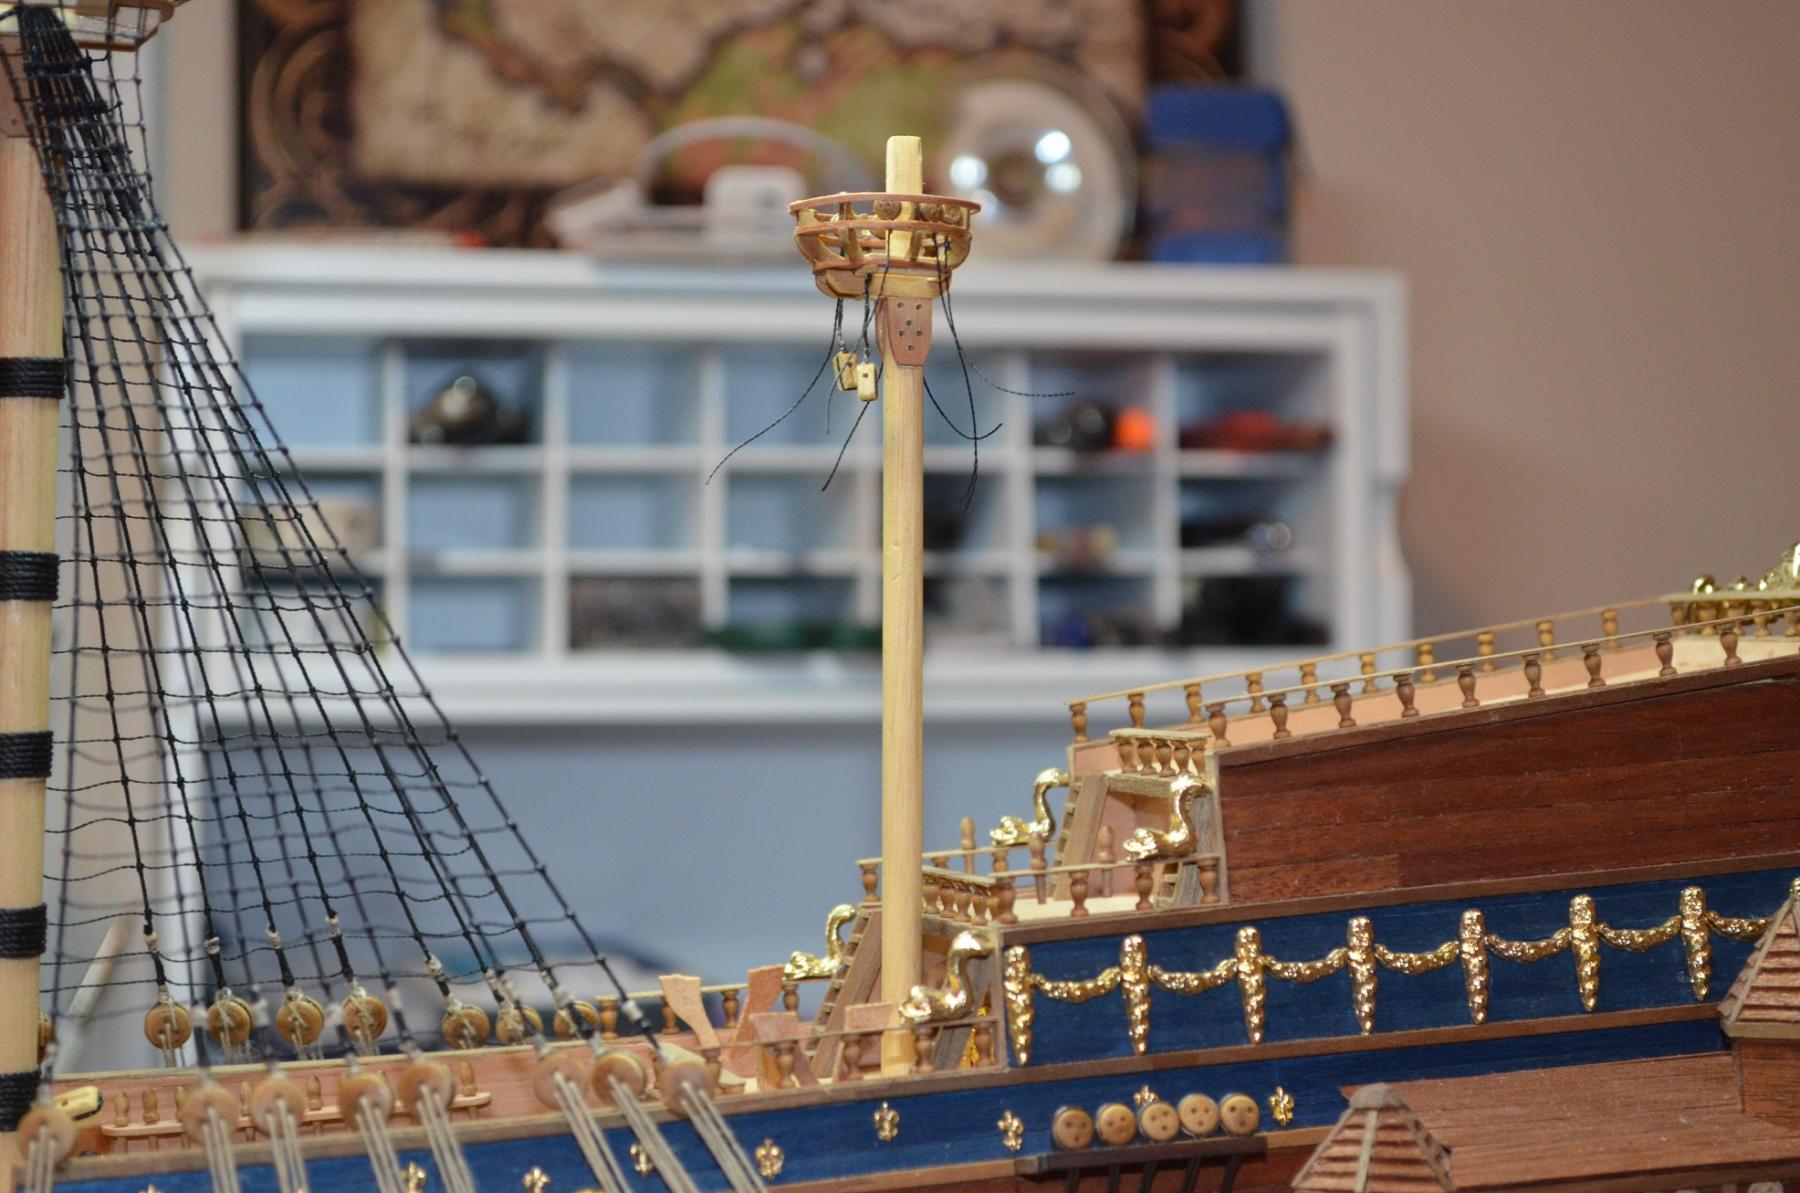
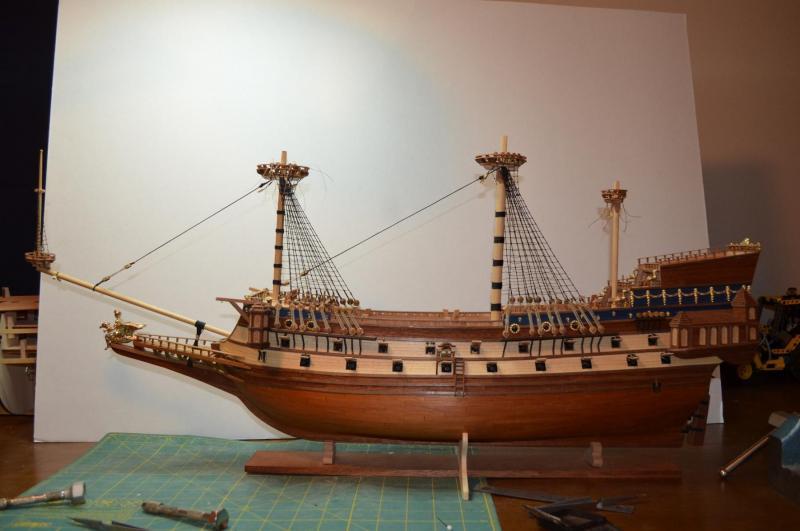
Happy New Year! While the holiday was a busy one with family in town I still managed to find some time to work in the ship yard. Told myself that I wanted to have all the lower masts stepped in place with shrouds ratlines and stays before starting the planking on S.R.. So with S.R. having reached a point where I will be starting planking soon, I gave her crew a much needed vacation and got La Couronne's back to work. Mizzen mast is the last one to build and so construction began a few days ago on the top. Finished it up today with the deadeyes for the mizzen top mast ready to go and stepped it in place. I plan on running the shrouds this week after I finish placing a couple of blocks on the deck for future rigging. As I only have 5 pairs of shrouds on the mizzen, I may even get started on ratting them down by the end of the week. My plan is to finish the lower masts then start the planking on S.R.. I will set a goal of so many strakes and once I reach that I will stop and come back to Couronne to start working on her top masts. Here are a couple of picture updates.

- 608 replies
-
- 6
-
-
- la couronne
- corel
- (and 1 more)
-
You are doing an excellent job on the planking. It is looking nice and even. I can't speak to the accuracy of the planking under the cabin but what you have done looks fine. That saw will be a great tool for you to have. Being able to rip your own planking is a big advantage especially when you get into kit bashing and going above what the kit gives.
- 291 replies
-
- 1
-
-
- bounty
- billing boats
- (and 1 more)
-
The rabbet allows the planks to tuck into the keel so there is no sharp lip where they meet. You can do this by marking the edges of the bulkheads to form a line and then carving out an angled slot so that the outside bottom edge of the plank is flush with the keel when inserted. The other way is to sand the backside of the plank to the angle where it meets the keel to simulate the same thing. On a model, especially on a non fully framed model that will be completely planked you will never tell which method was used. I've done mine both ways and would recommend giving the rabbet a shot and see what you think. As far as how to actually make the slot, I just use a small v shape carving tool. That has worked well for me so far when all I need to go in is a couple of mm.
-
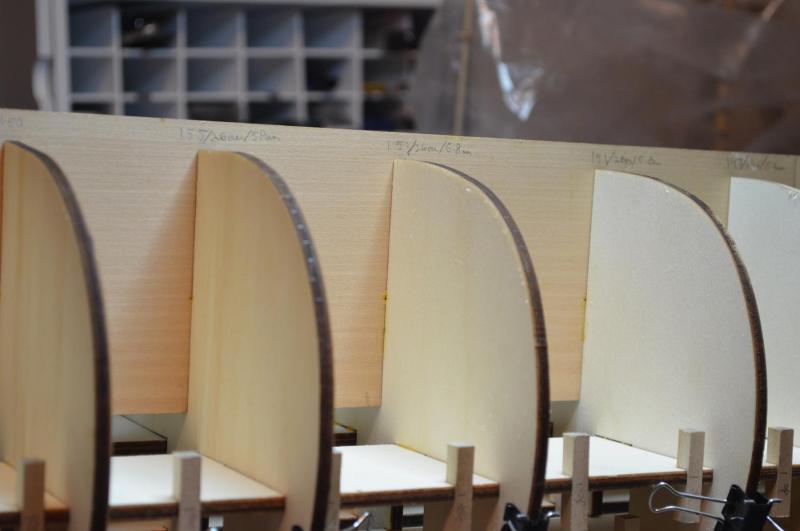
Spent a little more time in the ship yard today and decided that it was time to start laying out the planking guidelines now that I know where my lower decks will be. As this is a double planked hull I know that I have room for errors in my planking but, I always try to do it right as this gets me extra practice. I will explain how I plank my hulls for anyone who is either still learning or looking for a new idea. As with most things, this isn't a right or wrong it is just my method to get the results I am looking for. This will allow you to have your planks laid down with uniform widths in a complete strake running the length of the hull with no drop planks or stealers. So, to get started I established the lowest wale and marked it across all the bulkheads giving me a space to measure for planking between the keel and the wale. Next I measured the space along each bulkhead and wrote that dimension down on the wale at the intersection of the bulkhead. Repeat at each bulkhead. Next I measured the width of the planks that will be used. They are 6mm wide. I start with the widest dimension that I measured along the bulkheads. This was 155mm. I divided that number by 6mm and came up with 25.8 or 26 strakes. 155mm divided by the 26 strakes gives me a width of each plank at the widest point of 5.9mm or 6mm. Always round up as the sanding for tapers will eliminate that .1mm. Since this is my widest point, no plank will exceed that width. Once I know my plank widths I take a flexible tailor's tape measure and make tick marks down the length of the bulkhead from keel to wale line to establish guidelines for my planks. I am now in the process of repeating this step at every bulkhead on both sides of the ship. From here on out in both directions the planks will narrow. As you can see in the picture the spacing is shrinking, the number of planks stay the same and the plank widths decrease as the space shrinks. I will add more pictures as this continues. Let me know if there is something that should be shown as I can easily leave something out that I take for granted that someone may need.

- 961 replies
-
- 13
-
-
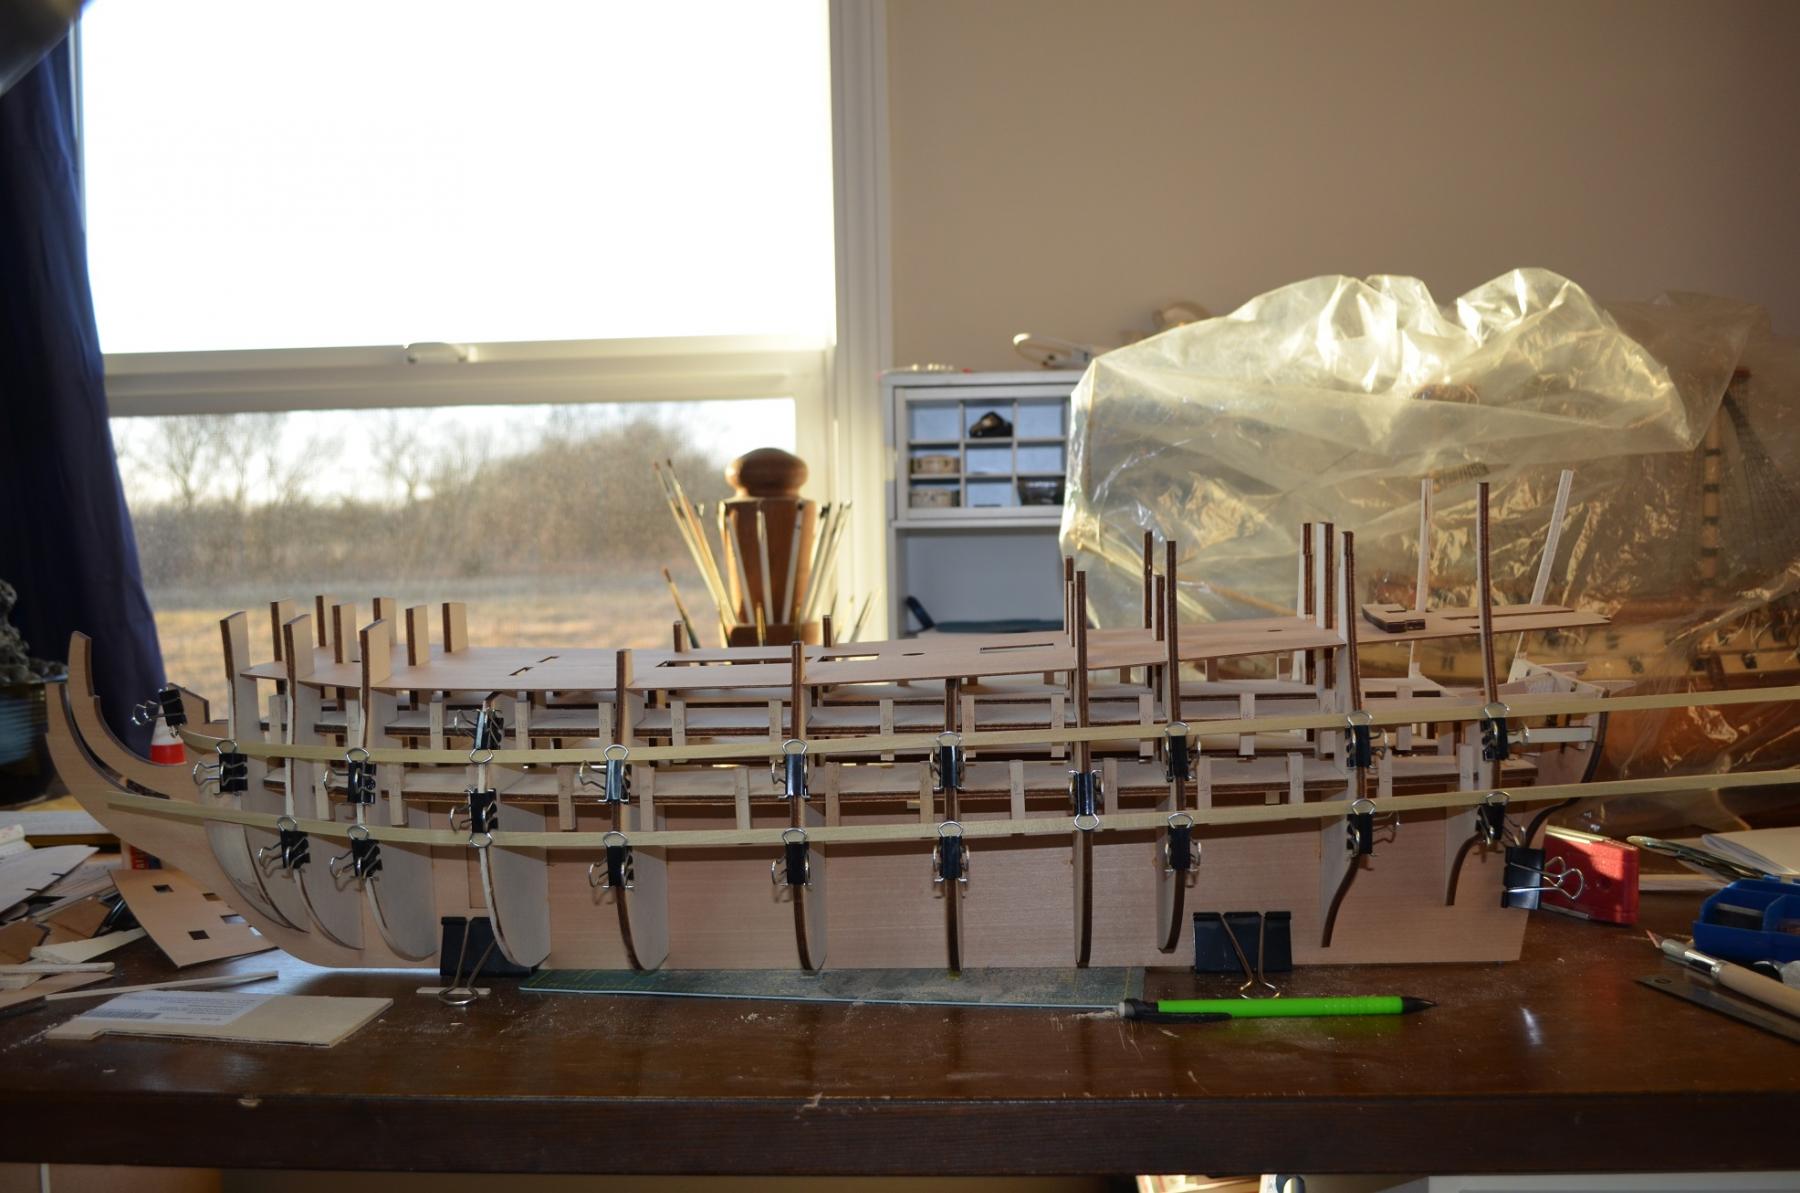
Been busy working on the cabin layouts. The main problem that I have now is that to build the cabins the deck layouts do not align properly. So, now I get to redesign the decks to work the way they should. I guess when you are not planning on showing the inside, it doesn't matter if they physically line up. Maybe I am making this harder than it has to be but, I want it to make sense and look right. So, here is a picture with the latest look. Basically the two horizontal strips that are clamped to the frames are where the decks should be. You can see where the false decks are designed. It really isn't bad until you get to the stern at which point nothing lines up right. I can adjust the gun ports on the false decks and shift the dummy blocks for the canon barrels for the new alignment easily enough. The upper decks and quarter decks will be a different challenge. I have a couple ideas on how to do it. More to come!

- 961 replies
-
- 12
-
-
Nice start John. I think I will pull up a chair and follow along.
-
HMB Endeavour by fukui - Corel SM41
EJ_L replied to fukui's topic in - Kit build logs for subjects built from 1751 - 1800
You are off to a good start. Your planking looks well done and I like the progress you have made on the deck. Good job! I look forward to seeing more of your work. -
Good luck to you on your new build. Hopefully this one goes better for you than the last. Scratch building is a hard route to take even when experienced. Having a kit should provide a better starting point and guidance to get you through it. As always, we will be here to help you out. Just remember to take your time, double and triple check things and if something doesn't look or feel right, stop, take another look or ask questions. It is much easier to fix or redo a little bit than a lot. I look forward to seeing your build!
-
Happy anniversary!! I can see your improvement all the time in your work which also shows how much you are enjoying it. Your Phantom is looking great and it won't be long now!
- 701 replies
-
- 3
-
-
- phantom
- model shipways
- (and 1 more)
-
On the bow, keel and stern pieces I've done it both ways. The advantage to having them in place is that you no for certain where they will be and how they will look with the planking. The advantage to waiting is that it is easier to sand the edges of the planks back to make a nice tight connection. On most of my ships I have laid those on first but mostly because I will laminate them with the same kind of wood that I am planking with. This is done since those pieces are typically made out of plywood and have the layers exposed and/or they are not the same color as the planking. By laminating over them, I can also hide any small gaps from misalignment where my planking butts up to them. As for length, remember that planks could only be as long as the available trees. So to make this simple, let us say that your planks are 20' long. At 1:50 scale for your model that would make them 122mm. If they are 16' long they would be 98mm. You might be able to search for the actual length of the Bounty's planks but if you use one of those sizes, I think you will be fine. Just remember to stagger them correctly in a 4 lap layout. To do that, divide you plank length by 4. So on a 122mm you will set the next plank up 30.5mm back from the edge of the lower. This will create a nice pattern that will be close enough to the correct planking.
-
I don't think it will make a difference either. As long as you continue to follow your layout and you don't taper the plank the wrong direction you will be fine. Great job on the planking by the way. You are doing a very nice job and will have good looking hull soon.
- 291 replies
-
- 2
-
-
- bounty
- billing boats
- (and 1 more)
-
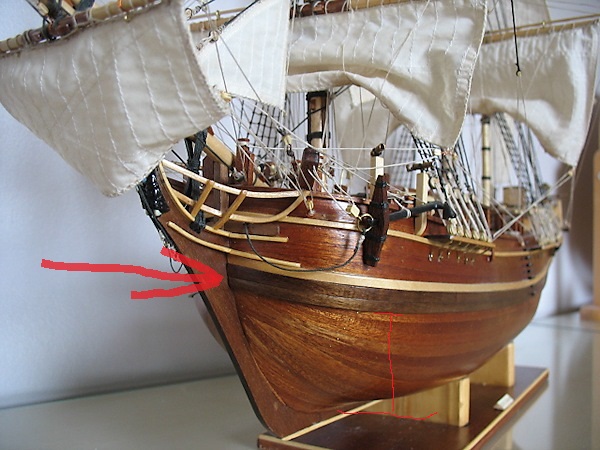
You are on the right track but I understand your confusion. Something that helps is to establish a solid line that you can measure to from the keel. The most common way to do this is to first establish your wales. On the photo I attached of a picture I found of your completed model, the red arrow is pointing to the wale that you should first install. You should be able to measure at the bow and stern to find the end points and down from the wale at the main deck to make sure it is following the correct path. Once this wale is in place you will have a good reference point to measure your plank spacing. As for the bow, yes it is a tricky spot to measure. Because of the curve there is no complete top to bottom point to get the measurement. So here is where some educated guessing is used. At the forward most bulkhead line you know what the width is. The planks will not get any wider than that. Also, in real ship planking, the plank should never become smaller than half of its width. So if your full plank is 6mm wide than it shouldn't get any smaller than 3mm. Also, the planks should not curve upward to follow the stem but run straight and stop, flushing up tight to the side. So knowing that, when the board passes the last vertical reference line, if you maintain the established taper you should be good to go. However, things are not always so simple and this is where you have to experiment some. As the planks begin to climb the hull constant vigilance is a must. You will quickly start to see the bow and stern areas closing up compared to mid ship. This is normal as those spaces are smaller. Still, after every couple of runs always recheck your measurements. If you continue to stay on track they will all fit correctly. If something is getting off, you can adjust either by sanding a plank a little more or by not taking as much off the next depending upon which direction you are going off. It is easy to lose these adjustments over the hull if they are done here and there and not all in one run. As for the partial numbers, this is where sanding comes into play. A sanding block is your new best friend for planking. If you can find a mechanical pencil that uses 0.5mm lead, that will make life a bit easier. Still, you have to do some rounding. If you need a width of 4.2mm, I would draw my line right between 4 and 5mm and trim off on the outside of the line. Then I would gradually sand down the plank using a sanding block till I could just barely make out the line. That is as close as you need to worry about. Again, this goes back to what I was saying earlier about making slight gradual changes in the planking. If one plank is 4.2 and the next is 4.3 and the next is 4.2 again, no one notices and your planking remains on track and sharp looking. However, if you round down all of those to 4mm with no variances, eventually you will need to have a plank that is 5-6mm and will stand out as wider. That is what you want to avoid. So try to get those wales located and installed. See if that helps and we will go from there!
-
That looks very good. Nice smooth and straight will provide you a good base for the second planking. Remember, pencil is easier to remove than glue. Double check your layout to make sure all the planks will fit and keep checking as you lay them down. As always, if you get stuck, take some pictures and we will try to help you out. Good luck!
-
It is good to see her lines and coloring. Very nice work. I too agree that the cradle is the way to go especially while you are still building her. Pedestals make a nice display but not so nice for stability when you are still building. Looking forward to seeing the build board off of her!
-
It is good to see her lines and coloring. Very nice work. I too agree that the cradle is the way to go especially while you are still building her. Pedestals make a nice display but not so nice for stability when you are still building. Looking forward to seeing the build board off of her!
-
Another advantage of working two builds at once is that I can more easily slow down and make sure I am doing things the way I want to. Just building the one ship, I kept wanting to keep on building and would settle or rush through something. Made a few mistakes that are still bugging me today on past builds doing that. Now, when I am at a slow spot do to research or waiting on supplies I still have another ship to work on that takes care of that itch to keep building. As crazy as it seems, I am more relaxed building these two huge ships than I was working on just one or even a small one. Yes, there will probably end up being extensive bashing done on this build. I was already kind of thinking there would be but as I have already pulled apart work that I have done to completely redesign it and I am only on the framework, I think I will do this a lot. Truthfully, I am happy with doing it though. I would like to build a fully framed ship one day and so this allows me to start thinking of how to do that without having to do the entire ship. Scratch building something with no instructions can be frustrating but it also provides a great opportunity to learn a lot. Thanks for all the support!
-
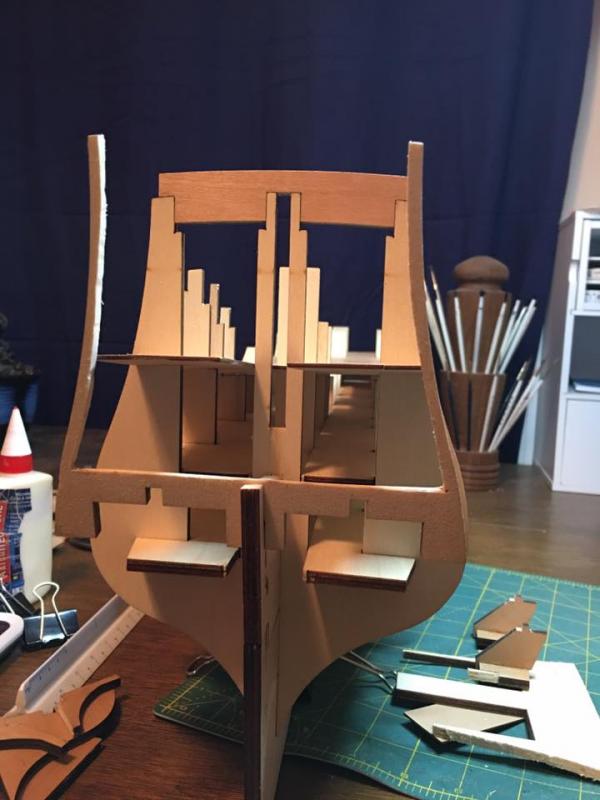
Well, I did it. I pulled the stern apart and cut away all the filler on the aft bulkhead so that it would more closely resemble actual framing. I realized to do the cabins the way I want to there was no way it could remain as designed. In fact, a lot of the aft portion of the ship may be getting redesigned as the decks and the cabin windows are not lining up properly. I am still trying to determine if the error is just in the supplied layout for the windows or if it is in the structure itself. I hope it turns out to be in the window layout as I am scrapping that one anyway to make my own. The reason for this is that the supplied layout is for a 5 window configuration and I am going to go with the 6 window configuration as seen in the below picture. While I do not know for certain which is correct, I like the look of the 6 window and the balcony layouts as well as the quarter galleys make the most sense to me this way. After viewing a lot of pictures of models built both ways as well as the various prints of her stern, I think I have settled on this. Ok, now to figure out how to build it.... Good thing there are a couple of holiday weekends ahead of me!

- 961 replies
-
- 12
-
-
Well done indeed! A beautiful ship and something to be very proud of. Now you get to enjoy that feeling of completing a ship. Sit back, have a drink and let the tension from building her fall away. Now you can just relax and admire her and let your mind start thinking on the next project. As nice as America came out I am looking forward to seeing what you can do with Cutty Sark!