EJ_L
-
Posts
2,246 -
Joined
-
Last visited
Content Type
Profiles
Forums
Gallery
Events
Everything posted by EJ_L
-
 So, you said that you were going to be coming back to work on this absolutely gorgeous build so I figured I had better get over here and catch up so I don't miss anything new. Looking forward to seeing her rigging come together.
 -
She sure looks good. Nice place to stop and switch to the Confed. Run some lines and then switch back later. Those breaks in between seem to help me a lot when working on my builds. Have a nice holiday weekend!
- 213 replies
-
- 4
-

-
- la couronne
- 74 gun
- (and 2 more)
-
I did see that there were two editions to this book also when I had bought it. I think I may still have the other on my wishlist but I do remember that it was unavailable at the time I bought this one. Granted that was some time ago now.
-
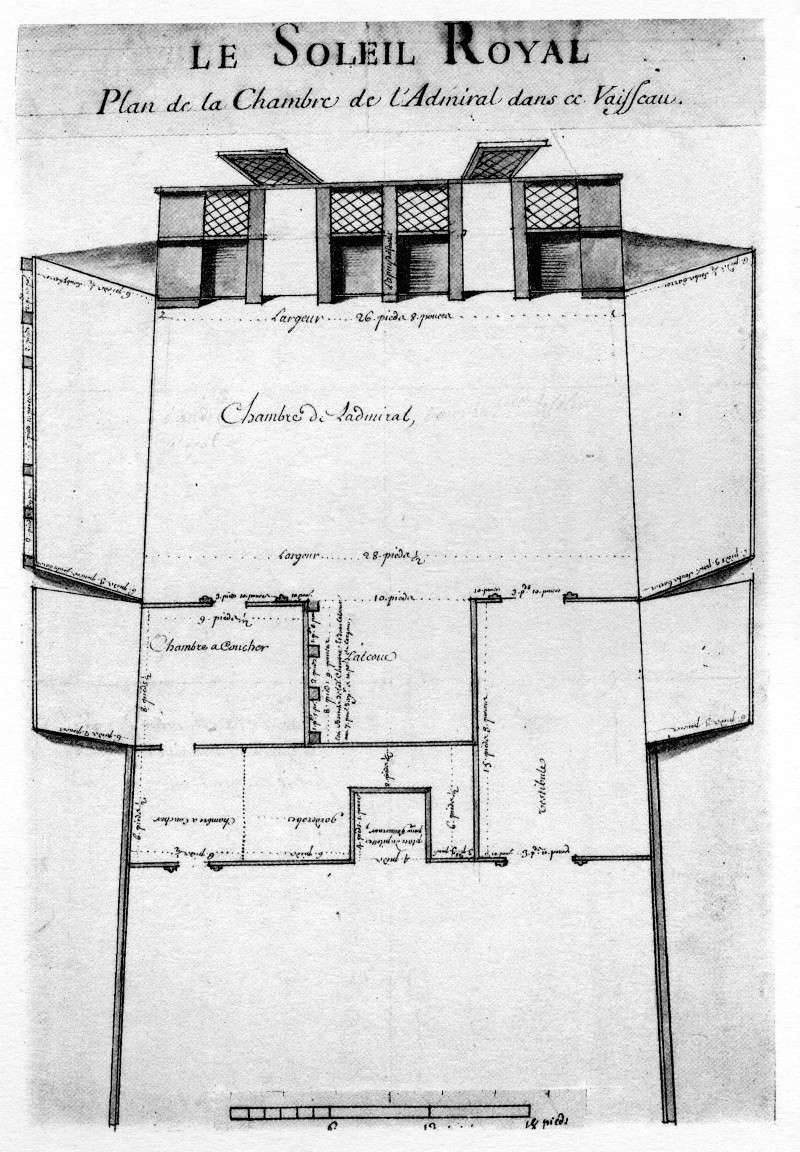
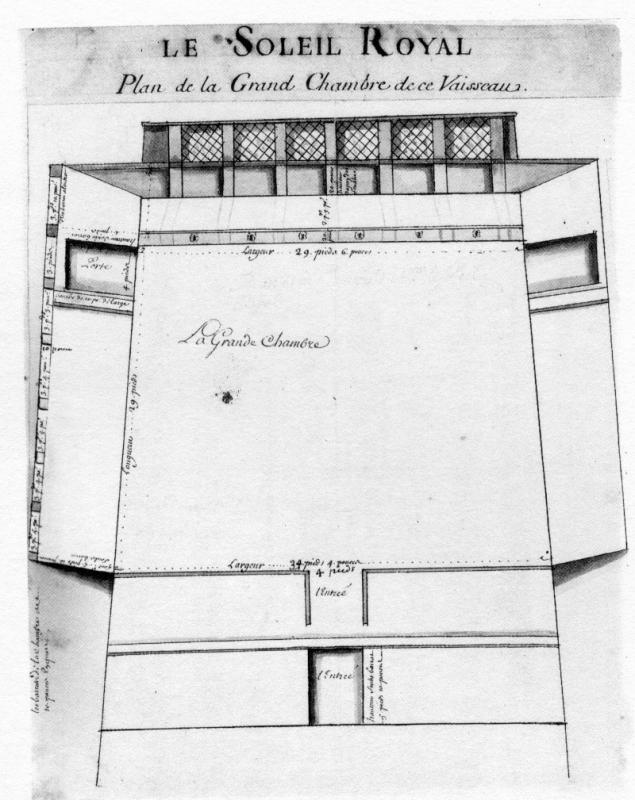
So I have found these pictures of the various cabin layouts on SR. I am hoping that someone may know where a clearer scan of these plans may be at as the writing is blurred to where I cannot read what it is saying. I am going to post this in a couple of places and hopefully someone will be able to help. This isn't something that is critical to construction but is more for knowledge. Thanks!


-
Andrew, welcome to MSW! Good to have you here. My dad and I built model cars and trains together when I was your age and it remains something we still share in today. You have a nice looking boat there and it will become something you can be proud of for a long time. You are off to a great start and I wish you the best of luck as you progress, grow and learn this great hobby.
-
Breaking the hull up into bands is a way of making the planking process a little less daunting as you can now deal with a smaller section at a time. The fan is a tool that can be used to help find plank thicknesses and keep the planks consistent across the hull. This is just another way of basically doing what I explained in an earlier post. I do not use a fan nor do I break my hull into bands but I do establish the wale line that I base all my measurements on between it and the keel. So in effect, I mark out one very large band. The nice thing with the fan is it helps to eliminate the human error when making your tick marks on the bulkheads for individual planks as it keeps them in a consistent spot where as my method does allow for slight variations as my hand could move the tape measure and throw off the marks. In either case it is important to double and triple check your measurements. Planking is one of those skills where there are many ways to achieve the same result which is to have a nice, smooth and straight planking. The various methods people use are only right or wrong to them as their skills and understanding allow. I took my understanding of the process and goals which are to have the strakes run in complete rows from stem to stern with no interruptions, drops or stealers and created my own way that was simplified to me. While not perfect, I have been very satisfied with the outcome of my planking at least after the first ship. That one was crap. A great tool to have for this is a flexible seamstress tape measure as they will lay flat along the curve of the hull. This will help to make sure your measurements are more accurate than a straight ruler will. If you have not already, check out my La Couronne build log. The link is in my signature. This was a double planked hull like yours. The first couple of pages show the first planking which is not done correctly but still came out okay once sanded and filled and if I was going to paint it or copper it, I might have accepted it. Page three however starts the second layer of planking and shows how I laid out the lower hull, (upper hull I planked already as it was just straight runs with no crazy curves). You can see the tick marks showing the number of planks I would need running down the center guide lines. The other guidelines have the widths of the strakes as they cross that line. So my center with the widest strakes is 5mm then they drop as they pass the next lines to 4.7mm, 4.5mm, 4.1mm and finally end up at 3.6mm at the stern and a similar narrowing at the bow. You can see how I laid them down one plank at a time and also how I tapered the long edges on an undercut so that the planks butt up against each other nice and tight. There should be a minimum of sanding required after this planking. At the bow especially, I cut the planks long and slowly, very slowly, trim to fit the curve and angle of the stem. This is a hard piece to fit tight but it can be achieved with small cuts and sanding. I hope this helps clear things up. I know this is a frustrating stage of the build.
-
Beautiful ships wheel! Looks like you did a good job cutting your holes and that all the double checking has paid off since everything on deck appears properly in place.
- 653 replies
-
- 5
-
-
- trabakul
- marisstella
- (and 1 more)
-
Your garboard plank looks good. Not climbing on either the stern or stem but nice, flat and straight like it should be. Sounds like you have a good plan and it is working well for you.
- 291 replies
-
- 1
-
-
- bounty
- billing boats
- (and 1 more)
-
White vinegar works good for dissolving wood glue. Let it soak into the wood and get in between the planking layers and it will come up. If you Google how to debond carpenter's glue, there are a bunch of helpful tips and instructions.
-
Planking seems to be moving along nicely and she is starting to take shape. Yes, you can have multiple build logs at the same time. many people on here do, I am one of them. Good luck to you on starting your next project and continuing good luck on this one.
- 291 replies
-
- 1
-
-
- bounty
- billing boats
- (and 1 more)
-
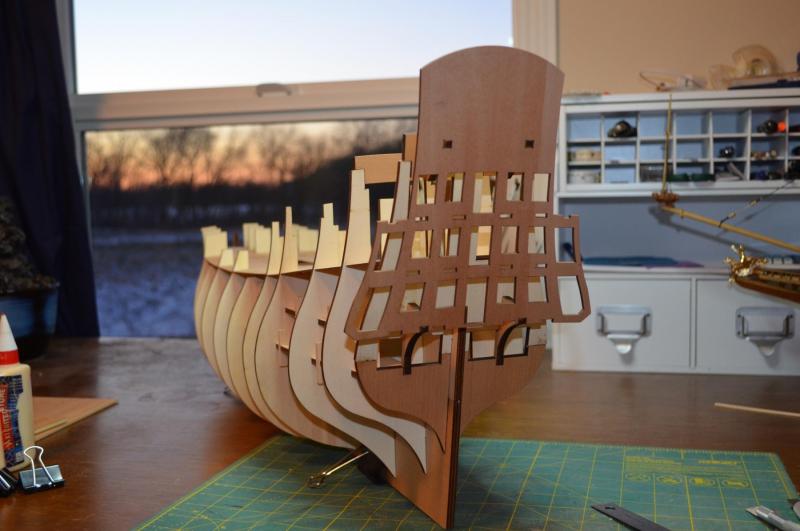
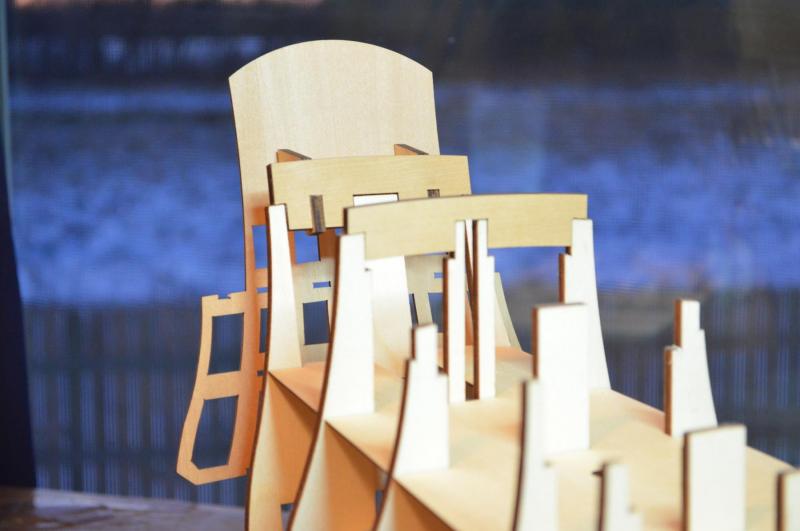
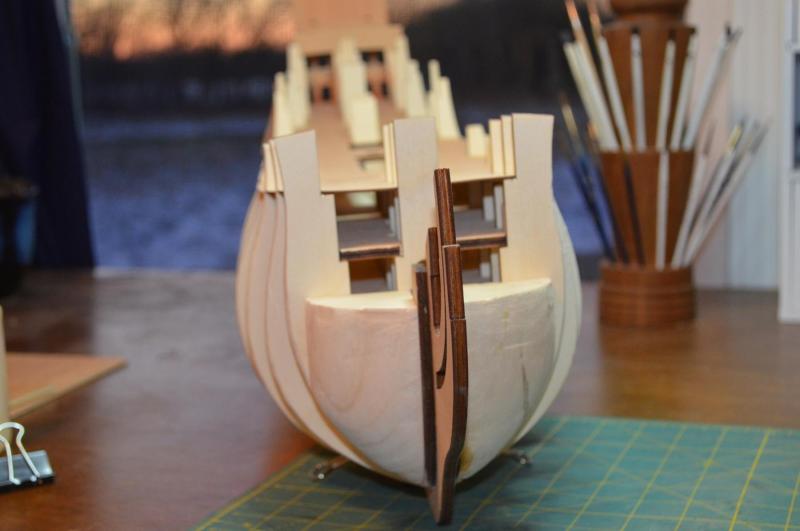
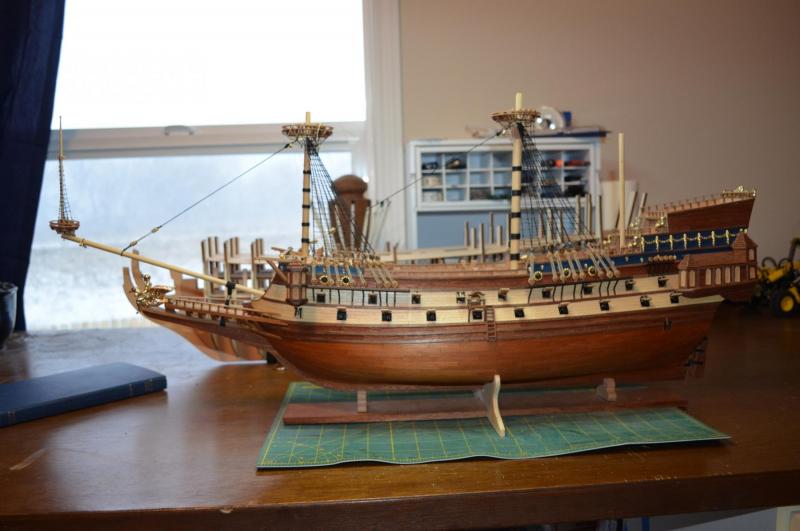
Today has been a busy day working on SR though you can't really tell. I did get the filler blocks installed at the bow but mostly I have been test fitting the stern cabin windows and trying to figure out the framing back there. There is not a lot of detail concerning the sub framing and so I am going to have to make a bunch up to achieve what all I want to put in back there. I am also identifying what parts of the lower false decks will be seen through hatches, grating etc. so I can make sure they are planked. This is where a fully framed ship has an advantage as the framing used is what should be there and you don't have to worry about modifying bulkheads to get the look you want. Of course there is the challenge of actually framing a ship so....... Anyway, here are some pictures. As I said, not much to really look at different but there is progress! By the way, the frame for the cabin windows is not glued in yet. The supports are but the frame won't be for some time yet.
- 961 replies
-
- 16
-
-
From what I can tell on the rake from the plans that I have, it is only a degree or two off perpendicular. I have not yet seen any written instruction one way or the other yet but, honestly I have not really looked for it either. I am building mine with just a slight rake as that makes sense to me and is what I have seen on all the prints I have looked at but I could easily be wrong. As an update, I managed to get a lot of work time in this weekend. Finished up ratting down the main mast shrouds and got the main forestay installed. That being done, I have switched back to SR for a little while and when I return it will be time for the mizzen mast construction. I will try to take some more close up pictures also in the coming days. Forgot all I took were overall pics.

- 608 replies
-
- 7
-
-
- la couronne
- corel
- (and 1 more)
-
I hope the museum never discovers something new that should have been there or you will have to go in and make more changes!! As always WOW! Just when I didn't think there any way to make those galleys more impressive you make a few changes and we are again blown away. As Captain Steve said, it is amazing how some thing as simple as a little paint can make a huge difference.
-
From what I have read, these ships were designed to fight more like castles and early tanks. By that I mean that they were more or less designed to outlast the opponent more than out maneuver them. Therefore I would think that to eliminate as much extra rigging and canvas from getting in the way, anything above the tops would not be needed. I would have thought that this would be an inconvience but the more I read the more impressed I become at how quick and efficient a good crew was at changing a ships rigging. Of course there was more time in the lead up to a battle but even if chance needed to be given, I would think that they could run the gallants up quickly for extra sail and they would be in undamaged unlike the main and top sails which would likely be full of holes.
- 2,699 replies
-
- 5
-
-
- heller
- soleil royal
- (and 9 more)
-
As promised, a picture! Worked until my eyes could not take anymore but I finished ratting one side of the main mast. I'll spin her around to start the other tomorrow night. Now to bed!
- 608 replies
-
- 8
-
-
- la couronne
- corel
- (and 1 more)
-
Carving the decorations has been something I have been thinking about doing ever since I thought of doing this kit. I intend to attempt it but I don't know if my skills at carving will do it justice or not. Fortunately I have plenty of time to practice and this build will offer plenty of opportunity to practice!
- 2,699 replies
-
- 3
-
-
- heller
- soleil royal
- (and 9 more)
-
Nice work with those beads. Great addition to the railings.
- 213 replies
-
- 2
-
-
- la couronne
- 74 gun
- (and 2 more)
-
It's not unusual for our wind chills to push temperatures into the negative teens or twenties and I've seen thirties, especially in the North-West part of the state. On the flip side of that, summer is not unusual to see temps 110-120. It's really one of those states that loves to give some of every weather pattern imaginable and has even decided to add earthquakes to the menu over the past decade!
- 608 replies
-
- 2
-
-
- la couronne
- corel
- (and 1 more)
-
It's about -8 celcius (18F) right now but this weekend's forecast is supposed to be around -18 celsius (0F). Plus they are calling for snow and freezing rain and as this is Kansas, there will be lots of wind. Always lots of wind...
- 608 replies
-
- 2
-
-
- la couronne
- corel
- (and 1 more)
-
I have been far from idle this week as the main mast shrouds are complete and ratting has begun. I will try to get some update pictures posted tomorrow night or Friday. The shipyard may be closing down for a modification soon. I've got an idea to build a rotating platform into the table top that will allow me to spin my builds back and forth much easier and safer than what I am doing now. The current method requires me lifting the ship each time and with the shrouds I am doing that a lot as I go back and forth securing each side. If my plan works the way I think it should I will be able to lock it in place when needed also. I have been wanting to do this for some time and I got a call from my dad who thinks he has found some bearings with a hub and bracket in his "extras" pile at his auto shop that might work. We are getting ready for some even colder, wet and miserable winter weather to move in this weekend so it would be a good time to stay inside and build it. Pictures will go up if/when it happens!!
- 608 replies
-
- 2
-
-
- la couronne
- corel
- (and 1 more)
-
Nicely done. It is always a challenge when you get conflicting explanations from different sources and then having to decide which one or which combination of ideas to use. In the end go with what makes the most sense to you because after all, it's your model! You may have taken time off from posting but that time has been well spent and therefore worth the wait. Her rigging is coming to life with every update!
- 481 replies
-
- 1
-
-
- rattlesnake
- model shipways
- (and 1 more)
-
What you have done so far looks very nice and well done. I would agree with Paul on giving her a matt finish to eliminate the shine of the glossy paints but again that is personal preference. As to the appearance on the quarter galleys and beakhead bulkhead, often times things will look disproportionate while the decorations are off, especially on a heavily decorated ship. Once installed along with the railings and trim pieces things will start to look right. As long as your measurements for the spaces are correct it will all work out. I'm looking forward to seeing her progress.
-
You didn't get to far yet so i think I will find a spot and join in to watch. I always enjoy seeing what can be done with a "simple" kit. I've always believed that the kits are just a starting point and while they can be nice and make a decent model, the real magic happens we we go beyond the instructions.
- 453 replies
-
- 8
-
-
- thermopylae
- sergal
- (and 1 more)
-
I will be tying ratlines in the next few days on my main mast shrouds. I will be giving this a try for sure as it has been already stated, anything to make them easier is a gift. Thanks for sharing!!!