Overworked724
-
Posts
1,263 -
Joined
-
Last visited
Content Type
Profiles
Forums
Gallery
Events
Everything posted by Overworked724
-
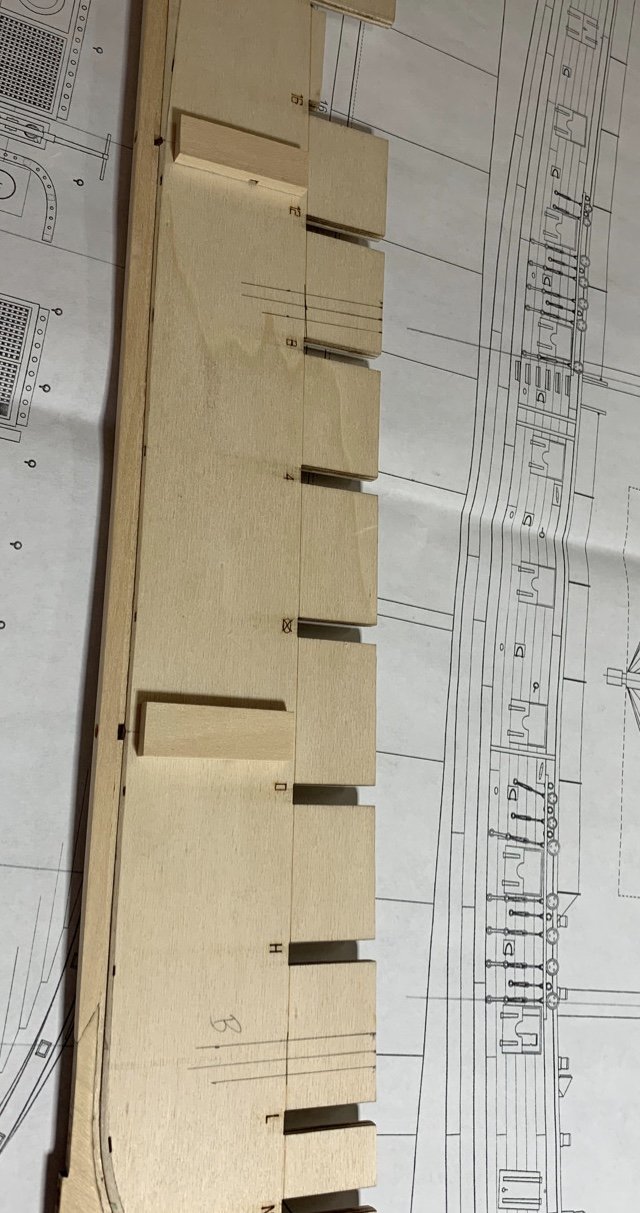
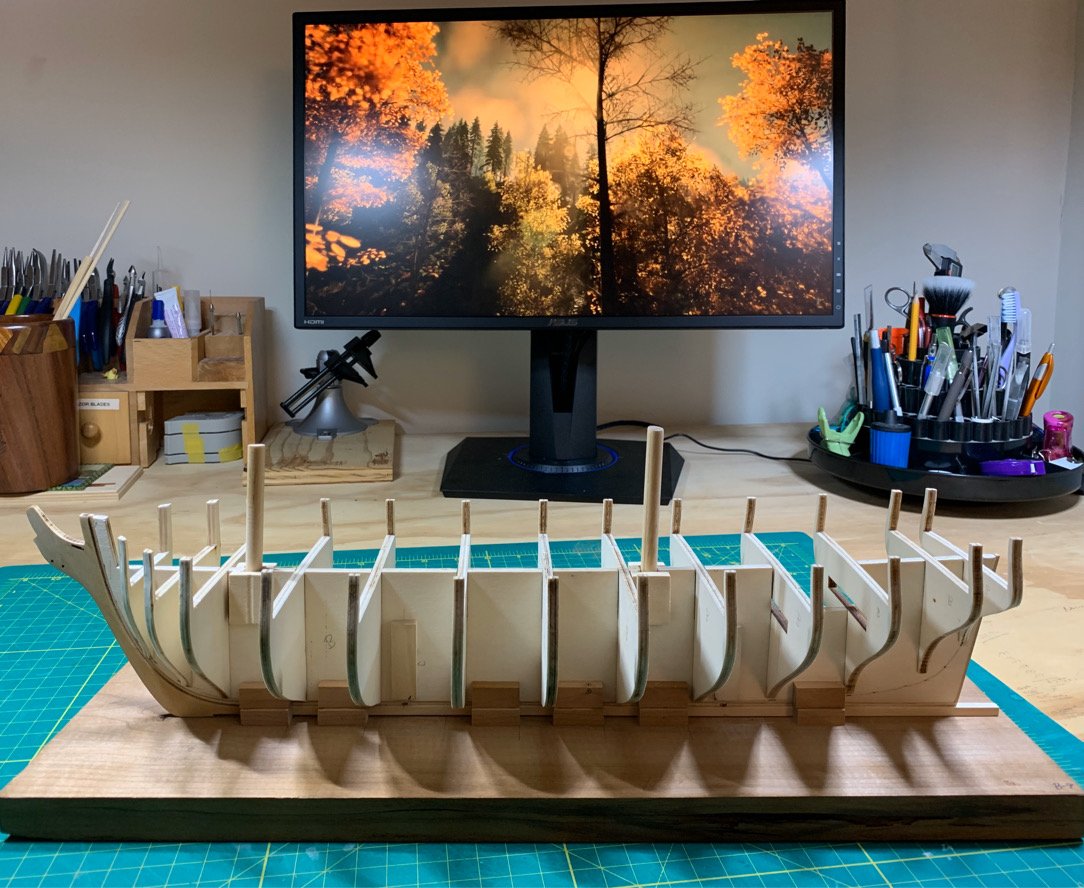
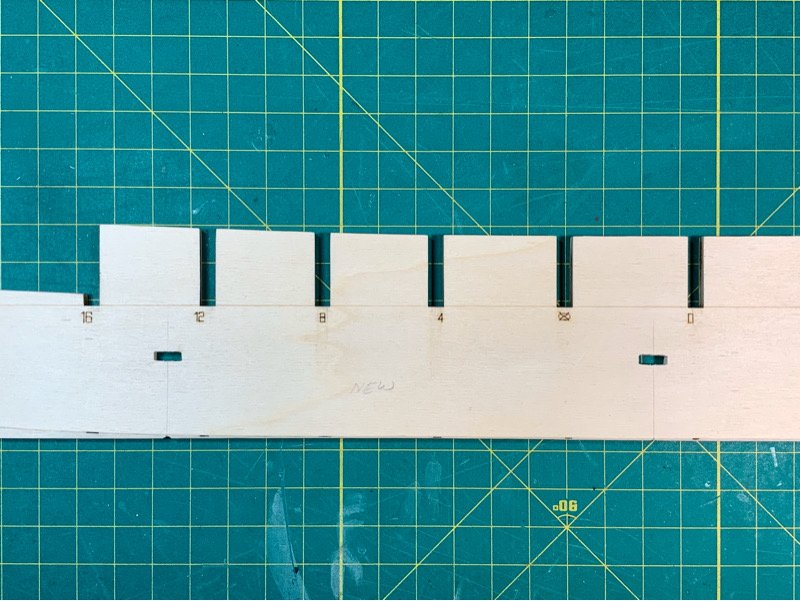
 Just to reiterate, this is my first framed model, and I swear...I will plank this beast! (Planking always scared me) The mast holes were a question in my mind until I saw some other modelers precut the mast hole in their bulkhead former. So I followed suit, since it will save time and effort a bit later (much later). By cutting out the holes for the masts at this stage, the rake (mast angle) is easier to ensure. I just went with the plans...an voila...a scroll saw visit later, and I had my mast holes cut out. I decided to 'box' each mast hole - since a circle can be bordered exactly within a square. 😃 So...I made some measurements and boxed in the new holes I made for the masts. The 'holes' are now boxes which perfectly fit the masts (taken from the plans they are 5/16" dowels). The plus to doing this now is that I don't need to fret about drilling the holes later (and at the correct angle)....what a mess. I did that with the Sultana and it was 'heart attack city'. The drawback to this, however, is that you will get a perfectly aligned mast which is perfectly parallel to the bulk head former (center frame). So, you will see immediately if there is a twist or lateral bend in the center frame...since looking head on, the masts will appear cockeyed (askew) to each other rather than parallel. And, like most kits, mine is not perfect. There is a slight twist towards the stem which I did not see until I inserted my faux masts to ensure fit. This means I will need to take even more time in putting in the filler blocks and trusting my measurements. But hey....it's progress. On a more somber note...I'm suffering from some serious anxiety. As we are all living in the dawning of what will be some extremely difficult times, I pray, hope, and work. I try to connect with those I love, and keep in my mind what's most important. Modeling takes my mind off for the moment. I put a monitor on my hobby desk in my den that doubles as a second screen which I use during my stay at home working hours. When I model, I switch it to a Youtube channel with pleasant scenes, and soft music. This and a glass of wine or scotch certainly takes the edge off! Stay well, shipmates. 🙏
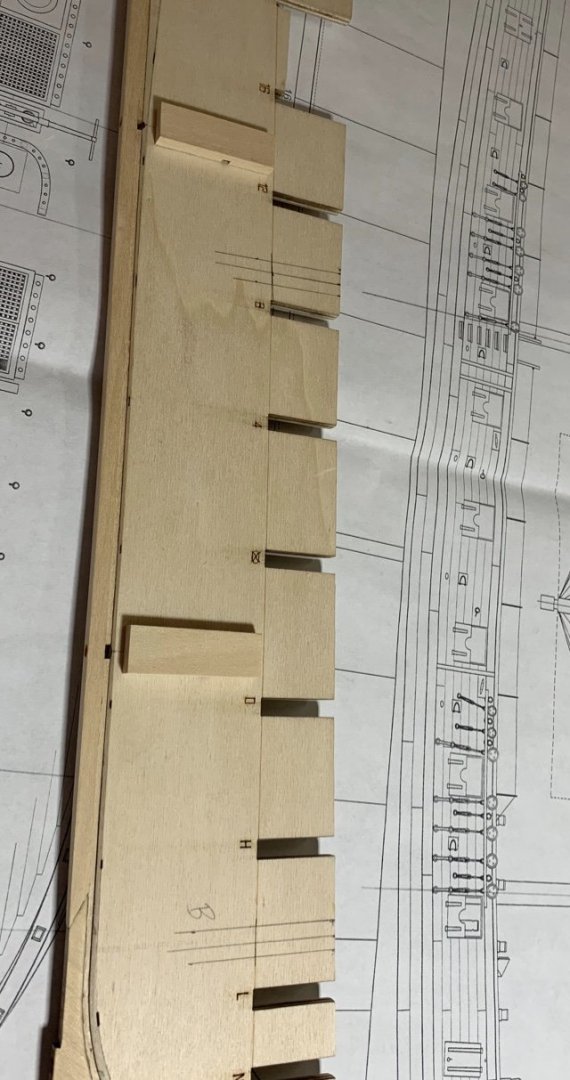


-
Great idea! Will follow suit and do likewise!
-
That’s some nice progress. I especially like the method for pre-drilling the mast holes in the bulk head former before putting in the frames! I think I might try that! My bulkhead and one or two frames are also slightly warped. Like you, hoping the fillers true the spine.
-
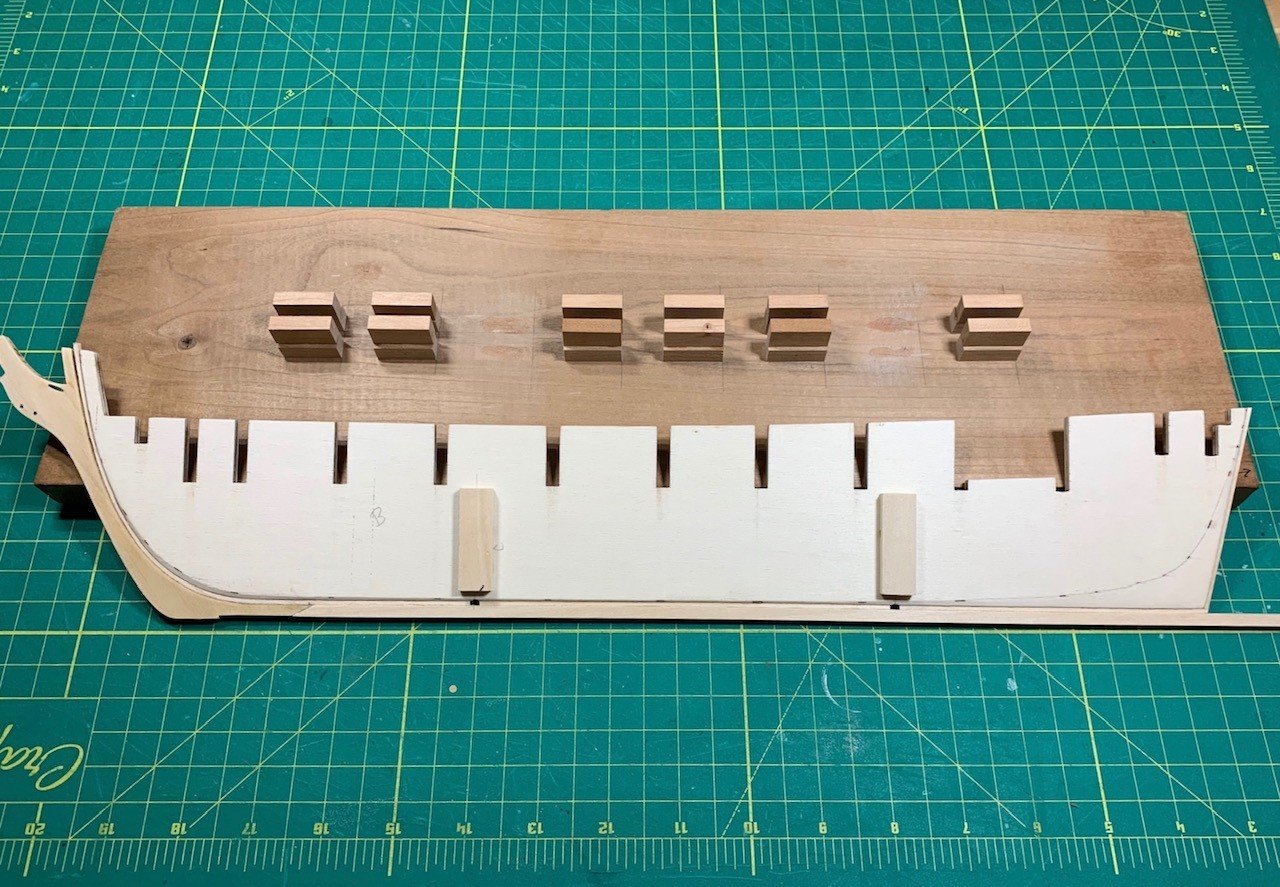
I checked the protrusion of the additional blocks added to support the exterior wall of each mounting hole. The blocks near the bow won’t interfere with the lay of the planks at all. The ones near the stern pop out only slightly on on corner and I can shave them down before I start gluing in the filler blocks.
-
I'll take your advice and shave them down a bit before I glue in the frames to make my life a bit easier...good advice!
-
Thanks, Kurt. You have a good eye! Actually, I made them long to cover the majority of the length of the hole. I planned to trim them back during the faring process after the frames and support blocks were in place. They are basswood, so they’ll be easy to trim back.
-
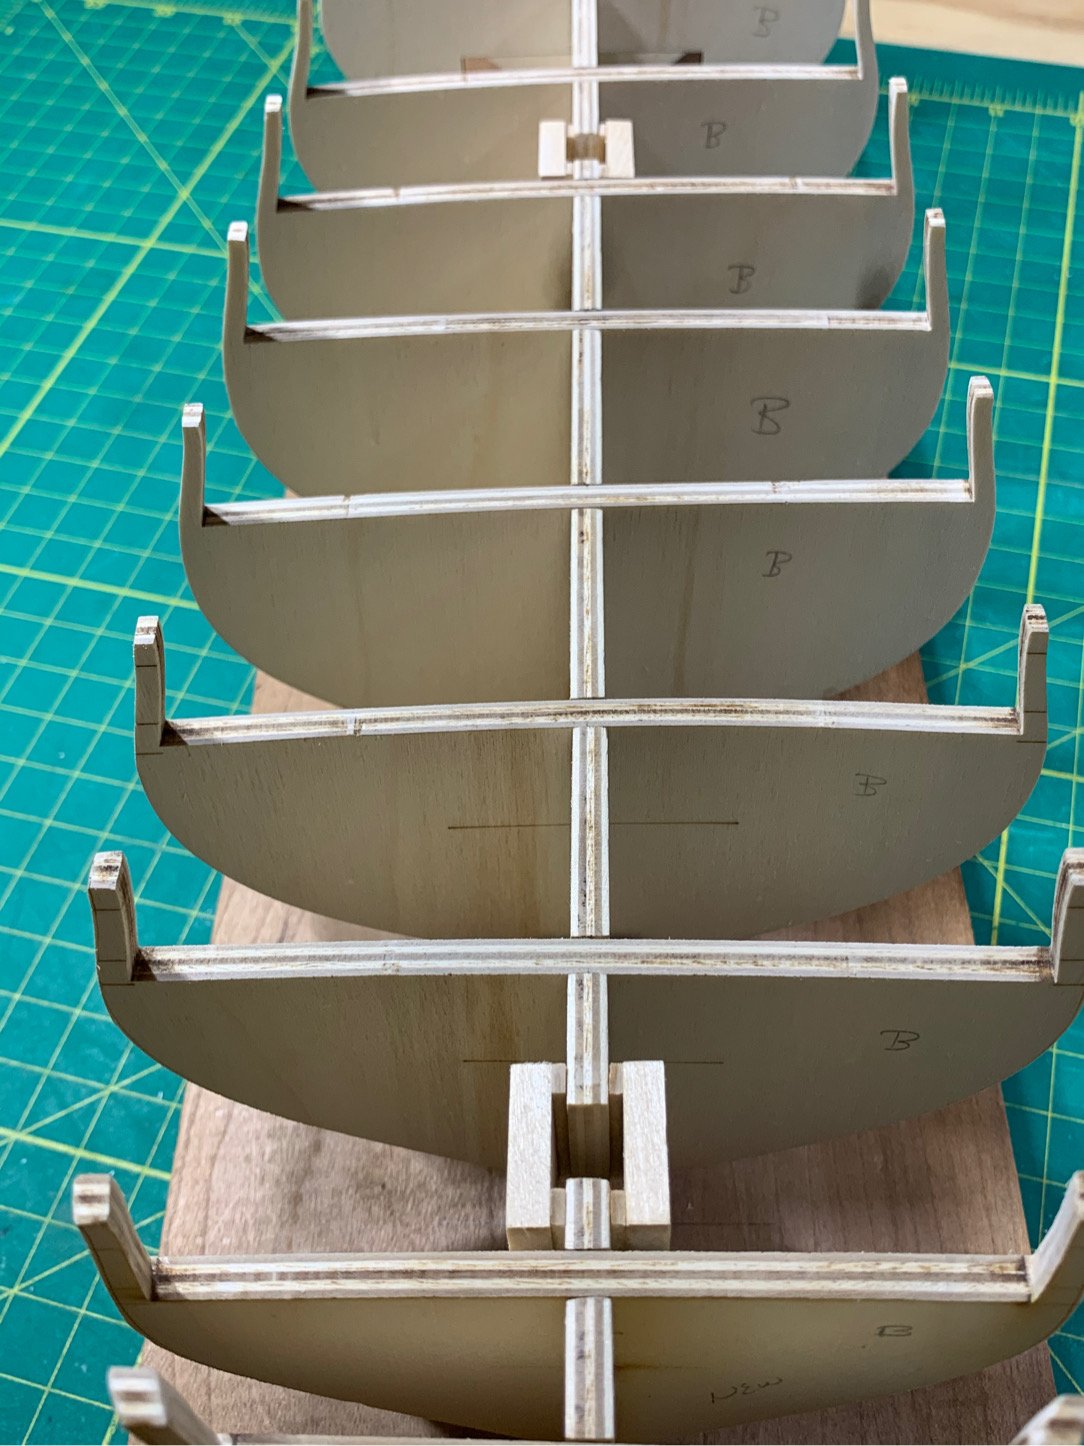
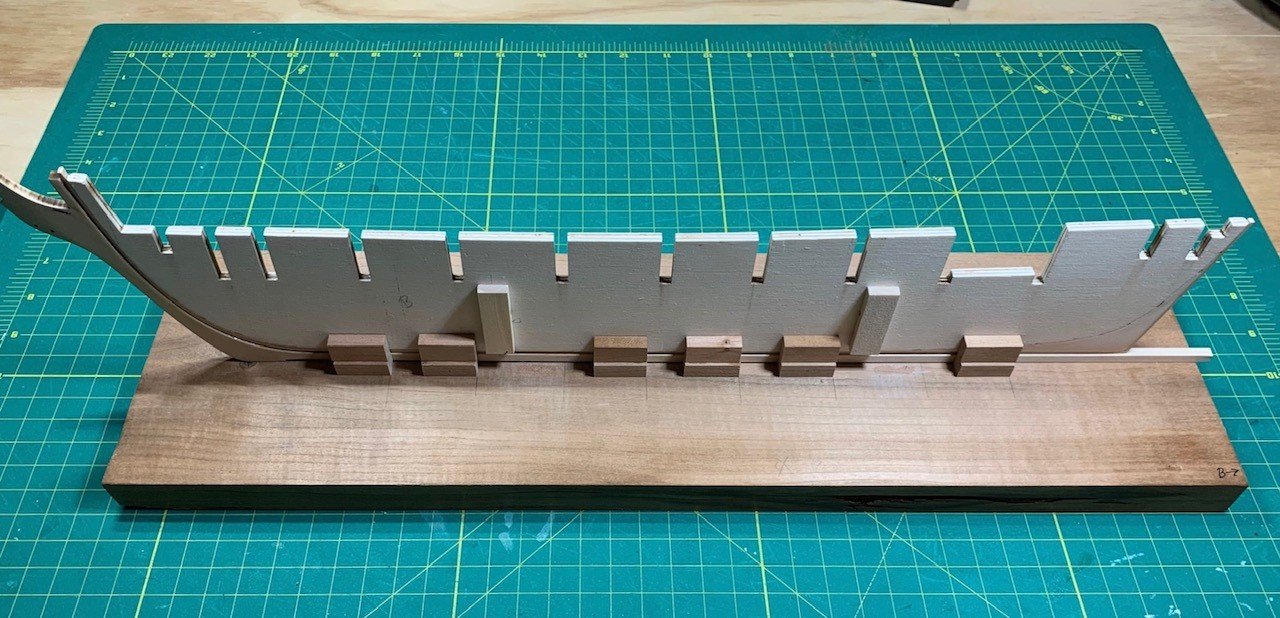
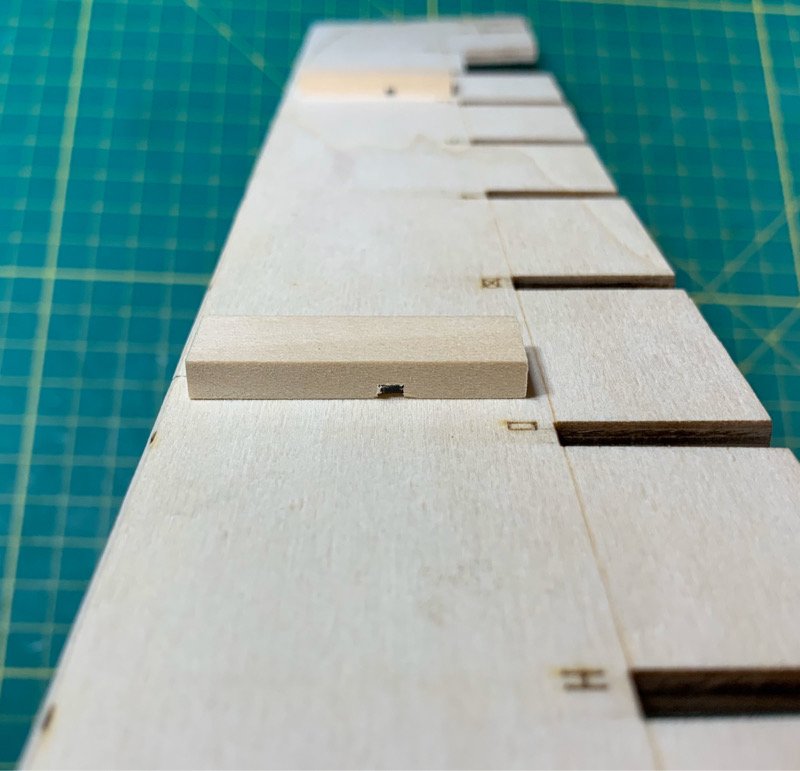
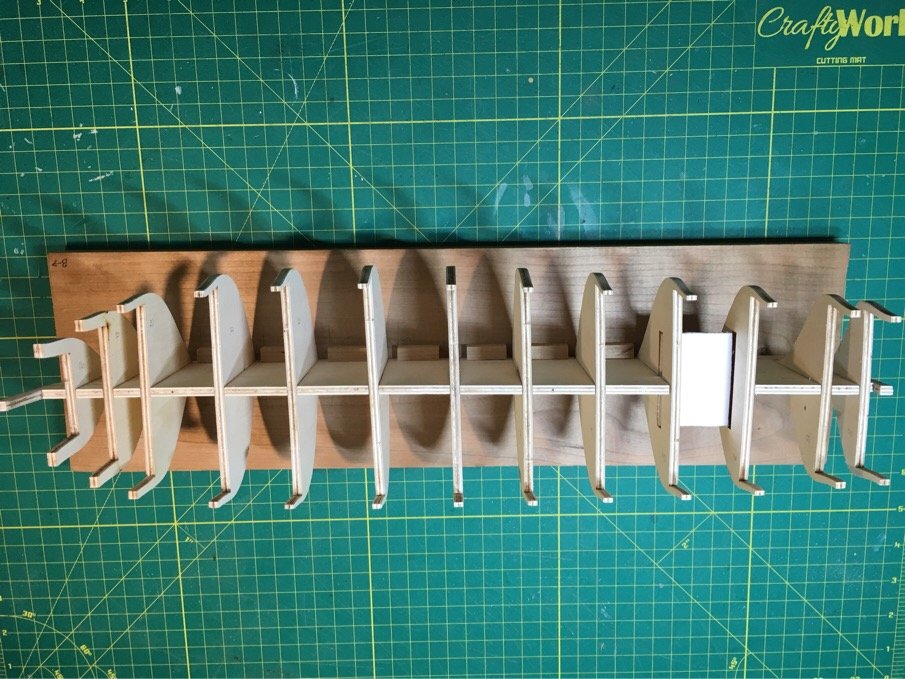
Some little progress. I took my time on adding the rabbet strip...breaking it into sections between the mounting holes. This actually made the job easier to ensure good alignment. Took the opportunity to add some height to the blocks on the building board, since the added keel and rabbet will raise up the profile. I can always remove these later if I need too... Then I tapered the stem post and added that and the keel to the bulkhead former. Took time to ensure the holes I drilled in the keel were aligned with the mounting holes and double checked with one of the screws...all good. You can see the gap along the rabbet where the mounting holes are, but these will be concealed later by planking and plating...so it a non issue. Although not shown, I also took the opportunity to pre-drill a mounting strip (using 1/2" square dowel). I can connect the board directly to the false keel so I can 'mount' the model on it and attach to my keel clamp if needed. This was something I did with the Sultana and I found it very useful, especially when working on the deck. As per Chuck's practicum, I'm leaving off the stern piece until the planking is complete...next up are the frames and filler blocks. Will take my time with these as well...got nothing but time at the moment. Moving on!
-
Outstanding! Another Syren! Looking forward to your build!!!
- 950 replies
-
- 1
-

-
- syren
- model shipways
- (and 1 more)
-
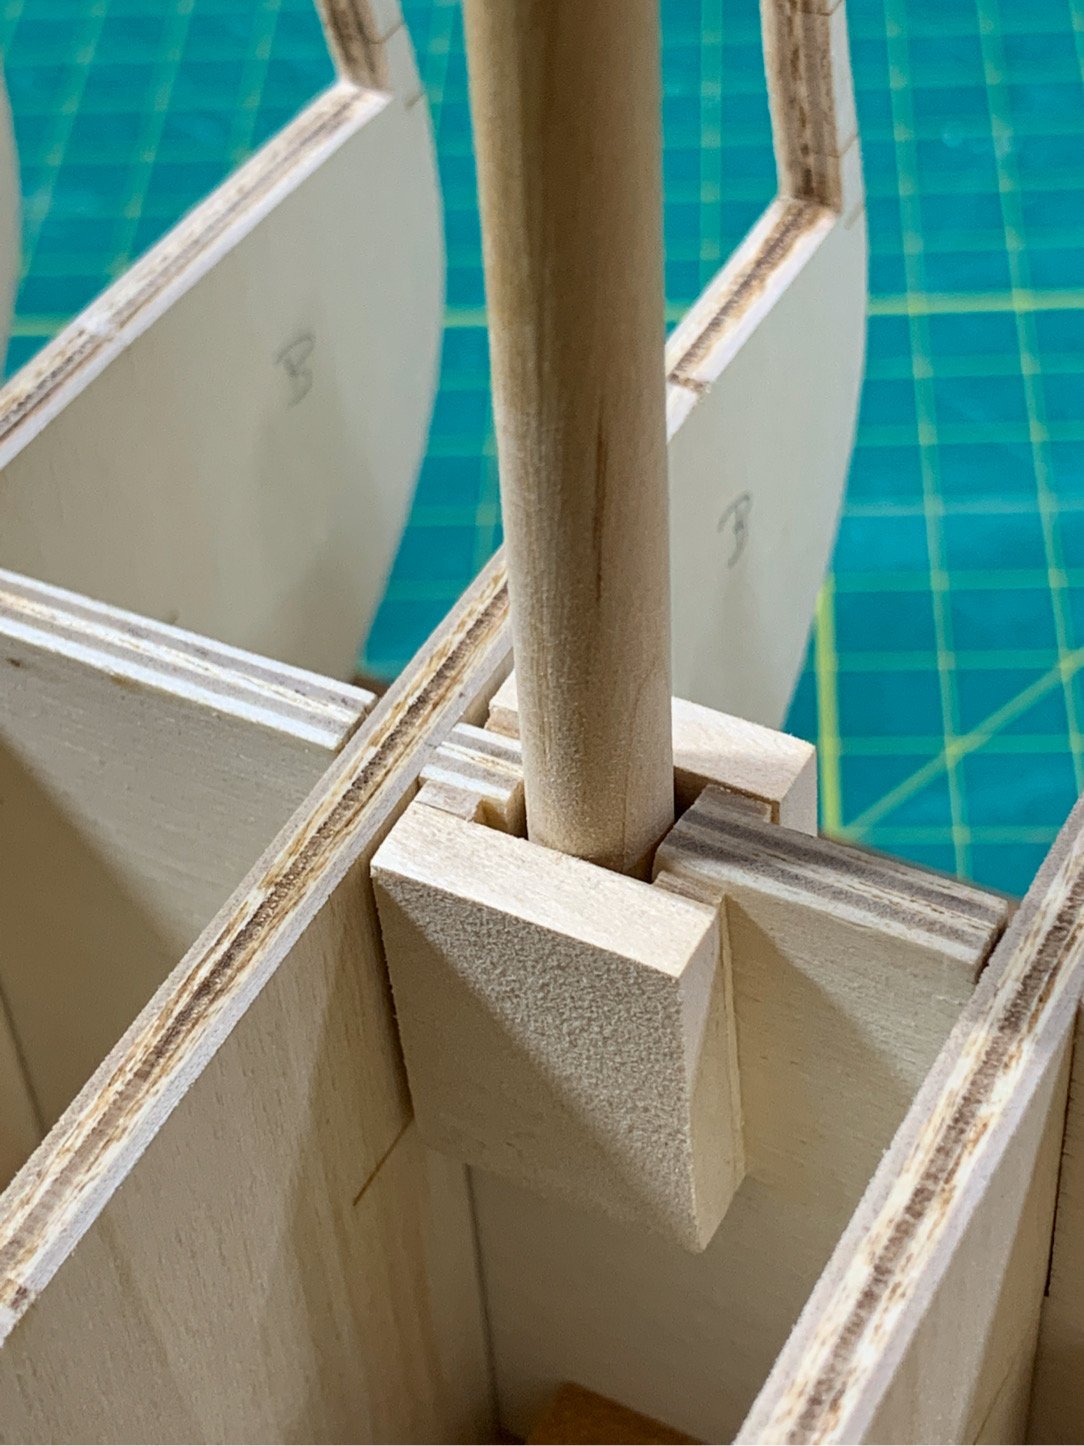
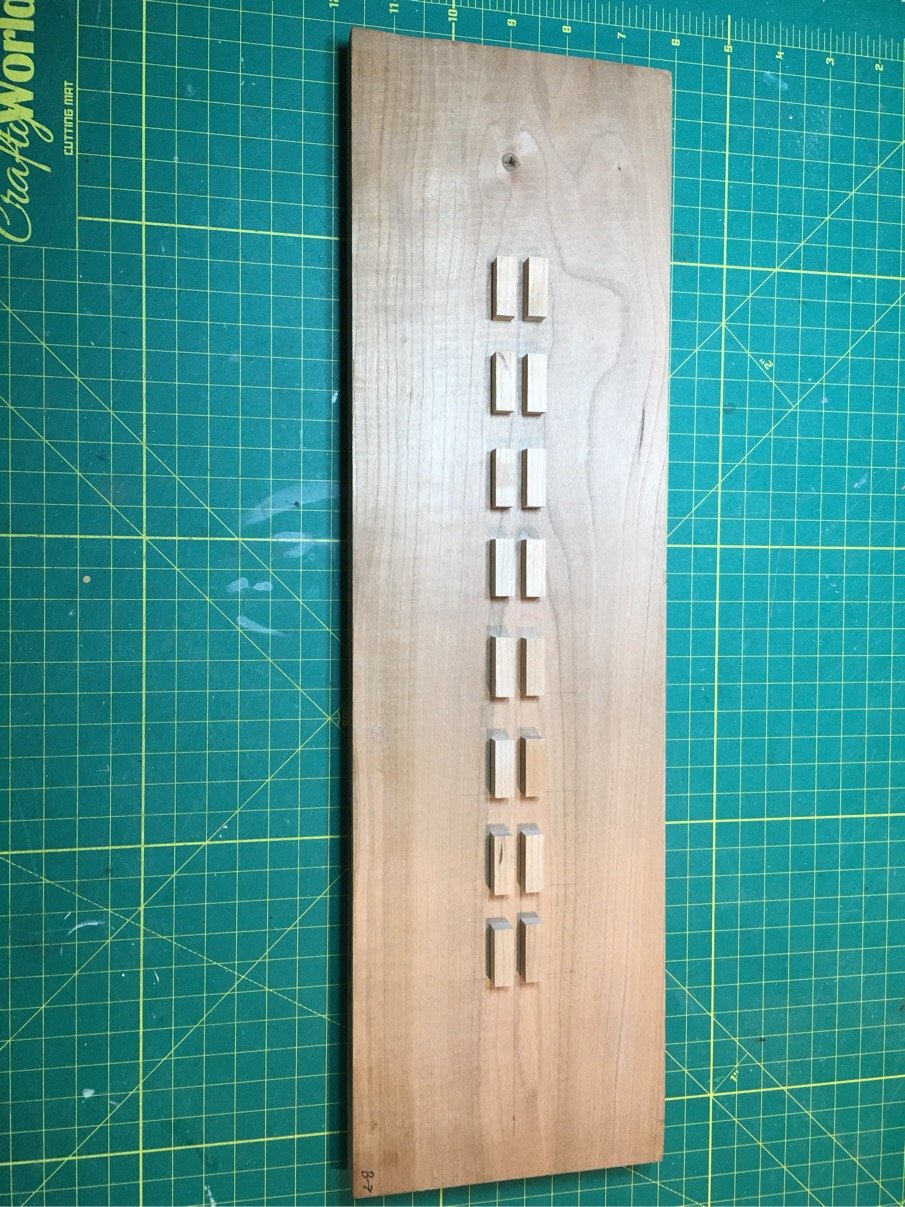
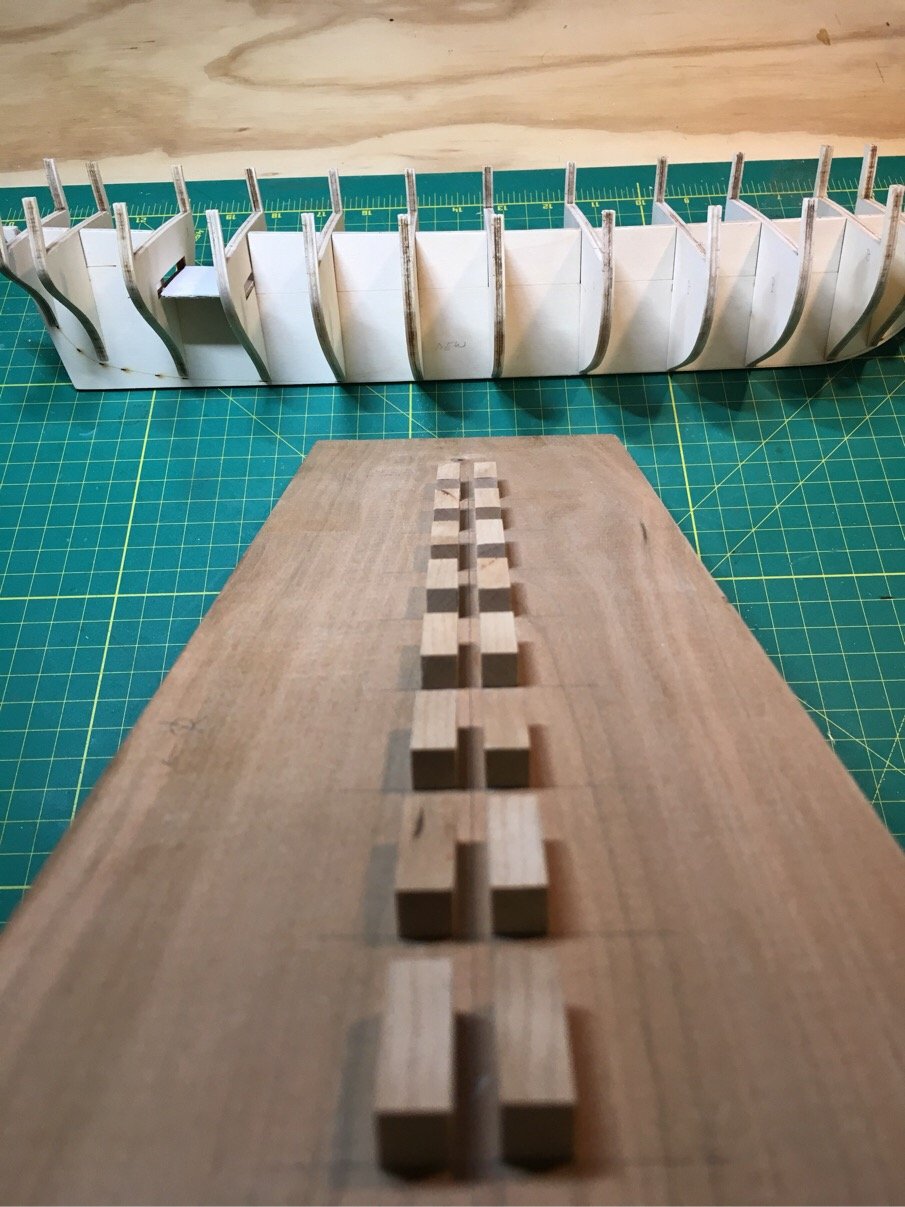
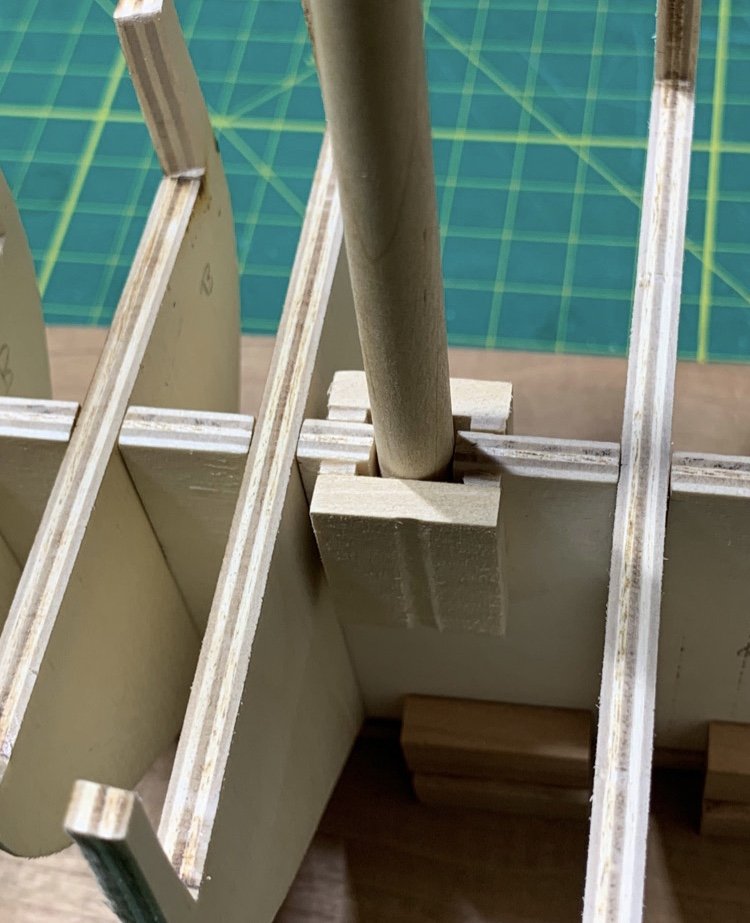
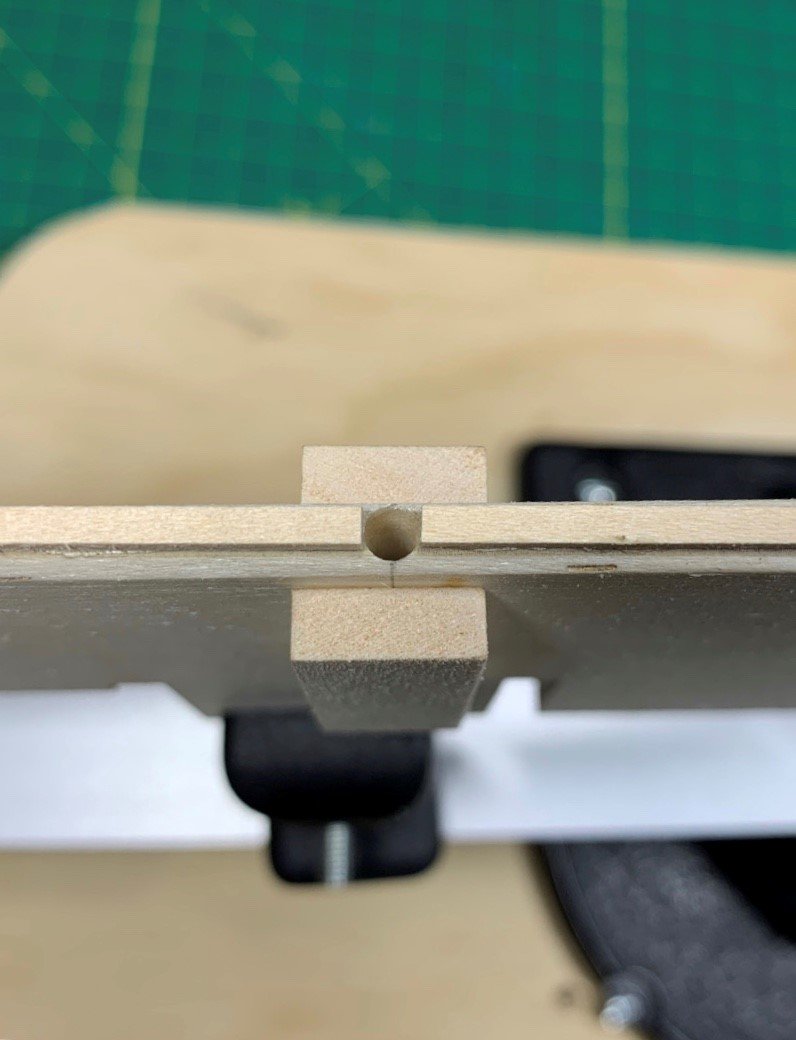
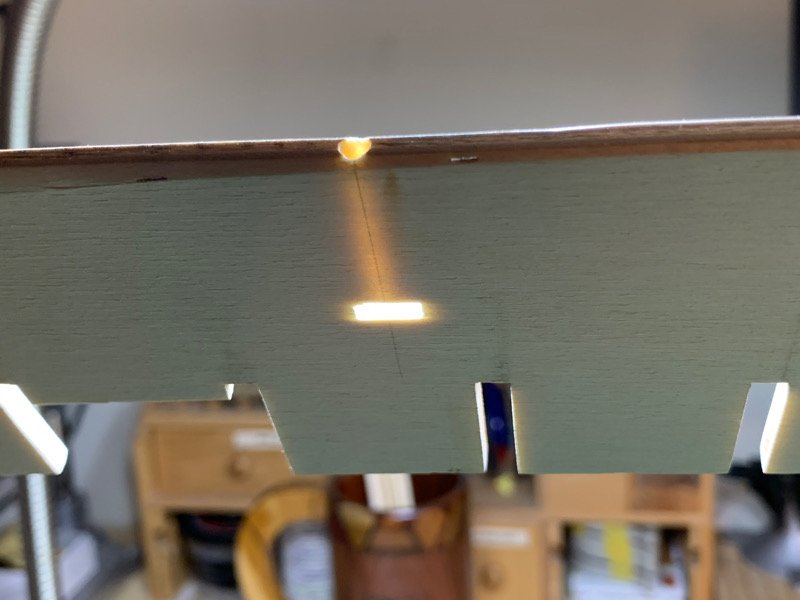
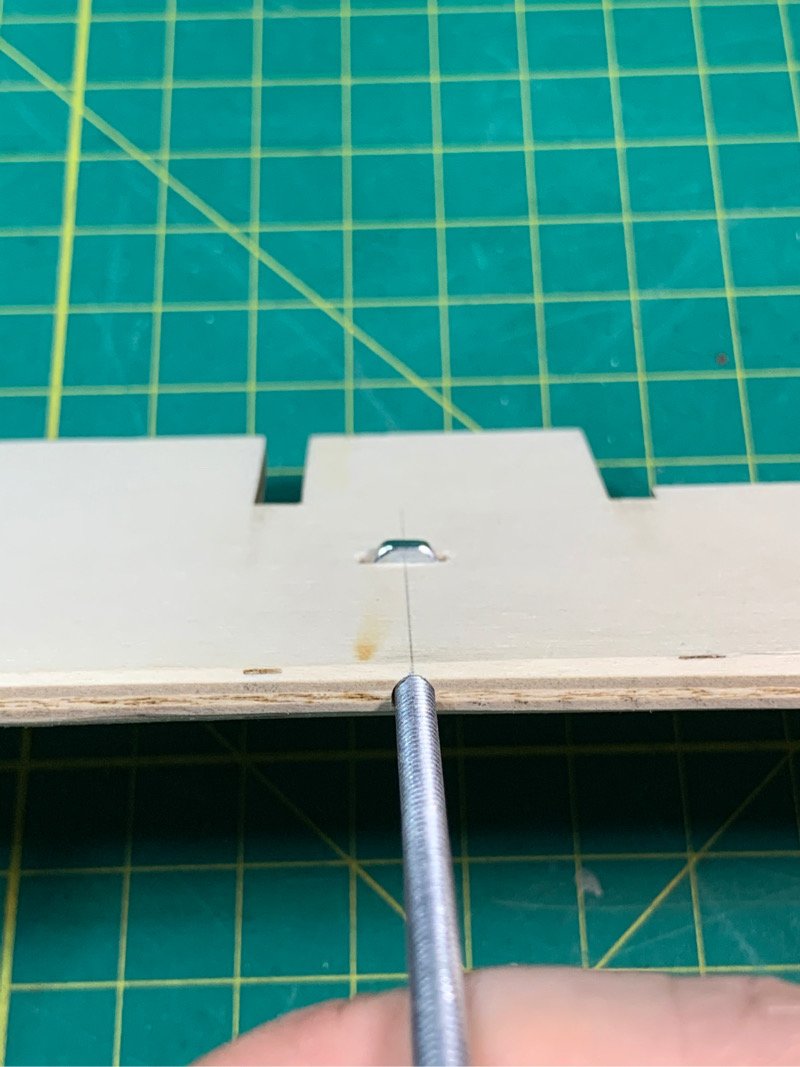
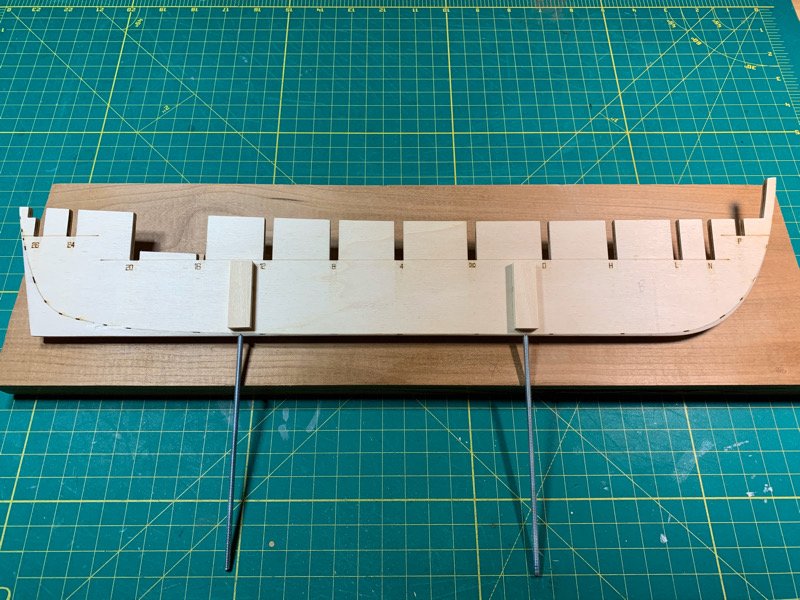
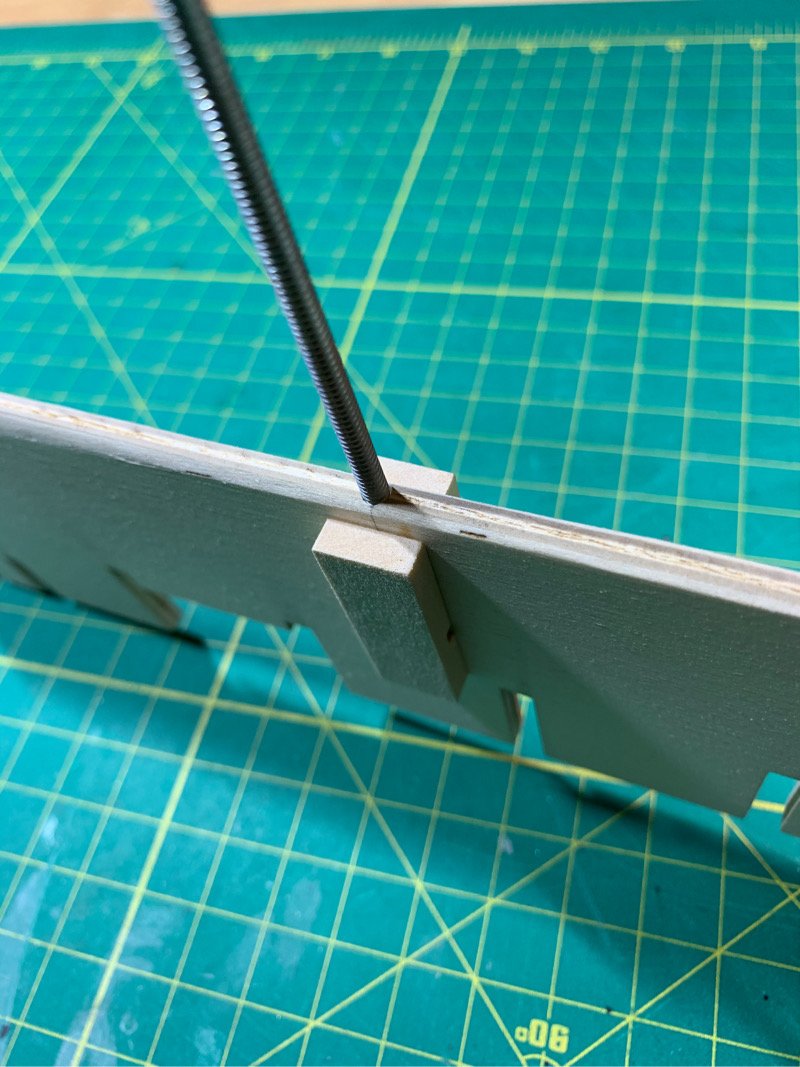
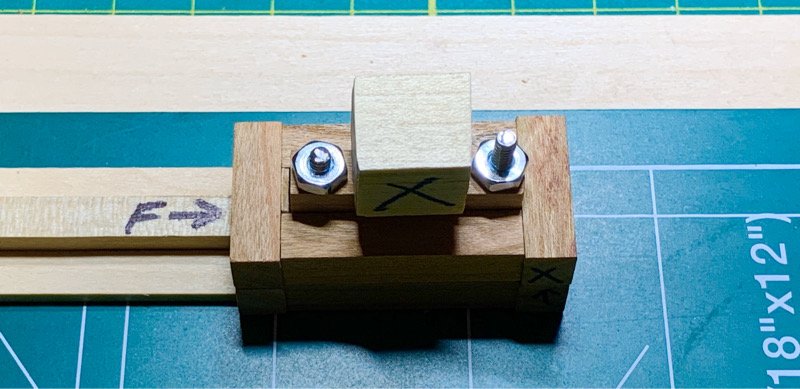
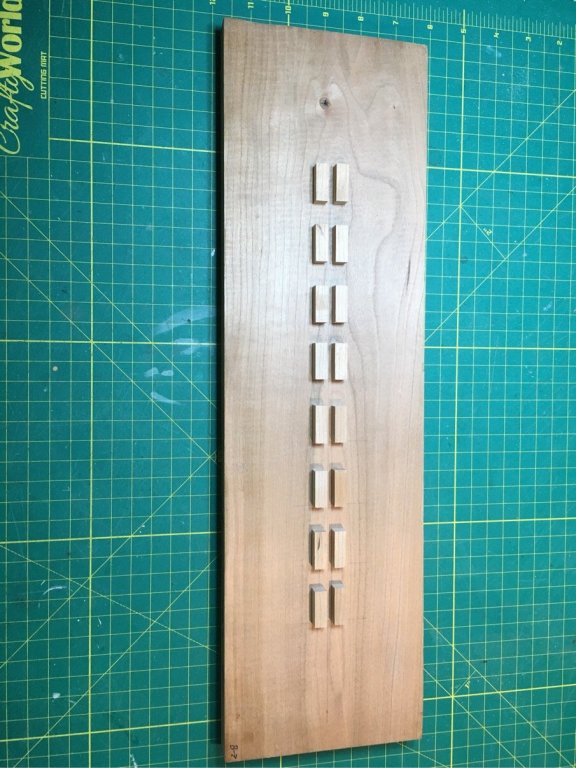
Well, I’ve been staring at the bulkhead former sitting on the building board for months. The key question in my mind was...How am I going to mount this thing? With my Sultana, a solid hull ship was easy....wood screws for the win! However, for a the USS Syren, a plank on frame, I wanted to ensure I had a handle on how it would be mounted before I started messing with the planking. Ok...I wanted a metal nut in the hull I could easily tap for mounting. It’s not rocket science. But I think I made it too difficult in my head. I got a 12” long screw (Hillman SKU 227-8956; #6-32 threaded screw 12”), and cut it in half with my Dremel. Next, I drilled a guide hole in the spine of the bulk head former at the appropriate spots I wish to put it on pedestals. The guide hole was drilled with a 7/64” bit, and the final hole with a 9/64” bit. This needed to be done very carefully and I used my mini drill press. The 9/64” bit allows enough room for the #6-32 screw to slide into the hole snugly without catching....but it leaves very little meat (wood) on the walls of the hole. I then drilled some holes perpendicular to the guide hole which will hold the screw and filed out a rectangular hole which a #6 nut can fit into without difficulty. As the nut protrudes beyond the sides of the bulkhead former (equidistant on either side), I ensured my wooden bolsters (to add meat to the side of the screw hole) had a slot which fit the width of the nut. I used a good amount of carpenters glue to ensure the additional wood supported the thin walls made by drilling the holes. So, my mounting nuts and holes are set. Most importantly...I can move on with the build without worrying about it anymore!!! Moving on...
-
Kurt - I’m still interested in the cooking/weathering process. Maybe it’s easier than my mind is making it out to be.
-
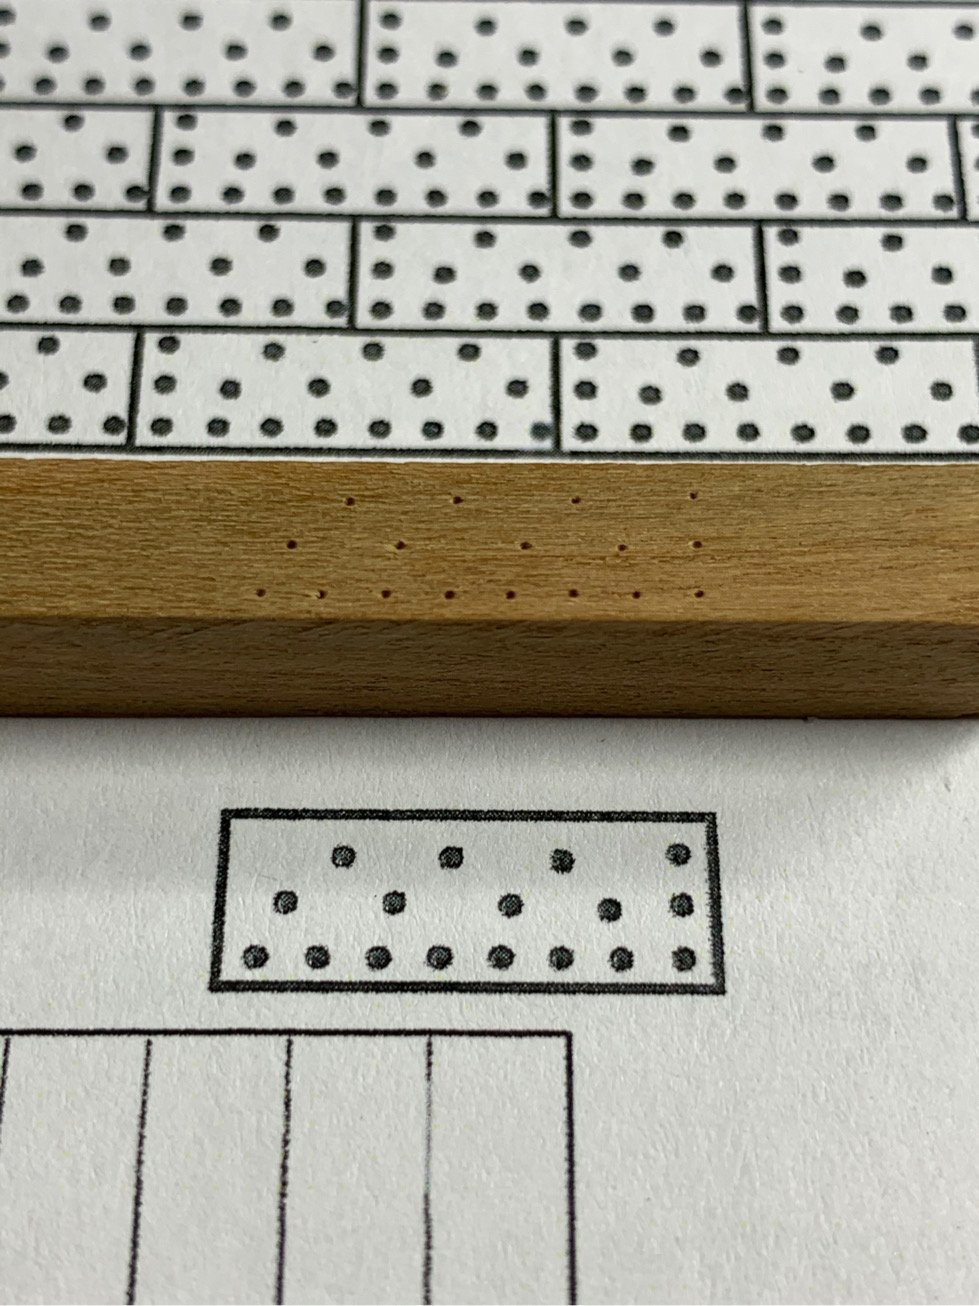
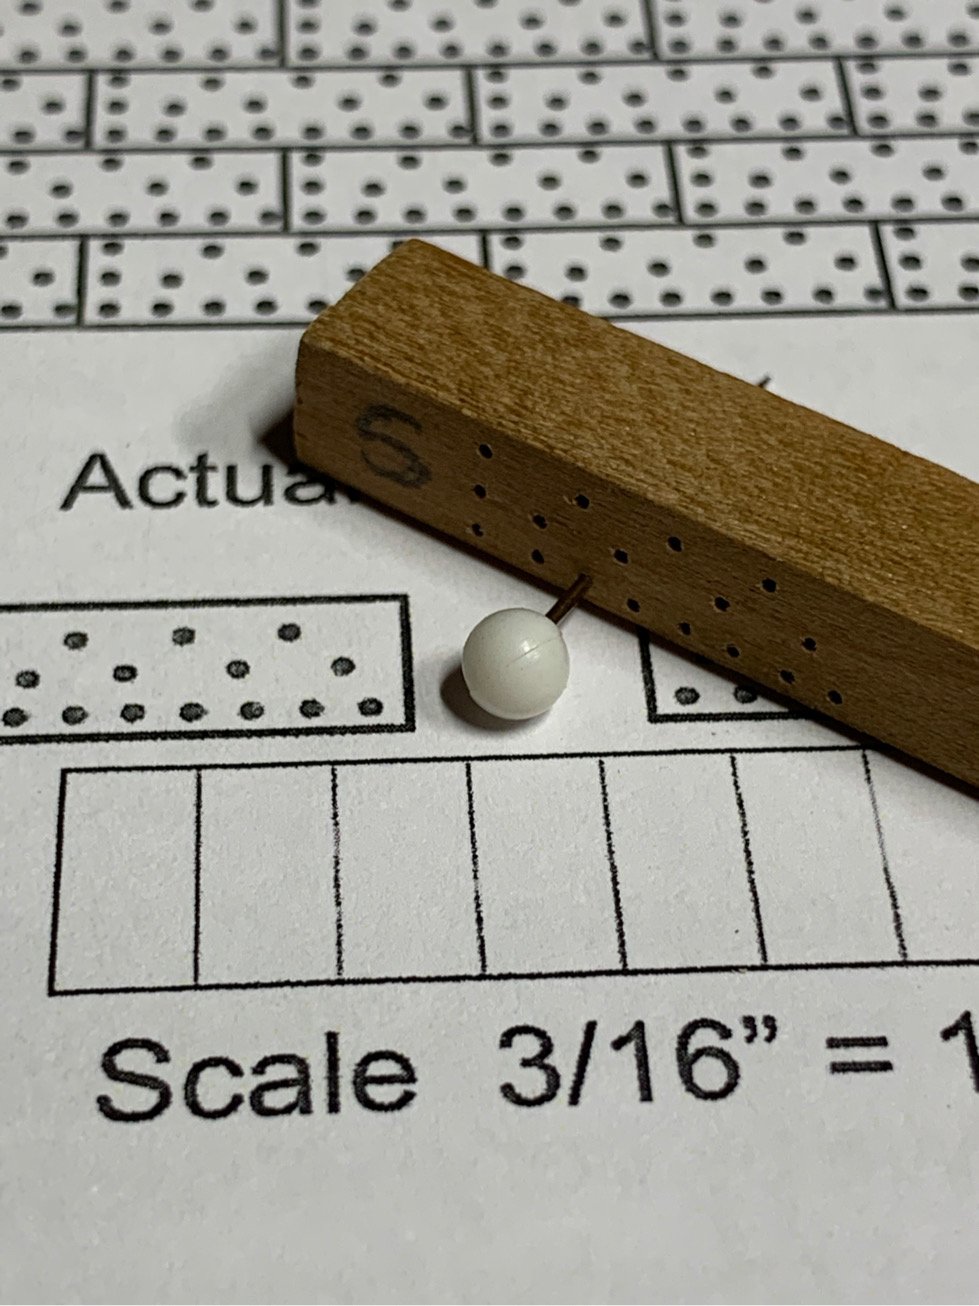
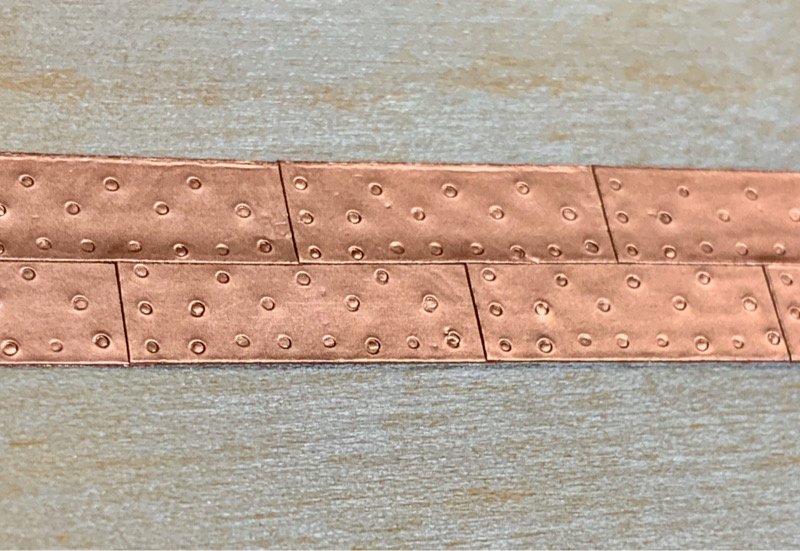
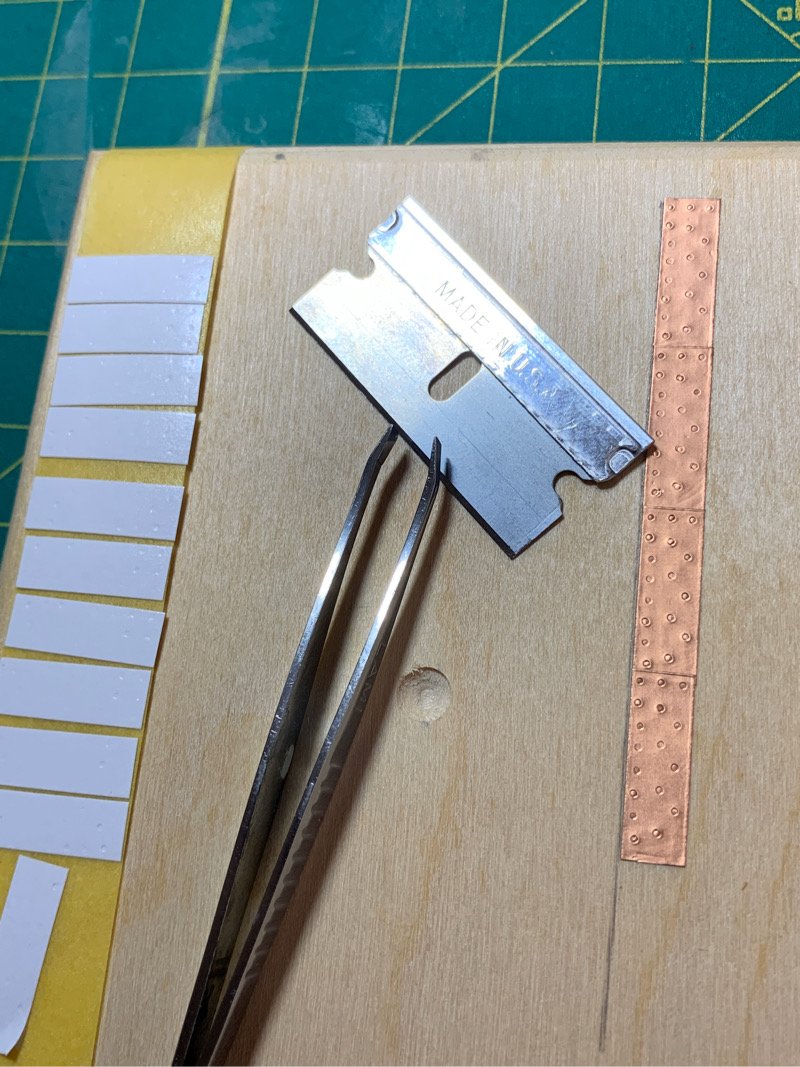
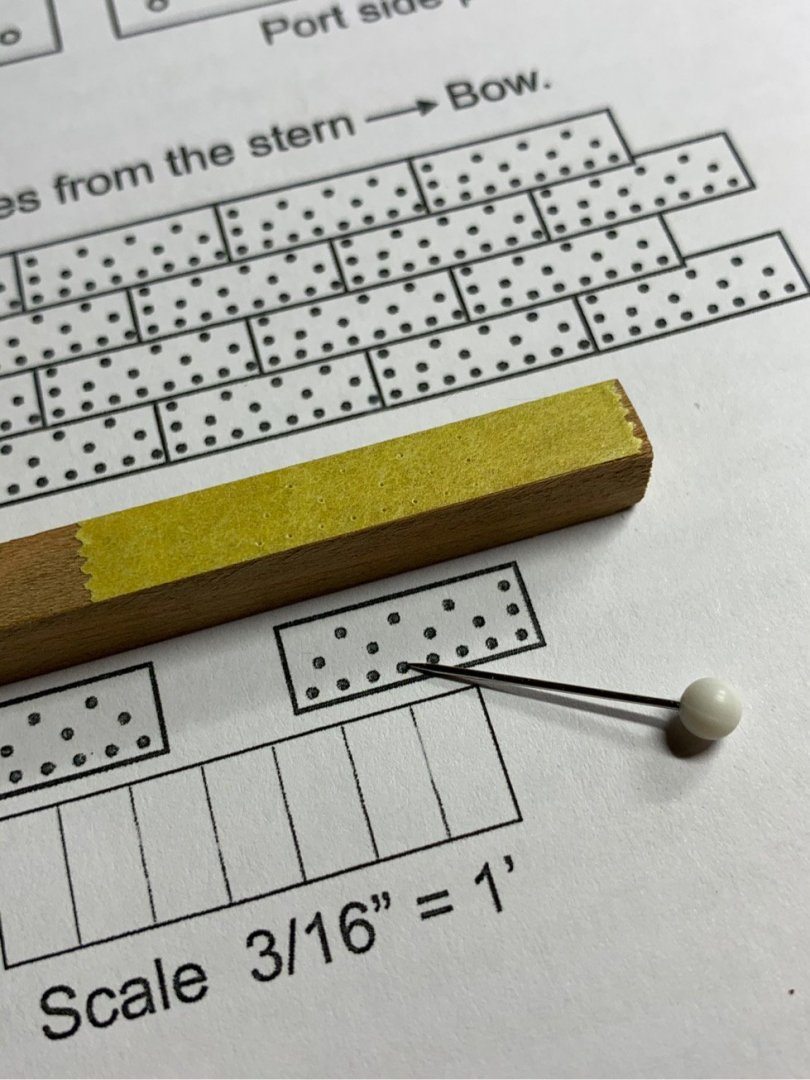
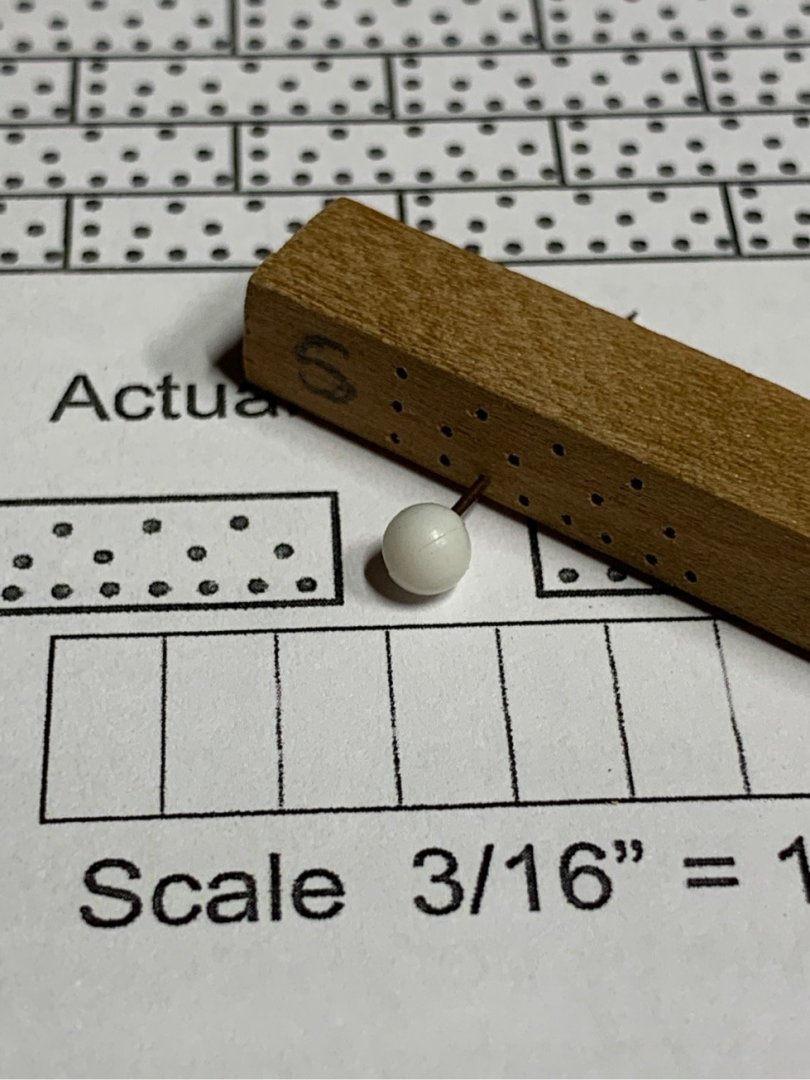
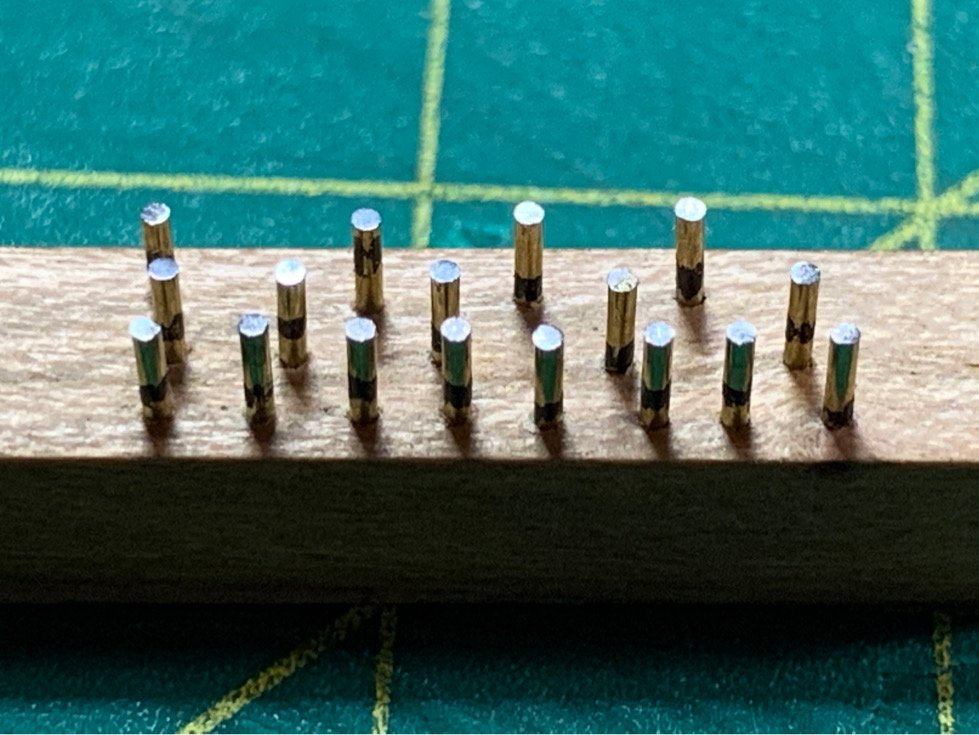
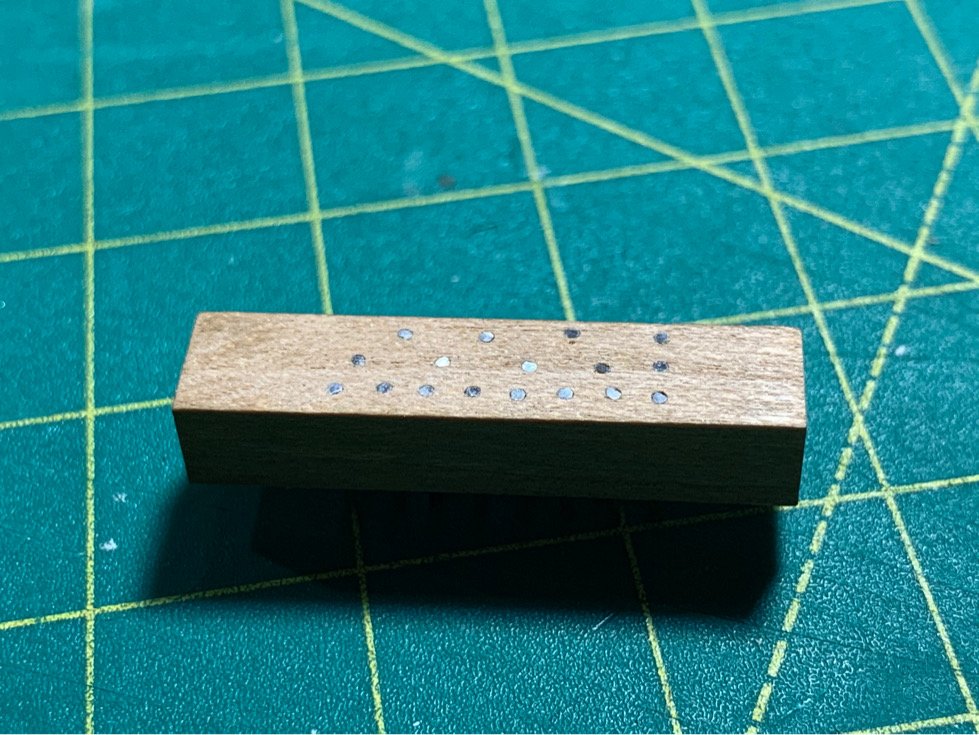
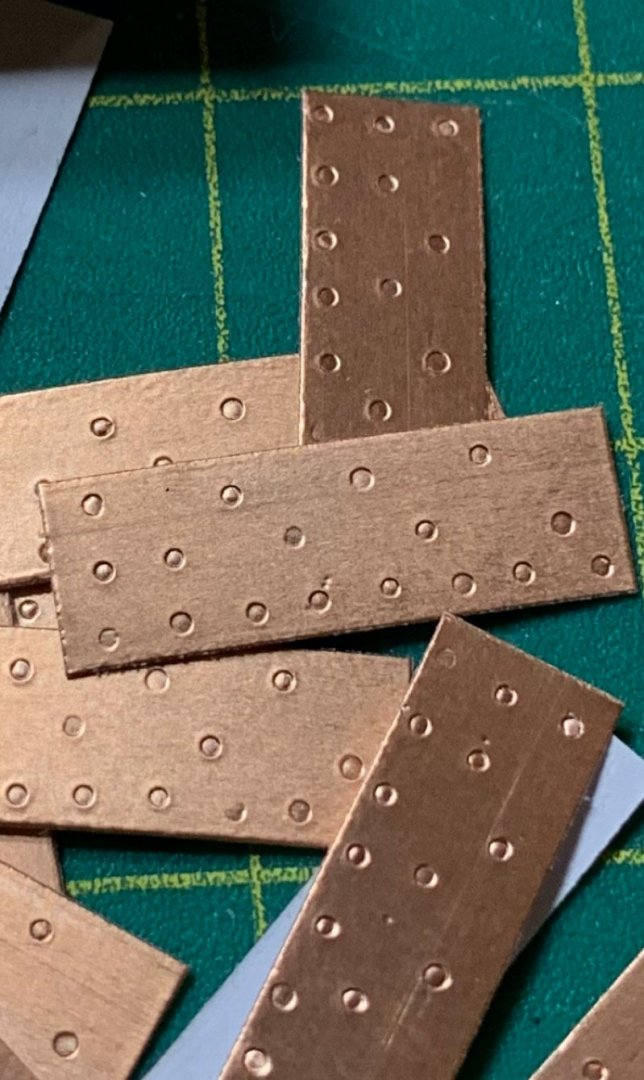
Just tweaking my template punches...replacing pins which are slightly too short or tall...to give the best impression. One or two taps of a hammer on the punch gives a clean pattern. I like my design. I can replace pins with ease...and I took one apart to see the effect on hammering on the copper and aluminum plates...no marks at all...the pins will keep in alignment after repeated hammering. Rather than burnishing after applying to the ship, I experimented a bit and found a simple approach more in line with the description in Chuck’s practicum. After finishing a 12” strip and before cutting into individual plates, I simply place the strip copper side down on a notebook. The paper acts as a soft but smooth batting. Then I simply rub the flat of my index finger nail along the paper backing. Ta daaa! Nice effect. Then I used a little paper cutter to evenly cuts the plates. I thought of the recent advice someone offered about sandwiching the copper tape between two pieces of masking tape and peeling apart to separate the foil from the paper backing...with a slight modification. I used some double sided scotch tape affixed to a piece of wood, then applied a copper plate (paper side down) onto the tape. Then I used a razor blade to very gently (and without crimping the foil) raise up the edge of the foil from the paper. I used a flat tweezers and grabbed the edge of the foil (only a small portion of the foil edge, as the tweezers will bruise the foil). This is hard...I gently pulled off the foil from the paper backing without curling it or twisting. The trick is to put tension on the foil and try to keep it straight while it peels away from the paper. It’s a learning process, but it works and I can already see my improvement. Now that both templates (punches) are done and I have some confidence in how to get the foil off (I’ll be going for the new penny look!), I’ll move on and make the plates for port/starboard over time Below is a shot of my first attempts at removing and applying the copper plates. Not a bad result....moving on. 👍🏽
-
Just thinking that the adhesive would burn off as well. What would you use to adhere the copper plate to the wood hull?
-
Thanks, Kurt. Actually, I kind of want the new penny look. 😁 Not historically accurate, but I kind of like the look. Can’t wait until Bob’s 3rd part on copperplating!
-
Actually, I tried a press using my drill press but the results weren’t very good. I’m limited by equipment so had to go with the hammer option. Now I need to figure out how to remove the paper backing from the plates without crimping or bruising the copper foil. Step by step!!!
-
Just started following. You are doing a marvelous job! I’m just starting on mine...but you make it look so easy! Quick questions: How did you peel off the copper foil from the paper backing without damaging or crimping the foil? And what brand of CA did you use on the back of the plate? Watching with interest!!!
-
Outstanding! Long journey but well worth the wait! Great job!
- 360 replies
-
- 1
-
-
- sultana
- model shipways
- (and 1 more)
-
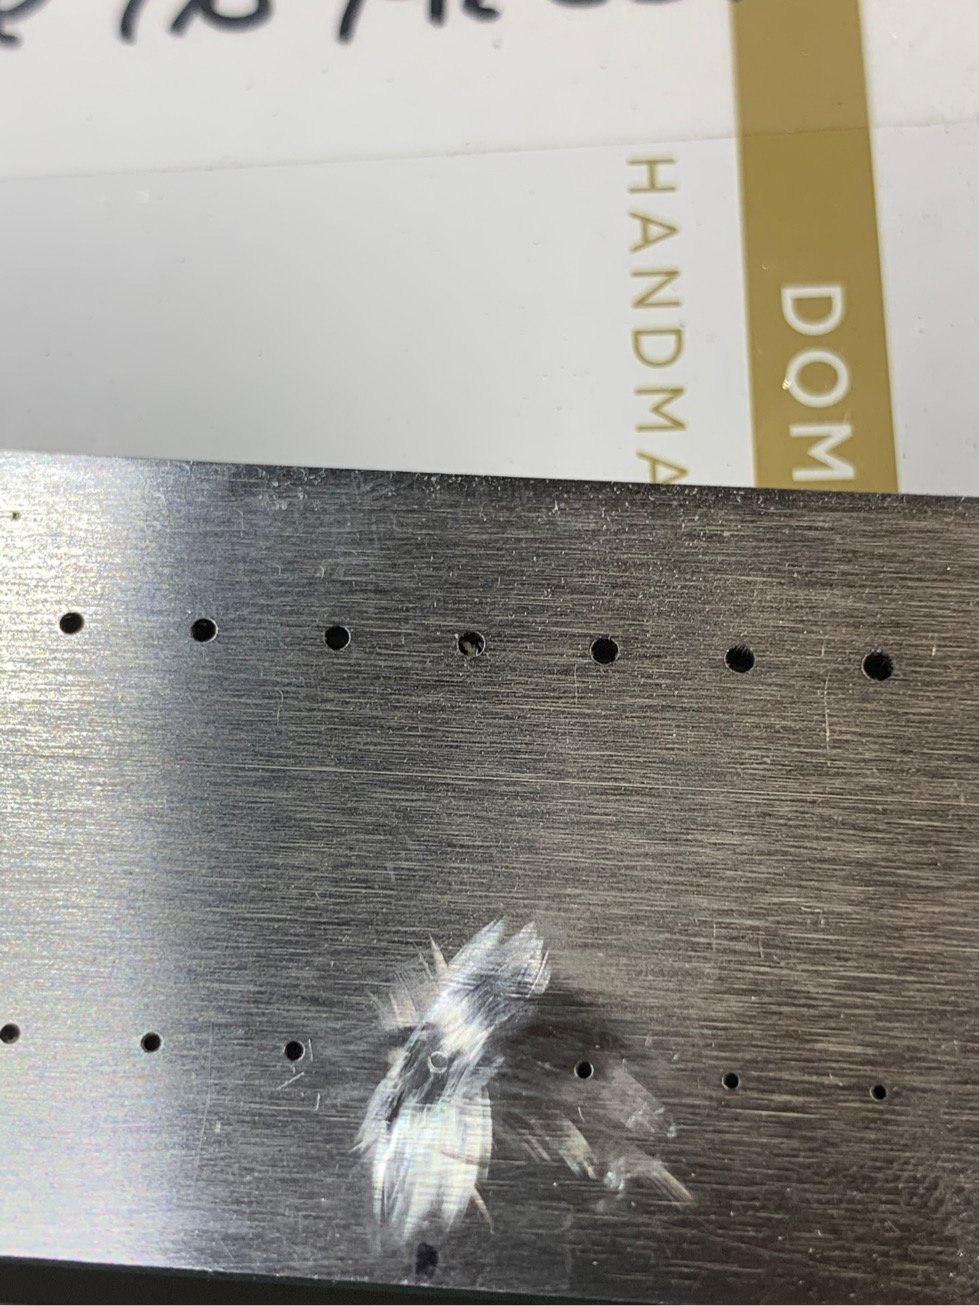
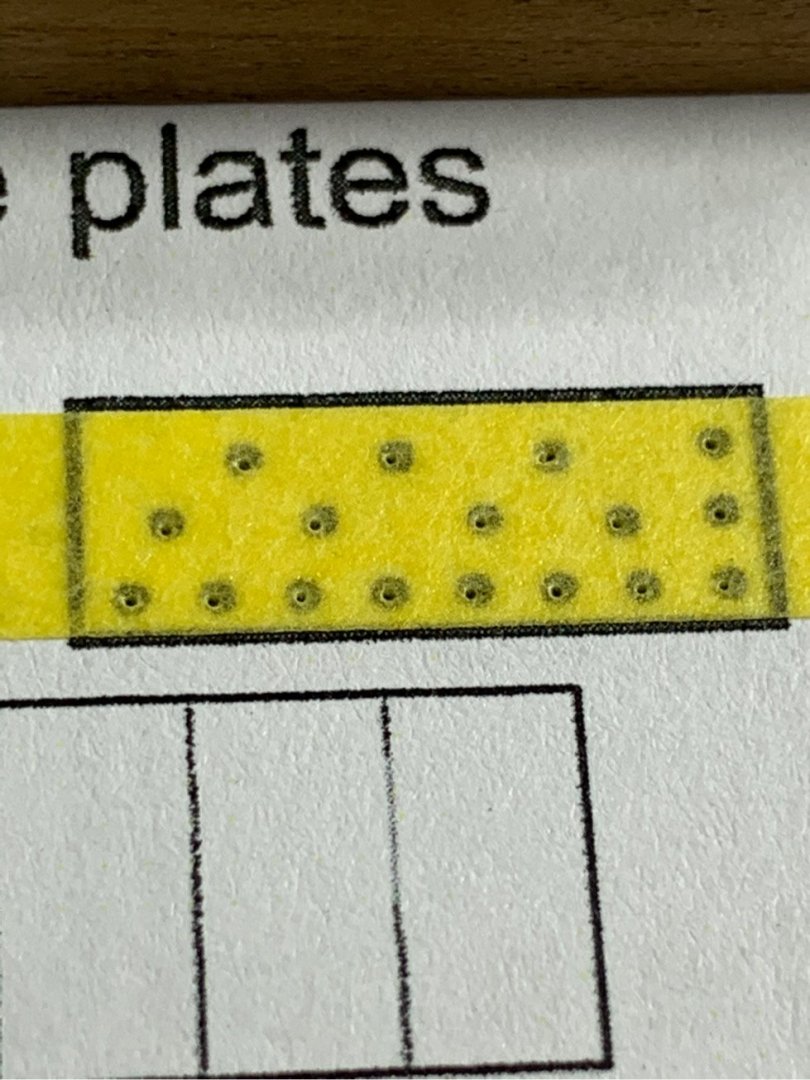
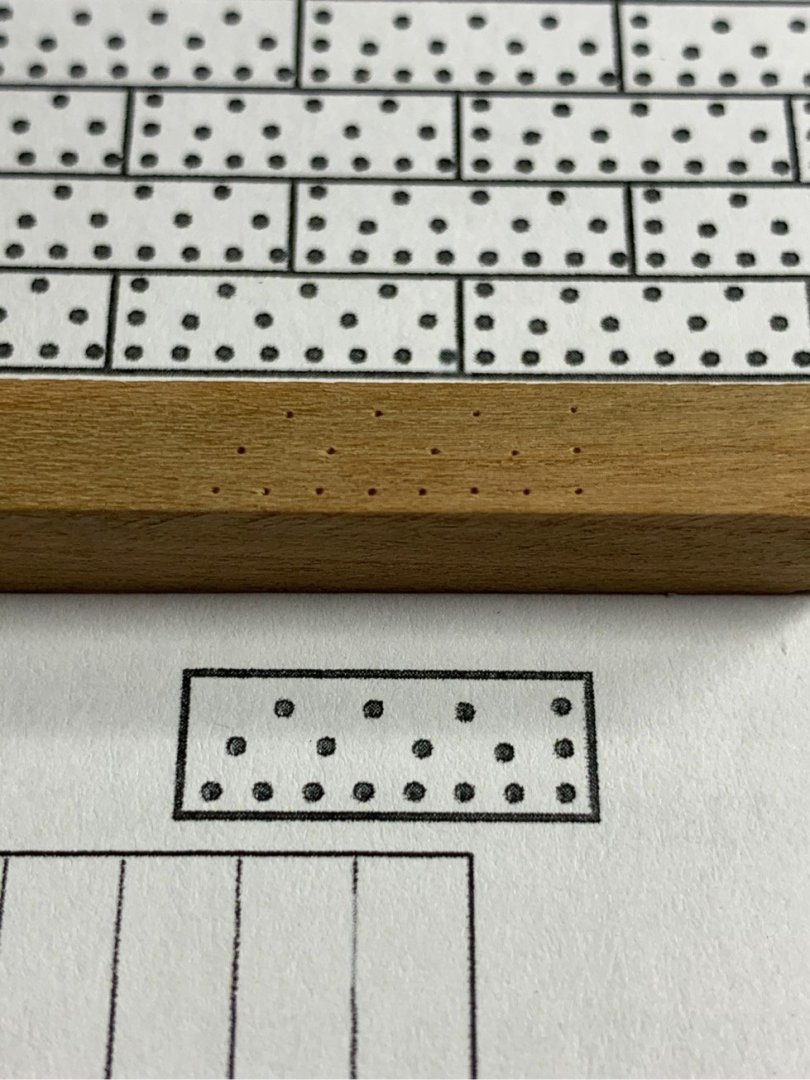
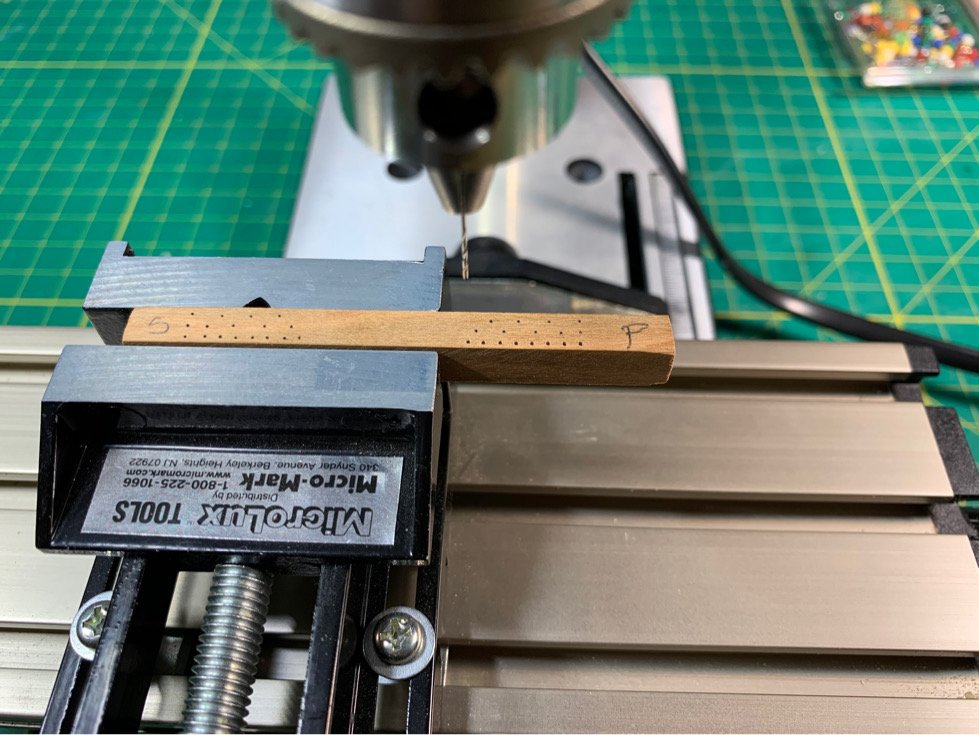
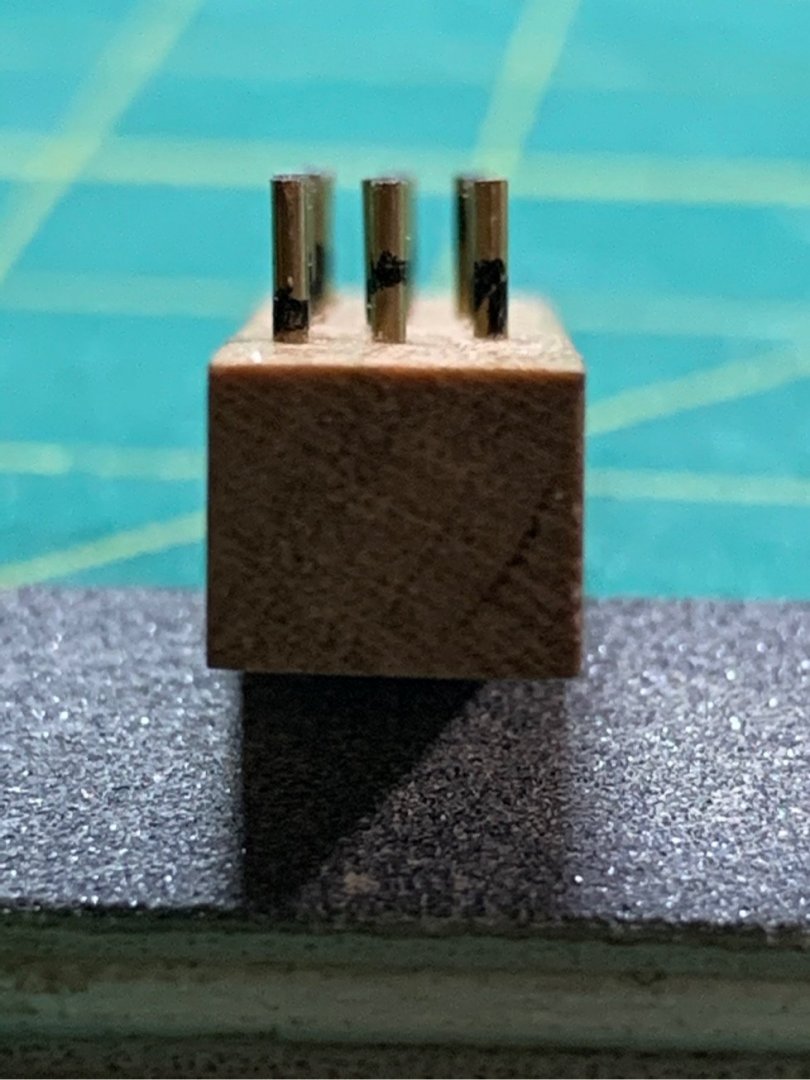
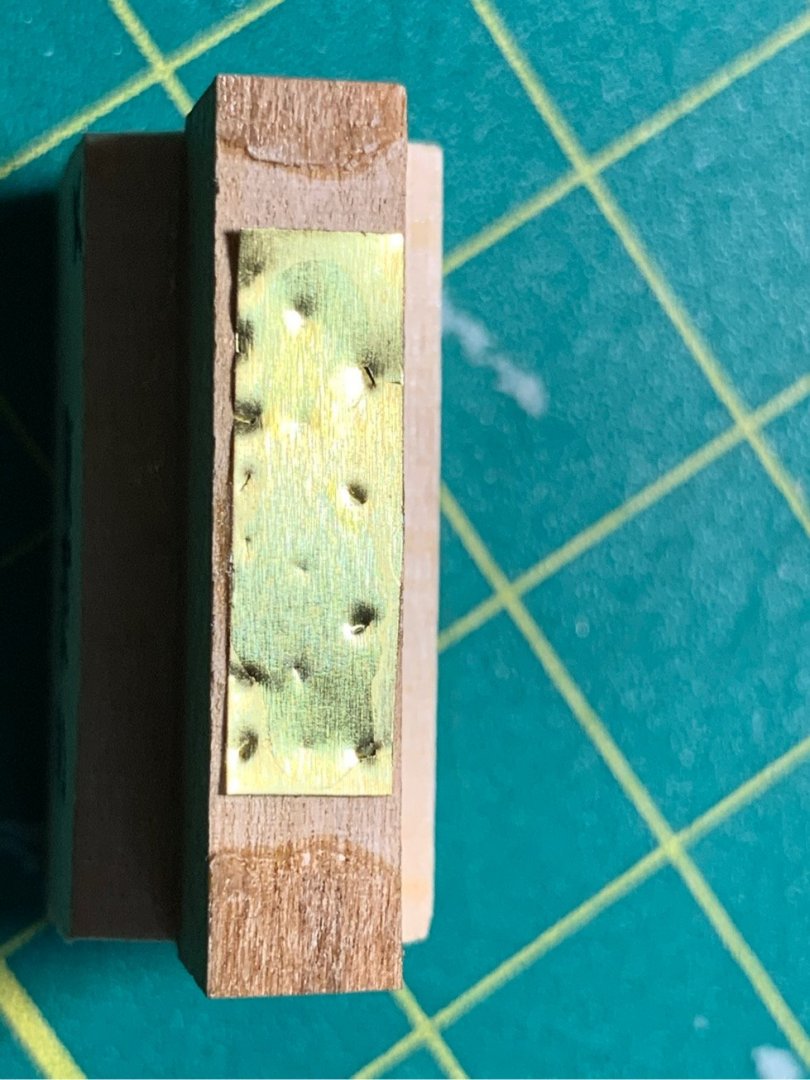
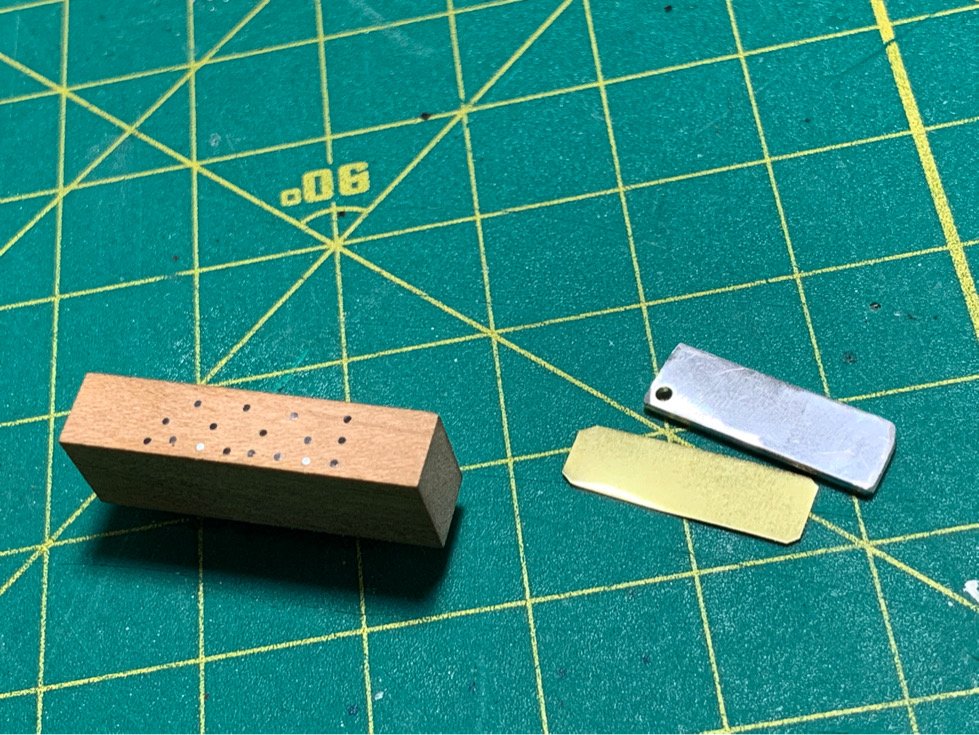
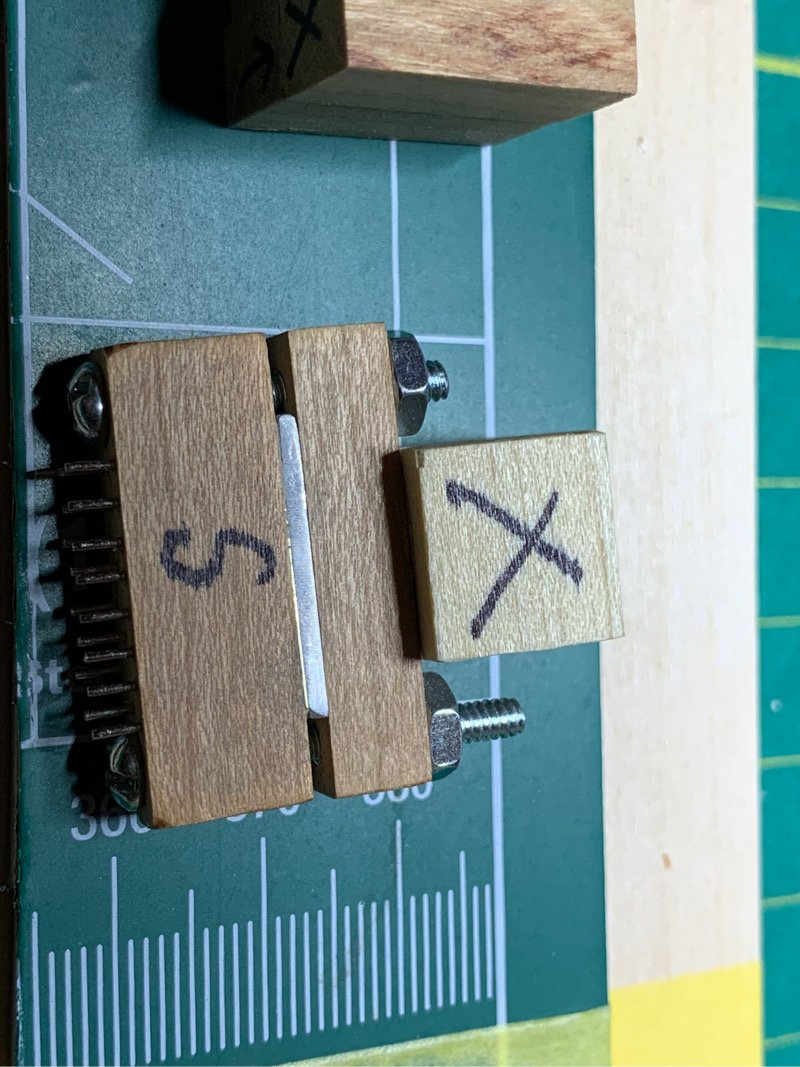
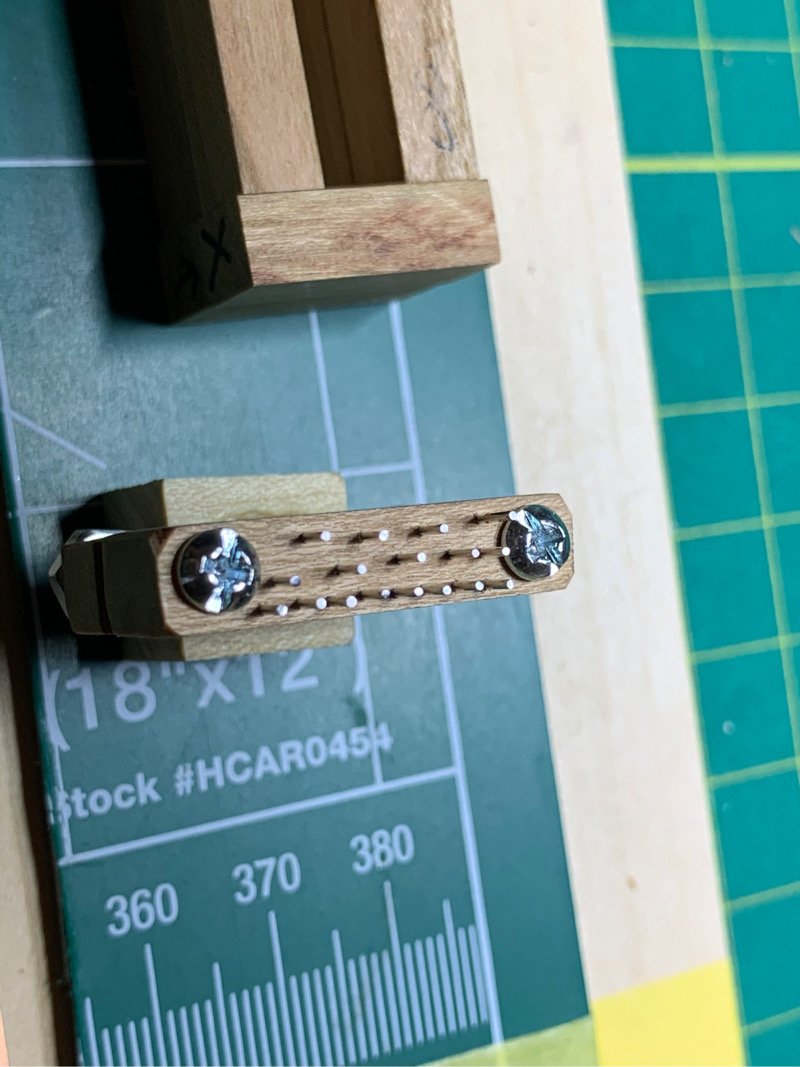
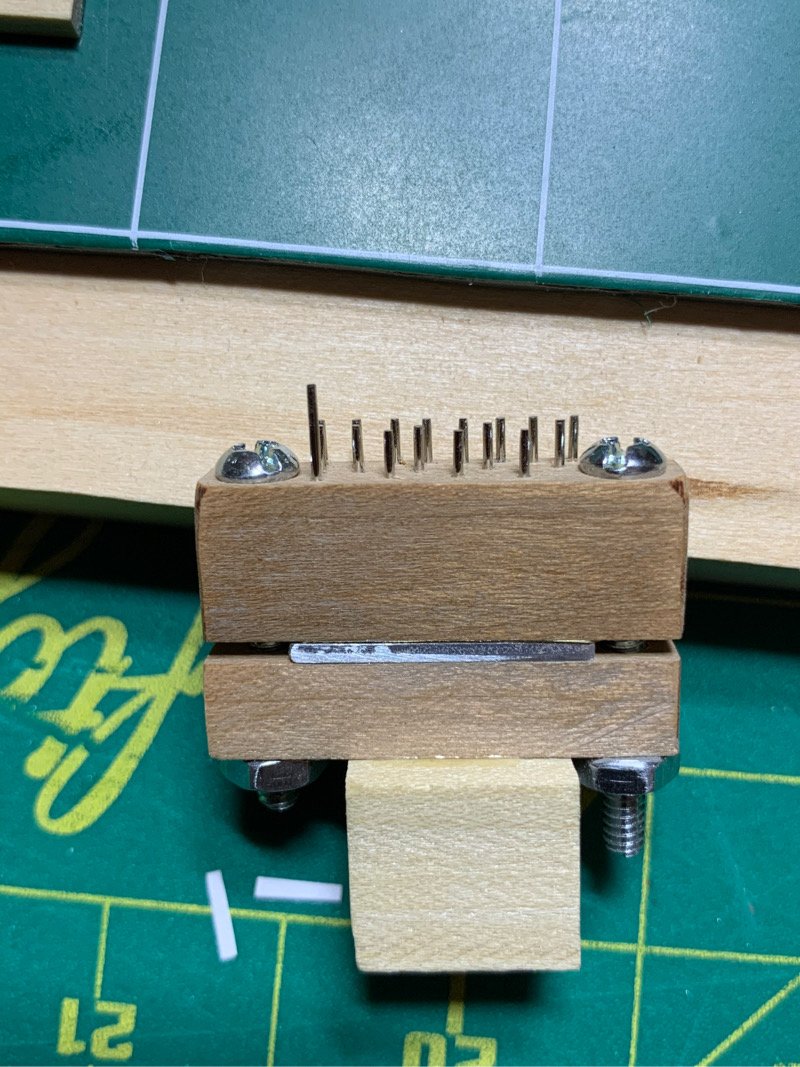
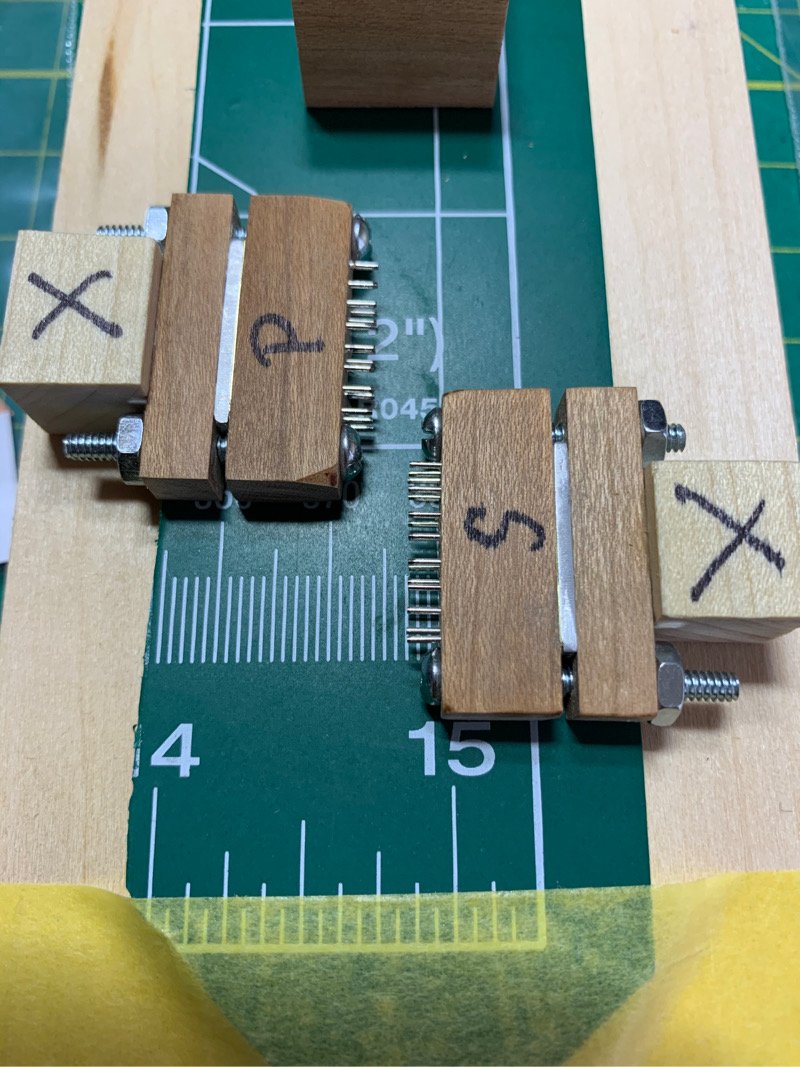
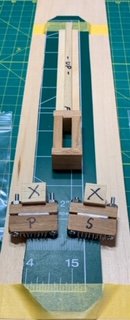
My copper plate jig journey.... Ok...so this is my first plank on bulkhead/copper bottom ship. Since the copper plating is such an obvious feature, I wanted to get the jig set up and working before I got to that point in the build. So...here was my approach: First, since Chuck's practicum included an actual life size pic of the copper plate pattern, I used 1/4" Tamiya masking tape and a push pin to create a stencil that I could easily transfer to the wood which will make my punch: After the holes were drilled (Thank God I had an x-y table on my drill press!...it made this easy) I ensured that the push pins that I had selected to use for my actual 'punch nails' fit snugly. Note that I did NOT glue these in...I wanted a snug fit so that I can easily replace one if needed (and I did...a couple of times). The geometry of the pins is critical. The actual head of the pin which will push into the copper tape needs to be flat and round - otherwise you won't get a nice 'bolt' look. If there is an angle to the flattened head, you can still risk puncturing the copper tape with a prominent edge. To avoid this, I simply used a stainless steel draw plate, inserted the pin in the appropriate sized hole, and simply sanded down the point to the level of the plate with my Dremel using a small sanding disk. Then I inserted the pins into the block of the punch to ensure evenness and alignment. This was my first lesson...and frustration. The heads AND the base of the pins must both be flat. The first couple of punches I made (yes, I made a few) I neglected to flatten out the base of the pins and they pushed up into the wood above them after a few uses....this threw the pins out of alignment and I lost my pattern. I had even attempted using a copper strip behind the pins to prevent this...but it still did not help much. After I lost the pattern, I took apart the punch and realized the copper plate was being bruised and pushed in upon repeated hammering. Since these pins are so small, any misalignment will cost you your pattern! So I started over and made sure I had pins with flat heads (punch side) and bottoms (wood side). To keep the pins from pushing up into the wood during use (I mean, come on... you are HAMMERING these things!), I used an aluminum plate (1/32") I got from Hobby Lobby and used it as a back stop, and placed a copper plate in front of it (pin side). You'll notice I used small screws with bolts instead of glue. That's because I had one of the punches I made earlier using glue literally fell apart during its initial trial and nearly threw my hammer threw the window! It was then I realized that if I want the punches to last the duration, I needed assurance that only a nut and bolt would give me. Taaaa Daaaa...Lowe's to the rescue. Note the pins are longer than the head of the screws...so the screw has no impact on the pattern during punching. Security and happiness was achieved!!! One other aspect of the punch which bears attention - the "well". The well is the little box which holds the punch in alignment before you smack it with the hammer. It really needs to be a good fit - if there is too much (or any) play, you don't have the control you need to get the reproducible pattern. And again...I'd like to note below that one of the pins was a bit short...I simply pulled it out, and made a new pin (which now only takes me around 60 seconds), and reinserted into the punch...which cured the minor misalignment and I achieved a good pattern. All in all...a worth while investment in time and effort which will pay me dividends later in my build. You note that the track I am using is 1/32"x1/4" boxwood strips laid on top of a piece of - you guessed it - cutting mat!!! Using a wood base, especially softer wood, ended up with the pins in the punch bruising/imprinting on the wood, which also ruins your pattern over time. The cutting mat is resilient, has some 'play', and bounces back nicely. I also tried using a small hobby hammer but getting a reproducible amount of strike force with a small hammer is problematic. I went to a normal household nail hammer from my tool kit and found I got much better results without much effort at all. With all things, the proof is in the pudding...I'm sure my results will improve over time as I get my technique down - but this jig being ready for use is 90% of the battle!! Moving on.....

-
Howdy Shipmates. Well...I've had life smack me in the face a few times since I last posted. Sadly, not much progress on my Syren. However, one benefit of being forced into quarantine with the rest of the world is that my shipyard is also my 'work from home office'. So I finally had some 'ship time' forced upon me! Since I am still trying to figure out how I want her mounted, I decided to tackle the sticky task of the copper plate jig used in creating the bolt patterns. Chuck's practicum as usual includes a great breakdown on creating a jig. However, the nuances of the preparation of the jig and actually using it (and dealing with the disappointment of seeing the initial sub-par results) were something I wanted to tackle early on. So...I spent the past week over-thinking and over designing my jig. I'll post the write up in the next post(s), but needless to say, it was time and frustration well spent. I learned a lot...mostly that to make a really nice looking copper plate, you need to consider multiple factors in creating the best looking plate...such as: 1. The fit of the punch in the 'well' 2. The geometry of the pins in the punch 3. The materials and resiliency of the floor on which the copper tape lies 4. The smaller the pins...the more likely they will be to go out of alignment as they begin to 'push up' into the wood within the punch...BUT - the smaller pins give the best looking results!! 5. Weight of the hammer used in the actual 'punch' Why did I tackle the copper plate punch now? Well...first, because I will need to make a bunch of them. And I will probably do so over many days because it's boring and repetitive. But also because I did not wish to slow down in the middle of my build to get bogged down on making a useable punch...keep in mind you need one for each side. So, better to get this thing out of the way now. Continued in the next post....
-
Hi Dave Great Meeting you at Midwest Model Shipwrights last night! I like your approach to the cap rails. I think they’ll turn out beautiful. Pat (Overworked724)
-
Happened with my kit parts as well. I also made my own. The wood was old and brittle, and even when I got the part out, they would snap with the slightest stress.
- 1,135 replies
-
- 1
-
-
- model shipways
- syren
- (and 2 more)
-
Looking fantastic, Rich! Takes a passionate modeler to ignore bandaged hands!
- 1,135 replies
-
- 1
-
-
- model shipways
- syren
- (and 2 more)
-
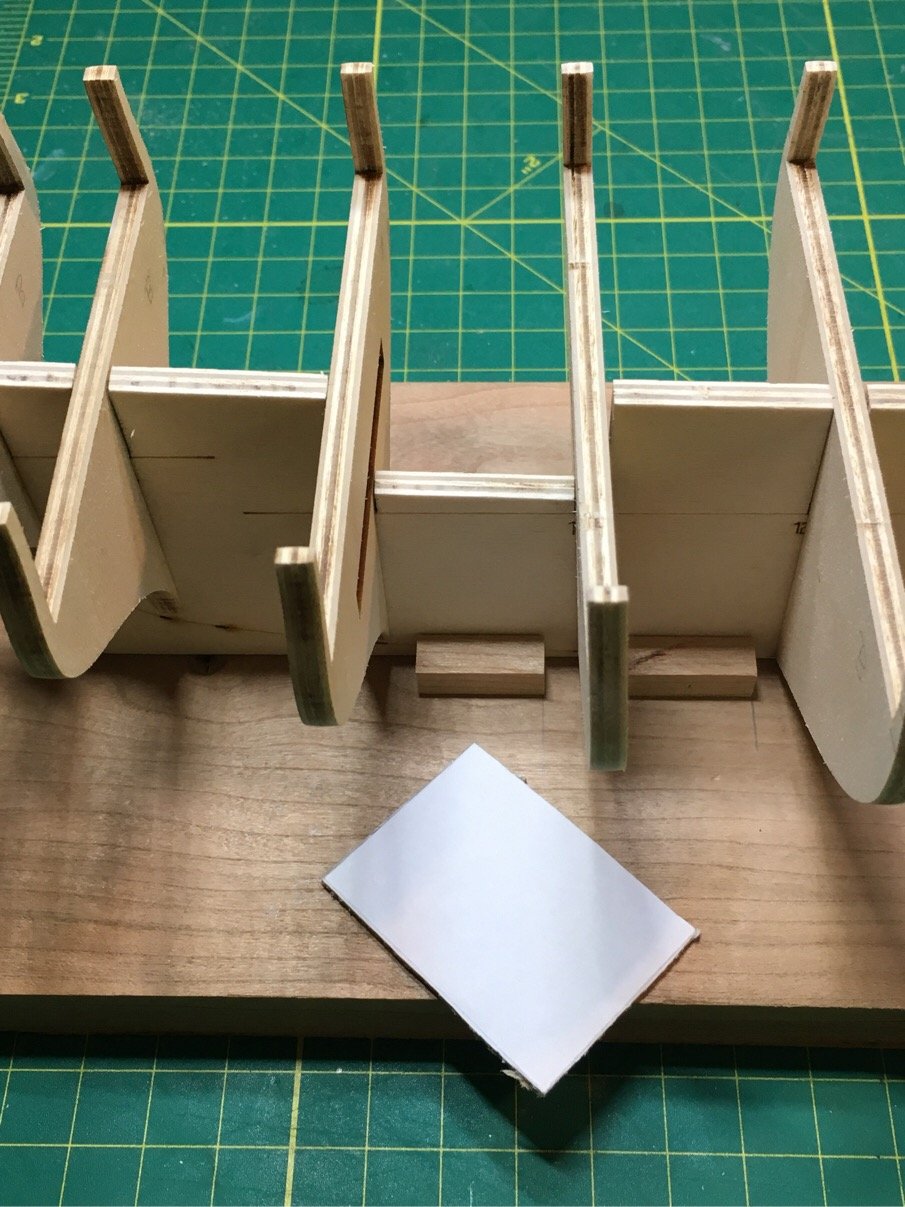
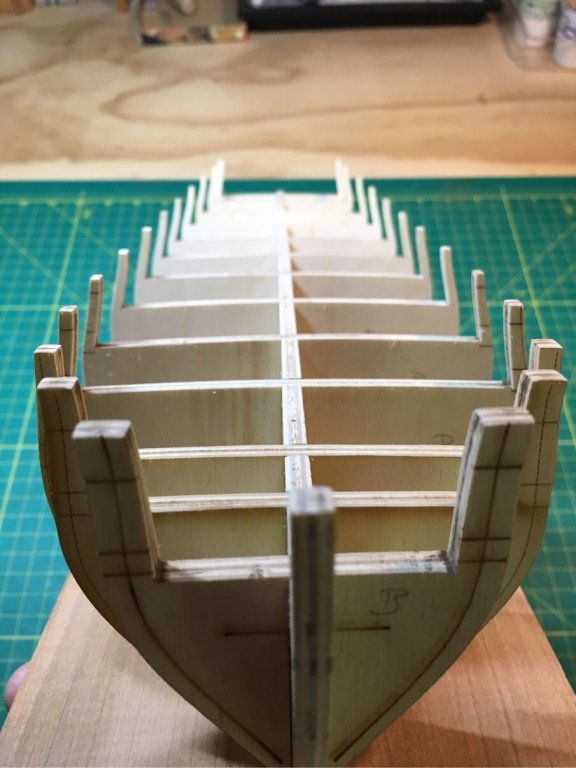
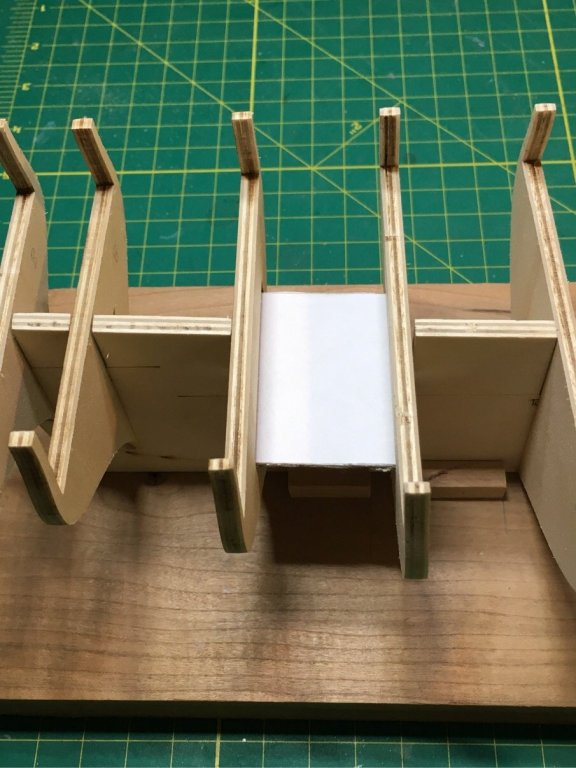
Got a chance to spend time in shipyard! Some slow but steady progress. Took it slow and got the majority of the char off the bulkhead former, frames and the stern pieces. Gentle sanding...you can see they still look a bit ‘dirty’ but they are smooth surfaces and should provide good purchase with glue. Very gentle sanding on the stern pieces! Dry fit the frames - there is enough wiggle room for a good fit and still ensure square alignment. Will use fillers in between frames as others have done when the time comes. Going to take my dear sweet time on this part since I know how misalignment will ruin the day. Played around with an the false second deck. Will simply build it on a thin piece of wood and slide it in place. Used a cardboard cutout as a trial piece. Seems to work ok. Some ‘baby’ pics below. Off and running!!!


-
Advise on a particular model-1st build
Overworked724 replied to Christa's topic in New member Introductions
Great advice! Agree that if there is a full build log with pics it aid your comfort level in progression through the stages of your build. Good luck!👍🏽 -
Advise on a particular model-1st build
Overworked724 replied to Christa's topic in New member Introductions
I vote for the Model Shipways Sultana. LOL But I’m biased...it’s the only wooden ship model I’ve made so far!