HOLIDAY DONATION DRIVE - SUPPORT MSW - DO YOUR PART TO KEEP THIS GREAT FORUM GOING! (Only 13 donations so far - C'mon guys!)
×


Fright
-
Posts
562 -
Joined
-
Last visited
Content Type
Profiles
Forums
Gallery
Events
Everything posted by Fright
-
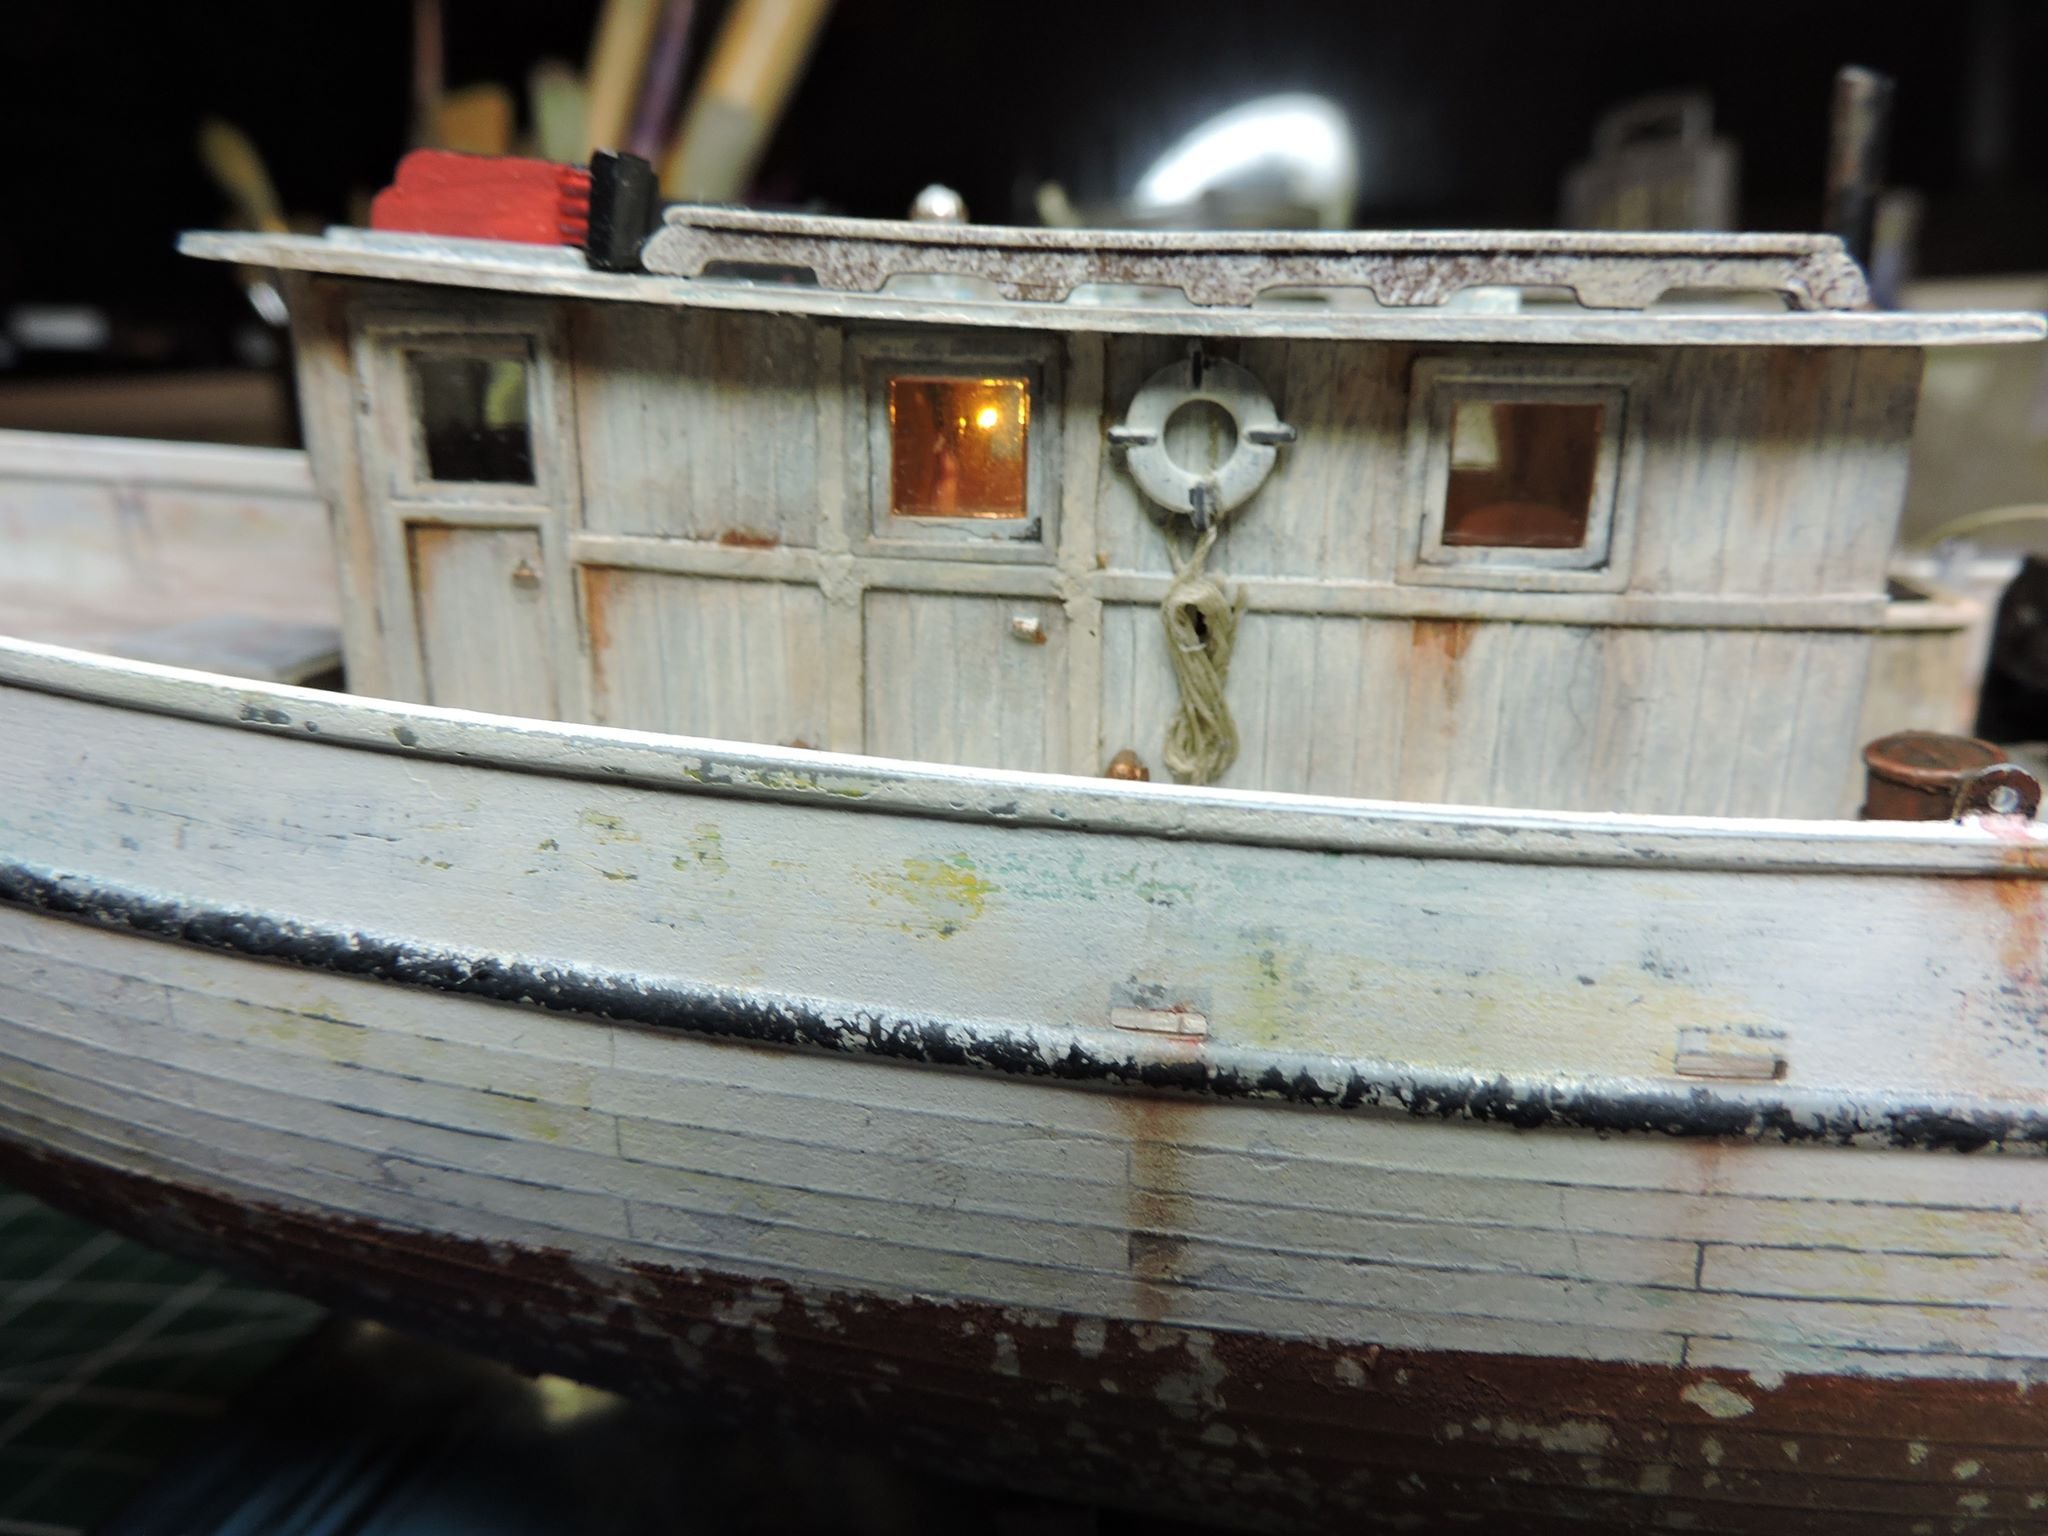
 Stayed up late and worked on detailing the deck and gluing Cabin and scratch built compartment under smokestack to the deck. 1st haul for Forest - 'there's no shrimp'! Toilet seat, rain boot and misc. crud. Scooper against bullwark. Small box added to lower right. Oil barrel and stack of cans added behind the cabin. Still need loads of line on deck but almost ready to install the outriggers and try net.
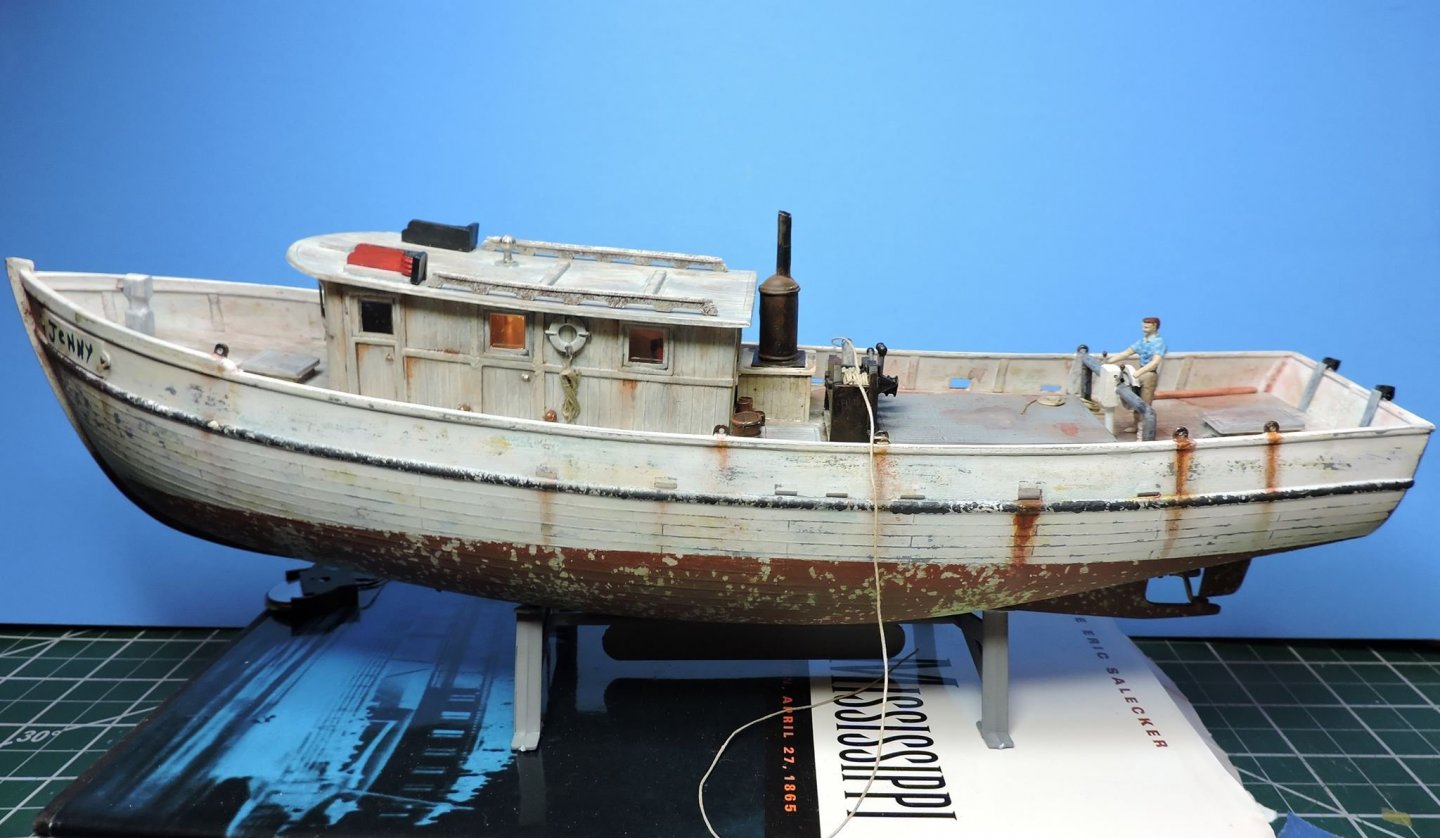
- 69 replies
-
- 11
-

-
DecoArt and FolkArt acrylics in the craft section are very inexpensive and provide good coverage. I have a HobbyLobby very close to my house. My wife does 1:6 and 1:12 scale figures and creepy doll house furniture. She got me hooked on using these products. A wonderful marriage indeed!
-
Nice job with the planking! Will be following you build.
-
Popeye the Sailor - Thank you for your compliment and you're right - my skills have improved. Thanks to yourself and many others that are here at MSW, I improve with each new model. I now have 6 kits to my name. Your models are always a pleasure to watch them come together. Your T78 Norden build helped to inspire me with my Jenny. It's good to be back modeling. I had some health issues last year and I stepped away for a bit. One month turned into another and... we've all done that. I keep getting sidetracked on building Model Shipways 1:48 18th Century Longboat. This would be my 1st attempt with POF.
-
Bob - It was years and years ago when I last visited Sacramento. I have a long time college friend that lives there. On one of my ventures up to the Bay area for a Who concert, she took me over to Old Town for breakfast. I sat there for at least 3-4 hours ordering drinks and people watching. She came back to pick me up and, needless to say, I was ready for the concert. Although I lived in SFV and Hollywood area, I constantly drove up to SF for concerts at the Cow Palace, Oakland Stadium, Fillmore West, The Fab Mabuhay Gardens etc. for concerts. I'm land locked here in Atlanta but my wife and I are hoping to move near Ocala Fl. About an hours drive to the Gulf and 1 1/2 to Orlando. We miss so many of our friends in CA but we no longer could really afford to live and have fun there. Our daughter and her family live in Loma Linda, CA.
-
Lou - thank you so very much for your comments and for following along with this build. Lindberg has a reputation for low quality, inexpensive model kits but with some time and a little extra work, they can come out looking like little treasures. My previous Lindberg kit was my 1st attempt with lighting and creating a seascape diorama base. That model was Lindberg Nantucket Light Ship 1:95 scale plastic kit.
-
Bob - I majored in Art while in college so I have some experience with painting. Also have practiced on a cheap model with trial and error. Here's a couple of links on that I found on line: Hope these will come in handy for you down the road! p.s. Say hi to Old Town Sacramento for me. Had a wonderful time there! I am originally from Los Angeles.
-
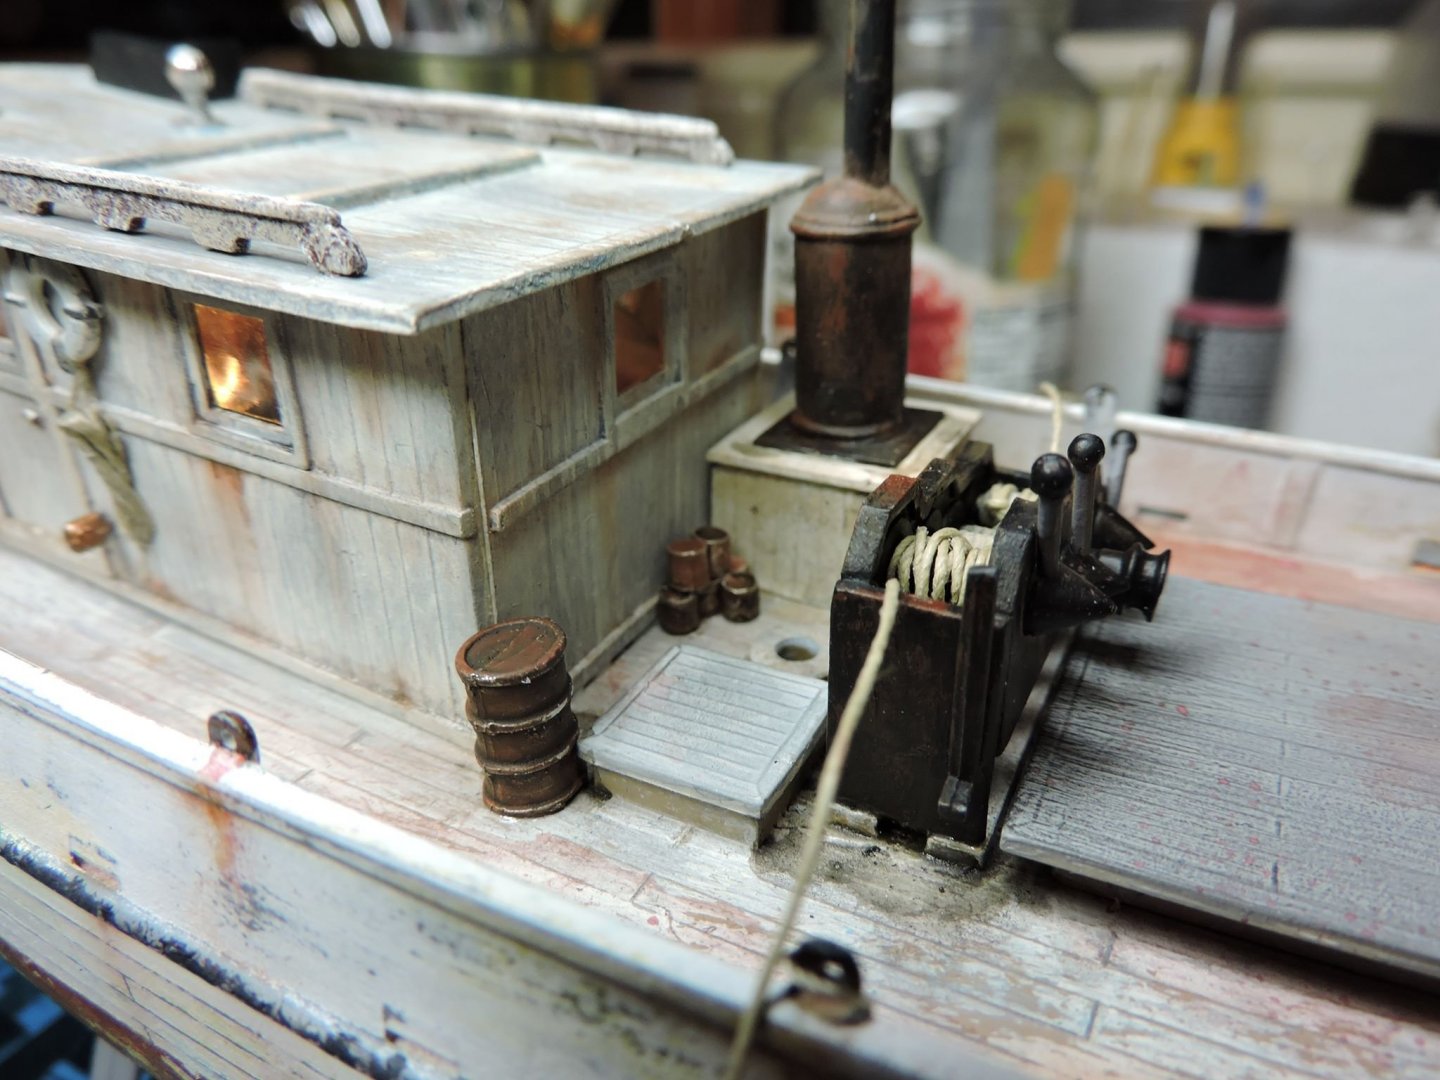
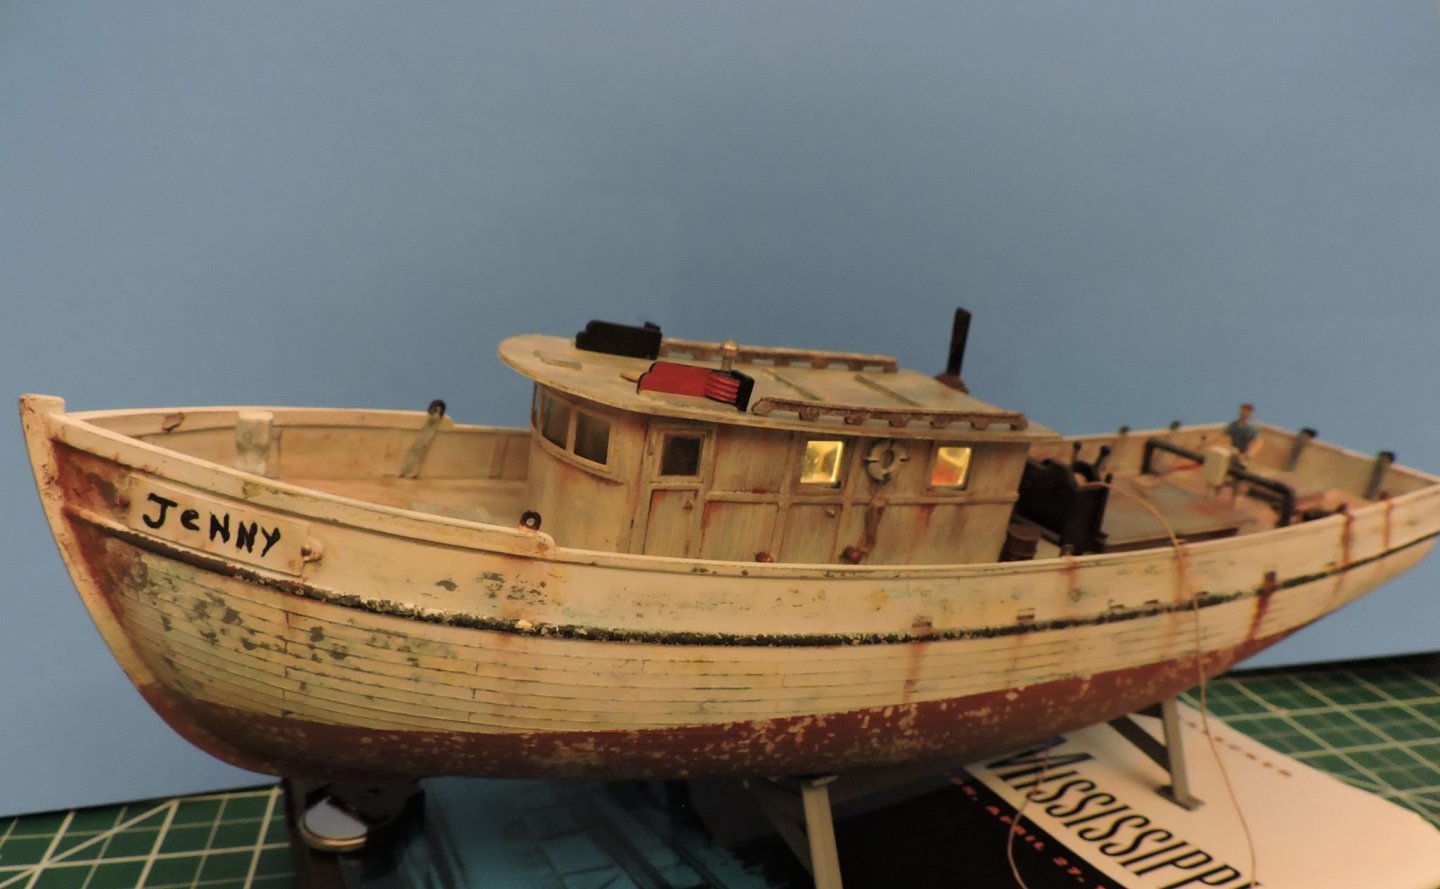
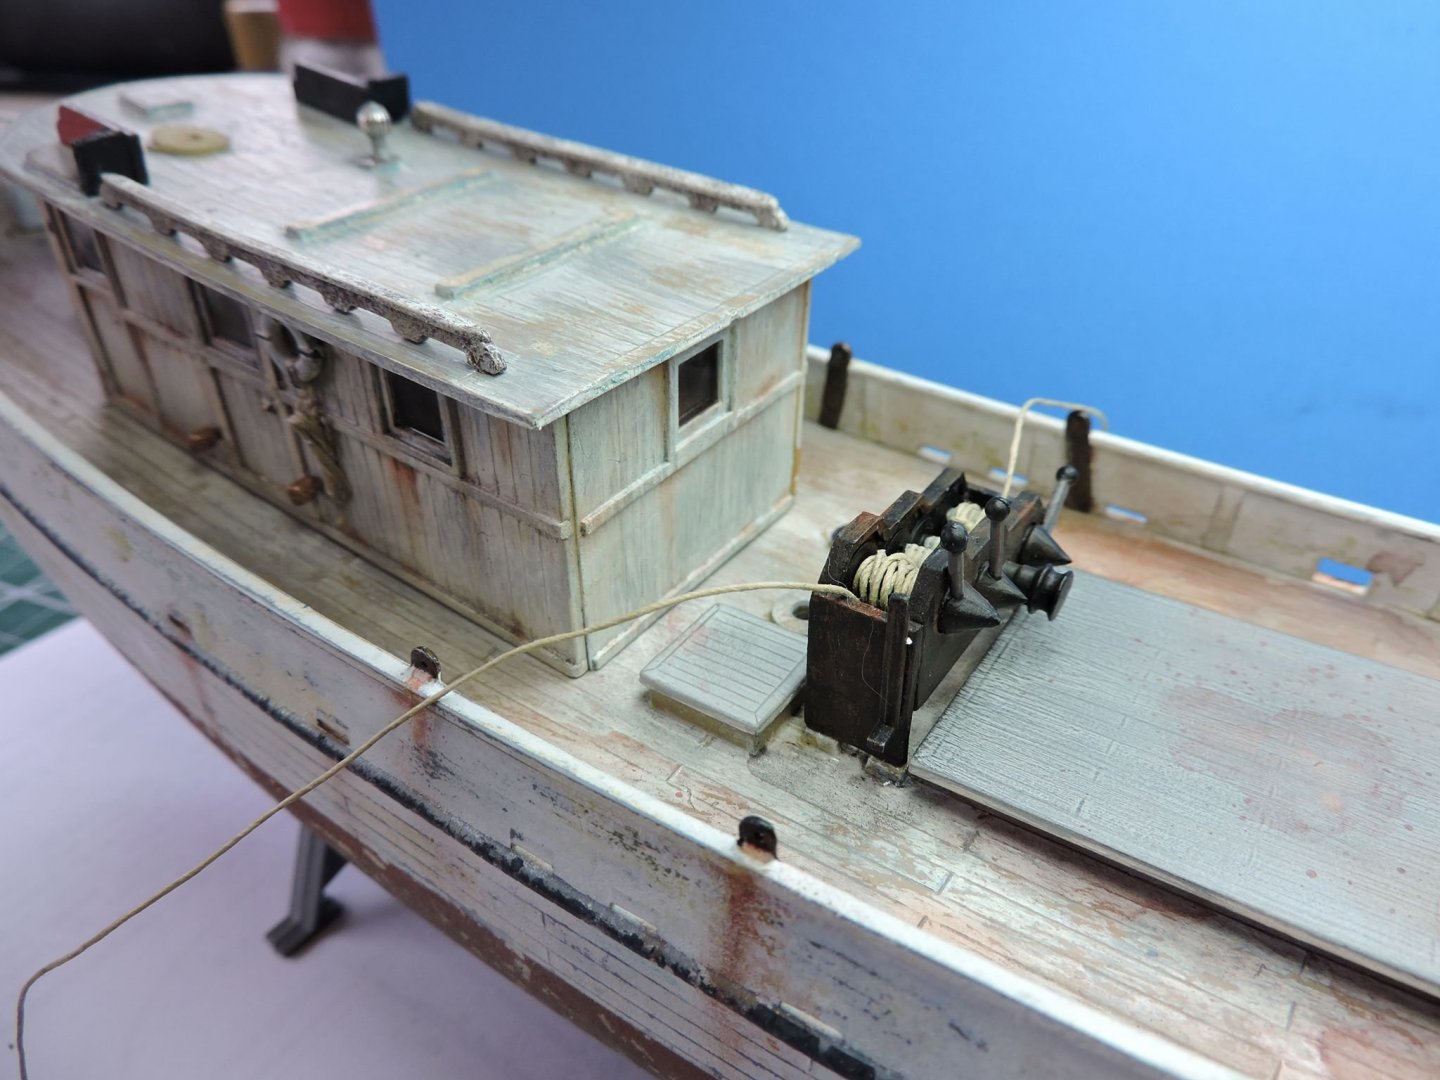
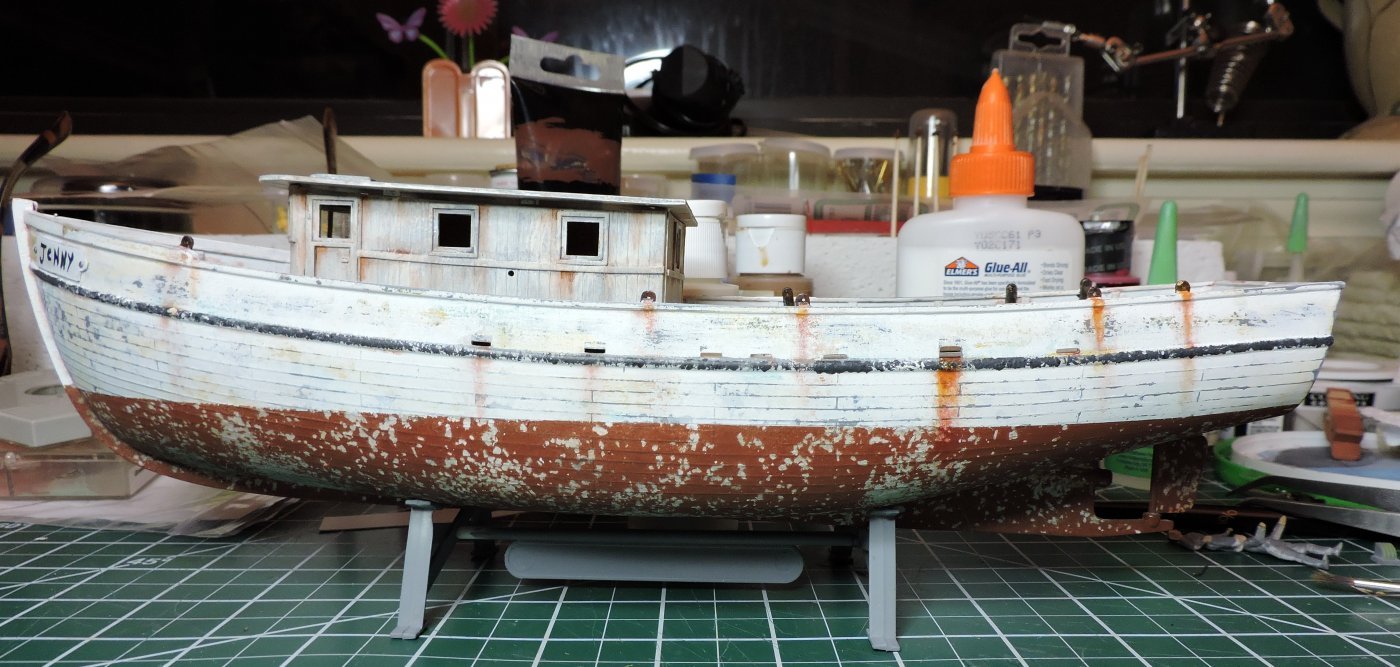
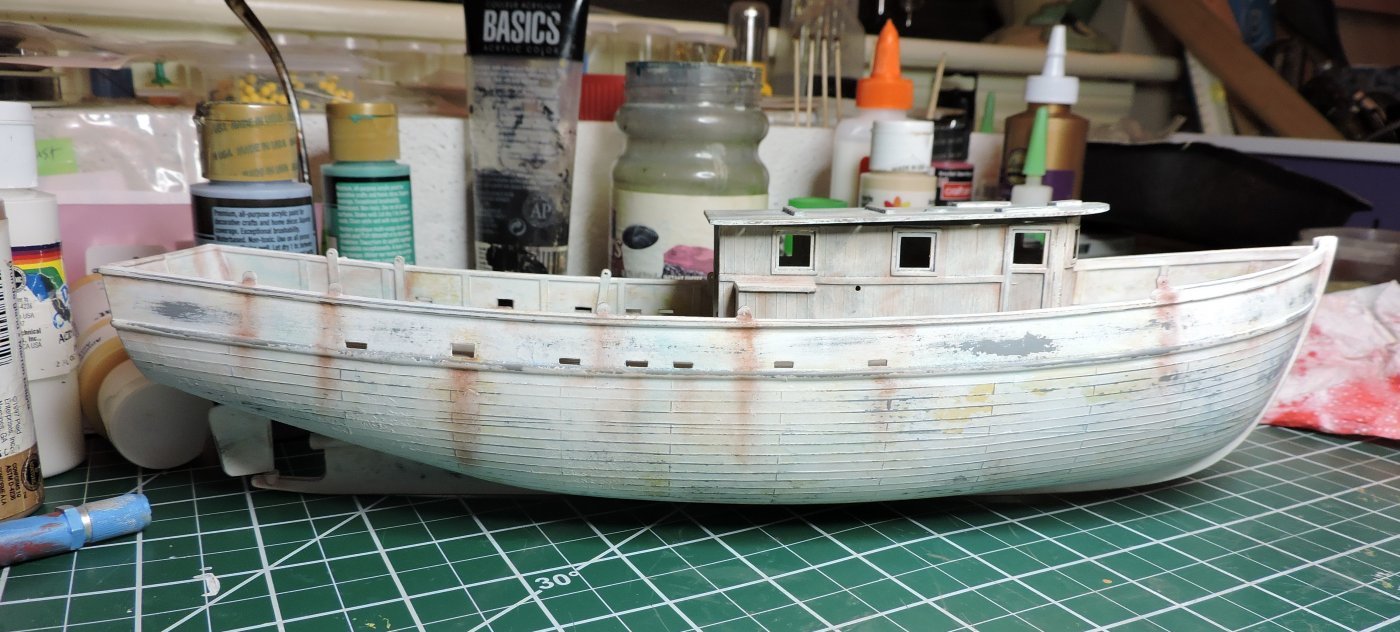
I was able to get quite a bit of work accomplished with Jenny. I went back in on the lower hull and with a stiff brush and added Green Grunge weathering powder from Bragdon Enterprises. I then sprayed the hull with a coat of Testors Dullcoat to seal the powder. I repainted the hatch covers to a light greyish white and glued the covers to the deck. I added a bit more 'grunge' to the deck with some brushed on graphite dust and then flicked some water-downed red onto deck and hatches. I think she is looking like a working shrimp boat similar to the movie version. In the movie, the life preservers are hung high on the side of cabins. I removed the square frame and the glue pin from the back of the preservers. I added some line and a rope coil (which hides the original placement hole on the cabin's bulkhead) and glued into place. I put together the winch assembly. The instructions are really vague on the placement of end parts so be careful. If fitted incorrectly, the winch will sit too low and interfere with the main hatch. Painted assembly and the wound some line around the pulleys that will go to the stabilizers rigging and glued into place. Glued the aft wheel assembly to the deck. I drilled hole into the deck where the center steering column glues into for extra support.

- 69 replies
-
- 12
-
-
I am amazed at what can be done in this medium. The detailing with this kit is outstanding and your skills really shine on this. Great work so far.
- 175 replies
-
- 4
-
-
- hanse kogge
- shipyard
- (and 1 more)
-
Hello and welcome!
-
Welcome Doug !
-
And another from the Great Pacific Northwest
Fright replied to Egilman's topic in New member Introductions
Welcome Egilman ! -
Great work on this schooner! The hull looks fantastic and nice clean look. Thanks for posting and sharing your work with all of us.
-
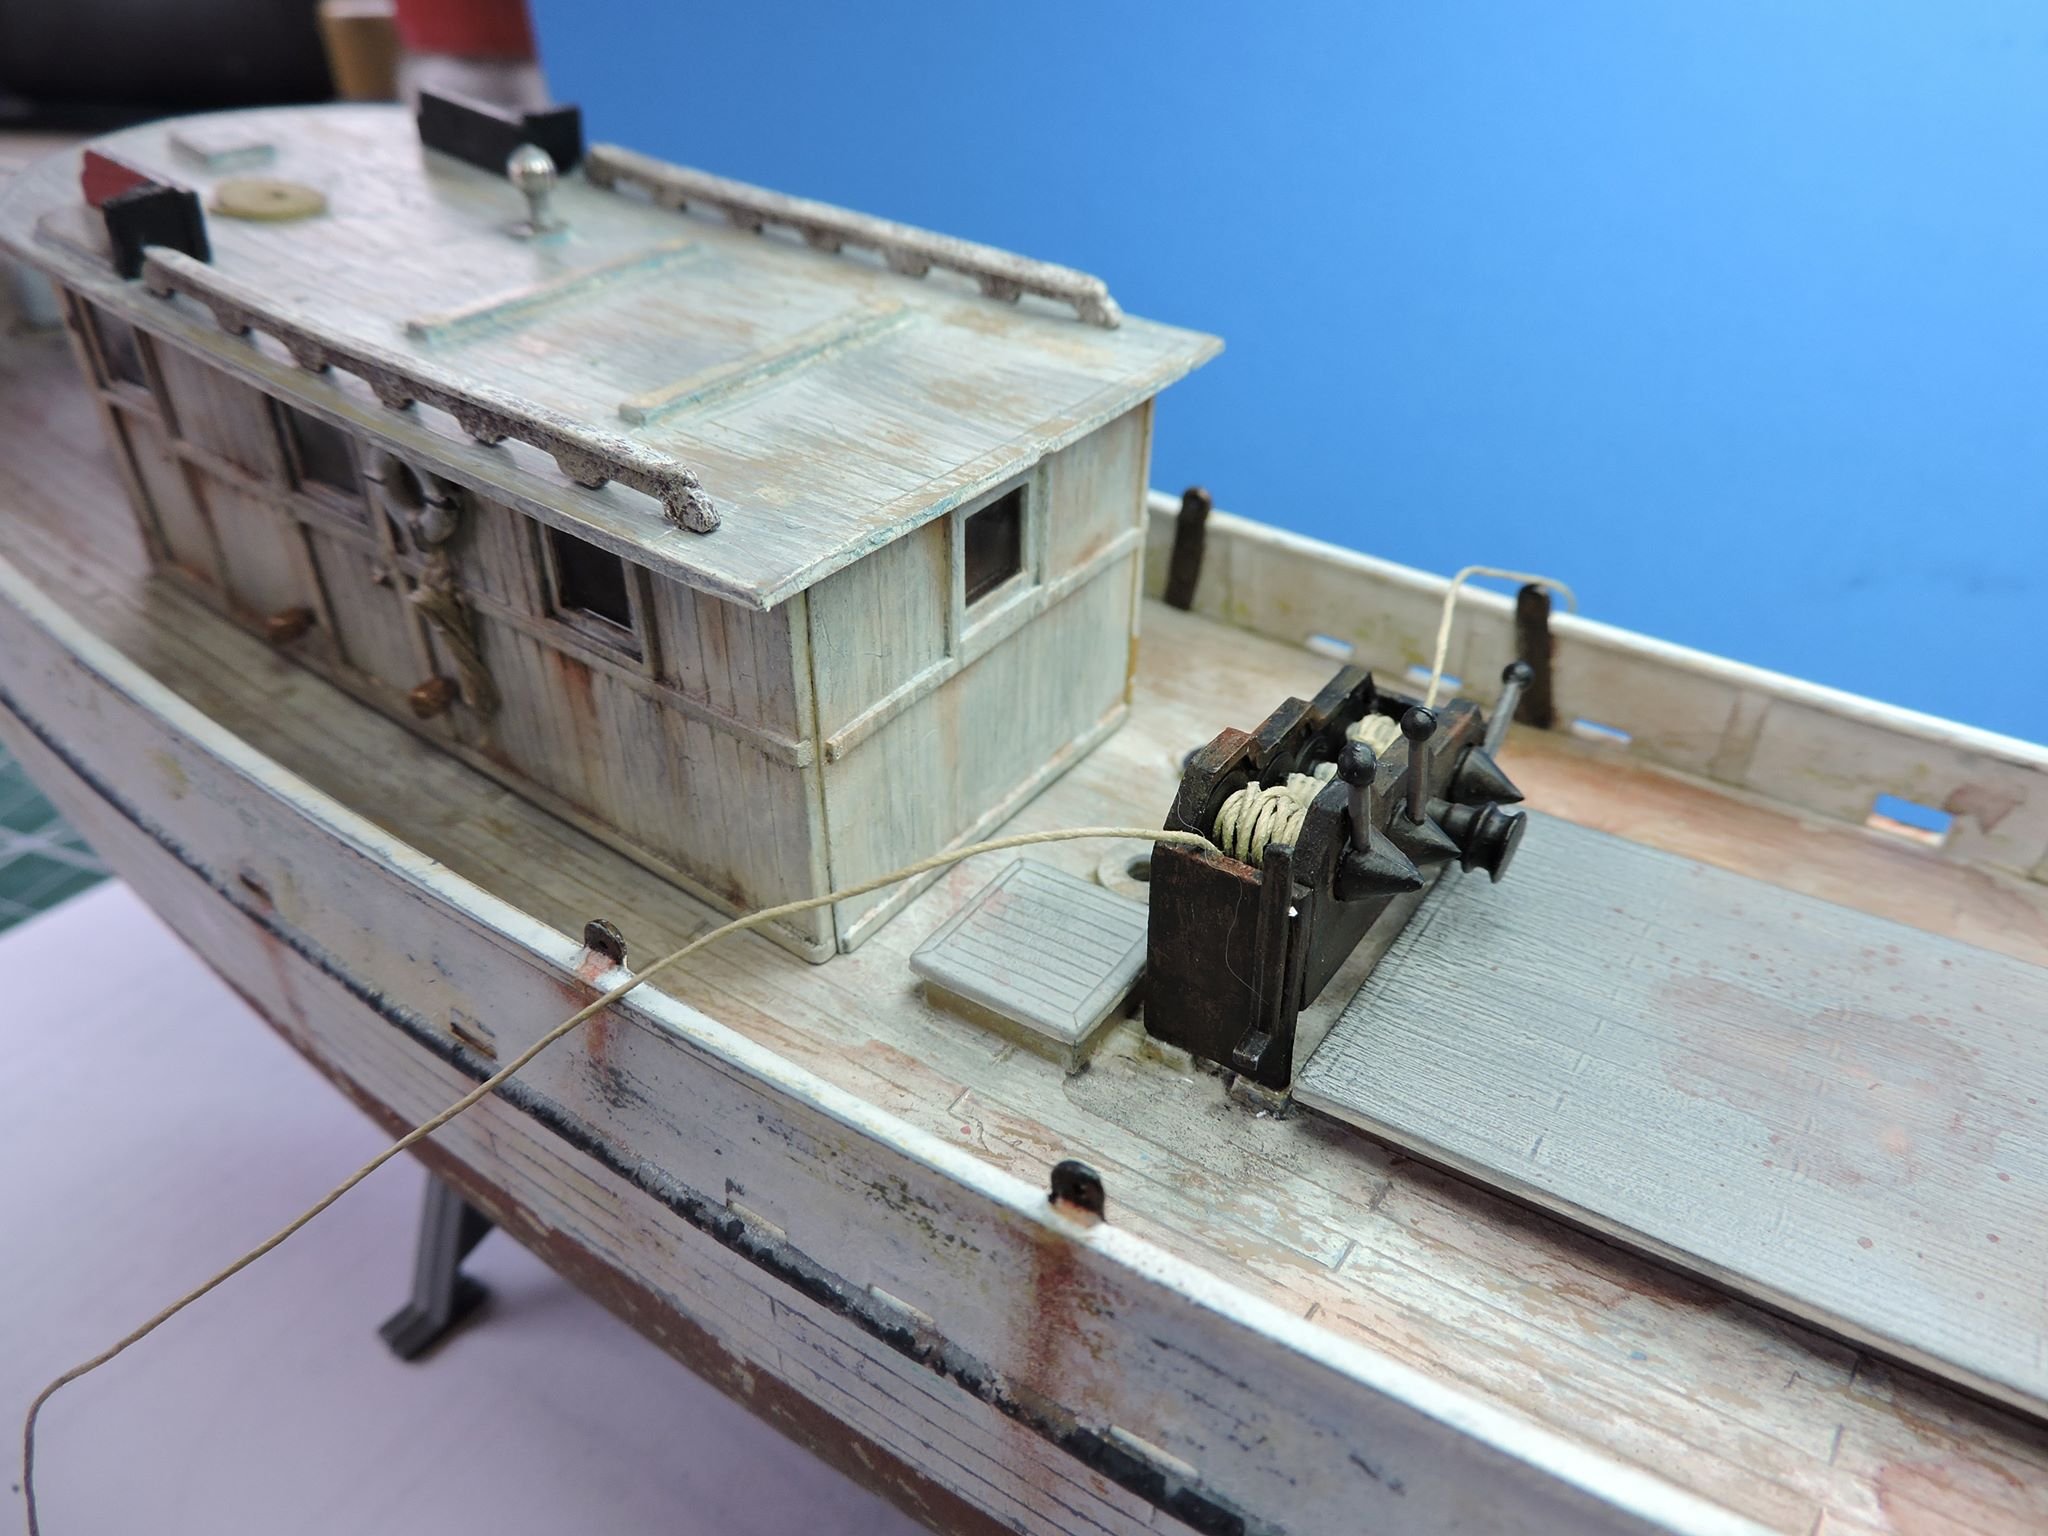
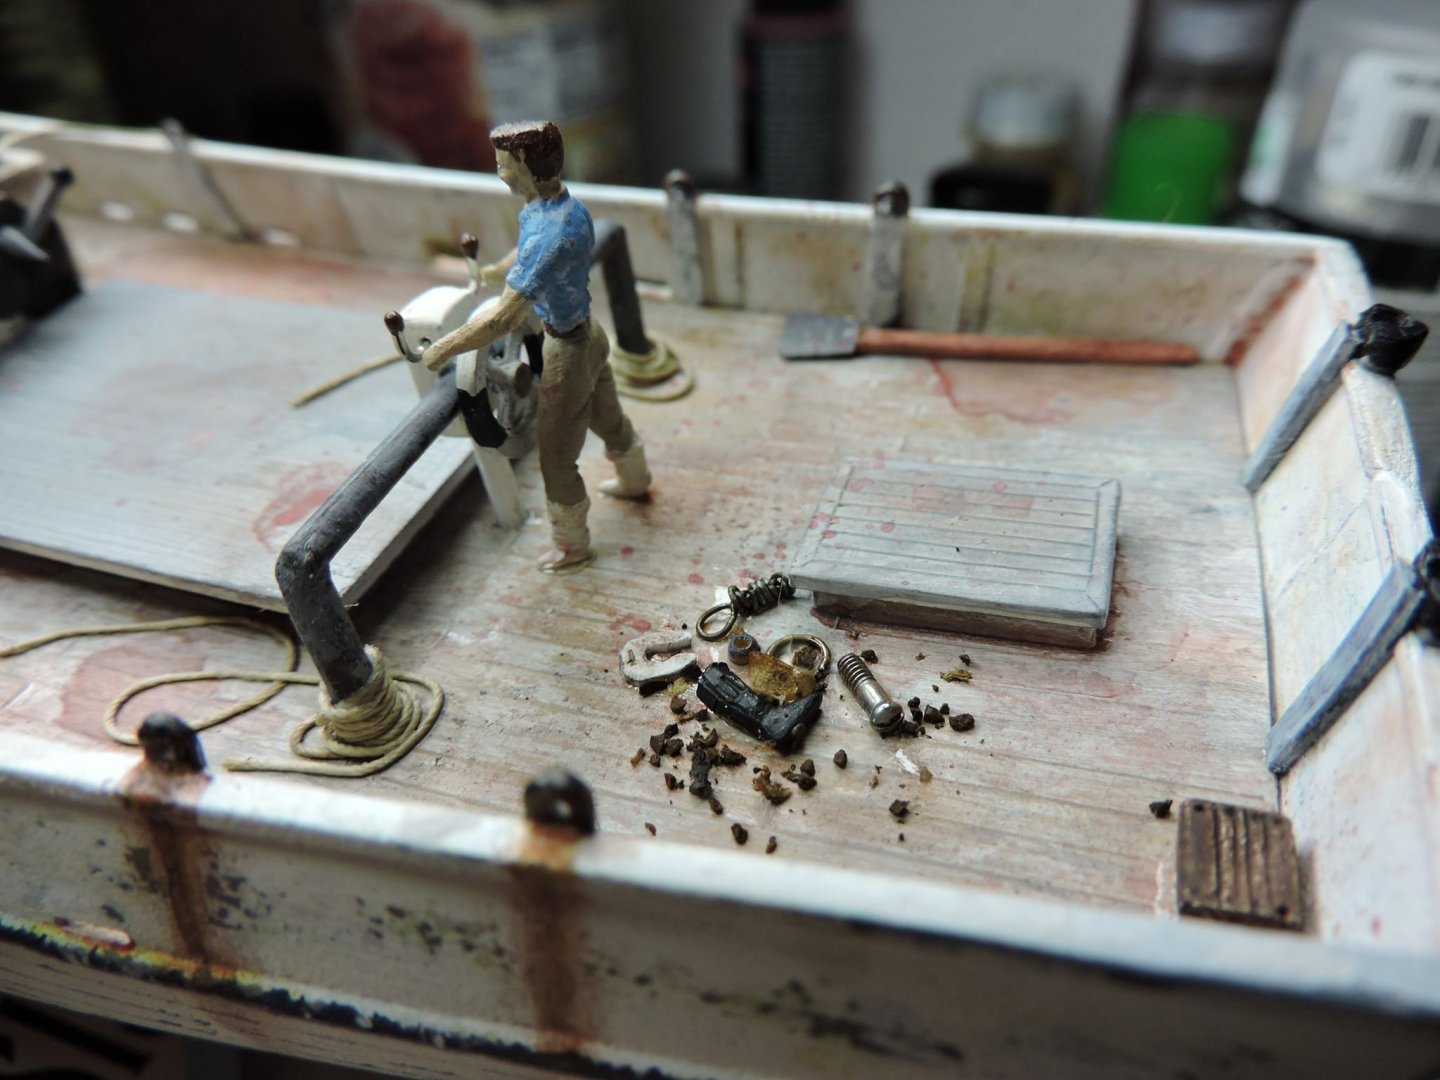
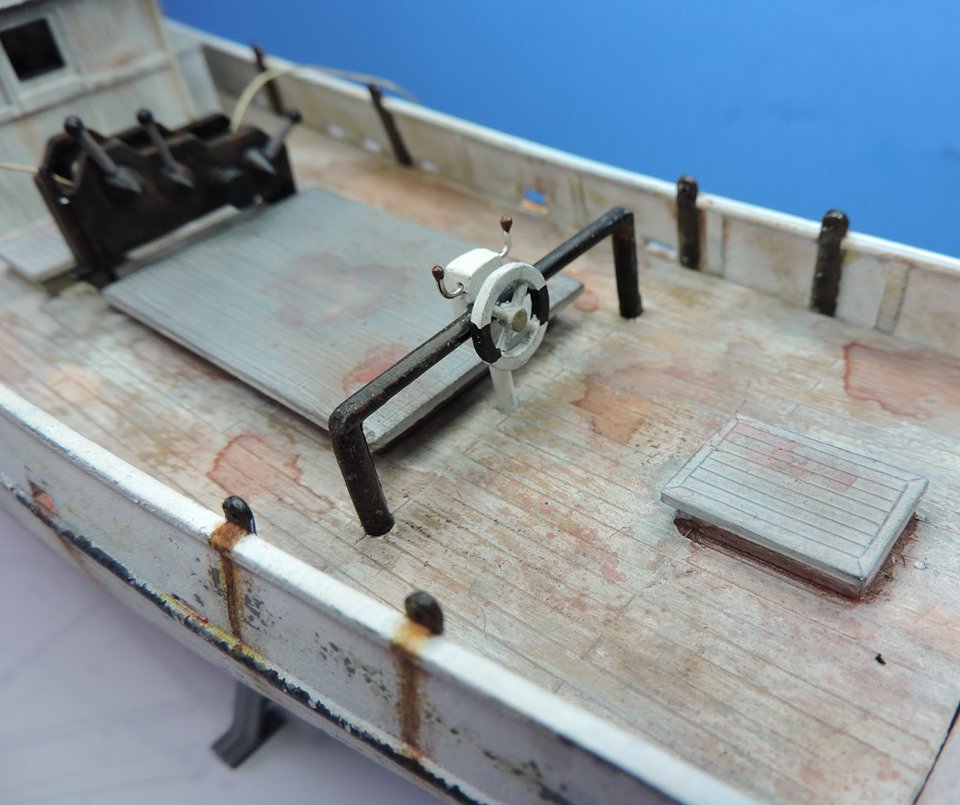
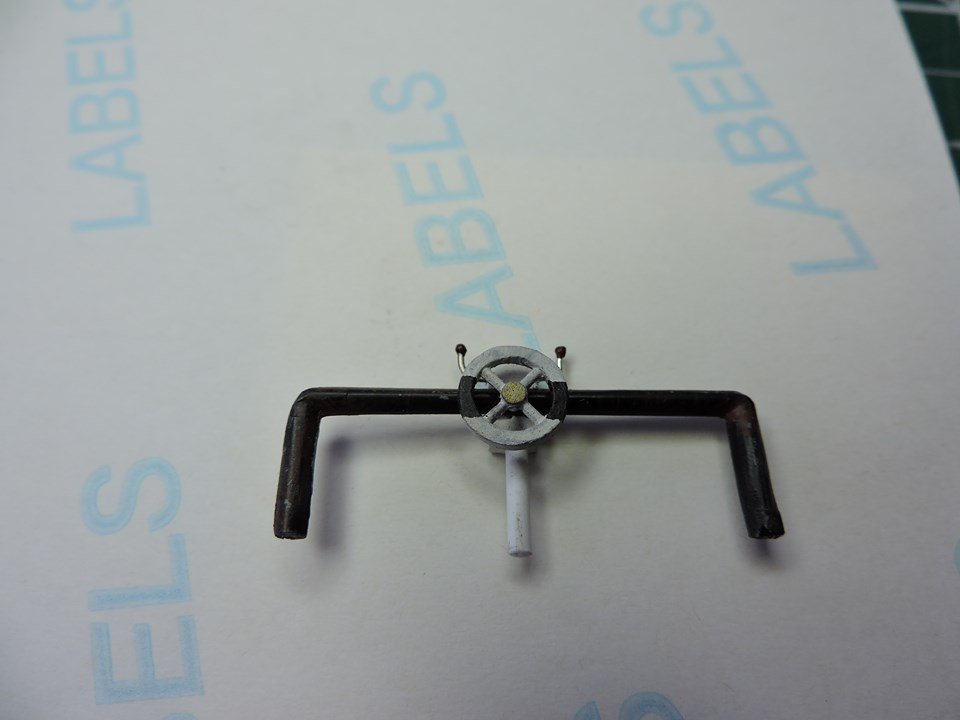
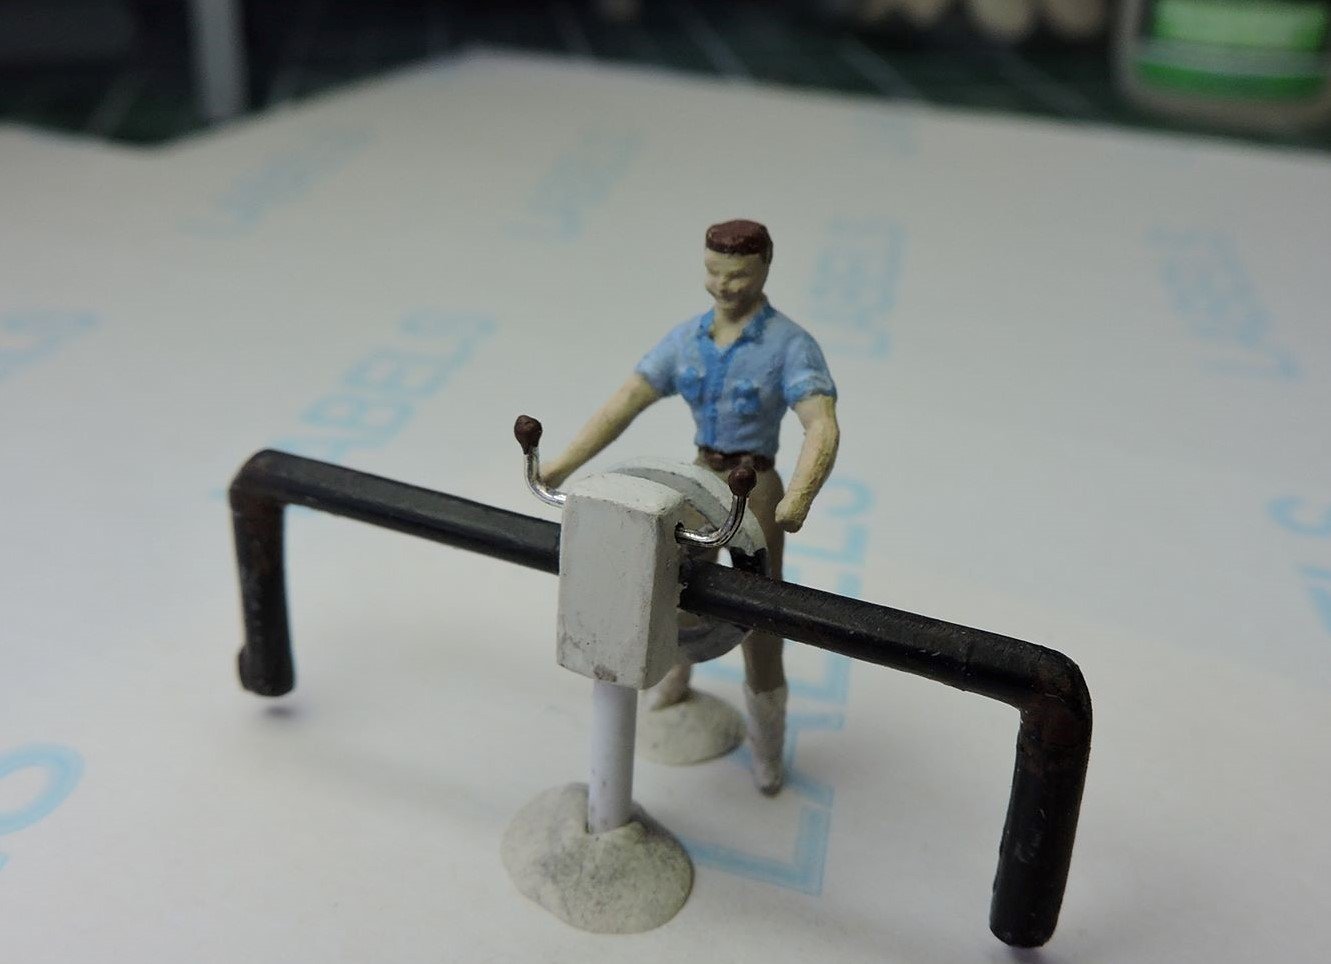
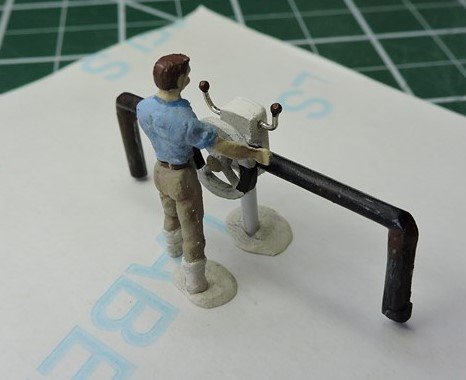
Today I worked on putting together my parts for the aft steering column. This was created strictly for filming Forest at the wheel. The figure came with the kit. The control box and U shaped frame was made with Evergreen plastic. I drilled hole in control box to allow me to place a wire through and bent the handles with a fine pliers. Used Elmer glue blob to create the round knobs on controls. The wheel is a spare part from a pirate kit. I cut off the extended handles and remove 4 of the inside rods of wheel. I also drilled holes into the bottom of U frame so I can insert a wire for more support when glued to the deck.
-
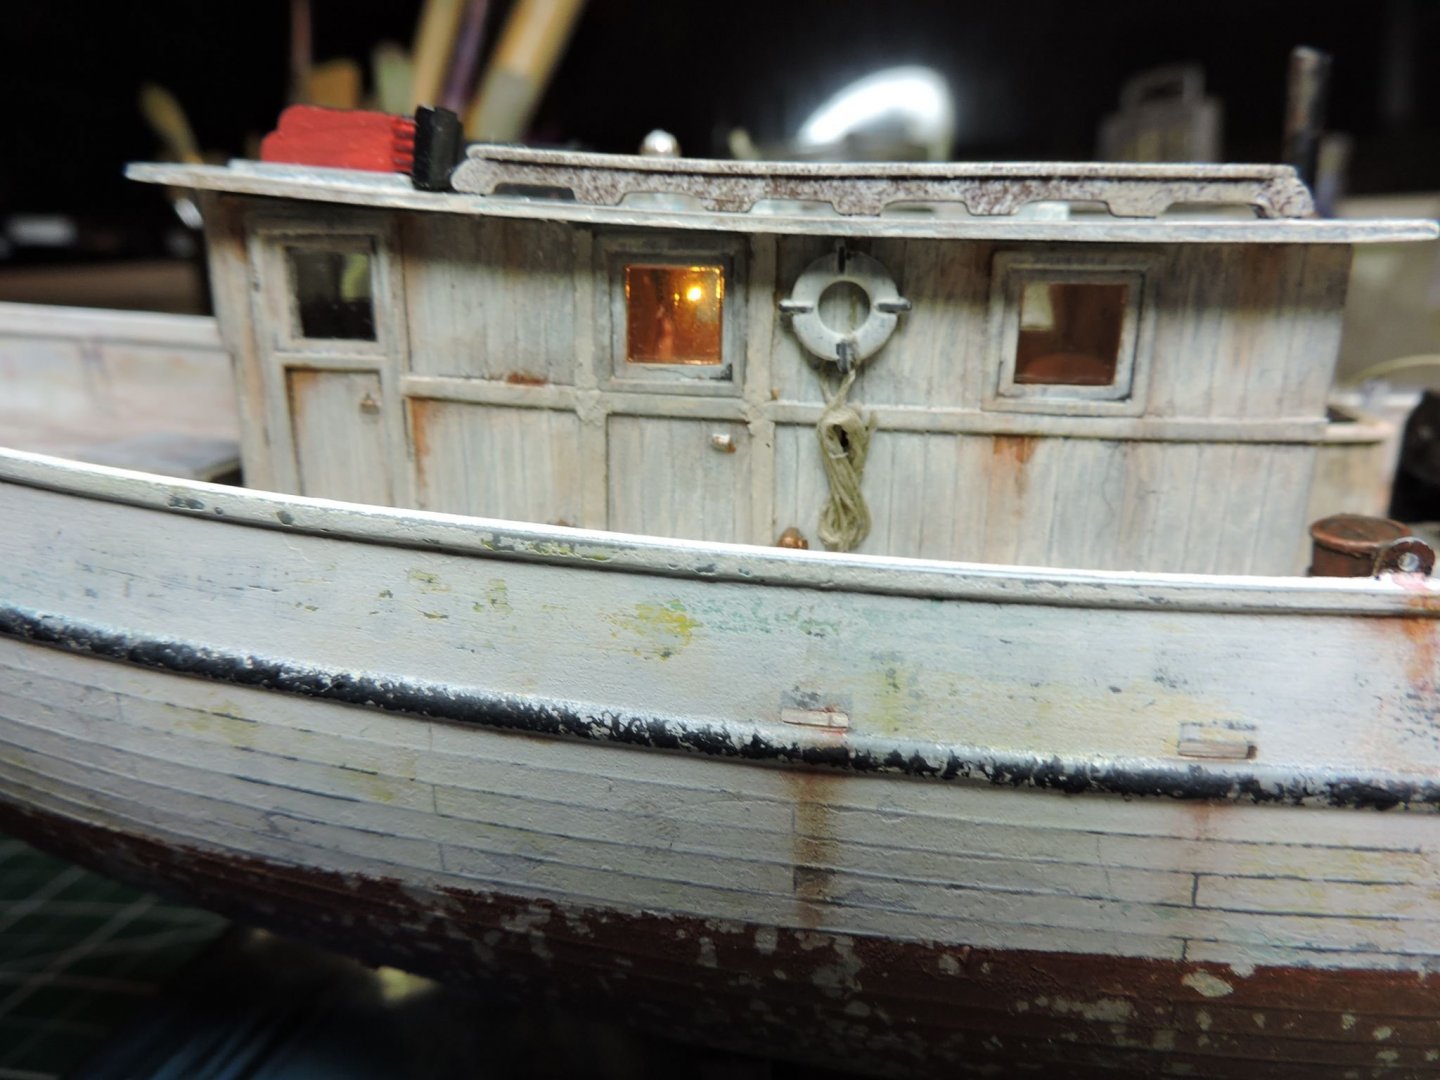
Bob - The acrylics seem to allow more versatility when it comes to scrubbing, wiping away, using steel wool to create the weather effects. Using several underlying colors also gives the illusion of years of built up paint. I plan to hide the small coin battery inside the base. I'm still toying with ideas for my base. The on/off switch will be on the back side of base. Wood would have worked but I had a lot of different sizes of Evergreen styrene sheets in my stock. Here's a test run with one Pico light that I did in the dark. * the cabin's top deck is not glued to cabin
- 69 replies
-
- 11
-
-
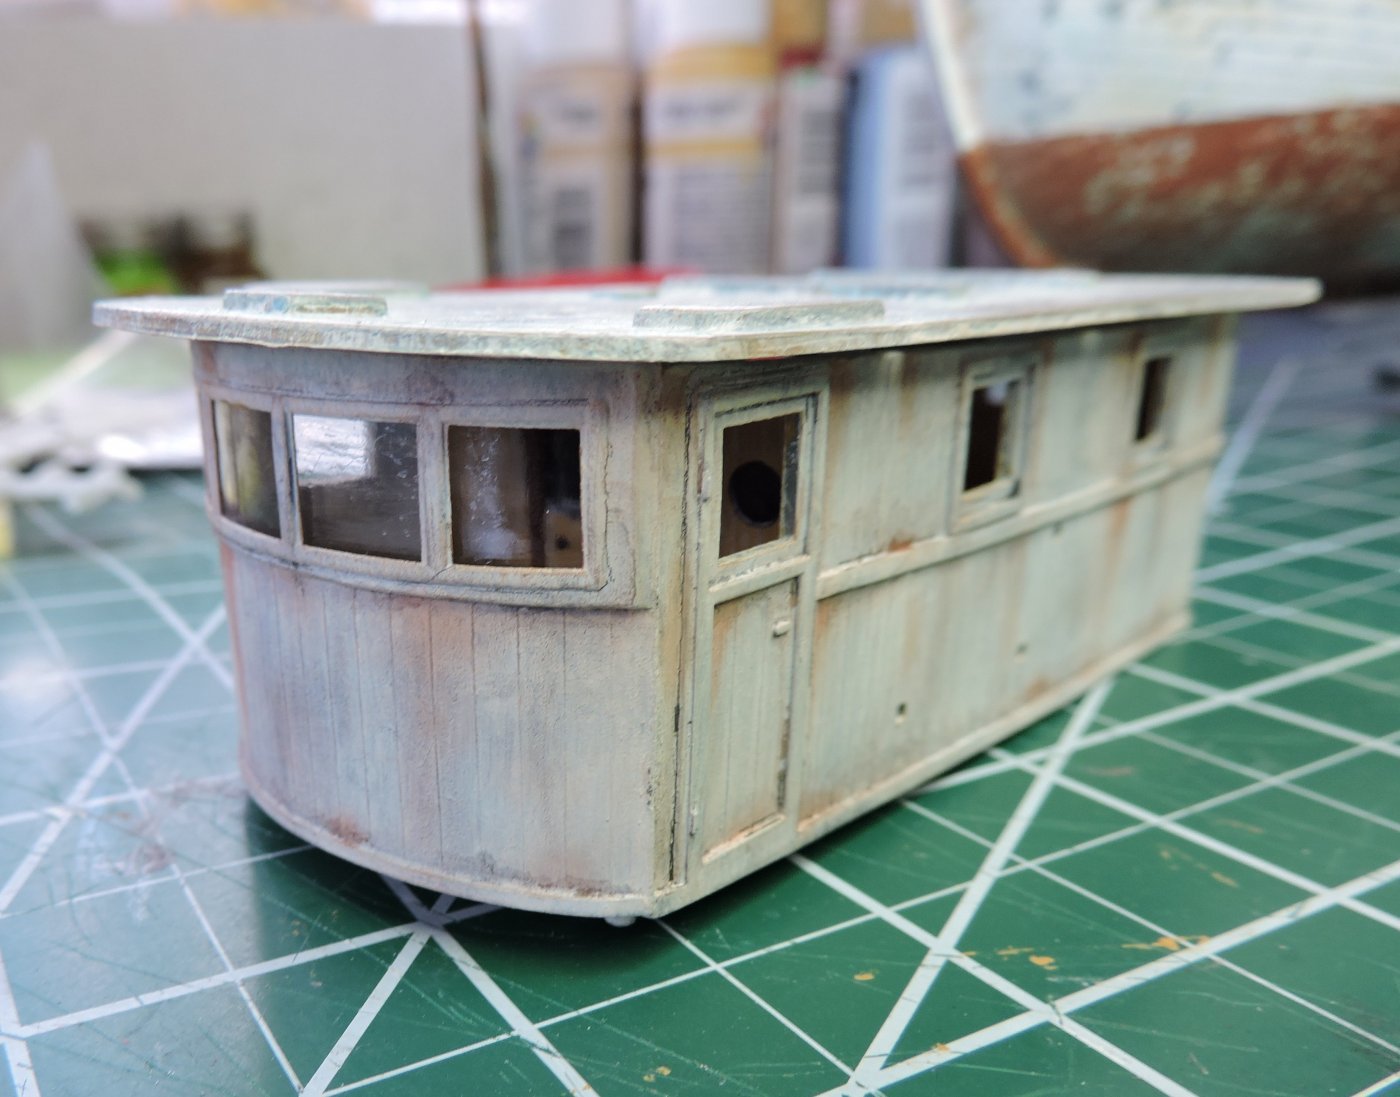
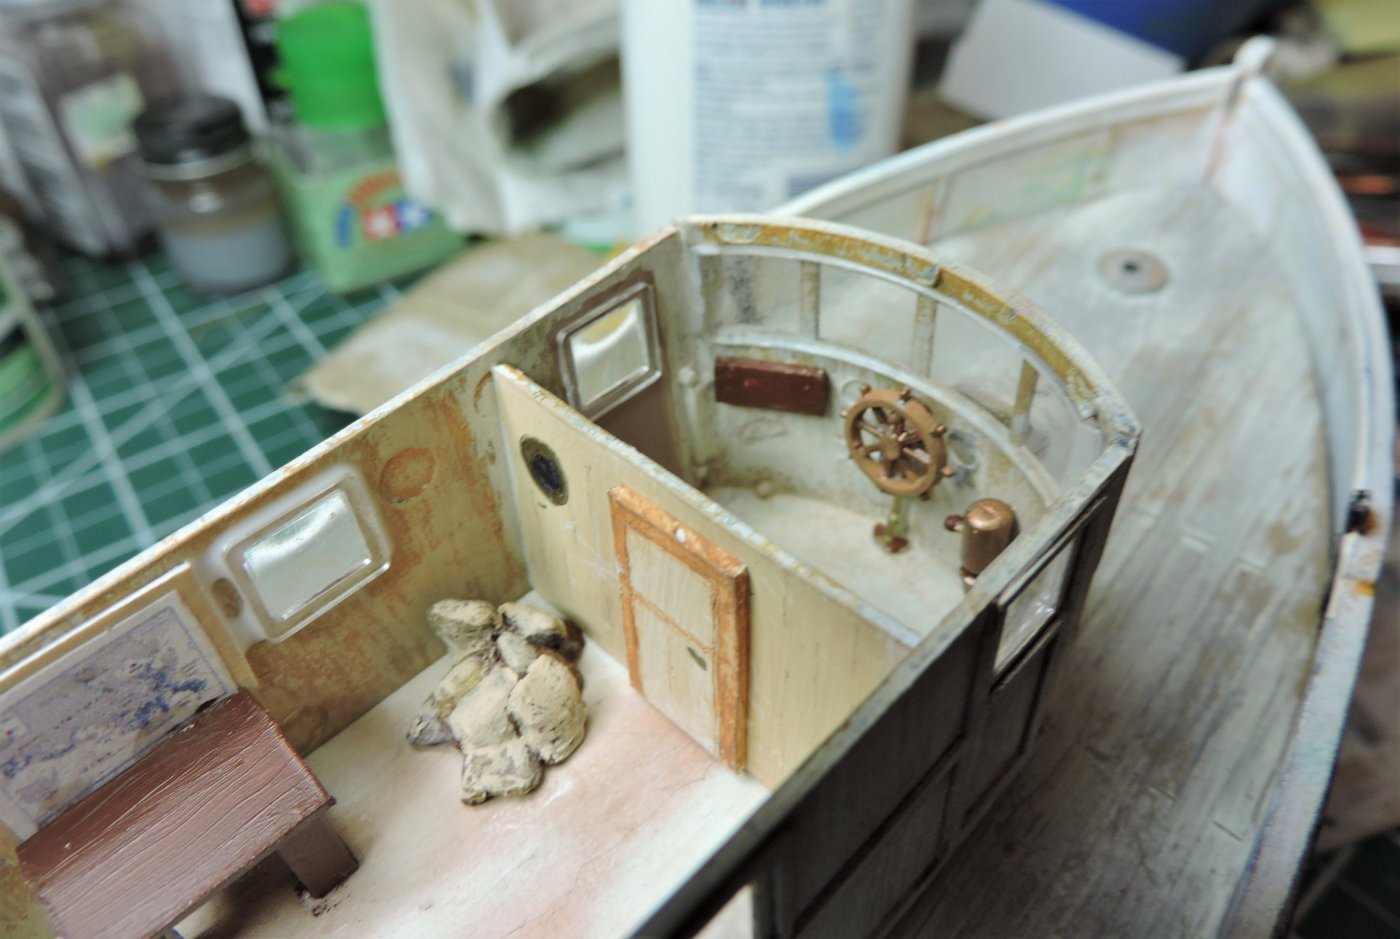
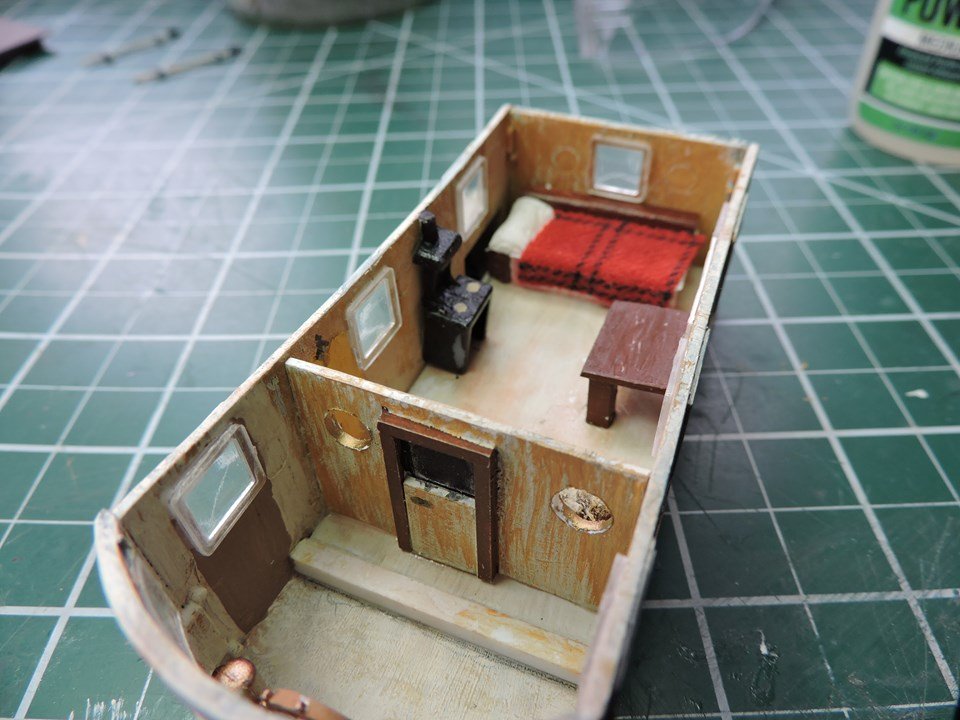
Until this build, I have always used rattle can sprays and either Testors or Model Masters enamels in jars. My wife does a lot of crafting and she turned me on to using acrylic craft paints from HobbyLobby. For this kit, I basically am using an Oyster White, AC Flesh and Khaki Tan for most of my weathering by brush. Two brands are Delta Creamcoat and DecoArt Americana that come in 2oz. containers and are very inexpensive. With that said, here is the start of my cabin. I'm sorry I did not show all of the pieces but they consist of four panels and the top deck. I had to do some sanding in order to get all of them even for gluing. I then went about weathering the cabin to match up with the hull. The cabin sits over a large opening in the deck. A gentleman by the name of Don Stauffer put in a floor for the front of his cabin. He has some fine models and great work! At this point I decided to borrow his idea and create a total floor and cabin furniture for some interest. Almost all of this will never be scene but I had a good time putting it together. I also decided I would add lighting to the inside of cabin. For my lighting, I am using a 3v Pico size warm white light and coin battery with on/off switch by Evan Designs. His products are so easy to work with and produce great results. I highly recommend checking out his sight! The floor, bed and desk were created with Evergreen styrene sheets and rods. The stove was created by using a plastic safety covering over a computer plug. I doodled around for a couple of weeks and finally completed everything. Again, most of this will not be visible. Here is what it looks like at this point.

- 69 replies
-
- 13
-
-
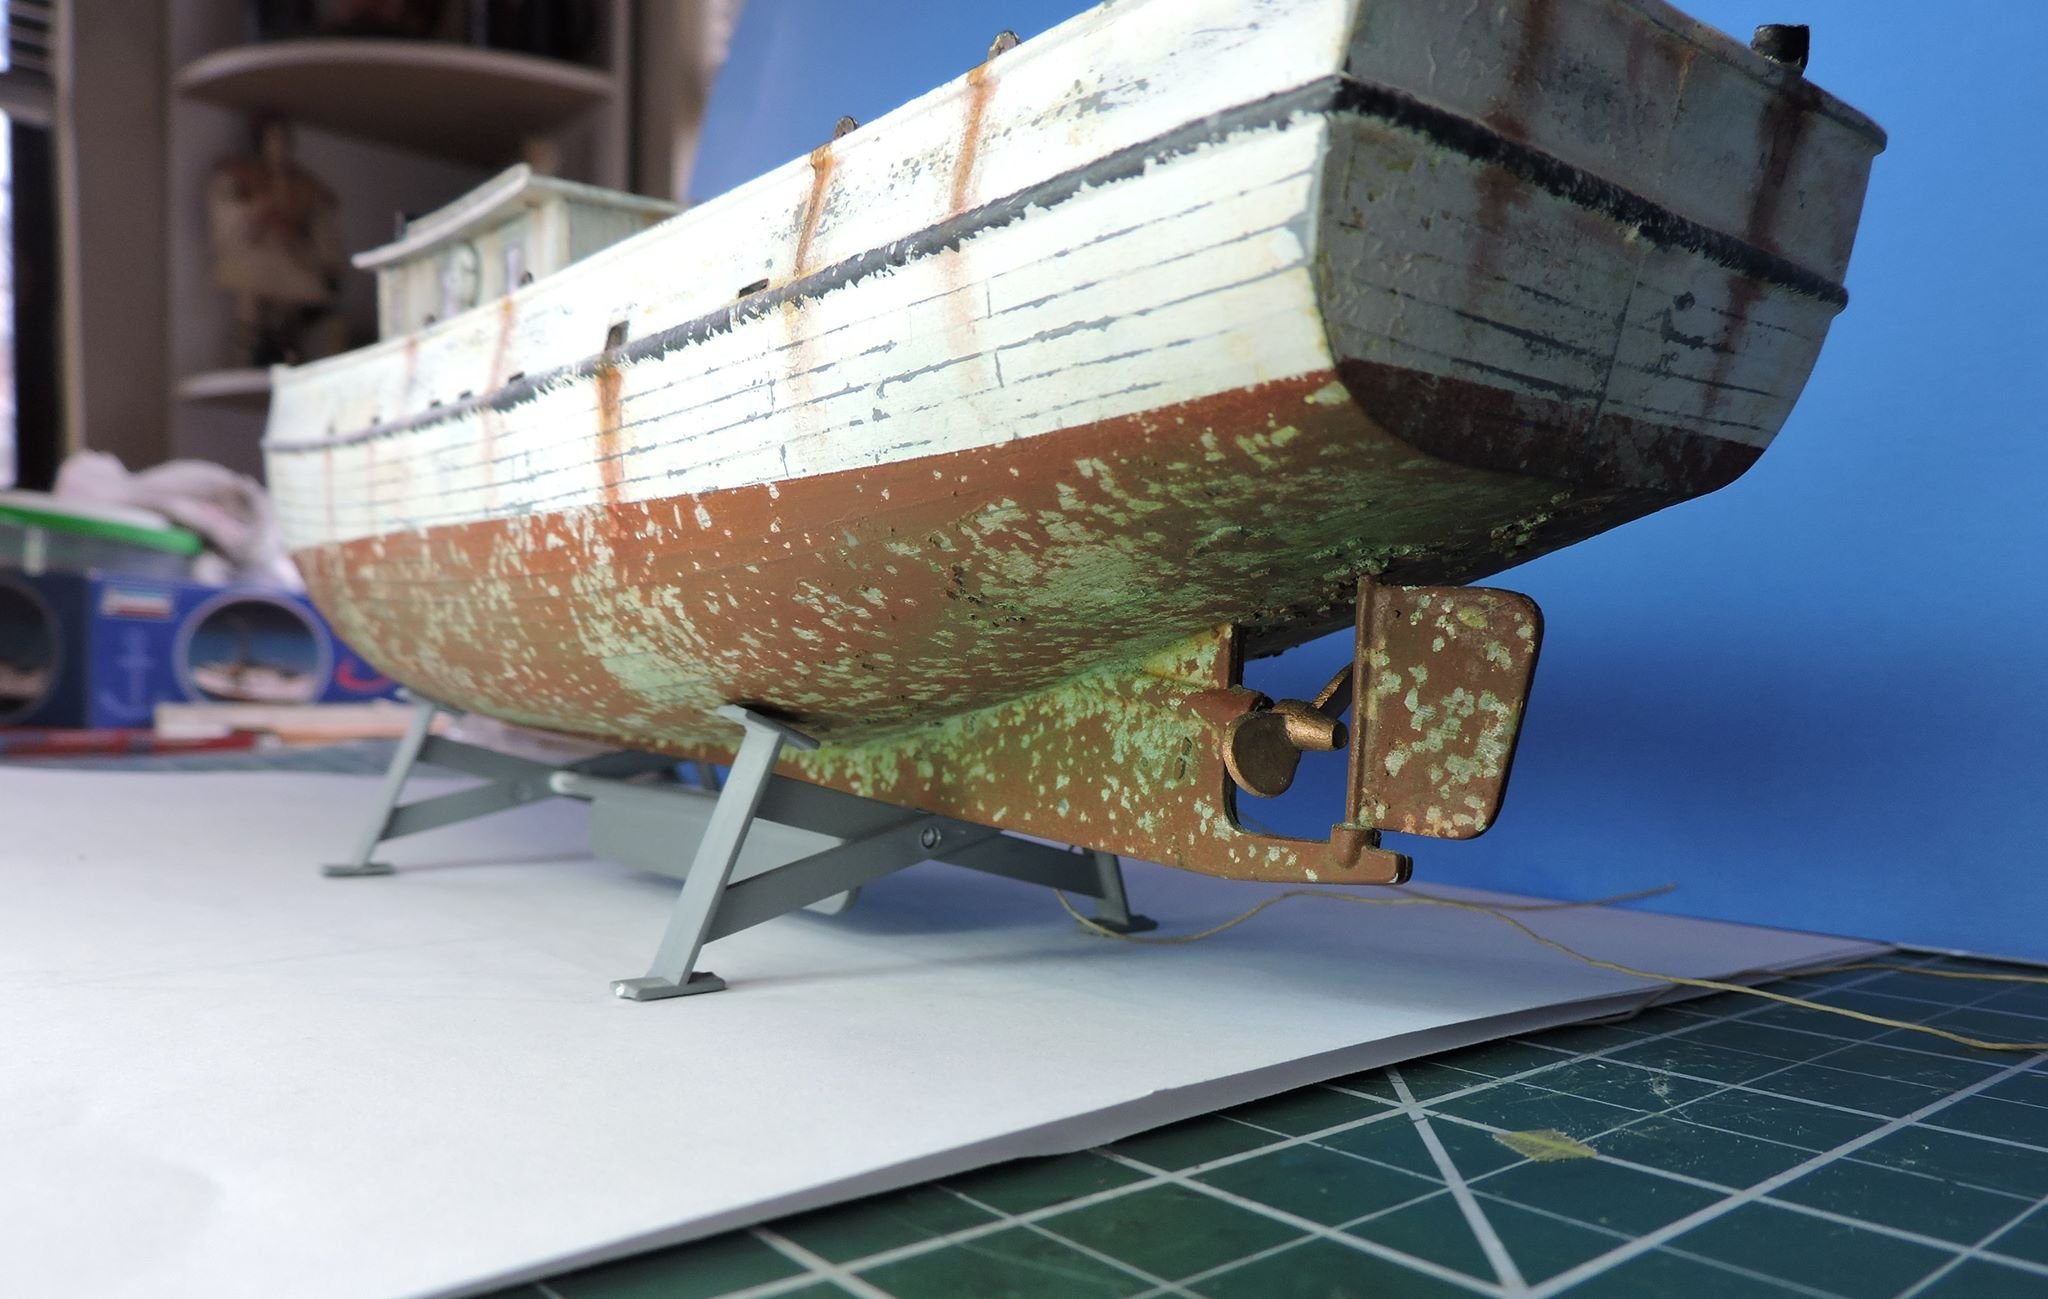
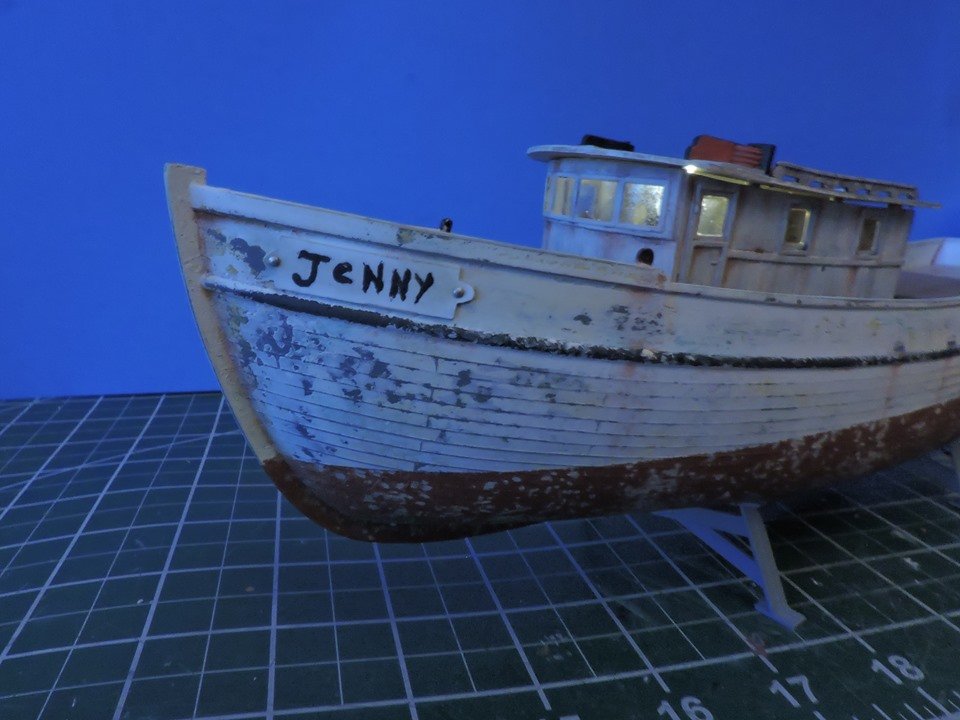
Taped off upper hull and used water and salt once again before spraying red oxide to lower hull. After drying, I then brushed off loose particles of salt. I sponged dark grey on the springer rail. Added a little more rust weathering to the hull. I also added the Jenny name plate to both sides of the bow.
- 69 replies
-
- 13
-
-
I washed all of the parts with soap and water and let dry. I sprayed all parts with grey primer. After watching a couple of videos on youtube using hairspray and salt techniques to create weathered paint, I painted some blotches of yellow, bluish green, and brown on the hull. I sprayed a layer of hairspray and then sprayed a thin layer of flat white paint over the hull. After drying, I scraped the surface with a toothbrush to expose the under colors. I wet the entire surface of hull with water and sprinkled course salt and let dry. I then sprayed another coat of flat white paint and allowed to dry. I then went in and used a toothbrush to remove the salt crystals. I'm sorry that I did not take any pictures of piecing together the cabin structure. The cabin roof is not glued nor is the cabin structure to the deck in these photos. The deck was weathered by brushing blotches of the yellow, bluish green and brown over the primer and then spraying the deck with flat white. I then used a stiff bristle brush and a little steel wool to remove some of the white to expose the under colors. I used enamel spray paint for primer grey and flat white and decided to use acrylic craft paints purchased from HobbyLobby for brush work on my boat.
- 69 replies
-
- 10
-
-
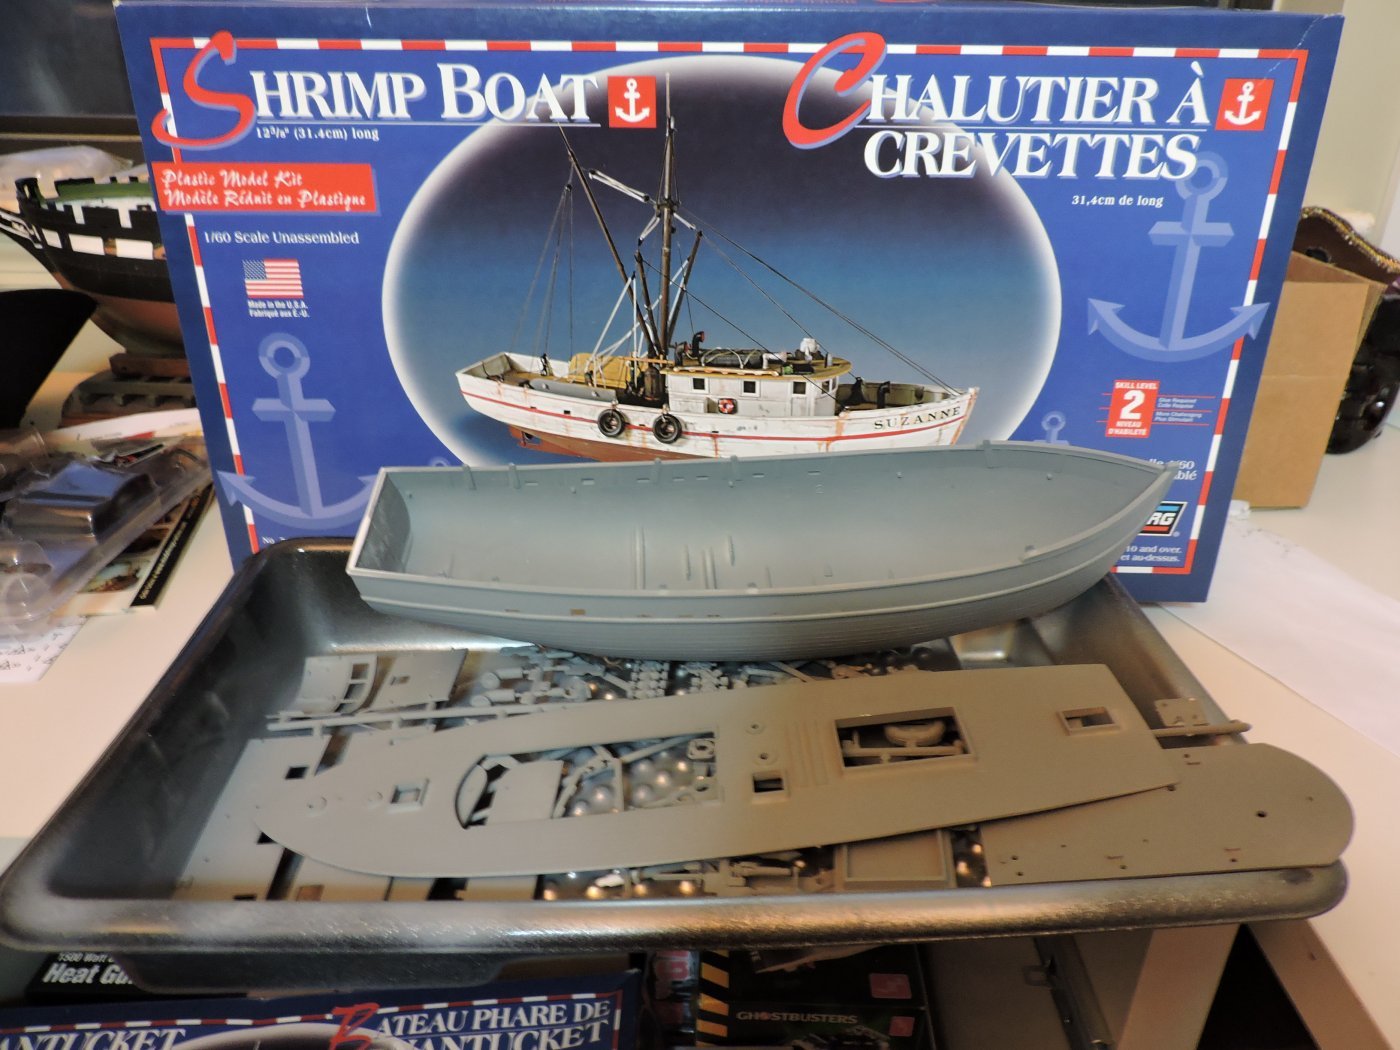
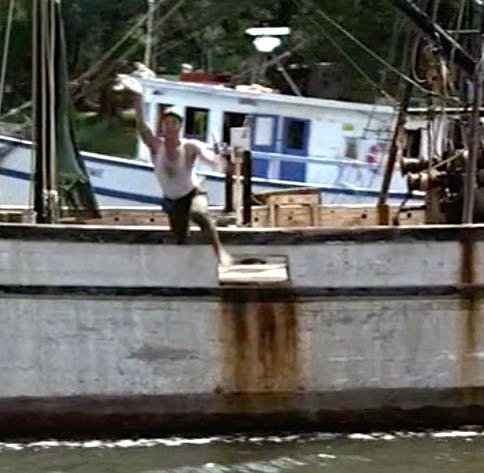
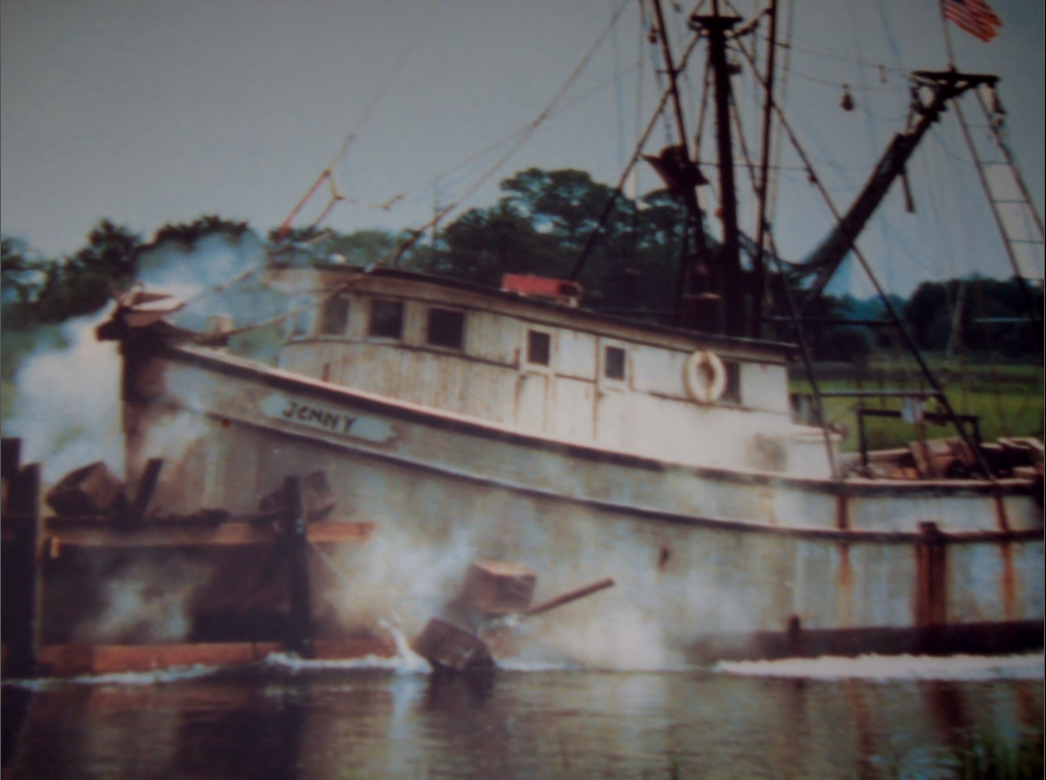
I was looking at plastic kits online when I came across Lindberg's 1:60 scale shrimp boat. I immediately had a vision of Forest Gump's 'Jenny' shrimp boat pop into my head. The price was right so I made my purchase on Ebay. I just completed my build of Lindberg's Nantucket lightship so I was aware of some of the problems with these kits. Poor fitting parts; lots of excess plastic; a good deal of sanding is why many look down upon this company's kits. Well, I wanted a shrimp boat and not much is out there to work with so here I go. I downloaded a few pictures from the movie of Jenny to use as a reference. There are very few pictures out there from the movie to look at. There is one good movie snippet that can be found on Youtube that shows part of the stern deck; Forest at the stern wheel (made just for shooting the movie); and quick glimpse of rear of cabin. So this will be my attempt at re-creating the 'Jenny".

-
Wow! Nice job so far on this schooner. She looks great!
-
Aye. Mate. This here ship be mighty fine for sailin'. Looks like the Captain knows what he's doin'!