
HOLIDAY DONATION DRIVE - SUPPORT MSW - DO YOUR PART TO KEEP THIS GREAT FORUM GOING! (Only 13 donations so far - C'mon guys!)
×

Michiel
-
Posts
236 -
Joined
-
Last visited
Content Type
Profiles
Forums
Gallery
Events
Everything posted by Michiel
-
 It seems like incredible material for turning. Does it come like this directly from turning or do you apply some finishing technique?
 -
I've been experimenting abit with Focus stacking, Here's one of my first attemps. 16 images with logitech c920 combineZP software Does any one have more experience?
-
some very useful ideas, thanks for sharing
-
that's a neat workshop, love those original workbenches
-
Nice pictures Janos looks really realistic I'll probably make my standing rigging a bit darker, its really covered by a thick tar layer originally Thanks Druxey nice to see you like it a lot. more pictures soon... Best, Michiel
-
you just need to leave yours out in the rain for a winter than they're probably identical..
-
I'm working a bit in parallel some on the outsize some on the inside, here's the progress on the gun deck. 40 rings made and installed. 32 for rigging the guns and 8 more on the hatches... Now I need to think carefully what else to put on the deck before I start placing guns/beams and knees... There are still some chicken egg problems there I need to find a solution to ... the first next thing here will probably be the lanterns that still have to be put covering the led's Have a nice weekend, Michiel
-
not strange at all! open models are nice so much more to see. Maybe you should consider making pictures with a tripod, I'm assuming you're currently shooting by hand, in addition use the timer, and it will be easier to make sharp pictures, you work surely deserves it. Keep on the good work, Michiel
-
Thanks guys, Janos, I have at the moment 100 60 and 20 ecru cordonnet speciale. All three are right handed. As long as I make a 3x1 wire I just turn them so long that they become left handed. Until now I did not break any during the process. I use as little weight as possible, to make flexible tropes. Due to the scalings in wieght and flexibility its so hard to make ropes behave naturally on scale... The ropes on the gun port lits are 3x1xnr100. For me that becomes thin enough for the thinnest work. Could you post some example pictures on you coloring? I'm really interested. I'll also stick to ecru now for the running material. But the standing rigging needs to be colored. Michiel
-
The work on the port lids slowly progresses. Partly beacause of other occupations an partly because they are made piece by piece to fit the specific port and each of them contains ~30 pieces.. The nails for connecting the hinges to the lids also arived. It turned out they spend some weeks at customs in Hamburg ... and the overview: 5 finished, two in in part ready, 25 to go...
-
Thanks, I'm now working on a cable...
-
In the meanwhile I build myself a rope-walk. A hanging model with six hooks. It is run by a power drill. The first tests worked fine, and now I started making real rope. I'm using DMC Cordonnet special numbers 20, 60 and 100. It comes of the roll right handed but the stands turn easily. Left handed strands can be made in to right handed ropes, which can be turned into left handed cables. On the dutch ships of this era all ropes are right handed, the anker cables left handed. (ropes consist of 3 strands cables of more than 3 ropes) Here are two ropes: The rope on the port lid is made from 3 single strands of Nr 100 (3x1x100), ~0.4 mm, the thinnest I can make. The lower one is 3x1x20 ~0.8 mm it will probably turn into gun rigging. Next to do rope wise is turning some even thicker ropes like 3x3x20 and combining them in foures into lefthanded cables for the ankers. (the super macro always shows those < 0.05 mm details :-( I'll have to work on that a bit) Best, Michiel
-
thanks, yes, I cut strips from a sheet of brass with a metal cutter. The end is rolled with an round ended pincer. The pieces connected to the ship itself are made the same but there a piece of brass wire is soldered in and the end is filed to a sharp point so it can be driven in a hole drilled with a 0.8 mm drill. Best, Michiel
-
when I was working on the hull again I decided to make to make the doors for the gunports as well here's some of the progress the first one mounted: and closed: the rope is still temporary have fun, Michiel
-
You're lucky. Last time I drove a chisel in my finger tip I got a building prohibition from the admiral until it was closed again....
-
I can't agree more, looking forward to the next project :-)
- 662 replies
-
- 1
-

-
- bonhomme richard
- frigate
- (and 1 more)
-
Nice progress Drazen.
-
Well, that is something different, surly beautiful. And a great story to. Best, Michiel
-
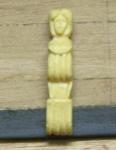
nice carving, Is there a lot more come as decoration?
-
It's realy practical, just drill a hole widen the opening a bit, bit of glue and one soft hit with a wooden hammer. so that only a simi spher ends up on th outside. the most time consuming is finding the brush with the right size of tips.
-
they are made of heads of a hairbrush.
-
Thanks Sherry, Here's some more: in total there will be 5 ankers of different sizes and, related different rope strengths. Three on port and 2 on starboard. And as can be seen here already I started making the iron bolds: Any guess what they are made from? cheers, Michiel
-
and the final piece of the deck finished I also finished the two pipes for draining water from this deck: Next the ports for the anker cables are on. On this scale the actual different sizes will show so I'll need to drill 4 different sizes.. Best, Michiel
-
Hi Paul, Thanks, If you're ever doing a tour on the Atlantic wall drop me a note. I have an uncle that is active in a club that tries to keep bunkers in tack and is also restoring some. They have a few around Vlissingen fully equipped again. Best, Michiel