Ian_Grant
-
Posts
2,152 -
Joined
-
Last visited
Content Type
Profiles
Forums
Gallery
Events
Everything posted by Ian_Grant
-
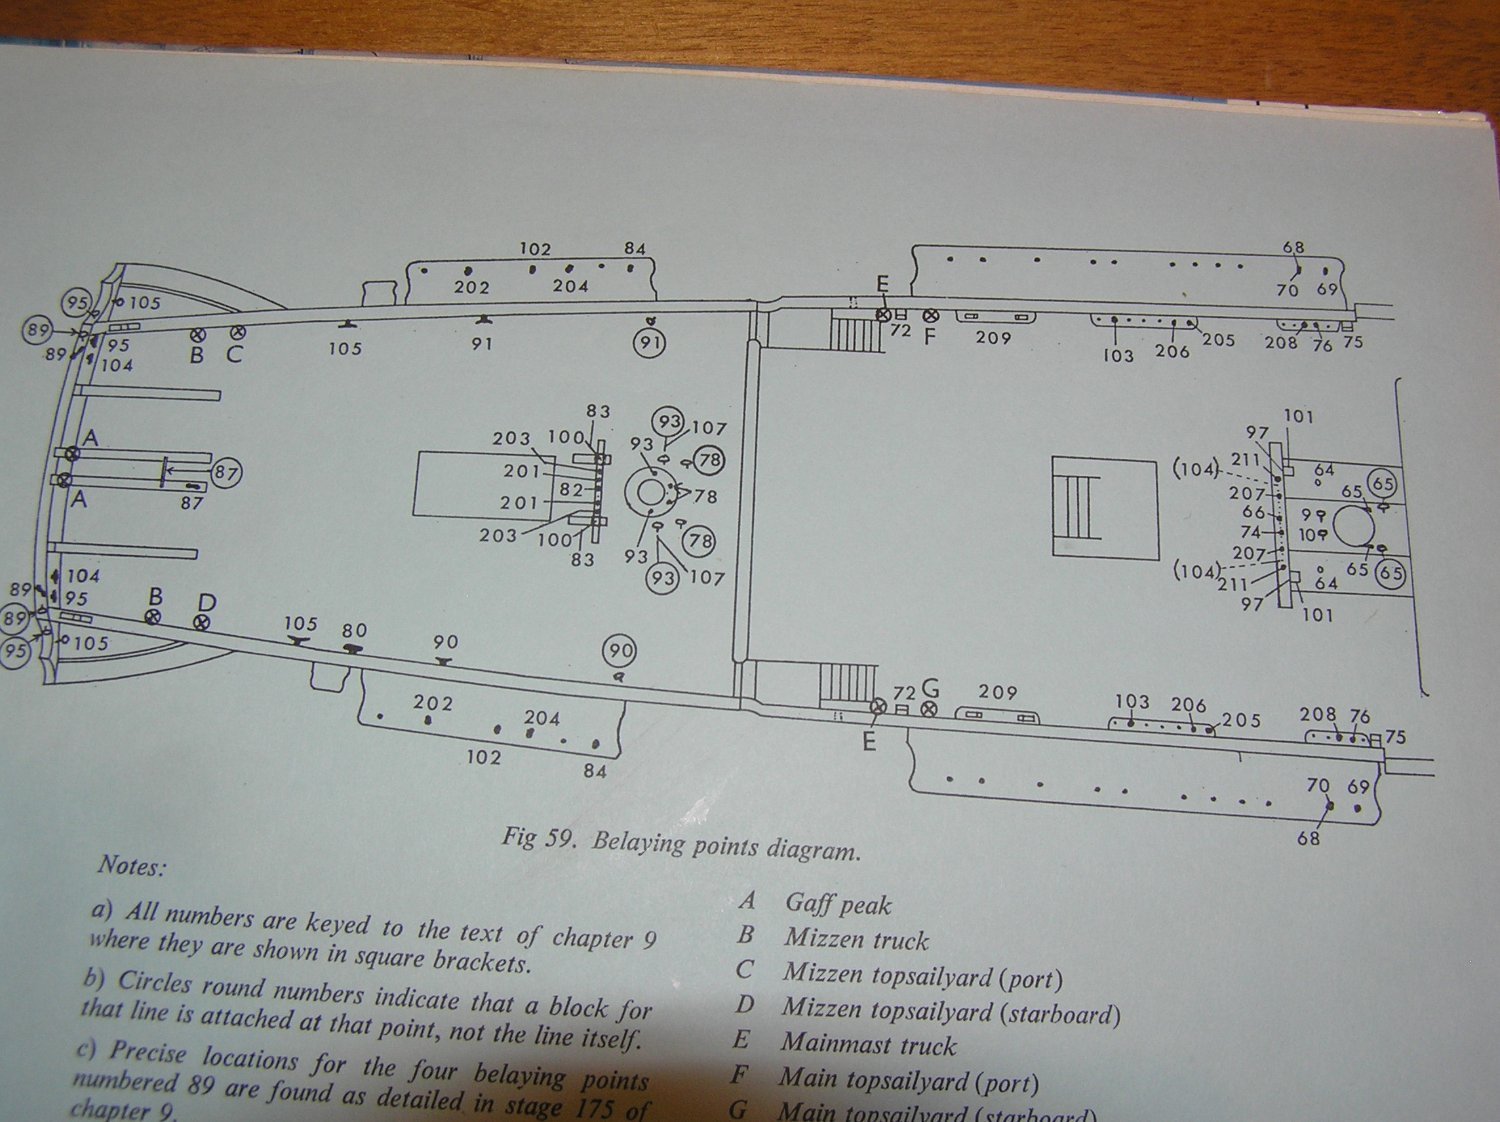
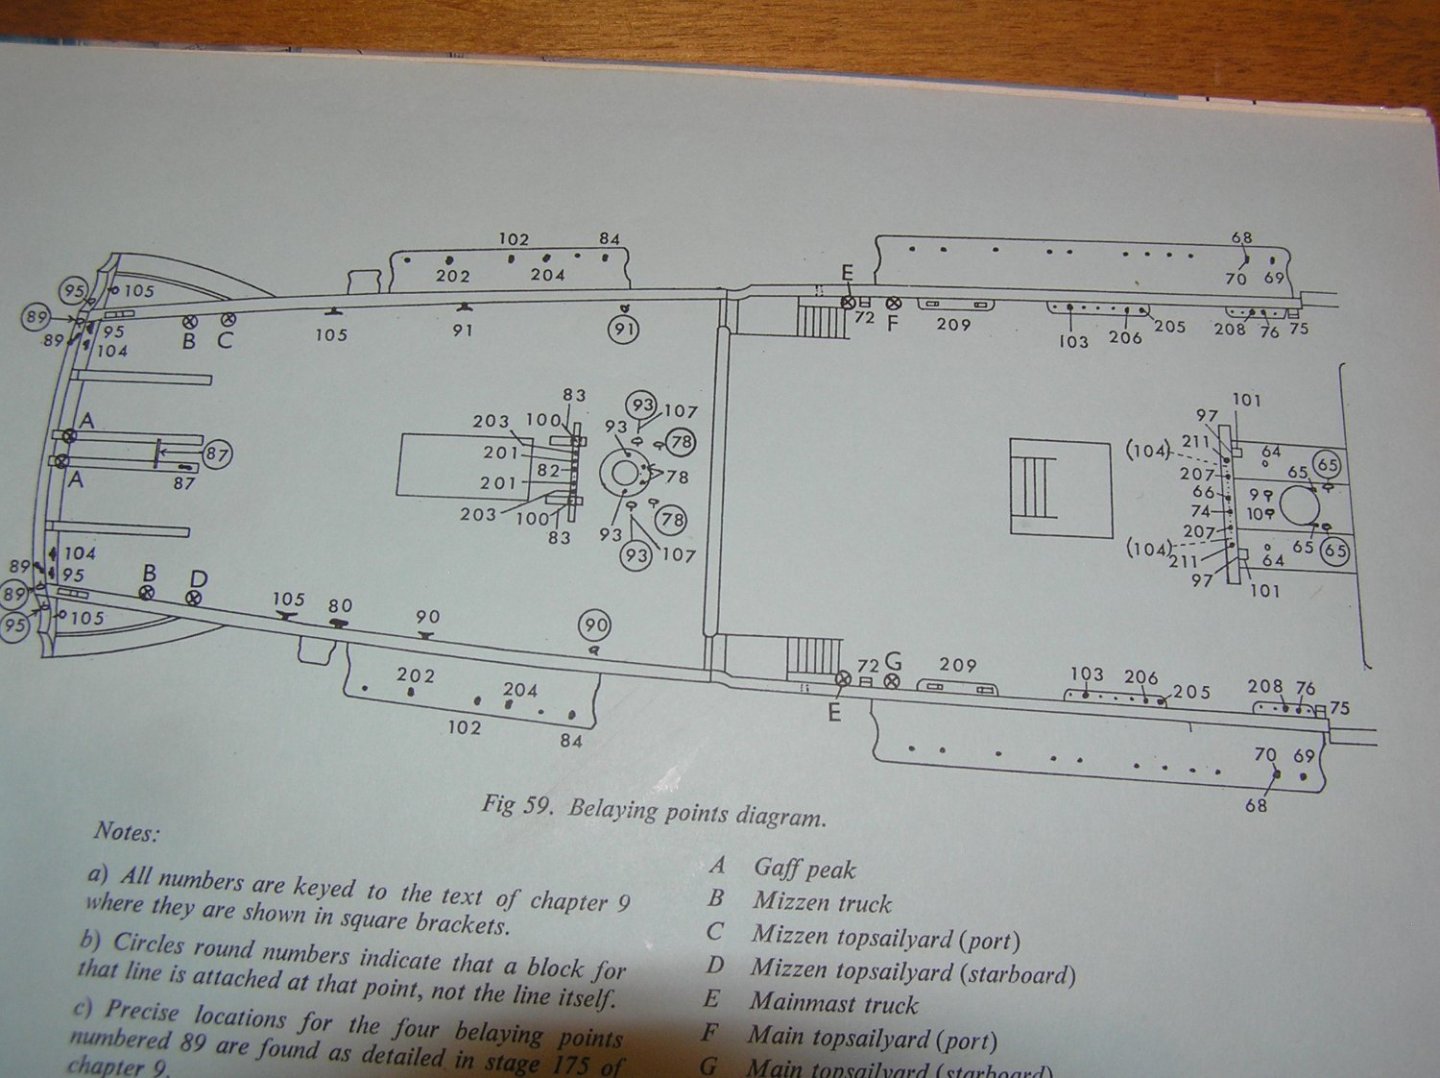
 Sorry my model is hard to photo in its case. Here are pics of Hackney's belaying diagram. Longridge's is very good but he omits some deck eyebolts. Consult him for rigging these lines, and the diagrams below to show where they terminate. The forecastle area: 47 are eyebolts and cleats for foreyard trusses; 18 is eyebolt for main topmast stay; 19 is eyebolt for preventer stay; Quarter and Poop decks: 65 mainyard truss pendants; 9 mizzen stay; 10 preventer stay; 78 cro'jack truss pendants; 93 driver boom topping lifts; 107 are davit lifts which he claims use same eyebolts as topping lifts; I think Longridge places them on mizzen belaying pin band. Oh and while I think of it - you'll be rigging many lines to the forecastle after rail beside the belfry. You might want to drill some sheave holes at an angle through the bases of the uprights before proceeding upwards. Good luck Mr. Phelps.........this post will self-destruct in 10 seconds............
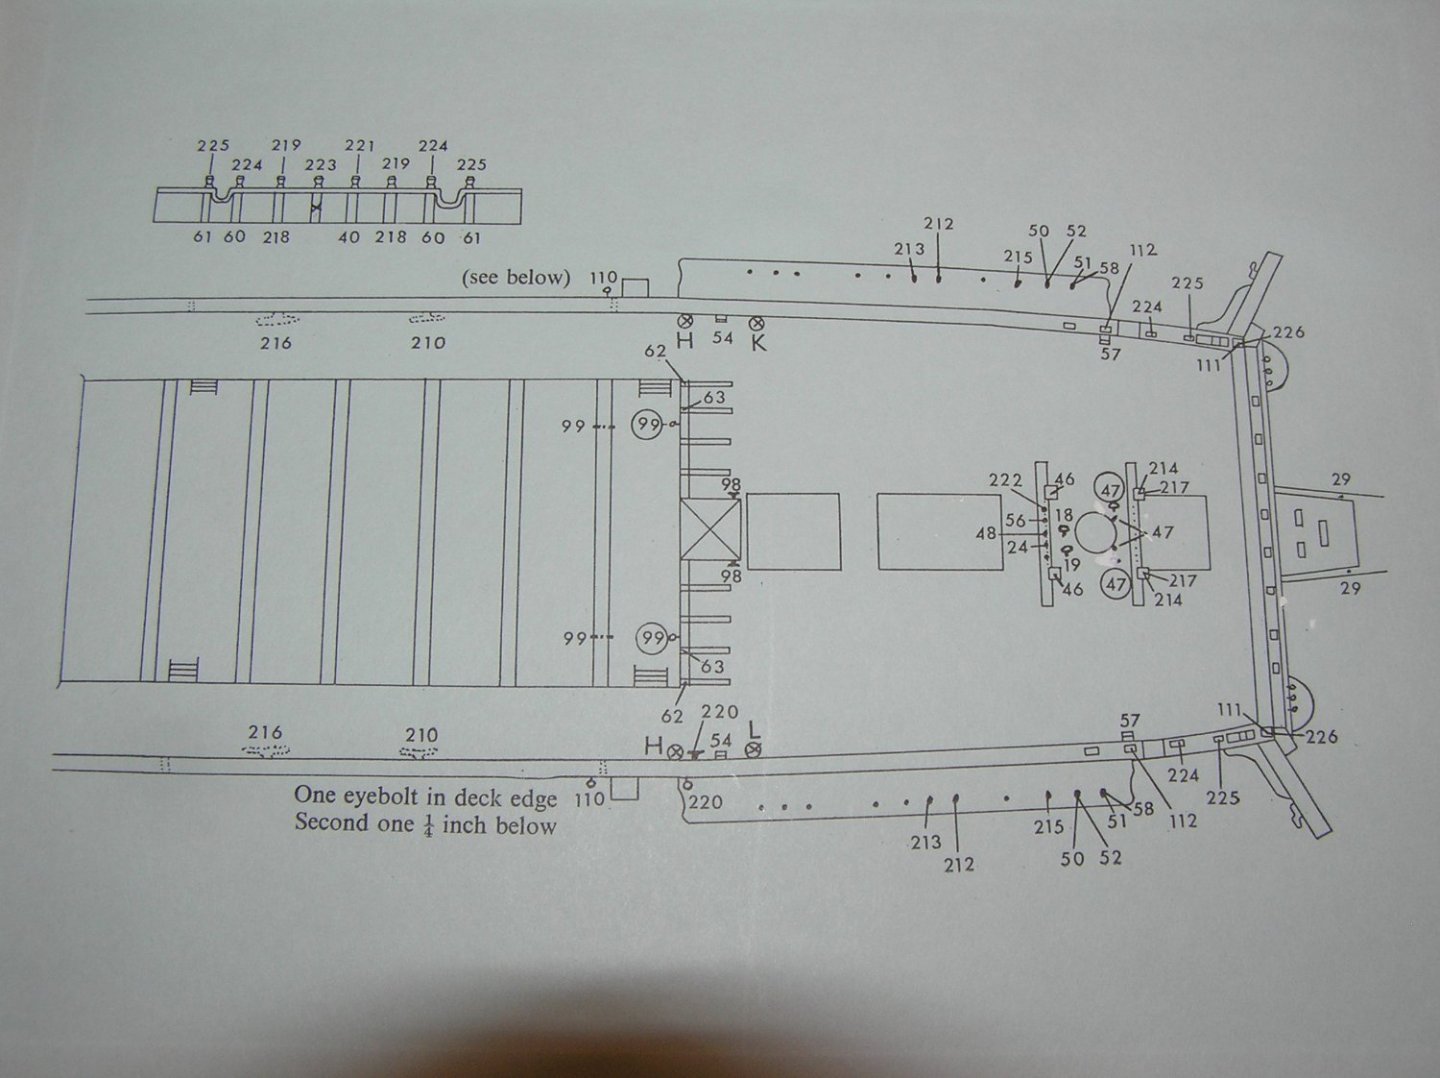
-
Thank you Ole! I am not using the kit line. I can't even remember what it was like. I guess Heller represents wire by black line; a lot of the running rigging is wire too with only the whips being of rope for handling by hand. So far I am using the grey line for "wire", and some Amati 0.1mm tan line left over from "Victory" for the whips. Probably I will use some smaller grey line for topgallant and royal stays, sheets, etc. Problem is I couldn't find the smaller line in the exact same shade of grey. The 0.1mm tan line seems small for the lower brace trim adjustments, for example, so I may use 0.25mm tan line when I get to them. I am partly limited by the blocks which are Syren 3/32" even for the lower yards, because 1/8" were out of stock when I needed them 😞 Do you have/are you contemplating a Preussen?
-
Thanks Bill, and I echo that comment to everyone 🥂 Have a safe happy 2022 😷. Bill, I realized that there are some things you could do before gluing in the masts; or maybe you have done them I don't know. Way way back I mentioned some additional eyebolts you need around the masts. I think you bought Noel Hackney's little book after I mentioned it? If so see his belaying plan inside the back cover. Around the foremast you need four eyebolts marked 18, 19, and 47(pair). These are for the main topmast stay and preventer, and foreyard truss pendants. You also need a pair of cleats at the front of the mast for the pendants. Around the mainmast you need four eyebolts marked 9, 10, and 65(pair). These are for the mizzen stay and preventer, and mainyard truss pendants. You also need a pair of cleats at the front of the mast for the pendants. Around the mizzenmast you need four eyebolts marked 78(pair), and 93(pair). These are for the driver boom lifts, and crojack truss pendants. You also need a pair of cleats at the front of the mast for the pendants. These would be easier to drill before adding the masts. In keeping with my rigging philosophy, I attached the stays and boom lifts, with the required thimbles etc, at this stage and rigged them in reverse later.
-
Hi Bill. You would be better to get the various blocks attached beneath the mast tops first while separate from the boat. Especially the fore top.
-
Regarding the order of rigging, my goal is always to minimize the number of lines I have to tie down at deck level while reaching in through previously rigged lines. I think I mentioned before I rig a lot of stuff in reverse for this purpose. It makes for a mess in the intermediate stages but saves a lot of cursing later. 🙄 For example I attached the lower yards and rigged their jeers completely, before the lower shrouds (shrouds were seized around the mast head, but just dangling). My thinking was that I had easy access at that stage, and that any slight movement of the mast as I later adjusted the shroud lanyards would not affect the jeers anyway. You just have to imagine later stages, and try to avoid painting yourself into a corner. I'm doing this again on my Preussen build. Only the jigger mast is glued in so far but already there are a lot of dangling threads. 😬 I will be rigging all the sheets and downhauls in reverse, at each mast.
-
Bill - Don't forget about the lashing at the heel of the jib boom.....Longridge mentions it on pg 227 "Standing Rigging of the Jibboom &etc"
-
Thanks gentlemen for the likes, and Veszett for your reply . Boy, I'm starting to believe I can fix anything! 😄
-
Glad that acetone makes CA removal easy. I didn't know that.........
-
Lee Valley used to do a sawstop demo using a banana. Very impressive! I am going to make a serious confession here, despite the opprobrium I may receive: I've had my unisaw in the basement workshop since we moved here in 1992. Just between us guys, I have yet to use the blade guard since we were in the old house. 😬🤓 It just gets in the way. For jobs I do for other people I take my Dewalt portable table saw. Being more modern, it has a much nicer blade guard; it has a riving knife not just a splitter; you can latch the side guards up to check a measurement against the blade; you can instantly detach it and leave only the kickback fingers; you can quickly detach the kickback fingers for non-through cuts; you can instantly reattach both; you never need to re-align it. The old unisaw guard has none of these features. I guess I should look into a more modern guard for the unisaw. I'm braced for feedback..............
-
Dear Bill, she's looking nice! However, you said to speak up any time so here goes ........ the pikes should be on the port side of the mast because the mainstay passes to its right, nearly rubbing it. That's why they don't circle the mast like on the main mast 😔. I guess you could try to change them, or ignore it, or pass the mainstay to the left now (in which case you'll need to mirror-image the holes in the marines' walk for the mainstay collar). Happy New Year to you!!
-
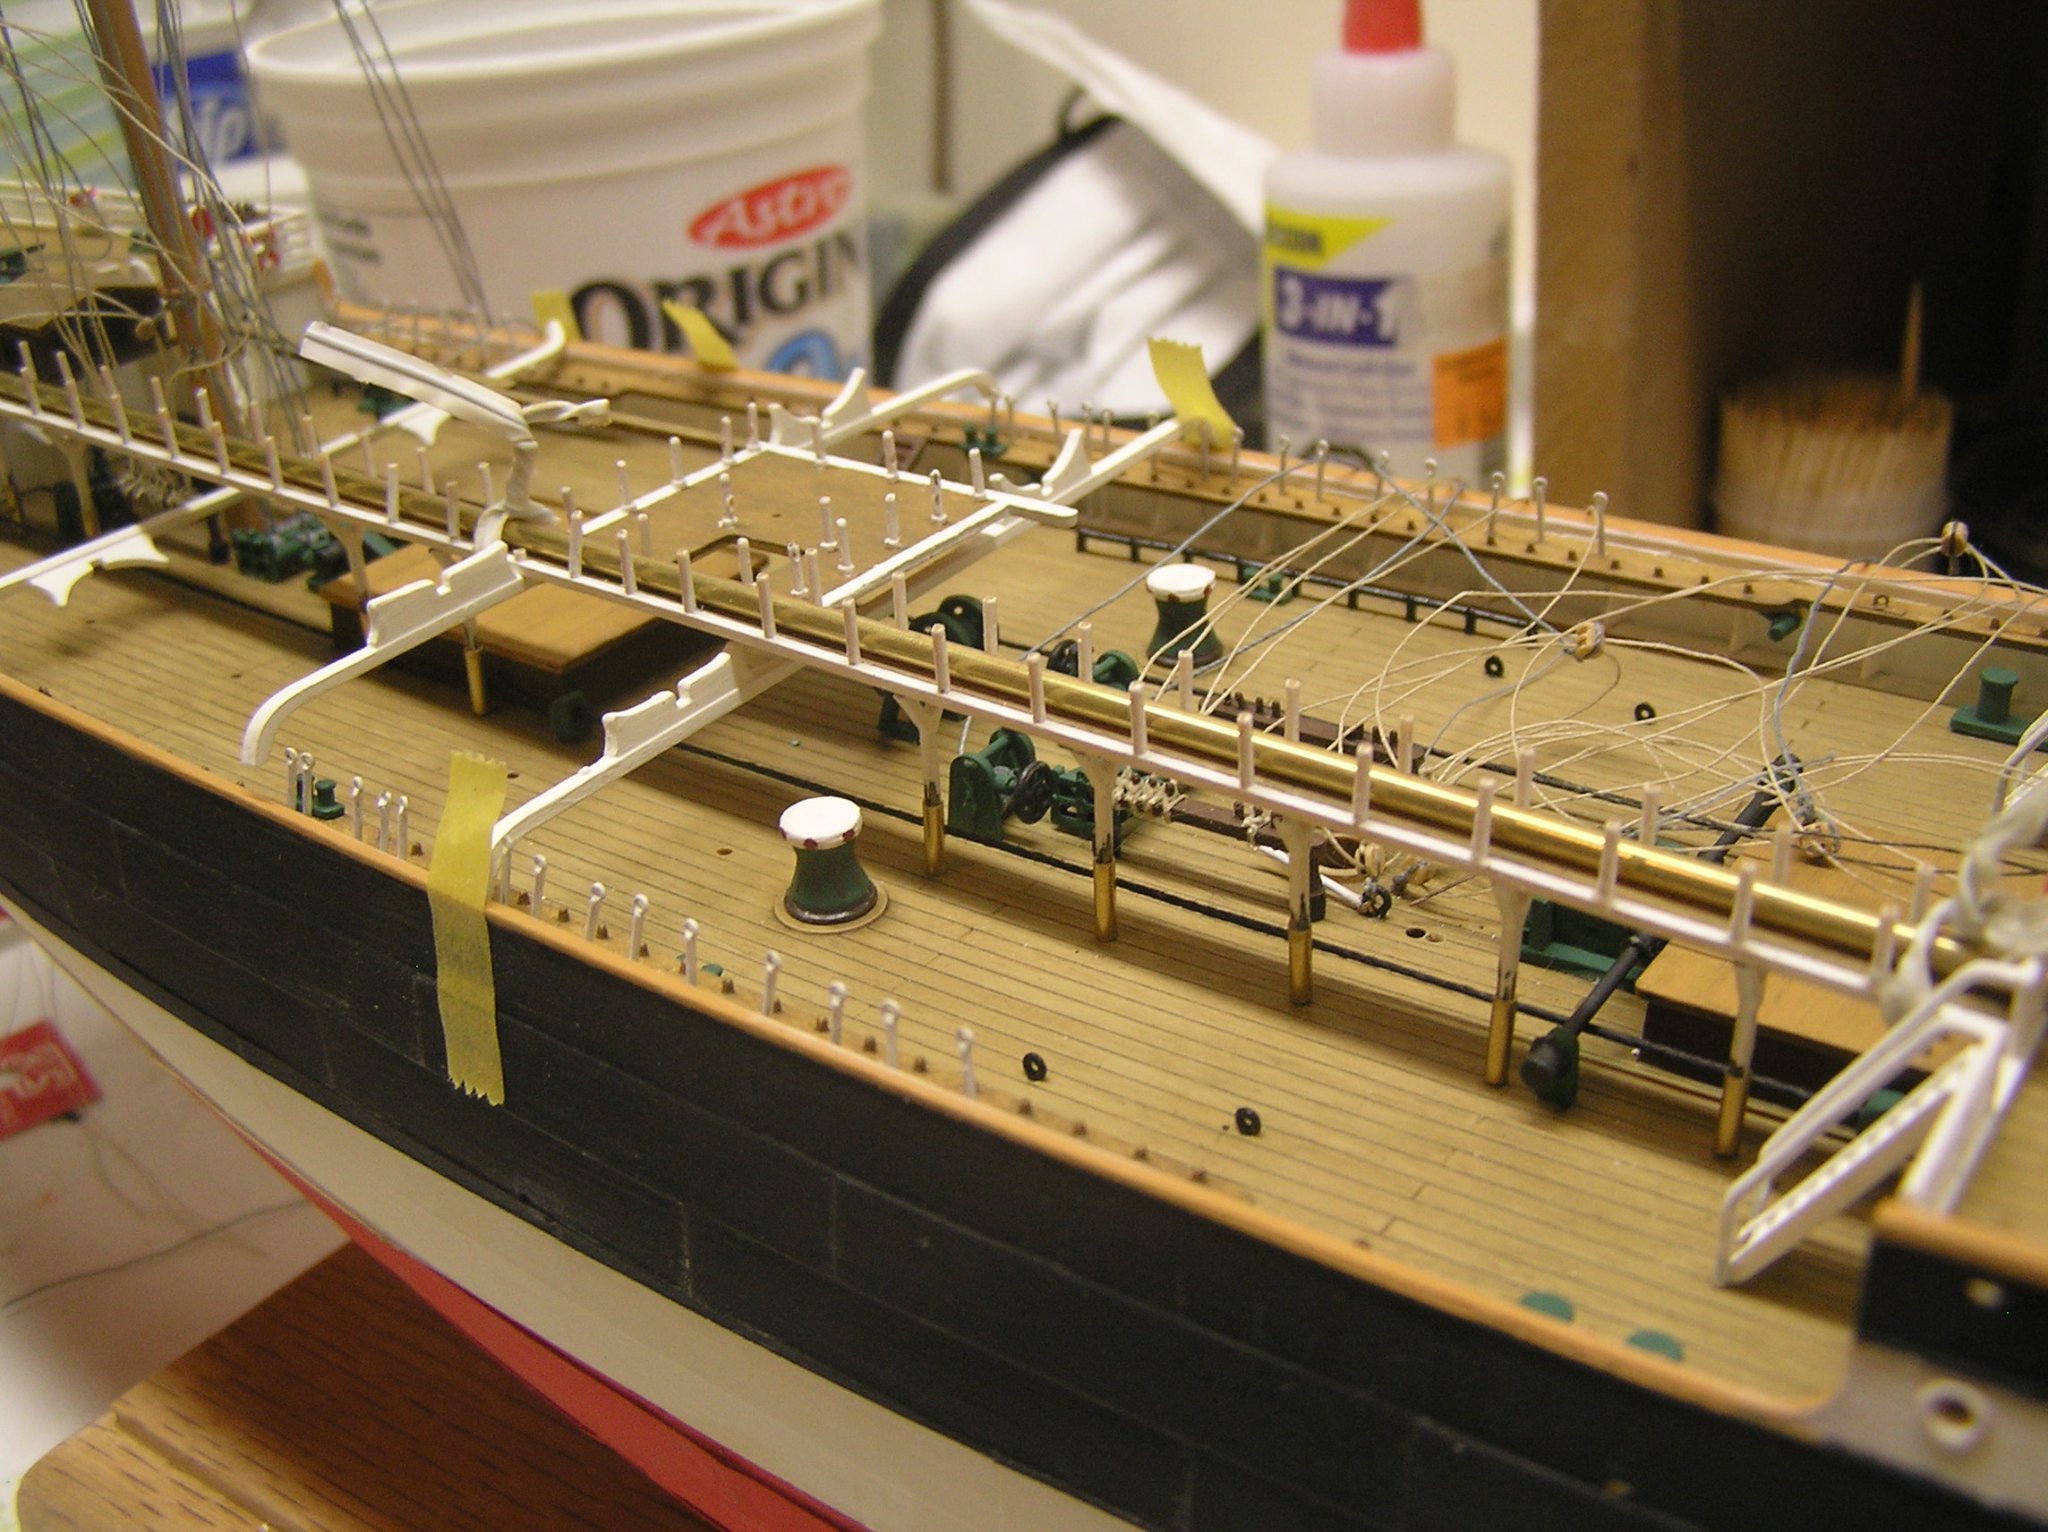
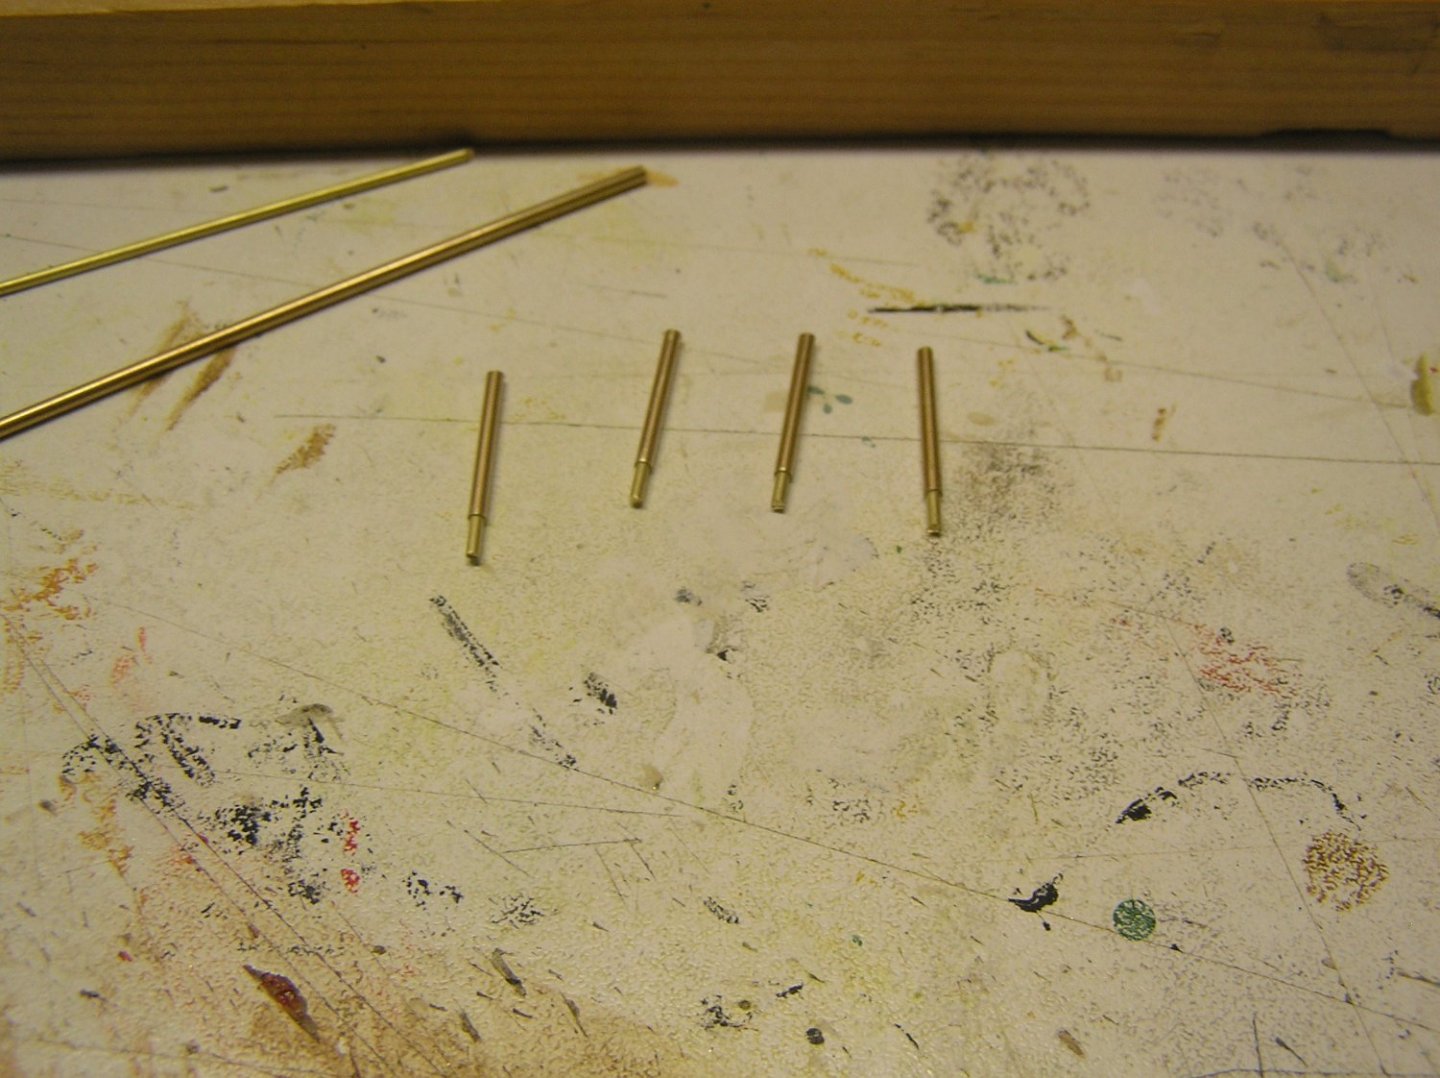
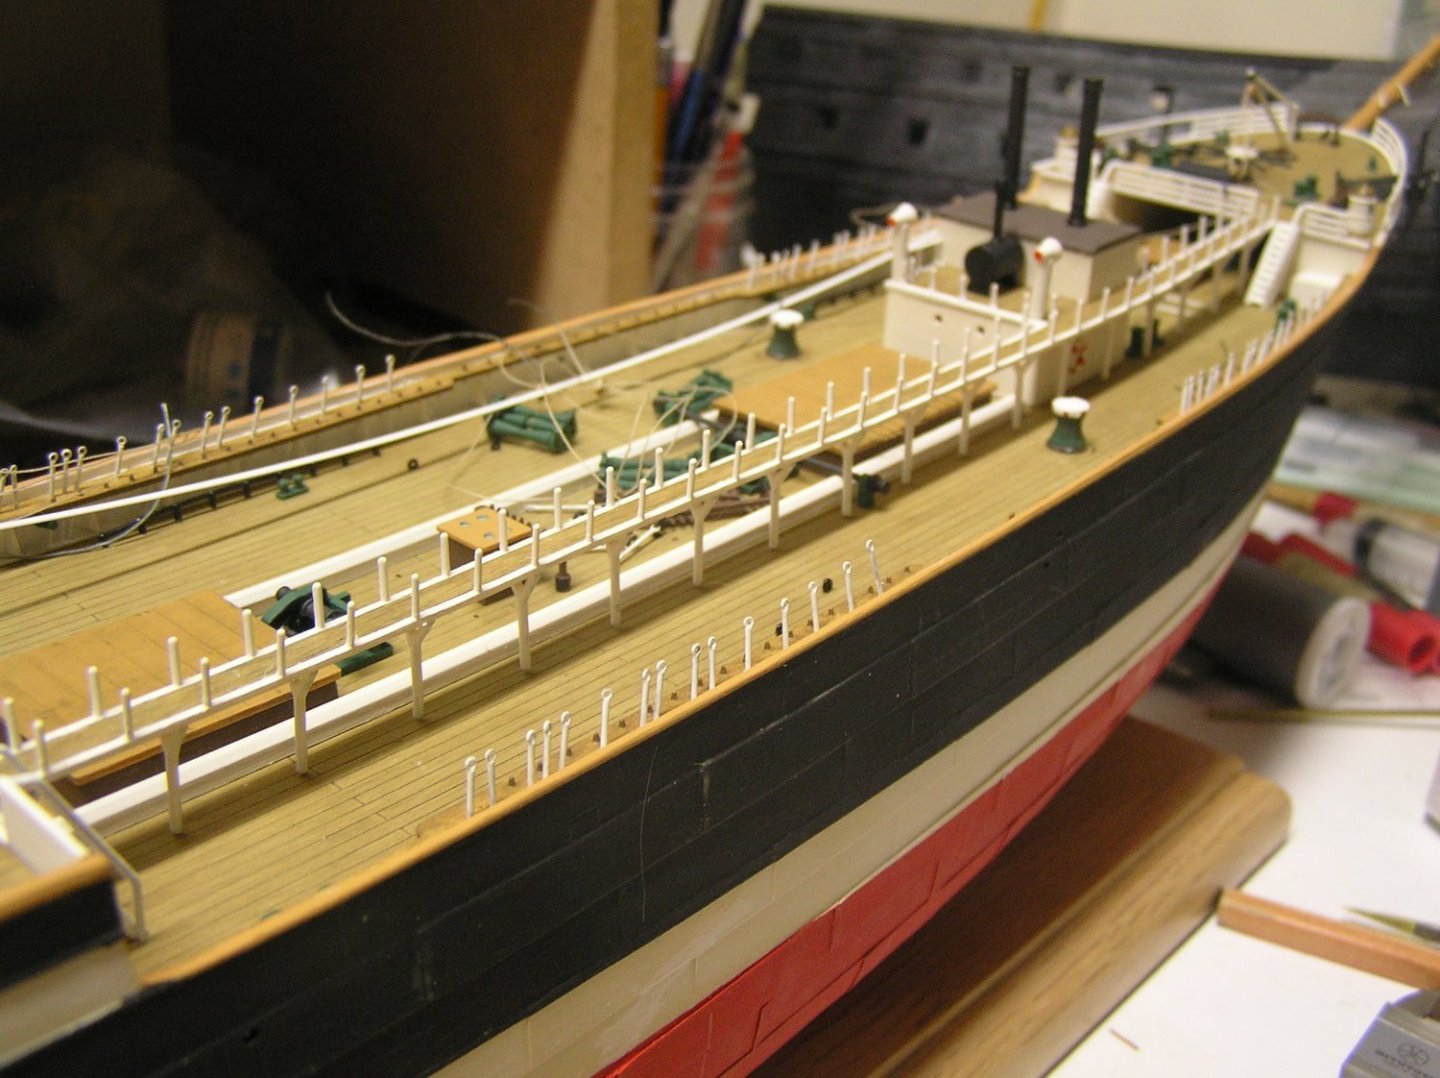
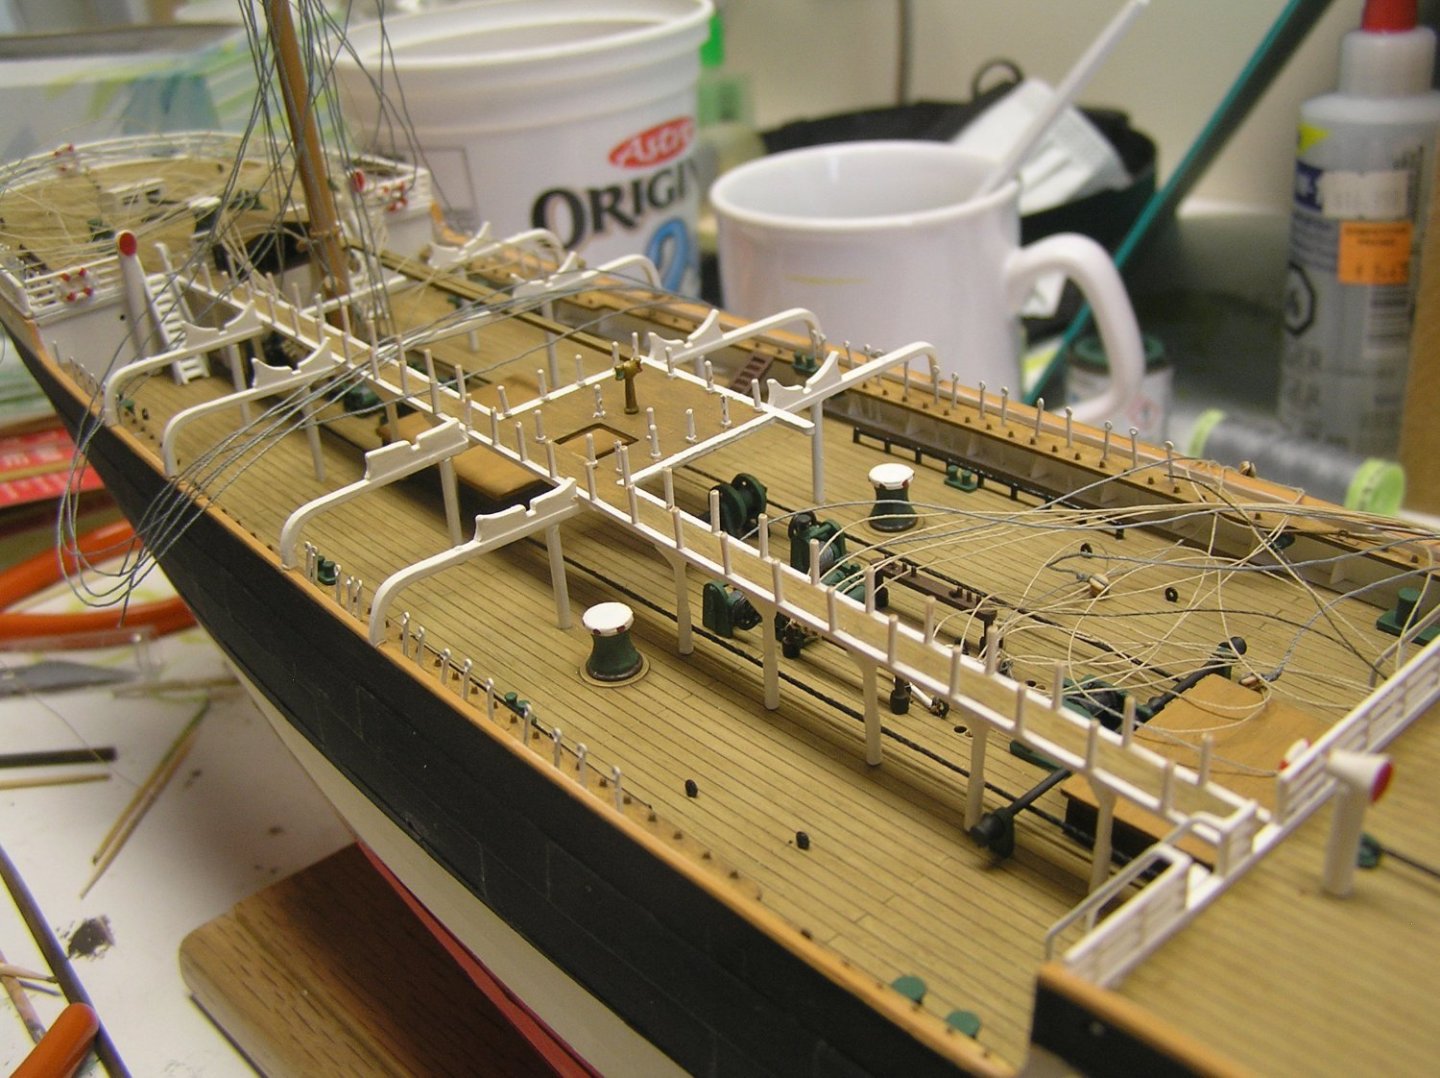
Used evergreen strips to lengthen the ends of the boat beams. I was then able to glue in the catwalk and beams. Since the beams were now higher from the deck, I fabricated new support posts from brass tube and rod. The tube was cut to the proper length for each post, and the rod CA'ed inside with one end flush; this end provides a gluing surface under the beam (as opposed to just the hollow tube). The other end glues into the deck holes, slightly enlarged. Here are some photos. Some new brass posts After catwalk with beams and posts, now flush with poop and bridge decks. 😀 I test fitted the forward catwalk and it was fine; the molded posts are the correct length for the forecastle bulkhead and the forward bridge bulkhead. I was so pleased with the appearance of the rear catwalk posts with their new "feet" that I would have added some to the forward posts too, just glued on flush, but I didn't want to be scraping the paint off since I broke quite a few stanchions handling the rear catwalk while trying to sand its posts. I can live with it. Got carried away and glued it in as well. I will regret that as I tie threads off to the starboard bitts at the forward masts. Next up: adding handrails along the catwalks. Not looking forward to it. I have some very small half-round evergreen for this because I don't like Heller's suggestion of thread. I have no idea why they didn't mold the handrails on like all the stern and forecastle rails.
-
As was said above, bad stuff can happen very quickly with a table saw. I have a 3hp Unisaw and my accident history is; 1) It once kickbacked an 18" or so long piece of wood, past me, through the workshop door, across the basement, and into the opposite drywall. Fortunately I have the good habit of not standing in line with the blade as the table is at about testicle height 😬. On this occasion the right-tilting blade was at 45 degrees and the projectile was trapped between it and the fence. I had a little voice in my head beforehand telling me the cut might not be a great idea as set up but I didn't listen. 2) Once I was trying to make a cut in a too-small piece of wood. My left index finger "somehow" contacted the blade which neatly manicured the nail and shaved off the tip. I have no idea how it happened, still. No serious damage, missed the bone, but lots of blood and the fingertip felt "numb" for several years until the nerves grew back. Again that little voice had tried to intervene. As a side note, it is amazing how the body recovers from injury; it was interesting watching the fingerprint whorls etc re-form as it healed. Not a bad record for 35+ years with the Unisaw I guess, but I have learned to pay attention to that little voice now.
-
John, I have an SR in my stash. I love your colours on the figurehead and stern. Now I'm wondering whether to "go Wasa" on mine and paint all the stern figures in colour. Regarding reins, I was thinking maybe some copper wire could be used, glued into very small holes drilled in Apollo's hands and horse's mouths.
-
Those pics do look good. Maybe I will buy the new instructions when it is time..........
-
Veszett, your "Pamir" looks great!! I noticed the anchor crane seems way more substantial than mine; but looking at the photo of Preussen wrecked Heller seems to have got it right.
-
Interesting to see the two pools. Wonder if you could jump off the second deck into the first pool? 🤪 If it's deep enough I'd love to try it! 🤿
- 24 replies
-
- 4
-

-

-
- Queen Elizabeth 2
- Gunze Sangyo
- (and 1 more)
-
Thanks Bill, and looking forward to seeing your build completed in the new year! Merry Christmas to all of you too!! ⛷️ 🚣♂️ 🚵♂️ ⛸️ ⛵ (Wondered where Bill found the Santa; boy there lots of little icons I never looked at before!)
-
Oh, I should have said - none of the boat beams are glued to the bulwarks yet. That one is just taped there from the first attempted fitting. The one that is glued to the bridge was easy to place since it's flush with the bridge's edge. The other three I was still trying to figure out. I will pad their ends to correct their heights then glue to bulwark and catwalk and all the boats chocks will line up. Ian
-
Local hobby place had the required brass tube (for any Preussen builders, K&S 815037 1/16" brass tube with 0.006" wall whose ID is about 0.050" just right for catwalk support posts. I cut it into 1/4" pieces and deburred the ends. Had to sand some paint off the posts - I had painted them black according to Heller instructions but later changed to white so paint was a bit thick. Then slipped them onto the posts, placed catwalk back on ship, tweaked the brass "post feet" into place and locked with tiny drop of liquid CA. Here is a photo. The brass tube along the walkway holds it straight and at proper height at ends, while I adjust the feet. Note the centre island bulkhead is slightly lower than the poop deck bulkhead so there is a slight slope. Oh well 🤪. Now to remove it again and repaint the posts white (over the brass too). Now I'll need to pad the ends of the boat beams a bit, and lengthen their support posts too. The second one from the jigger mast is glued to the flying bridge; you can see the ends levitated above the bulwarks.

-
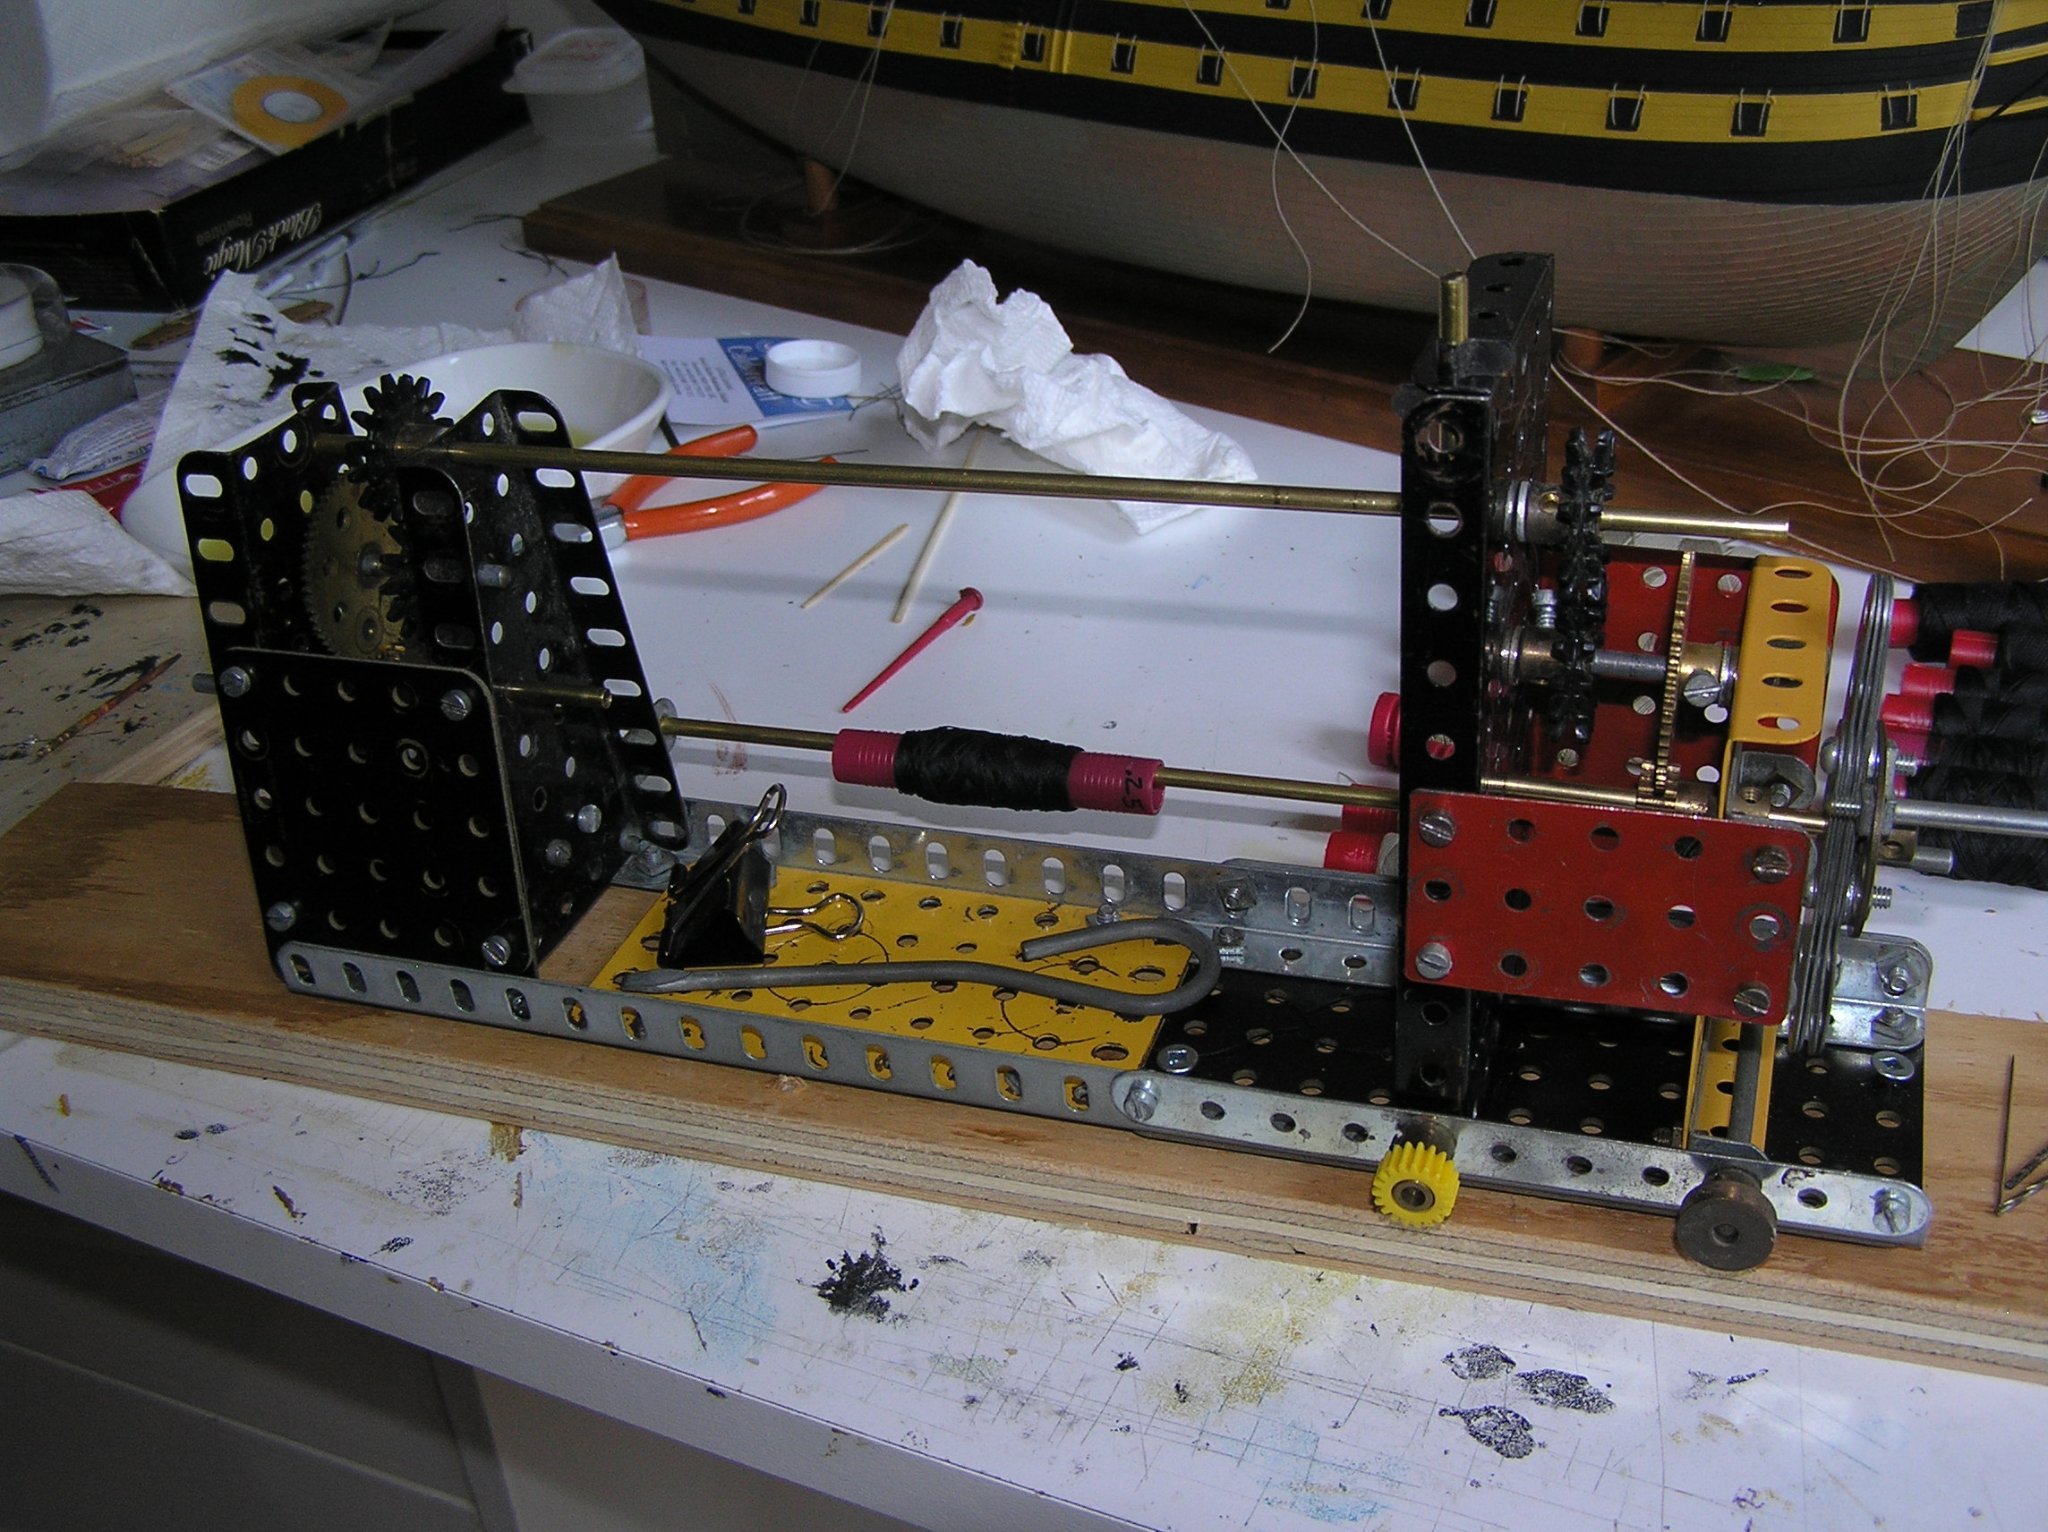
HAHA!! I thought about buying one, but found that I had enough gears on hand to duplicate the ratio in both towers so.... The two wheels on short axles at the bottom are "pins" to allow me to move the right hand tower toadjust the distance between the two towers. Built that feature in but never used it. The two hollow shafts are brass tube at meccano diameter. It's screwed to the board to allow me to clamp it near the edge of a bench. Making a meccano ropewalk would be cool! Ian
-
Welcome; but I thought Uhtred Ragnarsson torched Grimsby??? 😄 (I'm in the midst of reading the series, again)