


Heronguy
-
Posts
863 -
Joined
-
Last visited
Content Type
Profiles
Forums
Gallery
Events
Posts posted by Heronguy
-
-
-
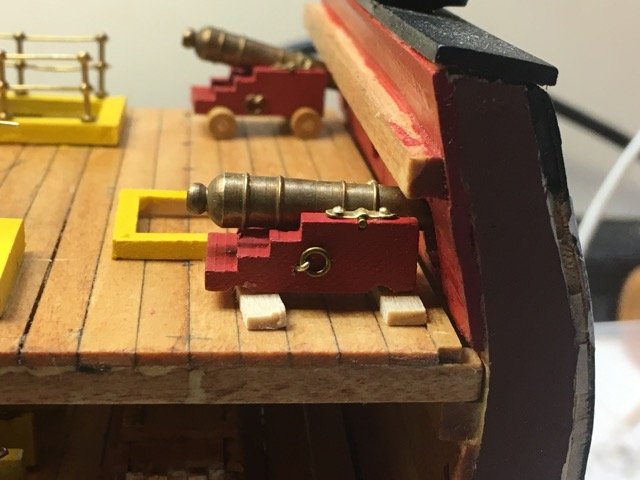
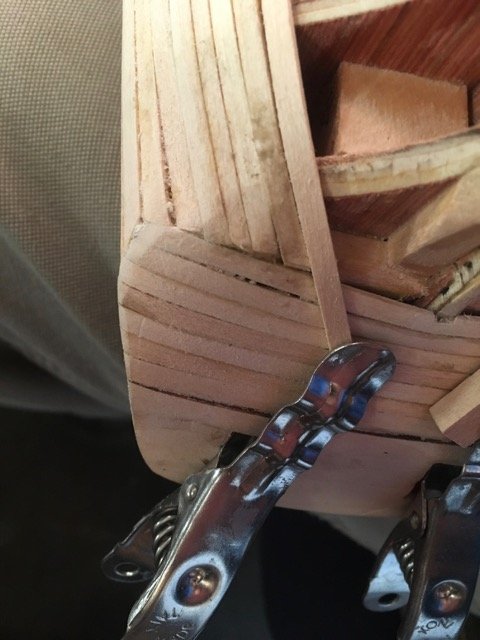
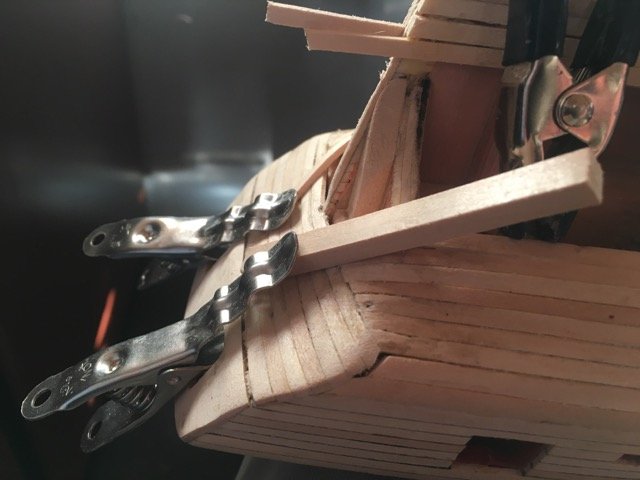
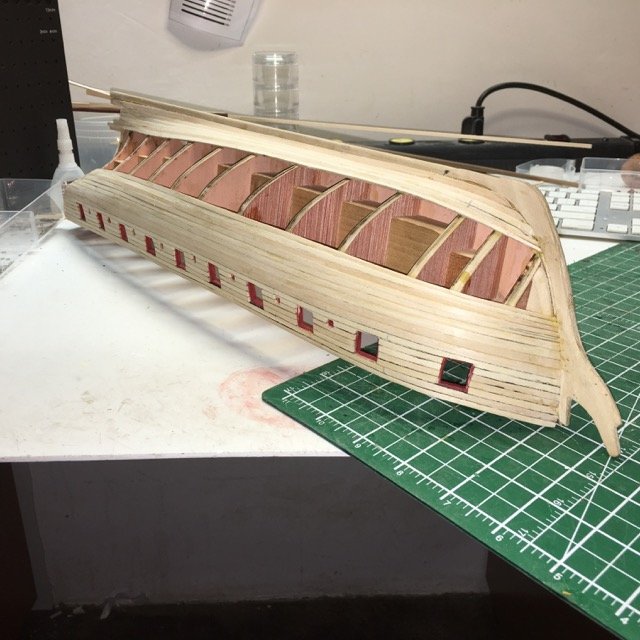
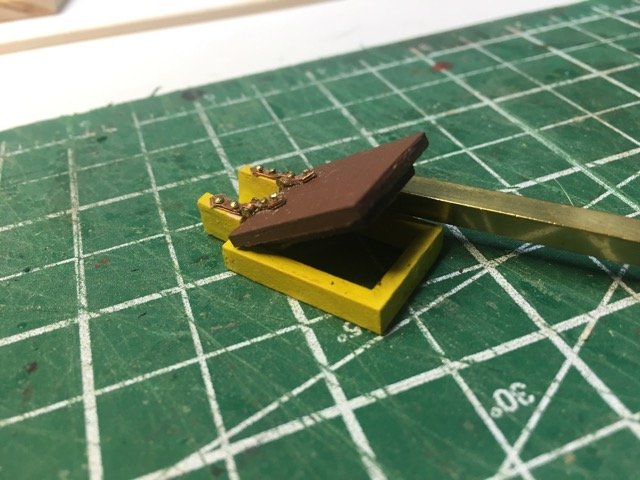
I have a problem on the gun deck.
The Quarterdeck cannon fits well

The gunports on the gun deck are too low causing the cannon barrels to hit the top of the ports at a depressed(ing) angle.
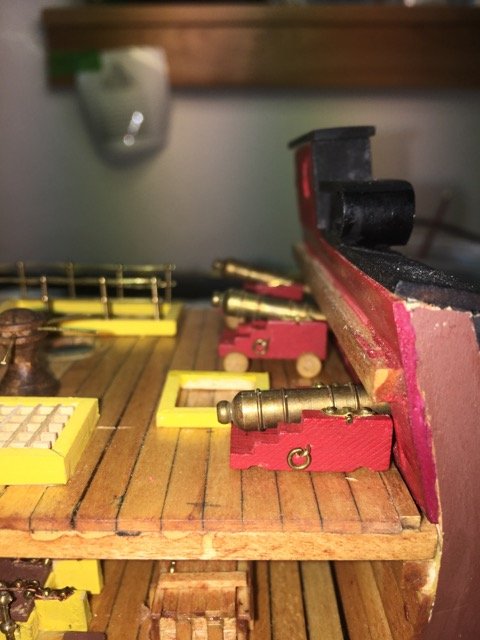
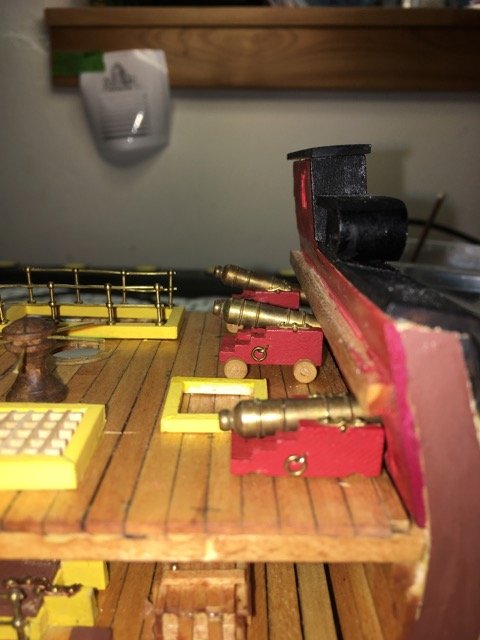
The fixes seem to be:
1) take the wheels off the carriages
2) take the wheels off and modify the bottom of the carriage so the axle and wheels are more inset in the frame
3) take the wheels off, discard the axles and glue the wheels on the carriage frame
4) lower the deck 2-1/2 to 3 mm
Kinda leaning toward 2 or 3. I've simulated the height of the cannon in cases 2 or 3 and it is better but not perfect.
Approach 4 may have undesirable side effects - crowding the deck below, exposing some inner bulwarks that aren't currently planked.
Too bad approach 1 is the easiest but looks odd.
-
Derek, Don and Mike, thank you - maybe I have a future in doll houses! 🤡
-
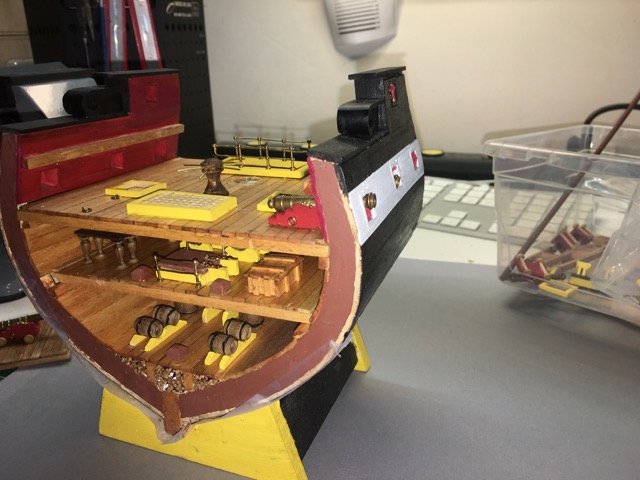
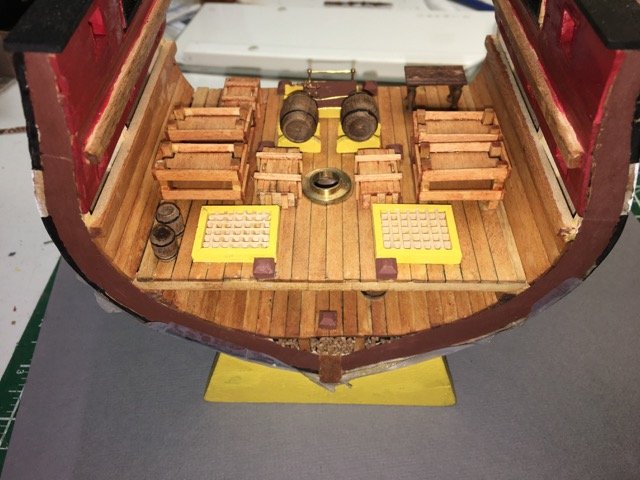
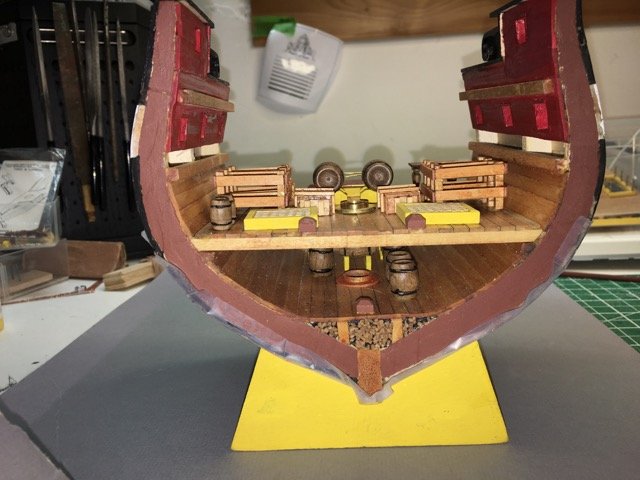
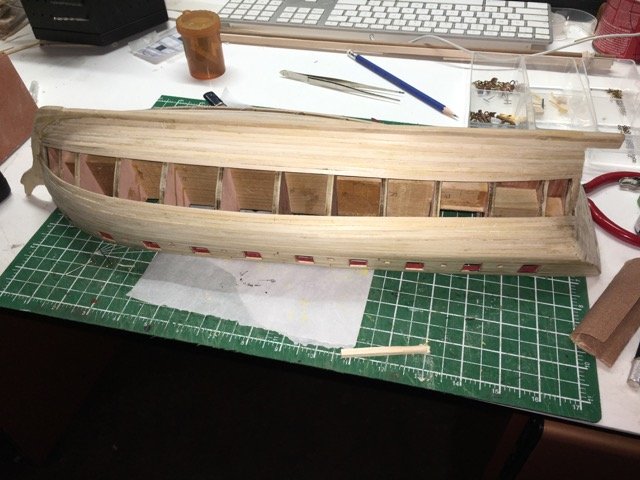
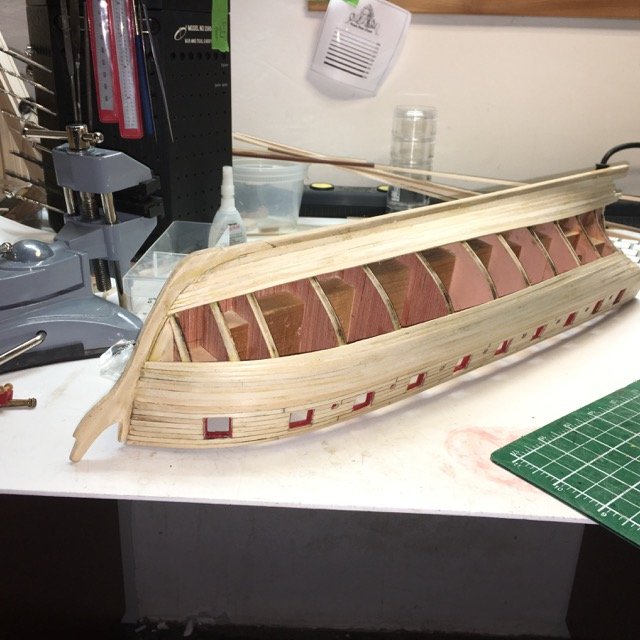
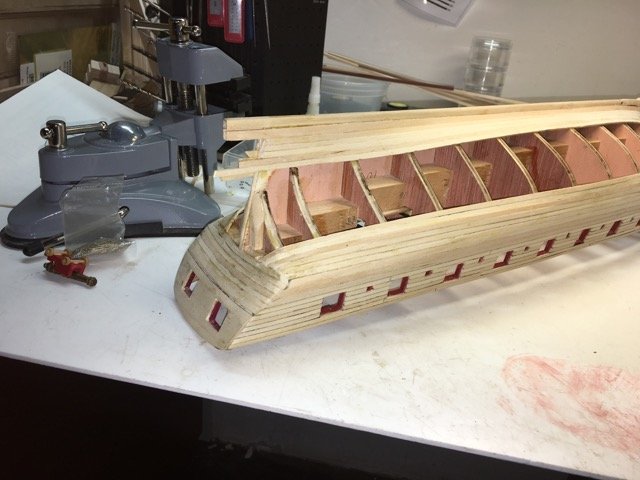
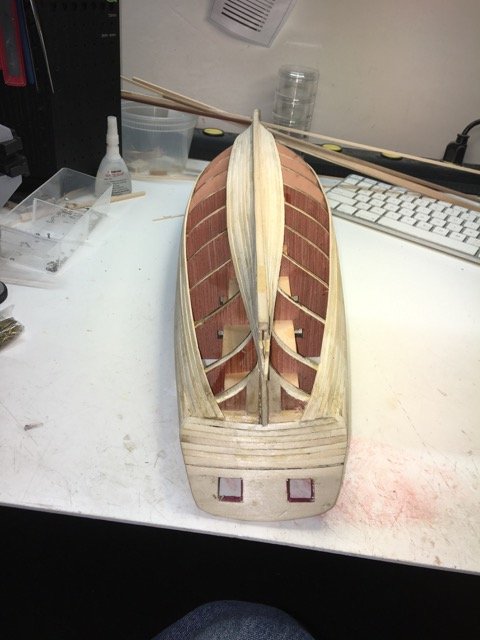
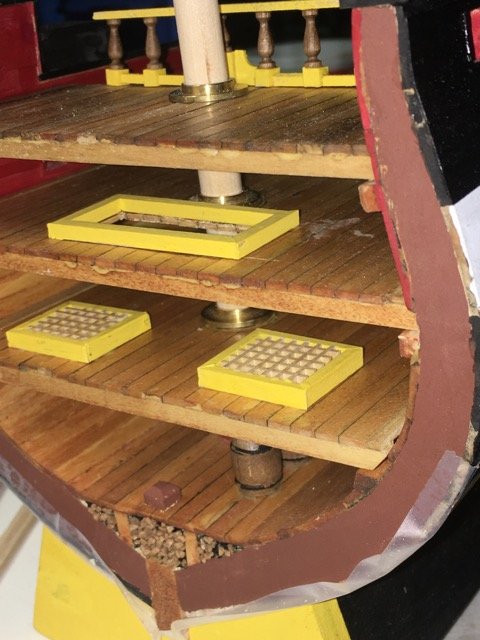
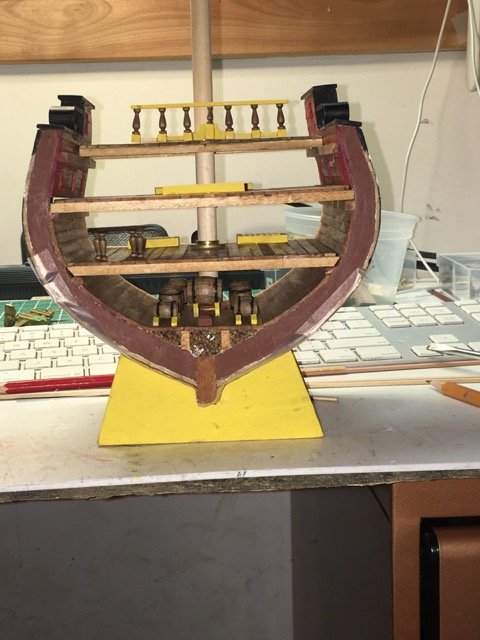
The hold and the orlop deck are now populated (except for support columns which have to wait until the deck is permanently attached to the hull)
- coxswain, mikiek, David Lester and 3 others
-
 6
6
-
Hi David,
You may have already seen it but if not check out the last pages of the Domanoff Ropewalk operating guide. He has a table of threads and rope sizes realized.
-
Welcome Ron! Long ago when I thought it'd be fun to build a wooden ship model I purchased the Norske Love. Relatively early in the build (if I am recalling correctly after one or two planks) I put the kit away. It moved with me for a number of years until I finally said ENOUGH and discarded it (in hindsight that was not clever). 20 years after discarding it I decided to start again. It turns out with a bit of maturity, more time, good instructions, and most importantly a community like MSW, that model ship building is a great pastime! I'm glad that Billings used to sell the fittings kits separately as it saved me the $s that I didn't have many of in those days. I sitll fantasize building the Norske Love one of these years.
I'll keep an eye open for your build log on both your kits. Enjoy.
-
2 hours ago, fnkershner said:
Doug I am using MDF as well. I might want to rethink this. I also discovered my problem. in the picture below you will see the tool I use to hold tiny bits in my Drill press. I found the shaft was just a tad bent. Unfortunately that was after breaking 3 drill bits.
Floyd, Sorry about my spell checker - likes pdf much more that MDF - bah! computer programmers are so uninformed! Glad you could decipher that.
I've been assembling the latest version of my copper plate jig. I milled a channel in a base plate and cut a small strip off my self-healing mat.
I've added sides to guide the nail head jig. The samples I'm getting of the nail head impression are more to my liking. I'm pretty sure the mat will prevent the blurring I encountered on the previous jig. I'll be posting more on my Syren log in the next couple of days.
-
I'm slowly closing in on the planking. Using motivation from Rich (HIPEXEC) and from Peter Bloemendaal I have found that rounding the corner at the stern is not so difficult. Rich demonstrated how well planks can be preshaped to fit the hull throughout the planking process. I haven't gone the "full monty" on that but I am doing more to get the planks to fit before I attach them. I still clamp the planks while the glue sets and It was Peter's demonstration of how he clamped around the stern that helped me rethink what I was doing.
Although I haven't yet sourced a good cork block for the clamping I found that the following worked on the section of hull I'm currently working on.
I leave the plank long and soak the last few inches it for 30-60 minutes. It then shapes easily around the stern bulkhead. The stern gunport is well places to allow a Lee Valley stainless steel clothes peg t clamp the end of the plank. I let it dry overnight.
I use an X-Acto knife with a chisel glad to trim off the excess for a nice fit at the counter. The apply glue. It still need some clamping but the clothes peg os too short so I just use a short piece of scrap to extend its reach. Since the plank is already nicely bent it requires very little pressure to keep it in contact at the counter while the glue sets.
Getting closer. - 9 more strakes to go and it looks like they will all be full length - no stealers or drop planks required.
- Ryland Craze, scasey88, piter56 and 3 others
-
6
-
-
Very helpful. Thank you Peter
-
Yes, but which one will be the better of the 2 - not necessarily the 2nd!

Anyways there will be different mistakes on each because I have an abundance of goofs I can choose from!
-
Yes please, if you have a chance for a picture I’d like to see it. My attempts to clamp have included bar clamps, rubber bands, and a vice grip variant. I’m still in the market for a method that works!
-
I mentioned earlier that I'd ended up with a second set of bulkheads etc when the wood in the 1st set crumbled. I've pushed ahead with the 2nd set and hope to plank it as well. This one I'll plank in pear or walnut and finish it as natural wood rather than coppering it.
I just got to the point of adding the stern formers on mkII. Since I had good luck with the stern formers I cut from the plans by pining them for some additional strength I decided to do the same with the mkII. I don't find the stern feels at all fragile even before adding all the lintels, sills and reinforcements.
My two Syrens
- David Lester, piter56, Elijah and 2 others
-
5
-
The clamping is the biggest challenge isn't it. I received some funny looks last evening as I used the only clamp I could get to apply pressure at the stern - my thumb. Trying to read a novel while cradling the siren and pressing down on the stern plank worked ok until I had to turn a page of my book (is should have read something on the iPad as I can single hand it better). Carpenter's glue just doesn't set quickly enough sometimes!
Push on Peter - I'm here to learn!
-
2 hours ago, fnkershner said:
Doug - As you know I have passed this stage. But for me it was very painful. Can you give some details. I want to learn and improve. What glue did you use? How did you decide the tapering? Did you divide the hull into belts?
For what its worth (I like planking but I'm not very expert at it) this is my current process for the Syren.
Glue is just carpenter's glue (brand available here is LePage).
On previous hulls I have followed the planking routines suggested in MSW docs and in Jim Robert's "Planking the Built Up Ship Model". I have done the belts as suggested. I used a micro-plane from Lee Valley to taper the planks before bending them. If required I also try to put in a lateral bend and/or a twist (especially at the stern). I wet the planks for a few minutes then use a soldering iron-plank bender- to get the bends. I have often used CA glue to tack the plank at the bow and then work back with carpenters glue on the bulkheads and the edge of the planks. I use whatever clamps I can get to fit and hold depending on where on the hull the plank is going. I usually only put on a pair of planks then leave it for glue drying.I plank both sides of the hull to keep everything balanced.
Back to this planking - I'm only using carpenter's glue - no CA this time. (I don't like CA very much).
Chuck's instructions on pages 22 and 23 seemed right for my hull so I've just started tapering the front 5" of each plank down to 3/16" at bulkhead N. I keep measuring the remaining gap and haven't yet had to deviate from that formula.
I taper the strip (usually 4 at a time). Then I soak them for a while (longer soak since I'm not using heat oaths bend). Put them in the jig that I made for the wale. and leave them overnight(or longer if I don't get around to it).
At the bow I thin out the plank so it will lie nicely in the rabbet and cut an angle to that it follows the curve of the stem. Clamp and glue the 1st 4 or 4 bulkheads and leave it to dry.
I leave the plank strip overlong at the while I glue the bow end. Once I'm far enough back on the bulkheads to be sure where the plank will end I trim it and taper its thickness as required to fit well into the counter. As the bend is getting sharper now I re-wet the very end of the strip and use the plank bender again to get a good fit on the stern. (obviously I have to have enough of the strip still free- 4 or 5 bulkheads- to manage that).
-
2 hours ago, knightyo said:
Doug,
I think this is one of the most satisfying parts of the build; especially after you sand everything smooth.
Alan
With you 100% Alan. I find as the hull is planked the wonderful shapes become so much more apparent. Very satisfying indeed!
- Elijah and svein erik
-
2
-
-
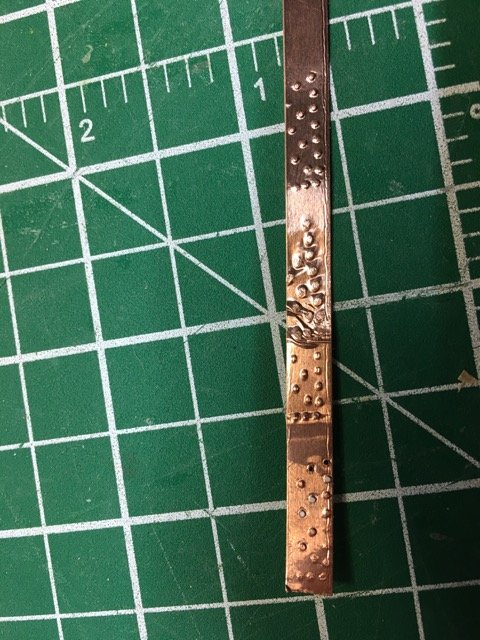
I've just spent the last hour or 2 working on Coppering Jig mkII. (actually my 4th or 5th attempt at a satisfactory one). Luckily I acquired a CNC mill this summer so I'm getting it to drill the pattern for me. I tried freehand drilling as well as freehand positioning in a dremel drill press. The drill press helps with the holes being vertical and avoiding breaking these tiny bits with lateral pressure. Freehand positioning was part of my problem but the major issue I had was that the nails would drive in a smidge while using the jig to press the copper foil. The satisfactory solution (used for coppering the Prince de Neufchatel) was to create a 3/16" plate into which I drilled the nail pattern and then inserted the nails. The plate was then glued to a longer piece (head of nail in the middle of the sandwich) with the same profile (1/4"x11/16"). Then I ground down the nails projecting from the plat so they were even and not pointy.
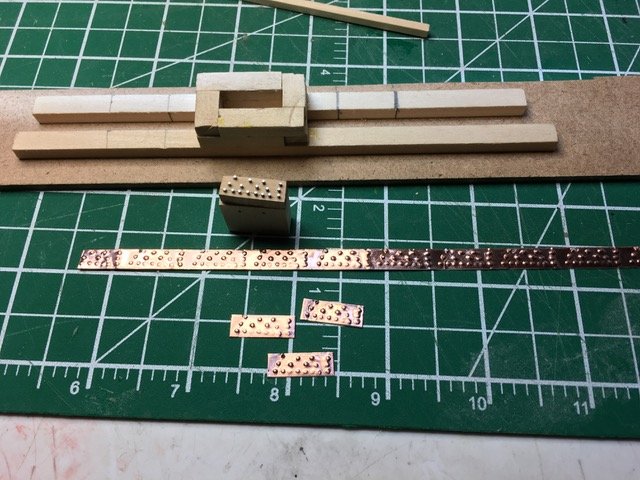
Only other thing I'd mention about use of the jig was that the bottom of the jig in my case was a piece of pdf board - after a bunch of plated were embossed the impressions became blurred because the pdf deformed under the nail but the little bit of plat in the jig spread the deformed area. The top impression is what I want. The 2nd from top is what I was getting. (hence another attempt at the jig before I copper the Syren!)
Hope this is coherent and/or useful
-
1 hour ago, knightyo said:
Are you and Doug copying each other? lol. It does look like you two are in the exact same spot.
Alan
I'm leading from behind
")
-
I feel like I'm planking the hull in slo-mo but I really enjoy the process of planking so it isn't a hardship. Current state:
-
-
2 hours ago, donrobinson said:
You have really come along with this Doug, it all looks real good, and I see you have mastered the mill
Far from mastered - kindergarten grad perhaps!
-
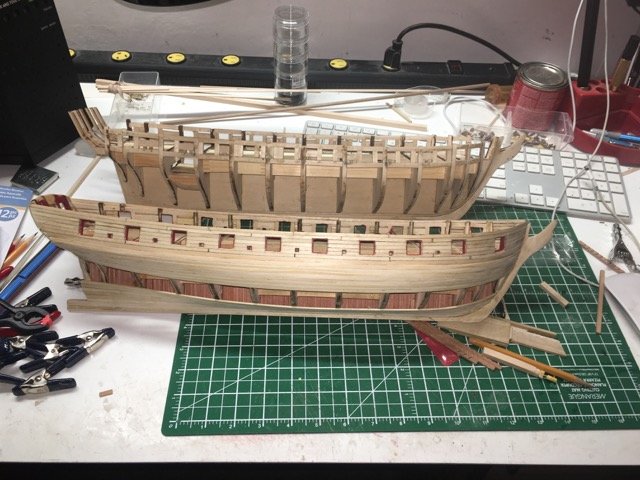
Essex post
I’ve been away from the forum for a while but still making some forward progress on the build.
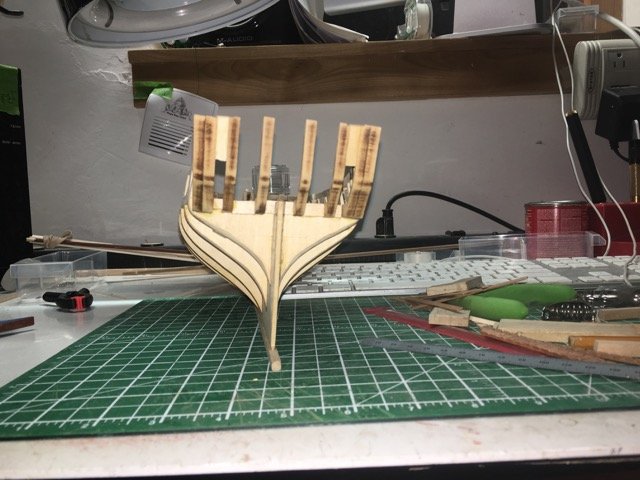
When I left off posting I was still struggling with the rounded end on the railing. Carving wasn’t producing good results for me and trying to shape it with the dremel wasn’t any better. About that time I received the used Sherline CNC mill that I purchased in the summer. I’m quite satisfied with the result given that this was part of my milling education as well. The benefit of this little project was that once the program was working for one side of the railing I could simply execute it again to generate a 2nd one that matched the 1st.
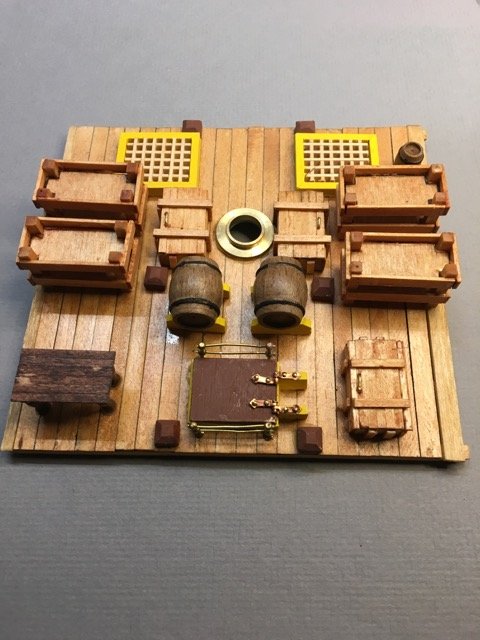
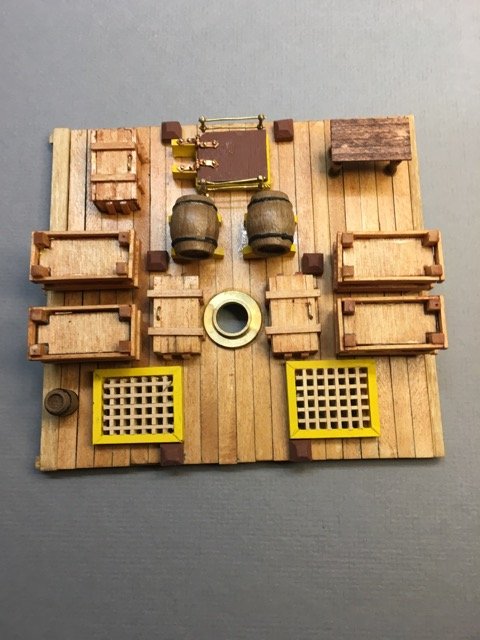
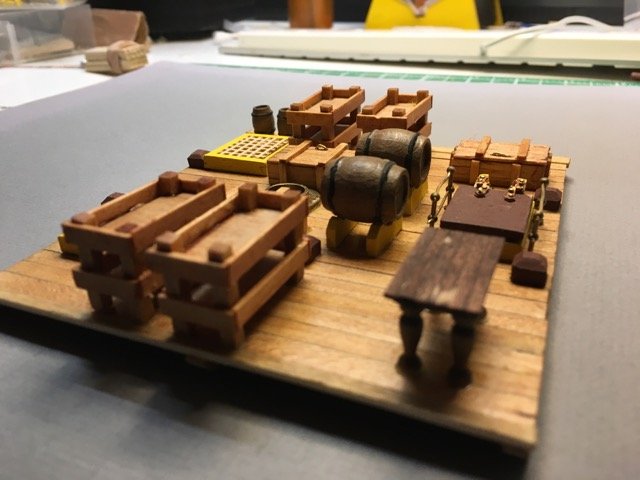
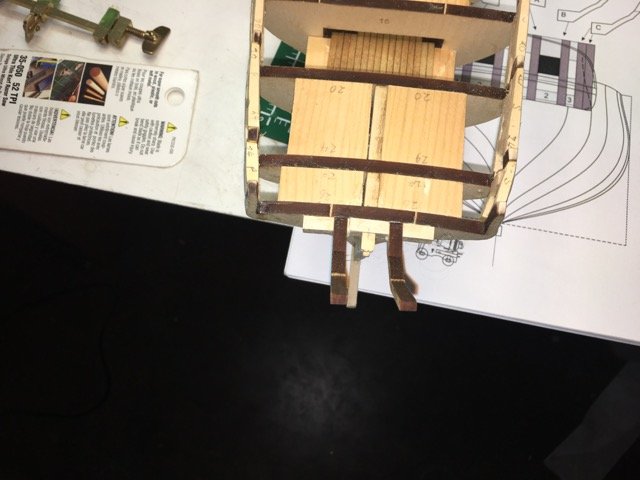
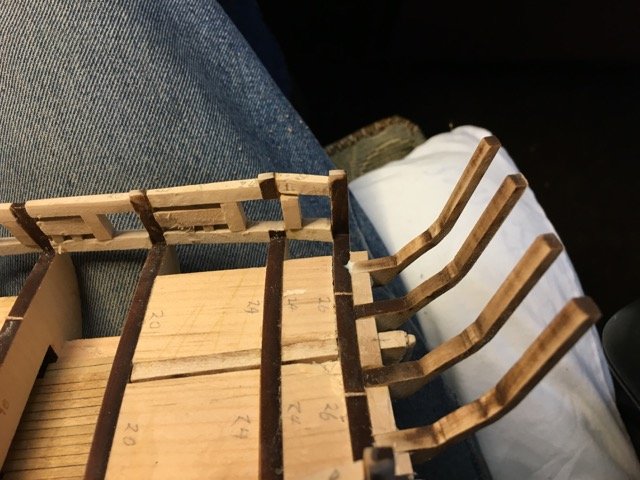
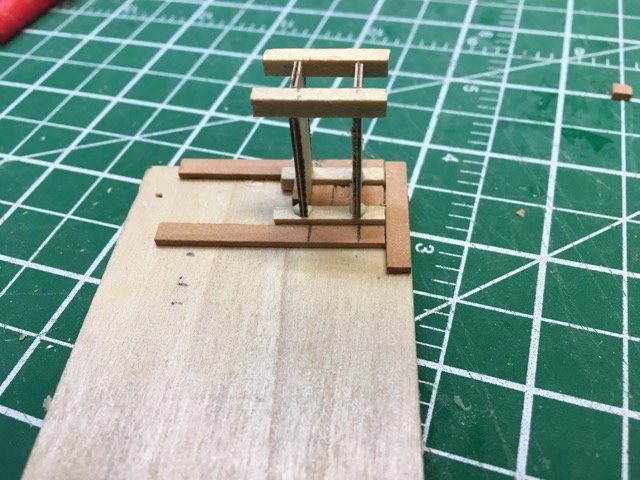
The current phase of building requires making lots of the interior fittings of the ship - tables, crates, boxes, railings, hatches, ladders and gratings. The 4 shelf-tables (I don’t really know what their use would have been and what else to call them!) were hard to freehand assemble so I ended up with a little jig for holding the pieces and keeping all squared up while the glue sets.
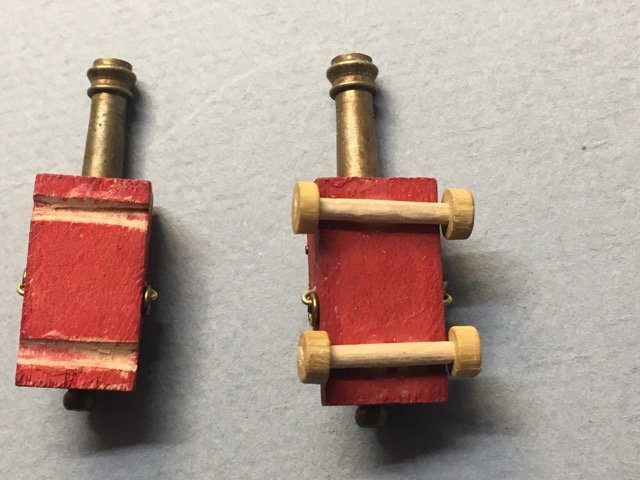
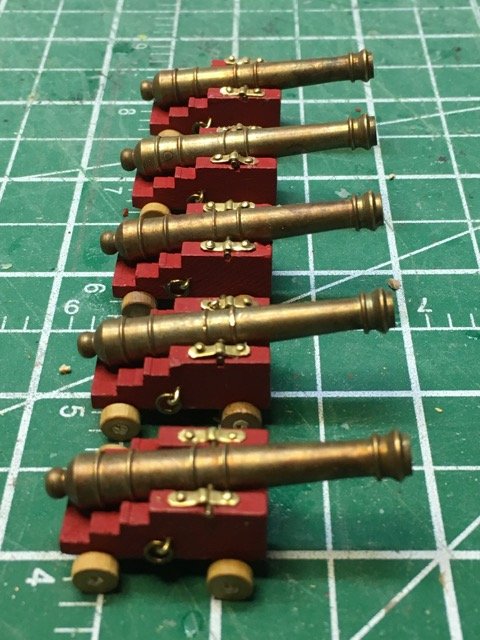
Included in the build are 8 cannons. My 1st cannon assembly ever - a milestone of sorts.

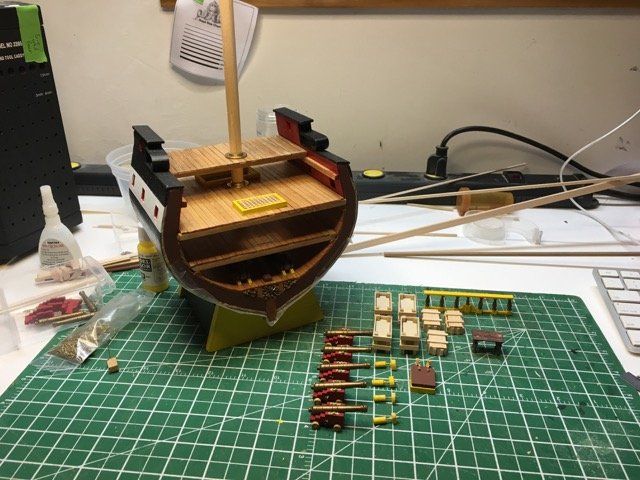
Just a few more simply constructions and then I can populate the decks and mount the decks permanently in the hull.
- AntonyUK, David Lester, coxswain and 3 others
-
6
-
Awesome work Don. Hearty congratulations!
- popeye the sailor, Elijah, EJ_L and 1 other
-
4
Frigate Essex by Heronguy - Aeropiccola - Cross-section
in - Kit build logs for subjects built from 1751 - 1800
Posted · Edited by Heronguy
Thanks Mike, It also occurred to me that I could lose the wooden dowel used for the axle and replace it with a brass rod. The dowel itself is 2mm so right way a could gain most of that back before digging into the frame.
The wheels on this model were just 5mm dowel with a 2mm hole for the axle. Nothing pre-made for me there. Your observation that the wheels may be different sizes will help out too if I can make the front wheels smaller diameter. I'll check out whether it is normally the small in front - do you know why the wheels were different sizes?