RiverRat
-
Posts
206 -
Joined
-
Last visited
Content Type
Profiles
Forums
Gallery
Events
Everything posted by RiverRat
-
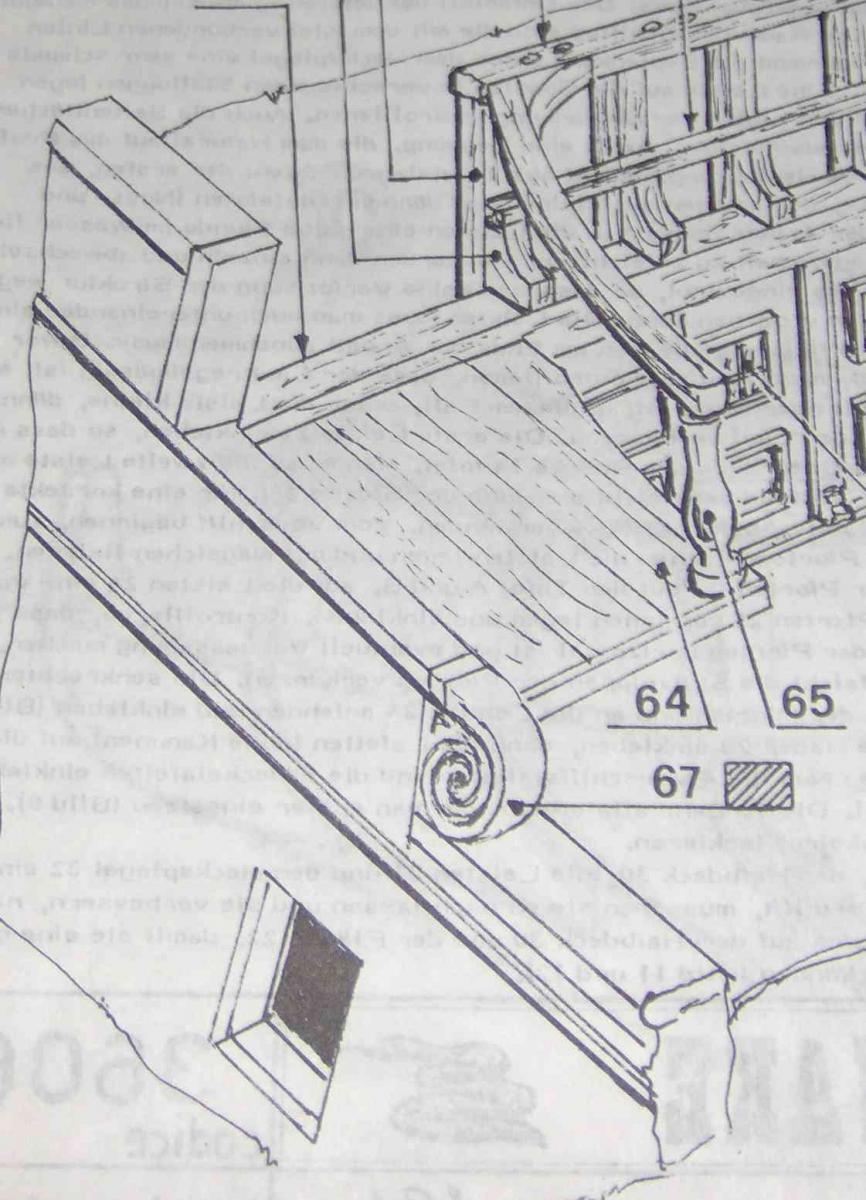
 JS and Martin, I think your rudder fit problems were caused by chopping off a hunk of the stern per the practicum! I had looked at the sample chapter of the practicum and was puzzled by where he placed those birch beech transom blocks, He butts them right up against the bulkhead behind it. Seems almost logical, but they should be placed all the way out to the kits stern to form the counter. I would guess the builder needs to fill in behind these back to the last bulkhead. Typically not crystal clear in Mamoli's drawings. See the third pic of my first post for dry-fit taped-together position. In my bashing, I made some "frames" for the counter, instead of using the blocks, to get the cabin area fuller, rather than hogging out the blocks, but the profile was maintained. Brian Edit: My rudder post fits fine, No problemo
 -
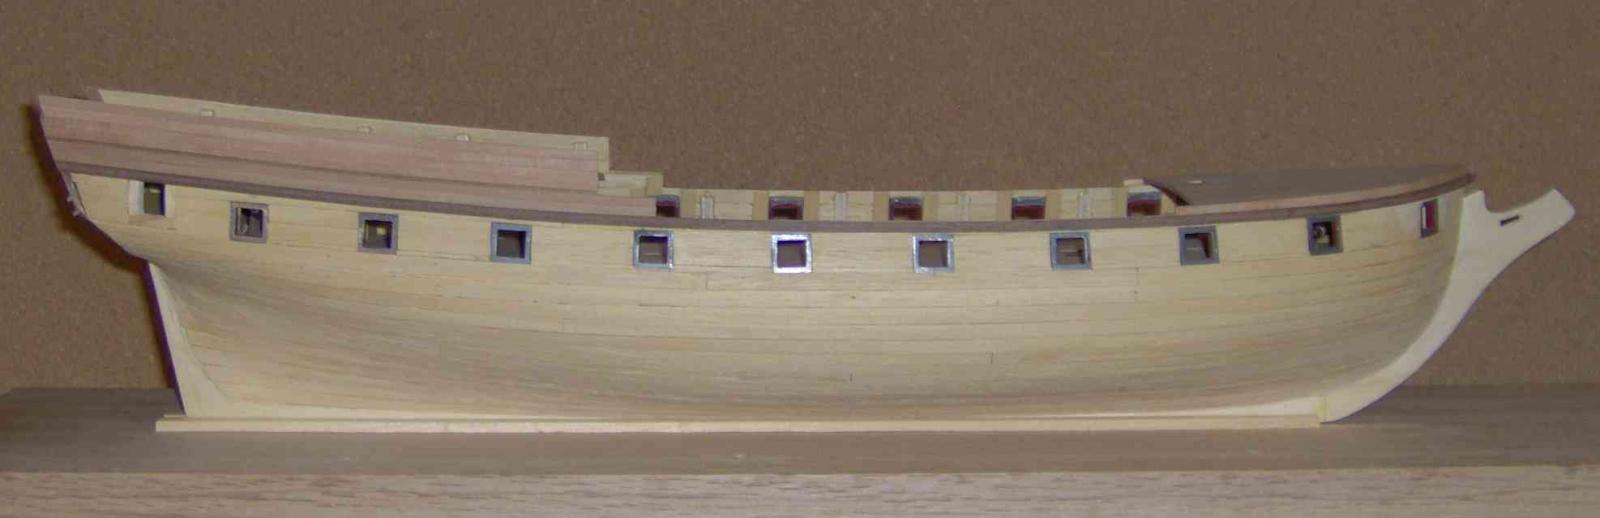
Actually, when I give it a closer look, it seems to be more that it's a depression between the last two gunports rather than a bulge!
-
Looks like an interesting and beautiful model! I applaud your desire to replace some of the metal pieces. Good luck! Brian
-
Hi JS. I've been enjoying perusing your log since you put it up. Looks great! I had been wondering what the Hunt practicum fully included. Now I'll see! I've made plenty of errors myself. One I meant to mention in the last post is that there is an undiscovered hump at the starboard quarter light area I didn't catch before putting on the "C" molding. You might notice it in one picture. It's not noticable at all angles, might be a major headache to fix, so I let it be. Will do better next time!, right? Brian
-
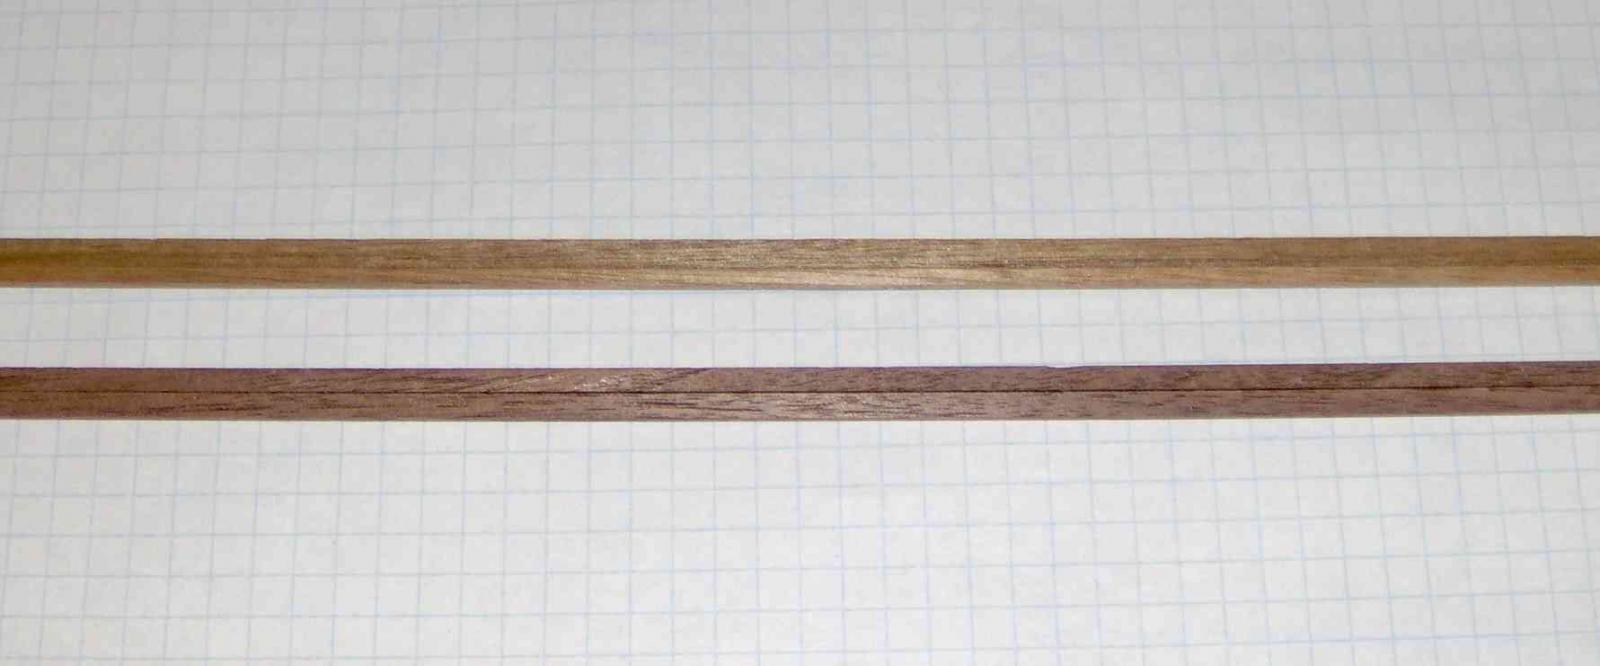
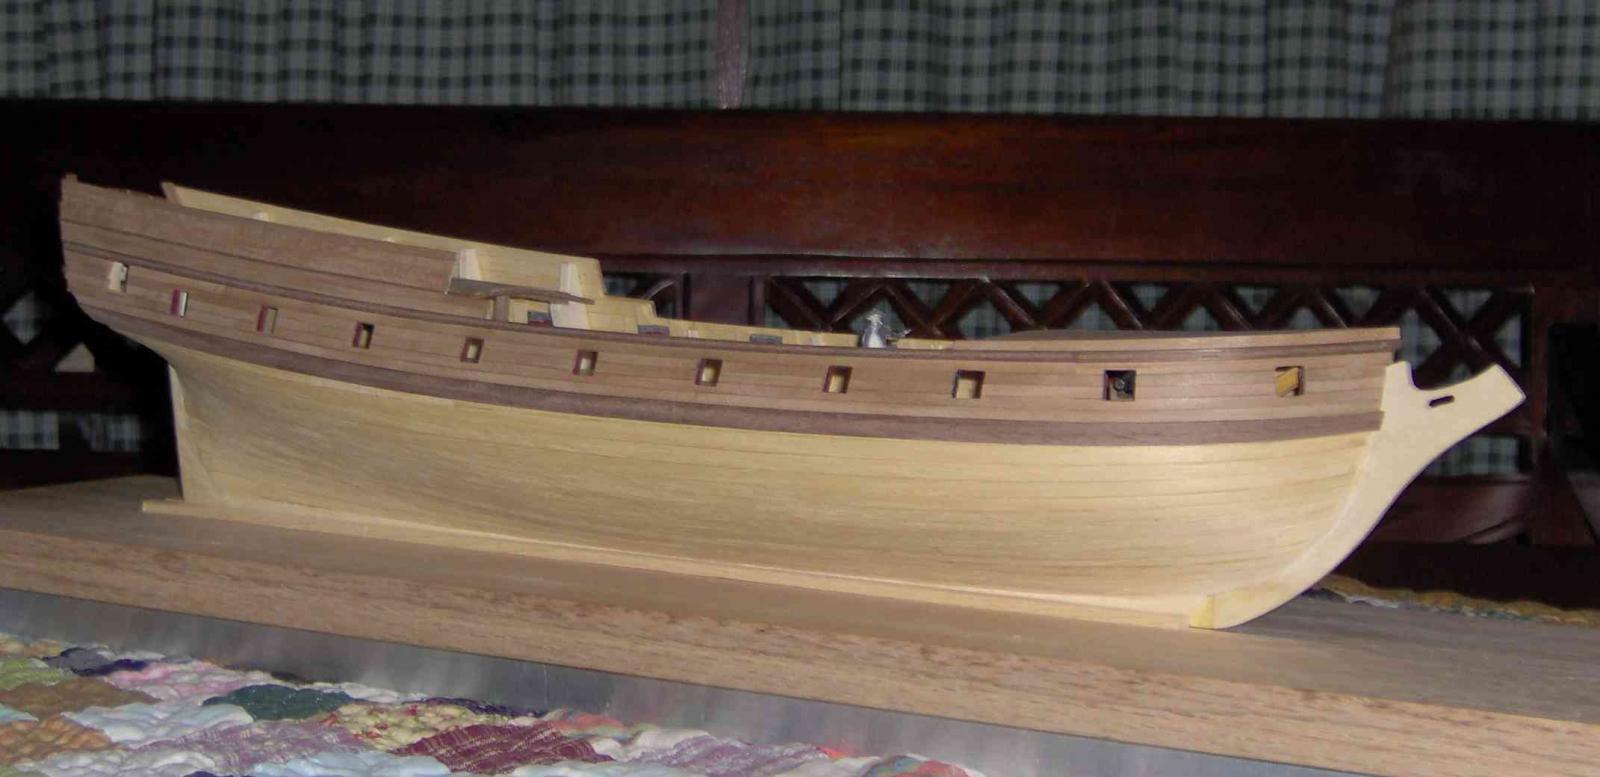
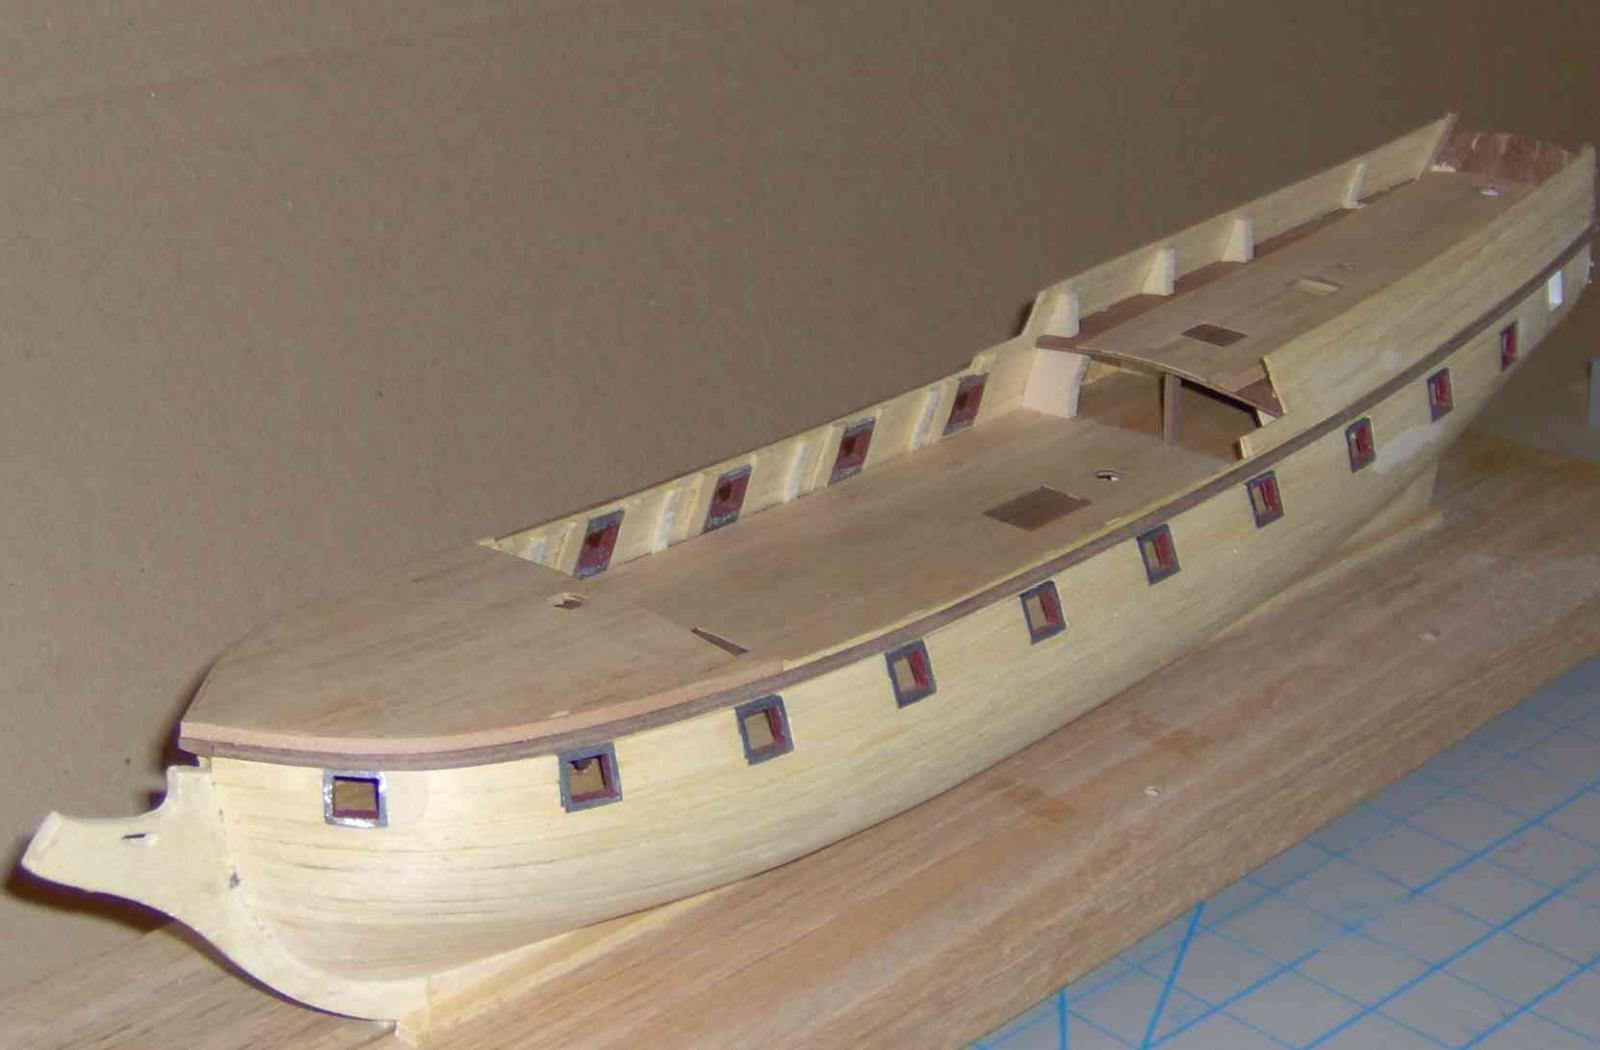
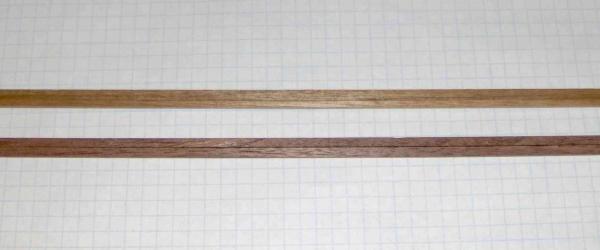
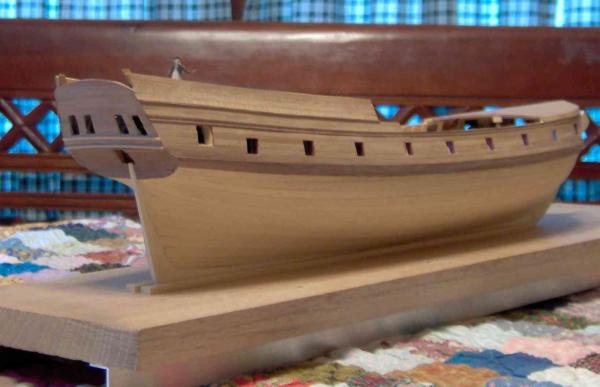
My cable internet was out a couple hours, couldn't start this post, and was beginning to have MSW withdrawal symptoms! Completed planking down to and including the wales. To plank around the quarter lights opening, I made a quarter-light-shaped block and tacked it in place with two dots of glue so it could hopefully be easily removed (it worked). This was to have minimal or no trimming of the plank ends. This left a ledge for the light to sit on so the frame could fit flush with the planking, rather than mounted on the surface like the transom lights. I popped them off after two strakes, cleaned off the dots, and replaced them. A nice, snug, press fit. The Admiralty drawings I've seen don't show it having a quarter badge. I'll likely try some kind of decorative trim, not too ostentatious; haven't decided yet. ( Hmmmm, maybe some Victorian gingerbread and lacy curtains..........) The kit supplies eight 2x2 mm walnut strips for wales and other things. The wales were to be (most of) three of these per side. The pieces varied in color and I couldn't get six similarly dark ones as I would wish. I was hoping for uniformly dark! I decided to use some of the 2x4 pieces I got from HobbyMill for another aspect of this build, and planed them to 2x3 mm. Two 3mm pieces per wale instead of three 2x2. Here's the color difference: The wales are to taper downward to be flush with the 1 mm lower-hull planking. I pre-tapered the pieces with a plane to get most of the taper started, and holding two together on a flat surface, sanded to get more of it done. More will be done in place after gluing. The wales as a whole are to taper a bit (unspecified amount in the instructions) at the bow. I tapered about three inches, taking off the top of the upper strake only, about 3/4 to 1 mm. Planed a bit of bevel on the top edge of these, especially the second, for a better fit. I used full-length strips, maybe not "scale", but I like the clean look better for this part. Here are two views of the better side. I had cut/trimmed the gunports previously, but have a little more sanding to do on those. Starting to look more ship-shape!, getting that bland first planking covered. I'll probably back up and get the quarterdeck planking done and the inner bulwarks covered. Tired of looking at those incomplete sections. (Or is he making an excuse to delay hull planking???.......) I may have found a historical reference to Rattlesnake in cpt Tom's Supply II build log. From a wikipedia article, an American ship Rattlesnake was a candidate for the First Fleet to Australia (transporting convicts), but was rejected for the trip. Rattlesnake was sold out of service that same year, so this is likely her. The article is at: http://simple.wikipedia.org/wiki/HMS_Supply_(1759) Enough for now, I guess... Cheers, Brian

-
Hi Ferit, There IS sort of an unwritten rule (though there has actually been some discusion about it), or oath as you suggested, of avoiding negative comments of someone's work, and rather, adding positive critcism in a helpful way. But frankly Ferit, no one here is bullshitting you ( forgive the language, moderators) when they praise your modelling talent! The accolades aren't there to make you feel good or to encourage you to do better. You somehow have a real talent for this stuff. Thanks for sharing it with us. Brian
-
Thanks Brian! Some of the crispiness might disappear if you look close though! I'm about to plank my last strake of the wales and will post an update after that's done. Likely tomorrow (or is that today down under?....) (BTW, no offence, but your avatar kinda creeps me out! I'm old enough to have seen that original episode) Martin, I understand, but I have no real regrets. I've enjoyed the challenge (well, most of the time), and it's been a satisfying and educational experience. Many CEUs accumulated! Regards, Brian
-
Hi Sam, This is my first wood model ship. The Mamoli kit isn't for beginners, but I felt I had the skills to get through it. I've done OK so far, especially with the knowledge sharing here at MSW and am comfortable working with it in spite of the kit's shortcomings. (Got a good deal on it on eBay. Unopened, good price, don't know how old.) The Mamoli seems to be meant to be a display model, and not necessarily an accurate representation of the Rattlesnake. The designer of the MS version worked from Admiralty drawings; I don't know how the Mamoli designer's drawings came about. Certainly close enough though, as far as its lines, unless you're a stickler for maximum fidelity. I've only seen incomplete build logs of the MS, and some finished pictures on the 'net, and I can't speak for the quality of the MS kit or ease of building. The MS seems to have a pretty good instruction booklet that has a lot of detail and tips. Mamoli's instructions are pretty basic, assuming a more experienced modeller, and the translation from Italian to English is sometimes awkward and unclear. Mam has a ply keel/stem/sternpost that are "sheathed" with strips after hull planking. Doesn't address covering the ply edge at the stem (all those curves). Not sure how this will turn out in the end. MS has seperate solid wood pieces for these, uses a bearding line and rabbet. goodgoodgood Mam has metal gunports. Not bad, but taking the time to replace with wood might have been worthwhile, though time consuming and fiddley. I had considered doing it early on and decided not to. Had I known how long these models can take to build, the extra time and fiddlin' seems trivial now. MS does wooden ports AND the sweep ports, which Mam didn't model in the kit. Mam is double-planked. GOOD for me, as I used it for practice, not having done planking before. MS is single-planked it seems. (As is your Enterprise? Looks like your doing an excellent job with that!) Most of the pieces fit reasonably well, though still had to do plenty of fitting and fairing. There's a lot of mahogany ply I'll do away with, as it's edges show a light layer in the middle. Some of the wood was poor quality and I've replaced some (not necessarlly the same species). I guess MS has similar metal as Mam (transom, figurehead, headrails, bulkhead?). Maybe not much difference there, though I'll replace all of these with wood. Anyway, I'd probably suggest doing the MS version!, though for myself, I'd not feel comfortable doing single planking on bulkheads only. Enough for now! Any more questions, feel free. Brian
-
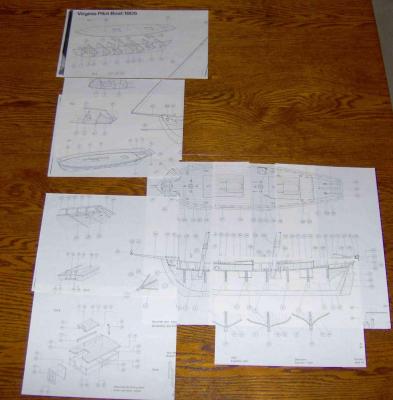
My wife often roams antique shops, saw this old kit for $30, and brought it home! Who knows if I'll live long enough to play with it. Only significant part missing is the short ply aft deck, which I think I can reproduce from the copies from the plans. The plans. The original sheet for the rigging is there, but there are only copies ( and incomplete, at that ) of the other sheet. Here's a photo of the copies placed in position. Question: Are the missing sections worth having to complete the build? The instruction booklet is intact. Thanks! Brian
-
My 1780-ish American colonial privateer kit Rattlesnake doesn't include one. Is keeping time with bells a navy thing? Used in privateers or merchantmen? Is there a typical location for one on the vessel? International use? "Why does the sun keep on shining? Why does the sea rush to the shore?" Brian
-
plank steaming
RiverRat replied to bigpav's topic in Building, Framing, Planking and plating a ships hull and deck
Here it is: http://modelshipworld.com/index.php?/topic/911-de-zeven-provinciën-by-dražen-carić-scale-1-45-1665/page-7?hl=steaming#entry25180 Start at post# 93 -
plank steaming
RiverRat replied to bigpav's topic in Building, Framing, Planking and plating a ships hull and deck
Hi Scott, I remember seeing a wooden steam box somewhere on the site. I don't recall if it was part of a build log or in a seperate topic. Do a search, but if I run across it myself, I'll let you know. Brian -
Interesting. Any mention of number/spacing/size of the bolts? Brian
-
Try a needle threader used in sewing. They can fit in remarkably small holes. http://sewing.about.com/od/notions/ss/needlethreader.htm Brian
-
Tom, I've absolutely NO idea what your last comments mean. What are these "recent events" you mention? How on earth COULD thou be aware if I check on "our builds for details". Who is this "our" you speak of? I don't inhabit MSW 24/7 and read each and every post. Sorry, I have other life activities. PM your explanation if you want.
-
Hmmmmm.....The channels on my Rattlesnake (ship-rigged) are given no support. Except for one model I've seen that has a small "ledge" underneath at least some channels, there are no supports shown on drawings such as by Hahn or Chapelle or any other model picture I've seen. Brian
-
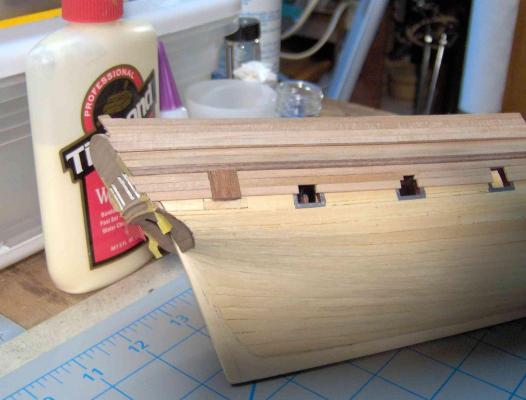
@Martin --- I've started planking this area and have decided to just use the med CA at the metal. Just need to make sure the planks are placed exactly in quick time. I had thought now and then of the seam of the rail and decoration and if I could make it look seamless with what model walnut I have, none of which is quite big enough. I DO have a piece of a walnut board from a previous life. If the color is not much different, I might try your suggestion and do something with that. @janos --- Yes, I had to file the metal port faces flush with the first planking. And just before planking this area, I checked all of their interior dimensions and found they were a fraction of a millimeter small. I started filing one. It made such a messy pile of soft dust I feared it might get smeared into the deck grain (though I had it covered some). I decided to live with them as they were. [ To others -- check their dimensions and file these before installation!] OK OK. Wales pieces one at a time..... Brian
-
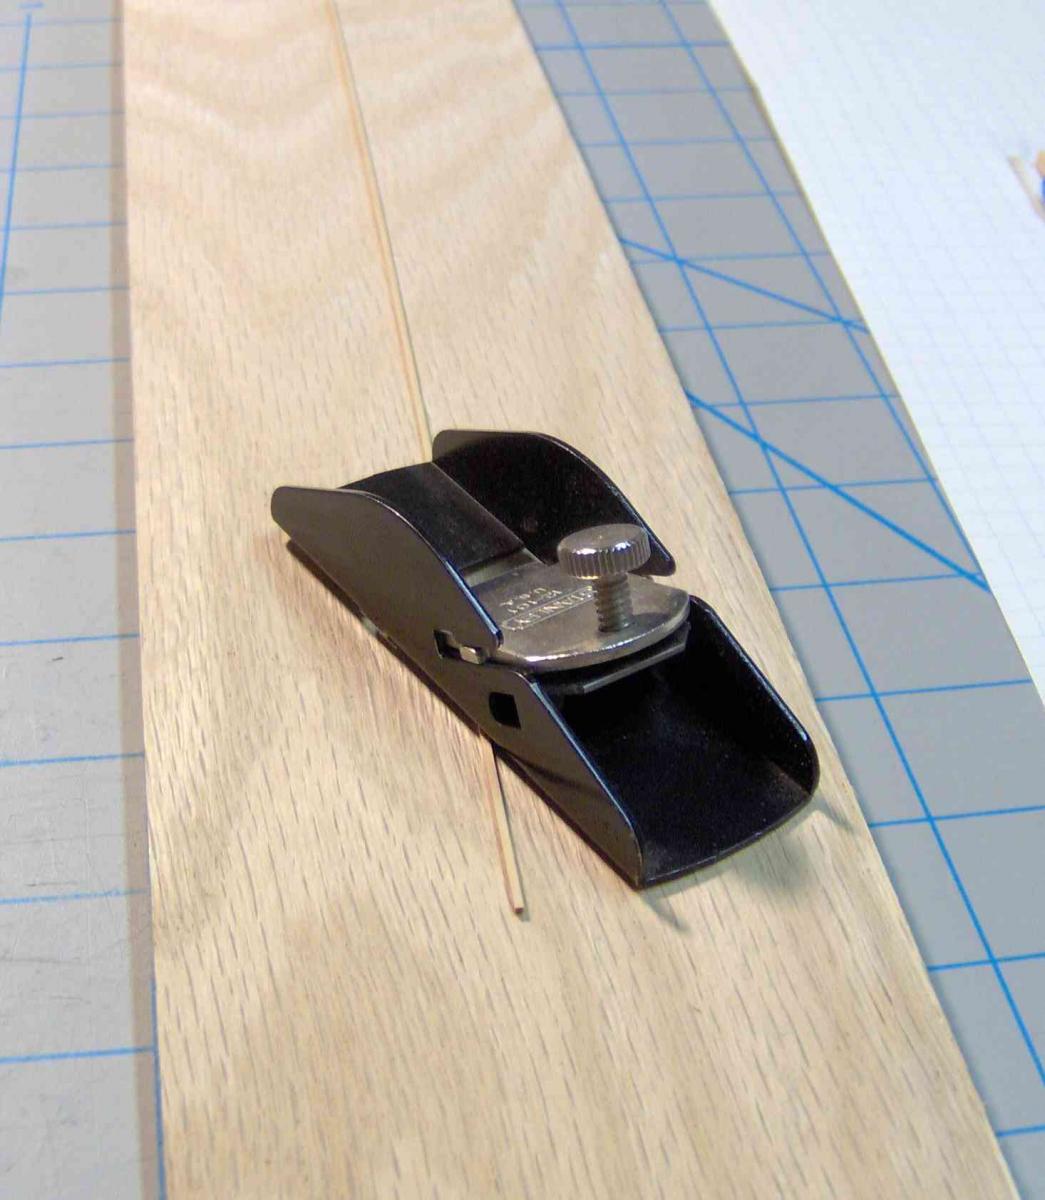
Hi eric, For neatly tapering planks, as opposed to sanding, I use this small plane. You can get it at "big box" hardware stores like Lowe's and Home Depot. If you've never used a plane before, practice setting it up (blade depth) on scrap pieces. Set it up to make very thin shavings. To do a taper, start by shaving off a short length on the tapered edge's end. Increase the length of the cut little by little until you get the taper you want. DO PRACTICE to figure out how this works. These are also good for bevelling the edges of planks to avoid gaps and clinkering. Brian

-
Hi Richard, Could you explain how the unit on the left works? I used to fly RC aircraft, and just guessing, I'd expect the two long rods to be connected to opposite ends of a servo arm or wheel. Brian OOPS I just glanced at your build log. Not RC, I guess. You just want working steering that works right!
-
Scale planking
RiverRat replied to S.Coleman's topic in Building, Framing, Planking and plating a ships hull and deck
Scale planking can be done over solid, POB, or POF hulls. The first layer of double planking on many POBs is to provide a continuous foundation for the second. For the first layer, you can use full length strips or multiple pieces per strake. On my current build, I used some full length, but generally used two or three so I wouldn't have to deal with gluing long (typically 17-18") pieces. Brian -
Hi Ferit, Thanks for the suggestions. It's just that I tend to avoid CA unless I need an immediate bond, and if it "strays" it may leave a spot that won't take a finish. But since these wood-to-metal areas are so small, sure, medium CA might be easiest. Mark, NOOOOO! Not the "Dark Side"! Come now, this is just tweaking the kit here and there, just a tiny bit of scratchy bashy stuff. Brian
-
Hi Dave, Your build is looking really good. I can certainly understand your not helping yourself and wanting to peer into the future! Your blackened brass eyebolts. I'm not to the point myself where I have to worry about it, but here at MSW I've read that the unsoldered eyes on these might loosen up on rigging that's in tension and allow the lines to sag. You might check out the article on silver soldering here: http://modelshipworldforum.com/resources/materials_and_tools/SilverSolderTutorial.pdf ....and see if it's relevant to your build. Brian
-
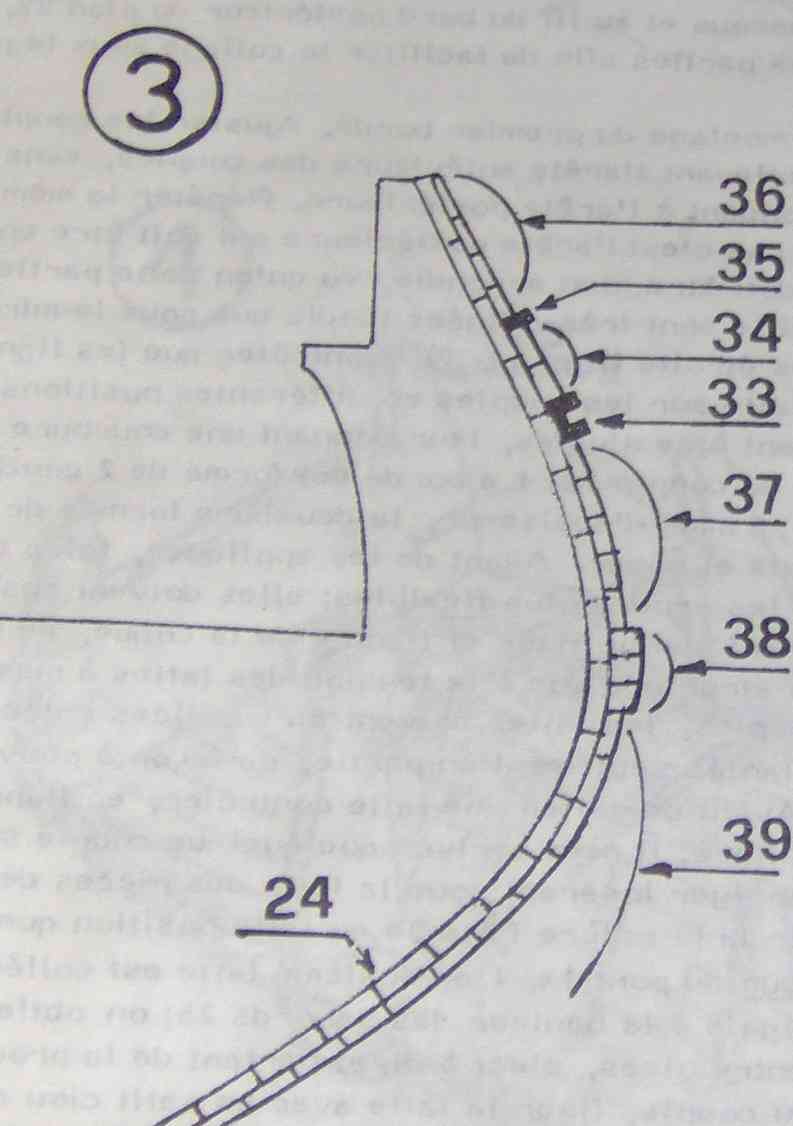
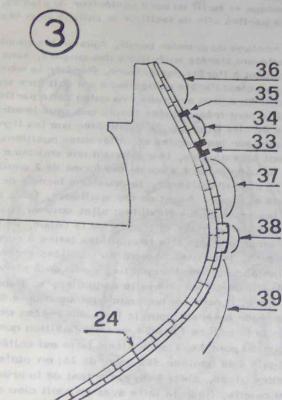
I've completed some of the upper planking. I was dis-satisfied with some of the kit's wood for this section and last month ordered some different woods from HobbyMill to try. (Will try Lumberyard next time for comparison) Here's the kit's planking scheme: 33, 34, 35, and 37 are called out as boxwood (what the kit provides is actually some coarse, splintery something else ---to be replaced); and 36 is walnut (quarterdeck bulwark). 38 and 39 are walnut. I'm changing the "color" scheme above the wales, using cherry for all the regular planks, and walnut for the "decorative" strakes (33 and 35). I first applied a 1x3 cherry plank, top flush with the forecastle deck. The walnut 1.5x3 "C" strake is next. The instructions specify this at certain distances above the 1st, 5th and 10th gunports. I didn't adhere strictly to this, as I wanted the full-width plank above it at the forecastle (for appearance), but it was close enough. This "C" molding seems to be only hinted at in the Admiralty drawing as far as I can tell, and may be the supposition of the kit designer, though I've seen a similar molding on scratch builds. I don't see it on pictures of the Model Shipways kit. The waist's caprail will sit atop this. The line I took for the "C" molding leaves a bit of the first planking exposed above it at the waist, which will be sanded to match the top of the "C". The instructions later have "Sand carefully the whole planking and cut it following the profile pictured on the table A." I assume this refers to this sanding the extra exposed 1st planking here at the waist and on the quarterdeck bulwark. At the stem where the bowsprit enters, I used solid 1.5x3 walnut pieces, rather than have the molded part butting up to the bowsprit. Aft, above the "C", are two 1x3mm cherry strakes, a 1x2 walnut strip set on edge, then four 0.5x3 cherry strakes. I bevelled the base of the 1x2 walnut and the top of the 1x3 cherry below it so the 1x2 would sit more horizontally, as it will line up (hopefully) with the short cap rail just fore of the quarterdeck. The kit provides some metal narrower-than-the-rail moldings for the end of this short rail. I'll replace this with self carved wood pieces. I will also have this kind of molding aft of the forecastle, seen on drawings and scratch builds, but not included in this kit. Some of the 0.5x3 cherry strips were "curly" (cross-grain figuring). I decided to use a little artistic license and use them on the quarterdeck bulwark. It may go against "scale" appearance, but I jus' got's a thang for curly woods! Not sure if the photo shows it well; might be quite striking with a finish applied. Next: 5 strakes at the gunport area, then the wales. Question 1: The gunports are metal. I assumed I will be having some 2-part epoxy on hand for the wood-to-metal bond spots in planking these strips. Is this usual or am I over-engineering here? Question 2: The wales are three 2x2 mm walnut strips glued together. Glue together and bend as a unit? (Would soaking these loosen the glue too much?) Apply each strake seperately? (Possible nightmare tightly fitting the compound curves and angles). Thanks! Brian

-
That's correct. Though you may sometimes see just a space instead of a dash. Brian
-
I guess there were more than are on the plaque. JPett, the Rattlesnake listed is isn't "ours"! (but, maybe you realize that) Thats a Pennsylvania sloop, smaller than the Massachusetts Rattlesnake. http://www.awiatsea.com/Privateers/R/Rattlesnake%20Pennsylvania%20Schooner%20%5bBall%20Craig%20Mansfield%20Treen%20Snell%20Stephens%5d.html Here's a listing for the second: http://www.awiatsea.com/Privateers/R/Rattlesnake%20Massachusetts%20Ship%20%5BClark%5D.html Brian