RiverRat
-
Posts
206 -
Joined
-
Last visited
Content Type
Profiles
Forums
Gallery
Events
Everything posted by RiverRat
-
 For my Rattlesnake kit (1:64 c.1780 ship-rigged privateer), I'm considering if it's feasible to make single blocks inset into the bulwarks to replace making "...4 slots on the bulwark with a 1.5 mm drill,...." What should the dimensions reasonably be for single fixed blocks, full-scale or converted to 1:64? (Hoping to look better than making some little gashes in the wood...........) Brian
 -
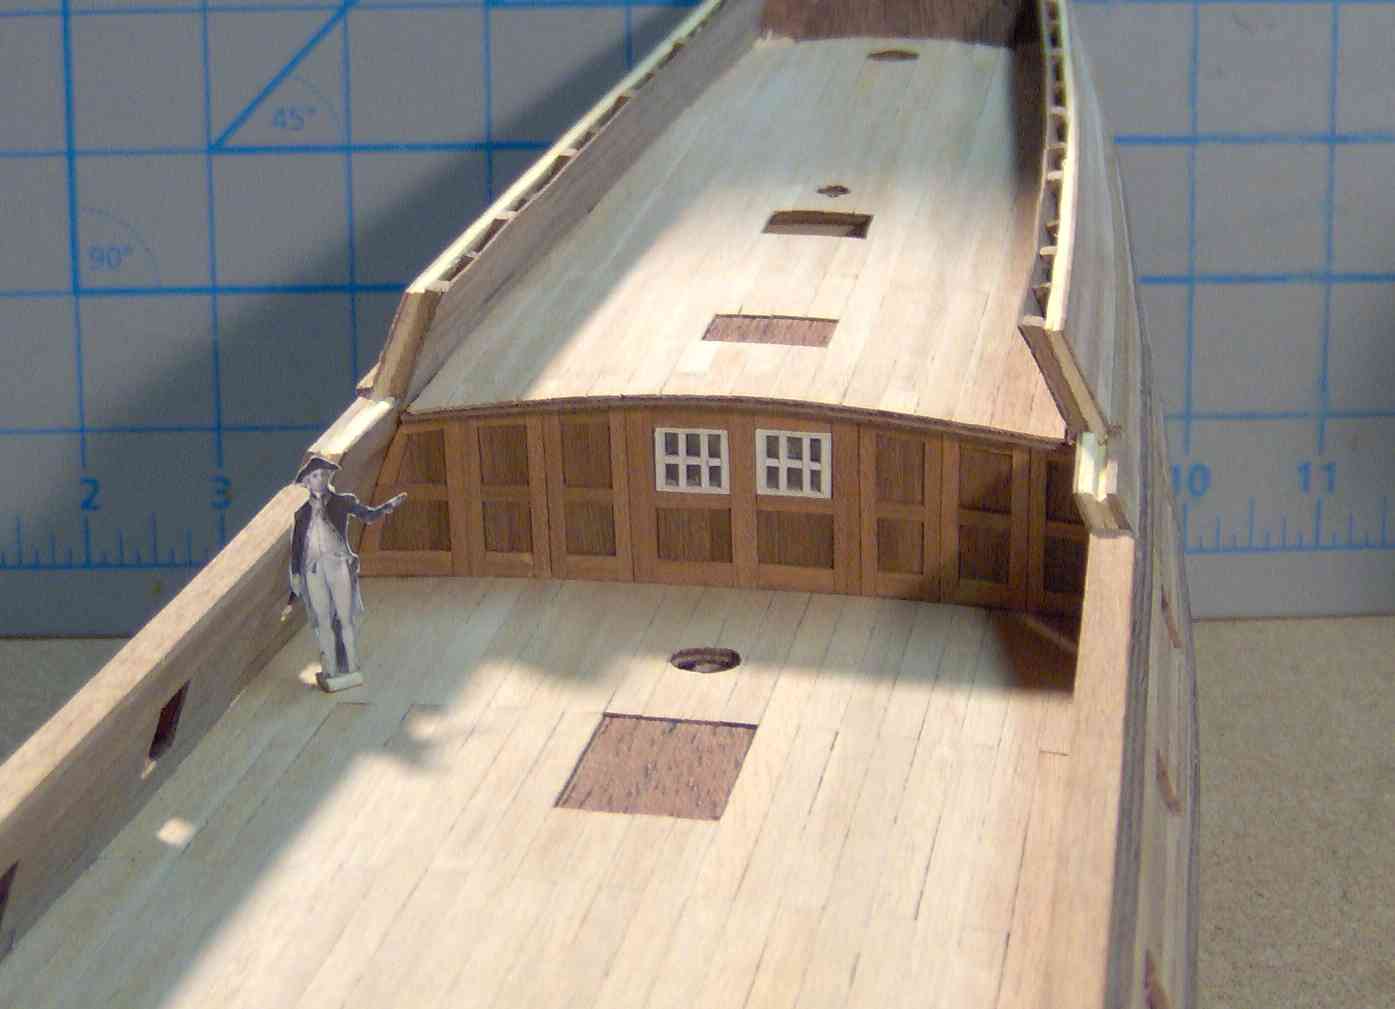
Pardon me for be a bit slow to get back to you,,,, Ferit --- Yes, having nice wood to use can be a joy! I hope I can do its qualities justice. I certainly can't claim mastership. Sometimes I try to be meticulous, but there are times I plod along impatiently and make some little mistake and have to decide if I should go to the effort to correct it. I often do (after all, the whole world, at least the MSW community, is WATCHING! and sometimes I might actually give a damn for myself) and I kick myself for not being my meticulous alter ego. JPett! --- I thought of you as I was making the bulkhead! You were "Looking forward to seeing what you do with the poop bulkhead" (pg 3, post#38)...........There it is! I've installed the doorknobs, glued in the bulkhead, and the waist waterways. No extra picture here. Left off the hinges. (Mr Meticulous took a vacation). Will install "cants" at the non-door bulkhead base. With much of this obscured by the short gangways coming off the quarterdeck, and the nearby cannons and rigging, elm pumps, bitts and mainmast......I gave up on the hinges. I had SO much trouble with them...........Sorry.... Regards, Mr. M
-
Hi Micklen32, Good luck with your build! Contrariwise, I think linking to a photobucket image, slowly opening a separate tab,really is a nuisance. Just what problem are you having? It's usually a simple straightforward process using the site's system. If you're having trouble, try this forum: http://modelshipworld.com/index.php?/forum/47-questionsinstructions-on-how-to-use-and-post-to-this-forumsite-problems-or-suggestions/ Brian
-
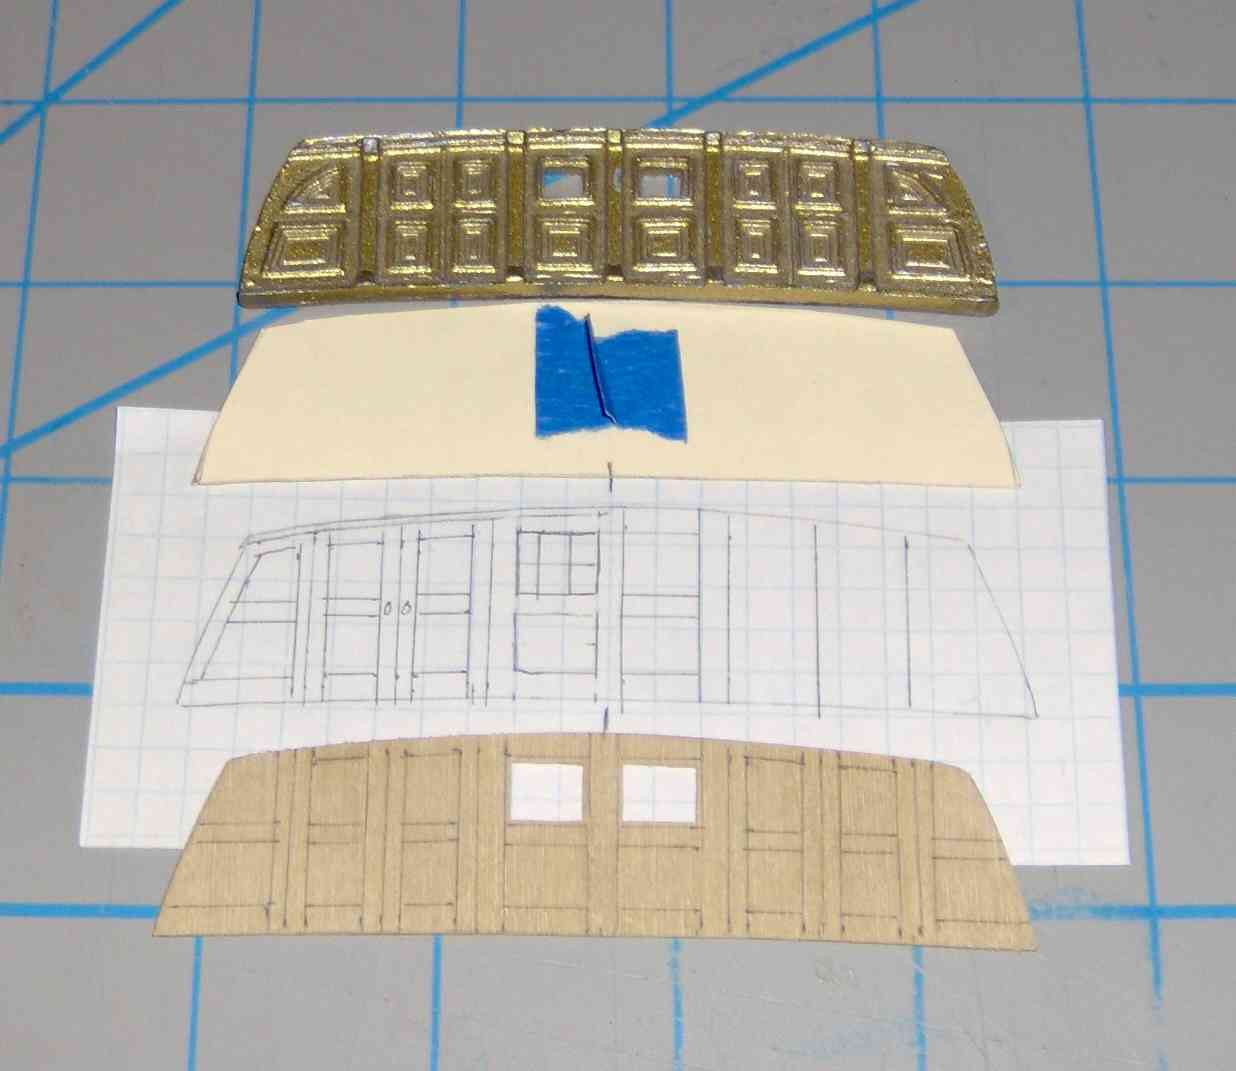
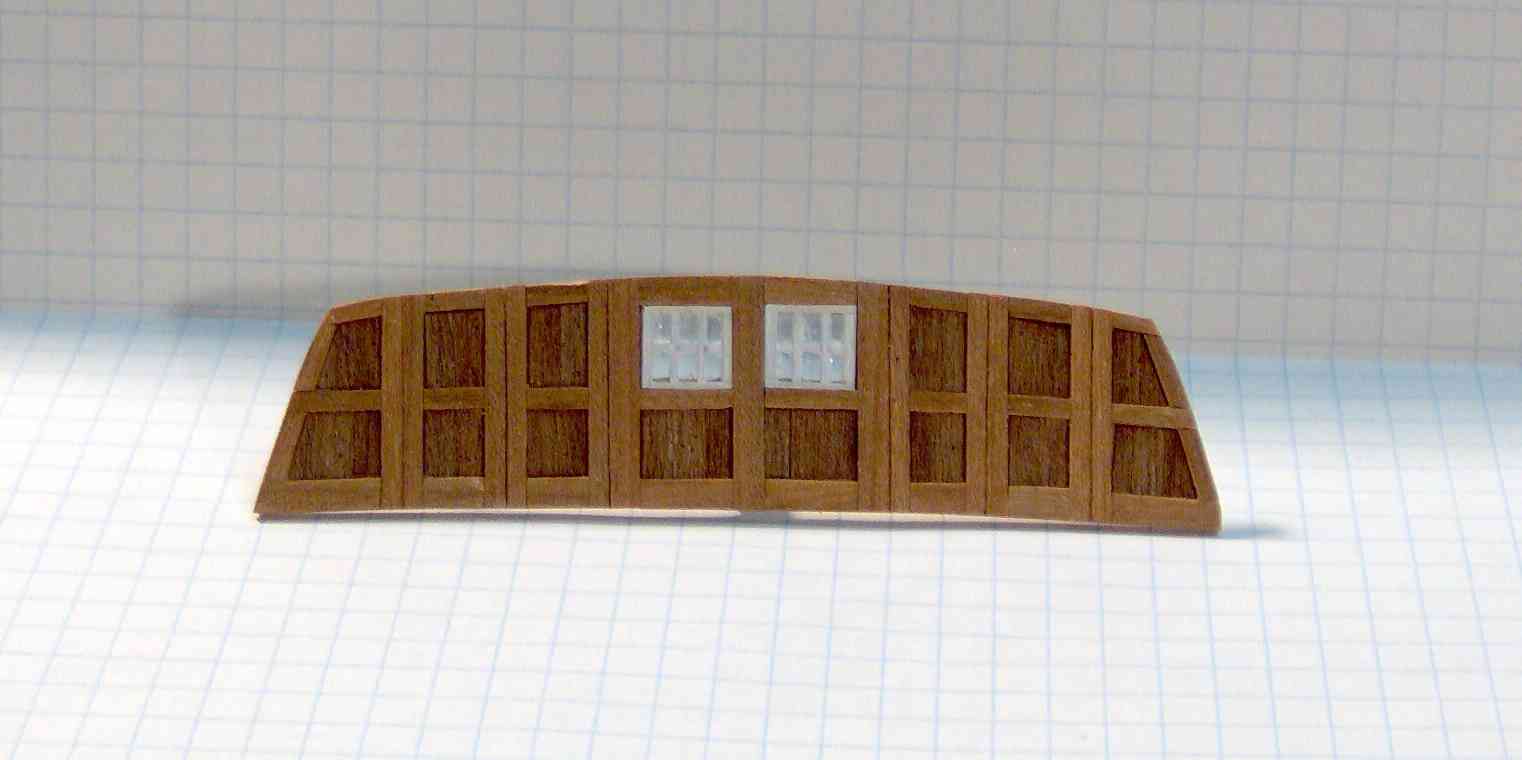
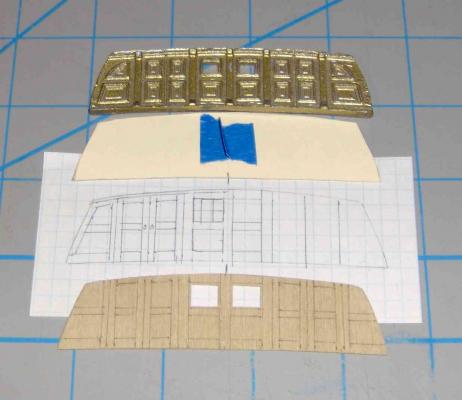
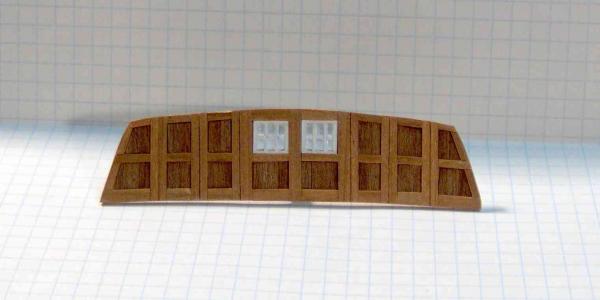
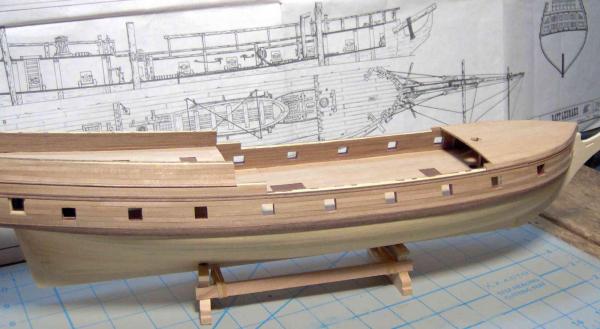
More stuff.... I added caprails to the waist. The kits walnut seems to be about as light as walnut gets! Not what I was envisioning. I'll probably stain all the rails with ebony or similar. With the bulwarks planked, I decided to make the bulkhead at the break of the quarterdeck. I've never seen one of the kit's metal bulkheads used; not sure how it would look painted. It IS about 3 mm short of reaching the bulwarks on both sides, and is a little tall, though there is material that could be filed away. The base actually is close to the decks camber. I cut some manila folder paper to fit the opening and used that to make a base on some 1/32" model aircraft plywood from my R/C days. Easy to shape and cut out the openings. I drew up a plan and transfered it to the ply. Simply fill in the lines with wood! The frames are 1mm cherry, 2mm and 3mm wide. (41 pieces!, though I could have done with fewer) I filled in between all these with 0.5 mm walnut strips. A ledge was left for the windows to rest on. The approx 8x9mm windows are painted boxwood I had left over from the stern lights. Such a pain in the @sh working with the littlest pieces. A little secret for just you folks! After the frame parts were assembled, I noticed things seemed to be leaning from vertical. I had worked from the center outwards and either misdrew the lines or placed the center piece wrongly. Shhhhhhh! don't tell anyone! Not really noticable looking casually at it. No re-do here. Oops. Forgot to add the doorknobs before the photos. They'll be pin heads darkened with "Sharpie" marker. I made some "L"-shaped hinges from black floppy-disk plastic. Too finicky to handle with my forceps. If I figure out a better way to handle them, I'll add them. Otherwise, I'm happy to leave it as is. Here it is in place, unglued.... Progress! Cheers, Brian

-
question regarding attaching bulkheads
RiverRat replied to Brucester's topic in Wood ship model kits
Yes, increase the size of the notches. Do not thin the keel. Try to determine which side or both of the notch needs enlarged. Compare to the part drawing on the plans, if it has them, or measure side-to-side from the slot edge to see if there is a difference. Also, check with the plans to see if the top of these bulkheads are to be even with the top of the keel. If it sits too deep, you'll want to add a shim of thin wood or something to raise it. If too high, deepen one of the notches. See if there's a kit build log for this model. Brian -
I've often thought myself that unaligned deadeyes are likely, though I don't know, and think that modellers' concerns about their close alignment might be unrealistic. Brian
-
Outstanding looking build! And the little green sails are a nice touch Brian
-
Hi Ferit, It's such a joy to watch your Berlin taking shape. Are you familiar with silver soldering? I'm not yet to the point where I've done any myself, but I've read here of instances where unsoldered rings and such may open up under the tension of the rigging, allowing it to sag. The wrapping and gluing might be adequate, but it's something to consider. There is a silver soldering tutorial in the article downloads section. Cheers, Brian
-
Interesting anchor lining arrangement! I had not seen (or perhaps just never noticed before) any of these that weren't right on the side of the hull. I've been admiring this log a long time. Thanks! Brian
-
Hey JP, it's Mark's BIRTHDAY! Fullfill his wishes! (Happy BD Mark!!) Brian
-
Tapering Frames
RiverRat replied to Ensign's topic in Building, Framing, Planking and plating a ships hull and deck
After. The lines of the planking flow from bulkhead to bulkhead and this is best seen when they are in place on the keel. Trying to do this beforehand might induce unwanted errors. Brian -
I really enjoyed looking through your build! Are you sure you have that thing pointed in the right direction?? Brian
-
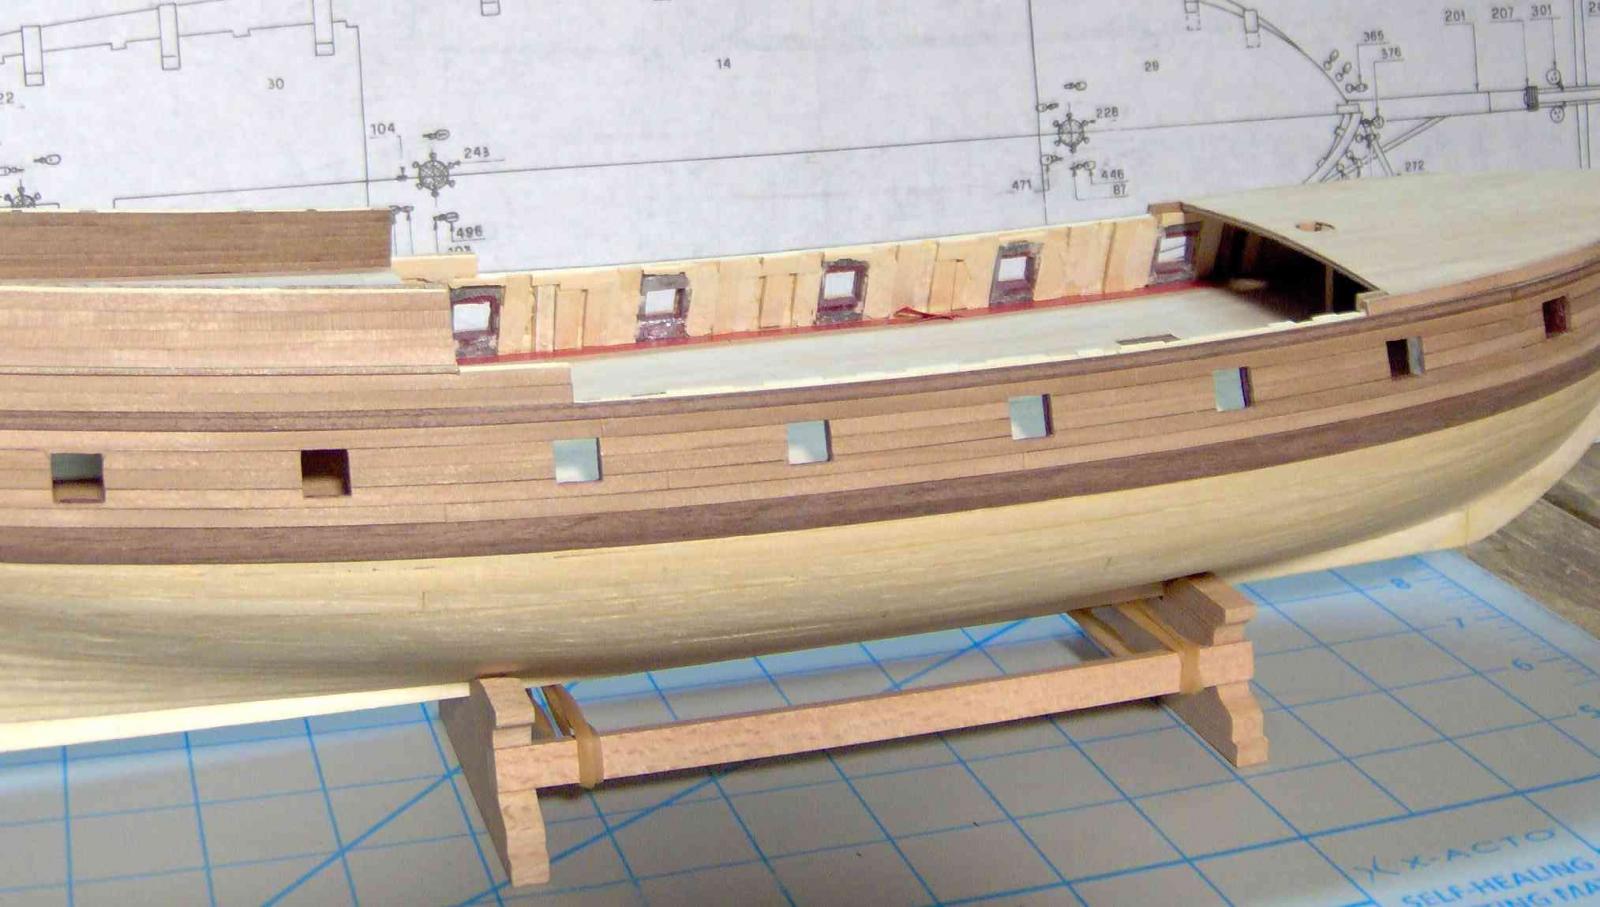
Well golly gee. Since there are some Alfalfa fans here, I'll return his visage! Little steps.................... I installed a generous amount of 1.5mm stock to fill out the waist bulwarks. The one offending metal gunport frame mentioned earlier was reduced by shaving with an X-Acto chisel blade (the ports are pretty soft metal), rather than filing or sanding which creates a lot of fine dust. Used a rocking motion near the deck, rather than slicing, to avoid marring the decking. A little filing to finish it off. Used some wood filler here and there, especially on the pieces next to the metal ports which I earlier ill-advisedly tapered instead of bending. Planked the bulwarks with the dreaded 0.5x3 mm walnut, and trimmed most of the excess at the ports, just needing a little fine-tuning of the openings. Still need the "waterways" installed. So nice to get the ugly sub-structure covered! Speaking of which......... no photo, but.... In front of the ply bulkhead under the aft of the forecastle (the bulkhead which I had trimmed down), was some of that sub-structure than might remotely be visible. So I made little panels of planks to cover those sections between the bulkhead and the port fore of it, just in case, and gingerly slipped them into the crowded space. I may add the waist cap rail, but the other rails I'd rather do in order, for ease of fitting. There are some decorative ends (hances) that I've yet to figure out how to do. I've ordered a decent (hopefully) rotary tool for carving these and the other decorations. Might arrive in about a week. Happy Independance Day to Amerika tomorrow! Though when one considers that recent US governments have been exponentially worse than what the Colonists had to endure with the Brits............What's to celebrate? Cheers, Alfalfa

-
If you dig for other formats/editions, you can find cheaper. Here's the early 1979 edition. I don't know offhand what the later revision(s) include. http://www.amazon.com/gp/offer-listing/0870218476/ref=tmm_hrd_used_olp_2?ie=UTF8&condition=used&sr=8-1&qid=1372691619 Brian
-
JP, I didn't mention my opinion of whether to paint. That's your choice of what the model is to be to you. If it's a display of how a ship model is built, of the craftsmanship or artistry involved, of the details that can go into it --- then leave out the paint. If this is meant to be a representation of a historical vessel, paint it appropriately if you want. (Even then, LOTS of treenails will still be showing) Regards, Brian
-
Hi JPett! Wow! Looks like a great treenailing job! Just what are you dis-satisfied with? Brian
-
Thanks all! Sam, there were actually a couple uneven spots (the photo doesn't show it well) which I frightfully sanded a little to eliminate their being obvious. And as I worked from the top down to keep a full plank on top, it was kind of tricky working under the angle of the tumblehome toward the bottom --- not much room! The waist gets 0.5 mm strips too! Fortunately, I can fill it with a lot of 1.5 mm stock so there will be very few unsupported spaces. Brian
-
My kit supplies pieces for a stand/cradle that has a keel slot started, but not the hull shape. I found this contour guage at a Harbor Freight store (US chain with cheap tools/hardware) for a few dollars. There are higher quality ones available elsewhere. I used it to get the hull shape to do the cradle piece. I can also see it used to check the hull's shape and symmetry when fairing. Brian


-
- 2
-

-
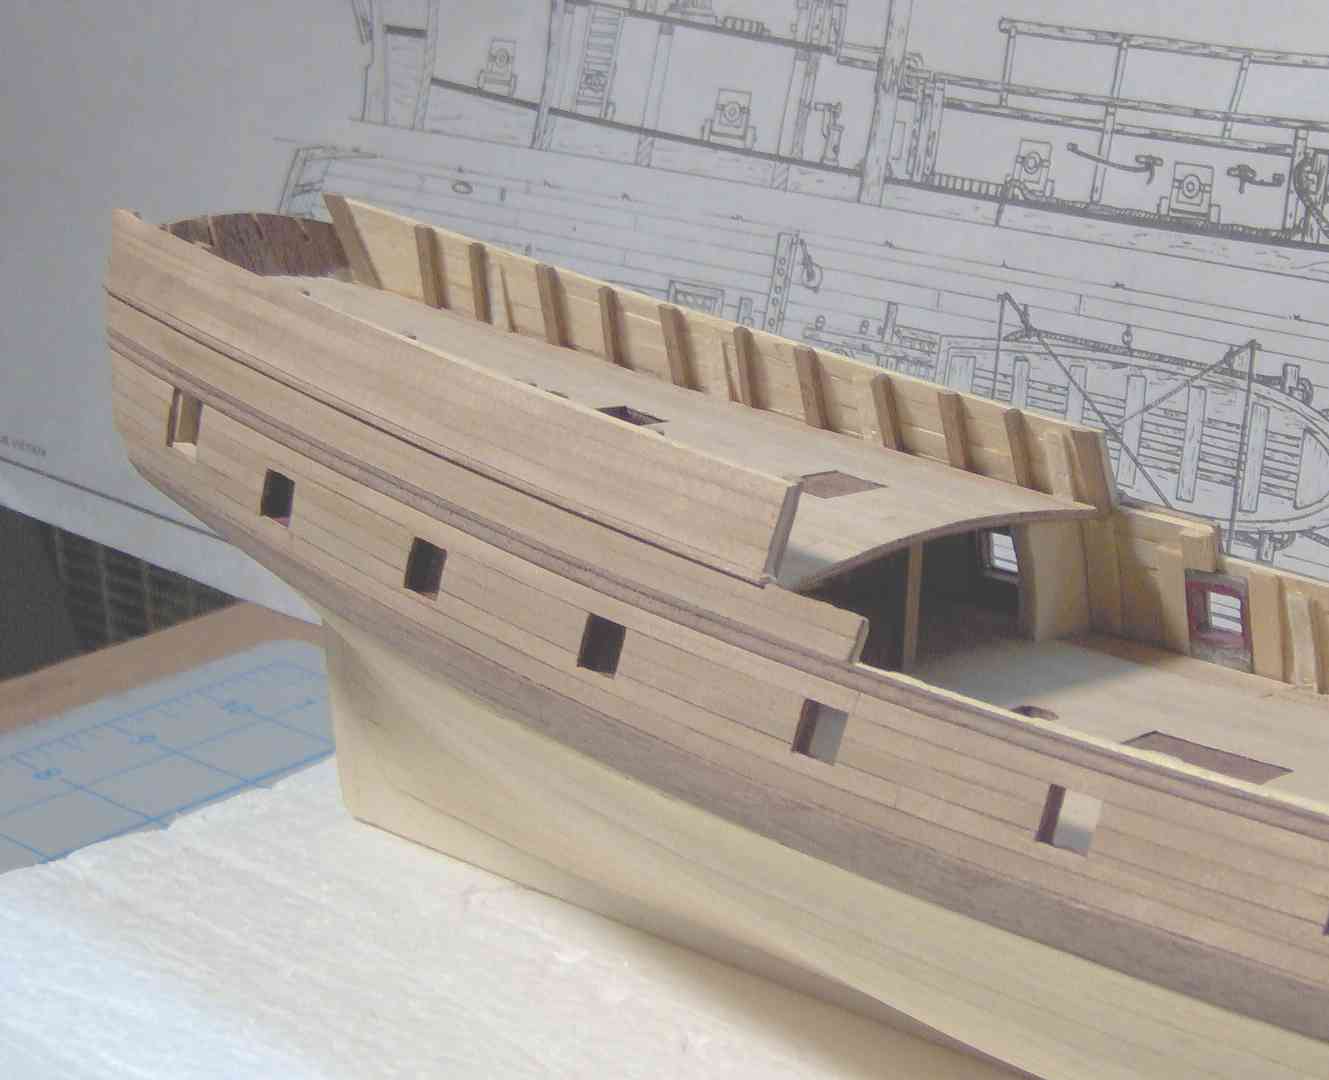
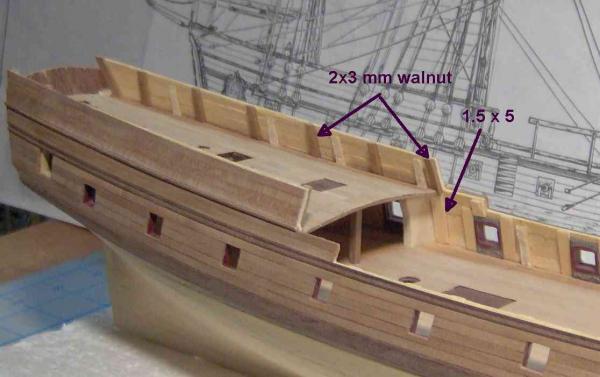
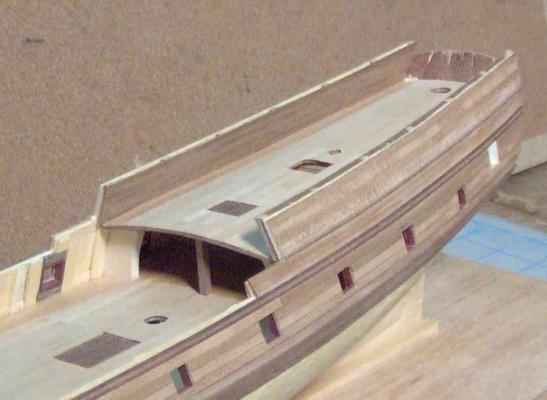
A bit o' progress............... The excess ply bulkheads at the quarterdeck were removed; the bulk of which was removed by my trusty piece of x-acto razor saw, the decking masked so as not to mar it. Shaved what was left at the deck with an x-acto chisel blade to make it flush (or lower) so that the remaing planks would lay flat. No need to remove all of it from the bulwarks/first-planking (might be harmful to try) as long as they're left no thicker than the 2 mm of the walnut 2x3 mm pieces added for frames/"wall studs". The q-deck decking was then completed. The plan drawing shows the 2x3 piece at the front of the quarterdeck extending all the way down to the main deck. Whether misdrawn or not, use 1.5 mm stock on the bulwark below the quarterdeck to match everything else there. The inner bulwarks are planked with 0.5 mm strips. Pretty flimsy stuff, thought meself, so I added some extra 2 mm stock for extra support. If you're building this and not up to this point yet. I'd suggest using 1.5 mm stock for the "wall studs" instead of the 2x3mm. Then plank with 1 mm stock (you may have to buy extra) instead of the 0.5mm. Would be much easier to handle, I'm sure. I'd first thought of planking this inner wall with cherry, as on the outside, but the shade was much like the light tanganyika decking. (Though I'd heard cherry darkens with age...) I opted to keep with the original walnut for a bit more contrast. Haven't built the stairs yet, so I'll jump down and plank the waist..................... Regards, Brian

-
OMG! Brilliant minds build alike! BTW, earlier, your build led me to get a copy of the AOTS Blandford book. Not necessarily to build, but to get a better picture of how these floaters are put together. (It's probably the cheapest AOTS) Thanks! Brian
-
Oops. The Mamoli intructions only say to taper (see the plan's cross-section earlier), not to blend with the planking below. I know I read somewhere that the wales were to blend, but I can't come up with the reference. @hamilton --- Thanks! Perhaps it's just one of those (many) things that the builder is aware of, but not obvious to onlookers. ( Like the starboard edge of my quarterdeck being a half a millimeter lower than the port edge and I've had to compensate................) Cheers, Brian
-
Martin! You're frightening me with all that I'll have to deal with in the future! Sounds like I'll need to spring for the MS plans after reading this discussion again. You seem to be doing a conscientous job trying to get the details right. Hope I can be as patient. Brian
-
ancre Le Fleuron by cabrapente - FINISHED
RiverRat replied to cabrapente's topic in - Build logs for subjects built 1501 - 1750
Considering the whole collection --- brackets. Brian -
Hi Kevin. If you have a guide with pictures from 1993, sounds like it may be the newer version. Mine has 1982 on the box and the parts list includes no illustrated guide.
-
ancre Le Fleuron by cabrapente - FINISHED
RiverRat replied to cabrapente's topic in - Build logs for subjects built 1501 - 1750
Hello cabrapente! I've been admiring your work immensely (and the photography!). "Squads"..... I couldn't find this in nautical terminology. "Squads" can be related to the term square. Might it mean bracket or support? Brian