HOLIDAY DONATION DRIVE - SUPPORT MSW - DO YOUR PART TO KEEP THIS GREAT FORUM GOING! (Only 20 donations so far - C'mon guys!)
×


JerseyCity Frankie
-
Posts
1,338 -
Joined
-
Last visited
Content Type
Profiles
Forums
Gallery
Events
Everything posted by JerseyCity Frankie
-
I was mussing on the presumed necessity of the pendants. With a capable boatswain, couldn't they just rig a strop of some kind when they needed a point from which to rig a purchase, like a selvagee? sure they could but it would always have to be attached to one of the other shrouds, which are already under some degree of strain and you wouldn't want to compromise any of those in any way- although you do see lead blocks for braces and things on them, and that is surely a strain, albeit usually lateral strain. And there are collars lashed around masts to direct the stays to the deck, and these are certainly under a lot of strain, why not an eye like one of those lashed up high? But the stay collars too have a mostly lateral strain on them and a vertical strain would probably make them slip down. The pendants are made off right around the masthead, an unambiguous strong purchase. Any strain placed on them would be translated directly to the strongest part of the ship aloft with no chance of damaging or carrying anything else away. "Nothing too strong ever broke".
-
Your right Guillemot, the neck of the bottle is a huge factor. I have seen some antique bottle models inside bottles with very long narrow necks in the collection of the South Street Seaport Museum in New York though. I avoid that if I can. And I do always keep my eyes open looking for new bottles.
-
I think of the Burton Pendants as being auxiliary handy places to hang something heavy from, and I do believe they just hang down under the tops when not being used in conjunction with a temporary lifting project. I know one of their uses was for setting up the lanyards on the deadeyes, with tackle hooked to the Burton Pendants to put tension on the lanyards, which in turn kept the shrouds tight. The lead from the Burton Pendants is PERFECT for this. I hear tall ships to this very day have issues keeping their shrouds tight- those few that do not use steel wire rope standing rigging, so this reason alone would be enough to keep the pendants on all the rigs. I am certain that the gear would be struck down after the job was done though so I wouldn't place anything on them on the model. The toprope I would just leave off too. Its only in use when they are striking the topmast down on deck and I seriously doubt anyone would leave that line in place if it wasn't in use. Why risk the wear and tear on a line you REALY don't want to part? Striking or Housing the mast was certainly done often enough. I recall reading somewhere of an English frigate crew that had trained so well they could strike topmasts in a matter of minutes, but it was a big 'all hands" type of job and setting up the tackle would be just one part of the sequence of events. Incidentally the Top Rope is one of the Seven Ropes on a ship. There are only seven ropes on a ship, it is said. All the other ropes are properly called lines.
-
Thanks Rob! Its not as hard as I had imagined it would be but there is still plenty of frustration involved at times. I recommend you or anyone else even remotely interested give it a try. Schooners are pretty easy actually.
-
The ship building and preparing will reach a point where I will need to start using the bottle in the planning and prep. I will need this round bottle to be stable so I should at this point build the base for the bottle and I may as well build the base I intend to display the model in rather than make a temporary jig that would be discarded later. A square bottle is nice since it will sit on the workbench but this one has the word "KRAKEN" embossed on it and two nice loops (presumably so that it may better be grasped with tentacles) so I want it to sit exactly at the right position. I need two brackets to conform to the profile of the bottle so I trace the bottle onto the timber I want to use and cut out the arcs. I learned the trick of finessing the cut to fit the bottle by wrapping some sandpaper around the bottle and sanding into the rough cut to make a nice fit even nicer.

-
With everything dry you can cast off from the building jig and fold the masts over to check for fit in the neck of the bottle. Drop the model right in with confidence since you can pull it back out again via the stays. If its a tight squeeze, sand file or shave off some of the bottom of the hull. In a conventional ship in a bottle, you are making a waterline hull anyway and shaving off the bottom is no big deal. Another conventional ship in a bottle practice is to attache the yards and have them stay with the masts through the insertion and erection inside the bottle. I have done this in the past but the yards add a TREMENDOUS amount of bulk and complexity and you have to finagle them back out of their inevitable cockbilled disposition once the masts are up. I am opting to attach the yards AFTER the ship is in and the masts are up and glue them on one at a time.
-
The stays were bent to the mast, then they pass through holes I drilled right through the deck and are left long outside the hull, about ten inches long. I paint one, two and three white stripes on the bitter end of each lower stay so that I can identify them outside the bottle. When the time comes to erect the masts within the bottle you will spend a lot of time trying to find which exact line to adjust during the process. Paper tags would work but I find the lines get pulled out and re-run a few times during the whole process so the paint works best for me. If I put on the upper stays they will pass through the wire eye fairleads aft of the tops and on the bowsprit. The ones the go through the tops will also pass through holes in the hull.
-
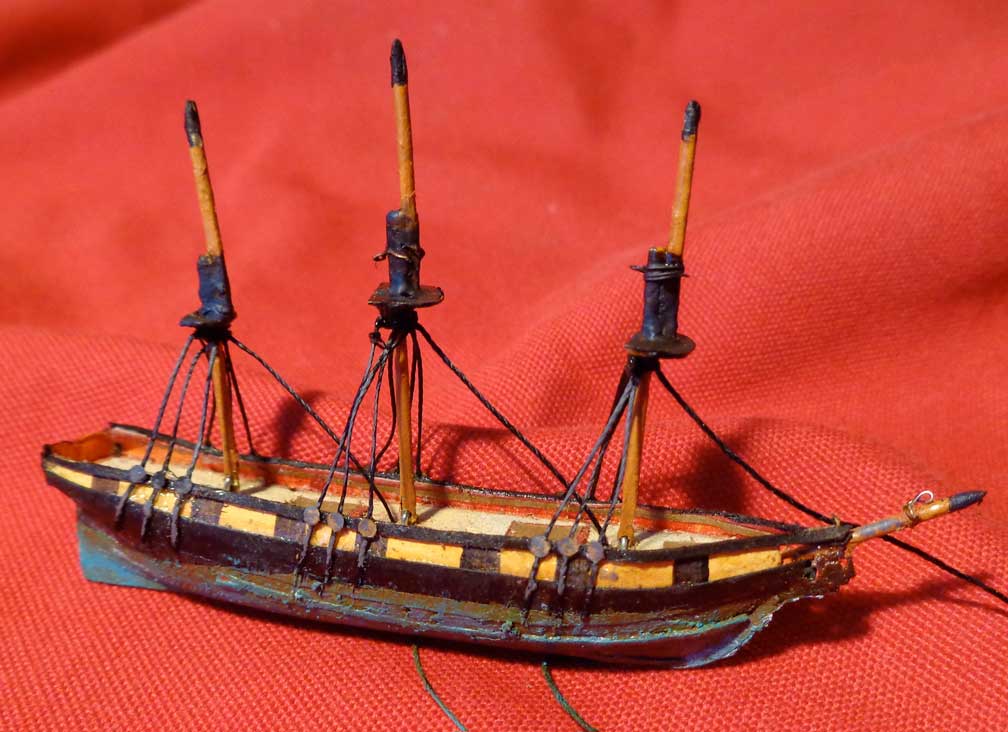
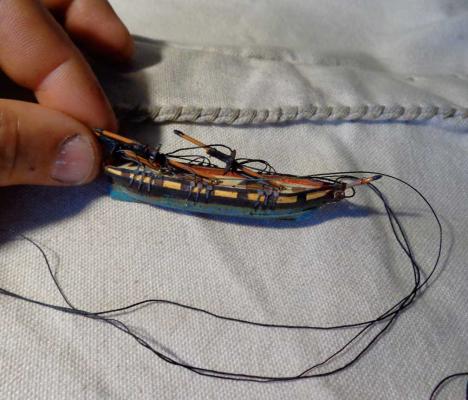
Shrouds and Stays: The masts flop around chaotically without anything holding them up so there is some degree of frustration in this step. When the shrouds and stays are tight the masts are rigid and behave themselves. But with JUST the shrouds or JUST the stays they will flop around. This is where the belaying pins on the base come in so handy since you can make one handed adjustments with the line while you hold the mast at the proper angle with the other hand. (As on a real ship, you can belay a line with just three figure eight turns around the top and bottom of a pin) I tie the stays onto the masts first and give them a drop of glue. Then I put the shroud gang on under the caps (each pair of shrouds middled and overhand knotted just under the top and a drop of glue) and leave their ends long. I hold the mast at the proper position and make off the stay on a pin at the base. Please note that the line you cut to make the stays has to be very long in order to reach outside the bottle later. With the stays belayed I move the shrouds, one opposing pair at a time, into their positions against the hull. I pass the ends of the shrouds to opposite sides under the keel to keep them flat against the hull and tape them temporarily in place. Once all is as I could wish it I white glue them onto the hull in one of those instances in which you want a REALLY SECURE GLUE JOB since the shrouds will be out of reach within the bottle when you erect the masts and you DO NOT WANT THEM TO COME FREE when you are tugging on the stays. The stays are going to be the only rigging outside of the bottle and they are opposed only by the shrouds. I put on some paper deadeyes made with a paper punch. A bit out of scale but I can live with them and I like adding any sort of detail I can at this small scale. After the glue has dried I cut off the tails of the shrouds.

-
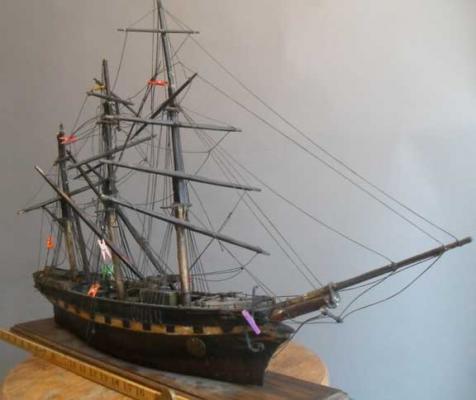
Such a nice model, such a nice subject. Its the perfect ship model. Its got cannons, its got a rig. But not so much of each you go nuts making umpteen copies of everything. And the finished product isn't too big and at a manageable scale.
-
Lashings on bobstays & bowsprit shrouds etc.
JerseyCity Frankie replied to Tigerdvr's topic in Masting, rigging and sails
Looks like you are right Popeye. here is what Lever has to say on page 40 of Masting and Rigging: ..."A lanyard was used to haul taught the stay to the collar.....When hearts were used the lanyard was spliced into the upper heart, then rove through alternate hearts, using as many turns as the hearts would allow or until the lanyard was used up. The end of the lanyard was seized to the turn of the lanyard adjacent to itself with a couple of seizings.".... the only way Niagara appears to have deviated from this is in the hitch taken above the heart on the stay, and the eyesplice is on the lower heart not the upper one. -
Lashings on bobstays & bowsprit shrouds etc.
JerseyCity Frankie replied to Tigerdvr's topic in Masting, rigging and sails
You could be right Popeye. The short splice I identified could be the eye splice starting the lashing. But I have a hard time believing they would eye splice directly to the lower heart. But the cow hitch at the top, or what looks like a cow hitch could certainly be the end of the lashing- a hitch taken around the upper stay and the end passed back and down and seized to itself. In fact that two legs coming down from the stay above do appear to have three or four seizings holding the two parts together. -
Lashings on bobstays & bowsprit shrouds etc.
JerseyCity Frankie replied to Tigerdvr's topic in Masting, rigging and sails
For what its worth, here is a photo I just stumbled across on the web of Niagara's stay lashing. In the photo they started the seizing with a cow hitch holding the middled line above the heart and then took turns around the hearts with the two ends. Or at least that is how it appears to me. Before I saw this photo I would have said they would have finished off the seizing with round frapping turns across the main turns, with hitches to hold them end end the knot but clearly there are no frapping turns here. I see no visible termination on the seizing so I suspect there is some sort of hitch on the underside? Its possible the two ends are seized back to another bit of line underneath and out of view. There is a short splice visible on the outermost portside turn but that is NOT a way to terminate a seizing, I think they just used some old line. I'm too lazy to go look in Lees Masting and Rigging, I am sure he covers this. But seeing something in actual use is worth considering, they do nothing half assed on Niagara.
-
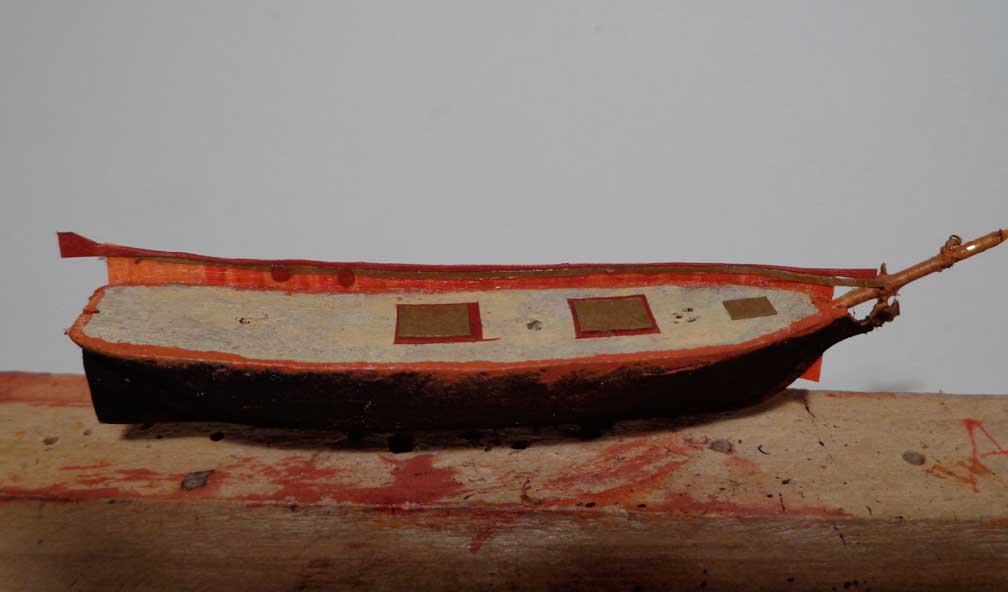
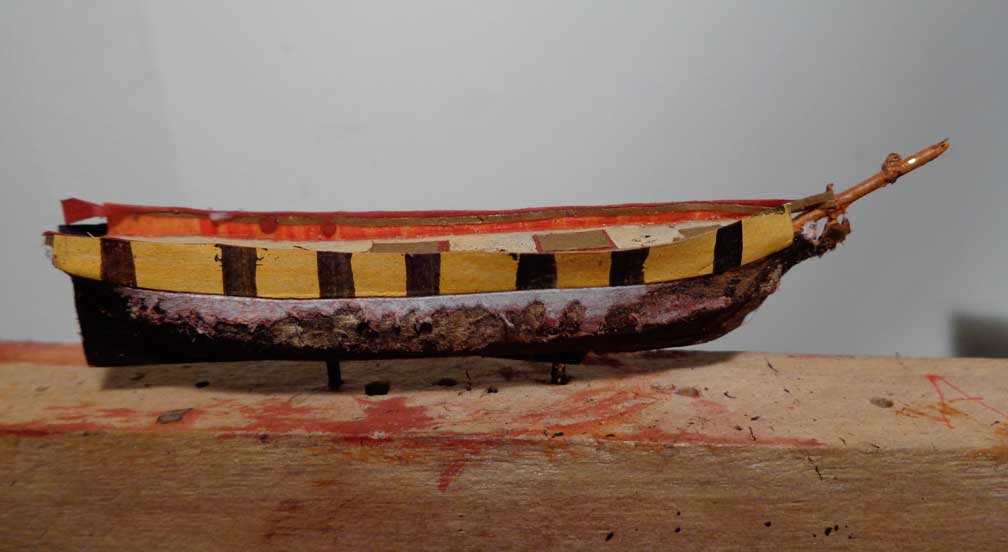
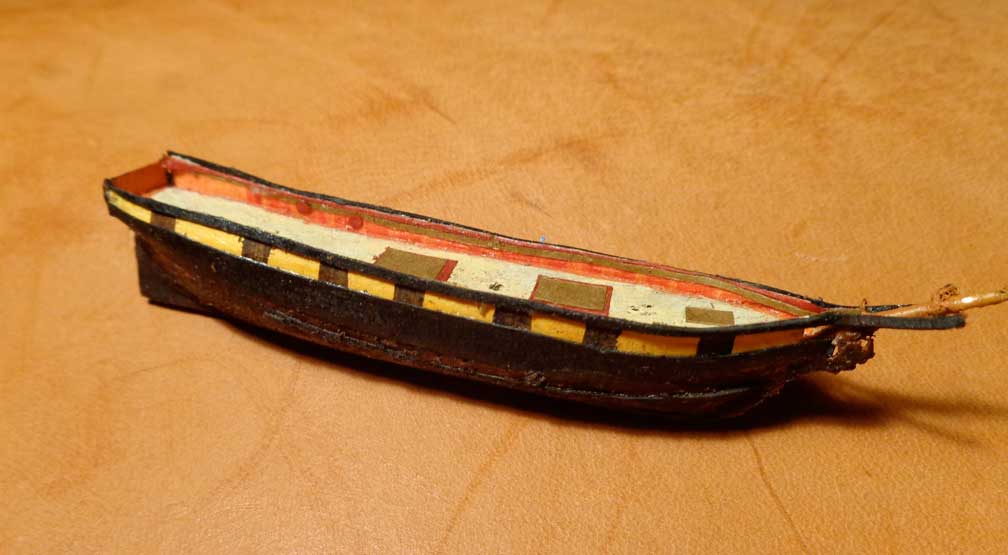
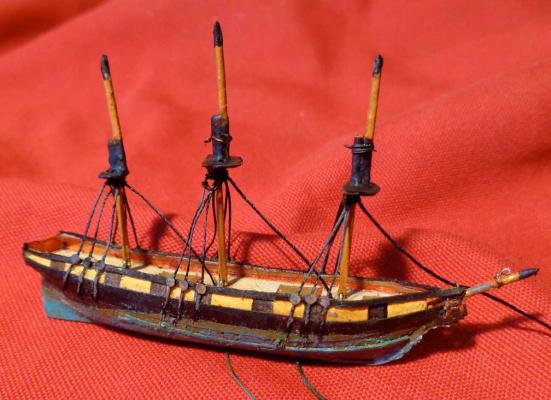
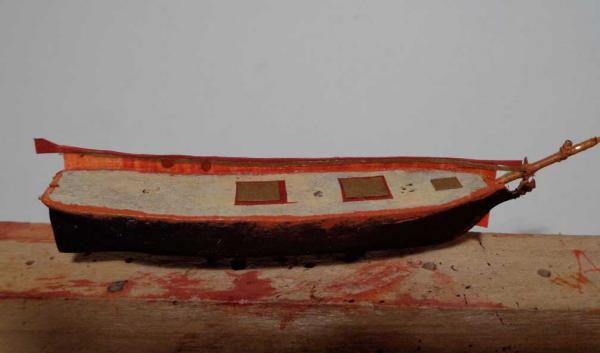
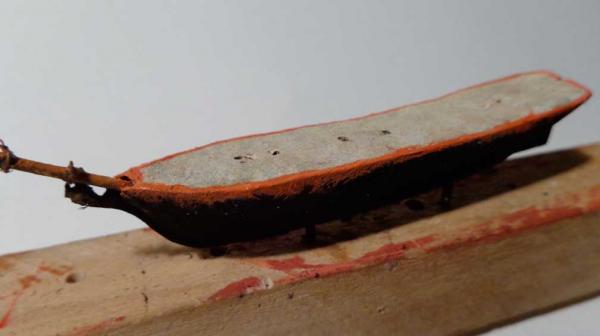
The bulwarks are then cut to the proper shear and hatches made of the origami paper are glued onto the deck. On the exterior hull I have the silly looking caterpillar stripes. I cut some pieces of black origami paper, with the proper shear line and when I glue them to the hull at the proper spot they define the lower edge of the Nelson checkers. I literally cap it off with a cap rail, which is made of a black artist paper heavier than the Origami stuff. I could have laminated the origami to get it thicker but I love this paper called Stonehenge, an artist paper. Black all the way through and acid free, it glues on with perfect ease with white glue. I could have simply painted the checkers on but I get a very quick very crisp checker using the paper, and the paper laminations add a great deal of rigidity to the otherwise floppy bulwarks. (I do have a world of caution though. I used this technique on a bottle model with a light grey hull. The oil in the plastecine clay soaked into the paper and turned it very dark. So if the paper will touch the plastecine you should seal it with something. ) A transom is glued on and then cut fair with some small personal grooming scissors which have the perfect camber. Parts of the caprail extend forward serendipitously and become the headrails I didn't even plan on making. Its not a bad little hull for the small amount of effort expended. Looks to me a little like Niagara.


-
White glue is applied to the outer hull right up to the deck edge and on the red face of the paper bulwark and the paper is glued to the hull. In this photo you see the portside bulwarks glued on and in the foreground a selection of Japanese origami paper. This particular bunch of paper has many shades of all sorts of colors and this brand of paper is colored all the way through so if I laminate some of it together with white glue, a cut out shape will be consistently the same color on each facet, a handy attribute. I use a lot of this paper for small details. Cut into long thin strips, I lay in a brown paper pinrail within my bulwarks. This strake glued inside the bulwarks also stiffens the paper and helps it to hold its shape. In the second photo you see a selection of shapes. I always keep my eye out for paper punches of different diameters since little round colored circles can be used for all sorts of things on small ship models. Coils on deck, running lights, all sorts of things.
-
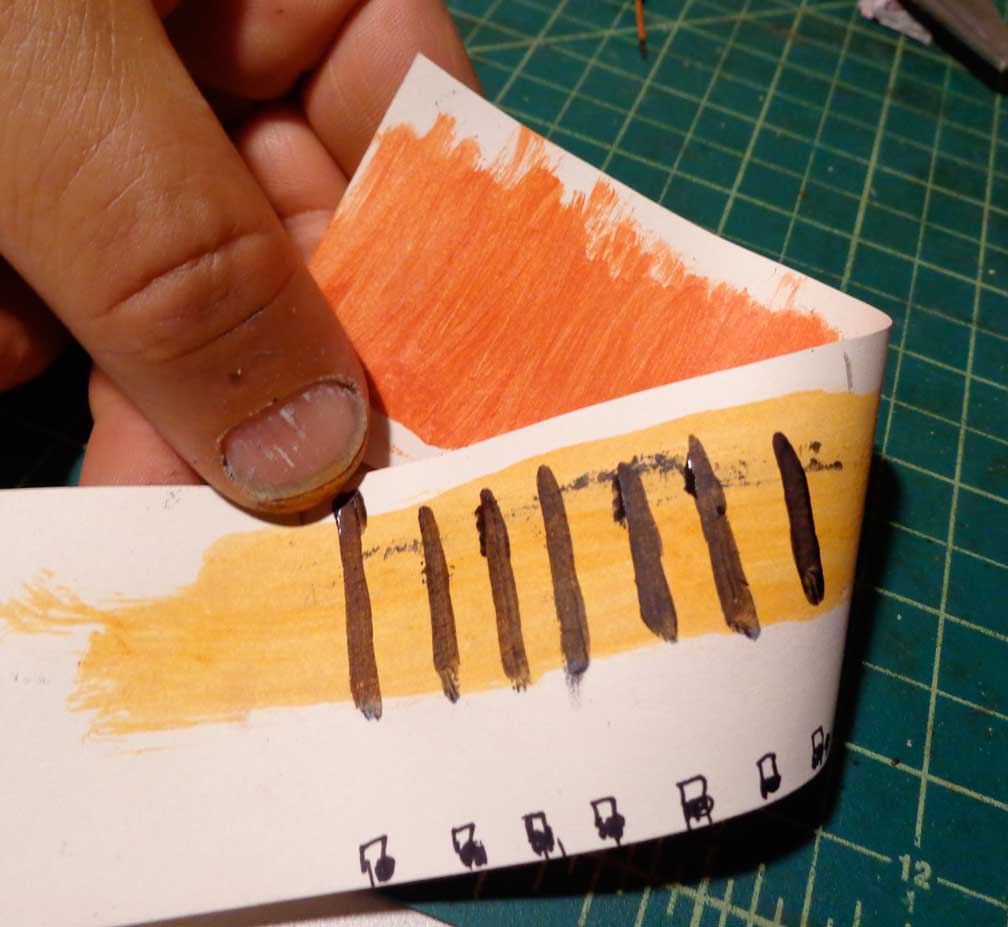
This next part may appear confusing but bear with me. I’m making the bulwarks out of paper and both sides will be visible. The inboard side will be red with some texture to suggest wooden details and the exterior will eventually get the Nelson checker with buff and black. I paint both sides of a piece of acid-free printer paper in the appropriate colors. The printer paper was purchased at a fancy-ish stationary store and being acid free its unlikely to become brittle as fast as regular paper. I want the model to last as long as possible. Note the black and yellow bumble bee stripes. These will be the Nelson checker by the final step. All that is important at this point is their size and spacing and it will become clear soon.

-
I use acrylic artist paint for EVERYTHING in my life and certainly everything in ship modeling. I painted the hull dark brown ( burnt umber with a bit of ultramarine blue mixed in) and painted the deck a chalky holystoned deck color. A red stripe was painted around the edge as waterway. Not shown, I painted the masts a natural darker varnished wood color and the tops black.
-
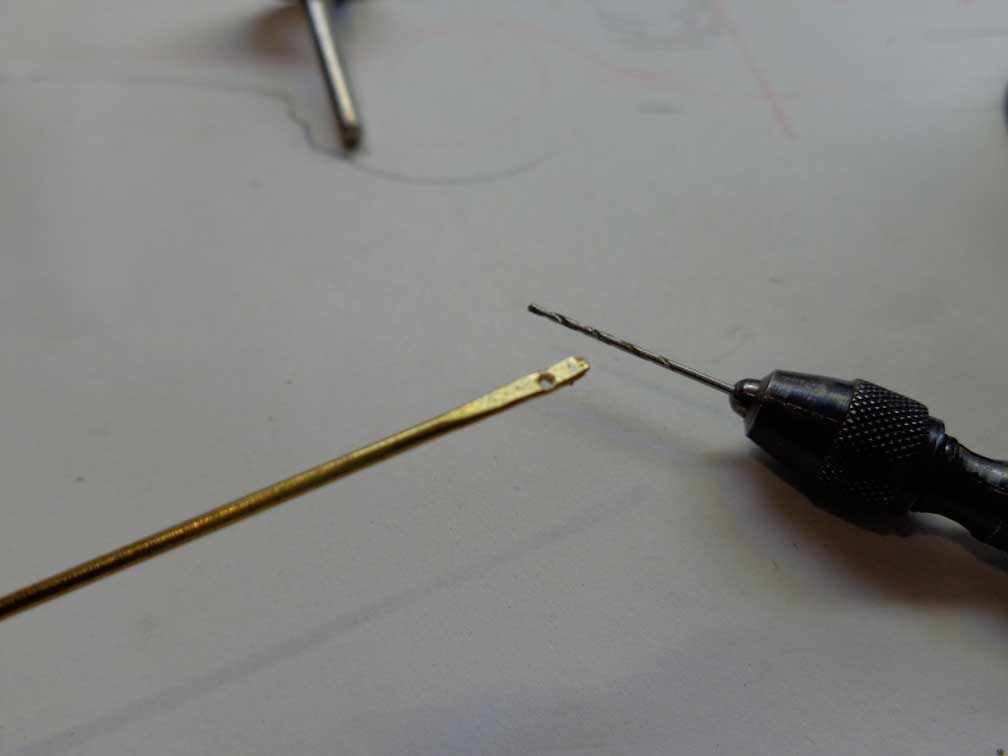
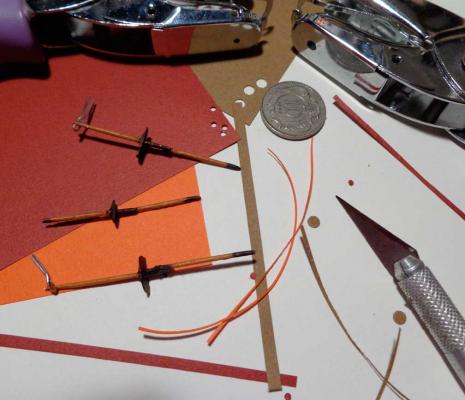
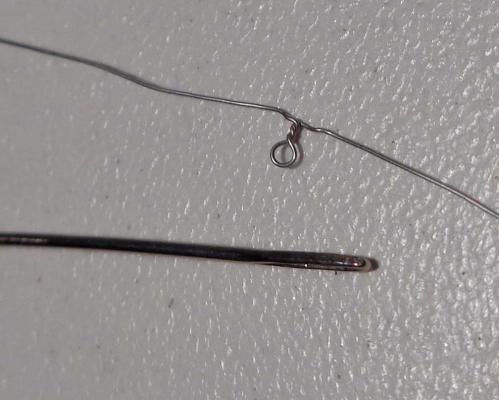
Its the fore and aft stays that will be doing the mast pivoting job inside the bottle. The stays will be bent to the the masts high up in the rig and run to the mast or deck in front or to the bowsprit. In some cases the stays will have to run through a fairlead to get to where they are going- from the mizen mast over to the main and then down to the deck for instance, with a fairlead needed on the main to allow the line to make the turn back down to the deck and still be able to run. You could drill through your spars to get this to work, but thats hard at this scale and even a small hole through a spar is going to cause more friction than a wire eye, which is what I am showing being made here. I use some really thin 34 gauge wire and a medium sized sewing needle. Twisted around the shaft of the needle, forming a "neck" of just a few turns and leaving long tails on either end in order to twist the tails around whatever part of the ship the fairlead will be fixed to.
-
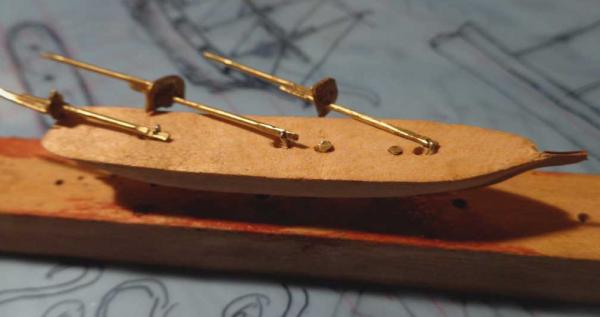
Here is a shot of the nameless ship with the masts stepped. If you look closely you will see the hinges. I should not have drilled the holes in the deck for the toothpick rig I had in place, but I thought I needed the toothpicks back in that earlier step in the process when I was firing the sculpy Kraken arms. I can dowel up the holes or disguise them or leave them, they will be hard to see. The hinges are very small. Everything will be viewed through the wavy glass of the bottle and be difficult to see clearly so there is a lot of leeway regarding visible contrivances on the deck. I have added tops and topmasts of brass. I used 5 minute epoxy to glue the brass together but its not as good as solder. My soldering iron is a big ugly crude affair though and I cant do detail work with it. At this point in the rigging the masts flop around in any direction.
-
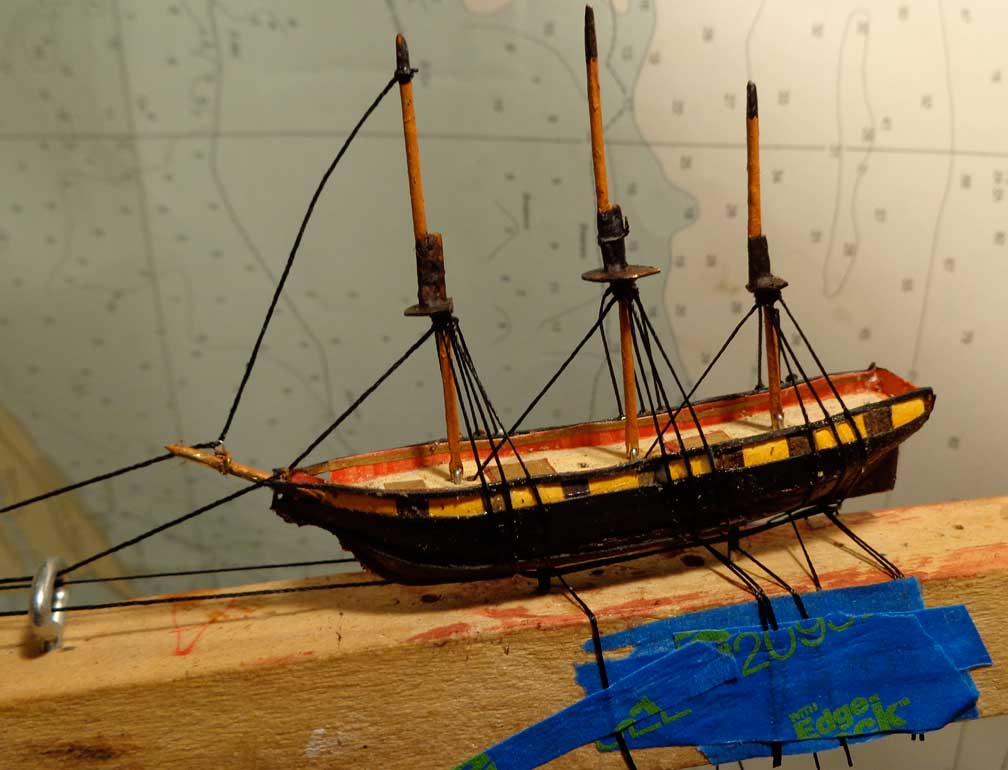
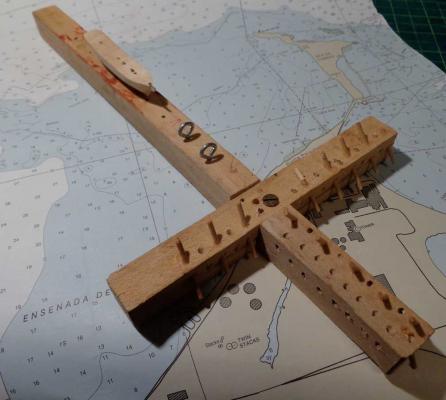
Working on the nameless ship some more. I forget where I first learned of the hint of using a building cradle shaped like this, some book or website I guess. The shape makes sense since the hulls are so small you will need to have them attached to something you can grasp and handle, while at the same time a lot of rigging comes off the model and needs a place to live while it is awaiting the insertion into the bottle. The assembly can be fixed in your vice or it can sit on your desk. I have drilled holes for numerous “belaying pins” along the shorter bar. The rigging can be belayed, snubbed, eased, taken up or cast off just as on an actual pin and its very handy to be able to cycle through all those steps with each line, since as you build the ship the lines are going to be run every which way. The two screw eyes are fairleads to get the rigging to run from the ship to the pins in an orderly linier way.
-
My two cents: I’m not familiar with what ship your working on but I can point out the nature of a downhaul on a staysail, a line running from the head of the staysail down along the stay back to the bowsprit or jiboom, used to pull the sail down to the spar in order to strike it. The canvas of the sail itself necessitates the block in question to be on one side or the other of the centerline of the spar, since the line would have to run down one side or the other of the sail, along the luff. So your downhaul block should be near to but not directly aft of wherever the stay terminates on the spar. If the downhaul block was on the centerline of the spar and/or immediately aft of the block for the stay, the canvas of the sail, as it was being struck, would quickly smother the block. folds of canvas would get in the way while the downhaul was being used, and the downhaul would chafe away at the sail. I would recommend locating your downhaul block at about a 3:30 or 7:45 position in relation to wherever your stay leads to in the headrig, or at any rate whichever point is under the tack of the sail as it is struck.
-
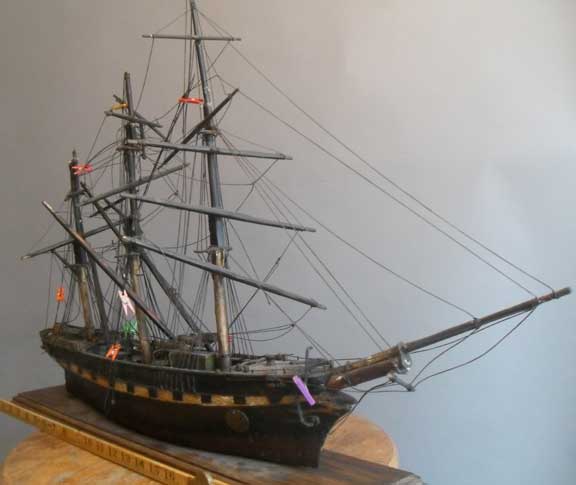
Its eerie how closely this ship restoration resembles one I did last year, the hull in particular looks almost as if it could be interchangeable between the two models, the spars too. Mine had a much simpler rig, her shrouds had no ratlines. Her tops were commercially available white metal affairs and there were fewer deck details. I would wager they are of a similar age.
- 40 replies
-
- 1
-

-
- restoration
- finished
- (and 1 more)
-
I would like to add my two cents about posting youtube video links on MSW. Often I click on a submission with a title like “ Rudder straps in the 1700’s” or something like that, only to find that the post consists entirely of a youtube link with nothing else. I have a slow internet connection and I am NEVER going to click on a youtube link. So for me it feels a little bit like a bait and switch. I would NEVER say that there is no place for youtube links on MSW. In fact If I had a fast connection I would probably be lobbying for an entire sub category for online videos. but I do think that if your content consists entirely of a link to youtube, you should admit as much in the submissions title. Perhaps the title could be “youtube video: Rudder Straps in the 1700’s”. In general I think submission titles on MSWneed more attention in that often they fall short of explaining the submission they represent in the way that a newspaper headline represents the story that follows.
-
Doing research on a "monkey rail" on a different ship, I learned that the deck on the roof of the after deckhouse, the one featured in your last few photos, is known by the delightful name Monkey Poop.
-
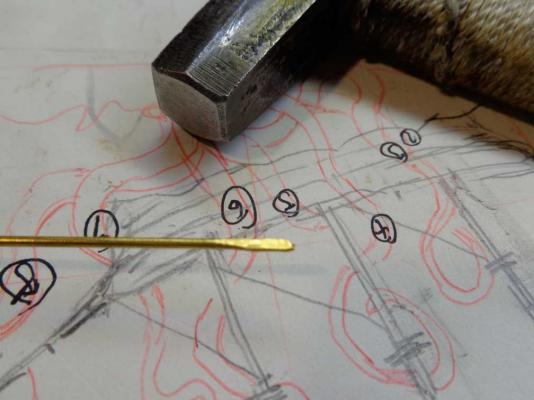
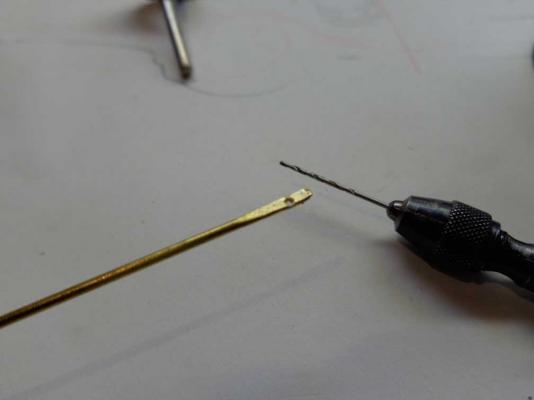
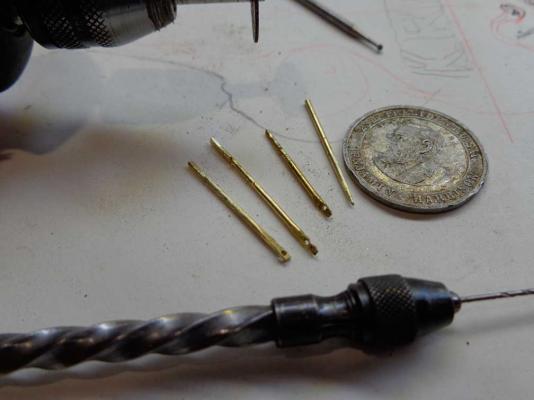
On to the ship itself, a little bit. I assume everyone knows about raising the masts inside the bottle? If not google some phrase like "the secret to a ship in a bottle" and you will find plenty of explanations. The issue I am addressing here is the masts. The masts have to fold, so you have to have a hinge at the base of each mast. Typically you drill a hole athwartship through the base of each mast and bend a wire to run through the hole, attached to the deck. Easy in theory but I had a lot of trouble over the years drilling through the thin wooden masts I was using. I used a paper hinge once and that worked but didn’t feel very robust. I tried leather once. Drilling a hole through an already very small wooden spar weakens the spar and I have had masts buckle and spring right in the middle of the most crucial part of raising the masts inside the bottle. Cursing ensued. I would stiffen the spar by soaking it in cyano but still I had trouble with the flimsy wood. Another issue that happens then is the wire. How to bend the wire so that it fits perfectly and is least visible? Band the wire 90 degrees, insert it through the spar then try to bend the other side 90 degrees and you will soon discover a new appreciation for the bending properties of small diameter wire, and right after that you will become disappointed with the bending properties of all the wire you can find. The wire will be either too resistant to bending or be too floppy and insubstantial. So I moved on from wooden spars and I use brass rod. Available in many small diameters and cheap, its easy to cut drill and work and now when I need to bend the wire through the hole in the base of the mast I can just squeeze the spar and the wire in the jaws of a tool and its bent perfectly and the spar won’t suffer any smashing the way wood does. Here are photos of some masts being made:
-
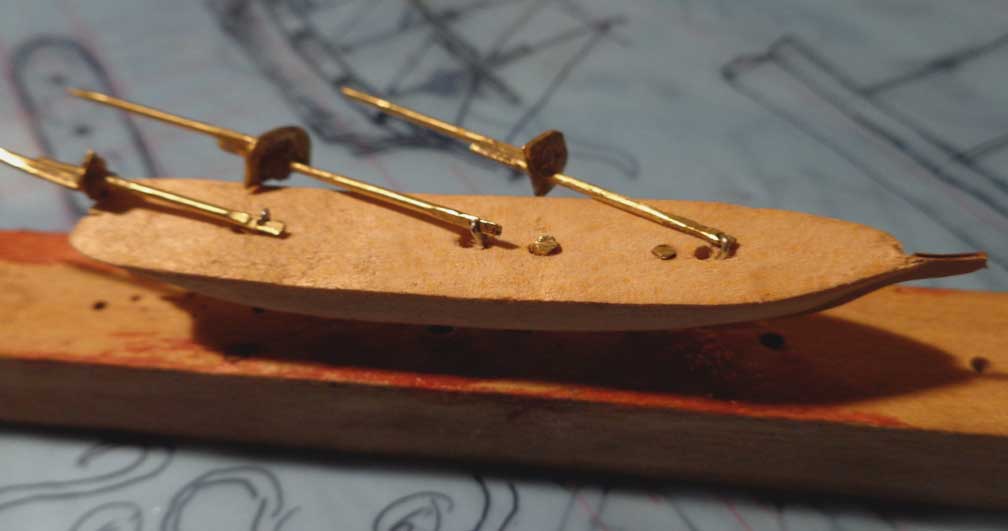
This latest update has no photos. Playing around with the hull and the arms on my desktop, cycling through removing the arms and plugging the arms back in around the hull using my hands, has shown me a few things and I have reached some conclusions based on how things are working out: Pulling the lines that raise the rig on a bottle model puts a lot of temporary horizontal strain on a conventional ship in a bottle. I have had previous ships in bottles pull out of the plasticine sea they are bedded in while raising the masts. I intend to have this ships hull supported entirely out of the water so I will need to supplement the Kraken arms with a pair of brass pins hidden within the wreathing tentacles to hold the ship firmly aloft. It wouldn’t do, at some point years down the road, to have the Kraken and the ship slowly slouch over on its side one hot summer day when the plasticine is softened by the heat. I intend to err on the side of stability. Thinking about the ship itself, I'm a bit disappointed with the rig depicted in the print. I want my kraken ship to have more square yards and more canvas visible, so I am going to liberally reinterpret the rig to show topsails and tagalents and a spanker and some staysails. Considering the ship it occurs to me the ship itself is a mystery. I have no idea what era it is from nor do I know its name or nationality, all I know is that it made the mistake of offending the Kraken. Speaking of the consequences of offending insurmountable forces, I want to apologize to the moderators for spending so much time on this build log on the process of building the creature, I’m spending a lot of time and energy describing the construction of a thing that is not a ship and I hope they will understand that the overall project IS a ship model, even if my mystery ship has no provenance.