
MORE HANDBOOKS ARE ON THEIR WAY! We will let you know when they get here.
×


hamilton
-
Posts
1,930 -
Joined
-
Last visited
Content Type
Profiles
Forums
Gallery
Events
Everything posted by hamilton
-
 Hi Peter: I found the scuppers to be very tough too...I ended up drilling them out very slowly starting with micro drills that were quite small and very gradually opening them up from both sides and using jewelers files to square them up. Another trick I learned was to clamp a piece of scrap hardwood on the opposite side of the drill to prevent the wood from flaring out when the drill went through...mine still did not turn out perfect...it's a very tricky business...but I still think your America is coming along very nicely.... hamilton
 -
Thanks Tim - welcome aboard! Hope you're a patient man! I have no dry-cleaning bag to put BN under, but at present, I have no keel, and no time or ability to cut a new one at the moment.....could be a long time before I strike this build up again....I have to do all my cutting outside and we're in the rainy season up here....waiting for a dry spell to make new keel pieces, and then onwards.... The good news is that I just got a wood shipment for this project and can proceed with some speed once the framework issues get sorted out....bye for now! hamilton
-
Thanks Jond - I imagine that a lot more work goes into people's models than often makes the log - I can think of a few notable exceptions here. I hope that my error can be of help to anyone going down this path in the future.... hamilton
-
I guess you have to be a bit grumpy to balance out the food, wine and scenery..... hamilton
-
Thanks very much Grant and Mark - fortunately there's a small hardware store just a block from my house! While the 5 minutes it will take to walk there won't cut too much into the time required for this fix, it will count for something! What's that saying? Measure once cut twice....? Wait, that doesn't sound right, does it.... hamilton
-
Well I spent a bit of time this morning trouble-shooting and confirmed that there is both distortion on the plans (between the template sheet and the sheet showing the profile) and some bad cutting and shaping on my part - particularly the centre keel piece, though also the aft joint on the forward piece, where it attaches to the centre . The aft piece - which is where I initially noticed the problem - is actually fine - the drawings all line up and the part is cut with only very tiny discrepancies, easily solved with a sanding block and thin shims. To begin with I made new templates from the profile drawing, which is where I noticed the issue with my keel as built. I then tested each of the new templates against both my keel and the template drawings. There was decent alignment between the new templates and the template drawings, except for the centre portion where there was some distortion - though I didn't think it was enough to produce the misalignment I had. When placed against my keel, though, the issue became apparent. Here are some photos that clearly show the problems in the forward and centre keel pieces.... I think you can easily see where my mistakes are!!! They're very obvious! Hard to say where they came in - likely as I was making adjustments to the joints, though the discrepancies between the template and my part are really pretty "universal"....more care in the cutting process is clearly in order.... You can also see that the aft piece is fine as made.....this is the piece with the new templates from the profile drawing, which match the template drawings on the MS plans.... The good news is that I have enough 3/16" ply to cut 3 new parts - and of course it seems that I really only need to cut 2 new parts.....Anyway, I think I will go with the "hard route" described above and cut two new keel pieces - centre and forward. I'll de-bond the existing pieces and try to salvage the aft piece, knowing that I can cut another if necessary. The bad news is that I likely won't be able to get moving on this till we have a decent string of dry weather, which in the pacific northwest is unlikely to happen before the new year. Usually we get some warm dry weather in January, and if that's the case I'll haul out the bandsaw and cut the new pieces then....until then (or later!) I'm afraid this log will be on hiatus.....sigh....at least I have the Syren to work on! And I think I've learned a valuable lesson about using plans as references for scratch building - if you've got two reference points check them both!! hamilton
-
Thanks Brian - I am dealing with 3/16" ply, so I think I'll avoid soaking....in the other thread SpyGlass suggested steaming....I'm going to give that a shot a see what happens....Since at least one of the parts in question isn't cut properly it's hardly a loss..... hamilton
-
Thanks Grant! I know this is probably the best way forward....I'm hoping I can scrape together enough of the material that I don't have to buy more - there's no local supplier of ply at this thickness, and ordering online tends to get expensive with the shipping costs.... In any case I woke up this morning with a fresh eye and double-checked things. I think the problem may be cumulative error in the joints. I took the assembled keel and aligned it with the profile drawing section by section. It seemed that each individual section lined up as far as I could tell, but that when each of them lined up the others were off....Not sure how each piece could fit but all together could be out of whack unless the problem was in the joints..... Regardless of the source of the error, it's hard to ignore it. I'm hoping i can salvage one of the keel pieces (preferrable the aft one, which was the most difficult to cut, but I'm not sure how to de-bond PVA so I can safely separate the parts....if there is a way at all....I'll post a query elsewhere on the forum but if someone has advice to post here I'd welcome it! hamilton
-
Hi Mark: I "liked" your comment, but I'm not sure I "like" it - certainly not the idea of you scrapping 2 years worth of work! That's off the charts harder than what I'm facing here. I'm going to rest on it for a bit....either way I won't be able to return to the build for at least a week, so.... The odd thing is that when I placed the keel over the plan view on the model shipways drawings everything lines up there.....So it's hard to say whether it's the template drawings or the profile drawing that's off....it's most likely to be the templates, given the issues at the stern which aren't just differences between the drawings but result in structural problems with the fitting of the parts as made....after all, the sternpost and rudder themselves match on ALL the MS drawings.... Anyways...I'm going to curl up with a book and forget about it for now..... hamilton
-
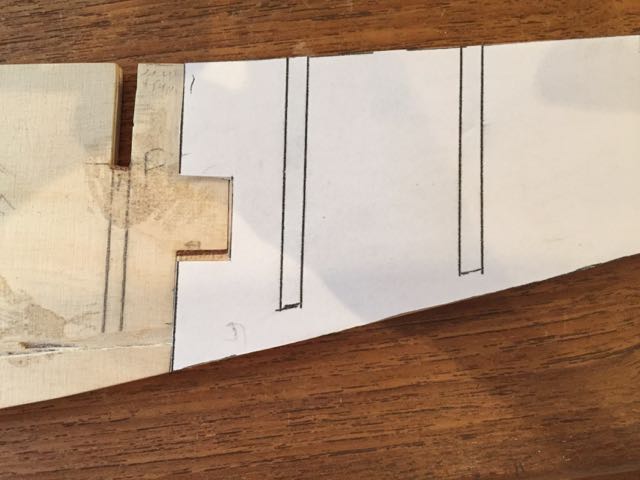
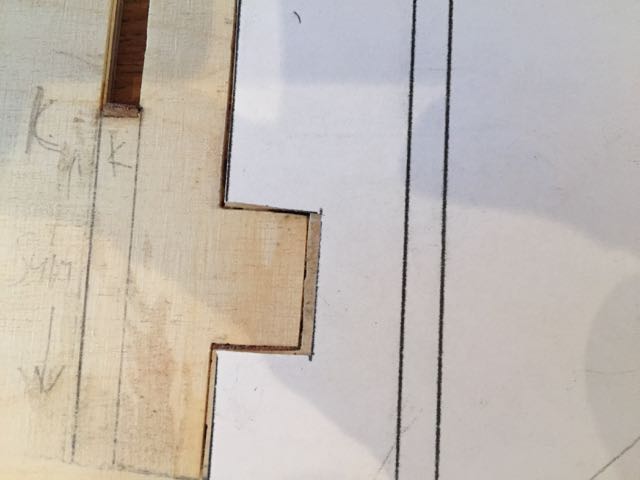
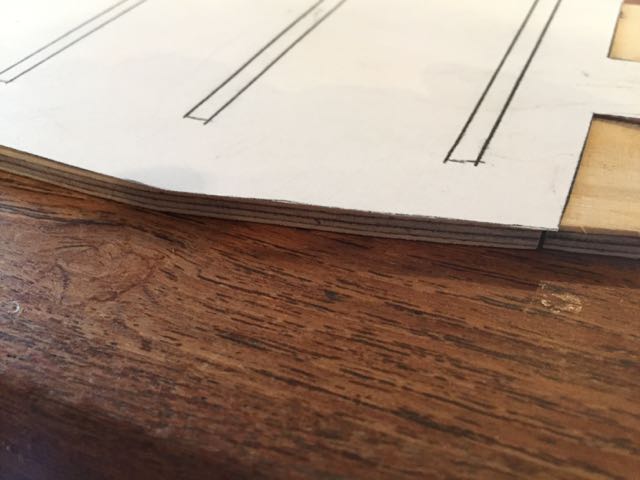
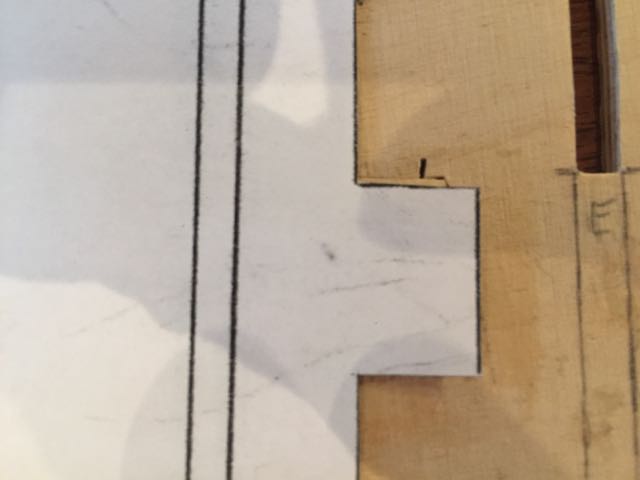
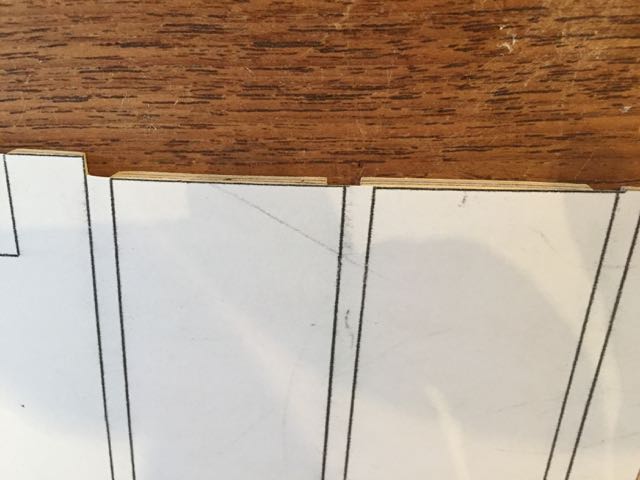
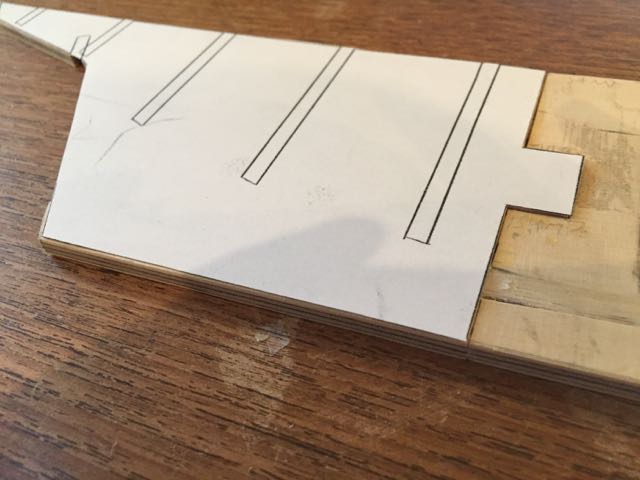
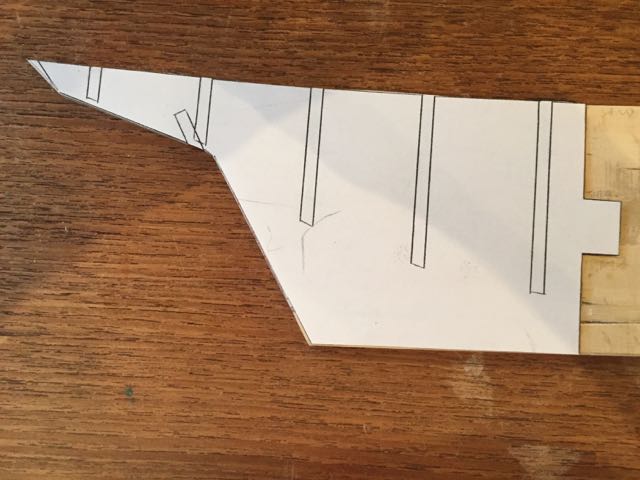
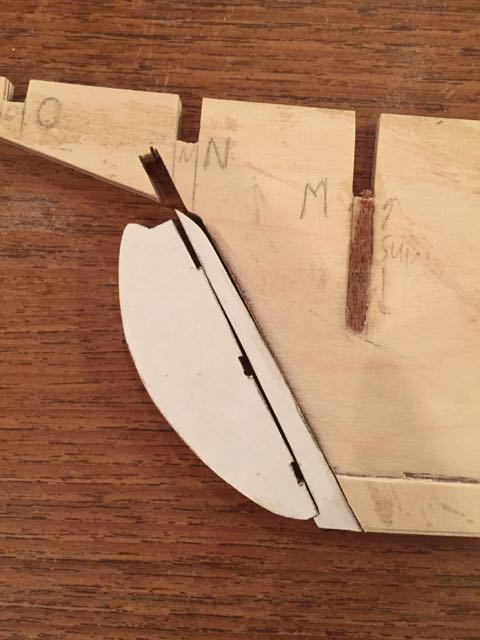
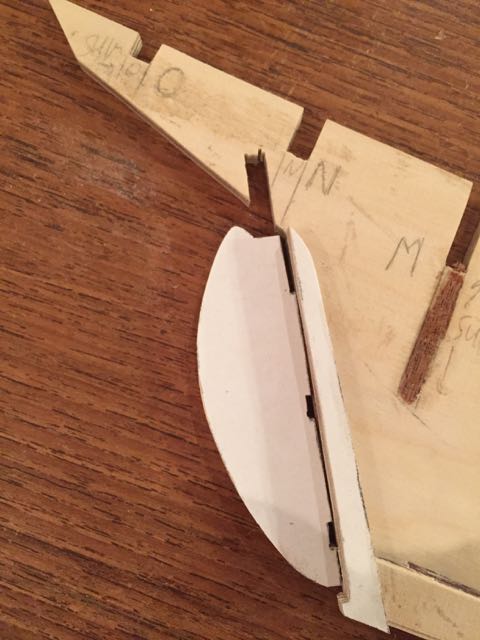
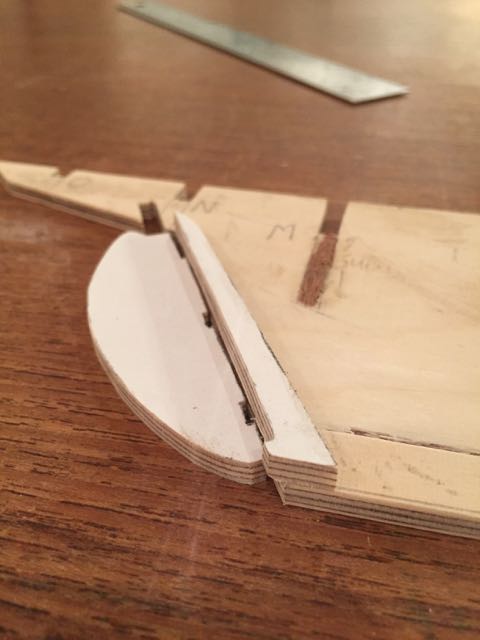
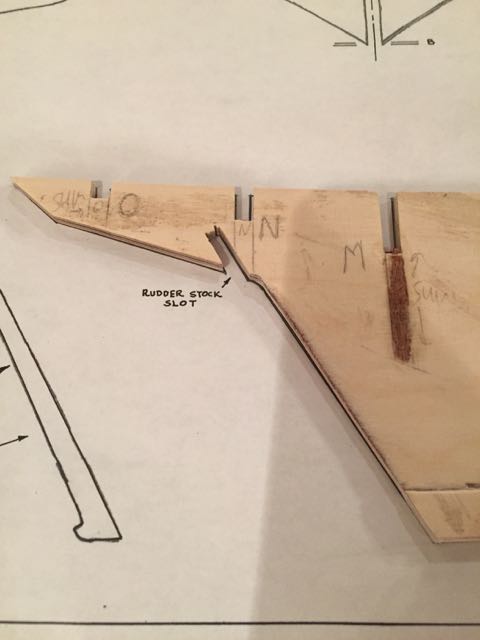
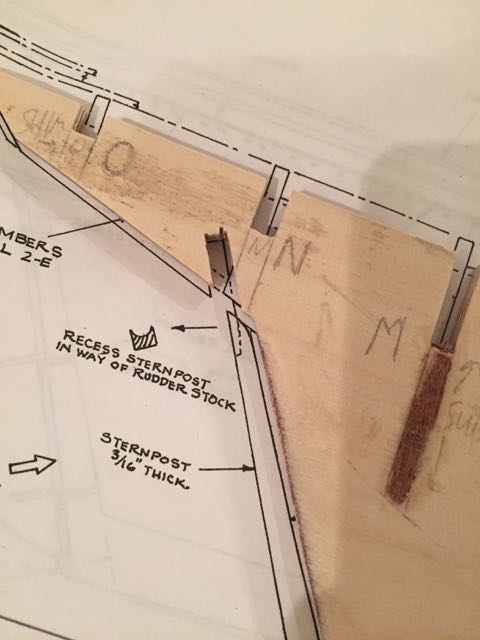
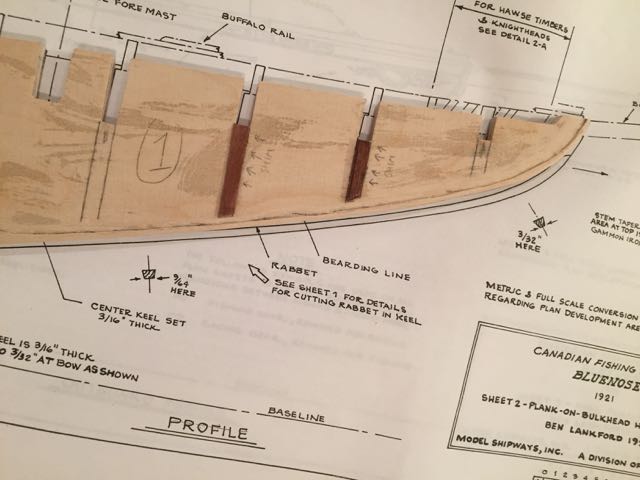
Well I've come upon the first major conundrum of this build.....it took me a while to figure out what was going on, but it turns out that what I thought was a need for minor adjustment of the centre keel at the joint with the sternpost is a major structural problem whose source is a discrepancy in the Model Shipways plans......Here is a digest: Initially, when I was dry fitting the 3/16" plywood pieces, I thought that I was going to have to make adjustments to the aft edge of keel piece 3 to provide a snug fit for the sternpost, which goes on after the hull planking is complete. Initially when the piece was aligned at the bottom of the keel, there was a gap at the upper half which widened to about 1/16"!! Quite a significant discrepancy, which I put down to my novice bandsaw skills. Also the top end of the sternpost, which is rounded over, didn't seem to fit quite right to the keel...This photo shows this gap and the ill fitting top end... You'll also notice the flat angled top of the rudder, out of which the post will project - and you'll note that it isn't aligned with the notch in the centre keel piece....the only reason I noticed this tonight was that I had cut the rabbet joint and was testing its depth at the stern with the sternpost. To my way of thinking, the rudder post should run straight up into the notch. But as this last photo shows, nothing like that is possible given the current state of the parts as made.... Initially I thought I would remake the sternpost so the rudder would align properly, but this next photo shows how much I'd have to trim off in order to achieve that result - not an acceptable strategy..... I then thought I could trim the aft end of the keel to achieve the same effect, but these next photos give you a sense also of how untenable this approach would be.... The odd thing, was that when I checked the parts as made against the template drawings they all seemed to fit ok, with only a bit of sanding required to bring them into line with the templates. I checked the sternpost and keel against the template drawings that I had used to make the parts, and everything seemed to line up, with a bit of shimming and a bit of trimming required as you can see in the following photo, but nothing dramatic. So I decided to test the assembled keel against the profile drawing, which is on a different sheet. When I did this, my jaw dropped. Here is a shot of the stern (you can't see, but the rest of the aft keel piece lines up with the drawing but produces this effect, which suddenly explained why the keel/sternpost joint was so off. Not only that, but the rudder post notch is noticeably aft of where it is my part as cut..... But then I noticed that when I had the keel piece laid on the profile drawing and aligned at the bottom edge through pieces 3 and 2 (aft and centre), this shocking effect was produced at the fore end.... As you see, my whole keel is significantly off from the profile drawing. In a slight state of shock, I checked each part again (though assembled together) against the template drawings and, once again, they matched!!! My conclusion - the only one - is that the template drawings provided by Model Shipways DO NOT correspond to the profile of the ship, but contain significant distortions that I did not catch when I was making my own templates and cutting the parts - I used the template drawing exclusively to test my parts..... So here I am at a crossroads - and a pretty big one. Everything I've made so far fits together fine, with the exception of the sternpost and rudder in relation to the aft keel and notch for the rudder post. But these things can easily be adjusted so everything lines up. The easy route would be to do these fixes and move on, forgetting that from about bulkhead "E" to the bows my hull profile is incorrect....The harder route would be to scrap what I've built (the keel parts anyway, not the bulkheads), take new keel templates from the profile drawing instead of the template drawing, and redo the keel entirely....This would satisfy accuracy and might help cut off further problems down the road....I'm heaving a huge sigh as I write this, primarily because I know I do not have enough 3/16 play to make new keel pieces (had to order through a certain online auctioning site at quite a premium in shipping costs - another online model supply shop had shipping costs that were, in a word, astronomical) and also because this will mean delaying this build until the Spring, when I can reasonably use the bandsaw again to cut the parts....... Anyway, that's my current tale of woe.....Any advice on the easy or hard route would be welcome - knowing that I'm tempted to take the easy one just so I can get on with the build.....Thanks all hamilton

-
Just catching up on your log - glad you made it through the bad weather! Granado is looking really great! hamilton
-
Hi Jond: These last posts were very enlightening for me. I've bookmarked this page now so when it comes (in the very far future) to making my deck gear I can emulate (on a smaller scale) your methods. To be honest one of the things that has been giving me "nightmares" (aside from my children becoming teenagers) is the metal work for Bluenose - and particularly the winch gear, etc. But your approach has opened my eyes to some possibilities beyond the suggestions given by Gene Bodnar in the BN practicum - which I was going to follow, but (all respect to Mr Bodnar) I think your way produces nicer results. Thanks again! hamilton
-
Hi Peter: Wow - your America is coming along really nicely! I'd say the coppering is more than "acceptable" - the rivets are a great detail - and I love the "dockyard" feel you provide in your photos. Really brings the model to life. Also - you live in a remarkable place! I've never been to Switzerland, but hope to in the near future. If you love rain you should try coming out to the Pacific Northwest! We have mountains, too - though not as dramatic as your Alps - and we have, as I say, lots of rain....so if you're ever feeling too dry, this is the place for you. hamilton
-
Hi Tim: Thanks for your very kind words!! Sorry to see no photos here! Though I'm excited to read that you're going for the sails - did I not read earlier that you were thinking of leaving them off? The sails really do make the model....this model anyway.... I did not use Mamoli's cloth since I found it too stretchy and could not get a straight stitch into it. I went to the local sewing supply shop and with the help of some very nice experts at the store I sourced some raw cotton muslin - thin but tough with a tight weave and not a lot of stretch in it - also more or less the right colour to pass for canvas. It is likely out of scale for the build - certainly the tan upholstery thread I used for stitching is out of scale - but I like the effect, so I won't mind too much....My sail-making process does not net the cleanest results.....Looking forward to seeing what you do hamilton
-
Looks really great John - beautiful job on the rigging hamilton
-
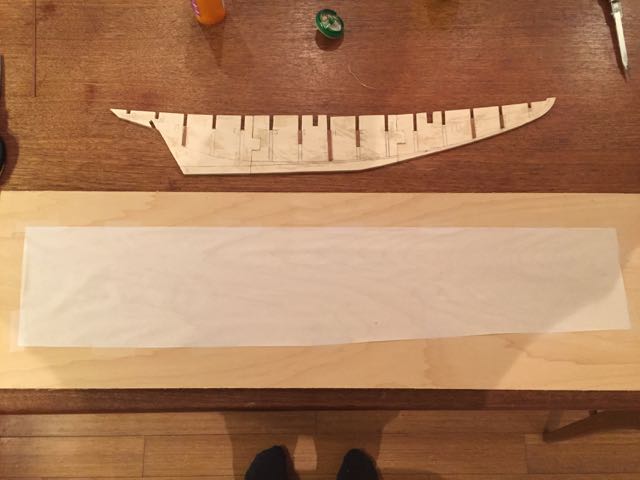
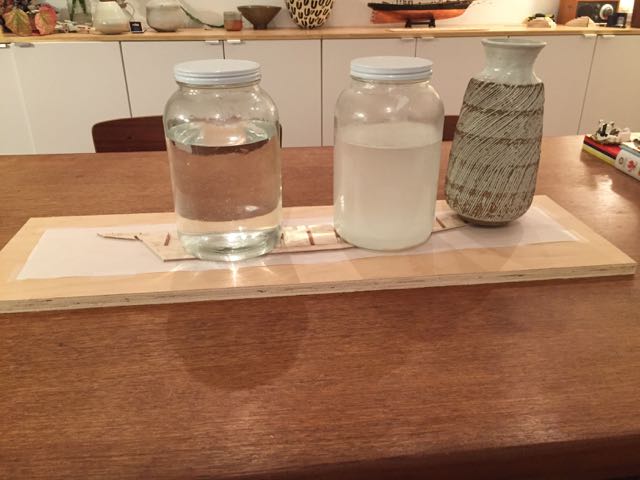
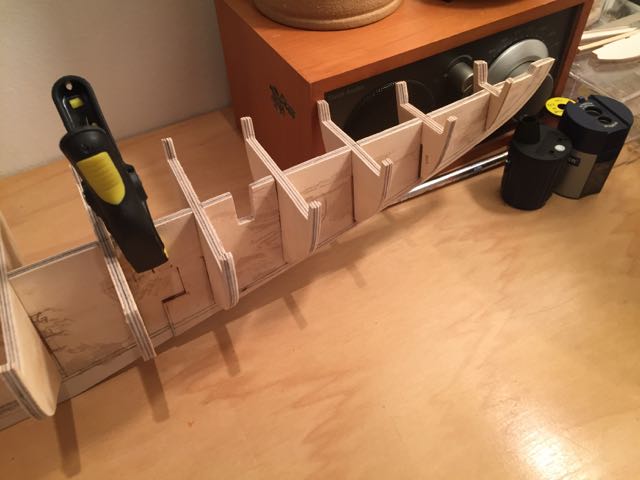
Alright - a minor but significant update on Bluenose - I have finally put glue to wood and assembled the keel parts! I had to do a few minor modifications to the joints between keel sections to make sure they fit as snugly as possible - a little sanding here a little shimming there - while also making sure I didn't accidentally mess with the overall dimensions of the parts. Not too tricky, but very finicky.... I also noticed that I made the first of what undoubtedly will be a long list of errors! In my rush to make adjustments to keel and bulkheads to get the bulkheads to sit nice and square, I realised that the shims I added below the slots on the keel actually made the three keel parts sit unevenly when I laid them out on a flat surface for assembly....The centre piece especially needed shimming and sat about .5mm higher on a level surface than the forward keel piece. The aft part didn't need much but it needed a particularly thick shim at bulkhead "O", which not only put the aft end of that bulkhead about .5mm higher than the fwd end, but also put the piece as a whole out of level with the centre piece! My choices were to try to inserts shims around and use a level to try to get things right (insane!) or to remove the shims on one side of the keel pieces. I went for the latter approach. I then salvaged an off-cut piece of plywood from some shelving I made last Spring, which will function first as the flat surface for setting the keel pieces together and later as my building board, once I invest in some paper large enough to make a tracing of the plan view of the deck from the MS drawings...... I used carpenters yellow glue on the joints and separated the keel pieces from the plywood surface with some parchment paper. Once I had scraped the excess glue away on both sides I set the pieces flat against the parchment and placed some storage jars (and one heavy ceramic urn) filled with water atop the part to keep it flat. The urn was added as an afterthought since I noticed the bow rising very slightly (1/64" or so) off the surface....this might require some correcting - which I'll do when I set up the building board.....When this will be I don't know because making keel supports fore and aft will require the use of the bandsaw and the weather forecast shows rain pretty constantly here for the next little while.....in other words, I'll probably spend more time working on Syren than on Bluenose in the near future...... bye for now hamilton
- 250 replies
-
- 11
-

-
Thanks Jond: Thanks! I imagine that has less to do with any skill I possess and more because I'm working from existing kit plans rather than developing a model from scale drawings - plus the needs of a static versus an RC model makes things simpler and tidier. I don't think I have the patience or skill to go down the path you're following!! We'll see how neat things look when I start carving the rabbet joint...... hamilton
-
Hi Jond: Finally took a slow stroll through your build log. What an odyssey! I will certainly be following this with great interest as I develop my (much more modest) Bluenose. I'm very curious about how you will tackle the anchor winch and windlass....I too have read through Gene Bodnar's Bluenose practicum and he suggests a way of making these parts that does not involve any metal work.....but I'm not sure of how the results will look.....especially at 3/16 (let alone 1/4) scale..... I also really like your approach to marking out the hatch areas during the deck planking - so simple! Yet I had never thought of it! I will definitely be using that approach on this and all my other builds so I can nest the hatches and yet have nice deck planking too. Thanks for posting this log and I'm excited to see how your build develops! hamilton
-
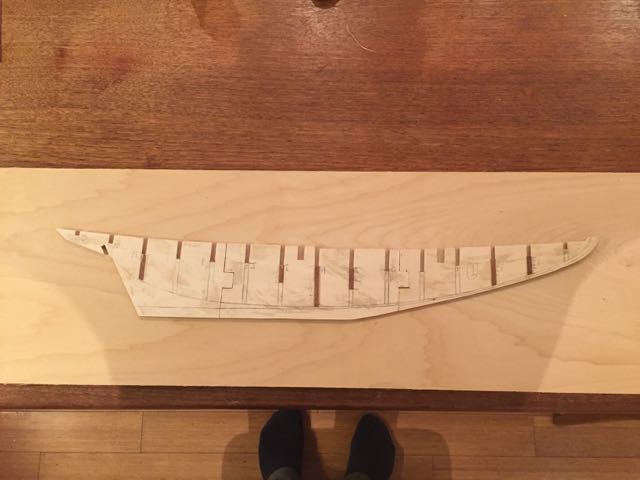
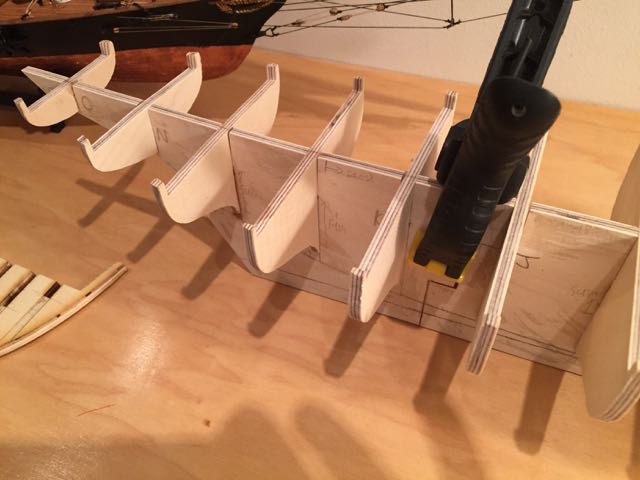
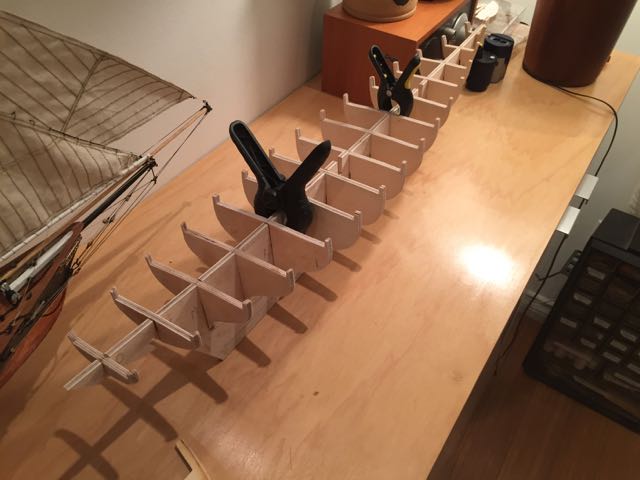
Slow progress on Bluenose. The templates I made from the Model Shipways plans were, I think, accurate. But my bandsaw skills need work! The centre part of the keel needed a lot of adjustment - the cut along the top was quite uneven and considering the quarterdeck "step" is there this required some finessing before it was right. The aft keel part was fine - needed a bit of trimming along the aft top edge, but was good other than that. The bulkheads, on the other hand, required quite a bit of adjusting and the addition of shims on the keel below the slots before they would sit square and rest nicely on the keel..... Anyway, as of this evening I've finished rough shaping and marking up the main framework pieces. Rabbet and bearding lines are drawn on the keel parts port and starboard, the centre lines marked on the edges of the keel and on the tops of the bulkheads and rough fairing of the fore and aft bulkheads and inboard bulkhead extensions is finished. My next step will be to make a building board and glue the keel pieces together, add some reinforcements to the seams and then figure out the mounting...this is something that's always turned me around a bit.....but more on this later...for now here are some photos of the keel parts and bulkheads clamped together.....bye for now hamilton

- 250 replies
-
- 17
-
-
Thanks a lot Tim! Oh to have a wood shop! Or a New Mexico autumn for that matter....I imagine it's drier than the one we're having up here in the pacific northwest..... I'll wait for your return to America - I hope you do get back to her soon - she's a lovely model! Bye for now hamilton
-
Thank you Mark, Nils and Peter! Peter - there are so many great Syren builds on the go that I'm unsure what mine would add! I will be keeping up with my scratch Bluenose log so you can find me there as an occasional contributor - I'm a kitchen table modeller so when Canadian winter descends I can't really use any of my power tools (haven't even tried to convince the Admiral to let me use the bandsaw in our dining room!)....so the challenge will be to get all the heavy cutting and sanding done before I'm unable to reliably work outside.....and I'll look forward to catching up on your America build! And Tim's (haven't heard from him in a while.....) Anyway thanks again! Bye for now hamilton
-
Well after over 13 months and over 100 actual work sessions America is now complete! It seems fitting that the last night of work on this model was among the most frustrating. I'm sure we've all experienced times when it occurs to us (too late!) that it probably was not the right time for us to sit down at the bench but we did it anyway....that was me tonight.....In rigging the jib halliard, I pulled its corresponding deck block free, but then in pulling up the eyebolt it was stropped to I ended up pulling free the single block holding the starboard side staysail sheets, and then when I was cutting away the thread with which I'd stropped that block to an eyebolt on the cap rail, I ended up crushing the starboard block for the jib sheet!! I thought I was ten minutes away from completing the model, and then put in another 90 minutes worth of work doing repairs, and then having to redo the jib halliard block on deck twice! Anyway, I think I would have put things to bed when the chaos first happened if I hadn't been so close to the end....all in all, I'm pleased with how the model turned out. There were a lot of (to me) confusing parts of this build and the fact that the kit was missing some key components (thanks again for the replacements Tim!!) and had others that were not the proper size for the jobs they were meant to do made things tricky and sometimes frustrating. I fretted probably more than I needed to over the hull planking since I ended up replacing the hull planking material - but used wood strips dimensioned for imperial measurements when the kit used metric.....But all in all, I had fun building this model and would probably recommend it. Thanks to all for following along and another special thanks to Tim (mojofilter) for the help! I've decided to build Syren next, but will not be keeping a log. I find that when I do I have less time for following my favourite builds here, so I think I'll spend my MSW time admiring other people's work! Here's a photo of the finished model - more in the gallery! Bye for now hamilton

- 165 replies
-
- 10
-
-
Thanks Bob, Peter and David for the comments and likes! Sails are so tricky....and I have a lot to learn on that front.....but even in the crude form they have here I think they add a lot to the look of a model. Looking forward to finishing this one! It's taken FAR longer than I imagined (working on it for over a year - almost as long as the much more complex Blandford)...... hamilton