
MORE HANDBOOKS ARE ON THEIR WAY! We will let you know when they get here.
×


hamilton
-
Posts
1,930 -
Joined
-
Last visited
Content Type
Profiles
Forums
Gallery
Events
Everything posted by hamilton
-
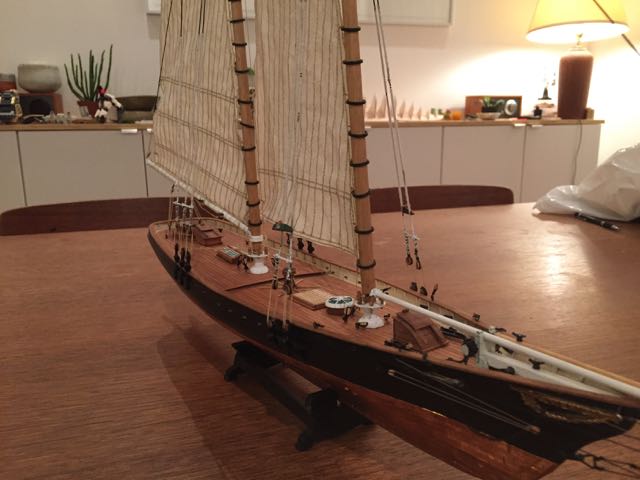
 Hello there Just a few photos of the progress to date on America - realising I've not updated here in a while....a lot has been accomplished since my last update with photos - finished making the spars and doing the standing rigging, made 3 of the five sails and now rigged them......here are the results. Now to finish stitching the fore staysail and jib and finishing her off! Next post should do it I think..... hamilton
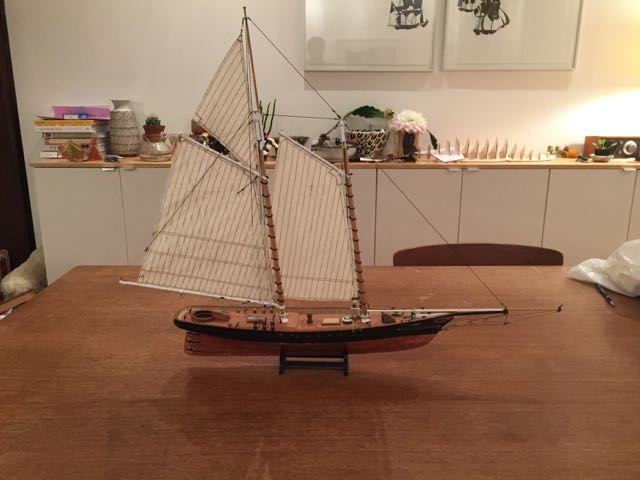

-
Hi Peter! Yes - I was experimenting with some new approaches, including hand stitching the hems and boltropes, which turned out to be a real bust....I've read through a number of tutorials on scale sail-making, but I feel that none of them are suitably descriptive in terms of the actual process....I am going to eventually order volume for of David Antscherl's The Fully Framed Model, which I understand has a section on sail making.....given the high quality of the descriptions in the rest of that series I've got high hopes for the sail-making parts...... In any case, I have made sails for the America - they are machine stitched (easy enough) and I've simulated the hems with regular machine stitching....I'll post some photos later to show the results....they're not pretty close up, but they work fine to bring the model to life a bit more (as long as people aren't too picky about things....the main issue is the fraying of the sail cloth around the outside hem stitches....it is impossible (for me anyway) to cut the sails from the cloth exactly to the hem line, so there is a bit of fraying - sometimes this results in the hem stitch getting pulled out a bit too....fortunately this has only happened in areas of the model that don't immediately draw the eye....except my eye of course...... hamilton
-
It's been a while since I updated here, but progress on America continues.....I spent about a week re-learning how to use the sewing machine and make half (or quarter?) decent stitches, then a bit more time messing up and redoing the sail patterns, then still more time stitching the sails, then accidentally cutting the jib sail pattern in half while cutting out the main gaff topsail.....you get the idea......too frustrated to take photos, but I'll have a few of the sails to this point posted a bit later. I've got the mainsail and the main gaff topsail on at this point - from a distance they look great! Up close....it's obvious I need to develop my technique.....or forget about sails - fortunately none of the builds I have from here on (except the Berlin) feature sails, so I can avoid them.... Anyway pictures soon - I imagine I'll be finished this build on the weekend or early next week! Then it's onto something else....not sure what I'll build next...my scratch Bluenose project is on the go but it can't occupy much of my time, so I'll choose another kit to build alongside it....It'll be either Syren or the Corel Bellona but it's been hard for me to make a choice. I know that Bellona will take a long time since I want to build the kit to a high standard of historical accuracy (using the AOS volume, as well as Lees Masting and Rigging). Syren will be "easier" though I'm frightened at the prospect of so many 1/8" and 3/32" blocks!! Anyhoo....that's all for later....in the meantime, happy modelling hamilton
-
What are these? does anybody knows? thanks.....
hamilton replied to BIGMAC's topic in Masting, rigging and sails
Yes something like that but obviously less modern.....I don't know anything about lateen rigging, so the idea of a counterweight kind of makes sense - but I'm used to seeing ball trucks on the upper end of a top or t'gallant mast, so that's just my guess..... hamilton -
What are these? does anybody knows? thanks.....
hamilton replied to BIGMAC's topic in Masting, rigging and sails
They seem pretty exaggerated, but they must be "ball trucks" (though "ball" doesn't really describe them. They would have contained a sheave through which the flag halliards would have been run - for flying standards and pennants off the masts.....I might be wrong though - they look significantly different from the later period ball trucks I've seen..... hamilton -
Thanks Allan! I'm flattered you came by! So far the toughest aspect of scratch building is figuring out how much material I'm actually going to need.....I have a suspicion that I'm going to spend a lot of money on wood and other materials that "won't end up getting used" - in quotes because I know they eventually will get used...... Also - starting with the BN feels more like dipping a toe in the lake rather than diving right in......I'm not sure what's on the bottom or exactly how chilly the water is......the MS plans are very detailed and take a lot of the guess work out of things - though developing some drafting skills is something I would truly love to do.....more for the future! Bye for now hamilton
-
Hi Jond: The trip to Lunenburg is definitely worth it. I grew up just up the road from you in New Brunswick (spent a bit of time in Portland and Bangor as well). Anyway, I wish I had the kind of space you've got for modelling! This will be a really interesting project to see come together. hamilton
-
Hi Jond: Thanks for stopping in - I took a look in on your build log - that's going to be HUGE! I'll follow with interest for sure....bye for now hamilton
-
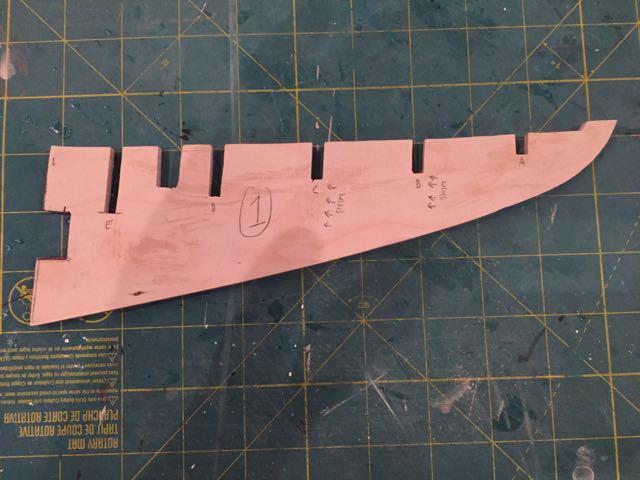
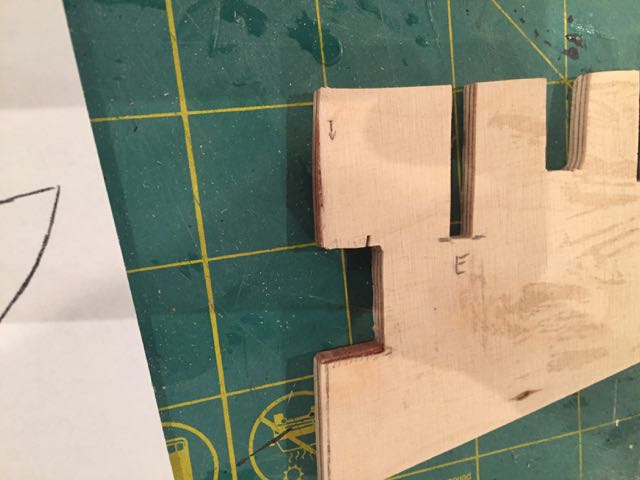
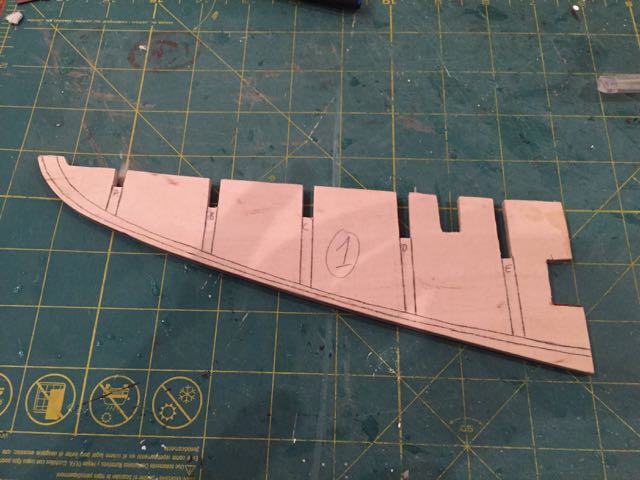
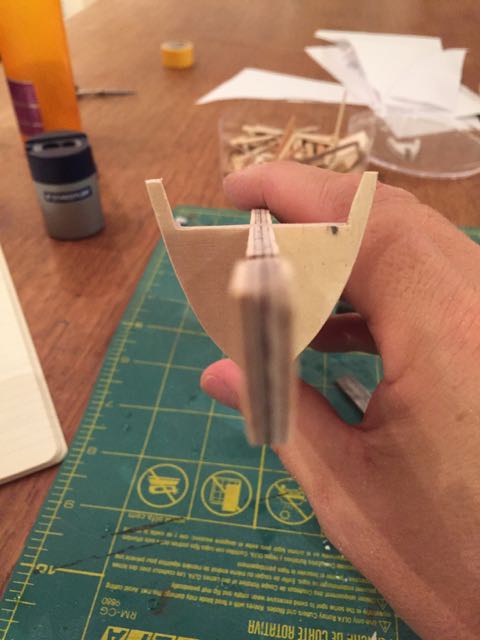
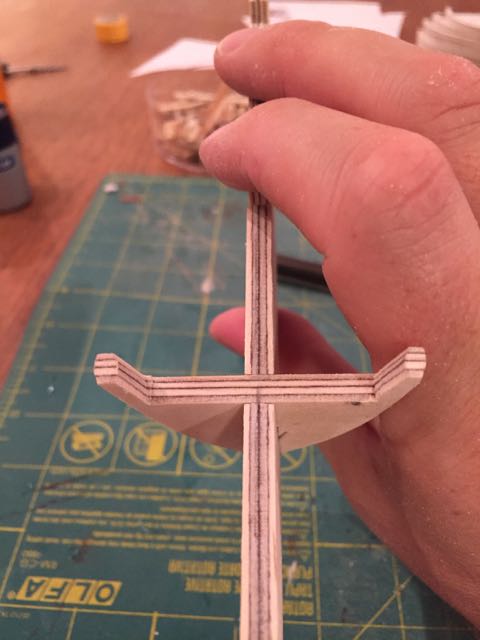
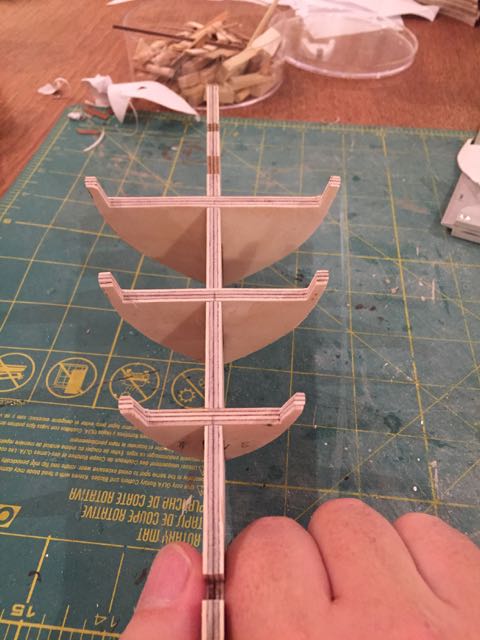
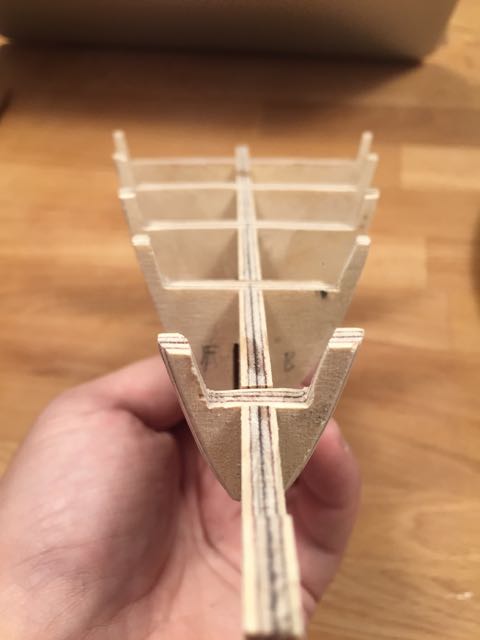
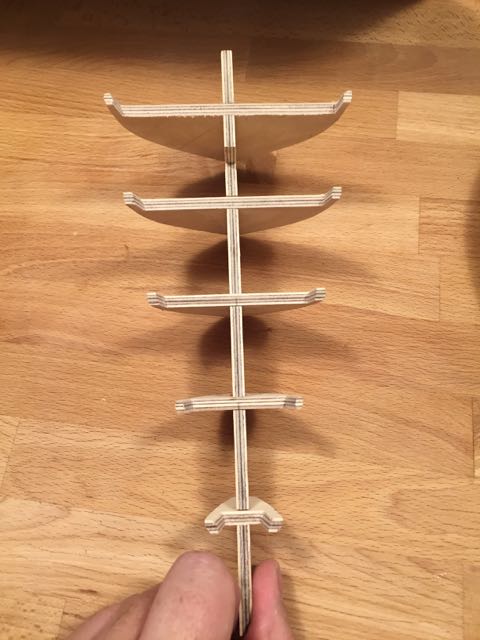
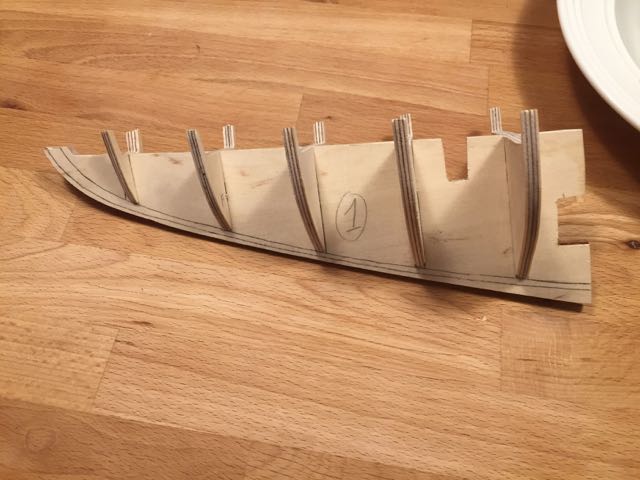
Minor update on Bluenose...... All the 3/16 framework parts are now cut and I've begun to refine them and prepare them for assembly, section by section. Because I can only work on Bluenose for a few hours a week, the progress is relatively slow. I started with the forward keel piece (1), testing it against the plans and marking it up where adjustments needed to be made - a particularly fussy area was the joint with the centre keel piece (2), which needed quite a bit of shimming and trimming for a decent fit. I'll also have to do a bit of work on the fwd joint of keel piece 2 (especially at the top/deck line) to make things fair..... I then needed to mark on the rabbet and bearding lines on both sides of the keel part....technically I should have waited to do this until all the keel parts were assembled so I could be assured of a smooth run of these important lines....but I decided instead to throw caution to the wind! I figure they're just pencil marks so I'll see how things line up and make adjustments later - worst case scenario I'll have to make a template of the full run of the lines and remark them.....not the end of the world. I made templates off the plans and marked the lines from the templates. They look a little rough in these photos but I've cleaned them up since.....Once these lines were on, I drew in lines from the bulkhead slots to the bearding line for purposes of squaring the bulkheads.... The next step was to dry fit the bulkheads. This was a matter of filing out the keel slots on the bulkheads slightly (all were tight) and the bulkhead slots on the keel slightly. Some of the slots needed to be filed down a bit so the reference lines would line up properly and so the tops would be flush on the top of the keel. In seating the bulkheads I noticed a couple whose tops needed to be sanded down a bit further to sit flush. The tops also needed to be filed down for the deck sheer, and then faired slightly (using sanding blocks and files on both the outer edge and the inner edges of the bulkhead extensions). Final fairing will be done later obviously.... I also discovered that I had to recut bulkhead "A" and make significant adjustments to bulkhead "E". This is what I did today. That does it for the forward keel and bulkheads....next week I'll start work on the centre section..... That's all for now. Thanks for stopping by hamilton
- 250 replies
-
- 13
-

-
Frame construction
hamilton replied to jbeyl's topic in Building, Framing, Planking and plating a ships hull and deck
Hi Jon I invested in the first volume of TFFM and it describes what you're talking about in great detail (with illustrations and photos to help with visualisation). I have not built a fully framed model, but I can see how this and the other TFFM books would be invaluable in this process, especially for those cutting their teeth on this approach. I will likely buy volume 2 this Christmas and use both for general tips in the construction and outfitting of my Echo cross-section (once I build up the guts to tuck into that project....) hamilton -
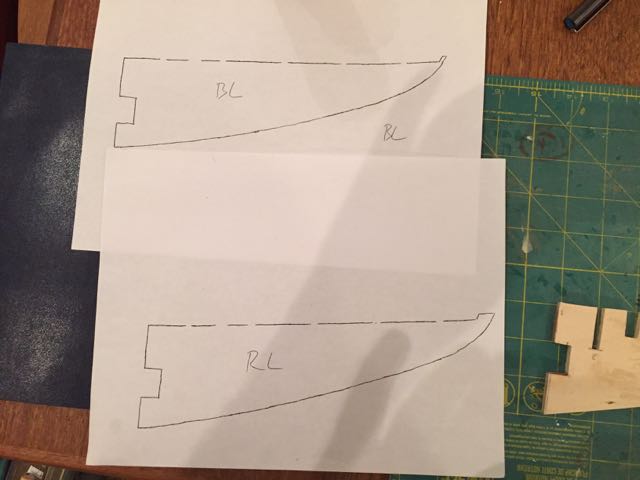
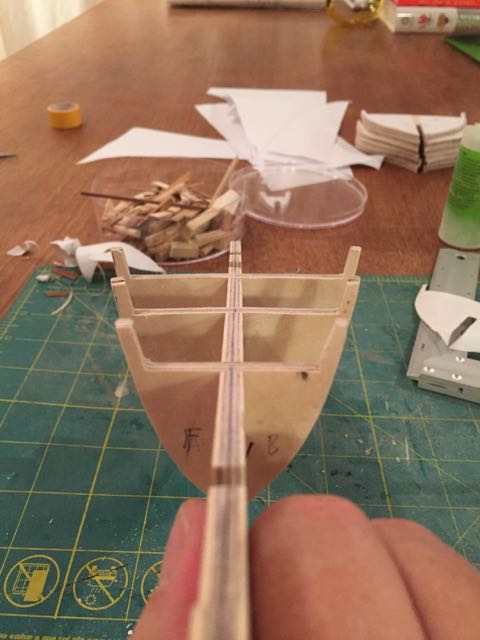
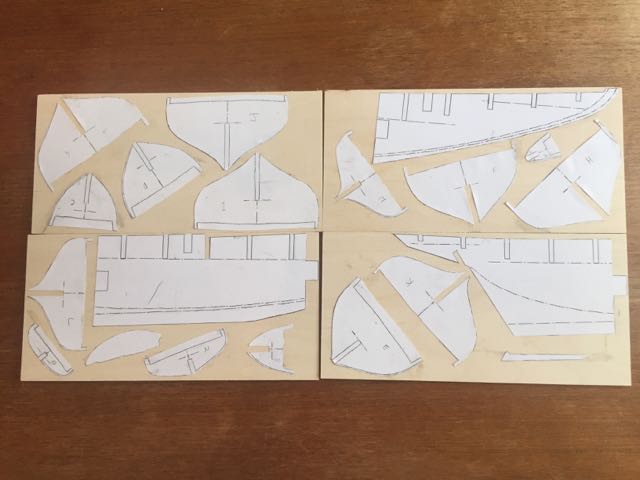
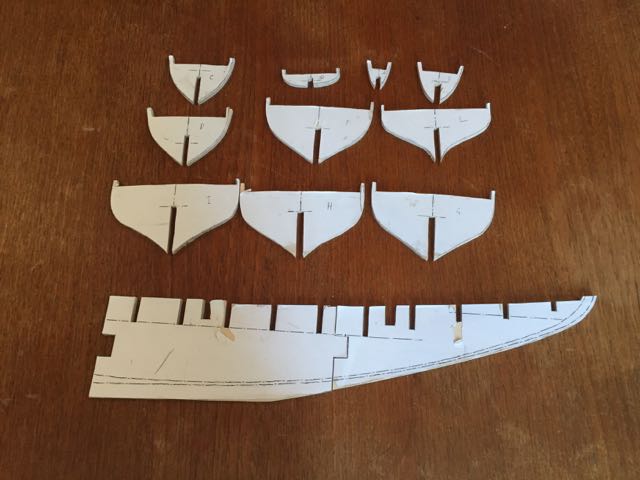
OK - it's time to turn this into an official build log by documenting the beginning of the build....these photos may look familiar - in fact they're almost identical to photos posted earlier of my tests...the difference is that this is the real deal.... I remade patterns for the keel pieces, bulkheads, sternpost and rudder and arranged these on 4 3/16" birch ply billets. I then dragged out the bandsaw and managed to get through 2.5 of the billets before my wife came home with the kids and I had to pack up.....I also took my disc/belt sander for a test drive cleaning up the parts after cutting - I already see the great utility of this tool! One issue is that because of the depth of the gap between the belt sander and the frame I can't use the belt sander to clean up all the bulkhead slots....I'll take a file to these later....in the meantime, I'm quite pleased - I've only really botched one part so far (bulkhead "M", which I'll have to redo) - with a bit of finessing, I think the framework will come together just fine.... Anyway here are a couple of photos - it'll probably be back to the America during the coming week (making sails, and finishing the rigging), but while the weather's nice, I'd like to get as much into the Bluenose as possible - once the framework's done, I'll be able to move the build inside for planking, etc.... bye for now hamilton
- 250 replies
-
- 11
-
-
Looking really nice! hamilton
-
attaching grommets to sail feet/luff/head
hamilton replied to hamilton's topic in Masting, rigging and sails
Thank you all for your comments - very sage advice!! I'll have to give it some consideration - fortunately I do have an excess of fabric so I can try a couple of things to see what works/handles best - I'm definitely not going to spend 300$ for a grommet press!! I think that's a definite.....as for the rest, seems like there's latitude for experimentation. Thanks again and bye for now hamilton -
Hi there: I've seen grommets represented on the feet, luff and head of sails (mainsails) through which the lashing runs. Can anyone describe/post photos of a technique for attaching these to the sail? The instructions that came with my Mamoli America kit are extremely vague but reference riveting the grommets on....there are some extremely small grommets that come with the kit for this purpose, but I have no idea how to rivet them, nor how really to attach them to the sails....my instinct is to simply fasten them on from the display side only, but I think that ultimately this would look bad..... Any and all suggestions would be most welcome! Thanks a lot! hamilton
-
Hi Tim: The parts you're referring to are "hearts" -- there are closed and open varieties - the open ones you'll normally see on forestays of the 18th century (perhaps beyond and probably prior, as well). The ones on America are closed -- they should be seized into the shrouds with the grooved side facing away from the line. They are rigged using lanyards - I usually tie the lanyard to one of the hearts using a simple overhand knot and then you just wrap the line between the two hearts....I'll get a picture up soon I promise.... Yes I quit on Dec. 6, 2006. I had been a committed smoker for about 10 years at that point and an occasional one for the 6 or 7 years prior to that. It was pretty tough, but definitely the best decision - I still indulge very occasionally - usually while travelling, which I do frequently and mostly alone. It's relaxing to sit at a cafe somewhere and have a cigarette with few worries or commitments. I'm heading to Spain this Saturday and will undoubtedly have a few cigarettes over the ten days I'm there if the humidity goes below 65%....otherwise it's just gross..... hamilton
-
Hi Tim: Thanks for the tip.....I'm a little short on cigarette lighters (quit many years ago) but I'll have a try of this method....I'll see if I can get a decent picture later today and post it for you....bye for now hamilton
-
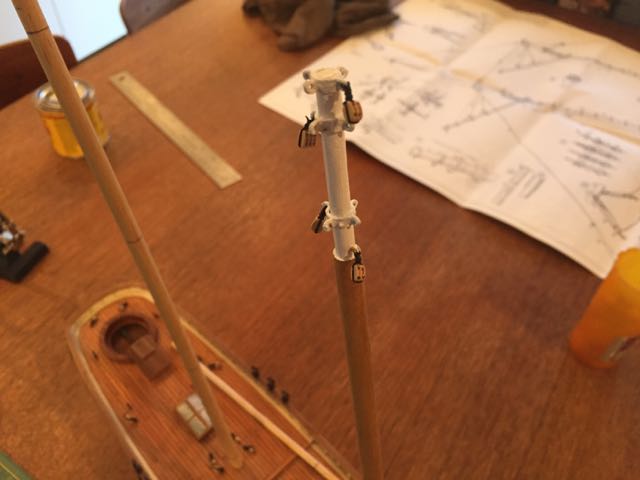
As promised, a very small update - have not taken many photos of recent progress, though at this point I've constructed the foremast, mainmast and maintopmast and stepped and completed standing rigging on the fore mast. I have served the lower portion of the shrouds with white sewing thread (following Tim's build), but it has become really fuzzy....I was thinking I would paint on some diluted PVA glue to calm the frizzies down....but I'm open to suggestions.... Anyway, here's all I've got! Quick snap of the foremast head as a teaser....more later hamilton
-
Hi Tim: Yes you're right - not the kit-supplied thread, which I don't plan on using. I have a stash of thread of various gauges left over from other builds (mostly the model expo thread) and also some Syren thread that I bought in bulk a while ago. I've tried to go as light as possible with the gauge, but I was having a lot of trouble with the 1/8" syren double blocks - mostly because I needed to widen the holes and I don't have a collet for my pin vice that will hold smaller bitts....So I ended up going with 4mm blocks all around for the bobstay tackles (though not for the martingale backropes...) Anyways.... I understand your decision to avoid sails....they are very tricky. I haven't done sails in a while but I will try on this one....we'll see how they come out. Not a huge amount of time for modelling these days (or for the next few weeks - the admiral's down in NYC for the week and then I'm off to Barcelona the week after that, then my classes start the day after I return so it's a very busy time.....Some small update on America later tonight or tomorrow no doubt.... hamilton
-
Ahhh ratlines! Thankfully my current build doesn't have them.....listening to whatever music soothes you is as good a prescription for creeping ratlinitis as I can think of..... hamilton
-
Thanks a lot Frank! This is exactly what I've been looking for!! Much appreciated! hamilton
-
Beautiful work - thanks for showing your technique on the mast woldings - I'll definitely borrow this technique for future builds! hamilton
-
Beautiful craftsmanship as always, Bob! Thanks also for listing the paints you use! The wood-toned one seems pretty authentic, considering it's paint! Very nice work! hamilton
-
Just catching up on this build - great work! hamilton
- 306 replies
-
- 2
-
-
- armed virginia sloop
- Patrick Henry
- (and 2 more)
-
Hi Peter: I almost bought the dremel moto saw, but the one thing that held me back was that to do angle cuts you had to hold it like a coping saw.....I preferred to have something with a tilting table for angle cuts.....the band saw works well, though I have nt had extensive use of it - seems to cut curves nicely, though the 1/4" wide blade does not do tight curves, which is why I'm trying to find a thinner blade - 1/8", which I heard was available, but have never actually seen.... At some point, this will turn into an actual build log, I promise! hamilton