hamilton
-
Posts
1,933 -
Joined
-
Last visited
Content Type
Profiles
Forums
Gallery
Events
Everything posted by hamilton
-
 Well normally I spend my Sunday nights modelling, but this time I've got too much work to do and am grading essays instead. However, I thought I'd share a couple of photos with you - not of the Blandford. This afternoon I took my son and his friend to the Vancouver Maritime Museum where the St. Roch is housed. The museum is being renovated so the ship is closed unfortunately. There is a small marina close to the museum where boats of interest are often docked. Today we found the North Star, Canada's only fully rigged ship. It is pretty small, but the rig is quite impressive and of extreme interest on such a strange vessel. I just have a shot up into the rigging, so sorry for the lack of context.... The second photo is of a future project - I've been toying with the idea of this one for a while, and when I saw the kit at the museum gift shop and compared with what I would pay shipping it from an online supplier I snatched it up! Once I get through a couple of other builds I'll start a log on this one! Bye for now hamilton
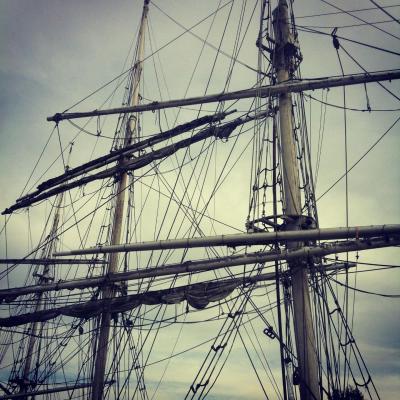

-
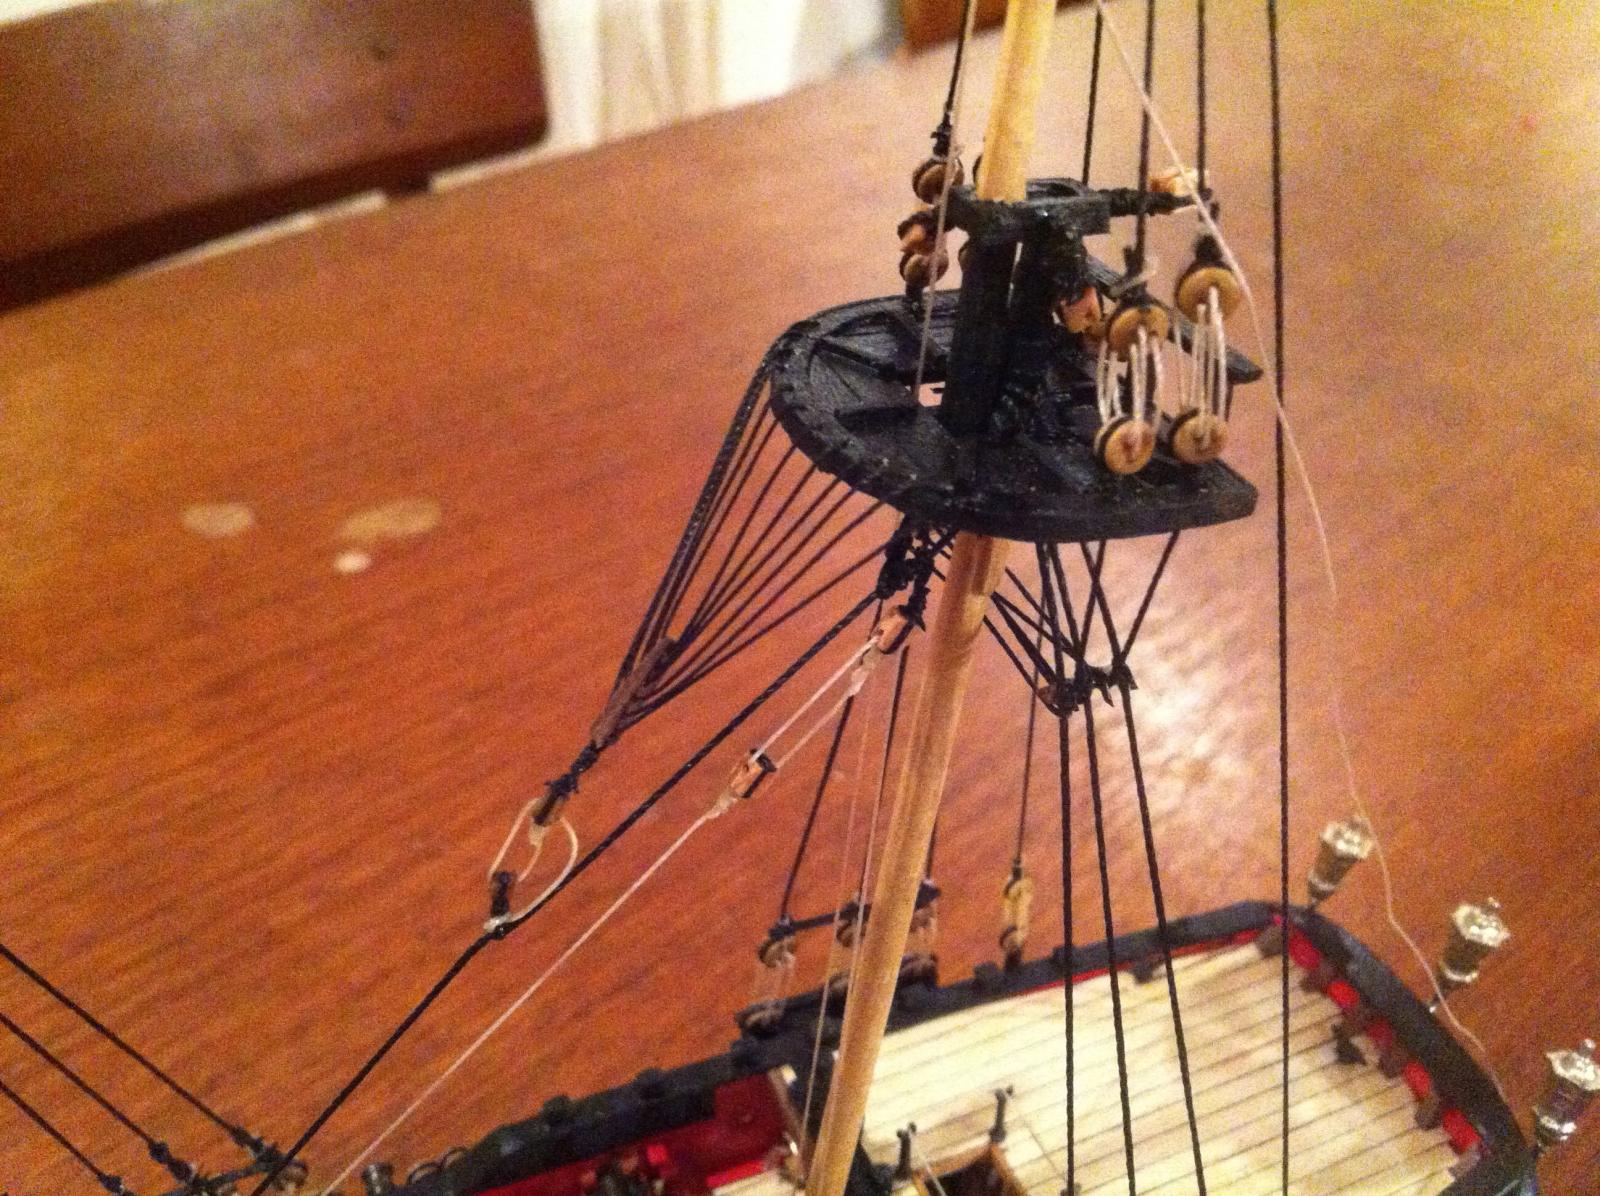
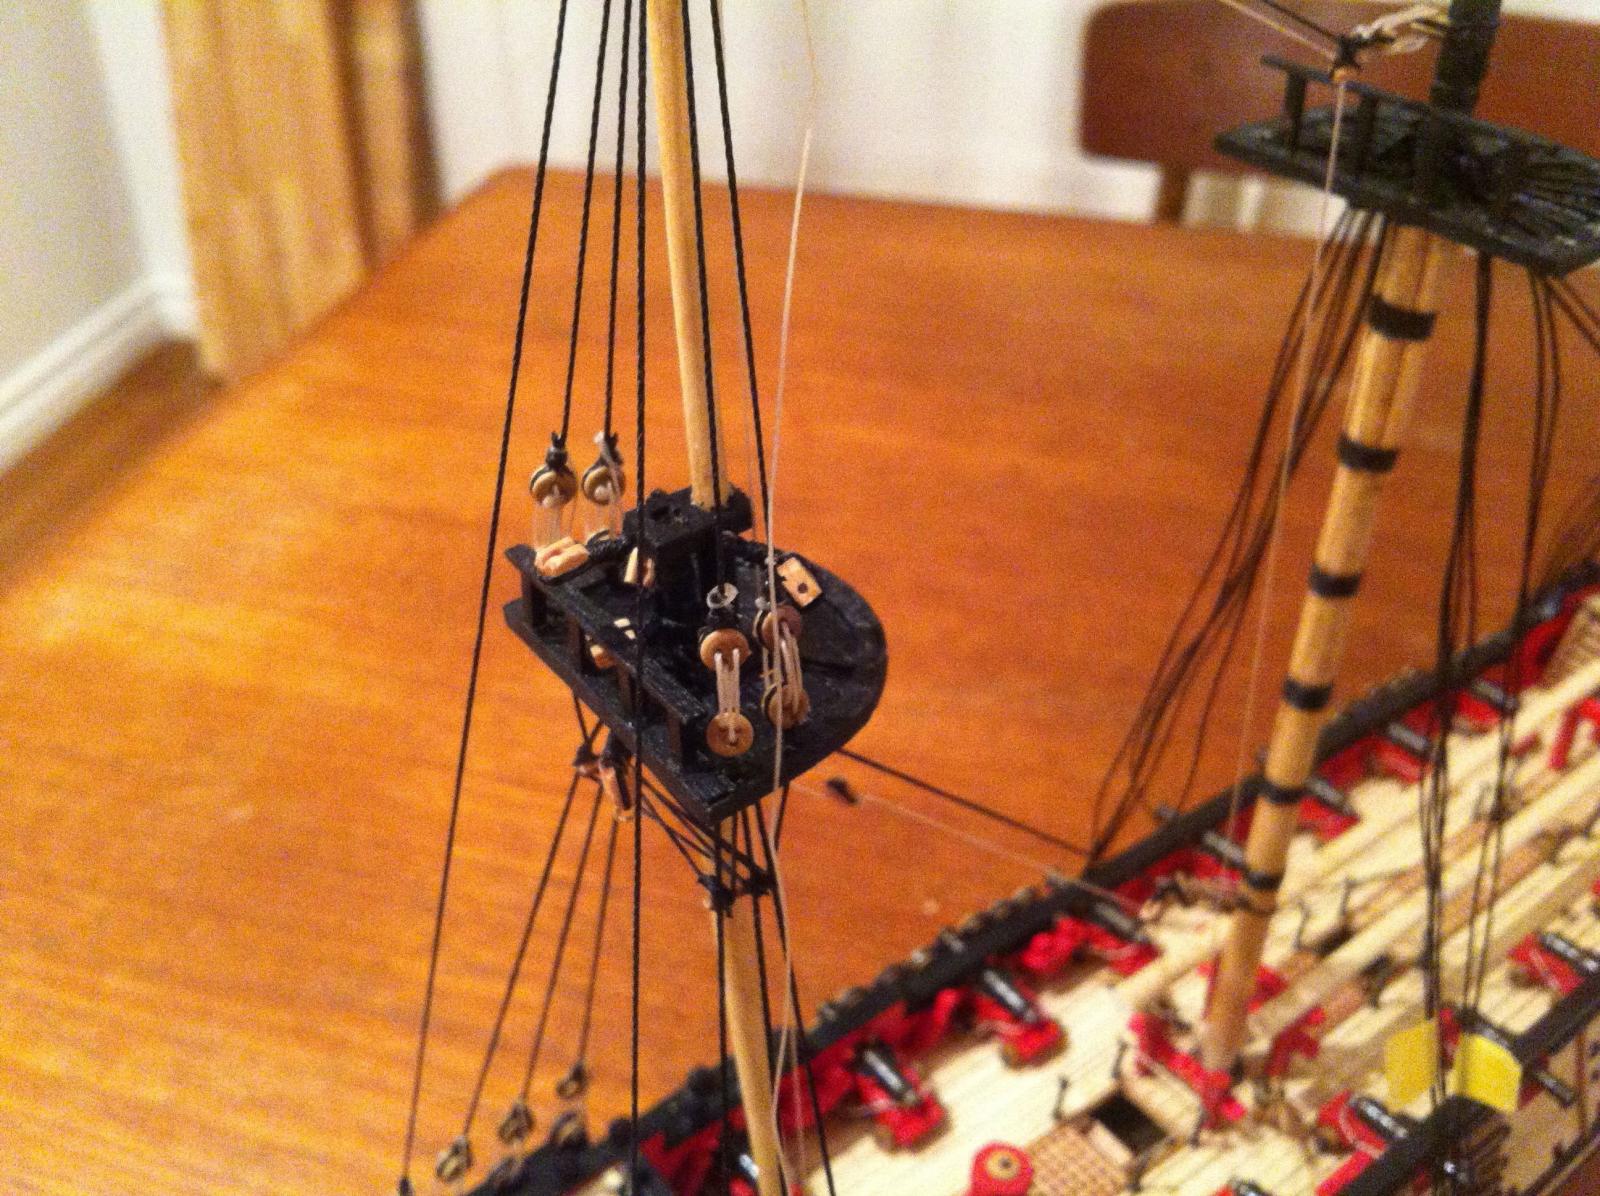
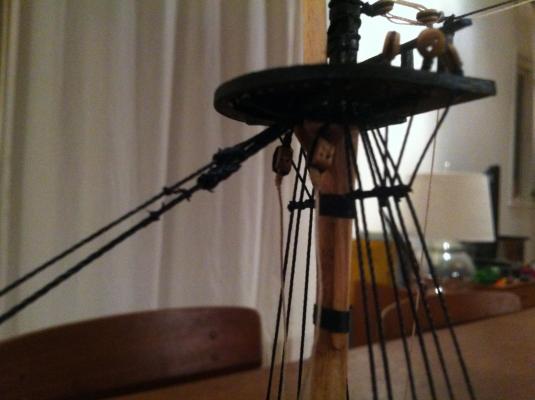
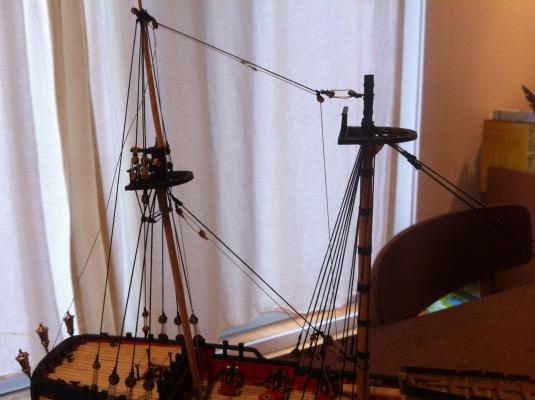
Thanks Alistair & Ferit: The scale is quite daunting for the little tasks, to be sure. As for the slackness in the lines - in some cases the lines haven't been rigged - the jeers I had to seize into the upper jeers blocks so they had to go on when the blocks did, though they won't get rigged for a while and will go on dangling and getting in the way until the lower yards are fitted. Also, I had to put on the mizzen topsail yard halliard well before the yard itself since (following Lees) it is seized with an eye onto the mizzen topmast. It is always my preference to attach these lines while the masts are off the ship as it reduces the complexity and danger of trying to attach them amidst the spider web of other rigging.... There are other lines, however - and in the photos the mizzen topmast shrouds and the crowsfeet tackle are obvious culprits - where it is builder error that has led to an imperfect look. The more I look at the crowsfeet tackle, for instance, the more I want to redo it entirely. I think I could re-do it without too much bother....and if I get through all my house chores and grade enough of my student's essays I may try this evening, in tandem with the main crowsfeet and main catharpins....So while the crowsfeet themselves are by no means perfect, fixing the tackle will hopefully go some way toward making the whole rig look a little better..... hamilton
-
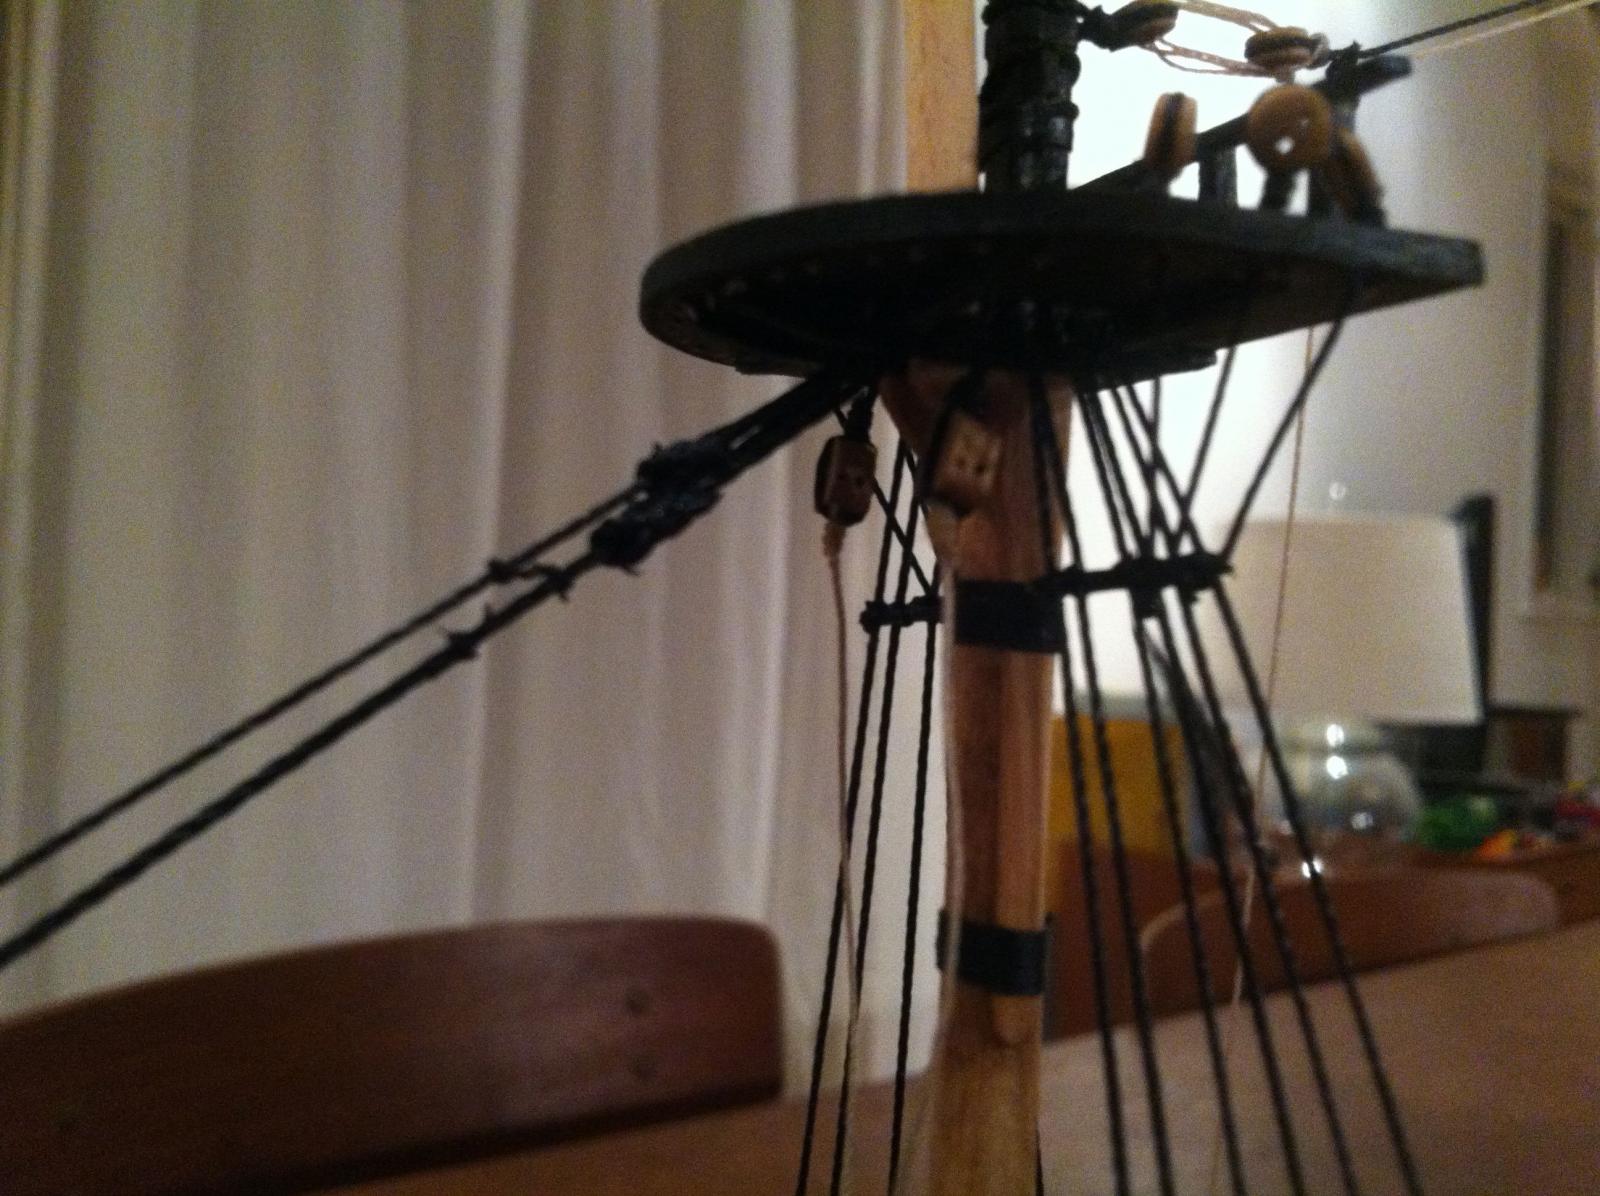
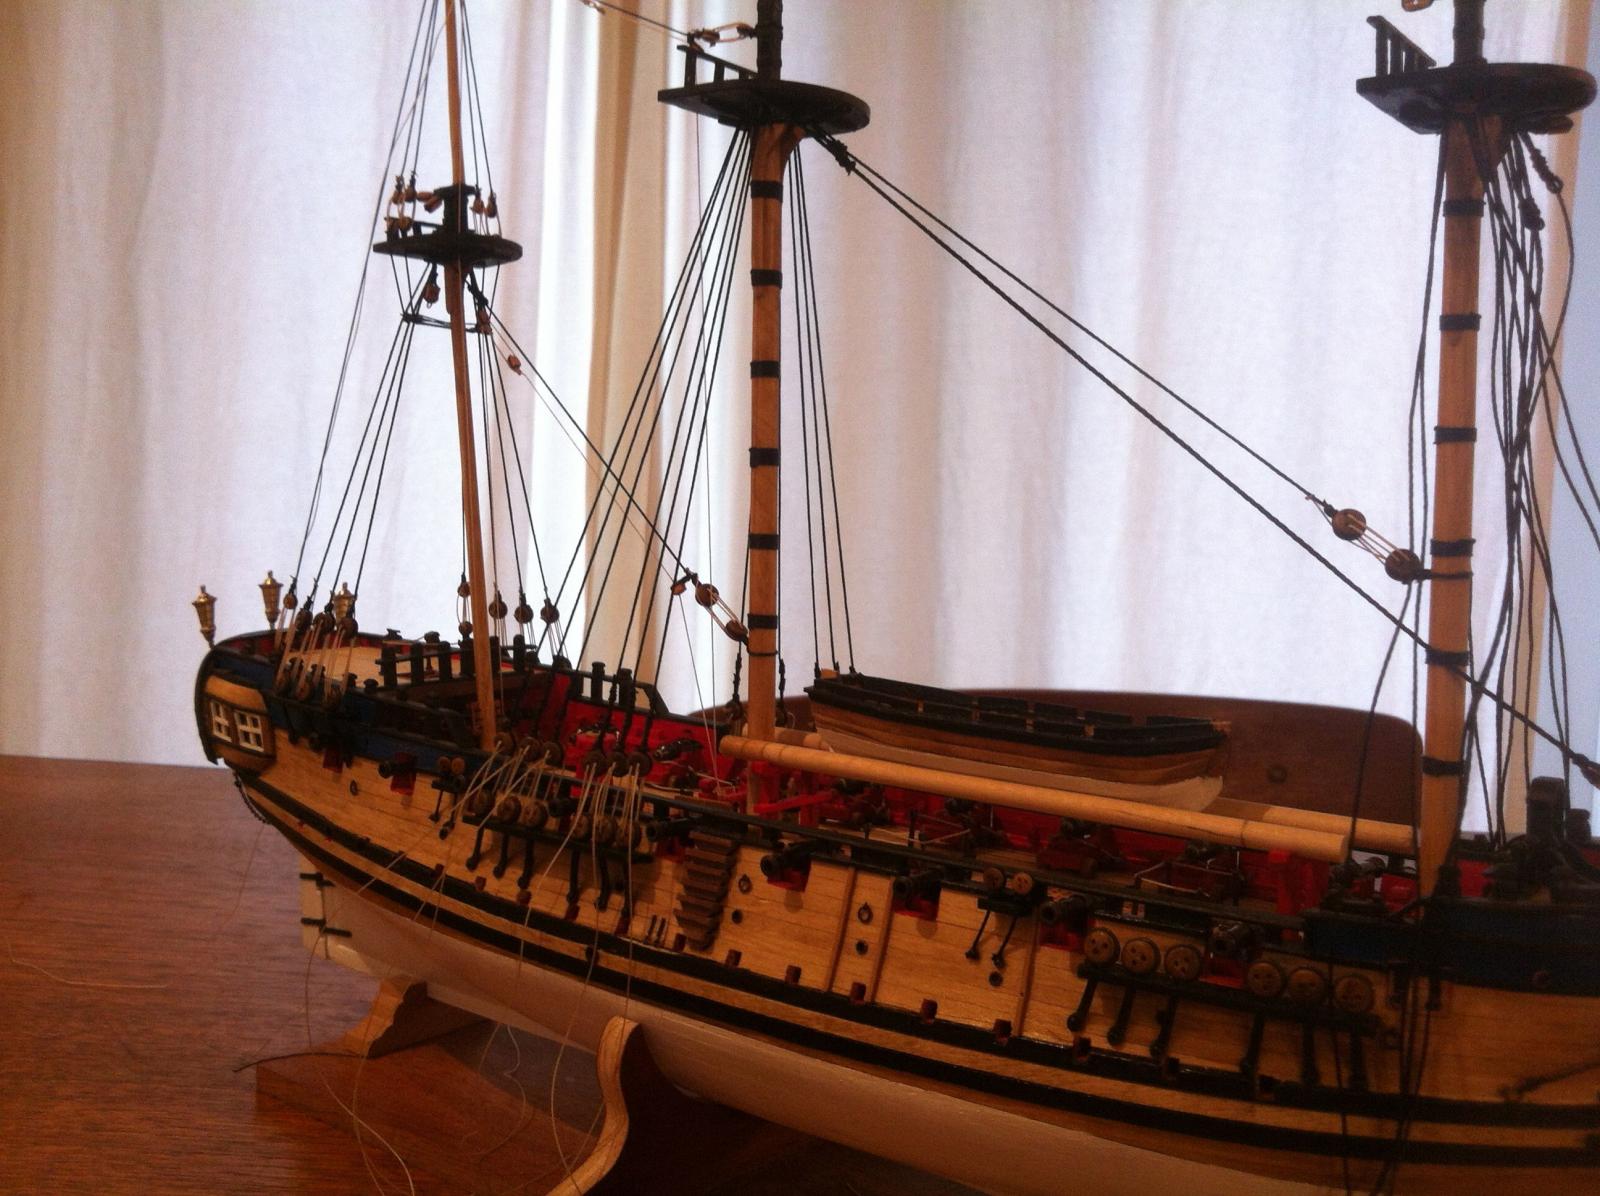
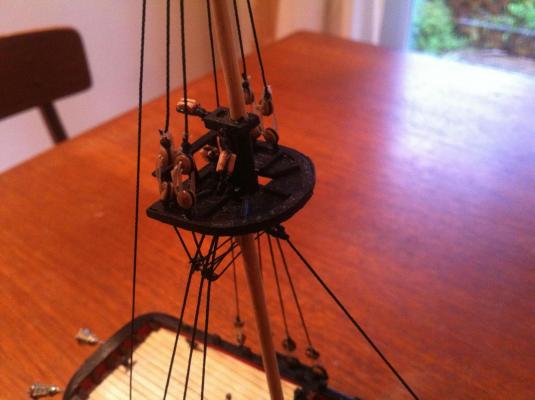
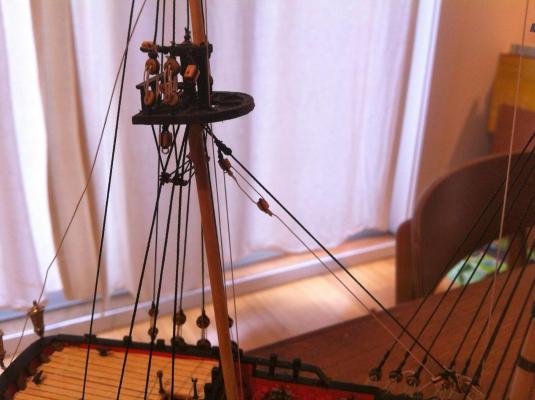
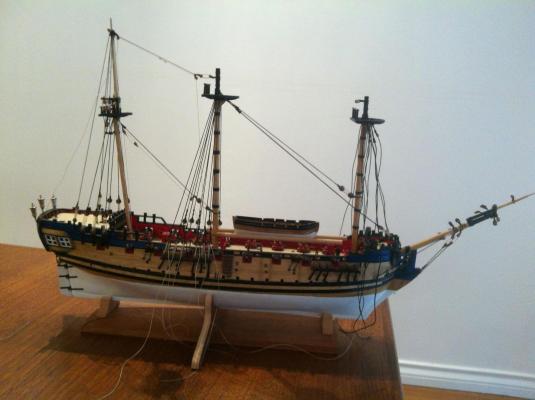
Thanks John! I'm now getting to that stage of the build where it's difficult to get decent photos....so the updates might be a bit sparser in the picture department. Since the last update, I've done only a little bit. I've fitted the lower deadeyes for the main topmast shrouds and added sheer poles, futtock staves and futtock shrouds to mizzen and main masts. I've also added the jeers blocks to both fore and main masts (with the jeers seized into them). Tonight I also added the crowsfeet and crowsfeet tackle to the mizzen mast and stay. For my first attempt I feel ok about it, but I could certainly have done a better job. The 2mm blocks that Alistair sent are a good fit - and not too difficult to handle. But the tackle line itself I didn't get quite right and I have to practice making smaller seizings...As for the crowsfeet themselves, I made the mistake of using a thicker upholstry thread for them - slightly thicker than normal sewing thread and easier to handle. But now that I look at it, I feel that sewing thread would have looked a little better - I doubt, however, I will redo them at this point - it would involve a lot more than just redoing the crowsfeet..... Making the euphroe block was a little difficult and the one I made for the mizzen is quite sharply out of scale. In the end I got a decent one starting with 1.5 x 4mm walnut. I drilled holes in the wood strip first and the using a sanding block I narrowed and thinned the wood to get a more or less appropriate shape...Again, I'm hoping the second time will improve the results. Here are a couple of shots of the recent progress. The shot of the crowsfeet does not show them in their best light, but I've fond it very difficult to get a good shot in focus. Anyway, the build is really slowing down as we gear up for the new baby and work ramps up. I was initially hoping to have it finished by the baby's due date - November 24. This will probably not happen. But we are getting pretty excited about the new arrival. Enjoy the photos and happy modelling hamilton

-
Thanks Andy - I try not to sin too much and where I do, I prefer the venal to the cardinal! Usually more fun anyway. Your words bring some relief - thanks again! hamilton
-
Quick question to you all about "snaking" - the stabilising line that zig zags back and forth between the lower mast stays and preventer stays on the main and fore masts.... I tried adding this last night on the main stay/preventer and thought it would be a relatively easy process, if tedious - kind of like tying ratlines. But I turned out to be a lot more difficult than I thought and I've temporarily abandoned it, though I think adding it would look great. Here's what I did - if anyone can advise me otherwise on either materials or application I would appreciate it. Goodwin shows the snaking attached with round seizings at each contact point with stay and preventer stay. At 1:100 scale I thought this would be too much, so I opted to tie the contact points off with half hitches. But even this ended up looking clunky. This may be because of the thread I was using - it's black upholstery thread of about .0010 or .0080 gauge - not as thin as normal sewing thread, but quite thin. Should I be using a thinner thread? And what about fixing the line to the stays? Anyway, don't know if anyone's got any tips on this, but my policy has become - if it's not going to look good then don't do it (similar policy adopted with hull decorations).....Thanks in advance! hamilton
-
Thanks Ian: I appreciate the compliments! The sense of power actually results from me collapsing on the floor after tying lanyards....the ratlines may produce the same effect (and a similar shot!) hamilton
-
Thanks aj - there's actually a button at the top of the page that says "follow" - you can just hit that and you'll get the updates. Anyway, yes, there are at least 221 adjustments to be made to this kit. There are lots of different ways of squaring the bulkheads to the keel - some use lego clamped in place (gets a good right angle) others use angle plates (kind of expensive to invest in). I usually use square supports between the bulkheads (and sometimes against them vertically at the keel (which I've seen others do as well). What I do is to take a measurement of the space on the centre keel between one bulkhead slot and another. Then cut the square stock (could be anywhere from 1/8 to 3/13" square depending on the size of the model) a little long (maybe 1-2mm longer rough cut). Then it's just a question of filing them down slightly (and carefully, so you don't end up with something too small) to fit snugly between the bulkheads. Doing both sides at the same time and making sure the supports are equal is important.... Anyway, you should start a build log on this forum - easy enough to do. I would definitely follow and assist with whatever questions you might have hamilton
-
Thanks Ferit - I often feel that I'm in this position myself - at least on the good days! hamilton
-
I think that, as Harlequin has said, this kit can be very frustrating. For me it was bulkheads 9 and 10 that did not extend far enough towards the keel, if memory serves (though I think I note this earlier in the log). I had to add layers of thin wood strips to their edges to make sure the planking ran properly. In other cases you may have to shave some off the edges to achieve the same effect. It's a tough build to be sure and Corel does not make it any easier. I stopped following the plans and instructions altogether almost as soon as I started, due to their unreliability. As for adding the false lower deck and upper deck prior to fitting the bulkheads I would avoid this. Instead you can use square wood stock in the joints between the false keel and each bulkhead to keep them square. I used support beams between the bulkheads cut from square stock, which also helps to add strength to the framework during the fairing process. I had to make a lot of adjustments to the main deck. The slots for the bulkhead extensions were not cut properly, and you should not assume that they are on your kit either....Many of the "adjustments" I made were the result of noticing only after the fact that the kit was not "behaving" as it should. But in many ways this kind of problem solving is part of the process. Anyway, it does build up into quite a nice model once you wrap your head around the difficulties - but it requires a lot more thinking and planning than many other models I've worked on which can more easily be built out of the box.....In any case I'm happy to help if you need it! hamilton
-
Hi Bob: Wow - I'd love to see how it turned out. The Unicorn seems like a very different ship, though I'm not that familiar with it, except via ian's build log elsewhere on this forum. I imagine you encountered (as I have) a lot of difficulties in adapting the kit. I've found that the line between frustration and fun can be a very thin one in this craft....My grandfather used to say that if the results are good then the only question you need to ask is if the process was honest. Anyway - keep on keeping on hamilton
- 1,477 replies
-
- 1
-

-
- essex
- model shipways
- (and 1 more)
-
Hi Ajromano - I feel honoured that your first post is in my build log! Thanks! But I might be up all night wondering what it means! hamilton ps - burger and fries?
-
Trying to keep the spiders away, Mobbsie - hard to do when my son likes to keep them as "pets"..... Anyway, a very small update. I've always found it difficult to document rigging on my ship models. Partly this has to do with the camera I'm working with - my iPhone camera. The HD setting gets good photos but the files are ridiculously large. So I settle with what I can get and what's reasonable to handle...Anyway the following photos show the progress since last time. I've rigged the mizzen topmast shrouds and stay, the main stay and preventer stay, the mizzen and mizzen topmast staysail rigging (since this would be difficult to do after rigging the main shrouds) and begun the main shrouds (I just have to adjust them and tie off the lanyards. The photos do not do it justice - I don't mean this in an immodest way, but just that the photos are not the greatest and do not show the model to its best. After tying off the main shrouds, I'll do the snaking between the main and main preventer stays add the lower topmast deadeyes, futtock staves and futtock shrouds and install catharpins on the main shrouds. Following this, it's on to making main topmasts, two in total - one for rigging, one spare for the ship's boat. If I can get that far by Sunday I'll have another update. Until then, enjoy and happy modelling hamilton


-
Looking great Jim! The wheel house is superb hamilton
-
Thanks for sharing the information about your tools and supplies! For people with little experience, this information is invaluable as a foundation for developing a new skill! hamilton
-
Beautiful shot Ferit - I love the tone of the wood and with the rigging on it's really coming to life! hamilton
-
Hi Bob Just read through your log - I have to say you've done amazing work despite the challenges you've faced with the kit. She looks like she's starting to shape up. My current build (the Corel Greyhound kit) suffered some similar issues - two of the bulkheads were completely out of whack and I had to build them up with 1mm x 4mm strips. The rest of the bulkheads were also mis-dimensioned, though not as severely. In the end, constructing the skeleton was complete guesswork on my part, though I had the best of intentions. I tried scaling up the lines contained in Goodwin' AOTS Blandford, which clearly served as one of the design templates for the Corel kit, but this proved only to confuse matters. The lack of reliability in the parts and the plans (which were so woefully inadequate that I completely stopped using them almost as soon as I began) meant that I had essentially to plot things out to achieve something that would work rather than something that was really accurate to the ship's lines..... Anyway, I really admire your perseverance and have great sympathy too for Sam, who I imagine has been driven to some distraction by these issues. I'll follow along here with interest hamilton
- 1,477 replies
-
- 3
-
-
- essex
- model shipways
- (and 1 more)
-
Looks great Mobbsie - the pinnace looks like a fun project - I build a small ship's boat this summer for the Blandford - the technique is slightly different than the CC one - and to be honest the CC kit looks like a more secure construction method than the Model Shipways one I made. Looking forward to seeing how it turns out hamilton
- 1,279 replies
-
- 1
-
-
- agamemnon
- caldercraft
- (and 1 more)
-
Glad you didn't wait for an update - the carronade rigging looks really great! hamilton
- 800 replies
-
- 1
-
-
- snake
- caldercraft
- (and 1 more)
-
There it is - would love to see a profile shot, but maybe you're waiting till she's done... hamilton
-
This is an art work that definitely needs to remain visible! I continue to be amazed at the amount of fine detail you're able to achieve here Ian - incredible! hamilton
-
Hi Richard: I love the close up shots - gives a great impression of the fine points! And it's also exciting to see the rigging dangling around waiting for the final touches - very exciting! hamilton
-
I've learned a new word! And of course been suitably impressed by your craftsmanship, Augie! You're working fast! The fact that there is only one page of comments between your photo updates is a testament to your agility at both the workbench and the keyboard! hamilton
- 2,191 replies
-
- 1
-
-
- confederacy
- Model Shipways
- (and 1 more)
-
Nice looking stand Jack - can't wait to see more of the rigging! hamilton