
DONATION DRIVE - SUPPORT MSW - DO YOUR PART TO KEEP THIS GREAT FORUM GOING!
×


DSiemens
-
Posts
1,060 -
Joined
-
Last visited
Content Type
Profiles
Forums
Gallery
Events
Everything posted by DSiemens
-

HALF MOON by jct - FINISHED - Corel
DSiemens replied to jct's topic in - Kit build logs for subjects built from 1501 - 1750
J those nests are perfect. I'm glad SGraham posted the old and new together. There is a huge difference. Great work. -
Jeff I look forward to seeing this build. You've picked a beautiful ship and done extensive research. I'm sure she'll come out beautifully. David B - That wouldn't be John Fox III would it. Sounds like something he would do. I've had a few conversations with him and he finds the most interesting things to use in his modeling.
-
I agree with Mark. She's looking great.
-
Great work! Those yards are incredible. I have seen fray check used before. Some one in my local club uses it a lot and really likes it. I've thought about getting a bottle and trying it out on my mini ratlines.
- 607 replies
-
- 2
-

-
- scottish maid
- artesania latina
- (and 1 more)
-
That grass looks great. A nice match for a great model.
- 170 replies
-
- 1
-
-
- ogallala
- praire schooner
- (and 2 more)
-
I hope thats enough detail. Some one let me know if there's something I could explain more. I'll start on the bulwarks next. Carving and the bulwarks are the two hardest parts of this build.
-
Here's what it looks like after the carving. Cutting with the exacto knife ensures a nice clean cut for the deck house. I then finish off the detail sanding. There are some burn marks from the dremel on the hull. I'm not worried about them because the paper bulwarks will cover them up. Also when rounding out the hull I keep in mind this is a water line model. The detail can be less the further down I go because it will be under the clay water.
- 36 replies
-
- 5
-
-
- bermuda sloop
- sloop
- (and 2 more)
-
I switched from my dremel to sand paper to soften it up and get some more fine detailing. Once the hull outside of the hull was pretty much done I went on to the deck. Here I used an exacto knife and made a cut to where the front of the deck house will be. Often these Bermuda Sloops had deck houses that took up the stern. What I plan to do is carve down to the deck leaving the deck house. The bulwarks will be added later using paper. This cut will stop the blade as I cave down to the deck. I will make it several more times as I carve farther and farther down until I get to wear I think the deck should be. I suggest wearing gloves for carving with knives. I've cut myself plenty of times doing this type of carving and blood is hard to wash and sand out of a hull.
- 36 replies
-
- 4
-
-
- bermuda sloop
- sloop
- (and 2 more)
-
The site isn't liking my image extension for some reason so I'll try and post in smaller amounts to see if that helps. Next I started bringing in the bottom of the hull and rounding it out.
- 36 replies
-
- 5
-
-
- bermuda sloop
- sloop
- (and 2 more)
-
Thanks Michael. I have the carving completed and I hope I have enough photos to be able to explain it all. Here we go. I first measured out my 3/8ths and used a disc sander on a dremel to cut straight down into the wood. I gave myself a little room, better to cut big and sand it smaller than to cut it to short. This line goes down to the whole height of the ship. It acts as a solid stopping point for the back of the ship. I then draw out my center line and draw the deck plan. You can print out plans for this part but I just drew it. Bermuda Sloops are round in the front and taper going back. I used the center line to try and keep it symmetrical. Once the deck is carved I took off the sides up to the deck. I used a dremel this time but have used knives and chisels as well. I think the dremel is a good place to start when carving. It allows for quick work and you get a sense for what your seeing and looking for as you whittle a piece of wood into something. You'll also notice I whittled down the wood just behind the ship. This allows better access for carving the stern.
- 36 replies
-
- 5
-
-
- bermuda sloop
- sloop
- (and 2 more)
-
Thanks every one. Mark I think the ammonia fuming works on cherry and oak but may not work on other woods. Maybe worth trying though. Some more mathematical parts to this build. As an accountant so I do a lot of percentage type stuff. I actually use it a lot when it come to figuring out approximate size in small builds. In order to figure out the length of the hull I have to start with what I know. The length from the waterline to the top of the mast should not be more than 1/2 an inch. I then went online and found several photos of the Bermuda sloop and measured the length of the waterline to the top of the mast and the length of the hull. I found that the hull was generally 75% of the height water line to top of the mast. So 75% of half and inch is three eighths. With that said I don't always measure things so particularly. I think the longer lengths of height and length of the bigger pieces are important but I'm not going to try to find the ratios between the length of spars or height of the bulwarks. I follow another rule for that. If it looks right it probably is. There is a bit of eye balling it at this scale. Millimeters and 16th can only go so far. I'll start carving now and get some pictures together for the next post.
- 36 replies
-
- 4
-
-
- bermuda sloop
- sloop
- (and 2 more)
-
Yup. There's a reason they used stream boxes and not just water boxes. Great job Per. She's looking great!
-
For those interested I have started the log on the super miniature scale. Click here.
-
Now to cut out some wood. The important thing here is to make sure it can fit through the opening. I will be carving down height and length so it's width I have to worry about. I cut a block a little over a quarter inch and gave my self plenty of length. When building ship this small you want to be able to handle them. So you get a good long piece of wood and carve the ship on the end of it. Then you can work on the ship and not worry about dropping it. Here's a picture of another one I did. The ship is pretty much complete and still attached to the rest of the wood. Quick side note. I used the same sherry for both the current and previous builds but you'll notice there's a color difference. The darker one was made by using ammonia fuming for 24 hours. I may do the same with this build I like the darker color.
- 36 replies
-
- 7
-
-
- bermuda sloop
- sloop
- (and 2 more)
-
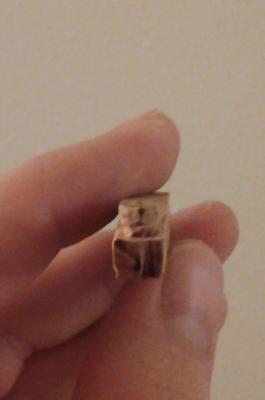
This is one of my favorite builds. I've done two now and they are quick and easy. I probably spend 4 to 6 hours on it. If you want to impress some one with a neat gift this is a good one. As far as ships in bottles go the ship is incredibly easy. What is not easy about it is the scale. This is on the small side even as ships in bottles go. Any smaller and your putting them in flash light bulbs. (Yes that's been done.) As far as the log goes I want to try and explain every thing I can so this will be as much a how to as it is a log. If you have questions or even new ideas to try at this scale please ask and share. I'd like their to be a good amount of information in this log so any one that wants to try this style build has everything they need to do so. Step one selecting a bottle or in this case vial. Here's one I got from Michael's in a package of vials. It came with a couple of these and a bunch of others. This size has been great. It's about an inch long not counting the bottle neck. I measure the opening to see how much clearance I have. This one about a quarter inch. The most important measurement is the inside of the bottle. Typically tall ships are about as tall as they are long so with the bottle on it's side you have enough space forwards and back. So what I need to know is height. You can measure the outside and guess on the glass thickness or you can just measure the inside with a paint brush bristle. The paint brush will be used for masts and spars as well. This is a regular old paint brush I don't even remember where I got it. I have enough bristles though for a thousand ships so there's no worry about wasting any. I cut one off and grip the middle with some tweezers and insert it into the bottle so that the ends touch what will be the top and bottom. If it's too long it will bend. I pull it out and slowly cut it down until each end just touches the top and bottom. That will be the height. This bottle happens to be a little over a half inch tall inside.
- 36 replies
-
- 8
-
-
- bermuda sloop
- sloop
- (and 2 more)
-
Oh come on David we could use more people in this little corner of the dark side. Actually if your serious about trying it out I suggest doing one like my German Cutter build. Or if you want to go really simple try this one. Beginners Schooner. I'm all for people trying it out. I think it's to much fun not to share.
-
Thanks Dan. I need to remember to add a little tilt to my ships. I did it accidentally once on my Bounty and every one I show it to likes the look. Thanks also for your help and support with this build.
-
It's funny once you start looking what you end up finding. My favorite bottles I've gotten from friends but I've found some good ones in thrift stores including a 1950's wine bottle. I think I may put a 1950's yacht of some sort in that one. I'm not sure yet. I've also found bottles while out walking the dog. I put a xebec in one that I found that way.
-
Augie- Thank you. Mark- Thank you. As far as 1:64 scale...there was this. A Victory built by Yinka Shonibare for Trafalgar Square scaled 1:30. Most ship in bottle builders don't consider this a real ship in bottle because the builders could fit in the bottle. It's kind of cheating.
-
Omega that's quiet the compliment. Thank you very much. If there is any thing I hope to achieve with my models it's what you describe. David thank you as well. I appreciate your help and support through this build. I've also learned a lot from your recent build. I hope to use some of what I've learned in my next larger build. As far as the next build goes I'd like to do the super miniature sloop next. I need another anyways because they're to easy to give away. Then my son William really wants me to build the Prins Willem. Just so happens Story of Sail has the plans so I guess I'll have to do it.
-
Well....She's in. It was a tough battle and she looks it. The mizzen sail came partially off and I couldn't fix it with out removing the ship. The sails in general had trouble and I also lost some rat lines. Not the best ship I've ever built but this ship was experimental and I learned a lot so I am happy with that. I'll try this scale again some time and see if I can't do better. For now I want to get back into my normal scale and a log on the super small ship's I've built.
- 94 replies
-
- 10
-
-
Thats beautiful. Great work.
-
I hadn't noticed any gaps until you mentioned it. Seems like I've heard of filling gaps with wood putty to hide them. Could be wrong but maybe something to look into.
