Dr PR
-
Posts
2,471 -
Joined
-
Last visited
Content Type
Profiles
Forums
Gallery
Events
Everything posted by Dr PR
-

Problems with blackening brass
Dr PR replied to Desertanimal's topic in Metal Work, Soldering and Metal Fittings
In another thread someone described using Sparex to prepare brass for blackening. I bought some but haven't used it yet. Most of the blackened parts I have made so far are very small. But for larger parts with large surfaces it seems better reparation is needed to get good even coats. One of the recommendations was to find a small crock pot to heat the Sparex. So I visited out local Good Will store today to see if I could find one. There were about half a dozen, ranging from US$6 to US$9. I got one that holds about a cup to 1 1/2 cups (240 to 360 ml) and it works, heating water to 170F (77C) in about 45 minutes (45 min). I think I will need the Sparex for the more complex machinery on my minesweeper build. -
Free at last, free at last! Taxes are done (I hope). Now I can get back to important things. Next I need to add the reef points to the larger sails. But how long should they be, and what size rope? As for the length, Steel (The Art of Rigging, 1796) says: "POINTS, short pieces of braided cordage, plaited together as gaskets are; beginning at the middle with nine foxes, and tapering to five at the ends, and from one fathom and a half to one fathom in length." A fathom is 6.0 feet (1.828804 meters) , so the points would be 6-9 feet (1.8 to 2.74 meters) long. At 1:48 that comes out to 1.5 to 2.25 inches (38 to 57 mm). Falconer (Universal Dictionary of the Marine, 1769) says: "... the top-sails are always, and the courses generally, reefed with points, which are flat braided pieces of cordage, whose lengths are nearly double the circumference of the yard. These being inserted in the eyelet-holes, are fixed in the sail by means of two knots in the middle, one of which is before, and the other behind the reef-band." The circumference of the course yard on my model is 0.6 inches (15 mm) and the main boom is 0.66 inches (16.8 mm). That would make the course points 1.2 inches (30 mm) and the boom points 1.32 inches (33.6 mm). Falconer's point length is a bit shorter than Steel's, but close enough for speculation. Half the length of the point lines will be hanging down each side of the sail, and at 1:48 that will be somewhere between 0.6 and 0.75 inches (15 to 19 mm) on each side of the sail, minimum. They could be half again as long using Steel's rule, or 0.9 to 1.125 inches (23 to 28 mm). On my model the reef bands on the main (gaff) sail are spaced 1.5 inches (38 mm) apart. Looking at historical drawings and paintings I see the reef points from an upper band may extend from half to two-thirds the distance between reef bands. So I can use reef points from 0.75 to 1.0 inches (15 to 25 mm) on each side of the sail. I think I will use 1 inch (25 mm) on each side, so the reef point lines will be 2 inches (50 mm) long, with a bit of allowance (to be determined) for the overhand knots on each side of the sail. Note: On square sails with multiple reef bands near the top the reef points are successively longer by a bit on reef bands from top to bottom. This allows for more sail material being gathered together by the lower reef points. This leaves the question of what the reef points should be made of. I am not going to try to make 1:48 flat braided and pointed pieces. And I didn't include reef points in my calculations for the amount of rope I would need for the model. I have a spool with 75 yards of tan cotton covered polyester thread (J & P Coates Dual Duty Plus) that is smaller than the smallest rope I am using (0.008 inch, 0.2 mm) and larger than the small stuff I use for seizing (about 0.003 inches or 0.07 mm). It is supposed to be for buttons and carpets, but now it will be used for reefing sails!
-
Mark, Thanks. Dremel makes a small hand-held version that gets pretty good reviews. I'll check Micro-Mark. But that is dangerous - I might find other things I am tempted to buy! I just checked. Micro-Mark has several options - all out of stock!
-
Problems with blackening brass
Dr PR replied to Desertanimal's topic in Metal Work, Soldering and Metal Fittings
I have had problems similar to what Chris and others reported - some blotches and the blackening rubs off. I noticed that the parts blacken almost immediately in Birchwood Casey Brass Black diluted 1:1 with water. I have tried leaving them in the bath for 5, 10 and 15 minutes with about the same results. Then I rinse with water 5-10 times and dry the parts. Maybe I should use a minute or less. I normally wash the parts in acetone for a minute or two to remove solder flux, then use rubbing alcohol to remove the acetone, and a final wash with water to remove the alcohol or any remaining water soluble materials. After drying I use the blackening solution. I have also tried etching with mild acetic acid (vinegar) and then rinsing with water. Then the acid/alcohol/water washes. It doesn't seem to make any difference. -
Some people say shellac is the only thing to use ... It is sorta like a ship's rigging - there are as many versions as there are people.
-
Can anyone recommend a small, hand held reciprocating (back and forth) narrow kerf saw? I need to cut some pieces from 1/8 inch (3 mm) plywood and don't relish doing this with a coping saw or jeweler's saw. I do not have a band saw (or a place to put one) nor do I have a laser cutter.
-
There are many "sanding sealers" or primers. But shellac is probably the best. You can get pre-mixed spray on shellac. Zinsser Bulls Eye Shellac is available at hardware stores, A 12 ounce spray can will last a long time. Use the clear shellac for painted surfaces. For "bright" (unpainted) wood use the amber shellac. Each new layer will darken the wood, so continue until you get the wood color you want. I sometimes spray it on the surface, or just spray it in a small cup and paint it on with a brush. Either method works, but brushing gives you better control of where the shellac goes. Shellac cleans up with rubbing alcohol. But if you want to dilute it use denatured ethanol (alcohol fuel). It dries quickly. You can paint over it with just about anything. **** First sand the hull smooth, starting with heavier grit and then fine grit. Keep at it until the hull is smooth enough to paint. Coat the wood with shellac and let it dry an hour or two. Then sand it with fine grit sandpaper. Wipe with a clean cloth to remove sanding grit and dust. Apply a second coat of shellac to seal after the sanding. Then rub it down with #0000 steel wool to get a nice satin finish. Wipe the hull to remove steel fibers. Use a strong magnet to pick off any remaining steel wool fragments. Paint with whatever you want. Use thin coats and apply evenly, stroking from wet paint to dry, and you won't need any further sanding. But if you get runs and need to sand them smooth just apply another coat over the sanded area. If you use acrylic paints allow each coat to dry for 3-5 days, or longer in high humidity areas.
-
(inexpensive) Lathe recommendations
Dr PR replied to palmerit's topic in Modeling tools and Workshop Equipment
A lathe us a useful tool to have around, but I don't think it is the best way to make masts. A lot of experienced modelers have said the same thing. The main problem is that it is tricky to set up a lathe to create a tapered (conical) piece, and some lathes do not have all the features to do this. And masts aren't conical - the taper varies to create something like a long truncated ovoid. I have made masts and spars starting with round dowels and chucking them into an ordinary hand drill (a locking trigger is very useful for this). Then I used files and sandpaper to grind the dowel down to the desired dimensions. However, I like the simple method of using a small plane and files to taper the mast. Starting with a square dowel you shave off the corners to 8 sides and then again to 16 sided. Then you can round it in a drill or using files and sandpaper. This is a lot easier than it sounds! Here are some examples. https://modelshipworld.com/topic/19611-albatros-by-dr-pr-mantua-scale-148-revenue-cutter-kitbash-about-1815/?do=findComment&comment=908539 https://modelshipworld.com/topic/19611-albatros-by-dr-pr-mantua-scale-148-revenue-cutter-kitbash-about-1815/?do=findComment&comment=904995 -
A fairly simple way to modify the cannons is: 1. Find some round head pins of the appropriate diameter for the cascabel. Fabric stores carry a variety of pin sizes. Clip the pin about 1/16" / 2mm from the head. 2. File off the projections on the rear of the cannon and round off the back end. 3. Drill a hole in the back end where the cascabel should be. The hole/drill bit diameter should be the same or slightly larger than the diameter of the pin. The metal is soft so you can do this with a pin vise or motor tool. 4. Glue the shaft of the pin into the hole in the cannon. Use a glue that will adhere to metals. I would use Duco Cement or a two-part epoxy. 5. Paint with satin black paint. Note: Don't try to solder the pins into the holes. Some of these fittings are cast from low melting point metals, and the whole cannon will melt into a puddle if you heat it very much.
- 4 replies
-
- 11
-

-
There are several photo editing programs for Linux. GIMP is the one that comes to mind - I think it has been around for some time, Some of these raster image editors can import and export PDF images.
-
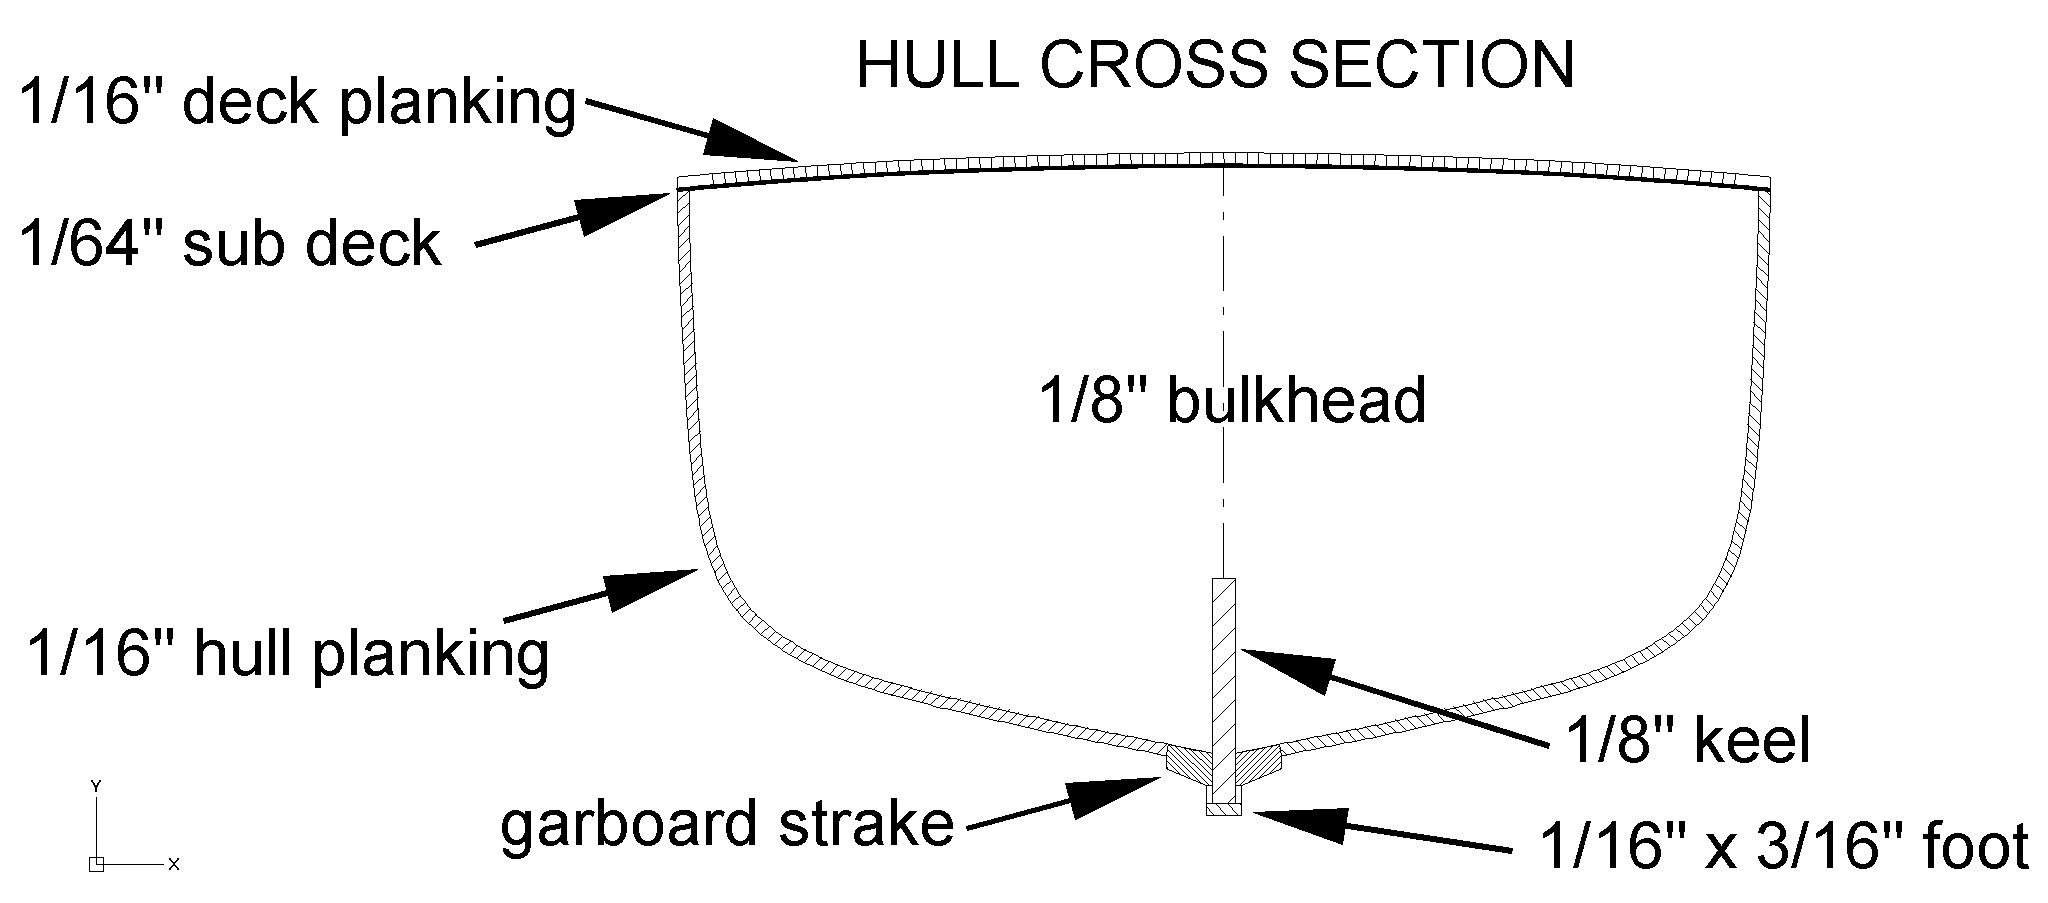
Another slight change of plans. I decided to use 1/16" (1.6 mm) plywood for the sub deck. I think the 1/64 (0.4 mm) plywood would be strong enough, especially with the large number of bulkheads. However, I have a lot of spare 1/16 inch material and I might as well use it. The added stiffness will give more strength to the hull, and that is important in minesweepers! Several places around here carry 1/16 inch plywood, but 1/64 inch is pretty rare, and relatively expensive. It is really handy for making small bits and pieces and is much stronger than plain wood. So I will save it for those special pieces and use the thicker material. I already know I will be cutting some 1/64 inch thick pieces for trim on the superstructure. I can't find any 1/64 inch thick wood scale lumber of the right dimensions.
- 492 replies
-
- 7
-
-
- minesweeper
- Cape
- (and 1 more)
-
There were two common ways to get up the mast without rat line. One was to climb the mast hoops - only works when the gaff sail is raised. The other was a bosun's chair - basically a plank in a harness at the bottom of a halyard run through a block at the mast top (or just tie a line around a sailor and haul him up with the halyard). Capelle's books show smaller vessels (less than 40 tons) without ratlines. Larger vessels (40-90 tons) may or may not have them - usually masts with square sails had ratlines, fore-and-aft sail mast did not. The largest vessels (100+ tons) usually had rat lines. The advantage of the fore-and-aft gaff sails is that all the lines can be worked from the deck, and they can be reefed from the deck. Ratlines not needed. But square sails almost always required sailors to go aloft, especially to reef or furl the sails. Ratlines allowed many men to go aloft in a short time. The exception with square sails is that smaller sails (topsails and topgallants on schooners, royals and skysails on large square riggers) could be rigged to the spars on deck and the rigged spar and sail lofted into place quickly. This still might require a man aloft to secure things. But these spars/sails could also be lowered to the deck quickly. So a lot of men aloft weren't needed, nor were ratlines high aloft.
-
Very, very nice!
-
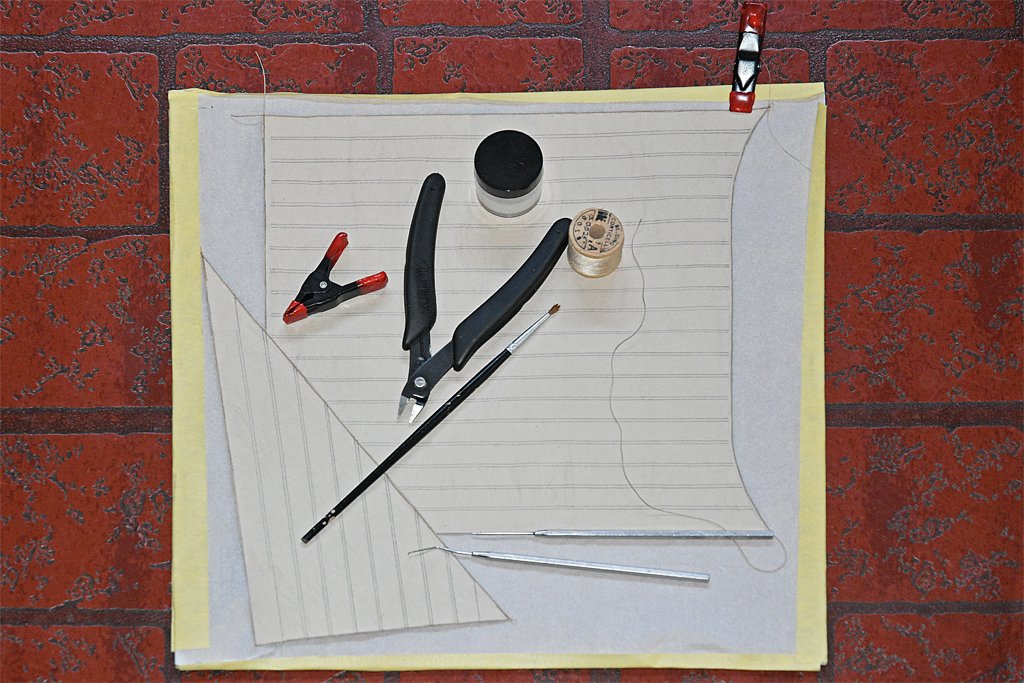
I have some progress to report. When I find time I have been adding the bolt ropes to the sails. Here is a photo of the sail loft with work underway on the fore course and a finished fore staysail. It is monotonous work. The rope tends to wander off from where I want it so I can glue only fairly short lengths to the sail edge at one time. I use a tool to hold down the loose end and "paint" diluted (1:1 with water) white glue along the sail edge, While the glue is still damp I use the brush to push the rope into place along the sail edge. The glue doesn't stick to the parchment paper on the work surface. Here are the completed triangular sails laid out on the sail loft (kitchen) floor. Now I am working on the larger sails (course, topsail, fore sail and main sail). They should be finished in a week or two. Then I have to put on all the reef points. So far I have found no reference that says what diameter/circumference line was used for reef points. One source does say they were flat braided straps that came to a point. Well, I am not going to try to do anything like that. I think I will just use the smallest thread I have. While adding the bolt rope I had a sudden "oh, no!" moment. The triangular sails used a lot of the 0.008" tan rope, and I realized that when I did the calculations to determine how much of each rope size I need I didn't include the bolt ropes! I went back to my spreadsheet and added up the lengths of bolt rope. Fortunately, I have a lot of extra rope on hand. I should have about nine feet (3 meters) of the 0.008" left after the model is finished.

-
Remove Tamiya paint
Dr PR replied to JoniP's topic in Painting, finishing and weathering products and techniques
Experiment first in an inconspicuous place on the model or a separate piece of similar plastic. Some paint removers will melt plastic and distort the surface. Some paint removers use ethylene glycol (brake fluid). -
There is a discussion of carriage gun rigging here: https://modelshipworld.com/topic/21776-carriage-gun-rigging/?do=findComment&comment=652700
-
Gregory, I saw George Wales' drawing of the Rattlesnake in "American Sailing Ships" about 55 years ago and thought it was a beautiful ship (I really like vessels with tumblehome). I started redrawing Chapelle's plans by hand, scaling them to 1:48, with the intention of making a scratch build model. However the little fuss in Vietnam brought that effort to a halt. About 25 years ago I saw the Mamoli kit in a local hobby shop and bought it on the spot. However my job, marriage and a couple of houses to keep up put the kit on the shelf, where it has been ever since. But someday I intend to bring it out and start building it. Hence my interest in your project. I will be following it closely, taking notes for when I start work on the Rattlesnake.
-
Tom, Here is a link to a discussion about heating Titebond Original glue: https://modelshipworld.com/topic/37071-planking-without-clamps-clean-up-or-drying-time-a-new-way-to-use-titebond-original/?do=findComment&comment=1060839
- 492 replies
-
- 3
-
-

-
- minesweeper
- Cape
- (and 1 more)
-
I have decided to make a small change of plans. I originally intended to lay the decking directly on the bulkheads, and the tops of the bulkheads were dimensioned for this. The decking is 1/16 x 1/16 inch (1.6 x 1.6 mm) basswood sticks. These will not be very strong and might break easily. Looking at other builds I see that a subdeck of thin plywood is common, with the deck planking laid on this. I decided to use some of the extra 1/64 inch (0.4 mm) plywood for the base deck material and plank on top of this. I reduced the height of the bulkheads by 1/64 inch to allow for the thickness of the plywood. I plan to try the technique mentioned in recent posts of using Titebond Original glue and heating it to fasten the planks in place. First the subdeck will be coated with a thin layer of the glue. Each plank will also have one side coated with glue. After the glue dries the planks will be put in place and then I will use my spiffy new small quilting iron/plank bending tool to heat the planks, melting the glue.

- 492 replies
-
- 7
-
-
- minesweeper
- Cape
- (and 1 more)
-
An interesting follow on to square rigger tackles - in the modern US Navy the heavy lifting tackle is called the Burton tackle, and the associated winch is the Burton winch. So the name persists today.
-
Here are a few thoughts. 1. The fairleads in this position were common, so they were used for something. 2. The open top fairleads/chocks are used when you need to lead a line temporarily and be able to move it quickly. 3. They are above the well deck, so they were probably associated with something there. 4. There are life boats on the well deck of the Cecilie. 5. The deck plan drawing marks "boat skids" port and starboard. Perhaps these were portable skids to allow the boats to be moved. We had essentially the same thing on the cruiser I was on. 6. The boats are positioned under the shrouds. It would be necessary to haul them aft before lifting them over the sides. 7. The lines to move the boats could be lead through the fairleads and back to a capstan.
-
The model is looking good!
-
Jim, Good to hear from another CLG sailor - if you will excuse me calling a Marine a "sailor." This thread isn't very active. The CAD model is finished, mostly. I guess I should put a Kaman SH-2B Seasprite on the fantail (the Admiral's helo) but I haven't found any good plans to work from.
- 54 replies
-
- 1
-
-
- 3d cad
- cleveland class
- (and 1 more)
-
Mark, I worked pretty closely with the MARDET on the Okie Boat. They guarded the nuclear weapons spaces. I also have a few tales about those guys, but this isn't the place to tell them.
- 492 replies
-
- 2
-
-
- minesweeper
- Cape
- (and 1 more)